Creating a garden path using a do-it-yourself mold. How to make a mold for filling garden paths with your own hands Homemade molds for paths with your own hands
Garden paths made using molds are an alternative to paving stones, natural stone, brick and monolithic concrete. For those who want to arrange paths in their country house both cheaply and beautifully, this is the best option. With this choice, you will have to work hard with your own hands and spend some time.
Wonderful imitation of stone using moldsFeatures of paths made using molds
It is most correct to use forms for laying pedestrian paths, as they have a small thickness and limited strength. Each template is poured separately and the solution must set before the stencil is removed. All this requires a considerable investment of time. At the same time, the use of matrices for making paths in the garden has a number of advantages:

Choose a matrix or make it yourself
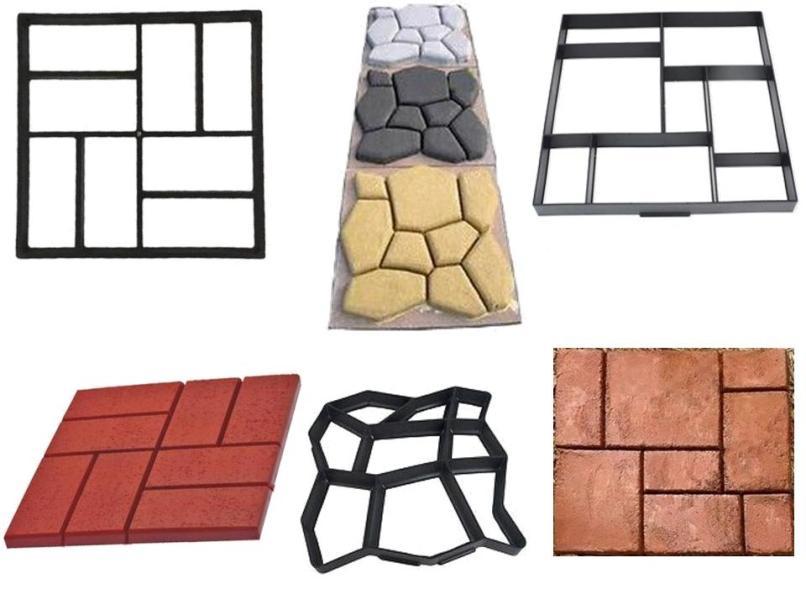 The simplest option is factory-made ready-made molds, samples of which are shown in the photo. Firstly, they are inexpensive. Secondly, the thin and smooth mold lintels have a variable cross-section, which allows the matrix to be removed without destroying the concrete casting. The template is reusable. There are ready-made matrices made of plastic, silicone, rubber and metal.
If you want to make unusual garden paths, you can make molds for them yourself from wood, metal, silicone, and other available materials. In this case, it is possible to create several different stencils of the required sizes, which will provide a varied structure of the track.
Note that to speed up the paving of the surface, several forms will be required. In this case, you need to purchase enough templates, or make more yourself.
 You can buy silicone matrices or make them yourself
 The most durable homemade mold is made from silicone, but you will have to work hard to create it:
- First you need to decide on a prototype. It will be good to choose a few different samples for variety.
- Formwork is made around the prototype to prevent silicone from leaking.
- The sample and formwork are covered with lithol so that the finished matrix can be easily removed later.
- Fill the mold space with silicone, removing air. The operation is performed with a brush and spatula treated with detergent. The base of the mold must be at least 2cm thick.
- After the silicone has completely cured, the mold is carefully removed. It will take 2 to 4 weeks for the material to harden.

For many, it is much easier to make molds from metal:
- The basis will be a metal tape with a thickness of 1.5-3mm. For a pedestrian path, a width of 3-4 cm is sufficient; for a platform under a car, tiles with a thickness of 5-6 cm are required.
- The tape is bent in accordance with the required pattern and connected by welding or rivets.
- Welding areas, protruding parts of rivets and burrs are cleaned so that the mold can be easily removed.
- Convenient to use as a tape - rings cut from metal pipes and barrels. It is possible to use other available materials.
 Some examples of wood forms
 The easiest way to make forms for walkways is from wood. Of course, such a matrix will last less than a silicone or metal one. In this case, there will be quite large gaps between the covering elements that can be planted with grass:
- It is best to choose larch slats with a thickness of 15-20mm and a width of 60mm;
- individual structural elements are connected to each other with self-tapping screws;
- uneven internal surfaces of the mold are cleaned with emery cloth;
- the matrix is treated with impregnation to protect it from moisture and extend its service life;
- Before use, the mold is covered with lithol.
The process of laying a path using a mold

The process of pouring a garden path using a mold is quite simple. In this case, the matrix cannot be removed until the cement has cured.
In order not to stop the paving process, it is advisable to have several templates at once so that after filling the last form, the first one can be used again.
Using a template, we construct the track according to the following scheme: 
Original options for shapes for paths

A relatively simple way to decorate a pedestrian surface is to add color to the concrete. This path will not lose color over time.

If you use acrylic paint, you can paint individual fragments of the coating in different colors. The dye is applied to a dry and clean surface in several layers with intermediate drying.

Another opportunity to decorate the path at the dacha is with fragments of ceramic tiles. The tile pieces are pressed into the mortar before the mold is removed.

You can create an original path in your dacha using burdock leaves as a stencil. The leaves will be slightly different, which will ensure the individuality of each element.

Professional builders know that after concrete is cast, a cat will miraculously walk across it, and there will be its tracks on the surface. You won't give the cat any chance if you do it first. In this case, it is better to lubricate your hands with Vaseline. In this way you can capture the image of any other objects. Whatever option you choose for making a path using molds, it will be cute and practical.
We invite you to watch a video on the relevant topic.
Having decided to improve her garden, FORUMHOUSE member _KM_ I looked at the construction market for forms for creating concrete paths. This option is several times cheaper than purchasing, and in the picture such paths looked very aesthetically pleasing. And, most importantly, this mold for garden tiles allows you to cast products directly on site; after hardening, there is no need to lay them. True, the forum member still had doubts about its durability.
KM_ Member of FORUMHOUSE
Plastic garden path molds are nice, but I'd like to talk to someone who has had at least a few years of experience using them. Simply making road tiles so that they do not crack or chip is a rather complex process that requires precise adherence to the proportions of the mixture, thorough mixing, vibration compaction, and steaming of the product... I want to somehow bring the quality of my homemade product closer to this, but I doubt it's real.
D e Indeed, many members of our portal have already poured concrete into shaped plastic forms, some ready-made, others home-made. However, for some, garden paths “under paving stones” have served faithfully for five or six years, while for others, they fell apart into small stones in the first season. According to FORUMHOUSE participants, the first factor influencing the durability of any structure is the quality of foundation preparation.

Preparing the base for the paths
First, you need to mark out the area in the garden: draw the boundaries of future country paths or areas that are supposed to be concreted, paved with homemade concrete tiles. It is important that the base is level, without significant differences in height. Member FORUMHOUSE
igo131019671
gives the following recipe for preparing the base for concrete paths:
igo131019671
The base, geotextile (dornite), then crushed stone, on top - a 5 cm layer of sand. We compact everything well and only then fill the tiles.
However, it is worth considering that at this stage a lot depends on the type of soil.

Here's what they say about this on our forum:

Helga Member of FORUMHOUSE
In our garden on clayey hard soils, such paths “sit like a glove” without any preparation from below. Preparation “wisely” for such small paving slabs will not help.

Krysya Member of FORUMHOUSE
And at my dacha there is gorgeous high-moor peat throughout the entire area. I will have to make this base longer than the tiles.
If your garden plot is covered with a thick, well-kept lawn, there is a temptation to lay path forms directly on top of the grass. But nothing will work out that way. Member FORUMHOUSE Just Grandfather advises removing the turf before filling the path.

Just Grandfather
I did it very simply: I placed the form in the place where I wanted to see my tiles. Using an ordinary plaster trowel, I cut through the turf around the perimeter of the form. The turf was removed, the base was slightly leveled with sand and compacted with a masher if necessary. I installed the mold and then filled it with solution.

Mixing concrete
The next stage is perhaps the most important in the process of making tiles for garden paths - preparing concrete. This will require a number of materials: cement (not lower than grade M400), sand, crushed stone (fraction 5-20), plasticizer. The latter allows you to reduce the volume of water during mixing and reduce the number of pores in concrete, which prevent its destruction during freezing and thawing. The plasticizer will help make the surface of the path smoother.
Pay attention to the date of manufacture of cement and do not buy it for future use, because this material, even if properly stored, loses up to 10% of its strength per month.
On our portal there is another topic dedicated to, where participants also willingly share their accumulated experience in arranging beautiful and comfortable garden paths.

Nuwa Member of FORUMHOUSE
Concrete is prepared from a mixture of cement, sand and crushed stone (fraction 5-20) in a ratio of 1:2:3 by volume with the addition of a plasticizer (1 liter per 1 cubic meter). It is also advisable to add fiber fibers (600 g per 1 cubic meter) to the solution, which provides plastic reinforcement of the layer.
It is best to use a concrete mixer to prepare concrete, as this will greatly facilitate the work and save time. You may not have a concrete mixer at your dacha, but you can prepare concrete by thoroughly mixing the ingredients in a trough.
The exclusion of at least one ingredient from the concrete composition will significantly reduce the quality of the coating.
Place the forms on the prepared base
It's time to pour the solution into the molds. Since the tiles are cast on site (that is, unlike factory paving slabs, after drying they will no longer need to be laid), we place the forms directly on the prepared base - a cushion of geotextile, compacted sand and gravel. The form for making garden paths with your own hands must be lubricated so that in the future it can be easily removed from the hardening concrete.

Strekoza Member of FORUMHOUSE
Cement molds must be lubricated several times with drying oil or machine oil before use.
Placing concrete in forms
When pouring concrete into plastic molds for garden paths, it is important to make the surface smooth, without grooves or bumps, using a trowel to level it. Concrete must be poured quickly, and action must be taken carefully.
After the concrete has set a little, the templates must be removed - some do this 4-5 hours after pouring, when the density of the concrete becomes comparable to the density of plasticine, others wait one and a half to two days.
To increase the strength and hardness of concrete, as well as protect it from moisture penetration, by removing the form, they resort to the ironing procedure.

Ironing is a method of improving the quality of the external surface of concrete by rubbing cement powder into freshly laid concrete. Concrete will become more durable.
Painting concrete
If the natural gray color of concrete seems boring to you, or the design of the site requires bright colors, concrete can be painted. Here's how summer residents, members of our portal, add color to garden paths:

nuwa
The dye is evenly scattered onto the smoothed concrete layer so that it completely covers the entire area to be treated. The dye penetrates deeply into the pores of the layer and not only colors it, but also strengthens the surface. Within a few minutes, the dye powder absorbs moisture. After making sure that there are no dry areas left, it is smoothed with a trowel, removing grooves and irregularities. Then the procedure of adding dye and leveling it is repeated again.
Here’s an interesting way to paint country paths using “folk” remedies, suggested by a FORUMHOUSE participant b_l_e_f

b_l_e_f
I used ferric chloride. A tablespoon per 2 liters of water, spray through an ordinary sprayer. You need to spray fresh concrete (I did this on the 3-4th day), it doesn’t work so effectively on old concrete. I don’t know how this color will behave in cold weather, but mine withstood the autumn showers.
Also, participants in our country forum decorate fresh concrete with homemade mosaics, laying out the design with pieces of colored tiles of different sizes, carefully embedding them into the solution. The tiles left over from renovations in a house or country house will come in handy here. It is first broken into pieces with a hammer. The use of large beads, bottle glasses and other decor is allowed.

Checking the readiness of concrete
During the first week, the concrete will actively gain strength; this process lasts 28-30 days. In hot weather, the tiles are moistened during the setting process by watering from a watering can. Also, to reduce moisture evaporation in the first days, you can cover the products with plastic wrap.
Beautiful paths play an important role in giving the site a certain style and personality. They are not only comfortable and allow you to move around in any weather without the risk of getting your shoes dirty, but they can also decorate your yard and garden. Making concrete paths with your own hands is not difficult, but they will last a long time only if the work is done correctly.
Construction Materials
There are many options for creating beautiful paths. Narrow solid concrete sheets are a thing of the past. Special plastic molds for garden paths allow you to create paths that look similar to sidewalks lined with tiles or stones. To complete the work you will need the following building materials:
- crushed stone;
- fine sand;
- cement;
- geotextiles (dornit);
- plasticizer;
- dyes;
- polymer forms.
Polymer form
A plastic mold for paths is a stencil that is filled with concrete. It is made of polypropylene and is designed for 1000 pours. The thickness of the external walls is 6 mm, the internal partitions are 3 mm. Forms vary in configuration and size. The thickness of the tile depends on its height - usually it is 50-60 mm. The jumpers can be the same size or be shorter by a few centimeters. In this case, at the base of the mold, a solid slab of 2-3 cm is obtained, on which “pebbles” 3-4 cm thick are placed.

How to make a concrete path - construction sequence
Design
Before starting work, you should decide on the most convenient location of future paths and their shape. In the classic style, they are made along straight lines, with a rectangular intersection. By organizing concrete paths at the dacha in a more free, landscape design, you can give free rein to your imagination. These are various bends of paths, rounded shapes and intersections. When developing a scheme for laying them, you should take into account the habits of people and the convenience of their movement around the site.

Preparing the base
- According to the drawn up diagram, the paths are marked.
- Using a tape measure, cords and pegs, their boundaries are marked.
- Then the top layer of soil - turf - is cut to a depth of at least 20 cm.
- The bottom of the trench is compacted and covered with a layer of crushed stone 10-15 cm thick, which is covered with geotextiles. The material will prevent weeds from germinating and prevent sand from sinking into the ground - the garden concrete path will be more durable.

- Geotextiles are covered with sand in a layer of 4-5 cm and compacted again.
- A 4-centimeter mixture of sand and cement is the last layer in the prepared base, although this layer is often not used. In this case, before pouring the molds, the sand is generously watered with water from a spray bottle. This is done to prevent the soil from drawing moisture from the concrete. When constructing the base, a slight slope is created to drain away sediment.
Preparing the solution and filling out the forms
After the substrate for the path is ready, a solution of cement, sand and crushed stone is mixed in a ratio of 1:3:3. Concrete must have a thick, plastic consistency - otherwise it will spread. It is not easy to prepare it manually, without experience. The best option is to use a concrete mixer. Adding a plasticizer will improve the quality of the solution and increase its frost resistance. It is believed that a plastic mold for a concrete path does not require lubrication. But if you use machine oil, it will be easier to remove it from the solution.

- The greased form is placed on wet sand and filled with concrete.
- Using a trowel, the solution is distributed over the mold, filling it to the brim.
- The excess is removed with a wide spatula or any flat, even strip.
- If the solution is made correctly, then 10-20 minutes are enough for it to “set”. After this time, you can carefully remove the form and move it to the next place to continue working.
- Having two or three stencils will speed up construction.

In order to diversify concrete paths, photos of which are easy to find on the Internet, a coloring pigment is added to the solution. In addition, they can be decorated with colored pebbles, shells, tile fragments or other suitable materials. Decorative elements are pressed into the damp solution and, after it dries, they hold quite firmly.

Concrete completely hardens in 3-4 days. During this time, it is advisable to regularly water it and cover it with film or tarpaulin. This is especially important in hot summer weather - the longer the concrete hardens, the stronger it is.
The gaps between the tiles are filled with a cement-sand mixture and filled with water. This prevents soil from getting into the seams and grass from growing. But in some cases, the gaps are specially filled with soil with lawn grass seeds.

The main stages of constructing a concrete path:
- drawing up a diagram;
- path markings;
- soil sampling, compacting the bottom of the trench;
- backfilling of crushed stone;
- laying geotextiles;
- backfilling and compacting sand;
- preparing the solution;
- filling forms with concrete;
- backfilling the joints with DSP, sand or soil.
Each well-groomed area requires attention and work. A little effort and its space will be decorated with original paths - straight or winding, colored or plain - it all depends on the desire and taste of the owner.
The purpose of garden paths is well known to each of us: they serve for convenient movement around the site and are its decoration. A properly organized path will be a wonderful addition to the landscape, but to create a beautiful and original garden path, you don’t have to spend money and buy ready-made tiles in a store - you can get by with cheap improvised materials, and with your own hands create tiles of the size and design required in a particular case. All you need is cement mortar and an appropriate form, and you can make it yourself or purchase a ready-made one. Choose or make a mold and fill the garden path yourself easy and even interesting, and we will try to understand the main nuances of this process.
No. 1. Why use pour molds?
An alternative is not to nail the bottom and use a form to fill the solution at the location of this track element, but this is not so convenient, and the dependence on weather factors is too great, so it is better to attach the bottom and work with the form in any convenient place.
Made in such a simple way the mold can be used to pour cement-sand mortar into it many times until the required number of elements is ready. Each time before pouring the solution, the walls and bottom are lubricated with waste oil or petroleum jelly so that the frozen element can be easily removed from the mold. If you have made a fairly large template, then when pouring the solution approximately in the middle, do not forget to place it.
No. 4. How to make a metal mold?
It can be useful for creating molds, and even metal hoops from an old barrel can be used, they just need to be treated with an anti-corrosion compound. Strips of the required width are cut from metal or cut to fit height of the future path: 4 cm for the pedestrian area and 6 cm for the parking area. These strips are easy to form figures of the required shape, since metal bends easily. All that remains is to secure the workpiece or use metal screws. 
It is advisable to bend the upper edges a little with a hammer so as not to get hurt by them while pouring the solution. Next, everything is the same as with the wooden form. Before each use, the mold is lubricated with oil, the finished tile is removed from it after hardening, and the stencil itself can be used many times.
No. 5. Forms from scrap materials
Any container that has the required shape and proper strength can serve as a stencil for creating elements of a garden path. The following can be used as a mold for pouring a cement-sand mixture:

No. 6. How to make a silicone mold?
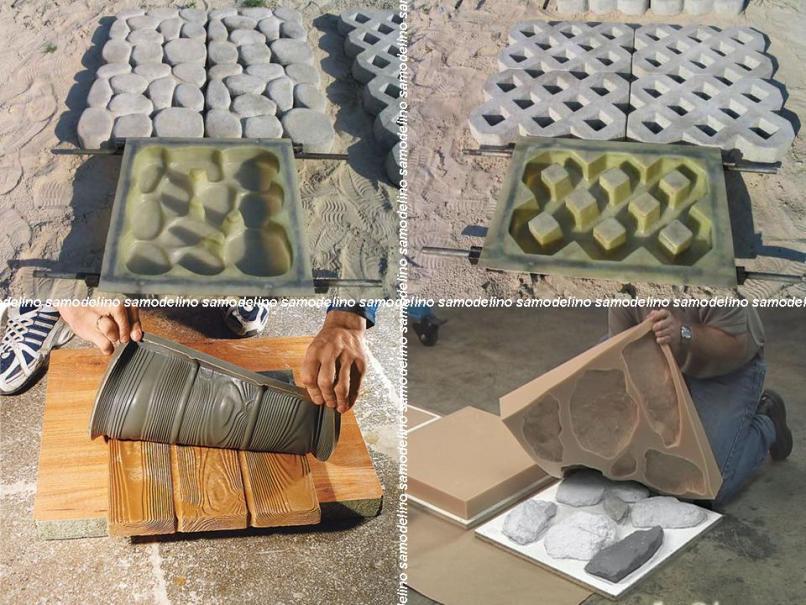
Making a silicone mold yourself is the most time-consuming and complex method of all of them. The result is essentially the same form for pouring the solution that is sold in the store, but it will allow cast unique tiles. As template are used large natural stones, less often used with pronounced relief. As a result, you will get a durable, strong and most accurate imitation of natural materials. To make the path have a more natural look, it is better create more blanks, for which you will need stones of different sizes and shapes.
The mold is made of two-component silicone - this is an inexpensive material that hardens at room temperature and is sold in all hardware stores. Sequencing to create the form is as follows:

No. 7. Preparing the solution and pouring it into molds
The solution for pouring into molds is prepared from cement and sand in a ratio of 1:3, water is added in such an amount to obtain a solution with the consistency of thick sour cream: it must have sufficient fluidity to fill the mold, but not completely liquid, so that the material made is durable in the future. better take some stamps M300 or M400, river or quarry sand is suitable. First, cement powder and sand are mixed well, and only then water is added, mixing is carried out using a construction mixer or a special attachment. You can use it if there is one on the site.
You can add reinforcing fiber to the solution; it would be a good idea to use water-repellent additives. If you want paint the path some color, then at this stage you can add to the mixture. It is advisable to prepare the solution in such a quantity that it will be immediately used to fill the molds. After preparing the solution, you will have approximately 1-3 hours to fill the prepared forms with it.
Now you can proceed to laying the tiles, focusing on the stretched threads or the laid border. The elements are laid out in the necessary order, gaps of 0.5 cm are made between them, then the tiles are fixed by tapping the edge of the board with a mallet. The seams between the tiles are filled with a cement-sand mixture or just sand, then they are rubbed down with a hard fluffy mop. Now all that remains is to rinse the path with water using a hose and after 4-5 days you can safely move along it.
The paths that no heavy load, sometimes they are equipped by simply deepening the tiles into the soil layer. In this case, grass quietly breaks through between the tiles, thereby decorating the path.
No. 11. Pouring stencils on prepared soil
If a ready-made removable mold is used to give the solution the desired shape when pouring it onto the path, the process will take a minimum of time. Such forms, as a rule, consist of several cells, reminiscent of natural stone in shape.
Sequence of work:
In this case, you can get by with just one stencil, but if you use 2-3 forms, the work will go even faster. Decorate the surface of the path, made in this way, can be done by processing with a metal float, squeezing out prints, pressing in glass and other objects, or by painting a dried surface.
Creating forms for garden paths and pouring them is an interesting creative process that does not require large financial investments and is suitable even for those who do not have much experience in construction work. You can experiment as much as you like, and the result in the form of an original path will become a source of pride and decoration of the site.
The form for the garden path is an opportunity to give the site a unique appearance. Paths should not only play a practical and functional role, but also act as a certain decorative element that will harmoniously fit into the surrounding landscape of the dacha and personal plot.
Features and Benefits
Buying a finished product is the simplest and fastest solution. Despite the large selection of different materials, this approach does not make it possible to fully realize all ideas and solutions. In addition, the cost of finished products often does not correspond to their quality.
By making tiles yourself, you can be sure of the quality of the material.
In turn, using different forms for filling has a number of advantages:
- Affordable price. Special matrices make it possible to create original and unique tiles using inexpensive and simple materials. In this case, the budget for the work will be minimal.
- Reliability and durability. The basis of the concreting process is a sand-cement mortar, the distinctive characteristics of which are reliability, the ability to withstand heavy loads and durability.
- Originality of design. Using homemade forms allows you to make a path according to your own design, which has no analogues. In addition, homemade forms are an excellent solution in cases where it is impossible to find tiles that suit certain parameters.
- Non-standard approach. Regardless of what shape the future tile will be, you can use paint, glass, pebbles and other materials as decorative elements. For the most part, products that are presented on the domestic market cannot boast of such a design.
The peculiarity of creating forms for garden paths yourself is that it is a labor-intensive process that requires considerable time and physical effort, but all this is compensated by a worthy end result.
Video “Do-it-yourself garden path”
From this video you will learn how to make a beautiful garden path with your own hands from molds:
Creating a matrix yourself
To arrange garden paths, different forms are used that can be systematized:
- Plastic stencils. They are used for pouring cement directly onto prepared soil. Most often, this type of matrix is in the form of squares with a side of 50 to 70 cm and internal partitions. At the beginning of work, they must be installed in the place where the path is planned to be built. After this, the solution is poured into the mold. After about 30 minutes, the mold is removed and moved to the next part of the track. Such ready-made stencils are distinguished by a large selection, ease of use and affordable price.
- Ready-made forms. It is necessary to pour the solution into such forms and after it hardens, the resulting material can be used as a regular tile on a pre-prepared base. These can be blanks with sharp and rounded corners.
- Self-made forms. To produce such forms you will need certain material, tools and skills. Most often they are made from silicone, wood, metal and even scrap materials (for example, tin containers or ice cream boxes). This is the most labor-intensive option, but it is the one that allows you to create the most unique products.
Made of wood
Wood is the most popular material for making molds yourself. To do this, it is best to use wooden blocks with a cross-section of 50 mm, which are pre-polished and treated with special antiseptics. A strong connection is ensured by cutting special grooves at the ends and fixing the corners with metal corners.
 Wood is a popular material for making tile molds
 The size and stencil may be different and depend on the characteristics of the site and the original idea. The most commonly used shapes are rectangular, square, polygonal and triangular. You can cast several tiles at once; to do this, the inside of the mold must be divided into several parts using bars.
It is best to use laminated or waterproof plywood as the bottom. The plywood is attached to the bars using self-tapping screws or nails. The durability of its use and the quality of the finished material depend on the strength of the mold.
You can use a mold without a bottom. In this case, the filling is carried out directly at the place where the path is being constructed, but this option is dependent on weather conditions and requires the work to be carried out in strict reference to a specific location.
Hand-made wooden molds are used for reusable pouring of sand-cement mortar, and before each pouring, the walls of the mold are treated with petroleum jelly or waste oil. When working with large templates, it is necessary to use a reinforcing mesh.
Made of metal
Metal blanks are also very popular. Sheet metal is best suited for their production. You can also use hoops from old barrels, but in this case they must first be treated with an anti-corrosion agent.
 Metal molds for paving slabs are no different from wooden ones, but it is advisable to treat them with an anti-corrosion agent
 At the initial stage, using metal scissors or a grinder, special strips of the required width are cut out in accordance with the height of the future path. As practice shows, the optimal height of the pedestrian path is 4 cm. Next, shapes are formed from the cut strips. Curved workpieces are attached using self-tapping screws or welding. To avoid injury during work, the upper edges are bent with a hammer. In the future, all work is carried out in the same way as in the case of wooden samples.
Made from silicone
One of the most time-consuming processes is creating a silicone mold. You can use relief boards as a template, but most often large natural stones are used.
 Creating silicone molds is a simple process, the main thing is to follow the basic rules
 This product is based on two-component silicone, which is an inexpensive material and hardens at room temperature. Buying it will not be difficult, it is sold in most hardware stores, and performing all the steps yourself will not be difficult.
The step-by-step process includes the following steps:
- Preparation of formwork. The distance from the walls of the formwork to the sample should be approximately 2 cm. The formwork can be made of plywood bars or thick cardboard. The result should be a sealed and collapsible mold 2–2.5 cm above the template.
- To ensure that the finished (hardened silicone) is easily separated from the walls, the formwork is lubricated with a thick layer of grease.
- The stone at the bottom of the box is placed face up and is also pre-lubricated with oil or grease.
- Silicone filling. To prevent bubbles from forming, immediately after pouring the silicone is sealed using a brush pre-moistened in a detergent solution. To give the shape the most even contours, use a spatula dipped in soapy water.
- After pouring, the mold is sent to dry in a dry room. This process usually takes 2-3 weeks.
- At the final stage, the formwork is removed, the stone that served as a sample is removed, and the finished silicone mold can be used for its intended purpose. If the production technology has not been violated, then the solution can be poured into the finished mold about 1000 times.
From scrap materials
Various available materials can serve as a form for a garden path:
- kitchen containers (both plastic and metal);
- metal or silicone baking dishes;
- containers from different building materials.
 You can use any available containers as molds for tiles.
 When working with materials, you must be careful and careful so that the finished product does not deform or tear the workpiece.
Unusual decor
Often, hand-made tiles look gray and monotonous. To give it an original appearance, the following decorative options are used:

Laying paths
When the molds for pouring are ready in a ratio of 1:3, a solution of cement and sand is prepared. Water is added until the consistency of thick sour cream is formed. Cement grades M-400 and M-300 are best suited. First, you need to thoroughly mix the cement and water, and only then gradually add water. For mixing, you can use a concrete mixer, a construction mixer, or a drill with a special attachment. The finished solution must be poured into molds pre-treated with oil no later than 1–3 hours. To guarantee quality, it is recommended to pre-cover wooden and metal blanks with film.
Depending on weather conditions, the drying process lasts 3–5 days, but the surface must be sprayed with water 1–2 times a day to minimize the likelihood of cracks.
The frozen material is removed from the blanks and left to harden in a cool, dry place for 2–3 weeks.
Of course, making matrices for garden paths yourself requires certain physical and time costs, but following all the technological processes you can get a result that will exceed all expectations.
 (1 ratings, on average: 5,00 out of 5)

