The wooden floor on the balcony is your own. How to make a wooden floor on a balcony with your own hands. Balcony floor materials
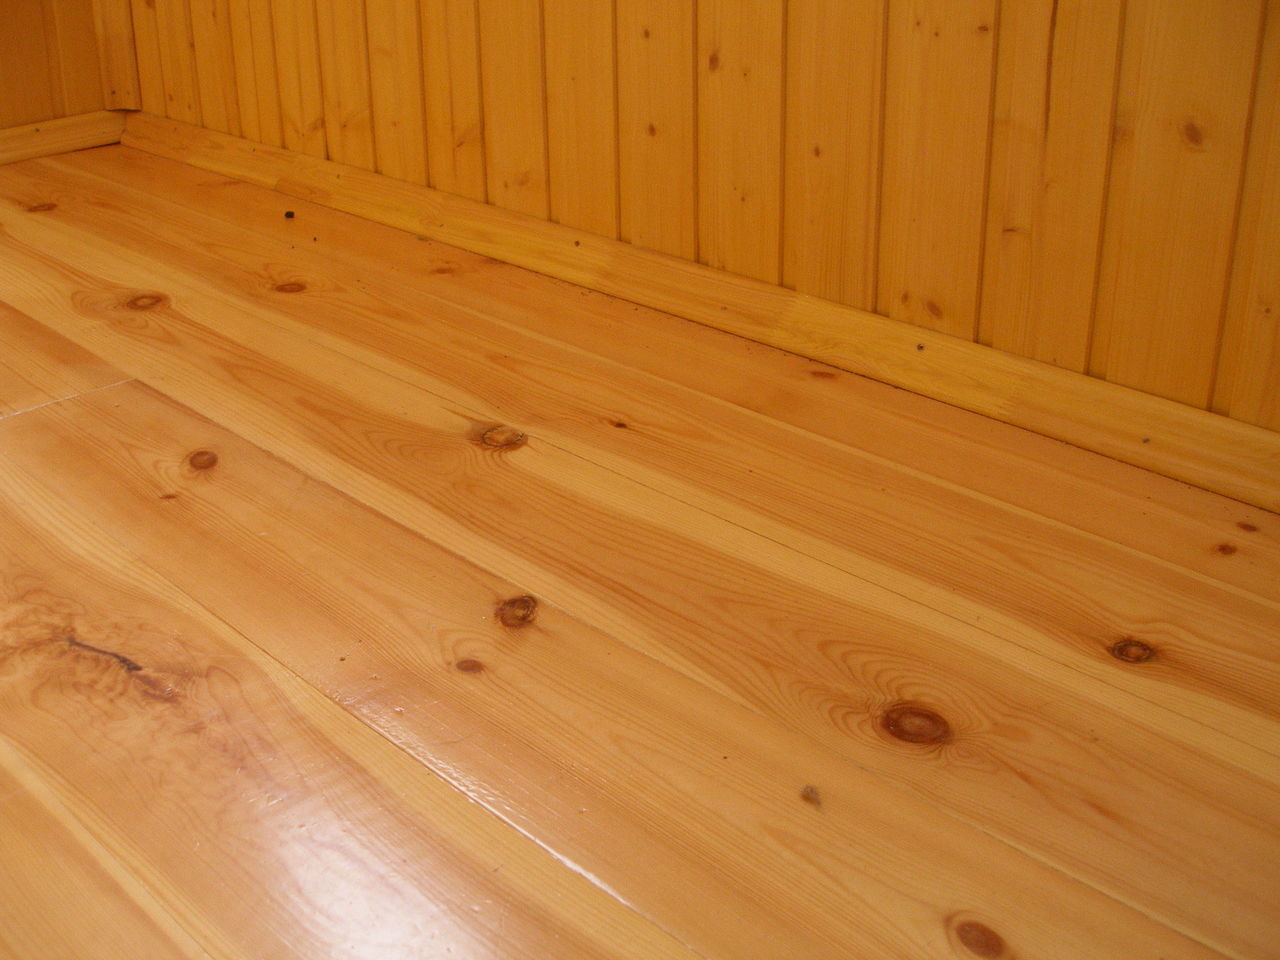
Floor coverings made from wooden planks are popular not only when installing floors in residential premises, but also when making surfaces on a balcony, loggia or terrace. The wooden floor on the balcony is beautiful and warm. Moreover, the comfort of the surface is ensured not only by the possibility of laying insulation under the plank floor, but also by the characteristics of the material. Provided that the installation technology is followed, the balcony decking will serve you for decades. If you don’t know how to make a wooden floor on a balcony with your own hands, step-by-step instructions from our article will help you with your work.
Advantages and disadvantages of wooden flooring on the balcony
Before making a wooden floor on the balcony, let's consider the main pros and cons of such a covering. Wooden floorboards are a natural material that is traditionally used for flooring. Wood has low thermal conductivity, so a plank floor on a balcony is the best option for creating a comfortable and warm covering in a room without heating.
The advantages of such flooring include the following:
- aesthetic appeal;
- Possibility of use in any interior;
- ease of processing (fastening and cutting wood is carried out without the use of special equipment);
- environmental cleanliness is very important for homes with children and allergy sufferers;
- if you lay the floor from durable beech, oak or larch wood, the surface will serve you for several decades while maintaining all its performance characteristics;
- the best solution for balconies with a low floor is to cover it with plank flooring along the joists (in the end it will be possible to understand it to the level inside the room);
- to level an uneven base made of a concrete slab, the easiest way is to lay a plank covering;
- installation of a wooden structure will allow for high-quality insulation of the balcony;
- It is possible to lay plank floors even on dilapidated concrete slabs, since the structure does not load them at all.
Wooden flooring on a loggia or balcony has its disadvantages:
- wood is susceptible to rot, mold and insect damage;
- the material is flammable;
- Wood quickly absorbs moisture from the air and becomes deformed.
Important! All wood defects are minimized if the elements are treated with antiseptics to protect against rotting and fire retardants to prevent fire. To ensure that the coating does not absorb moisture so quickly, the floors are painted and varnished.
It is best to cover the floor with boards on a glazed balcony, so the operating conditions will be as close as possible to a living room. If you decide to cover an unglazed balcony with a plank floor, then carefully choose the wood. Give preference to moisture-resistant species, such as larch, and get ready for more thorough surface care.
Preparing the concrete base of the balcony
If you are making wooden floors on your balcony with your own hands, then pay special attention to preparing the base. If the concrete slab is strong enough and in good condition, then the preparatory work is as follows:
- Using a cement-sand mortar, we seal all the cracks, holes and crevices in the base. Using polyurethane foam, we seal all joints of structures.
- Let's start leveling the surface. To do this, we cut off the protruding mortar, concrete and mounting loops.
- We prime the surface using deep penetration primer solutions. They are applied to the concrete slab and the lower part of the walls.
If the concrete slab is old and has many defects, make a new screed:
- Waterproofing mastic is applied to the junction of the house wall and the slab. The composition is applied to the wall and slab to a width of 10 cm.
- We attach temporary formwork around the perimeter to a height of 100 mm.
- We install lighthouse slats along the slab. Align them horizontally by level.
- Pour in the cement mortar and level it over the beacons.
- The next day, we remove the lighthouse slats and fill the voids with mortar.
- Let the screed dry for a couple of weeks.
Floor waterproofing

When making a wooden floor on a loggia with your own hands, do not neglect waterproofing the base. It will protect the floor from dampness, mold and mildew. For this purpose, the surface can be treated with impregnation, paint, waterproof plaster, rubber, liquid glass and covered with roll materials.
When performing waterproofing, pay attention to the following recommendations:
- The easiest way to waterproof using polyethylene film. The material is laid with an overlap, and the joints are taped. Use two layers of film and place it on the wall to a height of 150 mm.
- Ruberoid is laid on bitumen mastic, applying it with a spatula to the base. And the rolled material with the mastic already applied is simply heated before installation.
- Painting waterproofing Suitable for do-it-yourself. Typically, latex-acrylic compounds are used, which are applied with a wide brush to the floor and bottom of the wall.
- Penetrating waterproofing mixtures applied in several layers to walls and floors. The substance crystallizes in the pores of the material and reliably protects against moisture.
- For application moisture-resistant plaster compositions use a brush or spatula.
- Liquid rubber and the same glass are the most reliable materials for waterproofing.
Installation of wooden floors on joists
The floor on the balcony of a wooden house is often below the floor level in the room, so when walking you have to overcome a step, which is not very convenient. Thanks to the arrangement of the floor along the joists, it will be possible to smooth out the difference in heights and bring the surface to the same level as the floor in the apartment.
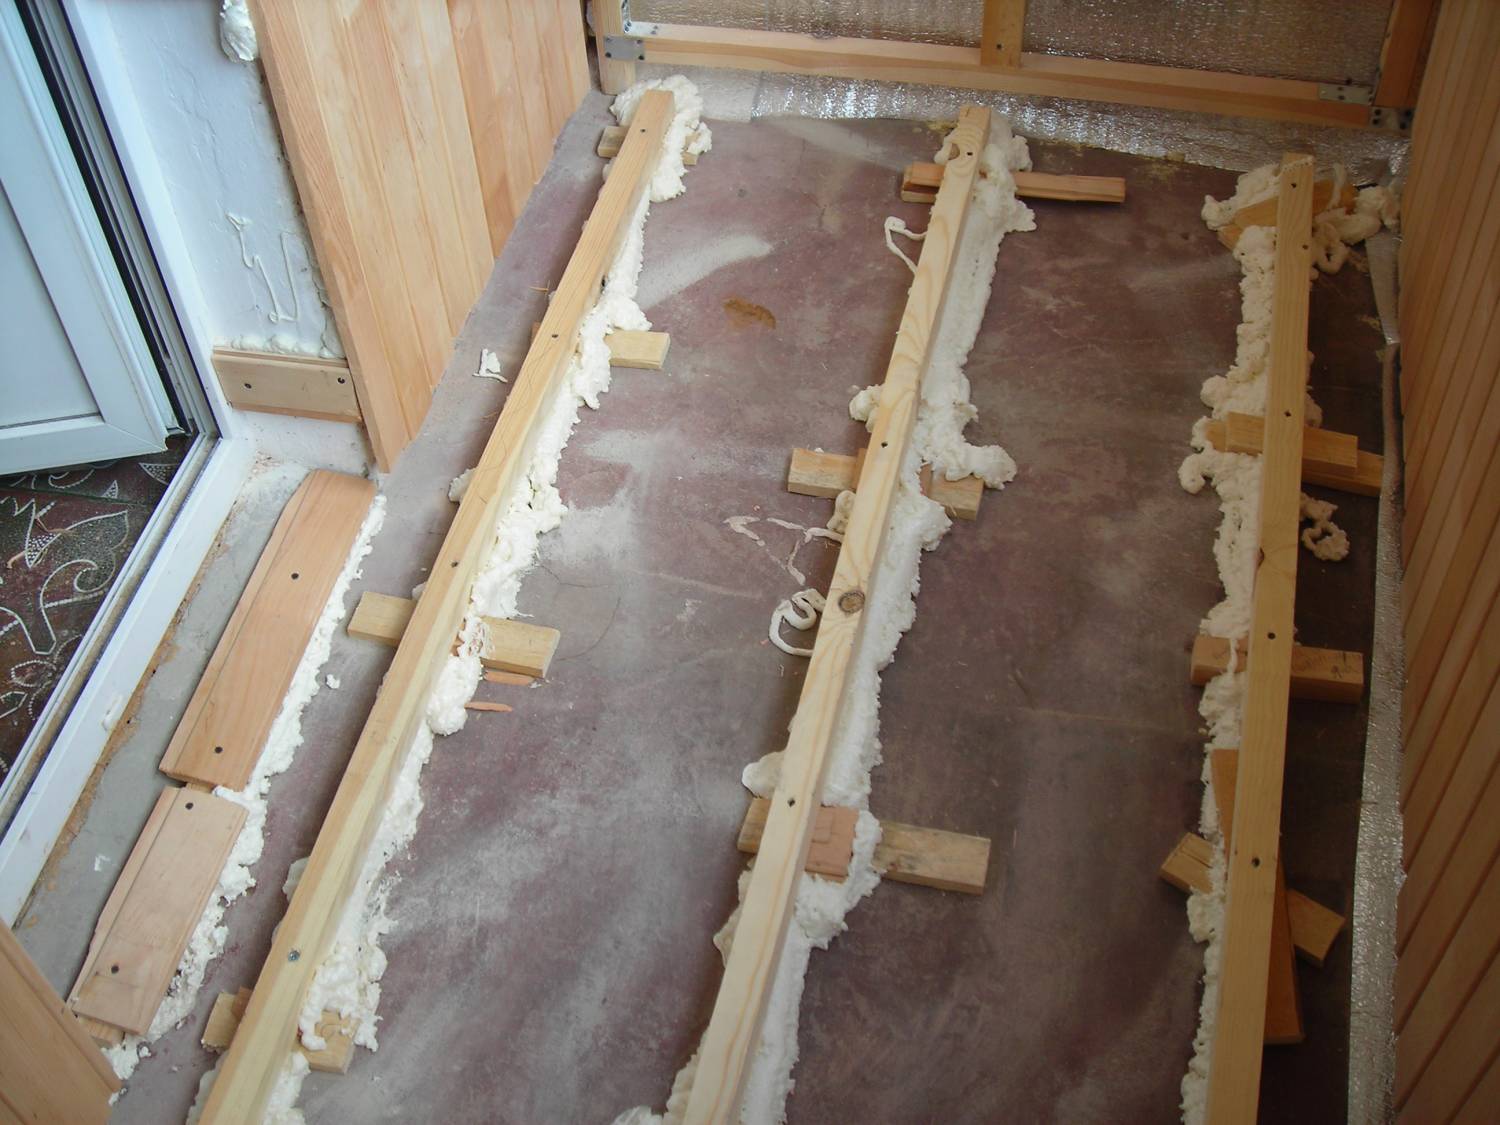
Installation of floor joists
To make the frame, dried timber is used. Its cross-section is determined from the height to which the surface is raised, minus the thickness of the boardwalk.
We carry out the work in this order:
- We lay two beams along the longitudinal edge of the balcony and against the wall.
- Next, measure the distance between them and cut bars of the same length. You need enough cross bars so that they can be laid in increments of 800 mm across the balcony.
- We treat the blanks with an antiseptic and cover them with drying oil.
- We lay out the bars and align them in a horizontal plane. We fasten the outer longitudinal and outer transverse bars to each other with metal corners and self-tapping screws. We level the structure horizontally by placing scraps of plywood or wedges under it.
- We install the remaining transverse bars inside the frame and fasten them to the sheathing with corners and self-tapping screws.
Important! We fix the resulting wooden frame with dowels to the concrete base.
Insulation of floors with joists
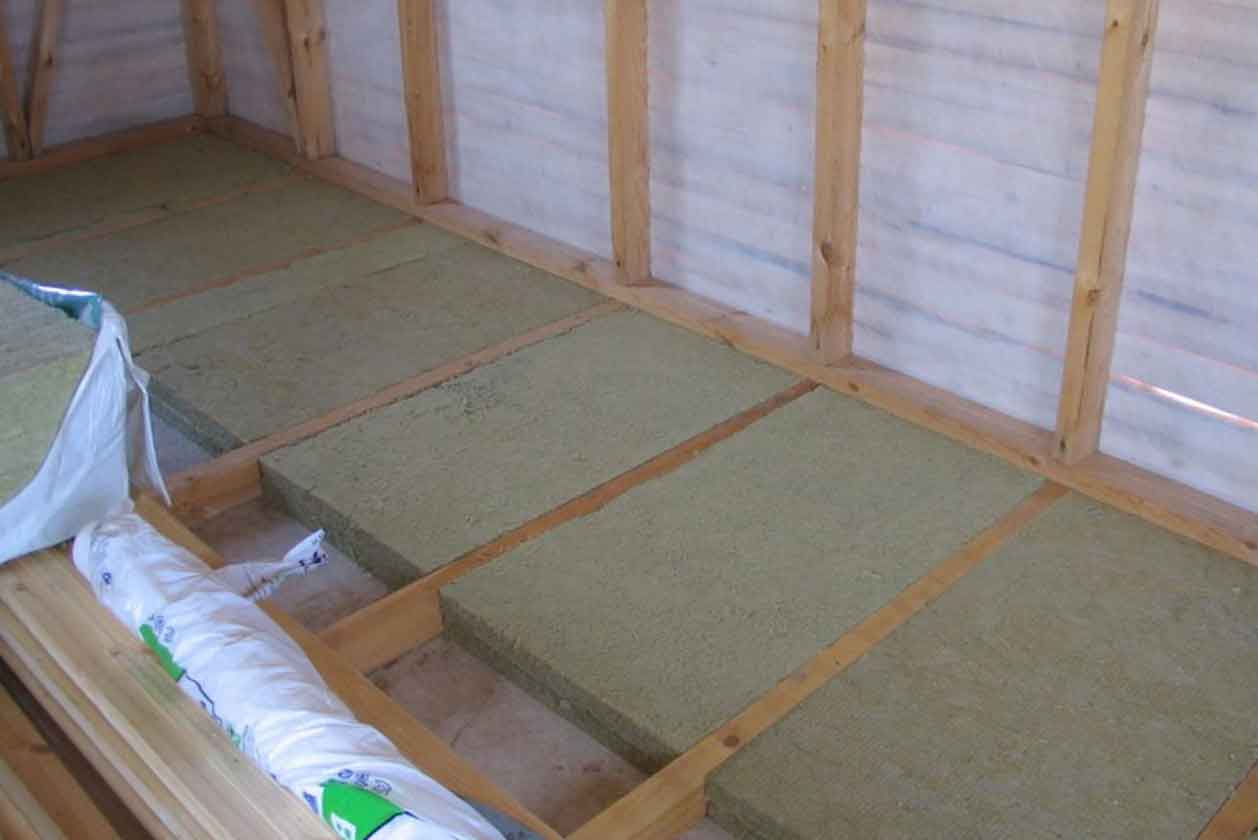
Despite the low thermal conductivity of wood, the structure needs to be additionally insulated. This is simply necessary if there is an unglazed balcony or open space below. For insulation, rigid board materials and roll insulation based on mineral wool are used:
- extruded polystyrene foam;
- slag wool;
- perlite cement slabs;
- glass wool;
- basalt wool.
The insulation is cut into rectangles of suitable size and laid between the joists. For dense installation, the dimensions of the insulation are taken a couple of centimeters larger than the gap between the structures.
Important! A balcony without glazing is not insulated due to the lack of such a need and due to the possible accumulation of moisture in the thermal insulation material.
It is also allowed to use bulk materials as insulation. Expanded clay, sawdust, granulated polystyrene foam, ecowool, and vermiculite are suitable for filling the voids between the joists. The selected insulation is poured into the space and lightly compacted. If necessary, add more material.
Plank flooring

It is better to use boards with interlocking joints as flooring. We impregnate all elements with antiseptics before installation. This is done especially carefully on the back side and at the ends, because after installation it will not be possible to get to these places.
We carry out installation in the following sequence:
- We lay the first element with a groove against the wall with a distance of 1 cm from it. We fix it to the joists with self-tapping screws or nails.
- We insert the tenon of the next floorboard into the groove of the previous one and press it tightly. We also fix it to the joists.
- We arrange all the following elements in the same way. We cut the last board to the required size and also lay it.
- If two boards are used in one row, then the place where they meet should fall exactly in the middle of the joist.
- We install a wooden plinth.
Making a wooden floor on a balcony with your own hands is not such a difficult task. Anyone who knows how to handle tools at least a little can handle it. The material is easy to work with and the area is not too large. Here are some tips to help clarify any questions you may have.
Advantages and choice of material for a wooden floor
The balcony is an auxiliary area. It is not designed for large, rapidly changing loads. In addition, as the age of the house increases, the load-bearing capacity of the balcony slab decreases.
Therefore, the choice of wood as a material for the floor on the balcony is completely justified. Light weight, low thermal conductivity and sufficient strength together are the most preferable qualities that a material should have for such a purpose.
Advantages of wood for a wooden floor on a balcony:
Wood normally tolerates contact with sunlight and rain moisture.  Installing a wooden floor does not require a lot of tools and labor.
  As the wood wears out, it can be easily replaced.
Preparatory work
First of all, you need to remove everything that is on it from the balcony. Remove old coating (if any). If necessary, existing defects in the concrete surface should be plastered, and the cracks should be filled with foam.
Inspect the metal fence, if necessary, weld it, paint it, clean it from rust. Purchase materials for the coating - substrate, beams for logs, floorboards, fasteners (screws, corners, dowel-nails).
You will need some kind of antiseptic for the boards, as well as varnish or paint to protect the finished floor.
Waterproofing the floor on the balcony
The need for waterproofing is not reinsurance. Without proper protection, the floor may begin to gain moisture, become moldy, and metal parts of the floor and fences may begin to rust.
First of all, it is necessary to provide a slight slope for rainwater drainage. You can't let her stagnate on the balcony. One of the options for waterproofing coating is a concrete-bitumen screed.
It will allow you to achieve the desired slope and at the same time protect the balcony slab from moisture accumulation. Roofing felt is laid over the screed as a second layer of waterproofing, or some other insulating coating is used, the choice of which is quite wide, for example, a special waterproofing membrane.
The canvas should be wider than the balcony so that its edges extend onto the wall by 20-25 cm.
Video:
The first step is to strengthen the first row of joists. The distance between them should be about 45-50 cm; they are fastened across the balcony and secured to the floor using dowel nails. They should be 2-3 cm short of the walls.
The second step is laying the second, longitudinal layer of joists. This layer is the main one, made from a thicker block and carries a layer of floorboard.

The logs of the main layer are located along the balcony, the distance between them is 45-50 cm, from the walls - about 3-5 cm.
This layer of lags must be leveled in a horizontal plane, placing pieces of wood under them as necessary to adjust the level. Between the lags it is advisable to lay a layer of insulation - mineral wool or something similar, which is cut to size with a knife and placed in the spaces. There is one for this purpose.
Then they begin laying the floorboard. It is cut into pieces across the balcony in such a way that there is a gap of about 1 cm between the board and the wall. You need to cut off a tenon from the end board and attach it to the joists with self-tapping screws. The screws should be screwed into the groove at an angle so that they are not visible after attaching the next board.
The next board is inserted into the groove with a tenon, carefully adjusted through a wooden spacer until the gap is eliminated, and screwed in the same way as the previous one. The entire floorboard is laid in this way.
Sometimes thick plywood or chipboard is used instead of a floorboard, but this option seems short-lived due to its low resistance to moisture, and even atmospheric humidity will destroy such a coating quite quickly.
Video lesson:
Wood floor treatment
The laid floor must be protected from rain and atmospheric moisture. It is advisable to treat the material with an antiseptic in advance, before laying, this will make it easier to cover the entire board.
You can use varnish or paint as a protective coating. It is applied with a brush or roller in 2 layers with intermediate drying in the quantities indicated on the packaging of the selected varnish (paint).


Even if another coating is planned, varnish finishing is still needed to protect the wood of the floor. We must not forget that a balcony is not the most favorable place for wooden parts, and increased protection here will not be superfluous.
The wooden floor on the balcony creates comfort, a feeling of well-groomedness and order, and protects the base from moisture. Given the simplicity of the arrangement, the benefits of it are very great and are recommended to everyone.
The floor on a balcony or loggia, as a rule, is of two types: either concrete with floor covering, or wooden. The first option is colder and less comfortable, although it has a longer service life.
A wooden floor, if properly installed, can also last a long time, but due to its natural origin and the properties of wood, it is much warmer. This article will look at how you can arrange a wooden floor on a balcony or loggia.
Watch the video on how to lay a wooden floor on a balcony with your own hands
Advantages of a wooden floor
With proper arrangement of a structure of this type, you can obtain a natural coating with low thermal conductivity. To achieve maximum effect and durability, be sure to protect the wood from exposure to temperature and humidity.
To ensure that the floor surface is level, during the installation process all logs should be leveled and securely fixed to the balcony slab. It is the logs that will bear all the loads from the boards laid on top of them.
The advantages of a floor made of boards laid on joists include the following indicators:
— long period of trouble-free operation;
- minimal load on the balcony slab (compared to installing a concrete floor);
- natural beauty of wood;
— no negative impact on the human body due to the natural origin of the material;
— the ability to level the floor by raising its level relative to the concrete slab.

Procurement work
As when arranging any structure, the first thing you should pay attention to is, of course, the choice of quality material. All wooden products should be treated with an impregnation designed to protect them from the negative effects of moisture, which can cause the formation of rot.
There are two ways to cope with this problem:
1) independently treat purchased wooden building materials with impregnation;
2) or buy already impregnated logs and boards.
In the first case, the cost of funds will be less significant, but the inconvenience will be that you will have to do all the work of applying the impregnation yourself, and at the same time spend the time necessary to completely dry the wood.
Read also: Do-it-yourself wooden arch: types of arches, installation procedure
In the second, you can begin installation work immediately after purchasing the materials. The only drawback is the higher price.
 Which of the two options is more suitable is a matter of personal preference.
Separately, it is worth noting that if you purchase products made from raw wood, you must keep them in the apartment for some time so that they dry out. If some products become crooked after drying, they should not be used for installation work, as this will create a lot of difficulties. To avoid additional problems, it is better to immediately purchase all wooden materials that have been dried and treated with impregnation.
We lay a wooden floor on the balcony with our own hands: surface preparation
The essence of this stage of work is the sequential implementation of such actions as:
1) dismantling the old floor;
2) dry and subsequent wet cleaning of construction debris and dust;
3) drying;
4) arrangement of a rough concrete screed (in case of significant unevenness of the balcony slab).

Materials
To ensure high-quality installation of a wooden floor on a loggia, you should purchase the following materials:
- oak timber (logs are formed from it);
- floorboard (already treated with impregnation and calibrated in thickness);
— polyurethane foam for closing cracks;
— waterproofing in the form of a film;
— expanded polystyrene or mineral wool for thermal insulation (or other material with similar characteristics).

Tools
The list of tools required to perform installation work includes:
- a pry bar and a hammer (for dismantling an old wooden floor);
- a broom or vacuum cleaner for dry cleaning, and a rag with water for wet cleaning;
- roulette;
- jigsaw or wood saw;
- electric drill;
- cordless screwdriver;
- professional stapler;
— a small building level (so that you can conveniently work with it on the balcony);
— a stationery knife (for separating sheets of insulation).

Installation work
In order to properly install a wooden floor on a loggia the first time, it is necessary to consistently carry out each stage of work. Let's look at them in detail.
Laying waterproofing
Since the balcony is in direct contact with the environment and is exposed to moisture from all kinds of precipitation, waterproofing work should be approached very carefully. To do this, it is necessary to ensure high-quality sealing of all cracks using special plaster or polyurethane foam. Then a layer of film waterproofing is laid. If it is made of pieces, then at the junction points it is necessary to place two sheets with an overlap of about 15–20 cm and connect them together with aluminum tape.
Read also: Soundproofing walls: how and with what you can make your own soundproofing in an apartment

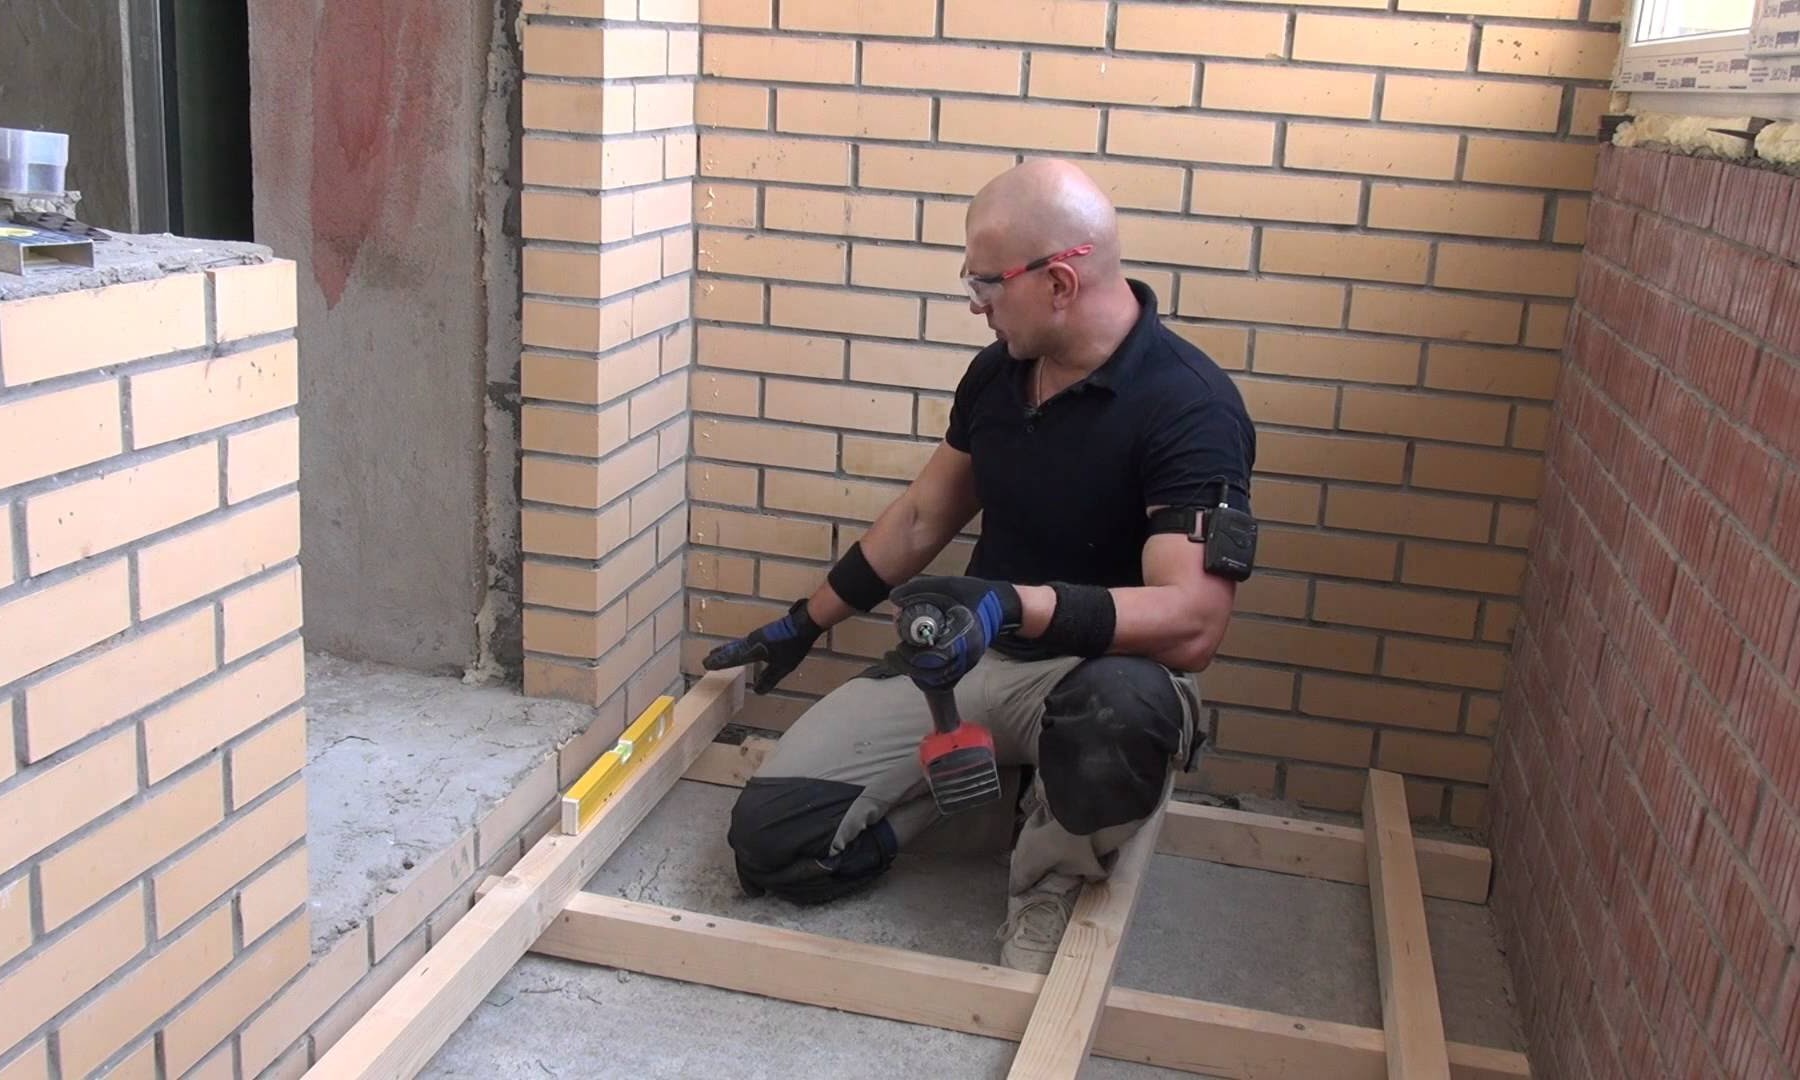
Installation of logs
There are two options:
1) use only longitudinal logs (less expensive option);
2) first install transverse logs, and on top of them - longitudinal ones.
Since the balcony area is small, in most cases it will be enough to lay only 3 longitudinal products. The first of them is located directly next to the wall of the building, the second - in the center, and the third - near the edge of the balcony. All of them must be parallel to the load-bearing wall.
 Fixing the logs to the concrete slab of the balcony can be done in two ways:
1) using anchors of a suitable size;
2) or use dowels and quick-installation screws.
Although, at first glance, there is nothing special about performing this stage of work, this is far from the case. The fact is that it depends on the correct installation of the joists whether the surface of the wooden floor will be flat or not. Therefore, in order to avoid mistakes, you should approach installation work very responsibly.
To create an ideal flat surface, it is necessary that all logs made of wooden beams are horizontal in level. As a rule, in some places you will have to lift the wooden beam relative to the balcony slab and install wooden inserts in the resulting gap, fixing them with self-tapping screws (connect them into a single unit with the beam).
 If we are talking about a loggia, it is best to use the second option. In this case, first, transverse logs are installed at a distance of 400 to 500 mm from each other (they are fixed to the concrete slab in the same way as described above), and longitudinal logs are laid on top of them. To connect the latter to the former, long wood screws are used, deepening their heads into the wood by approximately 15–20 mm.
Be sure to install all the joists in such a way that none of them comes into contact with the wall.
Advice: Before installation work, you should calculate the height of all materials intended to form the floor. Their finishing height should be less than or equal to the height of the threshold of the balcony or loggia.
Laying a layer of insulation
It is necessary to lay insulation in the space between the joists, which can be mineral wool or expanded polystyrene (or other material with similar functions). If there is a small space in height between the insulation and the floorboard, this will not create any problems. On the contrary, it will contribute to better thermal insulation.
Hi all! Recently a neighbor approached me. She and her husband had a desire to improve the balcony and decided to start from the floor. They had a regular concrete floor, without any covering.
She needed answers to questions about which coverage would be most convenient and less costly financially. Well, we sat down at the computer, I showed her the options, we did the calculations together and settled on laminate, because... The loggia is glazed and moisture does not enter. Well, in the evening I was ready to write this article. I hope it will be useful!
 If your balcony is still not glazed, it is clear that the floor on it is constantly exposed to active precipitation and strong gusts of wind, and in winter it has to hide for a long time under a fluffy layer of snow.
Accordingly, in the spring the snow melts, and the floor again has a hard time due to the significant layer of water that has formed.
Therefore, in this case it is very important to create a surface that is resistant to negative natural influences. It immediately comes to mind that the floor can be raised by forming a new screed, and a reliable, durable coating, chosen in advance by you, can be laid on top. We propose to consider everything in a little more detail and in order.
Option 1: Painting
You can simply take the concrete floor screed on the balcony and paint it with special paint, which is intended for outdoor work. This type of paint usually lasts for three or four years. This means that for this period of time you will not need to update.
It should be borne in mind that by painting the floor on the balcony, you will not be able to create a durable coating, since the paint is not designed to withstand loads associated with gravity pressure (furniture or other large items).
Option 2: Tile
If you plan to move old but still usable furniture here, then in this case it is better to cover the floor with tiles. By laying the tiles according to all the rules, you will provide the concrete screed with a protective layer, and it will not be destroyed by precipitation on the balcony.
Laying tiles should begin from the outer row, and at the same time try to maintain an even line. To neatly lay the tiles in the corners of the room, they should be cut at an angle of 45°.
For a glazed balcony
For a closed balcony, the floor design will be slightly different. If you want to turn it into an additional room where you are supposed to walk barefoot, keep in mind that then the floor must be insulated to ensure comfort.
Most likely, in this case, it will be better for you to seek help from qualified builders. Work on flooring and insulation of the floor is carried out thoroughly, in several stages, the first of which is the creation of a high-quality concrete screed. Sheets of plywood or fiberboard are laid on top of the screed.
Option 1: Linoleum
The simplest and most affordable coating is linoleum. The variety of patterns depicted on linoleum allows you to expand design possibilities when decorating a balcony room.
Option 2: Laminate
As an option, you can consider laminated or wooden parquet or sanded wooden boards as flooring on the balcony. Wooden floors are usually varnished or painted.
It has a huge advantage over other materials - walking on a wooden surface is warm and comfortable, and it does not harm your health. But there is also a significant drawback: the boards dry out over time from cold and dampness.
Option 3: Tile
If you decide to make an electrically heated floor, then pay special attention to waterproofing the balcony. In this case, moisture ingress is unacceptable. Using sealants, carefully seal the windows and insulate the walls and floor. Any modern foam material is suitable as insulation.
As you can see, having even the slightest experience in carrying out repairs will help you cope with installation work on laying the floor yourself without the involvement of professionals. Nobody says renovation is easy. But, as they say, if only you had the desire and the necessary tools at hand, you will succeed.
Source: stroitelstvosovety.ru/stroitelstvo-pola-svoimi-rukami/chem-pokryt-pol-na-balkone
What is the best way to cover the floor on the balcony?
 For city residents, owners of standard apartments in high-rise buildings, balconies and loggias are a favorite place where they can go out to get some fresh air and admire the panorama of the city.
In the warm season, you can sit there with a book in hand or have tea with your family. To create such an atmosphere, you need to correctly assess the situation and decide what floor to install on the balcony.
Let's look at possible options for materials for carrying out such work.
Repair of balcony floors must be carried out taking into account two factors:
- Will your balcony be open or glassed?
- What tools do you have to choose the right coverage?
If you want to get a good and high-quality result, construction work must be carried out in stages.
Where is the best place to start?
The process of initial preparation of the floor surface for subsequent work is also important. First you will have to get rid of the old coating using simple tools such as a chisel and hammer.
Note! If you have an open loggia or balcony, then it is better to take care of laying floors on the balcony during the warm season. Of course, you can do this in cold weather, but then you will have to spend money on more expensive materials to level the surface.
Material selection
The options for purchased building materials will depend on the type of balcony or loggia:
- for open types, laying tiles is more suitable,
- and on a glazed balcony you can make wooden floors followed by painting or laying linoleum.
Laying tiles
This is a universal version of the material; it is well suited for any type of balconies and loggias. And before covering the floor on the balcony with tiles, you need to carry out preparatory work.
- First, as is customary with any work, the floor is cleaned.
- Then a waterproofing film with insulation is laid on it. The thickness of the insulation layer depends on the height that is planned for the floor surface in the future.
- A cement mortar screed is poured onto the coating thus obtained.
- After drying, the surface is treated with special glue and tiles are laid on it.
- To obtain a smooth surface, tile slabs are laid using adjusting crosses; after installation, the seams must be sealed using a special grout.
Note! Laying tiles on the balcony floor is very convenient for open country attics, because such a coating can easily withstand any temperature changes, the main thing is to choose the right tile adhesive.
Everyone considers tiles to be a very strong and durable material, the surface of which is easy to clean and repair. But it has one drawback - it has a very cold surface. This can be eliminated by installing heated floors.
Laying wooden floors on the balcony
 Before installing a wooden floor, it is imperative to level its surface, since the presence of even small minor unevenness can later lead to disastrous results.
For leveling, a cement-sand screed is used, followed by removal of construction waste. In residential premises, a 5-6 mm screed is sufficient.
Insulation is placed between the floor and the joists. On the rough layer, a flooring is made of edged boards, which must be impregnated with a protective compound. After drying, the wooden floor can be painted with paint or varnish of your choice.
Note! The option with wooden floors is convenient because you can put an additional covering on it - linoleum or carpet.
A few more options
The above methods are considered a budget option, and if we talk about more expensive materials, then the following are suitable for laying the floor: granite, marble, decorative stone or cork.
Also, the flooring can be made from fiberboard and chipboard, this option will be cheaper. The technology for preparing the surface is the same as for laying a wooden floor. The slabs are attached to the joists using self-tapping screws and must be treated with protective compounds.
A little about granite and marble
These are very durable and heavy materials, and therefore they can only be used on loggias. Such materials are considered cold; when laying them, you will need to take additional care of the underfloor heating system.
Cork covering
This is a kind of decorative coating and it looks very attractive. But if you don’t take care of its protection, then in three years such a floor will turn into dust, because cork is very sensitive to moisture.
Before you decide what to lay on the balcony floor, and not be disappointed in it in the future, you need to take into account all the components of future work.
Source: polsvoimirukami.ru/chem-pokryt-pol-na-balkone/
How to cover the floor on an open and glazed balcony
 Almost every apartment has a balcony, which is used as a kind of warehouse where temporarily unusable things are stored or a small garden with beautiful flowers.
Some people turn the balcony space into an office or a secluded place to relax.
Whatever the purpose of the balcony, you need to select a floor covering that can withstand harsh climatic conditions (temperature changes, sunlight, precipitation) and at the same time should be comfortable to stand on.
There are a lot of materials for flooring, and it will be very difficult to understand what is best to cover the floor on the balcony.
Flooring materials for an open balcony
The balcony flooring should be durable, practical and even aesthetic. After all, no matter how ideal the cleanliness is in the entire apartment, dust from the balcony can disturb it.
The choice of material is greatly influenced by the type of balcony: open or closed. For the first type, many floor coverings will be unsuitable, because not everything can withstand constant precipitation, high or too low temperatures.
For an open balcony, you can make a regular concrete screed, simply painted. You can also lay ceramic tiles. Some believe that the floor can be covered with thick linoleum with a maximum protective layer and high density.
To make the right choice, you need to carefully consider each flooring option suitable for an open balcony.
Painting concrete screed
 To create this flooring on your balcony, you first need to fill the entire floor of the balcony with a solution that contains 1 part cement, 3 parts sand and water.
After the concrete screed has dried, it can be painted. The paint must be suitable for outdoor use and resistant to harsh weather conditions. For best results, apply several layers.
The resulting layer of paint will repel moisture well, protect the concrete from minor mechanical damage, and give a beautiful color and shine to the floor.
But it is worth noting that paint will not be able to save the screed from strong impacts or pressure from furniture legs. And after 3 years, the coating needs to be changed again, remove the old one and apply a new one. Painting the concrete screed is the most economical option.
Porcelain tiles
 A more expensive, yet durable coating can be made using porcelain tiles. It is also applied to the finished concrete screed as smooth as possible.
Tiles are divided into 5 classes according to their wear resistance; you need to choose 4 or 5, because... they have the highest degree of strength and abrasion resistance.
Also, when choosing a porcelain stoneware slab, you need to pay attention to its weight; the balcony support slab may not be able to withstand too heavy a material.
You can safely place furniture on the tiled flooring and walk on it in high-heeled street shoes. But you can’t go out onto the balcony with such a floor barefoot; you’ll need to wear slippers or lay down a small rug, otherwise your feet will freeze.
Not the best flooring for an open balcony is linoleum. It is not advisable to use even the thickest material; in the first year it will lose its color due to constant exposure to sunlight and will gradually begin to delaminate.
Moisture is destructive for it, and on this type of balcony it cannot be avoided. If water gets on the linoleum, it is impossible to walk on it, and in winter it will be very slippery. Therefore, it is advisable to refrain from purchasing this material for an open-type balcony.
Flooring materials for an enclosed balcony
It is much easier with closed balcony spaces; there is a wide choice of flooring materials, especially if the balcony is also insulated.
When using any floor covering, a concrete screed is first made, after which at least a sheet of fiberboard is laid, and only then the selected material is used. After all, even on a closed balcony, the floor suffers greatly from high frosts and winds, so it is better to insulate it a little, because it would seem that not everyone would want to constantly wrap their feet on a warm balcony.
As insulation material, you can use mineral wool, polystyrene foam, or lay an electric or infrared heated floor.
Linoleum, laminate, wooden boards, ceramic tiles and even carpet can be used as flooring materials. But the final choice depends on the required capabilities and characteristics of the material and its operating conditions.
Using linoleum is the simplest and most affordable covering option. It is easy to work with, the main thing is to cover it in one piece, without joints, to avoid moisture getting under the flooring.
There are many designs on linoleum, and the variety of their colors is also pleasing. You can even find imitation of various stones, tree species, etc. True, if there is high humidity on the balcony, then this flooring will have to be changed after a few years.
Laminate is well suited for flooring an enclosed balcony space. The main thing is to cover the concrete screed with a backing. Moreover, this cement surface must be made perfectly flat.
Laminate is a light and beautiful material. Can imitate valuable species of trees and expensive stones. Laminate flooring is warm. But this material has low resistance to moisture, so the balcony must be dry.
Wooden boards
 Wood is the best flooring for an enclosed balcony. Your feet will always be warm and comfortable.
Wood is a lightweight material, so there will be little stress on the base plate.
In order for a plank floor to last a long time, you need to choose yew or oak and treat it with special protective agents. You can also put birch, it is cheaper, but also very durable.
Pine or linden will not last long, because... they are most susceptible to rotting. It is better to coat the finished plank floor with paint or varnish; this will give it an attractive appearance and provide additional protection from moisture and other influences.
Ceramic tiles
 Ceramic tiles look beautiful, but they are cold materials, so it is better to have heated floors or wear slippers all the time.
It is advisable to choose one with a rough surface and light weight, so that the suspended structure of the balcony is not subject to heavy loads and does not reduce its reliability.
There are several classes of tiles; you need to choose them based on operating conditions. For a more insulated balcony, you can purchase tiles of a smaller class, 2 or 3 are quite suitable. You also need to pay attention to its moisture absorption and frost resistance, because even on a closed balcony the flooring will feel temperature changes.
You need to buy tiles with a reserve, because... There will inevitably be a large amount of waste. Ceramic tile flooring is durable and will last at least one decade. It is also practical, it will be easy to clean and wash.
You can put carpet on the floor of the balcony space. Moreover, the surface of the concrete screed must be made as smooth as possible. It will be pleasant to walk on such a floor.
But in terms of practicality, it is inferior to other materials. It will need to be constantly vacuumed and washed and cleaned as often as possible due to the constant presence of dust.
Self-leveling floor
 The self-leveling floor will look unusual. It’s difficult to make; you just need to spread the mixture evenly on the surface of the balcony. And the very next day you can walk on it. There are a wide variety of colors for this floor.
Using paints and a stencil, you can create any design, but to fix it you need to apply several layers of varnish.
If you know how to cover the floor on the balcony and what material to choose, then it is possible to use the balcony space to your advantage. By properly insulating it, you can purchase another small and comfortable room and thereby make the area of the apartment a little larger.
Source: gurupola.ru/ustrojjstvo-rmnt-p/chem-pokryt-pol-na-balkone.html
Before you start repairing the loggia, you need to find out what is the best way to cover the floor on the balcony.
When choosing the finishing floor covering for this suspended structure, experts recommend taking into account the fact that large differences in temperature and humidity regularly occur on the loggia.
Factors influencing the choice of material for floor improvement
The finishing coating for the balcony floor is selected taking into account both aesthetic and practical considerations. So, for example, the contamination of a given structure has a direct impact on the hygiene of the entire apartment.
Especially if the floor is being laid on an open balcony. In this case, the issue of choosing a finishing coating for an open loggia plays a decisive role in the cleanliness of the home. The selected material for floor improvement must withstand both winter frosts and spring warming. The future floor covering of the loggia should not be deformed from excess moisture.
Use weatherproof paints marked “1”. They are convenient for external use. Suitable for use in rooms with low or high temperature conditions.
The easiest way to make wet floor cleaning easier is to paint the top coat with weather-resistant paint. However, it should be noted that on balconies, especially open ones, wooden flooring is rarely installed.
It is not advisable to paint a cement surface, since in a couple of years such a coating will need painting again. This can be done in one day. However, this coating does not have a presentable appearance, although it performs its functions adequately. To paint the floor you will need:
- capacity;
- paint (depending on the parameters of the balcony);
- brush or roller;
- thinner or drying oil (depending on the paint manufacturer’s recommendations);
- gloves (if necessary).
Linoleum - an economical option for a glazed balcony
 Linoleum, as a floor covering, enjoys considerable success due to its durability and relative strength.
Modern linoleum is beautiful, muffles footsteps, is easy to use, and has sufficient thermal insulation.
Some households believe that it is better to make the floor on the balcony with linoleum than with paint. After all, such a coating is easy to maintain. However, its big disadvantage is that it slips when wet.
In this regard, construction company specialists recommend glazing the loggia. Compared to paint, linoleum is easy to maintain. However, even the highest quality material of this type cannot withstand temperature changes and severe frosts.
Due to water getting under the linoleum, it begins to rot. As for the installation of such a finishing floor, linoleum is easy and quick to install. Unlike painting the floor, linoleum requires preparation of the base.
To do this, you will need to take the following steps: level the base, prime it and allow time to dry. After which you can begin carrying out a new screed and priming work.
Linoleum is attached to a clean and dry surface, usually in one piece, if the configuration of the balcony or loggia allows it. After laying, in 10–15 days the linoleum will completely straighten.
Next, you will need to lay out the linoleum and give it time to stretch. Experts recommend laying plywood before installing linoleum. It will allow the finishing flooring to both “breathe” and not absorb moisture. For this floor you will need the following tools:
- roller;
- vacuum cleaner;
- level and metal ruler;
- large scissors;
- brush with soft bristles;
- putty knife;
- vinyl adhesive tape;
- dry floor screed.
Ceramic tiles and porcelain tiles, which is better?
 Ceramic tiles are a great way to turn an outdoor balcony into a terrace. But in this case, you will need to purchase ceramic tiles with a rough surface and high frost resistance.
At the same time, the adhesive for this material and the grout for joints must also have similar properties.
Specialists from construction companies know how to lay ceramic tiles. This work is more difficult to do than laying linoleum or painting the floor.
Ceramic tiles withstand various weather conditions well and do not tear or bend like linoleum. Such floors can confidently be called reliable and durable if you approach this issue correctly.
To do this you will need the following equipment:
- tile cutter,
- building level,
- mixer and drill,
- glue container,
- putty knife,
- grinder with dry cutter,
- diamond-coated crowns,
- rubber spatula for grouting joints,
- crosses.
It is better to lay tiles on the loggia floor along a stretched thread. In this case, you will need to indent one row from the edge. It is better to buy crosses for tiles taking into account its size.
During the installation of the first tile, it is necessary to check that it is level in each diagonal, both across and along. The next two tiles are laid side by side in the ladder. They also need to be controlled using a level.
When laying subsequent tiles, you no longer need to carefully check their level. Porcelain tiles are excellent for landscaping an open loggia in areas with harsh climates.
This material has maximum density and lacks a porous structure. It can withstand frosts down to -50°C and heat up to +50°C. This coating has high strength and wear resistance.
The surface on which porcelain stoneware or tiles will be laid must be smooth, strong, free of cracks and dirt, free of materials that reduce its adhesiveness.
Porcelain tiles are laid using the same method as floor tiles. But, unlike painting, the base will need to be leveled. Next, glue is applied to the floor and tiles. It is necessary to choose it taking into account the purchased porcelain tiles. As for the equipment, to improve the floor of a loggia made of porcelain stoneware you will need:
- capacity,
- drill and mixer,
- spatulas,
- tile cutter,
- roulette, level,
- rubber hammer.
The materials you will need to purchase are porcelain tiles, crosses, primer for the base, grout for joints, tile adhesive, and silicone sealant.
Decking and carpet - pros and cons
 Decking is a durable and lightweight material that is made from hardwood or wood-polymer composites.
The quality of decking is not negatively affected by precipitation and temperature fluctuations.
It is easy to install such a device, since the decking is presented in the form of modular structures that are fixed together in the same way as a constructor. You can lay such a floor on joists. Unlike tiles, decking is a lightweight material.
The benefits of using decking (terrace boards): easy and quick installation, smooth surface, easy maintenance, large selection of colors, high-quality imitation of wood of various species, including valuable ones.
To do this you will need the following tools:
- level;
- chisel;
- hammer;
- screwdriver;
- trim;
- Ruler and pencil;
- screws, nails;
- wedge.
According to experts, it is better to lay carpet on a glazed and insulated loggia. However, this device only needs to be laid on a flat surface. Permissible deviations should not exceed 4-5 mm. Otherwise, the base must be leveled and the carpet left on the balcony for three days.
Carpet can organically fit into any interior design. It provides a pleasant tactile sensation. This is an ideal solution when the loggia is converted into a relaxation room or office.
To lay this material you will need the following equipment:
- video clip;
- tool for cutting carpet plinths;
- kicker;
- iron for joining pieces of carpet;
- Double-sided tape;
- flus;
- glue.
There are other types of materials used to improve the floor on the loggia. It is better to choose the topcoat individually in each case.
Many people living in apartments need to carry out balcony repairs themselves, which means that the installation of the floor on the balcony should be done in the best possible way.
Housing prices today are very high, and a couple of square meters on the balcony will definitely not hurt anyone, especially if the apartment itself is small. For this reason, special attention should be paid to repairing the balcony and insulating its floor, because the largest amount of lost heat is lost through the floor.

Kinds
Depending on the purpose and purpose of the balcony, flooring technologies may be different. There are three main types, each of which varies in the degree of complexity of self-installation:
- flooring – the flooring is installed on a finished concrete slab;
- pouring, subsequently covered with ceramic tiles or similar materials;
- wooden floor.
All of the above options allow you to make a warm floor if a heating system is installed in the process. It can be electric or (not so often) water.
You should also pay attention to the fact that unauthorized installation of a heating pipeline connected to central heating is prohibited. To carry out this kind of work, you need to have a special permit, which can be obtained from the architectural supervision authorities.


What can it be made from?
There are several types of balcony floors. Like any other floors, they can be wooden, tile, self-leveling or polymer. Any type can be equipped with electric heating (cable or infrared):
- Polymer floors made from rolls of linoleum (possibly insulated) or from PVC tiles. They can be used both as an independent coating and as a decorative one.


- Self-leveling floors are made from special self-leveling mixtures based on cement or artificial resins.


- Tile floors made of tiles or ceramic granite. Not so often, but still, natural stone is used for their manufacture. The rare use of these materials is due to their heavy weight, which can have an undesirable effect on the balcony slab itself.


- Wooden floors are the most popular solution for balconies, since they are not as heavy as tiles and at the same time retain heat better. There are several main types of wood floors: parquet, tongue and groove boards, laminated wood.


Any coating, regardless of type, must be resistant to stains. It should also be durable and visually appealing.
When choosing the type of floor, it is necessary to take into account the design of the balcony. If the balcony is open, then the preferred option would be tiles, or simply a painted concrete slab. When choosing materials, you need to take into account how capable they will be of withstanding all seasonal cycles involving freezing and thawing. If the balcony is glazed, then almost any type of floor from those previously listed will be suitable for it.
Required Tools
You may find it useful:
- perforator;
- screwdriver;
- jigsaw;
- hammer;
- roulette;
- dowels;
- drill;
- marker or pencil;
- screws;
- acrylic or silicone sealant;
- cement or glue;
- Styrofoam;
- insulation or thermal insulation coating.
Preparing the slab and base
First you need to check the evenness of the surface of the balcony base. This is done using a building level. If the base is not level enough, you must first level it using a screed.

Next steps:
- The initial stage of installing a balcony floor is to pour the screed. In order for the screed to be level, you first need to solve the problem of leveling the floor. This is done by installing beacons, which are reinforced strips of metal. These strips are cut into a number of parts (depending on the size of the balcony) and installed at a distance of 60 cm from each other, perpendicular to the base.
- Beacons need to be leveled using a building level and a semi-dry solution with which they are fixed. In the case where the balcony is not glazed, you should make a slight slope towards the street. All beacons should be aligned separately. When the work is completed, final leveling should be done over the entire area.
There is no need to rush, the work must be done very efficiently and accurately.


- When the beacons are fixed and leveled, you need to leave them for a day so that they harden. You can prevent the solution from spreading by using formwork. To do this, you will need a block of wood or a board that is installed on the outside of the base. The remaining cracks should be covered with a thick solution. Once the pouring is complete, this formwork can be removed.

- Expanded clay is good for insulating screeds, which must be placed on the profile level, filling it along with it. You don’t have to worry about having to do this in one go, since the surface area is not that large. When the floor is poured, you should wait for it to completely harden, which will take a certain number of days.
- Once the floor has hardened, the final finishing can be done. Ceramic tiles can be a suitable material for this finishing.


Insulating the floor: step-by-step instructions
Insulation of the floor begins with the installation of wooden formwork on it. To do this you will need wooden slats:
- First of all, you need to measure the width of the floor using a tape measure. After this, you need to transfer the measurements to a wooden block using a marker or pencil. When the marking is ready, using a jigsaw you need to cut off part of the block to the required length, resulting in a wooden log. It needs to be attached to the attachment point, and then using an impact drill, drill holes in it at the same distance (30-40 cm). This must be done so that the holes are through, because the joist will be attached to the floor.

- Then you need to insert the dowels into the holes, drilled into a wooden plank and hammer them into the floor with a hammer. After this, insert screws into the dowels and hammer them in with a hammer. The log will thus be attached to the floor.

- When the widthwise bar is secured, you can take on the lengthwise bar. It is attached in exactly the same way. The only difference is the interval between the holes, which may be slightly larger (50-60 cm). Then several more planks arranged in length are attached, so that it looks like a “lattice”, between the planks of which foam plastic will be laid.

Installation of foam plastic and the second layer of formwork
- The foam is cut into plates and placed between lengthwise wooden planks. The width of the foam strips should be about 7-8 cm. For cutting, it is best to use a simple construction knife. After the foam has been laid, you should begin installing the second layer of formwork, the installation of which is carried out in the same way as the first layer, with the difference that the fastening will be carried out without dowels.
- The wooden planks will no longer be attached to the floor, but to the wooden planks of the first layer. Fastening, therefore, will be carried out using self-tapping screws and a screwdriver. When the second layer of formwork is ready, pouring should be done. The prepared cement or glue solution is applied with a spatula along the inside of the perimeter.
- After filling, you can begin installing the wooden planks along the width. There should be a distance of about 15-20 cm between them, which must subsequently be filled with another layer of foam. When all the planks are installed, you will need to once again eliminate all the gaps using cement or glue.


Laying insulation
When the solution hardens, it will be possible to lay insulation. It is important not to make a mistake with the installation side, installing it so that the reflective side is on top. When installing insulation, you must adhere to the following points:
- it must be laid with an overlap, so that the insulation extends 3-4 cm onto the walls and frame of the balcony;
- the remaining insulation must be rolled back into a roll;
- excess insulation is cut off using a construction knife;
- at the end it is necessary to straighten and smooth the material so that its surface is even.

When the insulation is laid and straightened, it will need to be fixed using wooden logs, the installation process of which has already been described earlier. In fact, now you need to mount another layer of “grid”, between the slats of which another layer of foam plastic will be laid, already the third in a row. The new layer of foam must also be secured on top with another layer of wooden planks.
At this stage, the installation of the floor can be completed by covering the resulting multilayer structure with clapboard. In another case, wooden slats that fit tightly together can be used for sheathing, on top of which the floor covering will be installed. To make the floor more durable, it is also advisable to lay the slats in two layers.

Cold floor covering options: installation steps
Wooden floor
In order to install a wooden floor on the balcony, the surface on which the installation will be carried out must be flat. There are two ways to level the slab:
- knock down bumps;
- complete the screed.

When the support bars are installed on a flat surface of the slab, You can begin installing and painting the sheathing. In the case where the screed is perfectly level, you can install the boards directly on the screed. However, with this option, the floor will be without insulation, air will not circulate in it, and it will be quite difficult to fit the boards. The positive side of using boards as sheathing is precisely the availability of the necessary space for insulation.
In order for the sheathing to be more durable, it is advisable to paint the boards or treat them with special compounds that prevent exposure to moisture and, as a result, rotting.
The bars are attached to the concrete slab using dowels and screws. The sheathing itself is assembled in the following way: first, a perimeter is made, and then longitudinal or transverse strips are installed at a certain distance from each other. If the balcony is long, it is preferable to lay the boards crosswise.


Laminate
Laminate is a fairly popular material for covering the floor on a balcony. The advantage of this material is the presence of several layers that provide:
- rigidity;
- thermal insulation;
- noise suppression;
- moisture resistance.

The top layer of this coating is decorative and contains a pattern. When choosing laminate as a floor covering on a balcony, you should take into account that this material does not tolerate exposure to water very well, so waterproofing is important when installing it.
The surface on which the laminate is laid must be flat, so before installing it, be sure to carry out all the relevant preparatory work, such as screeding and installing sheathing.
Between the sheathing and the laminate it is necessary to make a layer of substrate, the material for which can be polystyrene or cork. This layer should form an angle of 90 degrees with the laminate. The joints between the fragments of the substrate layer must be taped with tape.

It is necessary to carry out installation starting from the side opposite the entrance to the balcony. There are three options for laying laminate:
- diagonal;
- longitudinal;
- transverse
Each new row of laminate must be laid with an offset of 40 cm, as this will contribute to greater durability of the coating. A small (about 10 mm) distance should be left between the laminate and the wall. Laying such a coating is quite easy, since fragments of material are installed “in the lock”.

Plywood covering
A relatively easy to implement option for a balcony floor. As in all other methods, first of all it is necessary to level the surface of the balcony slab, doing this using a screed or by knocking down irregularities. Then logs are installed on the concrete base using screws and dowels, which should preferably be painted.

Next, the plywood sheets are cut according to the length and width of the balcony. It is advisable to carry out cutting using an electric jigsaw. This tool will make the edges of the sheets smooth, and the cutting process itself will be easy and convenient. When installing plywood sheets on the sheathing, you should leave a small gap. This is done so that the floors do not creak later.
In order for the plywood floor to be more durable, it is advisable to lay the sheets not in one, but in several layers. A finished plywood floor can be either an independent covering or a good base on which you can lay linoleum or carpet.
Ceramic tile
Another possible option is to cover the floor on the balcony with ceramic tiles. This option is also quite easy to implement. You should pay attention to the surface of the tile: it must be textured or rough, but not glossy, otherwise the floor will be slippery.
You can handle laying tiles on the balcony yourself.
 (1 ratings, on average: 5,00 out of 5)