How to make a pond at your dacha with your own hands. Pond at the dacha with your own hands How to make a small pond
Sometimes in the summer, on a hot day, you want to relax in nature near a small lake or pond. It’s great if such a body of water is located nearby your place of residence. But, for the most part, we have to relax in our free time in the summer on our garden plots or dachas. And many of us, unfortunately, have the money to build even a small country house and pay for the services of a landscape designer. A person has no other choice but to arrange a pond at his dacha on his own. By the way, it’s not difficult to do and quite realistic. This, as a rule, depends on your desire, effort and personal imagination. Therefore, this article from the construction portal will tell you how to make a pond at your dacha with your own hands step by step.
Important information
So, if you are going to build such a structure at your dacha, then first you need to decide on the place where you want to locate this reservoir. We advise you to immediately determine the size and shape of the future pond. Remember that these configurations and dimensions directly depend on the area of the future pond. The larger it is, the more convenient its further operation and maintenance will be.
A small pond will have to be removed and cleaned much more often than a large one. If you decide to plant a large number of plants in it and have a variety of fish, then it is better not to consider a pond with a small area as an option, because the internal microclimate will be disturbed and it will be difficult to maintain the desired eco-balance in it.  As for choosing a future location, you should choose a future location for a reservoir in an open area. Remember that the pond should be in a quiet area and not subject to strong wind gusts. You should not choose an area with bright lighting. It should be located in a place that is protected from direct sunlight entering the water (more than 7 hours), because in the future the pond will be susceptible to flowering. And its inhabitants will be only frogs. But if there is not enough light, then plant growth will sharply decline, and you are unlikely to see the beauty of this reservoir.
If your plans include installing a small fountain, then you will need to prepare a diagram of the reservoir for proper connection of special equipment. With a little effort, you can make the circuit yourself.
Do not forget about the distance from the pond to the electrical system. If you place a pond under trees, this can lead to the fact that falling leaves from them will lead to water pollution and this pond will need to be cleaned much more often. Also, tree roots can cause damage to the tank, and the pond will begin to dry out.
Pay attention to the site publication: How to make a pipe bender yourself

Setting up a home pond on a rigid basis
If you want to thoroughly equip a reservoir, then you should dig a large pit and cast a large bowl of the reservoir using cement and reinforcement. This design will serve you for many years (at least 25).
If you plan to make the pond small, then you can choose a cheaper and lighter option.
Let's find out below how to arrange a country pond yourself? So, the simplest and most affordable method is to purchase a ready-made “bowl” from a specialized store. But the big disadvantage of this method is that you will have to choose the shape of your future pond that is offered for sale. From less expensive options, you can choose a plastic pond with a total area of 5 to 9 sq.m. Naturally, there are larger forms, but this is no longer a pond, but a pool and their cost is much higher.
Before purchasing the design you like, you should ask the seller about its depth. It must have a depth of at least 1 meter. The water in this container will quickly warm up in the summer, and in winter it will not freeze to the bottom. Which in this case is one of the main factors. If you are going to build a pond yourself, on your existing summer cottage, and want to use a ready-made form as the basis of the reservoir, then first you need to familiarize yourself with what materials are used in the manufacture of this product.
A container made of plastic is the cheapest option, but when choosing this product you will need to take into account its disadvantages. When delivering and further installing this product, you should be careful, as the container can easily burst if a slight impact or bend occurs. Materials such as plastic are very susceptible to destruction from exposure to sunlight. Based on this, the operation of such a pond will be short - approximately 4-7 years. To achieve a longer service life, it is necessary to choose a container made of reinforced plastic. This material will last you much longer than usual. Such forms are less susceptible to ultraviolet radiation and their properties are much more plastic than products made from conventional plastic.  A more expensive, but also high-quality product is a fiberglass container with a rubber base. This product can withstand temperature changes, will not be deformed or destroyed by sunlight, and the components included in it are environmentally friendly and are not dangerous for residents of the reservoir. The service life of such a pond will be approximately 30-35 years. It is easy to repair, which, in turn, increases its operation several times. Arranging such a reservoir is not a very difficult job. As a result, you get a place to relax that is beautiful in shape, color, and aesthetically pleasing in all respects.
We build a pond on our summer cottage ourselves
This publication will tell every reader how to make a pond in your country house with your own hands. In general, remember that in order to arrange a pond yourself, you need to choose a place for it on the site and decide on its future shape. Let's say this stage of work is completed. Now we need to prepare for construction work.
- First you need to mark the contours of the future pit. They are quite easy to make. Using a shovel you need to make an edging of the silhouette. 25 cm should be added to the manufactured contour to allow sand to be added to the pond. If you bought a container that has ledges, you need to dig out each finished level separately, gradually reducing them. You should add 12-17 cm to each resulting level for future addition of sand.
- After you have made the pit, its edges will need to be leveled, compacting it with a shovel. It is also recommended to remove all unnecessary debris and the root system of shrubs or trees from the pit. If this procedure is not followed, the form may be damaged.
- Next, we start pouring out the sand. Each layer must be at least 15 cm; in this case, subsidence of the pond will not occur in the future.
- Then we install the plastic container. It is necessary to carry out this work carefully, using a building level to ensure level installation of the bathtub.
- After the container is installed, you need to carefully pour water into the container, filling it one third. The space remaining between the edges of the pit and the container should be carefully filled with sand. Make sure that all voids are filled. To do this, you need to regularly water the soil. The water pressure in this case should be small.
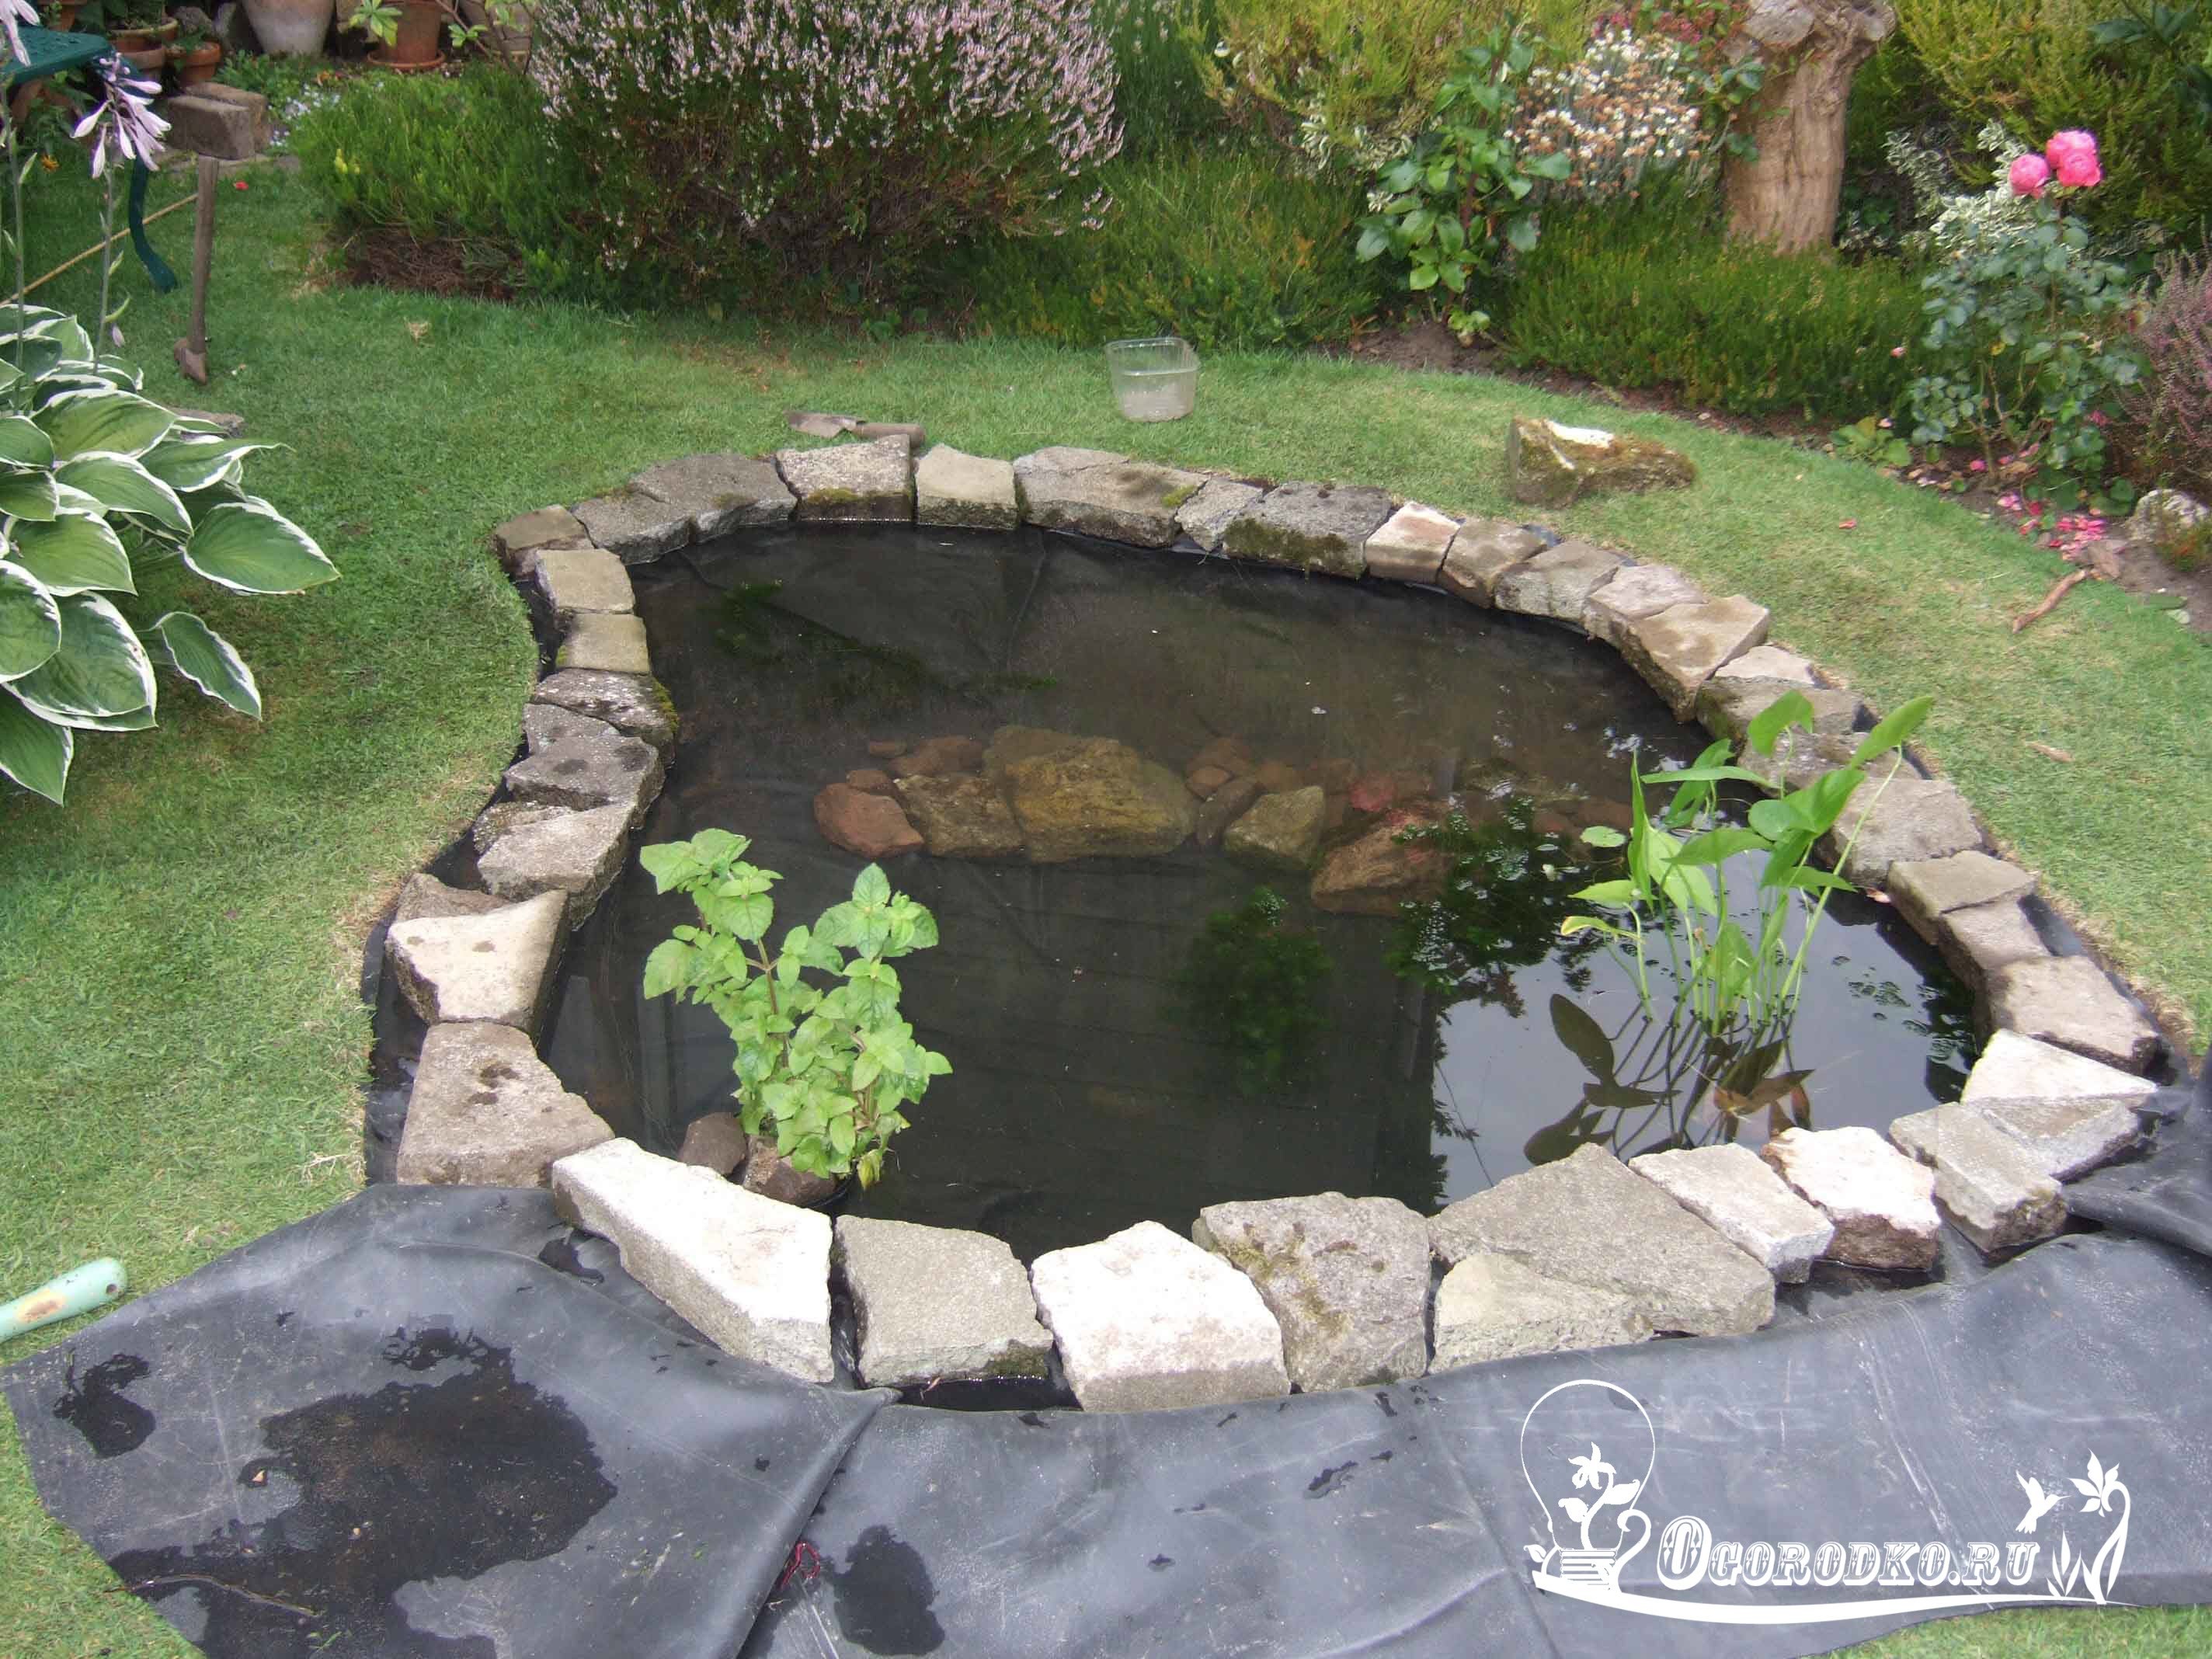
- After installing the container, you need to continue watering the soil around the reservoir, and if necessary, add sand. After the soil stops settling, the container can be completely filled with water. Using stones, decorate the edge of the bowl and plant plants.

Country pond made of flexible materials
Above we talked about how to make a pond at your dacha with your own hands. Now we will tell you about what options there are for making a pond yourself, if you cannot buy a ready-made bowl, but want to build a large pond of an original shape.
So, one of the most affordable options in this case can be polyethylene, 600 microns thick. Although its cost is low, this material has quite a lot of disadvantages.
Polyethylene is very thin in composition, so it can be torn, and under the influence of ultraviolet radiation, it begins to quickly deteriorate. The service life of a reservoir made of a polyethylene backing will, alas, be very short, approximately 3 -3.5 years.
A material such as PVC film is quite cheap, but its composition is much stronger than polyethylene film. Its service life will be 9-10 years. PVC coating can also consist of two layers, with a fabric base. This material also, unfortunately, has a lot of disadvantages. It is also susceptible to destruction from the sun, like polyethylene. But there is one main difference - you can always repair it. So-called repair kits are available for sale. In addition, PVC film has good elasticity and stretches well. And a large number of folds created as a result of filling the pond with water straighten out after a while.
One of the most expensive coatings, but also the highest quality, is butyl rubber. The service life of this material is 50-60 years. It is not subject to temperature fluctuations. Indeed, neither frost nor sun are afraid of him. It has excellent properties - flexibility and ductility. Withstands heavy loads. So if your plans include the construction of a large pond of a bizarre shape, then you will not find better material.
 The next step will be marking the pit. To make a pond yourself, you will need to use various materials. You will need:
- sand,
- pebbles,
- rope,
- felt,
- film,
- shovel,
- repair kit for film coating,
- bricks,
- irrigation hose,
- building level.
Using pegs and rope, you need to mark the shape of the pit that you want to make. To equip a large reservoir when performing earthworks, you can use excavators. You should carefully ensure that the levels alternate with each other.
This method is necessary to create more stable shores of a reservoir. It is also worth not forgetting about the terraces (about 25 cm wide) necessary for planting plants. The slopes of the ledges from each other should be gentle. The angle of inclination in this case should correspond to 45 degrees. Do not forget that the depth of the future reservoir should be 90 cm. If this distance is less, then with the onset of winter, all the water in the pond will freeze, and the inhabitants of the reservoir will all die. It follows that it is necessary to make a pit 20-25 cm larger than the planned size of the pond. This is necessary to add sand to its bottom and onto the terraces in order to eliminate future subsidence of the soil and damage to the base of the film. The sand embankment must be thoroughly leveled and compacted properly, having previously removed all debris, stones and roots from the bottom.

Drainage and waterproofing
- Once the embankment is ready, you can proceed to the next job. In order to preserve the integrity of the film intended for the reservoir for as long as possible, geotextiles should be laid on a layer of sand, preferably in several layers.
- After that, we level the film and secure its edges to the banks using bricks. No, there is no point in trying to smooth out all the wrinkles that appear on the film. They will subsequently be straightened out by water. Try to place the irrigation hose so that one of its edges is placed in the center of the pond, and gradually begin to supply water with low pressure. When filling the reservoir evenly with water, you need to partially release the edges of the film and level it along the ledges of the pit. After the pond is completely filled with water, it is necessary to stop any work for 2-3 days. During this time, the film will begin to gradually smooth out under the influence of water and as a result, all the voids in the pond will be filled.
- After its final subsidence, we proceed to cutting off the remaining parts of the film, leaving 45-50 cm for further decoration of the banks. We secure the edges of the film with pegs and small metal arcs. In the future, they will be hidden by ornamental plants and various stones and pebbles.
- Now we install the pump and begin to plant ornamental plants.

Pond above ground at the dacha
From this article, every reader will be able to learn how to make a pond at the dacha with their own hands step by step. In addition to useful information, in this article we will show an interesting video.
If there are small children in the family, then the most important task in building a reservoir is to ensure children's safety. In this case, it is necessary to arrange the pond slightly above the surface of the water. This method will not only facilitate its further operation, but will also make the pond safe for children. It will be necessary to use a reinforced concrete foundation for this. Let's describe in detail how to build such a pond.
- To begin with, you should dig a pit in the deepest part of the pond, and then make terraces for future plants, as described above.
- Along the banks of the reservoir, using formwork, it will be necessary to fill the foundation of the required height.
- After it has completely dried, the wooden formwork can be removed, and the internal parts of the resulting walls can be treated with plaster to make them smooth. By using this method you will avoid damage to the film.
- We cover the finished bottom of the pit with film and begin to fill it with water.
- When securing the edges of the film, we leave them behind the manufactured fence. After the pond is filled with water, let it settle for some time.
- Then we begin to trim the excess edges of the film, secure it, and create the decor of the edges of the pond.
 It should be noted that arranging a pond on your own is not an easy task. But if you approach this wisely, the resulting result can exceed all your expectations and delight you for many years. In this case, you should also try to properly and regularly care for your pond. Here are a few examples of equipment that you will probably need:
Equipment designed to remove debris from the water in your pond. These can, as a rule, be all kinds of scissors, nets or devices for cleaning the bottom.
You will also need radio sockets in order to connect to the network of fountains installed in a pond, or a filter for water purification.
If you want to add fish to a pond, then you will definitely need equipment such as water filtration units and various UV lamps.
You cannot do without a pump designed to pump water out of the pond. It also ensures its constant renewal, and in winter it drains the reservoir.
A decorative pond in a dacha is a unique element of landscape design, an object for pleasant contemplation. In addition, the pond will humidify the air and improve the illumination of the garden, thanks to the reflective surface of the water surface. If you are thinking about arranging a personal artificial pond, you immediately need to wisely choose the style, lighting and decorative elements.
Choosing a location for a pond
The choice of place to create a reservoir depends on many factors: soil, landscape, relief, lighting, and the presence of vegetation should be taken into account.
| Relief and soil | When choosing a place for a future pond, it is better to stay in an area that remains wet for a long time after rain. Obviously, somewhere in the soil layers in this place there is clay or loam. If the choice of places is limited, then it is always better to choose low-lying areas. |
| Illumination | The correct choice of lighting will make it possible to avoid strong growth of algae and flowering of the pond. The ideal option is that at noon the shading reaches at least 40% of its area, and the total illumination reaches 6 hours. |
| Neighborhood with plants | The pond should be set up in an open place, away from tall vegetation, which will pollute its surface with leaves, seeds, and debris. |
| Landscape | The pond must fit harmoniously into the landscape of the site. Often it settles down in front of the house or near the gazebo. |
There are some specifics if the pond is planned to be equipped with live fish: for example, with koi carp. In this case, it will be important to provide them with optimal water temperature, which depends on the breed of fish.
Excavation and waterproofing works
You have chosen a place for the pond and determined what shape it will be. Now it's time to dig the pit. First, turning points and contours are marked with pegs. Then terraces are torn off, 30 cm deep and 20 cm wide. Several levels of terraces can be formed to place plants on them.
Now the main bowl is dug out. The slope of the banks should be approximately 45 °C. The walls of the bowl should taper downward to prevent soil from crumbling and reduce the load of water mass. The minimum depth of the reservoir should not exceed 60-80 cm: a shallow reservoir will freeze completely in winter and become very warm in summer, which will make it impossible to breed flora and fauna.
If waterproofing with film is planned, to secure it, a ditch about 15 cm deep is torn around the perimeter. After the foundation pit is ready, its bottom is leveled, all stones and roots that could damage the film are removed. The surface is covered with clean, washed sand to a depth of 5 cm, and a monolithic slab of M150 concrete is poured on top. After hardening, it is completely covered with geotextile fabric. All these measures will protect the waterproofing film from damage and extend its service life.
The next step will be waterproofing - laying butyl rubber or PVC maple. The size of the canvas is calculated from the total length of the pond and twice the depth. To secure the canvas along the edge, about half a meter of reserve is enough. The sheet is laid out freely, securing the edges with bricks along the edge. To eliminate the negative impact of groundwater, a reliable drainage system is created, which is also included in the waterproofing system.
All of the above waterproofing work is carried out before concreting, if this form of waterproofing device is chosen. When creating small ponds, concrete work is first carried out, and then the concrete surface is treated in several layers with a mixture of Hydroshield.
Do-it-yourself concrete foundation installation
Concrete work begins before waterproofing with the casting of a base plate made of M150 concrete, which is designed to protect the reservoir bowl from ground movements. On top of this slab, after it dries, waterproofing is laid.
After the base for the bowl has been dug, a drainage system has been installed, a sand and gravel cushion 20-30 cm thick has been poured, a concrete preparation 10 cm thick has been poured, and the walls of the pool are reinforced. For this you will need reinforcement A 12 mm. The rods are connected with knitting wire in the form of a mesh with cells of 20 x 20 cm.
Installing mortgages is an important stage of work. Before the start of formwork work, the following components are installed: bottom drain, nozzles, lights, skimmers. Electrical wiring is also being installed.
The formwork is installed using moisture-resistant plywood 15 mm thick and wooden support beams. High-quality formwork will help save material and other leveling agents.
Concreting is carried out with high-grade heavy concrete with plasticizers. The walls vibrate to prevent voids from forming. It is more convenient to fill the bowl in 2 steps - first the bottom, then the walls. To prevent water from penetrating through the cold seam of a leaking joint, a self-expanding bentonite cord is placed into the joint when pouring, which increases 6 times when exposed to water.
The pool bowl is leveled with a layer of plaster. Using plaster, you can achieve a perfectly smooth pool bowl. The plastered surface of the bowl has no cracks, voids, depressions or other irregularities.
Devices for creating water effects and lighting
If the pond was originally planned with the use of water effects: fountains, cascades, jets, then an underground, waterproof electrical cable must be connected to it in advance. Lighting and pump can be connected to one source.
What energy design elements can be introduced into the design of a pond at the dacha:
- A closed-circuit fountain, where a pump from a reservoir drives water into the fountain bowl, from where the water flows back into the reservoir. Subsequently, the water flows back into the tank.
- It is better to place a cascade or waterfall on the shore, where it will be in harmony with the alpine slide.
- For illumination, you can use lamps located in the water, above the water, and even built into the body of the fountain. Along the contour you can install garden lamps that are recharged from the sun and provide light in the dark.
Aquatic plants in design
There is a huge variety of aquatic plants. In order for the pond design to look attractive and function properly, the following types of aquatic plants must be present in it:
- Oxygenators are plants that produce oxygen. They carry out biological water purification and are food for fish (for example, koi carp). These include swamp turcha, hornwort, spicate urut, and water star.
- Floating plants serve to decorate the pond's surface. They can be placed in containers on underwater terraces. The most popular are duckweed, watercolor, azolla, and thick-petioled eichornia.
- For shallow ponds, deep-water plants are used in combination with floating ones. They are also planted in containers. The easiest to care for are water lily, egg capsule, and apongeton.
- Embankment plants are necessary to decorate the contours of the pond and to protect the water from overheating. Typically, low embankment plants are used for these purposes: fern, thuja, barberry, juniper, etc. Other plants planted in pots also look good.
Design of banks and reservoirs
There are many ways to design the shoreline of a reservoir:
- the use of large stones of different shapes. The main types of stone used for decoration are marble, granite, sandstone, quartzite, etc.;
- construction of decks and bridges from logs;
- decorating the shore with slabs or tiles;
- with a special decorative film, immediately covered with a layer of gravel and imitating a rocky terrain.
When choosing a design method for a reservoir, you need to take into account its size and shape. The size of the stone should be proportional to the pond itself. Large stones will harmoniously combine with a large pond, and small ones with a small one. Ideally, the shape of the stones should be similar.
Large boulders are placed around the perimeter so that part of the stone hangs over the water. There is no need to make a continuous coastline of stones. Plants and stones should alternate in random order in the edging of the reservoir. After placing all the stones, they need to be fixed in cement, buried in the solution to a third of their height.
It is better to edge reservoirs of strict geometric shapes with similar materials: tiles, logs, boards.
Stylistic design
The design of the pond can be different - the main thing is that it is combined with the landscape of the site. A variety of stylistic solutions allows you to create amazing compositions that demonstrate the beauty of the water element.
Chinese
A pond is an indispensable companion of Chinese gardens. Traditionally, a path of large boulders should lead to a Chinese pond, and the banks should smoothly descend into the water. A small wooden bridge was often thrown across the pond, and a gazebo was placed next to it for contemplation and tea drinking. Koi carp and lotus are a typical feature of a Chinese pond. A Chinese-style pond is decorated with bright and lush vegetation.
French
The French pond is an example of elegance and sophistication and at the same time severity of form. It attracts with its clear boundaries and neat shape. Typically, French-style banks rise above ground level. This style features fountains, cascades, steps and sculptures.
Italian
A characteristic feature of the Italian pond is its symmetry. A pond of regular geometric shape, usually with a decorative fountain or cascade type, is located at the head of the garden. Since Italian landscapes are regular, compositional, and terraced, the pond may also have several levels. The banks are framed by a variety of ornamental plants in terracotta pots, or in tubs and beautiful containers. Italian ponds are often decorated with street lamps.
Japanese
A Japanese pond should resemble a natural one as much as possible. You will never find rectangular ponds in nature, so there are none in the Japanese style. A Japanese pond may have a waterfall, but not a fountain. In general, the art of creating a Japanese pond is similar to creating a bonsai - everything is real, but in miniature. The pond should look like the ocean, the pebble on the shore should look like a rock rising above the ocean. On the shore you can place a sculpture depicting Buddha, a dragon, an animal or a bird so that it is reflected in the water surface.
English
An English-style pond is much easier to arrange, since it does not require clear boundaries. The lines of an English pond should be smooth. An English pond is usually created as a landscape type - trees and shrubs grow in abundance around it. English ponds look natural.
After constructing a pond at your summer cottage and designing the landscape, you will have to take care of the reservoir. What is included in the concept of care:
- In spring, the filters and pump are usually turned on in mid-April. Immediately you need to carry out bottom cleaning and clean the surface of debris. At the same time, annual plants are planted.
- Tropical plants have been planted since June.
- Bottom cleaning should be regular and done using a bottom vacuum cleaner.
- In summer, a skimmer must be used to remove debris from the surface of the water.
- In summer, thread algae must be removed. If oxygen generators do not have time to clear the water of green algae, you can use special chemicals - algaecides.
- Water lilies and irises need to be fed with fertilizers.
- All summer it is necessary to monitor water quality with special tests.
- In the fall, tropical plants are removed from the pond, placed in containers with water and placed in a bright, frost-free room for the winter.
- In the fall, during the leaf fall period, it will be more convenient to cover the surface of the pond with a fine mesh so that the yellow leaves do not sink to the bottom, and to remove it by winter.
- In winter, the water from the pond is drained. It is necessary to drain water from all pipes and hoses. Remove and clean filters and pumps.
Conclusion
A pond on a garden plot is prestigious, fashionable and simply beautiful. If maintaining a large deep pond with fish is quite troublesome, then building a small pond with your own hands is within the means and within the power of even the owner of a small plot.
It's not difficult at all. It can be made in any size depending on the space on the site that you would like to allocate for it. The rules for arranging such an element of landscape design will be approximately the same, regardless of size. On a summer day, it’s endlessly pleasant to relax near a body of water you’ve created with your own hands and proudly show it off to guests. Any owner of a summer cottage can create a beautiful garden pond, arrange the banks, and populate it with colorful fish. Everything will depend solely on your imagination.
How to determine the location for a pond
To make a pond on your own property functional and attractive in appearance, first try to determine a convenient location for it.
It would be ideal to start constructing a pond in a free area that is not under the scorching sun, but also not shaded by trees. If you think you have found a suitable area, pay attention to how it is lit. Poor lighting does not allow planted plants to develop calmly, and this negatively affects the appearance of the reservoir.
It is not very good to build a pond in a completely open area, where there will be real sunshine on hot days. Single-celled algae love light, they will grow more and more and cause water blooms. If you have a shallow pond, animals and plants will not feel comfortable in hot weather and may die. And the owners are unlikely to enjoy relaxing in the sun. It is better to choose an area to create a pond that is not surrounded by trees, next to which there is a building or a fence. Then at midday the pond will be in the shadow cast by them, and the sun's rays in the evening and morning are not so hot and will not damage the structure.
Do not try to place the pond close to trees. Their roots grow imperceptibly and after a while they can damage the bottom - tear the film or move the mold.
If you intend to decorate the pond at your dacha with your own hands, arrange lighting, filters, using a pump, also take into account the proximity of the source of electricity.
A pond at the dacha made from a special plastic mold
If you want to create a beautiful landscape at your dacha with the addition of a pond, but don’t want to bother with the correct arrangement of the bottom, you can purchase a ready-made form for it. They are cast in production conditions from fiberglass or plastic. Such a container can last at least 10-12 years; it has good resistance to temperature and sunlight. But when installing a plastic mold, you should perform all actions more carefully, otherwise there is a risk of damaging it. Cracks that appear on the surface cannot be effectively closed.
Fiberglass is a more expensive material, which is also used to make molds for a garden pond. It is extremely durable and can last for many years. When using this option, the service life of the reservoir will be twice or three times longer than in the previous case.
The first step to setting up your own mini-pond is choosing and purchasing a form for it. It will need to be built in the ground. To get a pit whose shape exactly matches the required one, transfer the contours of the future pond to the surface of the earth. It should be done this way. Place the purchased plastic bowl on the ground, then start sticking sticks around it, stepping back from the outline by about 15-20 cm. Stretch a rope between the sticks. Then move the plastic base aside and dig a hole, being careful to follow the intended shape. The edges of the pit should be 30 cm higher than the height of the bowl. It is necessary to ensure that the location of the pit is horizontal. To do this, use a flat board or a building level.
Place a layer of sand at the bottom of the pit - this will be the basis of the pond. Place the mold in the prepared hole, fill with sand the free space remaining between the plastic and the edges of the pit. Then spray the sand layer with water from a hose to facilitate shrinkage.
Fill the mold with water. The banks can be decorated with stones. When starting to create a country pond with your own hands, you can view photos on the topic in advance to decide on its appearance. You can arrange beautiful stone banks, close in appearance to natural ones, and plant plants.
How to create a pond from film
You can build a pond at your dacha with your own hands from waterproof PVC film or butyl rubber. The option is convenient because the owners of the site choose the shape and size themselves. Polyvinyl chloride film is resistant to ultraviolet radiation, tolerates temperature fluctuations well, and does not lose color for a long time. It can last 10-15 years. Butyl rubber is somewhat stronger and more durable, but also more expensive. It should be used for reservoirs that are planned to be deep enough. It is worth buying the material with a small margin in order to thoroughly secure it around the edges.
The step-by-step construction of the reservoir will look like this:
- Creation of a pit. If you are going to plant plants in water, you can arrange shelves for them along the edges of the pit - ledges with a depth of 15 cm.
- When digging, try to carry out the work so that the walls of the pit do not crumble. If the soil on the site is clayey or black soil predominates, you can safely make them vertical. When working with sandy soils, the walls of the pit should be made inclined.
- After digging, remove roots, stones, and any large formations that may interfere with the work. The film should be protected from possible mechanical damage and ruptures. To do this, place a sand layer at the bottom or cover it with geotextiles.
- Lay the film over the sand layer and place stones along its edge to secure it. If ledges and steps were created during digging, do the same for them.
- In addition, you can dig a shallow groove with a width of 20-30 cm around the reservoir. This will allow the stones that fix the film to be flush with the surface of the earth. To enhance fixation, you can fill them with cement.
- When the container is completely ready, it’s time to fill it with water and plant the plants.
Equipment for a decorative pond from an old bathtub
You can make your own pond at your summer cottage out of anything. For example, if you have a bathtub that has fallen into disrepair, it can be used as the basis for a pond.
In this case, the pit is dug depending on the size of the bathtub - about 20 cm is added to them. When you lower the bathtub into the prepared pit, its edges should be lower than the surface of the soil. Dig a groove along the perimeter of the resulting hole - its height and width should be 30 cm. Place the bathtub in the pit and give it a strictly horizontal position, using a level to determine it. Fill the voids formed on the sides with soil or sand. At this stage, the base of the pond should look like this: a bathtub dug into a hole with a small groove surrounding the perimeter.
The next step is to mix the tile adhesive mixture with water, to which the pigment of the desired shade is added. Glue should be applied to the inner surface of the pond blank. Do not try to level it well - the sides of the bathtub should acquire a dark shade close to the natural color of the soil and a similar structure. Then cover the structure with film and leave it alone for one day - you need to wait until the glue has completely hardened.
Place a special metal mesh along the edges of the bathtub for fixation. Cut out fragments of the desired shape and lay them around the perimeter of the bathtub; it is necessary to cover the edges and internal surfaces to approximately half their depth. The bottom should remain open, and the walls of the container and its edges should be covered with mesh.
Now you should prepare a fastening solution from cement, water and sand. It is applied on top of the mesh, without particularly trying to level the surface. Additionally, stones are inserted into the thickness of the solution from time to time - this will help further strengthen the mesh and make the appearance of the pond more natural. The drain must be carefully cemented.
Where the mesh covers the edges of the bathtub, it is appropriate to place large stones. They will be able to emphasize the shape of the pond and give the banks a natural look. It is not necessary to maintain a geometrically strict rectangular shape - on the contrary, you can lay out the fragments along the edges in waves, in the form of steps, visually expanding the banks. Unevenness and hills that imitate natural relief look interesting. Here and there, instead of large stones, add handfuls of crushed stone. Give the pond a beautiful outline, focusing on your own taste.
Pour clay into the bottom of the bath, add water and knead the solution. Spread it on the sides, covering the cement, and fill the voids formed between the stones. This solution will dry quite quickly - after a few hours you will be able to pour water inside. Plant aquatic plants in the grooves around the pond. In a few days the water will become a little cloudy, the appearance will become natural, and it will be difficult to guess the true origin of the pond. You can read in more detail.
How to revive an artificial pond
When creating their own pond, many land owners dream of having fish in it or at least decorating it with vegetation. Then your home pond will turn into a real work of art. To choose a beautiful appearance for your building, you can watch a video on the topic.
When choosing plants for planting, remember that some of them can grow favorably only at a certain depth. If the water thickness is no more than 30 cm, you can plant yellow iris, marsh marigold, and heart-shaped pontederia. With a pond depth of 30-50 cm, you can choose common arrowhead, reed, and broadleaf cattail. Plant water lilies, lotuses, and water hyacinths in a pond more than half a meter deep.
You can put crucian carp, veiltails, and some varieties in your home pond. These fish are the most unpretentious and are able to live in the conditions of such a reservoir. But you should know that when introducing fish into a pond, you should: Without it, water will deteriorate, and this will quickly affect the decorative features, and the health of the fish will suffer if they swim in dirty, muddy water with an unpleasant odor.
To do it yourself on the site requires a lot of effort, but the result is worth it. You can create yourself a beautiful one, decorated in full accordance with your tastes. The contemplation of the water surface, which is bordered by tastefully selected plants, has a calming effect. Relaxing in the heat near a pond you made yourself is surprisingly pleasant.
In order for the pond to last longer, it should be emptied of water during the winter. The exception is ponds made from plastic molds: if you empty them during the cold season in the spring, you can end up with a twisted, crushed shape.
How pleasant it is to spend a few hours by a shady pond or lake in the hot summer! Of course, it's great if there is one in the neighborhood. However, most often we spend our free summer days at the dacha, and not everyone has the funds for a large country house and the services of a landscape designer. In this case, there is nothing left but to make a pond with your own hands, especially since it is not so difficult.
It all depends on your imagination, the size of the area and what you have on hand. If you put in a little effort and money, your dacha pond will not only delight you, but also cause the burning envy of your neighbors.
The size and shape of yours primarily depend on the area of the plot allocated for these purposes. But the larger the pond area, the easier it is to care for - a small one needs to be cleaned more often. If you plan to have fish and plant a lot of aquatic plants, then a small pond will not suit you either, because it is very difficult to maintain the correct eco-balance in it.
The best place for a home pond will be an open part of the site, at the same time protected from strong winds. You should not place the pond in a well-lit place: the location should be such that the sun's rays do not fall into the water for more than 6 hours in a row, otherwise it will bloom and only frogs will be able to live there. A dubious prospect, right? At the same time, if the lighting is insufficient, the plants will develop slowly, and you won’t get a beautiful place to relax.
If you decide to build a small fountain, you will definitely need a pond diagram in order to properly connect the pump and other equipment. With a little effort, you can draw up a plan yourself. Of course, you will also need to consider the proximity of the power supply network.
You should not locate your home pond under the canopy of trees. Firstly, this will lead to additional contamination of the water with fallen leaves, and the pond will have to be cleaned much more often, and secondly, the roots of the tree can damage the bed of the tank, and it will quickly dry out.

And, of course, the whole idea will become useless if you cannot enjoy the beautiful view from the window or from the terrace, so when planning to make a pond on the site with your own hands, do not forget about the aesthetic side of the issue.
Home pond on a rigid base
If you are a supporter of solid, durable construction, then you can approach the process on a grand scale: dig a foundation pit of sufficient size and, using metal reinforcement and cement, cast a reinforced concrete bowl for the pond. Such a design will certainly cost a lot, but it will last for many years (at least 30). If you are not a follower of the global approach, you can get by with a simpler and cheaper option.
So, how to do it One of the most basic ways to make your dream come true is a ready-made “bowl”, which can be purchased in a store. Perhaps the main disadvantage of this option is that you will not be able to come up with your own original shape for the reservoir; you will have to be content with the offered assortment.
The most inexpensive solution is a small plastic pond, from 4 to 8 m2. Of course, there are larger molds, but they already belong to the category of pools and are much more expensive. When choosing a container, you should definitely pay attention to its depth - it should be at least 0.8-1 meters. In summer, the water in such a pond will warm up completely, and all its inhabitants will be comfortable, but in winter, such a pond will not freeze to the bottom, which is also very important.

If you decide to organize a pond on your site with your own hands and want to use a ready-made base for this, then first of all you need to study the materials from which the forms are made - there are also several nuances here.
The simplest and cheapest option may be a regular plastic container, but it has its drawbacks. First of all, you need to be very careful when transporting and installing - such a tank can crack even with slight bending. Also, plastic tends to degrade from sunlight, which means that the service life of such a product is not too long - 5-10 years.
If you want your pond to last longer, choose forms made of special reinforced plastic - they have a much longer service life (up to 20 years). Such tanks are more flexible and less susceptible to ultraviolet radiation.
The highest quality and, of course, most expensive are products made from fiberglass on a rubber base. This form is resistant to temperature changes, does not deteriorate from exposure to sunlight and does not release harmful substances into the water, which is very important for the inhabitants of the reservoir. Such a tank will last more than 30 years, in addition, it can be repaired, which extends the time of use for an almost unlimited period.
Constructing ponds from a fiberglass bathtub is a simple process, and the result is quite aesthetic, since these forms come in different colors, and some are even coated with a coating that imitates stones, sand or small pebbles. This allows you to beautifully disguise the edges of the pond and give it the most natural look.
We build it ourselves
So, in order to build a pond on the site with your own hands, first of all you need to decide on the location and shape of the reservoir. Have you decided? Let's start construction work:
- First, we mark the outline of the pit. This is very simple to do - place the shape in the desired place and outline its silhouette using a regular bayonet shovel, pressing the handle tightly against the edge of the bath.
- Add about 20 cm to the resulting outline to fill the plastic pond with sand.
- If you purchased a form with ledges, then each level needs to be marked and dug separately, from largest to smallest, and do not forget to add 10-15 cm on each floor for a sand base.
- When the pit is ready, its edges should be thoroughly leveled and compacted, all glass, stones and tree roots should be removed. If this is not done, the mold may be damaged. Then you need to pour and carefully compact sand in a layer of at least 10 cm - this will protect your pond from subsidence.
- Place the plastic mold and make sure that it is level, you can use the rule for this. Then carefully fill the pond by about a third with water, being careful not to move it.
- Carefully fill the gaps between the edge of the pit and the mold with sand. In this case, you need to make sure that there are no voids left. Why periodically water the soil with water, but try not to let the pressure be too strong.
During the week after installation, regularly water the soil around the pond and add sand as needed. After the soil subsidence stops, you can completely fill the reservoir, decorate the edges of the pond bowl with stones, flagstone and plant ornamental plants.

Country pond made of flexible materials
Now let's talk about how to make a pond on your site if it is not possible to purchase a ready-made container or you want to arrange a large pond of a bizarre shape.
The most budget option in this case would be to use ordinary polyethylene with a thickness of at least 500 microns. However, despite the fact that it is quite inexpensive, this coating has quite a lot of disadvantages. The fact is that polyethylene is a fairly thin material, it is very easy to damage, and under the influence of sunlight it becomes brittle and quickly collapses. A pond on a polyethylene backing will last you a maximum of 2-3 years.
PVC film for a pond is also not a very expensive material, but much more durable; such a coating can withstand 8-10 years. Polyvinyl chloride coating can be regular or two-layer, in which a woven mesh is laid for strength. Of course, PVC has the same disadvantages as polyethylene - it is destroyed by ultraviolet radiation, it is easily cut and torn, but, unlike the latter, it can be repaired. Special kits are sold for this. In addition, PVC has better stretch, and after filling the pond with water, most folds will stretch and straighten over time.
The most expensive, but at the same time the highest quality coating is made from butyl rubber: the service life of such material is about 50 years, and it does not mind the sun's rays. Plus, butyl rubber is resistant to low temperatures, so you won't have to drain your pond in the winter. This is a very flexible and plastic material that can withstand significant loads, so if you decide to arrange a spacious pond of an unusual shape, you simply cannot do without it.
Marking the pit
To build a pond on your site with your own hands, you will need:
- pegs;
- rope;
- film coating;
- geotextile or felt;
- sand;
- crushed stone or large pebbles;
- shovel;
- special kit for film coating repair;
- bricks;
- garden hose for watering;

Using string and pegs, you need to mark the desired shape of the pit and begin excavation work. If you plan to create a fairly large pond, you can use an excavator. During the work, it is necessary to ensure that ledges and slopes alternate; this will make the banks of the pond more stable. It is also necessary to provide terraces (at least 30 cm wide) for planting. Descents from one level to another must be made fairly flat, with an inclination angle of up to 45˚.
It is worth remembering that the depth of the pond should not be less than 80 cm, otherwise in winter the water in it will freeze to the bottom and its inhabitants will die. Thus, you need to dig a pit approximately 15-20 centimeters larger than the expected size of the reservoir. This is necessary in order to be able to fill the terraces and the bottom of the pond with sand, in order to avoid subsidence and damage to the film. The sand cushion must be carefully leveled and compacted, after removing all pebbles, sharp sticks and plant roots from the bottom.
Drainage and waterproofing
When the sand drainage pad is ready, we move on to the next stage of work. In order for the pond film to remain intact for as long as possible, you need to lay geotextiles on a layer of sand, preferably in 2 layers. Next, we straighten the film itself and secure it to the banks using bricks or large stones. Don’t try to necessarily straighten and spread out all the folds - let the water do it for you.

We place the flexible one so that its end is in the center of the future reservoir, and we begin to supply water, making sure that the pressure is not too strong. As the pond fills with water, partially release the edges of the film and spread it along the slopes of the pit. After the reservoir is filled to the brim, leave it for 1-2 days. During this time, under the weight of water, the film will expand and fill all the voids.
After it has completely subsided, you need to cut off the excess parts, leaving at least 40-50 cm for arranging the banks. The edges are secured with pegs or special metal arches, and then masked with flagstone, large stones and pebbles. It's time to install the pump, decorate the hoses from the fountains and start planting plants.
Pond above ground at the dacha
When there are kids in the family, one of the main problems when building a pond is how to make the pond safe. It is best if such a reservoir is slightly raised above the soil surface. Firstly, this makes caring for it much easier, and secondly, the risk of small children or pets accidentally falling into it is significantly reduced.

In this case, you cannot do without a reinforced concrete foundation. Dig a pond pit in the deepest part of it, form terraces for plants, just as in the previous case. Along the banks of the reservoir, using wooden formwork, pour a concrete foundation of the required height; for strength, it can be reinforced with metal mesh. After the foundation has completely dried and settled (this will take at least two days), the formwork can be removed and the inner walls can be plastered until smooth. This will help prevent the film from tearing. We line the bottom of the pit with it and fill the bowl with water. In this case, we secure the edges of the material so that they are behind the concrete fence. After the pond is filled, let the water settle, cut off the excess film, secure it and decorate the edges of the bowl.
Inventory: what you will need
Of course, building ponds is not an easy task, but what can you do for your loved one, because if everything is organized correctly, the result will please the eye for many years.
However, it is not enough to build a home pond - you also need to take care of it. Here are some technical devices that will be very useful to you:

Rules for caring for a country pond
A pond in the garden is, of course, very beautiful, but if you do not want to become the happy owner of a personal swamp in which frogs croak in the evenings, then you need to properly care for it. First of all, you need to make sure that the water in it does not bloom. Of course, it is best to purchase a special cleansing system, but, unfortunately, this is not a cheap pleasure. However, there is another, more accessible remedy: take a canvas bag and stuff it. Place this “surprise” under water, and there will be practically no algae left at the bottom of the pond.
It is also necessary to carefully monitor the cleanliness of the reservoir - regularly remove debris from the surface and add water as it evaporates. If your pond is small, then it is recommended to completely drain it in winter, and for large tanks it is necessary to completely clean it at least 2-3 times a year, and the water must be completely pumped out.
From what's at hand
But what should those whose plot size does not allow them to place even a small pond? Don’t be upset: a small pond can also be arranged in the front garden by using a cut-off metal barrel or just a large basin for this purpose. Such a mini-pond can even be placed on the balcony of a city apartment by decorating the container with glued pebbles or mosaics. Of course, you won’t hear the gurgling of a fountain near such a “reservoir,” but you are guaranteed coolness and lush greenery of aquatic plants.
01.03.2016
45 782
How to make a pond at your dacha with your own hands - step-by-step technology and mistakes

Beautiful decorative ponds, photos and pictures of which can be seen everywhere, have become an integral part of many gardens and summer cottages. However, not everyone knows how to make such a decoration with their own hands. A pond is a decorative element, a place where you can relax and escape from the bustle of the city. Water is the best remedy for stress. Recommendations, photo galleries, tips on arrangement will help you overcome the steps on the path to beauty, serenity, and will also teach you how to improve your home area with minimal investment. Installing a pond in the yard and decorating it will not take much of your time.
Which style to choose and where to place it?
The initial stages of landscaping a reservoir are important and necessary. Thoughtful stylization in harmony with the landscape design will be the basis for creating a reservoir. You need to select a style in accordance with the architecture of the house and buildings. In the interior of the garden, you can place a formal version (of regular geometric shape), or a free natural pond, forming an integral composition with other decorative elements.
Formal views are the main decorative element in the garden. They are suitable for small and large areas, come in different sizes, and are placed in the center. Free reservoirs are arranged in arbitrary shapes, giving a natural look, hiding artificiality.
 do-it-yourself pond at the dacha - in the photo
 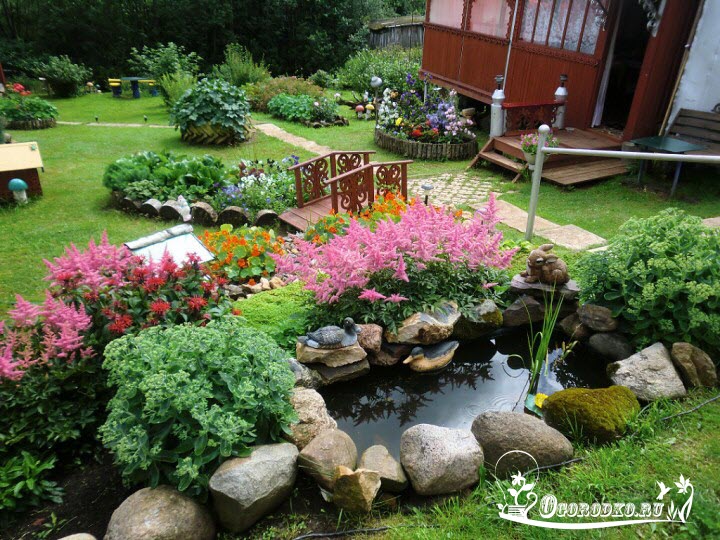 small pond in the country with your own hands
 in the photo - a pond on a summer cottage
  in the photo - a pond in the garden plot
When choosing a Japanese style, remember that stone, water and lanterns are the basis of the image. Think about the shape and location in advance. Bonsai-style trees and a tea house will complement and decorate the garden. Garden walls, windows, and moon gates are considered an indispensable attribute of Chinese manners. The entrance to the structure is equipped with an entrance gate. The English garden strives to merge with nature, the French one is filled with majesty and large space with fountains, cascades, and sculptures. Italian mini-pits with fountains are located in front of the main entrance of the house and are the central composition.
Choosing a location and material for arrangement
Many craftsmen know how to make a pond with their own hands, taking into account the size, location, and choosing sunny open areas. Trees located in close proximity will create additional troubles. Fallen leaves and constant shadow of trees hinder the growth of ornamental plants and pollute water. You can arrange the structure under trees, but you must be in the sun for 5-6 hours a day.

 DIY pond in the country house
Regarding sizes, consider the scale of the site. The pond should fit harmoniously into the landscape design. Small garden plots with an area of 6 acres are equipped with small structures that are easier to construct and the financial costs will be insignificant. Deep and voluminous ones are made for large areas and fish farming. If you don’t plan to introduce fish, don’t dig a big pit.
 DIY pond in the country house
  in the photo - a do-it-yourself country pond
To build a pit with your own hands, you need to buy and prepare materials for future construction. This opens up great possibilities for your imagination. You can build a decorative lake on your site from any materials. A permanent reservoir with a concrete base will require time and money. Various plastic containers, a lake from an old bathroom, tires from large tractor wheels will cost less and will look beautiful if done correctly. The design can be easily made using a special elastic durable film.
 in the photo - a pond on your site
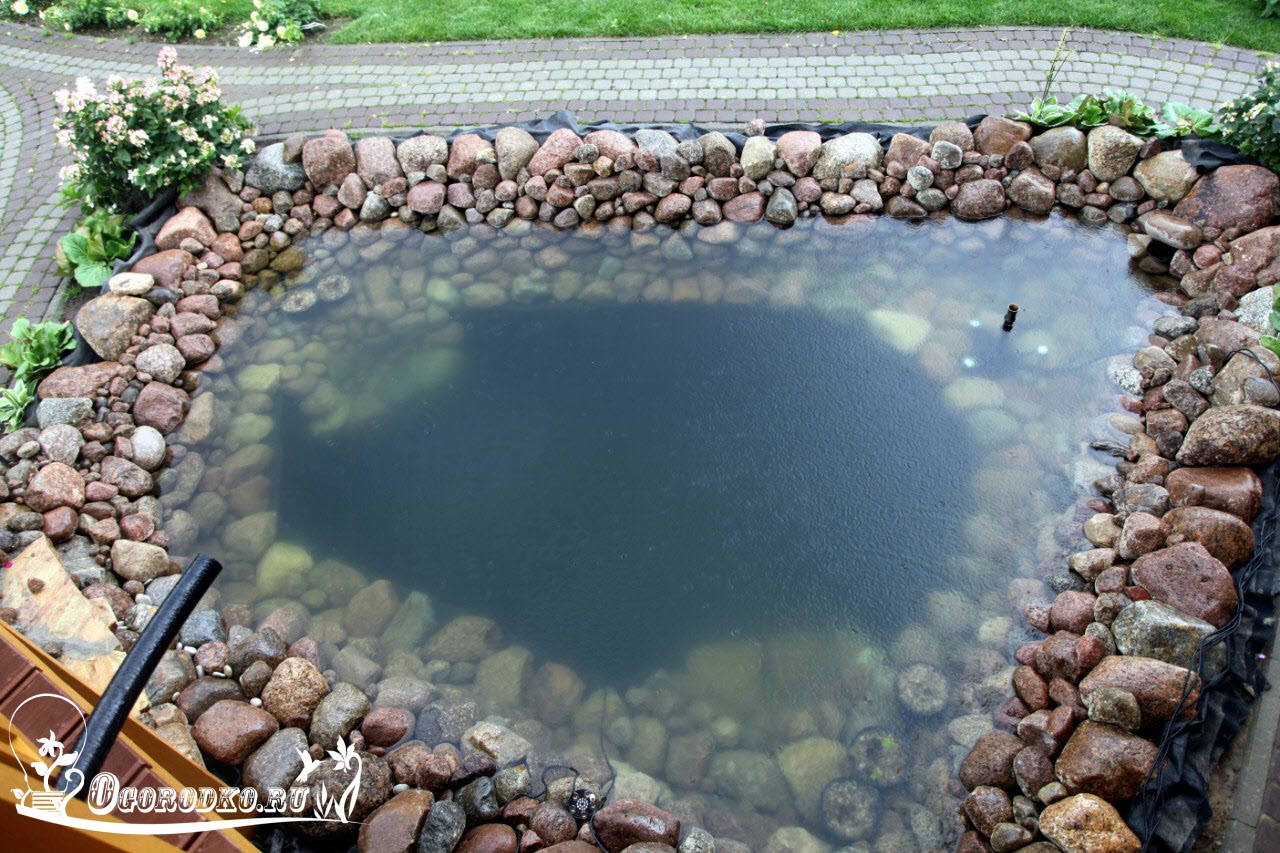
Step-by-step creation of a lake using black film
— Schematically sketch out the design of the future reservoir, indicating the width, depth, location of the curtains (thresholds for planting). The drawn drawing will allow you to correctly arrange the plant, decorative elements, and avoid mistakes and alterations.
 step 1
  step 2
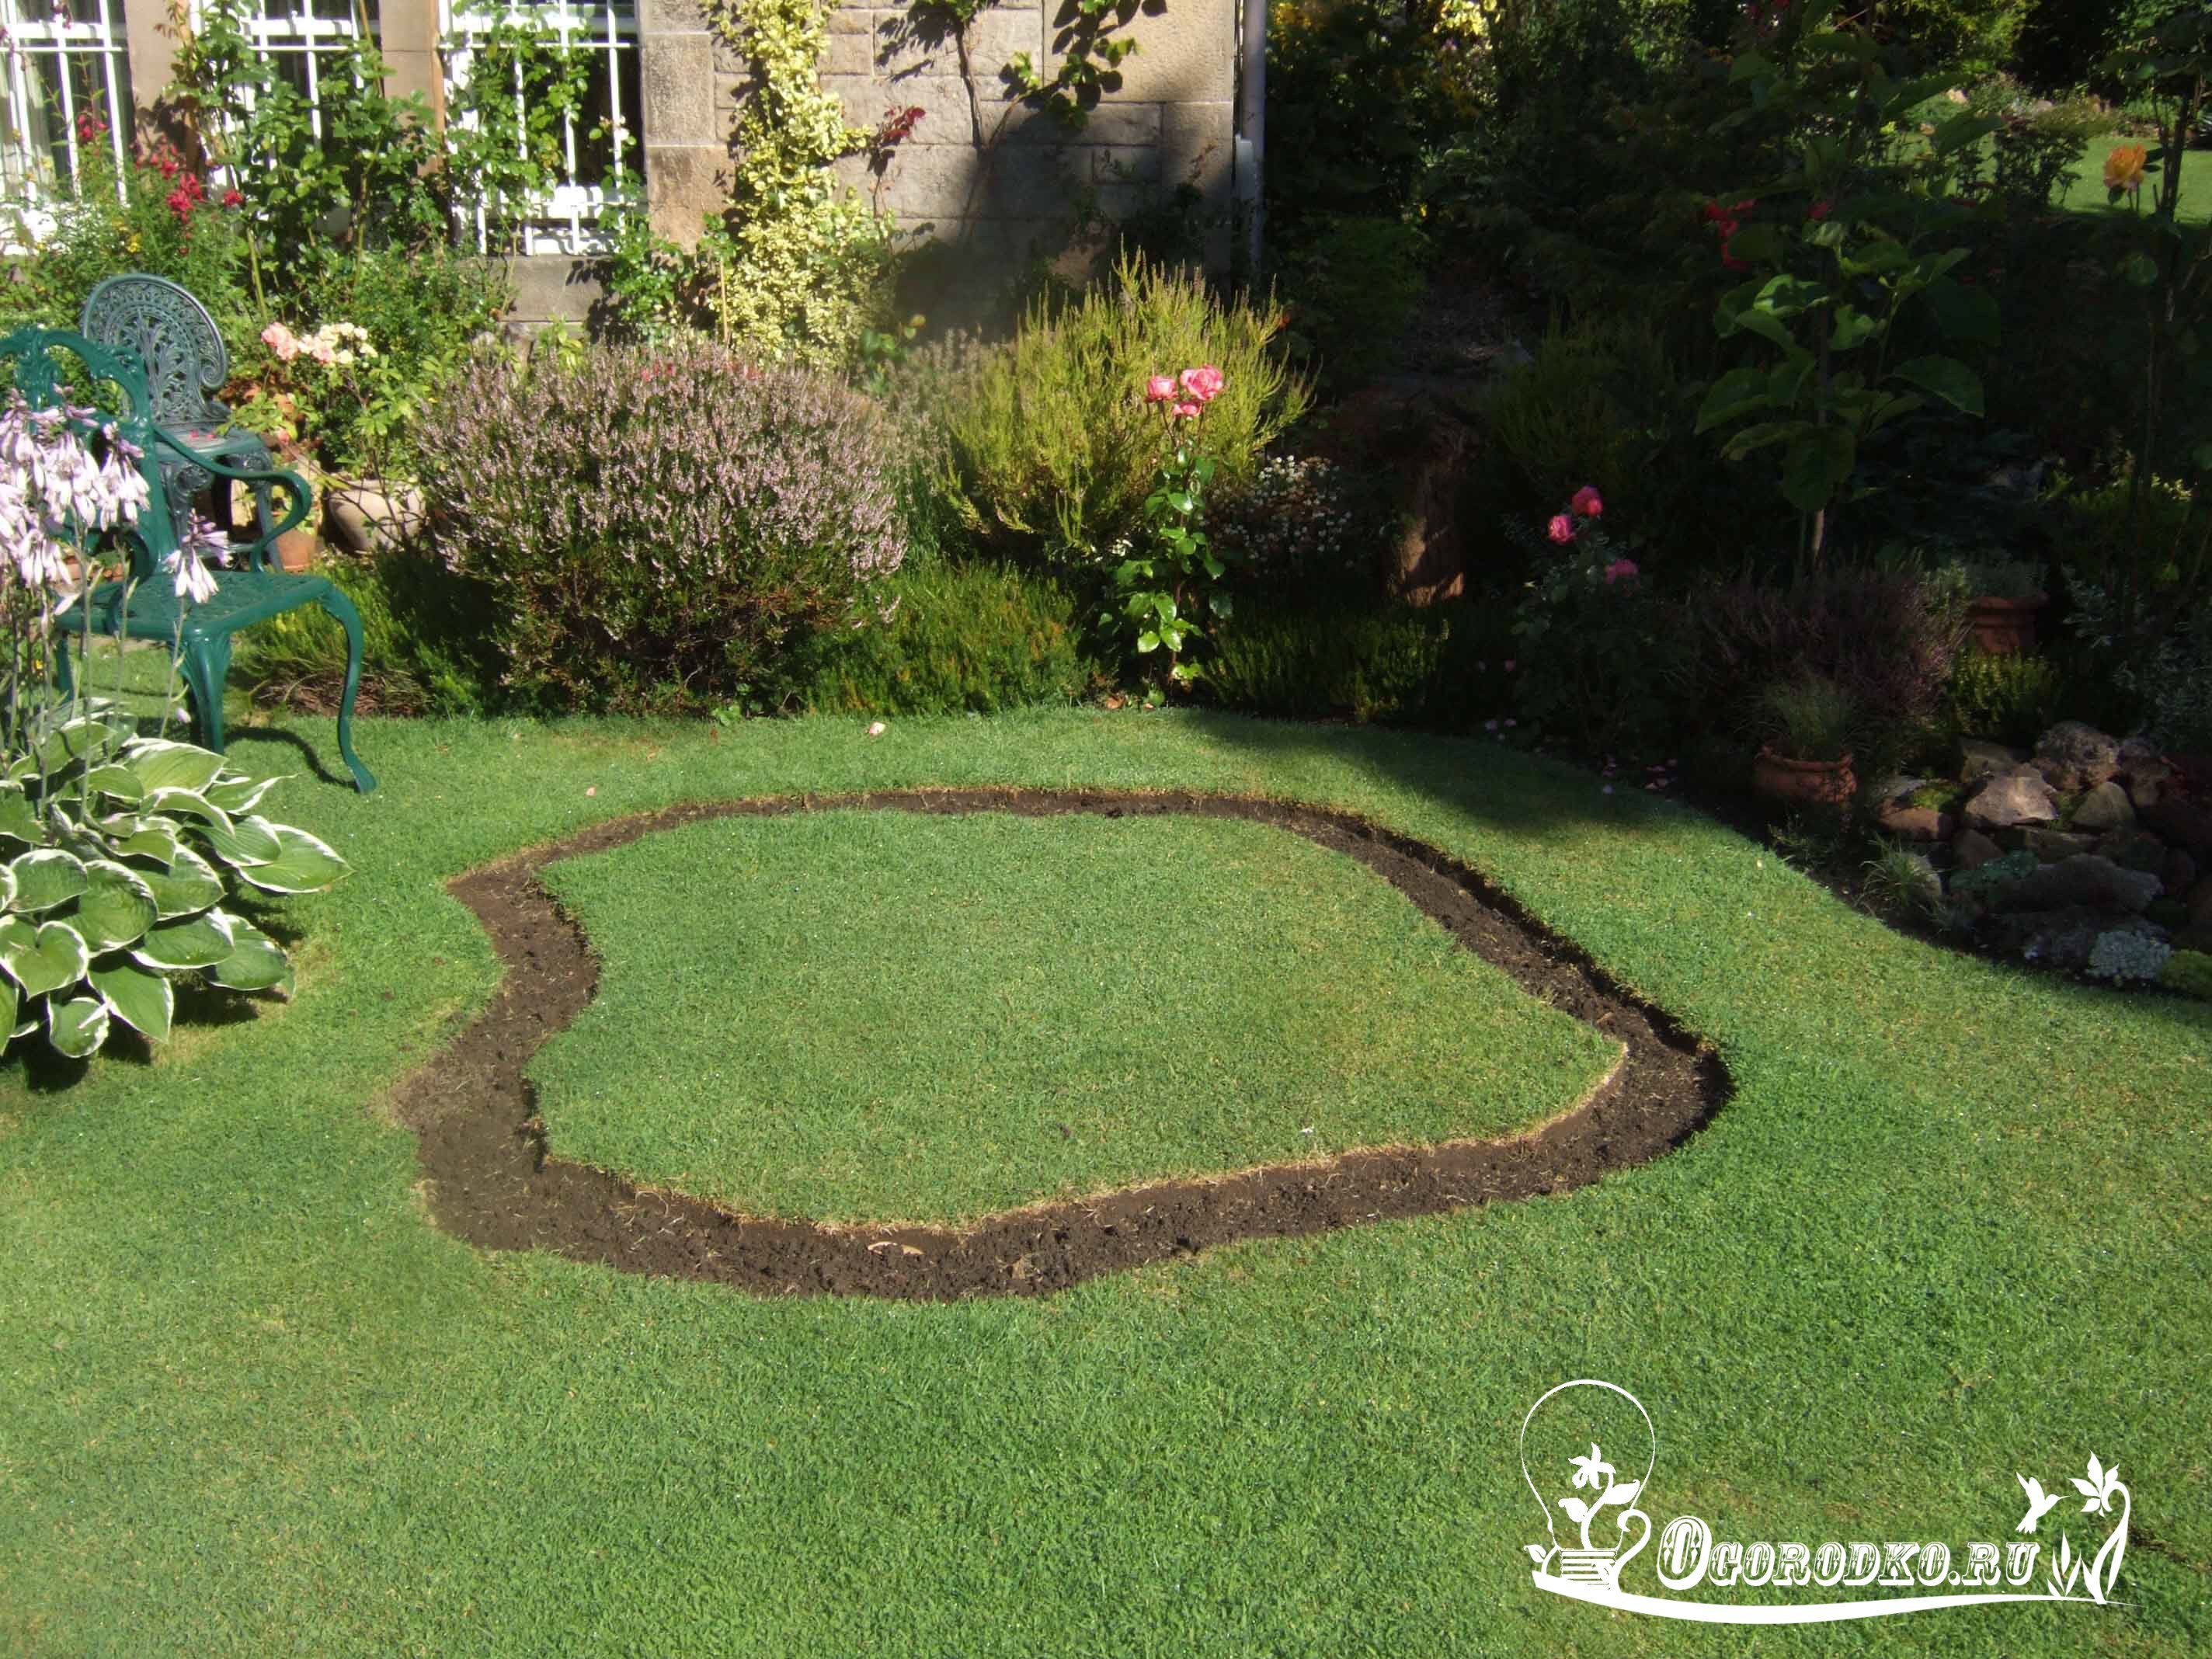
- Draw the contours of the lake using a garden hose, sand, spray paint, and other available materials. Uneven surfaces must be leveled.
- A pit is dug to the depth of the nearest threshold (for plants and flowers), the next tier is marked, and dug out. The lake can be made in several tiers. You can do without thresholds if it is small.
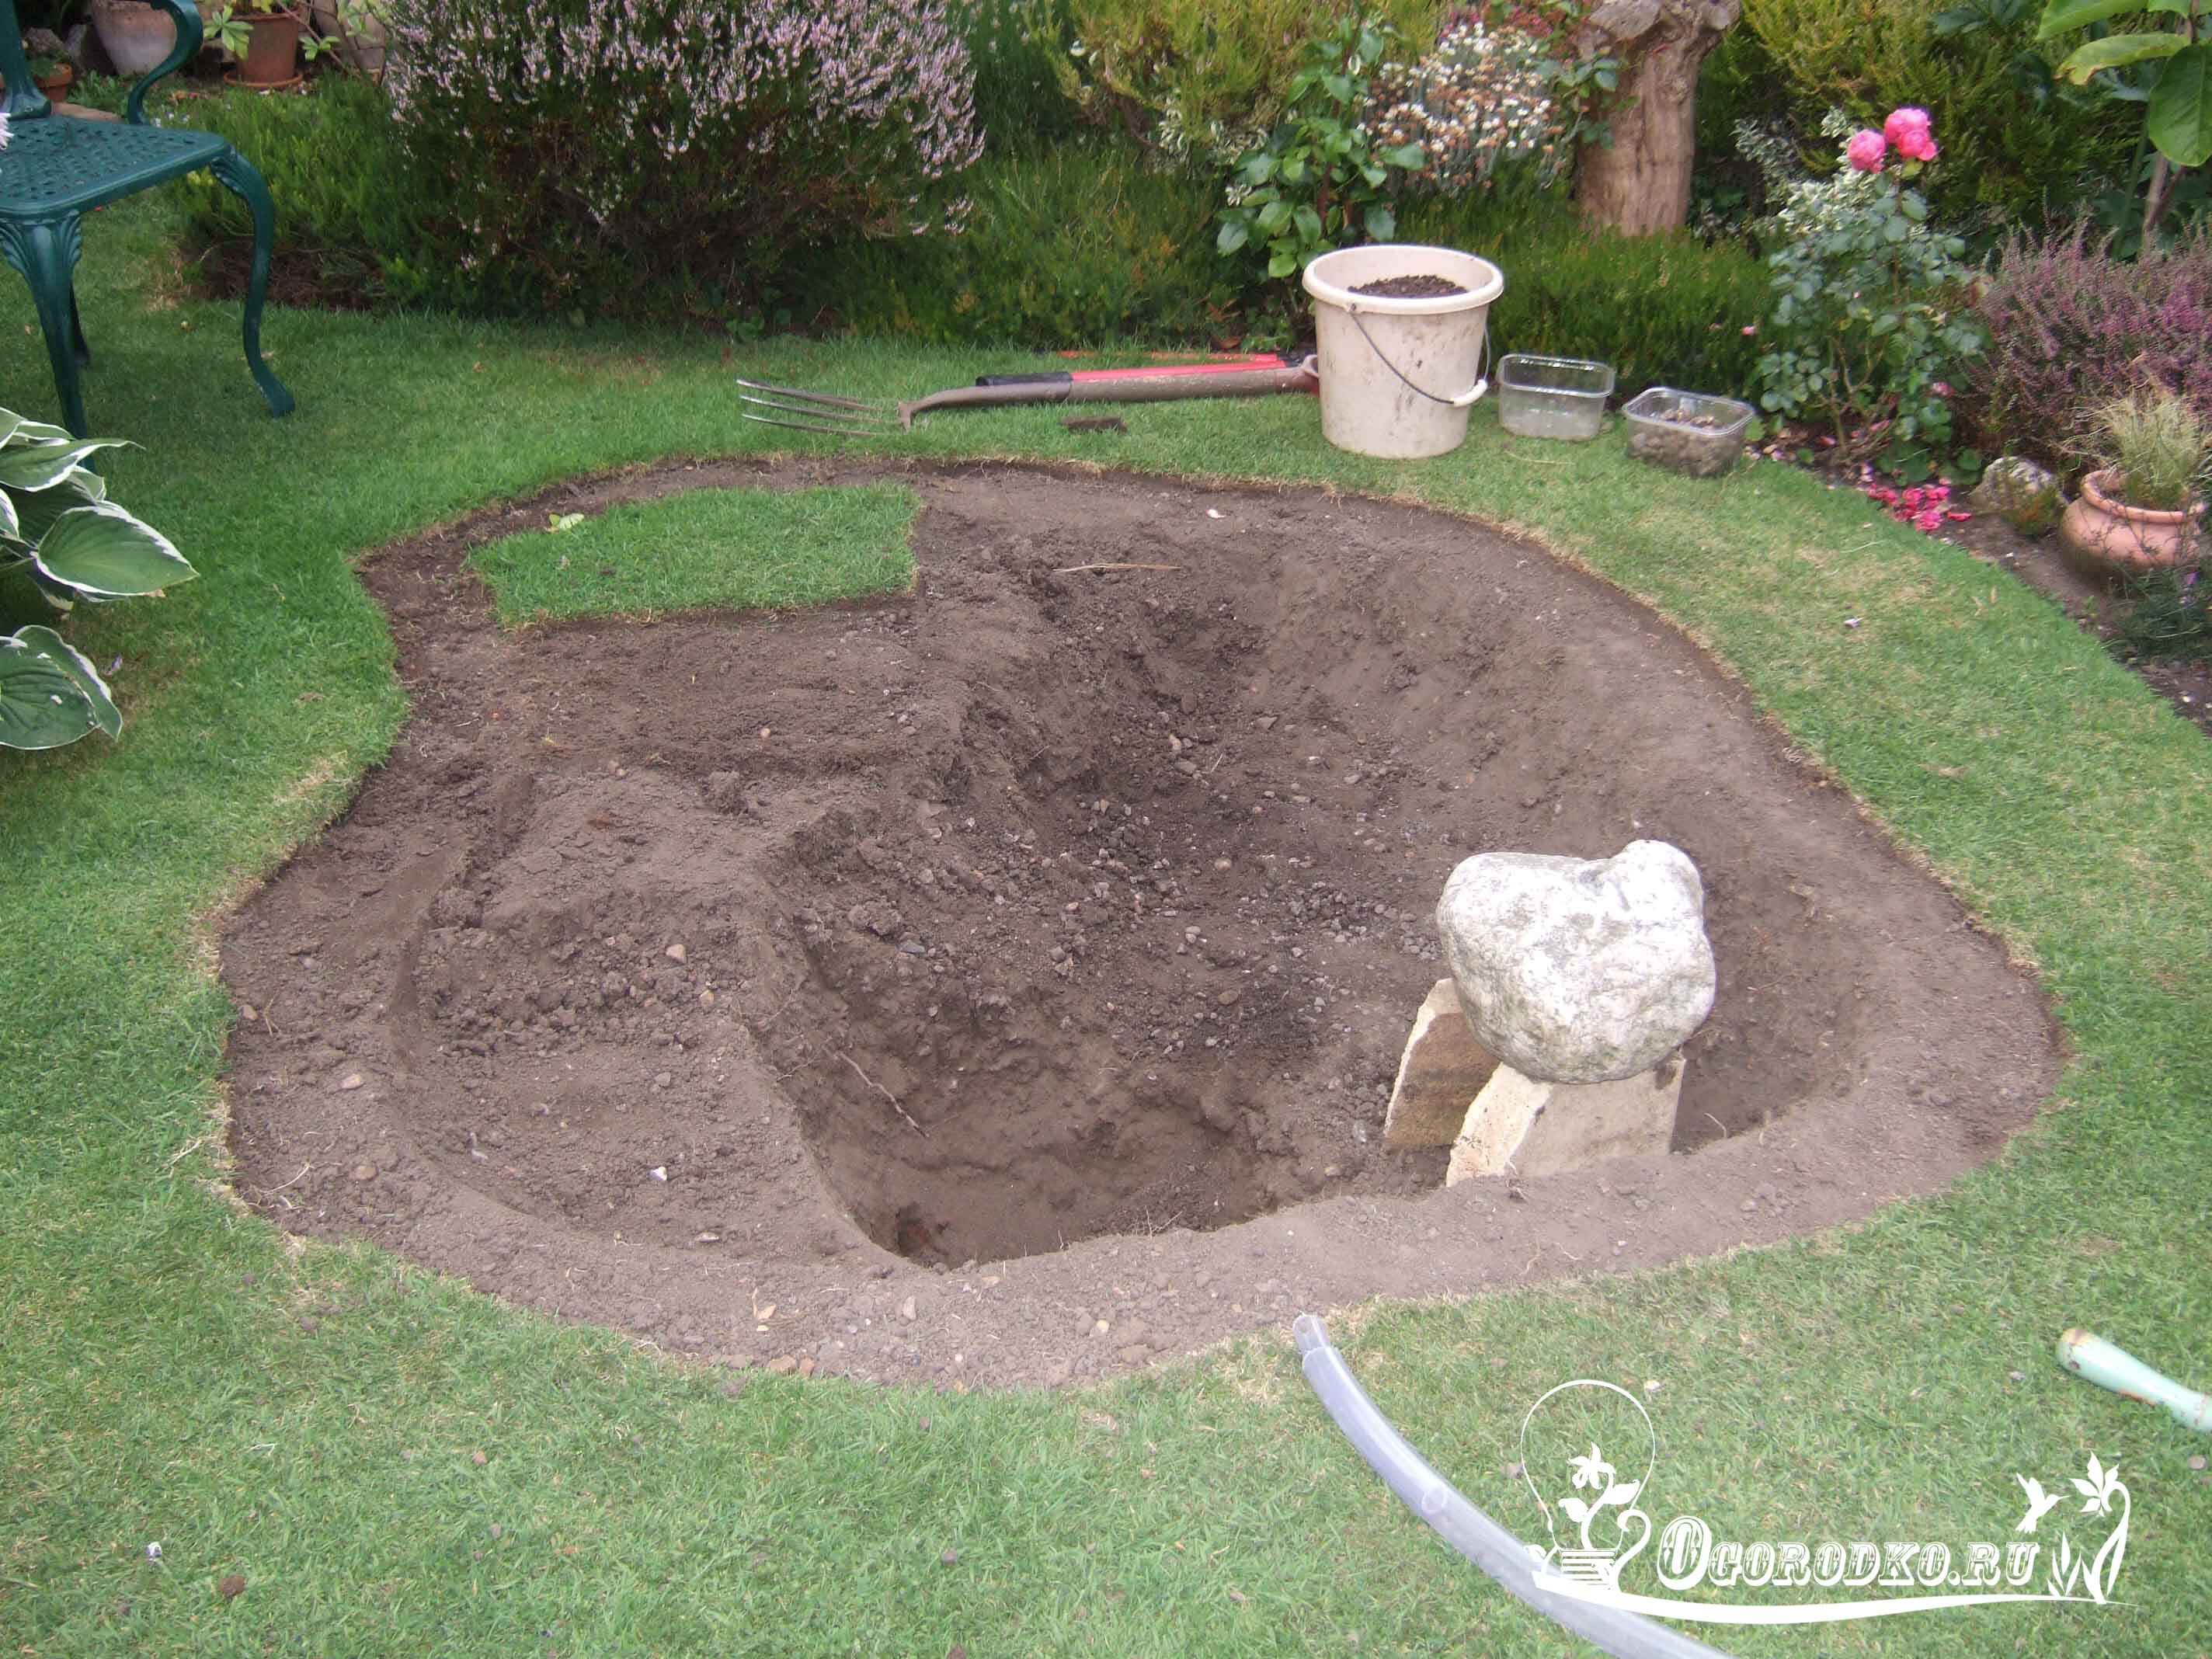 step 3
- To buy a film of the required size, the finished pit is measured using a cord, and 40-50 centimeters are added on each side of the bowl.
- The next step is to pour sand and compact it. There is no sand, proceed to laying the next layer. A small version can be made without sand.
- You can protect the material from cuts and damage using geotextiles, which are laid on the bottom and walls of the pit after a layer of sand. You can replace purchased material with existing old unnecessary linoleum, carpeting, or roofing felt.
 step 4
  step 5
- It is more convenient to secure the material by digging a shallow trench along the edges. The edges of the film are placed in it and sprinkled with a layer of earth and crushed stone.
- A stream and a submersible pump, which is placed at the bottom, will help rid a large pit of stagnant water. The pump is connected to cleaning filters. The stream is located above the level of the lake so that the water flows freely down and rises with the help of a pump. You can hide it under beautiful stones and plants. The brook hill is planted with beautiful flowers and decorated with various decorative elements (sculptures, clay pots).
 step 6
  step 7
- The coastline along the entire perimeter is lined with decorative stones (natural cobblestones), preventing the earth from sliding into the pond. Place the plants, cover the bottom with small pebbles, and fill with water.
The construction of the lake with your own hands is completed, keep the reservoir clean and tidy, remove debris and algae in a timely manner. Use preparations to maintain biological balance, plant fertilizers, anti-algae agents, and to clarify water. Find the right place, do it right, decorate it beautifully. Mistakes and miscalculations can turn an attractive, good body of water into a complete problem, take this into account.

 (1 ratings, on average: 5,00 out of 5)

