How to make liquid wallpaper at home. Liquid wallpaper for the kitchen: make it yourself from paper. How to make liquid wallpaper yourself: a universal recipe
To prepare liquid wallpaper yourself, you will need the following tools:
- construction bucket;
- drill;
- attachment – mixer for drill;
- plastic iron;
- spray;
- brush, roller or spray gun.
Materials and proportions for preparing liquid wallpaper
The example used printer paper.
For 1 kg of paper you will need:
- 6 liters of water;
- water-based tint to add color 100-200 ml;
- 0.4 kg PVA glue;
- 0.4 kg of gypsum or alabaster;
- decorative elements - wool fibers, glitter, cotton wool, beads, mica powder, etc. 10 - 20 g., marble chips 50 - 100 g.;
- wallpaper glue for paper wallpaper – ¼ pack.
Preparation of liquid wallpaper
Grind the paper as finely as possible and fill it with water.

The process of making liquid wallpaper can be speeded up by filling the paper with warm water. Let the paper soak.
During this time, we will prepare decorative additives. In the example, cut wool threads of different colors and lengths were used. You can add finely chopped cotton wool; after the mixture dries on the wall, it gives the wallpaper texture.
On 1 kg paper the amount of cotton wool should not exceed 20 grams.
If you are unable to buy ready-made additives that add shine, you can replace them with finely chopped Christmas tree tinsel. This is a long process, it is worth involving family members in it or starting to prepare everything in advance.
A few hours are enough for the paper to be well saturated with water.

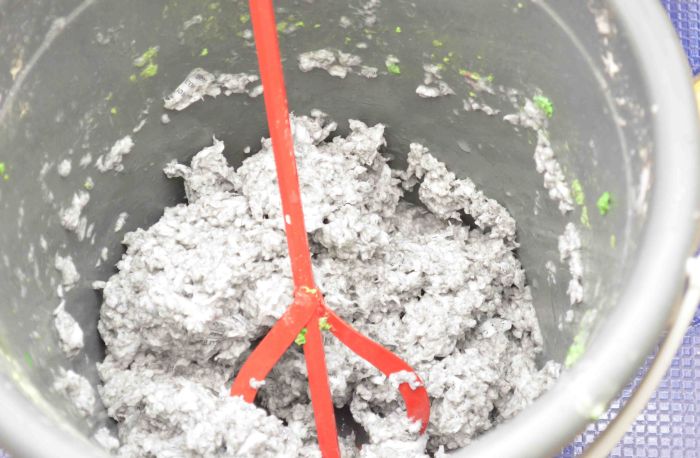
Grind it using a drill with a mixer attachment.
In this case, you can add a little water to the paper pulp, this will make the process easier. It is more convenient to shred the paper not all at once, but in parts. To do this, put part of the mass in a bucket and cover it with a bag with a slot and mix with a mixer. This device will help keep the walls and floor clean while shredding.

After mixing the whole mass until smooth, add color and glue.


Add PVA glue.
It should be taken into account that after drying the color of the mass will become less bright.
Now is the time to add decorative elements: natural and synthetic fibers, finely chopped cotton wool, mica, marble chips, glitter, beads and so on.


Photo of the process of preparing liquid wallpaper with the addition of various decorative elements.
Important: after adding fibers, mix the composition only with your hands. Do not use a mixer because this will cause a lump to form and the mixture will be unusable.
After this, the wallpaper is transferred to a large bag or the container with the mixture is covered with plastic film.

After a few hours the mixture is ready for application.
While the mixture is maturing, prepare the wallpaper glue according to the instructions. The glue gives the mixture plasticity and makes it easier to apply wallpaper, and the antibacterial additives it contains prevent the development of fungus and mold. Add plaster and wallpaper glue, mix the mixture thoroughly with your hands and begin application.

For 1 kg of paper add 0.4 kg of gypsum and ¼ pack of diluted wallpaper glue.
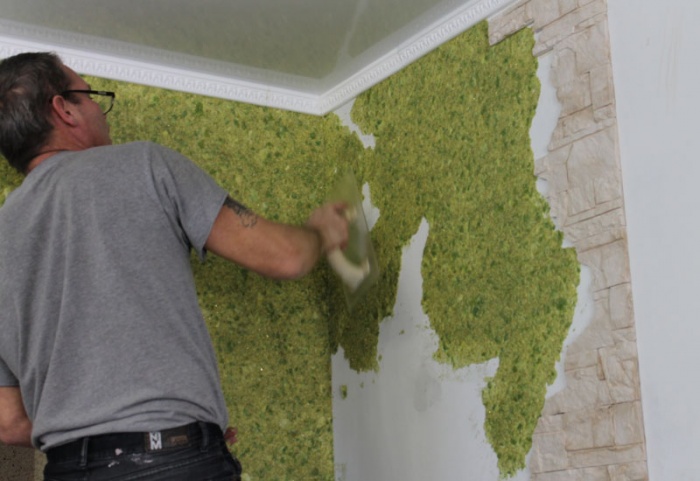
Application of liquid wallpaper
Surface for applying liquid wallpaper in advance treated with primer.
Wallpaper is applied with a spatula or plastic trowel. It is more convenient to apply part of the mixture to the wall simply with your hand and press firmly, and then distribute it over the surface using a trowel.
It is best if the smoothing iron is transparent, this will allow you to control the process of applying wallpaper, avoiding tears. When applying wallpaper, you do not need to press the smoother with the entire working surface, this will lead to part of the mixture being torn off from the wall. Wallpaper should be applied while holding the trowel at a slight angle relative to the wall.


It is easy to smooth the surface of the wallpaper by spraying water on it from a spray bottle. You can also moisten the ironing board with water.

The optimal application thickness ranges from 1 to 4 mm.
The amount of mixture prepared from 1 kg of paper, taking into account the indicated proportions, will be enough for approximately 4 m2 when applying a layer 1 mm thick. Drying time is 1-2 days, depending on the thickness of the layer and environmental conditions.
After drying, you can apply several layers of acrylic paper varnish to the wallpaper, this will protect it from dirt and moisture. Depending on the required density, the varnish is applied with a brush, paint roller or using a spray gun.

Varnished wallpaper can be washed, which allows it to be used for wall decoration in the kitchen and bathroom.
Recently, one very interesting trend has emerged - increasingly, to decorate walls, they use not the usual standard factory-produced wallpaper, with no color or relief pattern applied, but so-called “liquid” wallpaper, which is applied to the walls using spatulas, brushes, rollers, other painting and plastering tools. Ready-made mixtures for this technology can be purchased at construction stores, but craftsmen have long ago decided on the recipe for this decorative wall covering, and they successfully use it to make a working mixture.
Do-it-yourself liquid wallpaper can be made from a variety of materials that are usually no longer useful in the household - this feature can also be called a positive quality of such a finishing material. You don’t have to spend money on expensive components of the composition, saving a certain amount of money, and in addition, to a certain extent, you can solve the problem of waste disposal.
Before moving on to getting acquainted with the process of making “liquid wallpaper”, you need to thoroughly understand what they are.
What is “liquid wallpaper”, its main properties
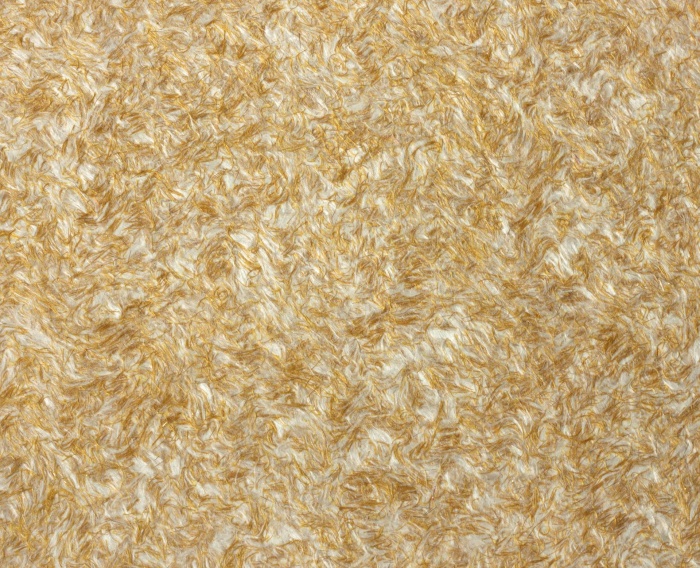
This finishing material is radically different from all other types, since it consists almost entirely of natural, as they say, “breathable” materials. The basis of “liquid wallpaper” is cotton, cellulose or silk fibers. The component composition also includes a fastening agent (this or that glue), which, when mixed with water, creates a mass suitable for application to vertical walls, by analogy with.
 Packages with “liquid wallpaper” of different colors
 Ready-made factory mixtures are usually sold in sealed plastic bags. Each package contains instructions for preparing and applying liquid wallpaper.
The bags contain a dry composition consisting of fibers treated with glue and some plasticizing and modifying additives. “Liquid wallpaper” can be already painted in a certain shade, or have a neutral white color.
If you plan to apply coatings of a certain color to the walls, then purchase white wallpaper, and then give it the desired color or tint effect using special coloring additives, sold separately.

What specific advantages can such a finishing material boast:
- After being applied to the wall, as it dries, the layer of “liquid wallpaper” acquires a porous structure, which contributes to additional sound and heat insulation of the walls of the room.
- This decorative coating does not clog pores in the wall material and allows them to “breathe,” which helps optimize the microclimate (temperature and humidity) in the room.
- When mixing the solution and when using it and drying, the material does not emit any odors, so when carrying out repairs in one room, there will be no particular discomfort created in other rooms - you don’t have to leave the apartment for this period.
- The material has antistatic properties due to the fact that it consists of natural components that carry a neutral charge of electricity. This has a positive effect on the health of the residents of the house or apartment. In addition, thanks to the antistatic effect, this decorative coating does not attract dust masses to the surface of the walls. Dust particles will not accumulate either inside or on the surface of the material, which means the air in the room will be cleaner.
- "Liquid wallpaper" is fireproof. The materials from which they are made do not contribute to the spread of fire, are self-extinguishing and do not emit substances toxic to the human body. .
- This coating, despite the presence of organic fibers in its composition, does not absorb odors, due to the presence of an adhesive mass, which becomes a kind of protective film for the other components.
- “Liquid wallpaper” has the ability to retain its original color for many years, since it is little exposed to ultraviolet radiation .
- In addition to all that has been said, this coating has no seams and can be laid in thicknesses from 1 to 8 mm. It is usually applied with a thickness of 2 ÷ 5 mm.
- There is no need to prepare the walls too carefully for this material, since it itself will help to level them, visually masking all surface imperfections.
- On the wall, after drying, “liquid wallpaper” creates a pleasant to the touch, soft, rough surface.
- The coating well masks various wall defects, such as small cracks or crevices - “liquid wallpaper” fits well near frames and baseboards, and their excess extending beyond the corners is easily cut off. On the inner corners, the applied layer does not wrinkle or crack when the building walls shrink, unlike paper wallpaper.
- If it is necessary to carry out certain work in a room with “liquid wallpaper” that involves violating the integrity of the wall, the decorative layer in the desired area is removed using a spatula, and the cleaned mass is saved. The wall is grooved or drilled, then sealed, and the previously removed mixture of wallpaper, previously diluted with water, is applied back on top.
- If desired, you can put a layer of new wallpaper of a different color on top of the old liquid wallpaper. In addition, if necessary, the material can be easily removed using a spatula.
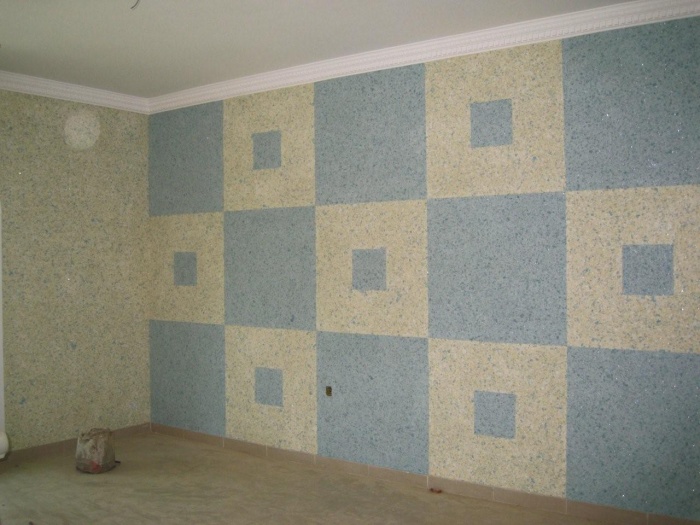
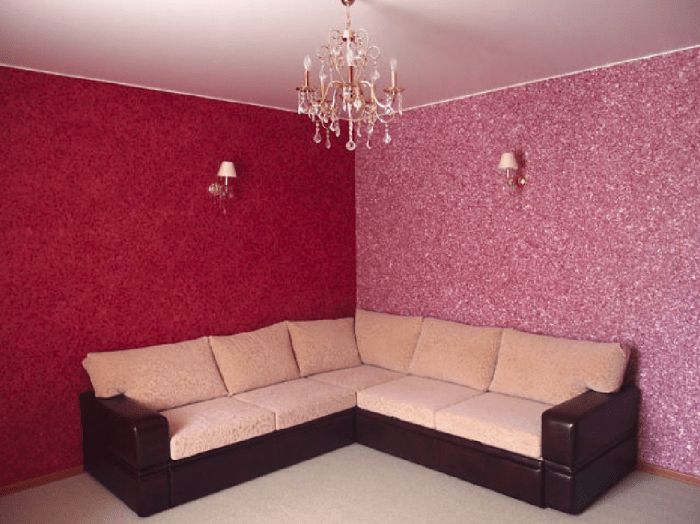
- By adding various dyes to the mixture, you can use different spatulas on the wall to create numerous color or even relief patterns or panels that create an accent in the interior design of the room.
 Bright panel of “liquid wallpaper”
 The material is fully suitable for premises intended for housing and household needs, as well as for offices and hallways of public buildings.
“Liquid wallpaper” can be diluted from a purchased mixture, or you can prepare it completely yourself, using suitable materials found at home as the necessary components.
Ready mixes
In order to dilute “liquid wallpaper” from a factory mixture purchased at a hardware store, you need to prepare one or more containers for soaking. Usually, a plastic basin (cuvette) of a fairly large size with high walls is used for this, since it is easier to mix in it.

Next, the mass from the bag is poured into the prepared container and filled with water. The amount of liquid used must be indicated on the packaging of the material. Typically, you need to use 5 ÷ 6 liters of water per bag. For soaking, it is better to use not too cold water, since if the process is carried out manually, it will be more pleasant to work in warm water. And the mixture turns out to be more plastic. True, you cannot go too far with the temperature in order to “cook” the composition - the recommended temperature should be indicated on the packaging (usually in the range from 25 to 30 degrees).
Next, you need to knead the mixture for a long time until smooth. It should be noted that it is recommended to pour only one or two packages into the container, since an excessively large amount of mass will be very difficult to mix thoroughly until the consistency is completely homogeneous.
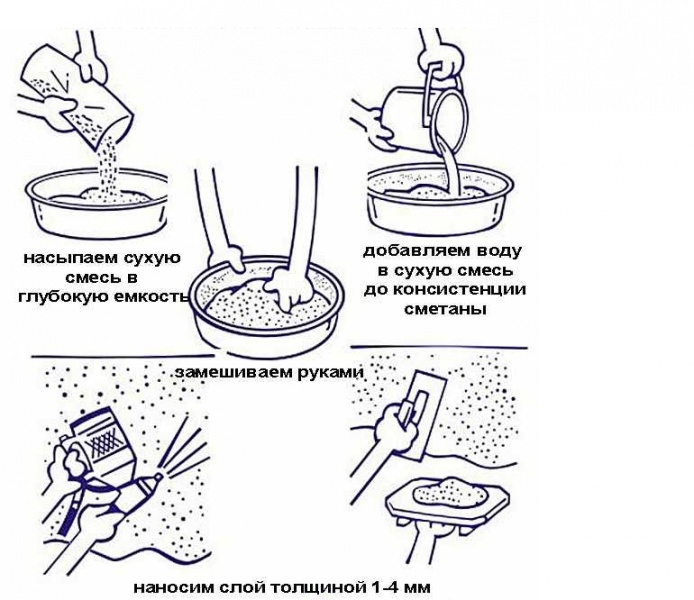
If we consider the manufacturing process step by step and in detail, it will look like this:
 “Short course” in pictures
 - Before pouring the bags with the dry mixture into the container, you need to shake them vigorously for 2-3 minutes so that the dry mixture breaks down completely into its components, without lumps.
- Next, the mass is poured into a plastic container.
- The required amount of water at the recommended comfortable temperature is poured into the cuvette.
- The mass is mixed until completely homogeneous.
- Then the composition is laid in polyethylene package or wrapped in polyethylene film and leave to infuse for 12 hours.
- The mixture should be plastic, of medium thickness, so that it can be easily applied to the wall, and it will not flow down the surface. Immediately before applying to the wall, too thick a mass can be slightly diluted with clean water.
One interesting property should be noted - such a mixed composition, sealed hermetically (in the same plastic bag) can be stored for up to two weeks without losing its properties.
Prices for liquid wallpaper
Liquid wallpaper
Video: technology for working with factory-made “liquid wallpaper”
How to make “liquid wallpaper” yourself?
As mentioned above, folk craftsmen learned to make this type of decorative coating on their own. There is a recipe for the base of the mixture, to which various decorative ingredients can be added, depending on the desired effect. Some basic components of the foundation may also change. But in general, mixing homemade “liquid wallpaper” follows the same scenario.
The first option is from paper waste
To make a working mixture of “liquid wallpaper” you will need:
- Any paper - old newspapers and books, printed sheets used in the printer, packaging wrappers and other scraps unnecessary in the household.
- Dye of the desired color or even several colors.
- PVA glue and water.
- Gypsum, acrylic plaster or Bustilat glue.
- The following additives can be used: crushed tree bark, dried seaweed, mica powder, small sparkles, pieces of yarn, crumbs of granite, quartz or other stone.
The process of making the base occurs in stages, and the dye is poured into the finished mixture. And only after it has infused, the selected additives are added.
— The paper needs to be shredded, and The smaller the pieces, the faster the further process will go.

— The shredded paper is placed in a container, filled with plain water and left for 3 ÷ 4 hours so that the material softens well. One kilogram of paper will require 5 liters of water.
 Mixing using a mixer attachment
 — After waiting the required time until the maximum soaking, the paper and water are kneaded using an electric drill with a mixer attachment until a homogeneous mass is achieved.
— Then, dye and glue are added to the resulting mixture, and then kneading continues.

— After the specified period, the mass is unrolled and thoroughly kneaded by hand.
— If you plan to make wallpaper with sparkles, they are also added to the mass after it has matured.

— Immediately before applying it to the wall, gypsum is added to the mass, and then it is mixed again until completely homogeneous.
Here you need to remember that the more gypsum is added to the mixture, the faster it will set and harden. Therefore, you should not add gypsum to the entire prepared mass of “liquid wallpaper” at once.
Video: an example of making “liquid wallpaper” from waste paper
The second option is made from other fibrous materials
To prepare another version of “liquid wallpaper”, you will need to prepare the following components:
Main material
- Cotton or cellulose fiber. As this material, you can use ordinary cotton wool or the insulating material “Ecowool”, consisting of wood cellulose.

Quite a lot of material will be needed if the finishing is carried out over large areas - this must be foreseen in advance.
If ordinary cotton wool is used, it will have to be thoroughly crushed. This operation can be done manually, using scissors, or you can build some kind of mixer, using an electric drill with a mixer attachment for mixing. The bowl for the mixer can be a bucket in which the material is placed, but the container must be closed with a lid with a hole for the mixer shaft, otherwise the cotton wool will fly apart. The lid can be made of thick cardboard.
- In addition to cotton wool and cellulose, you can use fibers - synthetic winterizer, linen fibers, polyester or wool.

These materials, just as in the first case, are thoroughly crushed, and, the smaller you can do this, the better and easier it will be to mix them, and the mass will be more homogeneous.
- Another option for making “liquid wallpaper” can be threads made from different materials - it can be wool, cotton, synthetics or a mixture of several components. Often, needlewomen have a lot of leftover yarn that has become unnecessary, and in addition, you can unravel old sweaters and jackets that have not been worn by anyone for a long time.

The threads also need to be chopped - this can be done with scissors or, for example, with a sharp axe-cleaver for chopping cabbage, but for this you need to have a wooden base on which to work is being carried out.

Of course, the work of grinding like this is quite tedious, but the result will be amazing. Colored crushed threads can be used independently or as an additive to mass made from fibers or paper.
Binding component
Various adhesives can be used as a component that holds the fibrous structure of “liquid wallpaper” together - Bustilat, wallpaper casein glue or PVA, or even acrylic-based putty. However, you need to remember that the latter, firstly, has a specific smell, and secondly, it will need to be additionally diluted with water.
The most resistant to abrasion and deformation are wallpapers made with acrylic putty.
Decorative additives
For decorative additives, as in the first option, the same components can be used - fine chips of various minerals, glitter, mica, etc. Their use will depend on what effect is planned to be obtained. However, you need to immediately warn about moderation - you should not use several additives at once, as this can only ruin everything.
Additives can be purchased in ready-made form. They are made from materials that will not oxidize or contribute to the appearance of fungal formations on the walls. It is not difficult to find such components in construction or decor stores, and they have a very affordable price.
Dyes
To give the “liquid wallpaper” the desired shade, it is very important to choose the right dye, which is added to the mixture during its preparation. It is necessary to purchase compounds intended for addition to water-based paints. Add them to the wet mixture while stirring - then they will give it a uniform shade of the desired degree of saturation.

If you want to give the surface an “iridescence” , that is, heterogeneity of color, in the form of inclusions and changes in tone, then you must proceed as follows:
- the first time the color is added and mixed with the mass until it acquires one even color;
- a second portion of dye is added just before applying the mixture to the wall, but this time it is not mixed so thoroughly, leaving some areas unmixed.
The process of manufacturing the working composition of “liquid wallpaper”
From the mentioned components, “liquid wallpaper” is made as follows:
One of the selected materials is placed in the mixing container bases - fibers, threads, or both at the same time, then mixed with one of the binders. The proportions of the mass should be approximately 1:1.
Next, decorative components are added to the mass, and it is mixed again until smooth, so that the glitter or stone chips are evenly distributed throughout the entire volume of the mixture.
If the mixture turns out to be too thick, you can add a little water to it.
It is recommended, as an experiment, to make a small amount of finishing material in certain proportions and try to apply them to the wall. If the coating fits well on the surface and has the look that the owner wanted, then you can prepare the required volume of the mixture, sufficient for the walls of one room.
After the mass is mixed, it must be left to mature for 5 ÷ 8 hours, since the fibers and threads must be well saturated with glue.
The time while the mixture is being prepared can be used for applying them.
Applying “liquid wallpaper” to walls
Preparing the wall surface
As with any application, the walls require certain preparation for applying “liquid wallpaper”. There is no need to make any special efforts, as standard procedures for normal preparation should be followed. These include the following activities:
- The surface is cleaned of old coating, which may interfere with the application of “liquid wallpaper” - this is any old wallpaper, whitewash, oil paint, etc.

- If the walls are covered with plaster that has no significant flaws, there is no need to remove it, since the wallpaper will lie on it without any problems.
- It is also not possible to level the surface of the walls to perfection. Necessarily, since “liquid wallpaper” will help hide minor flaws.
- If the walls are cleared down to the concrete base, they should be coated and the surfaces allowed to dry thoroughly.
- Then a putty leveling mixture is applied to the walls - it can be applied and spread using a wide spatula. After this layer has dried, a thin finishing putty composition can be applied to it, if necessary.
- And when the putty is completely dry, the surface needs to be thoroughly primed again. The last layer of primer is applied for better adhesion of the “liquid wallpaper” to the wall.

After preparing the walls, you can proceed directly to the production and application of “liquid wallpaper”.
Prices for different types of primer
Primer
The process of applying “liquid wallpaper”
 “Liquid wallpaper” will look good both on the walls and on the ceiling
 After the walls are ready to “accept” decorative finishing, “liquid wallpaper” is applied to their surfaces like thin-layer plaster.
 “Liquid wallpaper” is applied like plaster with a metal spatula or trowel
 However, here it is necessary to provide one more nuance for the work to be successful. The point is this. If a large amount of the mixture is prepared in advance in several batches, and the same dye is added to each batch, seemingly in the same quantity, then it will still be very difficult to maintain one color tone. It often happens that one batch may turn out somewhat lighter, another darker. This may not be particularly noticeable in a semi-liquid, diluted state. However, when drying on the plane of the wall, the difference can be visually felt quite significantly - the appearance will be untidy.

This is easy to avoid. In preparation for application to the wall, the same amount of mass is taken from each basin or package with the mixture and mixed thoroughly. After using it, when taking the next portion, exactly the same procedure is performed. In this way, you can achieve exactly the same color and distribution of decorative components on all walls of the room.
 There is no need to be afraid to make mistakes - there is always the opportunity to try again
 Applying “liquid wallpaper” to prepared walls is a very simple process, and even a beginner can cope with this work, since it is in principle impossible to spoil the material. If something doesn’t work out the first time, then the wallpaper applied to a certain area of the wall can be carefully removed and then reapplied.
The optimal thickness for applying wallpaper is 2÷3 mm. This layer can be achieved using a metal spatula or grater. It is best to smooth the material on the wall with a transparent smoothing trowel. Using it, you can constantly keep the surface areas being treated under control.
 A transparent trowel-trowel is the most convenient tool for “liquid wallpaper”
 The raw mass is applied to the walls and smoothed out using circular, horizontal or vertical movements, depending on the intended design effect.
Excess material protruding beyond the boundaries of the decorated planes is carefully cut off with a construction knife after the material begins to dry.
After the glue has initially set, you need to go over the entire surface with a transparent trowel, wetting it in water - this process makes the surface even. This operation must be carried out carefully, using circular movements counterclockwise.
If it is planned to reproduce a certain design on the wall, then it is applied to the desired area in advance with a pencil, making clear lines. Then the fragments of the intended panel are filled separately, with “liquid wallpaper” of the desired color. The edges of the areas are trimmed and left for some time for the glue to set.
 Layer-by-layer application of multi-colored “liquid wallpaper” when creating an artistic panel
 After this, the “liquid wallpaper” that will serve as a background for it is applied around the elements of the ornament. In this way, you can reproduce wonderful, completely exclusive patterns on the walls that will become the center of attention of the room.
Video: master class on working with “liquid wallpaper” - “silk plaster”
The production and application of “liquid wallpaper” can be fully called a creative process, which is accessible to almost everyone who has a desire to try their hand at this art. Therefore, if you have an idea to decorate a room or part of a wall in a completely original way, you need to boldly get down to business and start creating.
The building materials market is diverse, but even the availability of an assortment does not always allow you to find what you like. Planning repair work, in addition to rough finishing, also includes finishing, that is, that which will remain with the owners for many years and will be shown to guests entering the house. It should be treated with special responsibility.
The use of the usual standard finishing coating such as paint or factory-made wallpaper with a printed pattern has lost its relevance. People try to use modern and unusual materials in order to give the space a touch of individuality. One of the most popular and proven products today is liquid wallpaper.
What are they and what is it?
They have nothing to do with traditional coatings and are not similar either in composition, application method, or technical characteristics. This is a completely new building material that is applied to wall and ceiling surfaces using painting tools, spatulas, rollers and brushes. They do not contain harmful components, they are safe for health and are classified as “breathable materials”.

There are ready-made mixtures on the market that just need to be diluted with water and you can start finishing, usually they are:
- Cellulose.
- Silk-cellulose.
- Silk.
- Cotton.
The last type is the most expensive and has higher quality. Liquid wallpaper can be used in any room, including those with high humidity. They are popular not only in residential, but also in office and even industrial spaces.
Is it possible to make liquid wallpaper yourself?

Certainly. Craftsmen have long found a recipe for making a decorative mixture and actively use its basics in the finishing process. It’s not difficult to make liquid wallpaper with your own hands. To create mass, it is permissible to use components that we classify as waste. Making a decorative coating yourself is easy and cheap; in this way, the problem of disposing of unnecessary but useful “garbage” is solved.
Before we tell you how to make liquid wallpaper yourself, let’s try to understand what components are included in the composition offered on the markets.
About the formulations sold

Ready-made mixtures are sold in hermetically sealed polyethylene bags with a label and instructions for preparation. The dry mass contains natural or artificial fibers with adhesive impregnation, as well as modifying and plasticizing additives. There are compositions that are white or colored with the addition of coloring pigments.
What advantages do such coatings have?

Despite the fact that this finishing technology appeared recently, experts were able to highlight its positive qualities, among which it is important to note the following:
- Working with liquid wallpaper is easy and convenient. With their help, anyone can finish finishing, regardless of experience and skills.
- The work does not require careful preparation of the base, and unevenness can be masked with a compacted layer of wallpaper.
- Liquid wallpaper masks not only unevenness, but also other defects, such as small cracks and crevices. It is convenient to finish corners and openings from both the inside and outside. Excess is easily removed, the coating does not sag, and retains its original appearance even if the walls shrink.
- During the finishing process, you do not feel any odors, which means there is no need to leave the living space at the time of repair work.
- The decorative coating is classified as “breathable”, as it does not clog pores. This factor has a positive effect on the microclimate and temperature indicators in the room.
- After drying, they acquire a relief structure that has heat and noise insulating qualities.
- Regardless of the composition, whether purchased or prepared independently, liquid wallpaper has antistatic properties due to the natural components it contains that carry a positive charge. They do not absorb dust and repel dirt, remaining clean and beautiful for a long time. Rooms with such a finishing coating are not only beautiful, but also safe, as residents can breathe clean air.
- Thanks to the adhesive composition, which is one of the main components of the finish, during the drying process a certain protective film is formed, which prevents the wallpaper from absorbing various odors.
- The original color is preserved for many years, since the fibers are practically not exposed to the negative effects of ultraviolet radiation.
As you can see, the coating has many positive qualities, but the main thing is the ability to carry out repairs on a damaged area without removing a large area of wallpaper. In other words, if you damage the coating, apply a small layer of fresh wallpaper to the area and let it dry.
ATTENTION!
When using colored types of liquid wallpaper, make sure that at the end of the work you have a small amount of dry mixture left in case of unexpected repairs. It will be difficult to purchase formulations of the same tone after a while, and they may differ in texture.
How to prepare a mixture for liquid wallpaper with your own hands?

If you like to experiment and create something with your own hands, then creating a composition for the topcoat will not be difficult for you. There is one standard recipe, the base of which varies depending on your personal preferences and what kind of coverage you want to get in the end. Let's look at the main ways to create finishing compositions.
Paper base of liquid wallpaper
The main component is old waste paper, written on and used. Collect unwanted books, newspapers, magazines, sheets, wrappers, etc.

Chop them with scissors or tear them into small pieces. Fill the paper with water in the proportion of 5 liters per 1 kg of dry raw materials. Leave for 4-5 hours to soak.

When the paper is ready, use a construction mixer to start kneading it.
Add the coloring pigment to the homogeneous mass, as well as PVA glue, then mix everything until a homogeneous consistency.

The resulting mass should be placed in clean polyethylene and left for 14-15 hours to mature.

For better adhesion, add gypsum, Bustilat glue or acrylic plaster mixture. Mixing the components should be done before applying the mass to the surface of the walls.
Fiber wallpaper
This composition can be prepared from the following components:
Fabric fiber - cellulose or cotton; it is acceptable to use padding polyester, linen, wool or polyester. Cotton is used as cotton wool, and Ecowool insulation consists of wood cellulose.

The selected material must be thoroughly crushed. Splitting is carried out manually or with a mixer attachment on a construction drill. In the latter case, you will also need to build a container. Use a deep bucket with a lid with a hole cut out for the mixing attachment. If the container is not closed, the fiber elements will fly apart.
Attention!
If you are planning to finish a large area, then you will need a lot of the fiber component. It is permissible to combine several types of fiber.
The binding component is PVA or Bustilat glue. Casein wallpaper or acrylic type of putty mixture is also suitable.
ATTENTION!
Acrylic putty has a strong and unpleasant aroma, and therefore experts recommend diluting it well with water. Despite the smell, the material is the most resistant to deformation and abrasion, which means the coating will be more reliable and durable.
Regardless of the type of fiber, it is permissible to combine mixtures with decorative additives:
- Sparkles of different shades.
- Mineral chips.
- Mica.
- Shavings.
They are added during the process of hand kneading.

KNOW!
Artificial additives are susceptible to oxidation, which contributes to the formation of fungal and moldy lesions on the coating.
The color is set by coloring pigments, which are added during the preparation of the mass. Colors are chosen for water bases. They are added while mixing the mixture with water. Don't rush to add a large amount of color at once. The saturation of tone appears gradually. When adding pigment, do not stop stirring the mixture. After making sure that the component is completely dissolved and a uniform shade is obtained, you can stop the process.
The effect of inclusions is achieved in two stages. The main tone is set as described above, then before applying the mixture to the surface, a little more pigment is added, while the mixture is kneaded a little by hand, but not thoroughly, thereby leaving undissolved elements.

Connecting components
Place the selected fiber in a mixing container and mix it with the adhesive base in equal proportions until smooth. Combine the base with decorative elements (colors, sparkles and other impurities). Keep kneading the mixture until you get a uniform mass. If the composition is too viscous and thick, dilute it with a small amount of liquid.
In order not to transfer the components and get the composition that you need, make a test batch using small proportions. Apply the mixture to the surface of the walls and make sure that the liquid wallpaper you made yourself turned out the way you planned, it is permissible to prepare a large volume of the mixture.
When all the components are mixed, they should be left to mature for 10 hours, placing the solution in a clean plastic bag.

How to work with liquid wallpaper prepared by yourself?
Prepare the base. Remove the old coating, regardless of whether it is putty or paper wallpaper. To clean the walls, it is most convenient to use a spatula. If the walls were covered with paint, you can remove it by first lubricating it with a special solvent composition, then remove the paint using a paint spatula. It is recommended to thoroughly moisten whitewashed walls with water and also remove them.

Attention!
If the base of the walls is covered with a single-color putty on the surface of which there are no obvious irregularities, it is not necessary to remove it.
The cleaned surface should be treated with a primer, and after it has dried, leveled with a leveling putty layer. If necessary, you can additionally apply a finishing compound to the dried layer.

A primer is additionally applied to the dried layer of putty, which is necessary for better adhesion of the finishing coating to the surface of the walls.

Once the base is prepared, you can begin applying your own prepared liquid wallpaper. To work with them you will need a metal spatula or trowel. Application is carried out using the thin-layer plaster method.

If you immediately prepared a large volume of the applied mixture in one stage, then you should not have any difficulties since you have a uniform consistency of one shade. If the mixture was prepared in several stages, even if all proportions were strictly observed, there is a risk of a difference in tone, which becomes noticeable only after the topcoat has completely dried.
You can avoid this incident in the following way. Immediately before applying the liquid composition to the surface, take equal amounts of the mixture from each batch. Mix all the parts together manually until smooth and carry out such manipulations with each subsequent portion that you plan to apply. This way you will get a uniform consistency that will look perfect on the surface of the walls.

How to apply decorative mass to the surface?
The recommended application layer is 3 mm; this thinness can be achieved using a metal spatula. If you are a beginner and do not want the coating to have flaws in the form of small untreated areas, then purchase a transparent trowel-trowel with its help it will be much easier to control the finishing process.
ATTENTION!
Don't worry if something goes wrong during the application process. A liquid adhesive solution allows you to remove an incorrectly laid section of the coating and reapply the removed material.
The liquid composition is applied to the wall surface in any direction, be it horizontal or vertical, the smoothing process is carried out in a circular motion.
The surface is leveled after some time, when the adhesive solution begins to set. Use a transparent trowel after moistening it with water and carefully walk over the surface in a circular motion, but they should be counterclockwise.

Excess liquid wallpaper is removed after the adhesive base has initially set.
If you plan to create a pattern on the surface of the walls or divide the space into zones. Pre-prepare the stencil using a simple pencil. When the main part of the walls has been processed, start filling in the elements of the pattern; you can use a small spatula for this.
After the work is completed, the walls must dry thoroughly. It takes 24 hours for the composition to dry completely.

Liquid wallpaper, regardless of whether it is purchased in a store or made by yourself, looks great in any room. Their distinctive feature is that if the coating is damaged, it can always be repaired; to do this, try to leave a small amount of the mixture (if purchased) in dry form to eliminate flaws.
Don't worry if you don't have any dry ingredients left. Liquid wallpaper softens quite quickly when exposed to moisture, which means you can remove the damaged part of the coating, moisten it with water and reapply it to the walls, thereby repairing the damaged area.

How to clean and care for the coating?
We said above that such material has antistatic properties and does not absorb dust, and therefore contamination occurs extremely rarely or after many years. If you still plan to carry out cleaning, then you should protect the material from moisture by pre-treating the surface with protective compounds such as varnish. By treating the walls with a film composition, you really lose the “breathing” effect.
Untreated wallpaper can be cleaned using a washing vacuum cleaner after treatment, which will return the coating to its original appearance.
Some useful videos:
Everyone knows what wallpaper is, and, of course, at least once in their life they have glued it with their own hands. But now the construction market offers a completely new coating - liquid wallpaper. Despite the fact that they appeared relatively recently, this coating has already become a favorite among many. And this is not surprising, because with their help you can easily create a unique surface design without any special financial costs.
General characteristics
This material resembles ordinary paper wallpaper in that, if necessary, it can be easily removed from the walls with your own hands without the use of special tools or special effort. For a clearer understanding of what kind of material this is, let’s look at what liquid wallpaper is made of.
The basis of liquid wallpaper is ordinary wallpaper glue, to which various ingredients are added in the required proportions, for example:
Important! Silk wallpaper is the most durable of the presented types.
Before applying liquid wallpaper, no special preparation of the base is required, since the coating will easily hide all visible imperfections.
Advantages of liquid wallpaper
The most noticeable advantage of liquid wallpaper is its original appearance.
But, in addition to this, they also have such functional characteristics as the ability to wet clean and remove children's drawings from the surface. This type of wallpaper is very durable - its approximate service life is 10 years.

Another pleasant bonus is that when covering with liquid wallpaper, you do not need to putty the walls with your own hands in advance, which will speed up repairs and reduce costs.
However, protruding irregularities must be removed, since liquid wallpaper cannot cope with them. Even a beginner in renovation work can handle the technology of applying liquid wallpaper, as it does not require any special skills.
If mechanical damage occurs during the operation of liquid wallpaper, it can be easily eliminated. You just need to moisten the damaged area and carefully remove the coating, and then return it back and let it dry completely.
The following video explains how to do this:
Liquid wallpaper is odorless, which is especially important for allergy sufferers and particularly sensitive people.
Liquid wallpaper can perfectly fill joints near doorways, in the corners of the room, and places where baseboards and walls touch.
You can cover walls with liquid wallpaper in rooms where there is constant noise, for example, in a living room in which a powerful home theater or music center is installed, since the material has high sound-proofing properties.
Wall decoration with liquid wallpaper
The finishing mixture can be purchased ready-made and only diluted, and then applied using technology, or you can make it yourself. But, regardless of what liquid wallpaper is used, you must first prepare the walls.
In particular, remove the old coating, dismantle any metal objects, since moisture on them will cause rust spots on the finished coating. For better processing, you can prime the wall and cover it with water-based paint, but this step is completely optional.
Using a ready-made mixture
Before preparing liquid wallpaper, you need to prepare a shallow mixing bowl and the required amount of water. It is better if it is warm, it will be more comfortable to work with the mixture with your own hands.
Since ready-made liquid wallpaper is supplied packaged in bags, you need to use several bags at once.
Important! It is best to mix no more than 2 packets, as it will be more difficult to achieve uniformity with a larger quantity.
The recipe for preparing liquid wallpaper from the finished mixture is as follows:
- It is necessary to shake the bag to prevent lumps.
- Pour the mixture into a container
- Fill with 5 liters of water
- Mix the solution with your hands until a homogeneous mass is obtained.
Important! By gradually adding water to the solution you can obtain the desired consistency.
In order to imagine how to do this correctly, you can watch the video.
One package requires a little more than 5 liters of water. This proportion produces the optimal consistency, reminiscent of thick cream. It must be remembered that a solution that is too thin will flow, and a solution that is too thick will not be able to be spread.
On some packs of liquid wallpaper it is written that the prepared mixture is left to swell for 7 - 8 hours. After this, it is mixed and applied to the wall.
Self-production of liquid wallpaper from scrap materials
The composition of liquid wallpaper is not so complicated, therefore, to save money, you can make this material at home with your own hands. Moreover, the recipe for making it is quite simple. For this you will need:
- Waste paper or newspaper scraps
- Wallpaper glue or PVA
- Dye
First of all, waste paper is checked for the presence of metal elements and chemicals that can give an unexpected reaction. If found, they are deleted.
Important! It is best to make it from white printer paper, but if it is unavailable, you can use newspapers.
The production of liquid wallpaper is carried out using the following technology:
- Cutting paper into small pieces
- Filling the prepared material with clean and warm water. Consumption is 5 liters per 1 kg of paper.
- Swelling of the paper for 2 - 3 hours.
- Grinding the material with a construction mixer.
- Adding gypsum and PVA glue to create a homogeneous mass that adheres to the surface.
- To ensure that liquid wallpaper does not have an unsightly gray color, a color of the desired shade is added to it. This should be done gradually, starting with a small amount, each portion should be mixed.
If the solution turns out to be too liquid, then you need to leave it for a while so that excess moisture is absorbed, and if it is very dry, then just add water. You can make the mass more attractive by adding sparkles, mica, and pearlescent chips.
The process of making liquid wallpaper with your own hands is presented in the video.
Wall application technology
Liquid wallpaper is applied, regardless of the method of its preparation, using a spatula. A small amount of the mixture is applied to it and applied to the wall. Liquid wallpaper is smoothed over the surface with a roller or a special grater. An excellent tool for applying some types of wallpaper is a Hopper gun.
Application begins from the corner or edge of the wall; the maximum permissible layer for drying is a coating of 2 mm. In this case, it is necessary to maintain the same thickness throughout the entire surface treatment.
The tool with which the layer is distributed over the wall must be pressed carefully, since pressing hard can compress the composition, which will remove the texture, and if it is too weak, there is a risk of distributing the mixture unevenly.
Distributing the mixture over the surface with your own hands is done with reciprocating movements, in no case in a circular manner. The entire surface needs to be covered with only a layer of one batch. If you suspect that there may not be enough mixture, it is better to prepare a little more. You can watch the process of distributing the mixture on the walls in the following video:
Important! If there is excess mixture left, you can simply dry it and, if necessary, dilute it again with water.
The time for complete drying of the surface is up to 72 hours. It varies depending on the microclimate in the room, the layer of material and its composition.
Liquid wallpaper is a relatively new material for wall decoration, but it has become quite popular and has positive reviews due to its unsurpassed characteristics and original appearance after drying. Now you can make repairs at minimal cost by simply preparing liquid wallpaper with your own hands. The most important thing is to strictly follow the recipe and application technology; the thematic videos presented in the article will help with this. The coating result exceeds all expectations.
Thanks to the variety of colors and special structure, liquid wallpaper is now used everywhere. They can be seen on the walls of offices, residential premises, and beauty salons. Such wallpaper is easy to purchase at a hardware store. But it’s much more interesting to make them yourself.
The advantages of this finishing material can be listed for a long time. Therefore, we will highlight only their main advantages:
- the ability to finish complex surfaces, for example, curved ones;
- absence of seams when applied to the ceiling and walls (processing is carried out in a continuous layer);
- increasing the sound and heat insulation parameters of premises (the wallpaper contains fiber additives);
- leveling ceiling and wall surfaces that have small cracks and other defects;
- dust does not stick to the wallpaper, since it is not capable of accumulating static electricity;
- simple repair of individual areas of the surface if necessary (it is enough to apply a new layer of material).
Wall finishing material
Also, liquid wallpaper does not peel off (if it gets wet when your upstairs neighbors flood you, you just need to dry it), does not fade under the sun (and after 10 years it will look like new), and is an environmentally friendly material.
In addition, they are easy to care for. Wallpaper can be cleaned with a vacuum cleaner or wiped with a cloth soaked in water if varnish is applied to the material.
If you are planning to make this finishing material with your own hands, you need to understand its composition. All manufacturers of liquid wallpaper very jealously keep the exact recipe for their production, a complete list and proportions of the components that are used. At the same time, everyone knows that such coatings include the following elements:
- silk and wool threads;
- cellulose fibers;
- acrylic;
- dyes;
- natural cotton;
- textile;
- mineral chips, mica, mother of pearl of different shades;
- polyester, lavsan and other artificial fibers;
- antifungal additives;
- cellulose glue.
To make a liquid coating with our own hands, we will need exactly these materials. It's easy to purchase them. Cellulose fibers mean ordinary cotton wool. All you have to do is cut it into the required pieces and then dye it in different colors using fabric dyes.

Making your own liquid coating
Textile, polyester, polyester fibers, wool are easy to buy. You only need to prepare them for use by cutting them into threads of the required length. The operation is labor-intensive and time-consuming, but there is no other way.
Acrylic, which is part of the material, is sold in stores, but not in all. Therefore, it is easier to order it online. You can purchase mother-of-pearl, quartz or marble dust, and other multi-colored sparkles online. But cellulose glue is ordinary Bustilate, made on the basis of carboxymethylcellulose. It is sold at any hardware store.
As an antifungal component, you can use liquid glass (sodium silicate) or another fungicide that you come across. All you have to do is buy different dyes, mix them to your liking, and then start creating wallpaper with your own hands. We will describe how to do this below.
If you do not want to make a full-fledged liquid coating, but only an imitation of it - colorful and bright, we advise you to pay attention to the following recipe. Take a bag of construction putty for walls, stir the dry composition with water according to the manufacturer's instructions, and then add a little dye to the resulting solution. Now you need to stir the mixture, see what happens, if necessary, add a little more color (preferably a different shade to get the original color).
The prepared solution can be immediately applied to the surface to be treated (ceiling, wall). To do this, use a 40 cm spatula. After the solution has dried, it is advisable to apply varnish (colorless) to it. In a couple of hours you can enjoy not quite real, but very cheap liquid wallpaper.

Applying finishing mortar to the wall
The second simple recipe makes it possible to make the covering we are interested in with your own hands from old paper (any scraps of magazines, packaging wrappers, newspapers, and so on). Everything is simple here, we give a master class:
- Tear the scraps of paper into small pieces (the smaller the better).
- Place these pieces in a bucket, pour water from the tap, leave the mixture for 4 hours. The volume of liquid is taken at the rate of 5 liters per 1 kg of paper.
- Take an electric drill, screw a mixing attachment onto it, and thoroughly mix the contents of the bucket until you get a homogeneous mass.
- Add the selected dyes to the bucket and mix again with a drill.
- Take the mixture out, wrap it in plastic wrap or place it in a bag, and leave it for 13–14 hours.
After this, you take out the composition, which was made from water, paper and other additives, and knead it again. But now you perform this procedure with your own hands, without using an electric drill. If you want to get wallpaper with glitter, you need to add decorating components to the mixture.
This concludes the master class. All you have to do is add gypsum to your homemade wallpaper and apply the composition to the wall or ceiling. Important! Do not add gypsum to the entire mixture at once. She catches on quickly. You may not have time to treat the surface. Mix small portions and calmly distribute the homemade material.
Making a coating that will be as close as possible to the original compositions involves the use of different materials. The following can be used as an adhesive base:
- Bustilat;
- acrylic putty;
- PVA or casein glue, which is often used to attach ordinary wallpaper.

Bustilate for the production of liquid wallpaper
Experts say that the strongest connection is provided by acrylic-based putty. Liquid wallpaper based on it acquires high resistance to deformation and mechanical abrasion during operation.
The main material for wallpaper can be any fiber, which we already talked about at the beginning of the article. Feel free to unravel old sweaters, T-shirts, and cut them into small pieces. Buy dye at the store. It is important to purchase a composition that is recommended for water-based paints. Other dyes cannot be used.
After preparing the required components, we begin making wallpaper. Everything needs to be done according to this scheme:
- Place threads in the bucket, cut into small pieces of fiber or other materials that you use as main materials.
- Add the selected adhesive composition to the fibers (proportions - 1 to 1), mix the resulting composition.
- Add decorative elements (mineral mica, crumbs, glitter, etc.) to the bucket and mix the whole mass thoroughly again.
- You can add a little water if your mixture is too thick.
Leave the mixture for 7–8 hours so that the threads and fibers are completely saturated with the adhesive. After this, you can start on the wall or ceiling surface. The recommended coating thickness is no more than 3 mm.
 (1 ratings, on average: 5,00 out of 5)

