How to install a sink in the kitchen: installation rules. Types of kitchen sink installation Instructions for installing a kitchen sink
The use of innovative technologies in the field of design has significantly expanded the range of interior solutions for the kitchen, where the equipment used must be not only aesthetic, but also functional. In accordance with existing requirements, a modern kitchen must be equipped with a number of devices and appliances designed to optimize the food preparation process. One of these devices is a kitchen sink, the installation of which only at first glance seems like a fairly simple task. However, given the variety of models and possible locations for its placement, it is important to approach the choice of design and the procedure for its placement in the most responsible manner. Despite the wide range of models, the most popular are mortise structures made of stainless steel and built into the kitchen countertop. Given the popularity of these products, it would be most advisable to consider the design features of this product and search for an answer to the question: “How to install a built-in sink into a countertop?”
Principles of ergonomics in the kitchen: the role of the kitchen sink
To optimize the cooking process, it is necessary to properly arrange kitchen furniture and appliances. Surely everyone is familiar with the concept of “ergonomics” and its basic principles, which may vary somewhat depending on the type of room. The kitchen is no exception - renovations in this area are subject to strictly defined ergonomic principles. In accordance with them, the arrangement of furniture and equipment in the kitchen depends on the order of work, and therefore it is recommended to arrange the furniture from left to right in a strictly defined sequence: refrigerator - dishwasher (if available) - sink - stove. It is recommended to place work surfaces with cabinets between the mentioned technical objects.
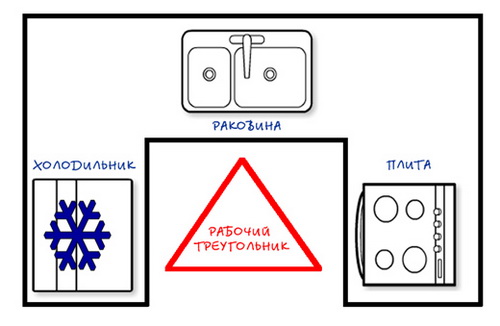
As for the minimum distances between objects, they are also subject to certain requirements:
- The distance between the sink and the stove, as well as between the refrigerator and the sink should be 40 cm;
- The refrigerator and stove should also be located at a distance of 40 cm from each other.
What should you consider when choosing a kitchen sink?
When choosing a kitchen sink, pay attention to the following factors:
- Functionality, determined by the nature of the work being done in the kitchen and depending on the number of additional bowls in the sink and drying wings. These compartments will be useful if you are used to carrying out several manipulations at once in the kitchen;
- Capacity, in the process of determining which it is necessary to pay attention to the number of dishes washed daily;
- Stability and durability, largely dependent on the material from which the structure is made;
- The design solution and design of the sink should be such that it fits perfectly into the surrounding environment and becomes a full-fledged element of a holistic interior concept;
- Ease of use: the configuration of the sink should be such that it is comfortable to stand and work near it.

Design types of kitchen sinks: brief description
There are a number of requirements for installing a kitchen sink, and therefore it must be carried out in accordance with a certain technology. The choice of the required technological solution, and, accordingly, the installation method depends on the design of the sink. Let's look at the most popular design types:
- Overhead sinks- the most budget option, the distinctive feature of which is the ease of installation of the structure. The principle of their installation is based on the fact that the sink is placed on a separate cabinet, and therefore they become a continuation of the countertop, as if replacing it. Despite the undeniable advantage described above, sinks of this type also have disadvantages - the relatively small thickness of the product and the formation of a gap between the sink and the countertop, which leads to additional inconvenience;

Important! Experts recommend giving preference to overhead models if the kitchen set consists of separate sections. If kitchen modules are combined under a common countertop, it would be more appropriate to use built-in models.
- Built-in sinks- are models that are installed directly into the countertop, and therefore installation activities must begin with the preparation of the appropriate hole in the countertop. The technology for installing mortise sinks involves attaching the structure to the inside of the countertop using special clamps and brackets. Built-in sinks of this type are characterized by a solid appearance and ease of use. Despite the fact that the cost of such models is somewhat higher, experienced specialists often prefer them due to their practicality and the ability to avoid moisture accumulation between the cabinets;

- Underbench sinks- innovative models, the high cost of which reduces their widespread availability and limits their widespread use. The principle of installation of these plumbing products involves their fastening below the level of the countertop, and therefore they form a single whole with it. The advantages of undermount sinks are their aesthetic appearance, high noise absorption and effective sealing of joints. In addition, such products are hygienic and durable.

Materials for the manufacture of mortise and overhead sinks
As for overhead and mortise sinks, both are made of stainless steel with equal frequency, remaining one of the most popular at the moment. The appearance of mortise stainless steel sinks can be different - the most common are smooth sinks and sinks with a texture that imitates linen.
In addition to traditional sinks made of stainless and enameled steel, mortise sinks made of stone and mineral-epoxy composite materials are no less popular. Artificial stone is also a popular material. Sinks made from composite materials have an impressive grain structure that resembles polished stone in appearance. Built-in sinks made of artificial stone make up a large group of kitchen accessories characterized by high aesthetic and performance characteristics, including resistance to scratches, abrasion and sudden temperature changes.
The shape of sinks is no less varied - along with single-bowl sinks, there are also models with several (from two to four) bowls, which can be either shallow or deep, equipped with additional dryers.
Installation Basics for an Overmount Sink
- The installation of an overhead sink is carried out on a separate module of the kitchen countertop so that it completely covers its upper part. This installation is quite simple - the equipment is fastened using L-shaped elements with an oblique slot. To fasten one sink, you need to prepare at least 4-5 fasteners.
Important! Before you begin installing the sink, you need to connect the faucet, which will subsequently avoid difficulties during the installation process.

- Attach the fasteners prepared in advance to the inside of the cabinet and leave the appropriate marks;
- Prepare the shortest self-tapping screws (15 mm) and screw them in the marked places so that at least 5 mm protrudes above the mark;
- Treat the end of the cabinet with sealant, which will protect the furniture and increase the reliability of the sink;
- Install the sink on the screwed-in screws and move until it fits completely;
- Fix the fasteners and, after removing excess sealant, connect the sink to the water supply and sewerage systems.

Installing an undermount sink into a countertop: a step-by-step guide
Let's consider the principle of installing a mortise sink in a countertop made of chipboard, covered with plastic on top. If you are wondering how to attach an undermount sink to a countertop made of other materials, including artificial stone, carefully read the product data sheet, where the manufacturer must describe in detail recommendations for working with this material.
Preparation of materials and tools
Before installing the sink, check that it is complete with mounting materials. Most often, these are special clips that are mounted on both sides - on the cut end of the countertop and on the inner surface of the sink. In addition, the kit should include a tubular sealant, which will be required to seal the joints. In addition, prepare the following set of tools:
- A jigsaw, which can be replaced with a regular hand tool, and a set of spare wood saws;
- Drill with a 10 mm drill (for metal) and self-tapping screws;
- Standard set of measuring tools: construction knife, level, corner, tape measure, Phillips screwdriver, ruler and pencil;
- Colorless silicone sealant necessary for sealing cracks and joints.

Performing markup: important nuances
- The markings made in accordance with the recommendations below will be relevant when installing a standard rectangular mortise sink. When installing a round mortise sink, familiarize yourself with the additional installation nuances.
- Using a pencil, in the place where you plan to install the sink, draw two perpendicular lines, at the intersection of which the drain will be located;
- Turn the sink over and place it on the countertop with the bowl facing up and align it in accordance with the prepared markings (you can see the intersection of the axes through the drain hole). Take a simple pencil and trace the outer boundaries of the sink around the perimeter. In this case, it is important to take into account the dimensions of the mortise sinks, as well as the relative position of the boundaries of the sink and the remaining free edge of the countertop, the presence of which is necessary for the rational installation of cabinet doors;

Important! To prevent a sink embedded in the countertop from becoming an obstacle to closing the cabinet doors, it must be located inside the cabinet.
- Next, measure the width of the side of the sink and, in accordance with the obtained value, draw an internal contour along which the cutting line will run. Despite the fact that the width of the side is an individual value for each sink, on average it fluctuates within 12 mm.
Important! The size of the hole must be such that the sink fits freely into it, while the permissible deviation from the markings should not exceed 3 mm.

How to properly cut a hole in a tabletop?
- This process is carried out using a jigsaw, however, before the saw of the tool enters the full depth of the material from which the tabletop is made, it is necessary to make technological holes to facilitate the work process. Holes are made using a drill or screwdriver in the corners of the internal markings.
Important! The corner holes should be located in the inner plane of the cutting area, and their edges should only be in contact with the cutting line.
- To avoid chipping the laminated surface, the entire cutting area must be performed on the front side of the tabletop.
- After you have made holes in the corners of the cutting plane, use a jigsaw to cut a hole along the inside cutting line. To prevent the cut part of the tabletop from falling, screw in self-tapping screws along the cut line, which will ensure its fixation.
- After you have made a hole in the tabletop, remove the screws and the cutting part of the tabletop from the main plane, clean the cut from dust. Pre-install the sink into the resulting hole, which is necessary in order to check the product’s compliance with the dimensions of the hole.

Important! The sink should fit freely into the resulting hole (if difficulties arise, you need to trim the edges with a jigsaw).
- During the preparation of the hole, all kinds of microchips and roughness can form on the internal cut line. In this regard, it is necessary to consider the rules for processing a slice; if neglected, the following problems may arise:
- Absolute sealing of an uncleaned chipboard surface is practically impossible;
Important! Insufficient sealing will lead to moisture entering the unprotected area of the countertop, which will cause the activation of rotting processes and the formation of fungal plaque. Subsequently, the cut edge will become brittle, which will reduce the stability of the sink and lead to its distortion.
- Rotting of the countertop will soon lead to a decrease in its physical, aesthetic and operational characteristics, and therefore there will be a need to replace it.
- To avoid this, the end side of the cut is sanded with fine-grained sandpaper;
- Carefully treat the entire cut area with plumbing sealant. Experts recommend doing this work with a spatula; if you don’t have one, you can do it with your finger. By taking such protective measures, you will prevent the tabletop from getting wet and swelling.

Important! If during the work you find chips on the plastic (the front side of the tabletop), carefully coat them with sealant, and it is not at all necessary that the layer be thick - its thickness in this case does not matter.
- There is another way to protect the end side of the cut - treatment with PVA glue. Despite the fact that it is more labor-intensive - in terms of its reliability it is not inferior to the previous one, however, for greater protection, the applied layer of glue must dry for 30-50 minutes.
- The next stage involves gluing a seal made of foamed polyethylene (it was previously noted that it should be included with the sink). It is glued to the side of the sink along its entire perimeter. If, after gluing the sealant, you find protruding edges of the material, carefully trim them with a knife. If you neglect this advice, you will find that the edges of the sink do not fit tightly to the countertop, and water entering the gaps will lead to swelling and subsequent rotting of the ends of the countertop.

Due to the fact that the process of gluing the seal directly determines the wear resistance and performance characteristics of the future headset, we will consider it in more detail.
- Take the sealant and, using a rag moistened with gasoline and solvent, degrease it;
- Apply sealant to the seal using a continuous strip (the sealant strip should be thin enough so that the glue does not come out during compression);
- Press the seal against the outer edge of the sink.
How to attach a built-in sink to a countertop?
- Apply a layer of silicone to the countertop (between the cut and the outer marking line);
- Install the fasteners on the inside of the sides of the sink and, making sure that they are not fully secured, proceed to install the sink. It begins with a recess on the side where the faucet will be attached;

- Subsequently, the rest gradually fits into the hole until the sides of the sink come into close contact with the inner surface of the countertop.

Important! When installing the sink, press firmly on the entire surface of the structure, which will allow you to remove excess silicone from under the sides of the sink.
- Using a building level, make sure that the installation is correct, and then proceed to the final stage - the final fastening of the fixing elements;
- Having completed the activities described above, proceed to connecting communications. To do this, connect the hot and cold water hoses to the water supply system using a sealing gasket.

After securing the hoses, installation activities look like this:
- Insert a siphon outlet into the sink (it is recommended to give preference to the S-shaped design);
- Add a hard corner or soft corrugated pipe to the siphon;
- Lead the pipe from the siphon into the sewer pipe;
- Check all system connections for leaks.


How to cut a hole in a countertop if it is made of artificial stone?
- In most cases, countertops made of artificial stone are ordered with holes designed for a specific sink, however, if such conditions were not agreed upon in advance during the ordering process, you can contact specialists who, using special tools, will cut a hole of the required shape and size.
- If you want to carry out the work yourself, in accordance with the technology described above, instead of a jigsaw, use an angle grinder (grinder), as well as a disc for cutting concrete with diamond coating.

Features of installing corner, round, and granite sinks
The process of inserting a corner and round sink is identical to that described above, however, for both types there are certain installation features.
Features of installing a round sink:
- Experts recommend making several holes along the cutting line in increments of 7-10 cm, which will facilitate this process;
- If the sink model you choose does not come with a template for the cutout, make one yourself.

Features of installing a corner sink:
- Due to the fact that the angle of rotation of the cutting lines is less than 90 degrees, in order to improve the passage of the jigsaw saw, make several holes along the cutting line - in the corner connection of the lines and at a distance of 2-3 mm from it.
Specifics of installing a granite sink:
- The point is that the design of a granite sink does not imply the presence of holes for installing the drain siphon of a mortise sink and tap. You need to do them yourself using a drill equipped with a special attachment. If you have no experience working with artificial stone equipment, you need to be extremely careful, since the slightest mistake can cause the equipment to become defective.
Installing a sink with your own hands is technologically quite simple. Some significant nuances will be described further in the relevant sections. Plumbers also charge inexpensively for installing a sink - the work is simple.
At the same time, a washbasin and a kitchen sink are a responsible matter: not only aesthetics and convenience, but also the general sanitary and hygienic situation in the apartment depend on them. Therefore, before you undertake installation or order it, you need to thoroughly understand the designs of these plumbing fixtures and choose the right one for yourself. Let's start with the general technical features.
Siphon
The simplest siphon is an S-shaped bend of a corrugated outlet hose, rotated 90 degrees in a vertical plane. For the washbasin, in theory, it is quite enough: used toilet paper, sanitary pads and scraps from dishes do not end up in the sink.

However, there is a “but” - when cleaning a sewer with a plunger, the corrugation plays a lot and breaks over time, and when cleaning with a pneumatic plunger (powered by a can of compressed inert gas), it often breaks immediately. Corrugations cannot be cleaned with a cable at all. Therefore, if the sewage system in the apartment is unimportant and you have to “break through” it often, you need a rigid siphon with an inspection (removable lid for inspection and cleaning), and in the kitchen it is absolutely necessary.
There are two types of rigid siphons: an elbow with a removable hatch (obsolete) and a bottle siphon. The last one is two concentric pipes, of larger and smaller diameter. The smaller one is inserted into the larger one with a gap at the bottom. The bottom cover of the bottle siphon is a threaded hatch; outlet - on the side.
Cleaning the bottle is simple: put on gloves, place a bucket, unscrew the bottom hatch and all the “bad stuff” plops into the bucket. You just need to make sure when purchasing that the outer pipe has some narrowing towards the top, otherwise the dirt may get stuck and you will have to pick it out.
The pinnacle of the evolution of siphons and at the same time tulip washbasins (see below) is a decorative chrome siphon with revision (see picture on the right). Among other things, it is also absolutely hygienic and functional. But the cost is an order of magnitude higher than usual, the sewerage installation for it is only built into the walls, which is also not cheap, and installation requires professional work.
Installation of the siphon with revision is always carried out before hanging the sink; corrugated siphon - whatever is more convenient for the location. In both cases, a transition collar is required from 32 mm (diameter of the sink outlet) to the existing diameter of the sewer pipes, from 40 to 100 mm; you need to look locally.
Mixer and fittings
The best mixer is one with a ball valve and a swing lever. When purchasing it, you need to make sure that the faceted parts of the threaded fittings of the flexible supply pipes - henok - are located at different levels, otherwise during installation they will not fit on the mixer pipes. This problem does not arise in a mixer with separate taps.
Henks are more durable and reliable than metal-plastic ones, but installing a mixer with them is only possible in an already suspended sink, which is inconvenient. Plastic henki in a woven fabric shell can be pulled out through the opening under the sink and attached without bending over and in the light, but they sometimes tear.

How to properly install a faucet on a sink or sink - .
Installation of a washbasin
Installation of the sink in the bathroom is carried out by hanging it from the wall using standard brackets and self-tapping screws in dowels. Remember that even a complete pedestal, from the bottom of the sink to the floor, is not a load-bearing part! Self-tapping screws must enter the body of the wall at least 70 mm, so we take them at least 100 mm long if the wall has plaster under the tiles, and even longer for thicker coatings.
Dowels are propylene. Polyethylene is fragile, metal rusts, PVC cracks due to changes in temperature and humidity.
 The diameter of the screws is the maximum possible that the brackets allow. Remember that the sink of any washbasin is suspended, and the lever, even with light pressure on its edge, becomes powerful. If the diameter of the holes for the screws turns out to be less than 6 mm, then they need to be drilled out, or not to take such a sink at all, especially since such “alternative” products most often turn out to be silumin (very fragile) or plastic, fragile.
Sometimes a sink with a cabinet is installed in bathrooms (see top picture). But it requires a spacious bathroom, dirt can accumulate under the cabinet and inside it, and the capacity of a solid-looking dressing table is actually small: a siphon with pipes takes up a lot of space, so this solution is more of a tribute to tradition.
Video: installing a wall-hung sink
Sink installation
Installing a kitchen sink in terms of strength is easier because it has a reliable support in the form of a countertop. An exception is a sink with sinks under the countertop, see below, but these are practically not found in everyday life and require highly professional work for installation.
But technologically, a kitchen sink is more difficult, since you have to work inside the kitchen furniture, bent over, in the dark, and you need to do carpentry. Accordingly, hired craftsmen charge quite a lot for such work. Therefore, if you are accustomed to tinkering, it makes sense to install the sink in the kitchen yourself. Features of installation of different types of sinks.
Sealing
All modern plumbing fixtures are equipped with standard gaskets. When working with them, the following rules should be observed:
- All sealing work must be carried out only on completely dry fittings. You can dry it with a household hairdryer if necessary.
- If possible, avoid touching mating surfaces with your hands. If captured, degrease them by rinsing them in water and household dishwashing detergent.
- Place paronite (red or yellow, hard) gaskets between the plastic parts and the metal supply pipe.
- Plastic pipes of standard fittings are supplied with a reserve; they need to be cut to size, but in the absence of much experience - only with a plastic pipe cutter. The slightest distortion of even the smoothest cut - and the joint will leak, even if it cracks.
- Lubricate rubber gaskets with silicone sealant before installation.
The latter requires some explanation. Separately, rubber and silicone last for several years, but together they are surprisingly durable. As it turned out, the point is the difference in their coefficients of thermal expansion: the materials all the time seem to knead each other, preventing them from hardening tightly and cracking. If the plumbing installation was carried out taking into account the above, you won’t have to think about leaks for many years. 
Sink installation height
The installation height of the sink is not strictly regulated by any regulatory documents. SNiP give recommendations of 80-85 cm, but this is based on average height data. Scandinavian construction sites recommend 85-90 cm, and in Trondheim, the homeland of the Viking giants, even 90-95 cm. In Ecuador and Colombia, where most of the population are short Indians and mestizos, they recommend, on the contrary, 75-80 cm.
So do what is most convenient - in a small family you can hang it lower; in the Bogatyrskaya - higher. True, if you plan to install a washbasin with a pedestal, you will have to be tied to its height.
Types of shells and their features
The usual wall-hung sink is familiar to everyone, so let’s move straight to more modern varieties.
Tulip
Semi-pedestal sinks
The tulip washbasin first appeared in railway carriages and exists there in its original form to this day. Its distinctive feature is not a pedestal at all, but a narrow, deep shell. It had to be deepened to reduce splashing.
In the small bathrooms of apartments built in the post-war years, this design was just right, and for aesthetics (the siphon was in plain sight), the tulip sink was equipped with a pedestal. Appearing en masse in bombed-out England and Germany, the innovation spread widely throughout the world, and soon all the shells on the pedestal began to be called tulips, although they already looked no more like a tulip than a dahlia or odontoglossum orchid.
Long-term and extensive practice has shown that the tulip, in general, did not justify itself, primarily from a sanitary and hygienic point of view. The cavity in the pedestal is a favorite habitat of small domestic animals, and under a microscope, smears from the floor along the perimeter of the pedestal can make even a seasoned sanitary doctor's face stretch out.
Half tulip
Modern sanitation and hygiene are based on the fact that the floor in the bathroom and toilet should be as free and accessible for cleaning as possible. Any, even the smallest nook, becomes a source of infection, so tulip sinks have recently been replaced by sinks with a half-pedestal - half tulips (see figure), no less aesthetic, but not cluttering up the floor.
Half-tulips have one drawback: to clean the siphon, you have to remove either the entire shell (in the picture below) or its rather heavy and fragile part in the air, risking dropping it and breaking it (in the picture above). But the washbasin siphon gets clogged extremely rarely, so this drawback is very relative. It is completely eliminated in sinks with a decorative siphon-semi-pedestal, which are mentioned above.
Sink above the washing machine

The washbasin above the washing machine (see picture on the right) is a relatively recent innovation and, I must say, it was invented perfectly. Everything ingenious is simple - for centuries no one even guessed that it was quite possible to place the grille of a washbasin behind the bowl or in its far corner.
For residents of small apartments, this solution is just a godsend. Unfortunately, the price of this popular product is still disproportionately high. But you can make a plastic sink yourself, and select a mixer with a siphon separately.
An approximate installation diagram for such a sink is shown in the following figure. A siphon for such a sink requires a bottle siphon, with an additional pipe for connecting the washing machine drain.

Double sink
The double or two-cup sink first appeared as an attribute of luxury apartments with a spacious bathroom. But manufacturers soon realized that a double washbasin, to paraphrase Ostap Bender, is not a luxury, but a means of hygiene: most of all, it is needed in a working family living on a salary. Here, the price of minutes of morning toilet on a working day is higher than some hustle and bustle in the bathroom.

Double washbasin
Currently, double washbasins with a total width of up to 80 cm are produced, which allows them to be installed in standard bathrooms. Ease of use (although quite relative) is achieved by turning the horizontal axes of the spouts 45 degrees in different directions, see fig. The water supply and drainage from the siphons are common to both bowls, so installing such a sink does not present any additional difficulties.
Heated sink
Recently, washbasins with heated water have been quite actively advertised. Although they really don’t need a hot water supply, such a device is nothing more than the fruit of marketing tricks. Flow-through electric heating requires prohibitive amounts of electricity, expensive and complex rewiring for higher current, and the same for a shower. It’s easier to find or free a nook and cranny in the utility room.
Types of sinks
The main types of kitchen sinks are shown in the figure. The most common and familiar overhead sink; in the picture - on the left. It completely replaces the countertop; the methods and features of its installation are well known and described many times.

The next view, in the picture in the center, is a sink embedded in a cutting table. Its advantage over the overlay is only aesthetic; installation is quite complicated, and the countertop must be made of water- and chemical-resistant material. A built-in sink can be without a wing, as in the picture, or with a wet wing - semi-overhead.
A template for cutting out an opening for it must be printed on the packaging of a built-in sink. Check when purchasing and, if there is none, do not buy: it is almost impossible to remove the template yourself; you need a height gauge with a parallelogram copier or a laser spatial scanner.
- Before you outline the template cut out of the package, inspect and measure the tabletop from the inside out. It is not advisable to cut its frame and transverse supporting bars;
- Before cutting (with a jigsaw), cover the outlined opening around the outside perimeter with masking (paper) tape. A jigsaw shoe that has already been used may stain or scratch the decorative coating;
- Make the cut without putting too much pressure on the tool. From strong pressure, a thin flexible saw blade can bend in a vertical plane, move to the side, and it will take a long time to refine the cut with a shearhebel or a chisel to get the sink into place;
- seal with silicone not only the cut, but also the countertop by 3-5 mm around the perimeter, so that infection does not spread there from flowing under the rim of the sink;
- Immediately remove any silicone drips that appear during installation of the sink with a cloth moistened with table vinegar.
Built-in sinks are also installed under the countertop (in the top picture on the right); This sink is held in place by overhead brackets and silicone. The tabletop should be made of natural stone or modified wood of valuable and durable species: teak, ebony, red quebracho.
Anyone who has purchased a new kitchen set or decided to replace an old sink with a new one asks the question - “How to attach the sink to the countertop?” There are a few fairly simple rules that will allow you to do this work yourself, without resorting to the services of a specialist.
Choice of material – porcelain stoneware or metal?
If you are just planning a purchase, it makes sense to take a close look at the options presented on store shelves. Kitchen sinks can be overhead, mortise or wall-mounted according to the type of fastening. The first two options are the most common. They can also be made from various materials:
- stainless steel;
- enameled metal;
- porcelain stoneware;
- artificial stone;
- acrylic;
- glass
The next point in the classification of kitchen sinks is their shape. Today, you can find not only traditional rectangular sinks or sinks that are located in the corner, but also round and more intricate bowls. When choosing an extravagant configuration, make sure that it does not affect the ease of maintenance and cleanliness of the kitchen. It also makes sense to decide on the number of bowls (often there are two), the location of the mixer and the presence of additional functions, such as the possibility of installing an additional tap for filtered water or an overflow.
But if the shape and the presence of additional “options” are still a matter of taste and comfort, then the material from which the sink is made directly affects its durability, practicality and ease of use. Let's consider the two most popular options: metal and porcelain stoneware (artificial stone). Both have their advantages and disadvantages. Knowing them, you can choose the most suitable one for yourself.
A metal sink is a time-tested classic; it fits most interiors, is simple and reliable to use, easy to clean, can withstand hot boiling water and impacts (if a pan falls, for example). Among the disadvantages is the noise that is created by both the water from the tap and the dishes if it is moved along the bottom of the sink. It is also quite difficult to achieve the initial shine: drops leave marks on the surface.

A porcelain stoneware sink looks expensive, it is durable and strong, environmentally friendly, and comes in a wide variety of colors and configurations. But you will need to be much more meticulous about cleaning it. Well, the main argument not in favor of this option remains the rather high price. Analogues made from artificial stone are much more affordable, but are inferior to sinks made from stone chips in many respects.
Installing a sink in the kitchen - cut in or overlay?
Installing a sink in the kitchen largely depends on whether the structure in front of us is an overhead one or a mortise one. Until recently, the vast majority of sinks were metal and countertop, standard in size. The kitchen cabinets corresponded to the same dimensions. The sink was simply placed on the side vertical walls, and it became the top horizontal surface. The new generation of bowls, as mentioned above, are varied in both shapes and sizes, so most of them are mortise-mounted: a suitable hole is cut out in the durable and monolithic countertop of the kitchen unit and the sink is installed.

Since, due to the plumbing line, sewer pipe and siphon, and sometimes several siphons, the sink cabinet does not have a back wall and additional stiffeners, its assembly and installation must be done with special care. All open sections should be treated with water-repellent agents, otherwise the material of the housing will be deformed due to moisture, creating a favorable environment for the development of fungi and mold.
So, to install an overhead sink with your own hands, we will need:
- sink and cabinet;
- electric drill;
- wood drills;
- screwdrivers;
- pliers;
- silicone sealant (preferably transparent);
- tape measure or ruler;
- masking tape;
- self-tapping screws;
- L-shaped fasteners with oblique slots.
If the sink is light, it can be secured using only one sealant; it will simultaneously act as glue and will not allow drops of water to flow under the metal surface. A more reliable way would be to fasten the washbasin using self-tapping screws. On the assembled cabinet you need to install 4-5 special L-shaped fasteners, which are sold in specialized stores. To do this, secure them with self-tapping screws in the center of each wall of the cabinet; for reliability, you can make 2 fastenings. The main thing is to correctly calculate the length of the screws - they should not be visible from the outside of the structure. All fastenings must be placed at the same height.
It is much easier to install a sink on which a siphon and faucet are already installed, since this will be inconvenient afterward. Especially when it comes to a corner structure.
If you have not done this before, treat the cabinet sections with a sealant or moisture-repellent compound. After this, the sink is inserted into the cabinet, the fasteners are tightened, securely fixing the structure. In modern versions of overhead sinks, even more elementary fastening is provided, when self-tapping screws are fixed vertically in the upper sections of the cabinet walls. The sink, which has corresponding holes, is put on the heads of the screws and pushed in in a given direction. In this case, the main thing is to correctly measure the places where the screws are attached.
How not to make mistakes during installation - do you need a partner?
If you purchased an undermount sink, carefully read the instructions on how to install a sink in your kitchen. Installing a sink into a countertop requires precision and accuracy. Otherwise, you risk ruining the surface, which is quite expensive. You will also need a marker, template cardboard, a wood or jigsaw, a cloth or a special sponge to remove excess sealant.
You can mark the hole directly on the tabletop, but if you do not have sufficient experience in such work, it is better to first make a template from thick cardboard. So, carefully measure the inside of the sink and transfer these measurements onto cardboard, cut out with a small margin, attach the template to the bowl, and make adjustments if necessary. If the sink has a wing - a working surface on which you can place washed dishes, decide on which side it is more convenient for you to place it. The template is convenient because it makes it easy to imagine what the installed sink will look like, where the faucet will be, and whether wall cabinets will interfere.
All this needs to be cleared up before creating the hole. Once you have decided, secure the template with masking tape, outline with a marker and remove. It wouldn’t hurt to cover the perimeter of the future hole with tape; this will protect the decorative coating of the tabletop from mechanical damage. Use an electric drill to drill several holes close to each other. Choose a comfortable place, such as a corner. Connect them using a chisel and start cutting out the hole using a manual or electric jigsaw. Constantly check the correctness of the cut line. Since modern countertops are quite thick, the jigsaw blade may break, so prepare a spare one just in case.
It is advisable to use the help of a partner who will hold the blade of the hole being cut from below, otherwise it may fail under its own weight and the fracture will come out crooked. Observe safety precautions and do not injure the assistant’s hands. Seal the edges of the resulting hole from moisture. Assemble the sink, install the siphon, mixer, and install the necessary gaskets. Apply caulk around the entire perimeter of the hole, right up to the edge. Install the sink and press it firmly. The sealant will securely fix the bowl; remove any excess immediately with a damp cloth or a special sponge.
Allow the glue to set and do not move the shell. Next, connect the communications and make sure there are no leaks. In a similar way, you can install a stone and metal mortise sink. For metal ones on the inside of the kitchen table, sometimes special fasteners are also used that press the bowl and wing to the wooden structure. Installing a stone sink does not require them, since the heavy sink is quite securely fixed to the sealant.
How to install a sink in the kitchen - drill a hole for the faucet
Sometimes manufacturers provide the buyer with a choice of where and how to mount the kitchen faucet. This often applies to sinks made of natural or artificial stone with a wing or an additional small bowl. For some it is convenient to place them on the right, for others on the left. It happens that in such sinks at factories they make two holes on both sides and put a plug in the kit for the excess. But much more often you have to drill a hole yourself, and it’s good if a cutter of suitable diameter is hidden in the box with the sink.
Such a cutter or crown will be needed in any case. Many craftsmen, especially when working with sinks made of artificial stone, are afraid to make a hole, they are afraid that the bowl will burst or the edges will turn out sloppy. If you follow all the rules and take your time, problems should not arise in such an important matter. Stock up on tools and get started. But first, here are two helpful tips. Drill the hole in a ventilated area, as resins emit a rather pungent odor when heated. Place the sink itself in the box in which it was sold or in another suitable size. This will help you easily keep your house clean, since the process produces a great many shavings.
- Carefully measure the location of the future hole and mark it with a marker.
- Drill a hole in the center with an electric drill. Start slowly, at low speed, to prevent the drill bit from slipping and damaging the decorative coating.
- The hole in the center is necessary because the cutter or crown has a point in the center and is thus fixed in one place.
- Place the cutter on the drill, start drilling a hole, take your time, hold the tool strictly vertically, and securely fix it so that there are no chips or scratches.
- In the case of a porcelain stoneware sink, it is necessary to additionally protect your eyes with glasses, and add water to the cutter, which will become very hot, to cool it.
- Install the mixer into the finished hole and finish as described above.
The main thing to remember is that not only the aesthetics of your kitchen, but also its durability and safety depend on compliance with basic rules and the sequence of work. And the money saved on the services of a master can be spent on something more pleasant.

It would seem that installing a kitchen sink is a simple job. But when it comes down to it, many nuances and important questions immediately appear. And it turns out that not every model can be installed with your own hands. In some cases, it is impossible to do without the help of a specialist.
Kitchen sinks differ not only in design, shape and material, but also in installation methods. There are four types of models - overhead, mortise, integrated and under-table. The installation features of each of them will be discussed in this article.
But before installing a kitchen sink, you need to consider some rules. Firstly, it is not recommended to place it next to the stove. Ideally, it should be located close to the work area where food is cut. The best place for the sink is between the storage area (refrigerator) and the preparation area (stove). The distance between it and other kitchen appliances should be at least 60 cm. If space in the kitchen is limited, it is better to place the sink next to the refrigerator rather than next to the stove.
In practice, kitchen sinks are connected to the sewerage system and water supply, so most often they are installed in a corner or near a wall adjacent to the bathroom. But in fact, modern technologies allow you to install a sink in any place you need.
Which type of kitchen sink should you choose? Ultimately, it depends only on the preferences of the housewife and budget capabilities, as well as on the kitchen set. If it is made up of individual items, it is quite possible to save money and supply an invoice model. If you plan to install sectional furniture with a single work surface, it would be best to choose a mortise or integrated sink. Then you can avoid the formation of dampness and mold between the cabinets.
Drop-in sinks
The main advantage of mortise sinks is their hygiene. When installing, the sink is cut into the countertop, as a result of which its edges do not rise above the surface and moisture does not accumulate under them. Installation of this model involves cutting a hole in the countertop to the size of the sink. If the furniture is made of chipboard, you can handle the work yourself; if it is made of hard wood or artificial stone, it is better to turn to specialists.
To install a mortise sink, you will need a set of tools - an electric drill and wood drills, a jigsaw, a set of screwdrivers, pliers, a ruler, a square and a marking pencil, silicone sealant and a rubber seal.
Usually, the sink kit, in addition to the necessary fasteners, also includes cardboard templates. This makes installation faster and easier. If a template is not provided, use the product itself instead.
Carefully consider the location of the sink on the countertop. You should be comfortable using it without bending your back. It is advisable that splashes of water do not fall on the floor. The distance from the edge of the table should be at least 5-10 cm. The installed sink should not come into contact with the internal elements of the furniture - power struts and sidewalls.
Place the template or upside-down sink on the installed and secured countertop and trace the outline. Then inside it, stepping back 1-2 cm from the edges, draw a second one - a working one. A hole will be cut along it.
Drill holes for the jigsaw along the internal markings. Then, strictly adhering to the drawn line, begin cutting out the inner contour around the perimeter. Please note that the cut cannot be made along the outer contour, otherwise the sink will simply fall inward during installation. When cutting, make sure that the jigsaw does not hit metal parts, such as corners. If there are any, it is better to temporarily remove them.
While working, hold the cut piece from the inside so that its weight does not break off the edge of the tabletop that has not yet been cut. After finishing the work, the entire cut contour must be cleared of sawdust, sanded with sandpaper and treated well with silicone, otherwise water will get under the sink and spoil the countertop.
According to the instructions, put the fasteners on the sink, and then install it in the resulting hole, checking the accuracy of the cut. The sides of the sink should fit snugly against the countertop. Check the installation of the faucet and hoses at the same time.
If the kit does not include silicone, which is placed on the edges of the sink and prevents water from penetrating, the cut must again be treated with sealant. After this, install the sink into the hole, pressing its edges tightly to fill any possible voids with sealing material. Then, using fasteners, tighten it from below - first the corners diagonally, then the fasteners in the middle. Remove excess sealant from the countertop.
Now the sink can be connected to the sewer. To do this, you must use a siphon that protects from all kinds of unpleasant odors. Double-breasted ones are considered the best, as they clog much less often than their bottled counterparts. The mixer must be connected to the water supply and the tightness of all components must be checked.
Surface-mounted sinks
Overhead sinks are usually installed in modular kitchen units, which consist of standard-sized cabinets and cabinets. They are made from different materials, most often stainless steel with a glossy or matte finish. There are models with and without a drying wing, with one and two bowls. This is the most popular option for kitchen sinks. Their advantages include low price and ease of installation. The disadvantages are the small thickness of the material, which causes unnecessary noise during operation, as well as the gap between the cabinet and the countertop, where water can get in.

The sink and the cabinet for it must be the same size, otherwise you will not be able to dock them. Therefore, it is better to order both items from one place to avoid mistakes.
Before attaching the overhead sink, you will have to assemble a cabinet for it. It's not difficult at all - just follow the instructions. The end result is a cabinet without a top with a cutout in the back where the communication pipes go. The side walls and bottom are fastened using confirmats, corners or other fasteners included in the kit.
The assembled cabinet must be placed in the chosen place and proceed to the installation of the sink. First, let's prepare the tools. We will need plastic corners, a flathead and Phillips screwdriver, 3 x 14 screws, silicone sealant, and masking tape.
There are three options for installing an overhead sink - with glue, using brackets and wooden blocks. The first option is the simplest. The sink is placed on a prepared cabinet, the ends of which are treated with silicone sealant. After the silicone dries, it will be securely fixed, and the ends will be protected from water.
In standard situations, an overhead sink is secured with special brackets. They can come with it or be sold separately. First, self-tapping screws are screwed into the inside of the cabinet walls, onto which the brackets are attached. Then you need to tighten the screws a little, install the sink and move the mounting angle along the screw so that it is fixed in the recess of the fastener. When the sink is completely pressed against the base, the screws need to be tightened completely.
If the standard fastening is not suitable, for example, due to defects in the countertop, or is missing altogether, you can make a mounting platform yourself by selecting suitable wooden blocks or furniture corners. The bars are placed in the sink box. Then four furniture corners are screwed to them around the perimeter and the structure is installed on the cabinet. The second part of the corner must be screwed onto the inside of the walls of the underframe. To avoid cracking, constriction and deformation, it is better to tighten the fasteners by hand. Without a screwdriver.
To attach the sink directly to the wall without installing a cabinet, use special brackets that can be purchased at a plumbing store. At the selected height, markings are made, then a second line is drawn just below the first. The distance between them corresponds to the thickness of the back wall of the sink.

Then you need to measure the distance between the installation locations of the brackets and mark them on the marking line. After this, holes are drilled in the wall, brackets are screwed in and the sink is attached.
As you can see, you can easily handle the installation of an overhead sink yourself.
Integrated sinks
Design features, the method of installation and connection with the countertop in the form of a single surface give the name to this type of sink - integrated, that is, combined. They require special preparation of the countertop, which allows the sink to be installed flush, that is, flush with the work surface. The edges of such models are made differently than regular ones. For them, a smooth and flawless edge is both a quality parameter and a decorative element.
Integrated washbasins are subject to very strict quality requirements. If their edge is uneven, it will be impossible to install correctly. Therefore, thicker sheets of steel (at least 1 cm) are used to manufacture products.
Installing the sink flush with the countertop gives a new perception of comfort and quality - the surfaces are easy to clean, and there are no puddles of water around and under the sink. Bacteria do not multiply on a dry surface. Owners of countertops made of artificial stone will especially appreciate the benefits of an integrated sink.
There are three options for installing an integrated sink - flush, above the countertop and under it. The most popular are the first and third, and the latter is relevant for countertops made of stone and plastic.
A necessary condition for a quality installation is the preparation of the mounting hole and good sealing. To work, you need to prepare a small set of tools, the same as when installing other types of sinks. In addition, you will need a milling machine.
The preliminary installation stage is marking. The template that comes with the product is usually used as a basis. Then a hole is cut to the size of the sink minus its rim. After this, a quarter is milled around the perimeter of the hole, corresponding to the width of the mounting side of the sink. Its depth is set using stops on the router.
Immediately after this, the sink is inserted and sealed. Silicone sealant is used to seal joints. The last stage is attaching the sink. Fastening elements are usually included in the kit, but can be purchased separately if necessary.
Undermount sinks
Undercounter sinks are the most expensive option. They are mounted just below the level of the working surface, providing an attractive appearance and excellent sealing. They are usually installed on countertops made of natural wood, plastic or artificial stone, so it is best to entrust installation to specialists.
This installation method is most often chosen for expensive models made not of stainless steel, but of artificial or natural stone. Therefore, for fastening you will need special tools, for example, saws and diamond-coated jigsaws.
The main installation steps are practically the same as those described above for other types of sinks. But the sink is glued under the countertop using a backing made of plywood or chipboard. It, in turn, rests on the frame of the kitchen module. Special brackets are used to fix the sink. If the tabletop is made of stone, they are fixed with screws and dowels.
The hole must be cut very precisely and then sanded. In countertops made of natural wood, the edges of the cut are covered with a seamless waterproof film to prevent water from getting in there in the future.

We list the main types of sinks by design
When choosing the shape and design of the sink, it is important to take into account not only your own preferences, but also the parameters of the kitchen, the design of the furniture, as well as the composition of the family. The most important thing about a kitchen sink is its bowl. It is characterized by several parameters.
First of all, you need to decide on the shape and size of the bowl. Square and rectangular are considered standard. The first ones are very comfortable, roomy, their range is the most diverse both in design and size. The most popular parameters are 50 x 50 cm and 60 x 60 cm.
Rectangular bowls work well on narrow tabletops, but if their long side is located across the table, they are less convenient to use. Main dimensions – 55 x 50, 50 x 80, 50 x 100, 50 x 125 cm.
Sinks with round bowls are quite popular. They are easy to clean due to the lack of corners, they are very spacious, but most often do not have additional sections.
Bowls of non-standard shapes are also available for sale - pentagonal and hexagonal, trapezoidal. These will not fit into every interior, so you should think carefully when choosing. First of all, the sink should not be beautiful, but functional.
Standard sinks have only one bowl. But models with two or even three containers of the same or different sizes are becoming increasingly popular. They are arranged in one row or represent a complex structure. Multi-bowl sinks require special faucet models equipped with a flexible hose.
Corner sinks are often supplied complete with corner kitchen units, but they can also be purchased separately. Typically, such models are used in small kitchens, allowing you to make maximum use of the entire work surface space. Under them you need a special trapezoidal pedestal.
Kitchen sinks with wings are very popular. There may be one or two wings. They provide additional work space and are used for various purposes - drying dishes, placing various kitchen utensils, cleaning and cutting vegetables, etc. The design includes grooves through which water drains back into the sink.
As for the depth of the bowl, 16-20 cm is considered optimal. Deeper ones are inconvenient. Since during work you have to bend over, and water splashes heavily from small ones. But if the sink is small, the missing volume can be compensated for by a larger bowl depth.
Our online store offers original Japanese Omoikiri sinks made of high-quality stainless steel and artificial stone, as well as faucets and accessories for them. Omoikiri brand products combine elegant design and functionality. All products are characterized by high quality, which is confirmed by multi-stage testing. They undergo careful testing before going on sale. We offer the best prices for Japanese kitchen fixtures and accessories, as well as delivery to any region of Russia using the most reliable transport companies. Our managers will be happy to provide you with any additional information on products.
A mandatory attribute of any kitchen is a sink, so no kitchen renovation is complete without replacing and installing it. Many owners are trying to learn how to properly install a sink in the kitchen with their own hands without the help of professionals, in order to thus save on the installation crew. In reality, there is nothing complicated about this, the main thing is to know some of the nuances, which we will discuss below.

Types of sinks
All sinks existing today differ in the installation method.
They are:
- Invoices;
- Mortise.
It should also be said that there is also a mounted option, but in our time it is no longer relevant. But overhead and sinks compete with each other in popularity, and their aesthetic appeal is almost comparable.
Installation of a mortise sink
This type of product has recently become particularly popular among our population, as it is practical and has an attractive design. In addition, the countertop into which the sink is embedded can be made of any material. Unlike an overhead sink, the dimensions of the cabinet practically do not matter.

Any defects in this design are possible only if the installation work was carried out incorrectly or as a result of leaky joints.
Work order
To perform the installation efficiently, it is necessary to carry out the markings correctly.
The instructions look like this:
- The product is supplied in a cardboard package, which at the same time serves as a template for cutting out the tabletop. Therefore, first of all, you need to separate the stencil from the rest of the packaging.
- Then the template should be placed on the surface of the countertop in the place where the sink will be located and secured with masking tape. The contours must be outlined with a pencil.
- Next, you need to cut out the opening using a jigsaw. To do this, you must first drill a hole so that the tool can penetrate inside. You should cut out slowly, without putting any effort on the tool, so that the cut does not turn out oblique.
- After this, the edges of the tabletop must be treated with sanitary silicone so that the cut area becomes sufficiently water-resistant.
- Then the sink is tried on. If the operation was successful, then fastening and sealing is performed.

Advice!
To prevent the silicone from hardening, you should first prepare the sink for installation.
After installing it, the fastener should snap into place.
Before installing a sink in the kitchen, you need to choose the most suitable place for it.
In addition, there are other nuances:
- It is advisable to determine the location of the mixer in advance, since some models may require a specially shaped cutout.
- Experts recommend removing the drain, as well as installing filters and valves, before installing kitchen furniture.
- When marking the countertop, you need to take into account the crossbars and cabinet walls, so you need to take careful measurements before applying the markings to the countertop.
- If the siphon is installed on a long outlet, it is advisable to tie it to the bottom of the countertop. Otherwise, the structure may sag under the weight of water.

Advice!
The distance from the back side of the sink to the wall should be at least 10-15 cm.
Otherwise, it will be inconvenient to wipe the countertop at the sink.
Installation of an overhead sink
It must be said that installing overhead sinks with your own hands is much easier than installing sinks. During the installation process, there is no need to cut the surface, since the product is installed on a cabinet with side walls, doors, but without a table top.

Preparatory work
Before installing the sink, it is necessary to insert siphon and faucet outlets into the cabinet. After fixing the product, this work will be much more difficult. In addition, it would be a good idea to treat the ends of the cabinet with silicone, since this procedure will protect the cabinet from moisture and thereby extend its service life.
Mounting methods
There are several ways to secure the product to the cabinet:
- Fixation with glue. This method involves placing the sides of the sink on the edges of the cabinet, which are pre-coated with silicone sealant or other sealant. In this case, the edges of the sink must be pressed against the ends of the cabinet and left in this position until the composition dries.
- Installation with mounting brackets. Fixation is carried out using special brackets, which are usually included in the package. The installation process consists of alternately fixing four plates with screws.
- If the cabinet or sink does not come with mounting brackets or the cabinet is defective, you can use wooden blocks. To do this, you should buy wooden elements of the required size and furniture corners, the price of which is very low.

The photo shows a mount for installing a sink.
Completion of installation work
The last step in installing an overhead sink is connecting the siphon to the sewer. In addition, flexible hoses that come from should be connected to the water supply. Before checking the system, you need to open the aerator and then turn on the water. This way, all garbage will come out of the system.
Advice!
After installing the fittings, turn on the hot water to check the tightness.
Conclusion
Now, having familiarized yourself with the nuances of installation, you can cope with this work without outside help. The main thing is to take your time and follow all instructions. In the case of a built-in sink, the quality of installation will primarily depend on the accuracy of the markings and cutout of the countertop.
For more information on this topic, watch the video in this article.
 (1 ratings, on average: 5,00 out of 5)

