Cladding the basement of a house with your own hands. How to veneer and finish the basement of a house - description of possible materials and technology for plastering. Basement cladding
The basement floor gives the owner of a private house many advantages: here you can place a garage, a sauna, a workshop and even a living room. Structurally, the basement is a semi-basement floor, partially located above ground level. Therefore, the finishing of the basement of the house is part of the external finishing of the entire building.
However, due to its architectural features, the materials for finishing the base of the foundation differ from the finishing materials for the walls of the house. Therefore, facing the basement of a house has a number of technological features.
Features of the basement
 Basement floors have been gaining popularity recently
 Unlike the ground floors of private houses, the ground floor is partially buried in the ground. The base of the foundation in this case acts as walls for the plinth. According to building regulations, it can be considered an underground room, the top floor of which is located at a height of less than two meters from the ground level.
The great popularity of this design in recent years is due to the significant increase in usable area to the total size of the interior: even for a relatively small building measuring 8 x 10 m it will be 80 sq. m. m.
 By and large, the cladding of a concrete plinth can be made of the same materials that line the walls of the house. You can cover the basement of a house using ceramic tiles, plastic panels, siding, natural stone and porcelain stoneware.
Also, facing the base of buildings can be done by plastering the outer surface. However, the proximity of the floor to the ground makes adjustments to the technology of work and the choice of finishing material.
In this article we will try to take a closer look at all the options for finishing the base and which material is better for cladding the base of a house.
Preparatory work
Before finishing the basement of the house, a whole series of preparatory work should be done.
Drainage device
 Drainage keeps the basement dry
 Both the base of a wooden house and the base of a brick house require the construction of waterproofing protection. First of all, a drainage system should be created along the entire perimeter of the foundation.
Good and properly executed drainage allows you to remove excess moisture from the foundation, which is especially important if the site is low or if the groundwater level is high.
Excess moisture, penetrating through pores and tiny cracks into the thickness of concrete, leads to its gradual destruction.
 Drainage diagram around the building
 In addition, dampness creates a favorable environment inside the basement for the growth of mold and mildew. A trench is laid around the foundation, at least half a meter wide and about 20–30 cm deep. At the bottom of the trench, a drainage cushion of gravel, crushed stone or expanded clay is poured, with the help of which melt and rainwater will be drained from the foundation.
Preparing the foundation wall
 The wall needs to be cleaned
 It is cleaned of dirt, all seams and cracks are carefully sealed using putty.
If there is such a need, then finishing the base at the preliminary stage should include leveling the walls using plaster solutions.
For plastering external walls, cement-based plaster mortars intended for external finishing should be used. You can familiarize yourself with the technical conditions of use on the packaging.
 Stone cladding will require you to pre-plaster
 However, the labor-intensive option of plastering will be necessary only if you are going to use stone, porcelain stoneware, clinker for cladding the base of the house - that is, those materials that are attached with adhesives directly to the foundation wall.
If you are finishing the outer surface with materials mounted on the internal frame (siding, PVC panels, etc.), then it will be much more expedient to level directly with the frame elements.
Next, before covering the base with decorative finishing materials, the surface of the wall will need to be treated with water-repellent compounds. Finishing the base of a wooden house, if its above-ground part is made of timber or logs, should also include treatment with antiseptic and antifungal drugs. This useful video will help you avoid mistakes when facing:
Clinker
 Clinker brick is strong and durable
 This material for cladding the plinth has a number of positive qualities:
- High quality and durability. Clinker tiles are made from special types of clay, pressed into molds and fired at high temperatures.
- Excellent decorative qualities. Clinker is able to imitate high-quality facing bricks, stone tiles and other more expensive finishing materials.
- Low weight. Clinker tiles have much less mass than real brick or granite. Therefore, the base lined with it will not exert excessive pressure on the base of the building.
 Typically, clinker tile cladding begins from the bottom of the foundation. Initially, you should determine this very lowest level, from which the work will begin. To do this, measure the height of the base and divide it by the width of the tile (plus the width of the seam).
Using these calculations, we determine the bottom line along which the first row of tiles will go so that the top row is level with the top edge of the foundation wall, or slightly above it.
After the lowest point is found, we draw a line from it along the entire perimeter of the basement wall. In this case, it is better to use a water or laser level.
Before gluing the tiles, the wall must be treated with primers. This will significantly increase the adhesion of the adhesive composition to the concrete or brick surface of the basement. For more information about the clinker base, watch this video:
 To stick clinker tiles, you should use specialized construction adhesives based on a polymer or cement base. When choosing an adhesive, you should pay attention to the area of its application - it must withstand changes in humidity, temperature and other natural influences well.
Dry adhesive mixtures are diluted with water in accordance with the recommendations on the packaging; the finished mixtures can be used immediately. The clinker is glued row by row either along the entire perimeter, or only along one wall with the obligatory entry into adjacent walls with corner elements.
After completion of the work, the seams between the tiles are sealed with special acrylic or cement-based fillers.
Plastering
 Plaster is easy to apply and repair
 Using plaster, you can finish the base of a brick or wooden house if the walls of the basement are made of concrete or brick. Finishing walls with plaster has the following positive aspects:
- weather resistance. Plaster solutions designed for external use have excellent resistance to temperature changes and changes in air humidity;
- breathability. Due to the presence of tiny pores, the plaster coating allows the interior to “breathe”;
- high decorative qualities. A large assortment of colors and textures of plaster mortars opens up wide possibilities for decorating foundation walls in any style;
- ease of application. Plaster solutions are quite easy to use - it is quite possible to plaster the surface of a wall with your own hands without the involvement of a team of professional finishers.
Selection of plaster mortar
 The most budget option is to use a traditional cement-based plaster mortar. It is characterized by high strength and durability in operation. You can buy it in the form of a dry mixture at a hardware store or prepare it yourself. To do this, you will need to mix 1 part of cement with 3 – 5 parts of fine sifted sand. Next, the mixture is diluted with lime water to a thick sour cream and applied to the wall.
 Special shapes allow you to create the effect of masonry on the plaster
 A more expensive, but also more aesthetic option would be to finish the basement floor with decorative plaster mixtures made on an acrylic or silicone base with the addition of synthetic resins and mineral additives. Such compositions can differ in a wide variety of colors and textures.
The great plasticity of the solution allows you to create all kinds of three-dimensional patterns on its surface, as well as imitate the finishing of a marble or granite slab.
Decorative plaster is presented on the market both in the form of a dry mixture and in the form of ready-to-use compositions. The table shows the ratio of components of various types of plaster solutions.

Plastering the surface
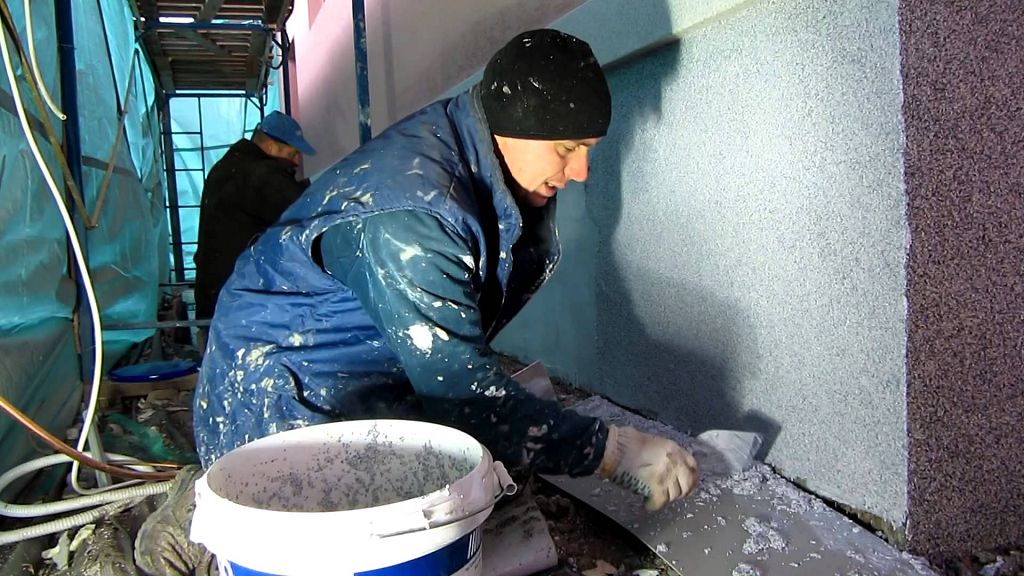
 For better adhesion to the surface, it is better to apply the solution onto a metal mesh
 Before starting work, you should clean the wall surface from old finishing materials, dirt and dust.
Then we cover the wall with primer solutions for better adhesion (adhesion) of the plaster to the wall.
When plastering a wooden base wall, to improve adhesion, you will need to cover it with metal or fiberglass mesh.
A similar mesh is also used for plastering basement floors covered on the outside with heat-insulating materials: polystyrene foam, penoplex, etc.
Plastering work should be carried out in the temperature range +5...+25, preferably in calm weather. The fact is that low/high temperatures prevent the natural “setting” of the solution. In the same way, wind contributes to the rapid dehydration of the mixture and, as a result, its cracking and peeling from the wall surface.
After applying decorative plaster, the surface is treated using a texture roller or grout. As a result, the plastered surface is covered with a voluminous decorative pattern. Surfaces plastered with a simple cement-based compound can be painted using exterior paints or whitewashed with lime mortars.
Stone cladding
 Modern artificial stone is almost as good as natural stone
 Stone is an excellent decorative material that can last for tens, if not hundreds of years. On the modern construction market there are options for facing slabs made from artificial stone.
This material (porcelain stoneware) is practically in no way inferior to natural stone: neither in aesthetic qualities, nor in long-term use. The foundation covered with porcelain tiles is practically indistinguishable in appearance from a wall lined with natural stone.
Stone laying begins from the bottom of the basement wall. As in the case of clinker tiles, we determine the lower level from which the cladding will begin. The stone is attached to a concrete or brick surface using cement mortar or special adhesive building mixtures.
 In order to properly cover the base with stone, a number of technological nuances must be observed.
In particular, after laying each row of stones or tiles, you will have to wait for the mortar to completely harden before proceeding with the installation of the next row.
The seams between individual stones are also filled with grout or acrylic sealant.
The stone for finishing the basement of a house must comply with building regulations, be sufficiently hard, not delaminate and not have cracks. Its quality largely determines its longevity, resistance to changes in temperature and humidity.
Siding
Recently, finishing buildings with siding has become increasingly popular. This is due to the high decorative properties of this material, affordability, as well as the relative simplicity of its installation. Siding is also a fairly durable material - its service life, according to statements from manufacturing companies, is 50 years or more. The materials used for making siding are polyvinyl chloride, acrylic or galvanized sheet steel. For more information about installing siding, watch this video:
Installing siding is quite simple - any owner can install it themselves. First of all, you should install a frame made of wooden blocks or a metal profile around the entire perimeter of the basement wall. The siding panels are positioned horizontally, so the sheathing must be installed vertically.
 Siding is mounted on a metal or wooden profile
 Its installation begins with the installation of frame bars at the corners of the building; A twine or fishing line is stretched between them, along which the remaining vertical bars of the frame are mounted in increments of 0.5 - 0.8 m.
After the sheathing is ready, we attach sheets of siding to it, starting from the lowest.
The design of the panels involves joining them into grooves and attaching them to the frame using self-tapping screws.
The panel joints at the corners are covered with decorative corners, and slopes and trims are installed around the basement windows.
Protecting the basement from moisture is a necessary and primary task when forming the basement of a house. The base is the connecting link between the above-ground structures of a structure and its fundamental underground foundation. The strength of the base largely determines the stability of the entire structure. During the construction process, it provides the necessary surface for the construction of facade walls. In the future, its main function will be protection from penetrating atmospheric and ground moisture.
Meanwhile, the very foot of the house suffers most from dampness and becomes the most vulnerable point in the structure. It takes on the consequences of heavy rains and melting snow, leading to destruction. Therefore, waterproofing the base is necessary; in addition, it requires careful attention to the choice of protective equipment that can adequately withstand the aggressive action of water.
Means and methods for protecting the basement of a house from moisture

Basement waterproofing.
When choosing materials for waterproofing the base, it is necessary to take into account that work is carried out in two directions:
- vertical protection, which involves applying a coating to the wall surface;
- horizontal protection - laying waterproofing between the walls of the basement and the foundation.
Horizontal insulation of a house can prevent the penetration of capillary moisture into the above-ground structures of the building. It is implemented using roll materials. The most common among them are roofing felt and roofing felt. Roofing felt has a cardboard base, so when choosing it you should understand that you cannot count on a long service life.
Modern roofing felt coatings are more effective. They are made of elastomeric bitumen, and the role of the supporting layer is performed by polyester non-woven materials or durable glass fiber.
Vertical is very variable and can be performed using various methods of waterproofing treatment.
- Spreading involves the use of bitumen and its analogues. The thick consistency of the material makes it possible to achieve a thick protective layer on the surface of the house. However, this material does not have high strength indicators. It is too unstable to mechanical damage. Innovative building materials, such as liquid glass, are much more durable and efficient.
- Protective varnishes and paints are used for painting. The advantages include affordability and simplicity of the application process.
- The impregnation process is based on the use of liquid polymers and synthetic resins.
- Pasting allows the use of a wide range of rolled waterproofing materials.
When choosing a product that will help treat the plinth, it is necessary to take into account compatibility with the building material used to construct the plinth.
Return to contents
Penetrating waterproofing

The advantage of penetrating waterproofing lies in the fact that it is able to penetrate 90 cm into the thickness of concrete. It moves along the same cracks and capillaries through which moisture could move. Having penetrated into the thickness of concrete, the material reacts with the components of concrete.
Penetrating waterproofing fills all the small cavities of the concrete structure of the house, due to which the material gains strength (the strength of concrete increases by 20%). The chemical composition makes it resistant to acids, alkalis and petroleum products, in addition, it is not subject to mechanical stress.
Clean the surface from dust and construction debris. Dilute the dry powder in water, following the instructions on the package, stir the mixture thoroughly until homogeneous. The mixture must be applied to the moistened surface of the concrete structure. Apply the first layer of penetrating waterproofing to the base, and after it has dried, apply the second. Experts recommend waterproofing with penetrating materials using synthetic brushes or a special mortar pump. The basement of a house can only be treated with this type of material at temperatures above zero.
Return to contents
Rolled adhesive waterproofing

Roll materials mean bitumen, polymer and synthetic waterproofing. The material is glued to all base structures of the house. Typically, external walls are covered with several layers of waterproofing. If the house is located in an area with a lot of groundwater, then the number of layers can be increased to five.
Layers of insulation are glued to the outer walls of the basement, overlapping them. This type of insulation is not resistant to damage, therefore, at a distance of 1 cm from the surface of the waterproofing layer, a half-brick brick wall is erected or a reinforced concrete block is installed. The space between the protective wall and the waterproofing is filled with bitumen mastic. Installation work can be carried out at an ambient temperature not lower than 10°C.
Return to contents
Coating waterproofing

When protecting the surface of the base from moisture, it is worth paying attention to the coating materials that are applied to the internal and external surfaces. If the mastic is applied from the outside of the wall, moisture is prevented from penetrating into the room. There are several types of coating materials: bitumen mastics, cement-polymer waterproofing, polymer-bitumen mastics.
Bitumen-based mastics are the most accessible, but have a short service life. After operation for 5 years, under the influence of low temperatures, the bitumen material is destroyed, and external moisture will penetrate into the room.
Cement-polymer and polymer-bitumen waterproofing is more resistant to frosty conditions. When installing them, it is necessary to ensure protection from mechanical damage. Clean the surface, apply mastic in several layers depending on humidity and dry the structure.
Return to contents
How to protect a brick plinth from moisture
Performed in several ways:
- lay brickwork pre-treated with waterproof impregnation in the factory;
- use bitumen lubricant applied to the surface in several layers;
- cover with roofing felt;
- apply a building mixture of a special penetrating composition.
The latter method is based on the action of the active components of the mixture, which, once they get into wet microcracks or pores, clog them with their own crystallization.
The basement is one of the most important parts of a private house: it is designed to protect the house from deformation, withstanding temperature changes, as well as numerous climatic precipitations. Therefore, facing the foundation plays an important role in the construction of a house. In this article we will give instructions on how to finish the base with your own hands.
Finishing material

To decorate the base, the following are most often used:
- Artificial or natural stone.
- Siding.
- Tiles or panels for facade finishing.
- Profiled sheet.
- Special coatings.
The choice of one or another finishing material is determined both by the preference of the owner of the house and his financial situation.
Artificial or natural stone

It is made from concrete mortar using certain dyes, as well as additives that allow the finishing material to withstand temperature changes. Cladding the base with artificial stone has a number of advantages:
- The effect of finishing with natural stone.
- Inexpensive cost of finishing materials.
- Long service life of artificial stone due to the increased strength of the material.

Natural stone is much more expensive than artificial stone, but it itself has higher strength than artificial stone. Most often used in finishing:
- Granite.
- River (sea) stone.
- Sandstone.
- Marble.

Siding finishing
Recently, finishing material such as siding has become increasingly popular. It is a panel made from a pressed polymer composite with the inclusion of various additives that give strength to the material. Siding has a number of undeniable advantages:
- Increased strength.
- Resistance to various climatic conditions: rain or snow, and temperature changes.
- Does not require maintenance.
- Allows installation in any weather on any type of base.

If necessary, preliminary work can be carried out to insulate the basement.
Tiles or panels

Tiles or panels for external walls provide a wide range of possibilities not only for finishing, but also for decorating a private home. This finishing material is made of dense concrete with small pores, which significantly increases the strength characteristics of the tile. A wide selection of colors allows you to choose the right shades that suit your home.
Profiled sheet

Profiled sheets are often used in finishing. However, it should never be used if the house is built from wooden beams. Since corrugated sheets are susceptible to corrosion when exposed to moisture, they can contribute to rapid rotting of the wooden base of a house.
Finishing process

Depending on the type of foundation and the chosen finishing material, finishing technology may vary.
The base, made of natural stone, does not need finishing. However, a foundation made of concrete or brick requires finishing work. A pile foundation needs a reinforced frame on which finishing material will be placed. A wooden house cannot be finished until it shrinks.
If a pile foundation was erected during the construction of the house, you first need to build a frame around the base. For this you can use both wooden slats and galvanized metal profiles.
Wooden slats are not durable. Therefore, when making a choice in their favor, you need to understand that in a few years you will have to repeat the finishing work again along with replacing the frame.
The frame is fastened on piles using self-tapping screws. Thermal insulation material is attached to the frame, which is primed with a special moisture-proof finishing material.
A concrete or brick foundation needs preparation: it must be cleaned of dust and dirt; its surface must be leveled using a special solution. Only after this is a moisture-proof primer applied, onto which the selected finishing material is subsequently laid.
Each finishing material for the foundation of a private house needs to be properly placed on the base of the building. For example, tiles or panels for a facade require the use of a certain type of adhesive solution. Natural or artificial stone is “set” on a concrete solution. Siding can be attached using either glue or self-tapping screws. Some types of panels or tiles for facade finishing have special grooves and ridges with which the elements are mounted with each other. In order for the finishing material to adhere to the base, it is necessary to support it with the help of special slats or overlays.
If finishing is planned, it should be borne in mind that it is advisable to make the base a darker color than the main color of the facade. Some materials, such as natural stone, require additional treatment with moisture-repellent agents that will extend the service life of this finishing material.
Photo


Video
From this video you will learn how to decorate a basement with siding.
Before deciding what the base should consist of, you need to know what it serves.
The base is not just a protruding step, not a design element, it is a continuation of the foundation, therefore, first of all, it must be solid and protect the house from moisture, temperature changes and possible groundwater. It is very important that not only cold and moisture do not penetrate into the room, but also that steam is removed from inside the house.
If you're going to do it, do it first. A common problem in the fight against humidity in the house is neglect of preparatory work. It is very important to carry out all work on installing and finishing the base in dry, warm weather. So, drainage is everything!
- We dig a trench around the perimeter of the building, 50 cm wide and 20 cm deep.
- We fill the trench with gravel, which ensures drainage. If desired, it can be reinforced with reinforcing mesh.
- The surface of the wall of the future plinth - 50-70 cm from the ground - is cleaned of dirt, treated with water-repellent primers, so-called water repellents, and, if necessary, smoothed out unevenness.
- If you are a perfectionist, you can additionally line the wall with synthetic carpet material with an air layer. This layer forms near the wall and ensures the evaporation of some of the moisture.
- We make thermal insulation. It can be insulated with polystyrene foam, polyurethane foam, extruded polystyrene foam and mineral wool. The last option is not very good, since mineral wool loses its insulating properties over time.
- Now we proceed directly to cladding the base.

Of course, before even starting preparatory work, you need to select the cladding material.
When choosing a material, you need to take into account a number of factors: price, durability, degree of protection, lightness, appearance. The base can be non-protruding or protruding. If you choose the second option, you must use ebb tides. We will look at different types of plinth cladding with their pros and cons.
Finishing the base with plaster
The simplest option is plaster followed by painting.
pros- an economical and relatively easy to implement option. This work can be done independently, without resorting to the services of specialists. If you choose good exterior paint, you can give your home a very well-kept look.
Minuses– unstable to chips and cracks, short-lived.
Stages of work:
- Clean the work surface from dirt and uneven surfaces.
- We treat the wall of the future plinth with a primer. It is necessary to carefully coat all cracks and chips. It is important not to rush to the next step and allow the primer to dry completely. This may take more than two days.
- Apply plaster to the wall with a spatula. You can make a stone effect from plaster, but you still need to have modeling skills to do this, but you can look quite impressive, especially after covering it with paint. If you do not have such skills and work on your own, just smooth it out with a spatula, let the composition dry, also for about two days, then sand it and paint it. Acrylic paint is most often used. It is waterproof, and at the same time vapor-permeable and frost-resistant. Polyurethane, alkyd and silicone paints are also used. It is not recommended to use enamel paints, since they are environmentally unsafe and do not allow air to pass through.

If you decide to make the base using the method of plastering over a mesh, you need to add an adhesive composition after applying a layer of plaster and press a polymer mesh into it about a third, which is smoothed on top with a metal trowel.
After another two days, coat the resulting base with acrylic primer.
But that's not all. If you are not a sculptor, but want to create the effect of natural stone with your own hands, rejoice, modern technologies have solved this problem too.
So, we first apply a cement solution to the pre-treated surface, then a decorative layer of plaster, level it with a spatula... and make an impression using a special mold. The downside, of course, is that you need to purchase it. But everyone will mistake your plastered base for stone.

Prices for popular types of plaster
Plaster
Finishing the base with concrete
This method of finishing the base is more reliable than conventional plaster. It is also suitable for subsequent finishing of bricks, PVC panels and tiles. But you can do it even simpler. After concreting, paint the base with concrete paint.
Stages of work:
- We attach a metal mesh to the base. It is better to choose a mesh with a cell size of no more than 1 cm with a three-dimensional structure. This will allow for a larger area of contact between the mesh and the solution, which will improve the reliability of the base. We fasten the mesh with quick-installation dowels or nail dowels.

- we make formwork. When preparing the formwork, we install guide boards and secure them with pegs that are driven into the ground. Next, we fasten the shields in a vertical position, first on one side, then on the other. Every half a meter we fasten the shields with spacers and additional clamps; they will prevent the formwork from opening when pouring concrete. The outside can be secured with spacers or pegs.

- pour the concrete, wait for it to dry, remove the formwork, paint it and voila - your base is ready!

Stone finishing
Finishing with stone certainly looks better, although the taste and color... But still, stone, natural or artificial, will last much longer and will protect better from external influences.
Let's consider options for finishing the base with stone.

A natural stone
The natural stone that is used to finish the base can be sandstone, limestone, granite and even marble.
Marble, of course, looks rich. But this very expensive material has a big disadvantage - it absorbs moisture and dirt. It can be washed, but it is also very difficult. Therefore, marble is rarely used. But that's not all. There are options that are more expensive than marble, generally with exorbitant prices. This is, for example, labradorite. It combines the uniqueness of color and the durability of granite, creating multi-colored reflections in different lighting conditions. Your home will literally sparkle with color at different times of the day. But you will have to pay a lot for this.
Pros: A house with a stone base looks much more solid and impressive. Longer service life, no need to repaint or finish anything, resistant to chips.
Minuses: Natural facing stone will cost you more than plaster with painting and finishing with other materials. Another disadvantage is stone - the material is quite weighty not only externally, but also in its mass, and this puts an additional load on the foundation. In such cases, a reinforced connection of the drainage pad with the foundation is mandatory. Often, stone requires complex installation and, therefore, entails an increase in installation costs. For example, granite blocks must be reinforced in addition to the mortar and special stops must be used.

Stages of work:
Since natural stone is very heavy, we need to strengthen the surface of the plinth:
- Using special fasteners, we mount the mesh to the wall.

- then we apply a solution of concrete or plaster for finishing work onto the mesh.

Applying the solution to the mesh
- After the surface has completely dried, treat the base with a primer using a roller or brush.

- The next stage, again after drying, is to apply a special high-strength glue.
- We attach the stone with glue in much the same way as tiles, without the use of cross-shaped beacons. Natural stone does not require the same distance between the seams, since the stones can also differ in size from each other. Be sure to wipe off any escaping solution.

- After complete drying, apply grout.
Fake diamond
The material is made on the basis of cement-containing mixtures with the addition of expanded clay crushed stone. There is simply no limit to imagination here. This material is made in various sizes, profiles, and colors. That is, you can choose the design, color, size to match the style of the whole house, and ideally select the base cornice. Artificial stone can have a rough or smooth surface. All of the above can be attributed to the advantages of this coating. The downside is the high price of the material.
Stages of work:
It would seem, what is the difference? Both are stone. But in this case, the weight of the artificial stone is still lighter and we can take two installation routes. The first, as in the case of cladding with natural stone, we strengthen the surfaces of the base; the second way does not provide for such a solution:
- leveling
- padding
- gluing the stone to the surface.
- applying grout.

Clinker brick finishing
This material is made from fireclay - fireproof clay, this is its advantage and advantage over ceramic bricks and facade plaster. Water-repellent and frost-resistant. Manufacturers provide a 50-year warranty on bricks. Cons: quite heavy weight and high price.
Stages of work:
The brick finishing technology is almost similar to the technology using artificial stone. Only cross-shaped beacons are used without fail.
It is imperative to take into account the hardening and drying time of the adhesive mixtures used.
Important: start work from the corner and lay out brick and stone from right to left.

Clinker tiles
You can't tell the difference between tile and brick by size and appearance. But the biggest difference between the tile is its thinness and lightness. Tile thickness from 8 to 21 mm. It is also convenient that there are corner elements, which allows you to perfectly close the corners of the plinth. pros finishing with clinker tiles - it is frost-resistant, moisture does not penetrate into it, it is very durable and has a long service life.
When installing clinker tiles, as well as other similar finishing materials for external use, it is important to use frost-resistant adhesive solutions and mixtures for joints.
Stages of work:
- prime the surface

- Apply special frost-resistant glue. Here it is important to apply a layer of glue no more than 1 sq.m., because after 30 minutes the glue hardens and you simply will not have time to glue the tiles. In this case, we use cross-shaped beacons to create equal distances between the tiles.

- After gluing all the tiles, fill the seams.


Basement finished with clinker tiles
Prices for various types of clinker tiles
Clinker tiles
Basement siding or PVC panels
PVC panel finishing can be considered one of the cheapest options, which is its advantage. This material is also convenient because it is easy to install, convenient to clean, it is very light, frost and moisture resistant, and it does not burn well. Here, as in the case of clinker tiles, there are also corner elements, which is very convenient. Manufacturers offer many design solutions. You can install siding under brick, stone, mosaic tiles, or wood. By the way, what is remarkable. This material can be used to decorate not only the basement, but the entire house.
The method of attaching the panels to the base is completely different from the previous ones. There are no adhesive solutions; metal or wood sheathing is used, which allows the house to “breathe.”
Don't forget to purchase connecting elements with plugs and guides.
The disadvantage of such material is debatable. Some people believe that it contains substances harmful to human health, but the manufacturers assure that this is not the case.

Stages of work:
- The first step in this case will be the manufacture of the sheathing. The materials for lathing are usually special profiles with wooden slats. Of course, all materials must have the main characteristic for the base - moisture-repellent. Therefore, we treat all wooden surfaces with moisture-proof impregnation. When making the sheathing, we use a water level and a plumb line. The material is large in area, so it is necessary to avoid distortions in the structure.

- Waterproofing film can be used as waterproofing
- We install the insulation using special clamps or tape.

- Using self-tapping screws, we attach plugs and joints around the perimeter of the entire structure to which the panels will be attached.

Installation diagram of siding panels

Siding prices
Base thermal panels
Manufacturers are not standing still; they are coming up with more and more economical and ergonomic solutions. Plinth panels are clinker tiles or artificial stone tiles, mounted on a thermally insulating polyurethane foam base with precise adherence to the “brick laying” rows. Plus is a more convenient fastening, since the panel consists of about 12-14 “bricks”. The downside is artificial materials, as with PVC panels.
Base thermal panels made of polystyrene are very short-lived. This is a temporary solution to the problem. The best material for thermal panels in terms of durability is polyurethane foam. Therefore, when choosing this material, be sure to inquire about its basis.
The work steps for installing thermal panels are identical to basement siding made of PVC panels.

Prices for various types of base thermal panels
Base thermal panels
Mosaic plaster
This plaster is completely different in its properties from ordinary plaster due to the binding element - resin. The resin imparts a very important property to the base - it becomes waterproof and vapor permeable. And this is exactly what you need! The advantages of this material include resistance to low temperatures and ease of application. The plaster contains small grains from 0.8 to 3 mm in diameter and looks like a multi-colored mosaic.
The downside is that it cannot be applied to calcareous, heat-saving surfaces, as well as artificial stone surfaces. It may also require adjustments during its operation.
Stages of work:
- clean and prime the surface of the base
- Apply a layer of regular plaster. You can do without it, but it will serve as an additional leveling step.
- Apply mosaic plaster using a stainless steel trowel. It can be applied to lime-sand, gypsum, cement plastered surfaces and concrete.

Porcelain tiles
This also includes quartz agglomerate - a slab of quartz or granite chips, again based on resin. The advantage of these materials is their high strength and resistance to external influences. You could even call it eternal; that would be an ideal option. If not for the minus - high cost.

Stages of work:
- We install the metal stainless frame to the wall using self-tapping screws, starting from the bottom of the structure, then the guides and side strips. The distance between the wall and the frame is 2-5 mm. This is necessary for ventilation.
- We fix a waterproofing film on top of the frame between the guides.
- We attach the tiles to the frame, having previously applied a thin layer of concrete mortar. The solution should be thick enough. We install the tiles on the frame using fasteners on the tiles.
Important: Be careful when working with porcelain tiles. Despite its strength, the edges of the tiles may break off during installation, which will result in a loss of tightness between the seams.

Prices for different types of porcelain tiles
Porcelain tiles
Flat slate
Flat slate is made from a mixture of asbestos, water and Portland cement. Slate can be pressed or unpressed. In our case, it is better to use pressed one, it is more durable. This material has a lot of advantages. Due to the asbestos in its composition, it is very durable and fireproof, does not corrode, is quite flexible, is not subject to temperature changes, is durable, and does not heat up in the sun. It has good sound and thermal insulation, and is resistant to aggressive environments. And most importantly, it has a low price. Disadvantages - when sawing slate, harmful asbestos dust is formed, it is inconvenient to install it alone, assistants are needed.
Stages of work:
- We prepare the surface of the base, prime it, and insulate it.
- preparing wooden sheathing.
- We attach the flat slate to the wooden sheathing, as well as to the drywall using self-tapping screws. We start from the corner of the house.
- We must cover the slate fastening points at the corners with galvanized iron corners using screws.
- We paint the slate, preferably with acrylic paint.
Important: Before installation, it is necessary to treat the slate sheets with an antiseptic composition. If the thickness of the slate is more than 1 cm, the sheet should only be cut with an electric saw in order to avoid large amounts of asbestos dust.
So, when everything is ready, we proceed to install the ebb and flow sills to prevent damage to our base by flowing water. Otherwise, all efforts will go down the drain.

Installation of ebb tides
They can be metal, aluminum, plastic. A more beautiful, but expensive, ebb can be installed from clinker shaped bricks or beveled clinker tiles, but the installation method is quite complicated, so you can’t do it without a professional.

Stages of work:
After cladding the base and before cladding the walls of the house, it is necessary to strengthen the flashings.
- for better adhesion of the ebb to the surface of the base, we make slopes at an angle of 15 degrees, level the top line horizontally, if necessary. The cement mortar should be thick.
- We wait a few days, the cement should dry thoroughly.
- We attach the sills directly to the wall using dowel nails.
- if the facade of the wall is sheathed along guides, then the ebbs must be attached to these guides with self-tapping screws.
Important: ebbs should protrude at least 50 mm above the base. The planks are attached to each other overlapping each other, with obligatory coating with frost-resistant sealant.
If you use wide metal ebbs, you will additionally need to use brackets for mounting to the wall.
The process of finishing the basement is quite labor-intensive, so it is important to use high-quality materials from the huge selection of building materials for finishing it, so that you don’t regret anything later, since the basement is a very important part of the house for preserving the warmth and strength of the building. And don’t forget about the exterior of the building, everything should be harmonious.
Video - Beautiful do-it-yourself plinth
Finishing the basement of a private building not only performs a decorative function, but also protects the lower part of the building from environmental influences. The base is a part of the foundation that rises above the surface of the earth, protecting it from moisture and cold. Therefore, it must be lined with durable and resistant, but at the same time beautiful material.
Types of finishing
Today, the building materials market offers a variety of foundation finishing options. The average consumer is often concerned with the question of what material is ideal for cladding the basement of a private house.
There are many options for finishing the base, the main thing is to choose the most suitable one for your home
Options for the most popular finishing materials:
- natural or artificial stone;
- decorative plaster;
- facing brick;
- siding;
- clinker tiles;
- sandwich panels.
Finishing the base with natural stone
This type of finishing is the most expensive option. In addition, this is a very long-term undertaking. But natural stone has better characteristics than many materials; it is resistant to the effects of the natural environment and is extremely durable. If you cover the facade of a wooden house with it, it will give the building an expensive and solid look.
Most often it is made of limestone, sandstone, marble, granite or onyx. Natural stone does not require additional care. Tiles are available in different sizes - from brick to slabs and textures (smooth or grainy).
 Cladding the structure with natural stone
Installation of stone tiles:
- Using an adhesive for working with stone, the tiles are glued one at a time to the base. To avoid peeling and cracking, use only this glue.
- To achieve the effect of integrity, the distance between small tiles should be no more than 6 mm, and between large ones - 2-3 mm or 1-2 cm, with visible separation.
- The joints are filled with a frost-resistant mortar, and sandstones and limestones are treated with a water-repellent agent.
Finishing the base with artificial stone
Existing options for artificial stone, as well as a large selection of colors, allow you to choose a material to suit every taste. It must be durable, resistant to moisture and temperature changes.
Artificial material is visually almost indistinguishable from natural material, but has a lower cost.
 Finishing the product with artificial stone
Installation of artificial tiles.
Stone tiles are glued to elastic or simple mortar. It would be better to treat the lined base with a water-repellent agent; this measure will increase the service life by more than 3-4 years.
Finishing the base with siding
Covering the base with siding is an economical and quick type of finishing. The material is not afraid of temperature fluctuations and moisture, which makes it possible to use it in any conditions.
The cost of siding panels is significantly lower than stone ones, and finishing work is faster and easier. In addition, this material is quite beautiful and also looks solid.
 The process of installing a plinth with siding
Plastering the plinth
This is a relatively inexpensive but effective way to insulate and protect the foundation from environmental influences. In the past, the base was simply plastered; now it is mandatory to insulate the foundation with all kinds of heat-insulating materials, followed by the application of plaster.
 Coating with decorative plaster
Insulation prevents the penetration of cold to the foundation of the building, while the mesh creates a solid base for applying the mortar and strength of the structure. To protect against moisture and improve the appearance, the surface of the foundation is then painted.
You can line the finished base with stone or siding.
Decorative finishing of the foundation
This type of finishing consists of decorating the foundation using painting, creating effects, and siding. You can also use a rasp to create a semblance of brick or stone masonry, mark the seams with contrasting paint, or line them with stone.
Finishing the basement of the house with mineral plaster
This type of material contains small fractions from 0.8 to 3 mm in diameter. The resin contained in the plaster base gives it water-repellent properties. At the same time, the material is resistant to cold and mechanical damage. It is vapor permeable.
The material can be applied to concrete, gypsum, and mineral plasters. Mosaic plaster cannot be applied over non-natural bases.
Plastering process:
- Mineral plaster is applied manually. Before applying mosaic plaster, the base should be lightly coated with plaster mortar to enhance adhesion to the foundation.
- Mosaic plaster is laid in a layer corresponding to the diameter of the fractions. Smooth it with a stainless steel grater before it dries. The direction of movement of the grater does not change. Work is carried out on a wet surface to avoid visible joints.
- In the very first days, the finished base is treated with a hydrophobic compound.
Thermal panels
Thermal panels are glued to the base like regular tiles. Foam glue or polystyrene foam glue is applied to their ends. The panels are glued and the seams are rubbed. The grout paste should be the same color as thermal panels or white. For optimal shrinkage, it includes marble chips.
Insulation of the corners of a wooden house is carried out using a corner thermal panel, made manually using a construction knife.
 Finishing the structure with thermal panels
- It does not require processing or painting.
- Does not get dirty, there is a self-cleaning effect.
- Easy installation and replacement of damaged thermal panels.
- The outer layer of the panel is protected from moisture and is vapor permeable.
- It is insensitive to ultraviolet radiation and reflects rays well.
- Thermal panels are characterized by elasticity, strength, and durability.
- It is resistant to temperature changes.
- It has heat-insulating as well as sound-insulating properties.
- The panel is not susceptible to mold.
Covering the base with thermal panels with clinker tiles
Such thermal panels can not only improve the appearance of the base of a private wooden house, but also insulate the foundation.
 Thermal panel design with clinker tiles
Clinker tiles imitate brick, but at a much lower price. It is made by firing, just like natural clinker bricks.
Thermal panels are slabs of extruded polystyrene foam, trimmed with appropriate decorative elements. They are easy and quick to install, provide insulation, as well as protection from moisture.
Clinker tiles
A foundation covered with such tiles looks like a wall made of clinker bricks, only much lighter and thinner. The tiles are glued to plaster, concrete and thermal insulation. It can bend and stick even on curved surfaces.
 Facing the house with clinker tiles
Finishing the base with your own hands:
- First, the line from which the tiles begin to be glued is determined (the height of the plinth divided by the width of the tiles, plus the width of the seam).
- Glue is applied to the tile and base with an area of 1 square meter.
- Starting from the corner, stick the first 4 tiles.
- After 2-3 days, the tile joints can be filled with cold-resistant jointing mortar. This is not necessary, because the fugu can be replaced by glue protruding from the seams.
- Such tiles do not require water-repellent impregnations, since they do not absorb moisture.
PVC paneling
This material will be a good choice for owners of a private house who decide to do without wet work. The panels can be easily installed by yourself. In appearance, they may resemble mosaic plaster or the surface of a brick wall. They are granules made of natural material, recessed into the plane of the panels.
 Facing the building with PVC panels
- The level is set and the starting profile is installed at the bottom of the foundation.
- Using grooves and ridges, adjacent elements are connected.
- The upper part of the base is covered with an overhead profile.
- The corners are covered with corner elements.
- The base sheathed in this way does not need to be treated with a water-repellent agent.
The foundation can be finished with small (0.4 by 0.18 m) or large (0.6 by 0.18 m and 1.2 by 0.18 m) panels in 40 color combinations.
Covering the base of a wooden house with sandwich panels
The panels are made of two layers of material (mostly metal), connected by insulation using a hot pressing method. Due to their layered structure, the panels provide excellent insulation, durability and strength. In addition, they look presentable and are easy to install, without unnecessary load on the base.
 Method of mounting the panel to the plinth
The surface can be smooth, decorated or profiled.
The above materials for cladding the base are the most popular among consumers due to their decorative, heat-insulating and water-repellent qualities. Insulation of the base of a wooden house can be done using any of them.
 (1 ratings, on average: 5,00 out of 5)

