How to print a text document on a printer. Publications
Text printing is one of the basic components of not only any office work, but also many other areas of activity that involve working with a PC. Naturally, this skill should be part of the arsenal of skills of even a novice computer user. In this article we will take a detailed look at the basics and all the nuances of printing text documents.
First of all, you need to make sure correct connection and setting up the necessary equipment:- The printing device (printer, MFP) is connected to the network and computer, is turned on, and a sufficient amount of paper is loaded into the paper feed tray.
- The computer recognizes the connected print device. You can check this through the “Device Manager” menu in the properties of My Computer or in the “Printers and Faxes” section in the Control Panel. Otherwise, you will need drivers for this printer on your PC (from disk, if available, or downloaded on the Internet). Some printer models, for example, HP LaserJet, automatically install the necessary drivers on your computer the first time you connect to it.
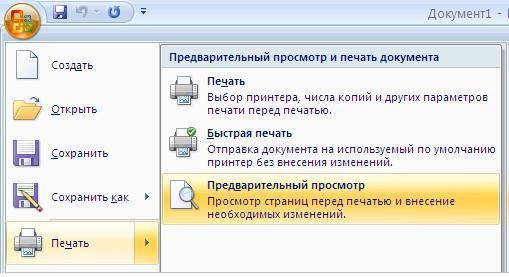
- “Print” – extended menu manual settings various printing parameters;
- “Quick print” – the document is printed in one click with standard settings: all pages, one page per sheet, one copy of each page, the default printer is used;
- “Preview” – preview the document for best rating layout of text before printing.


- Selecting a printer for printing and setting the parameters available for it (print quality, paper type, etc.).
- Setting up pages for printing: all, current (the one on which the cursor is located), selected fragment (if one was previously selected), number (you can specify a range separated by commas, for example, “1-3, 5, 7-8”) .
- Number of copies of each page (default 1).
- Scale: the number of pages per sheet and the size of the sheet itself to be printed.
- The option to print only even or odd pages is also sometimes useful, especially when duplex printing is selected. In this case, the entire range of odd-numbered pages is printed first, then the printed sheets are fed into the printer on the other side, and printing of the even-numbered pages continues.

Thus, printing text is very simple, and having mastered the principles of settings described above, you will easily cope with various tasks of printing not only text, but also other files.
Do you want to print photos or a text document? Of course, it’s good to purchase a printer and connect it to a computer. But this is not the end yet.
It is necessary to complete all the settings, do not forget to install the driver for this printing device, and also additional programs for correct operation of the device.
The combination of these actions will lead to the desired result - the ability to print. It is from these steps that we will begin to move towards the goal.
Connecting a printer
Older models of printing devices required a lot of attention to connect them to the computer.
It required connecting to a special port and waiting for the operating system to complete everything. Much has been simplified now.
There are two ways:
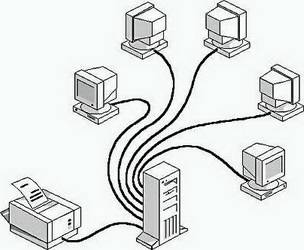
- installing it as a network one;
- or print from a smartphone or tablet.
We will look at two main types of connection:
- locally
- as network
First you need to install the driver.
Installing local way, make sure the device is turned off, then connect it to your computer, and then turn on the power. Standard Plug and Play makes the task easier - the operating system independently installs the necessary driver.
If this technology is not supported, you will have to install the driver manually.
In the first option, your actions:

If Plug and Play technology is not supported, then your actions are as follows:

When the installation is complete, in the folder Printers and faxes the corresponding icon will appear.
To use network type:

Note: The printing device may be the default one. Then all documents will be automatically sent to this device.
Driver installation
To install the driver, make sure the hardware is connected.
Then follow these steps:

If your device is in the drop-down list, then during installation, run the driver from operating system. This is not always good, as many functions will not be available. In this case, it is better to choose installation from disk.

This completes the work with the driver.
Setting up the printer
To configure or change the default settings:
- move the mouse pointer to the lower right corner of the screen, then up and click Search;
- enter in this field devices and printers, then click on it;
- equipment you will use, right-click, then select Use as default.
Using a laptop, mobile device or tablet, you can make settings for each network. The operating system remembers all these settings.
You can also choose to default to different models on different networks:

Comment! If you want the settings not to change when moving from one location to another, follow steps 1-3, and select Always use the same default printer. Then click OK.
Basic Printer Settings
Before purchasing a printing device, you should familiarize yourself with the parameters that affect its performance: 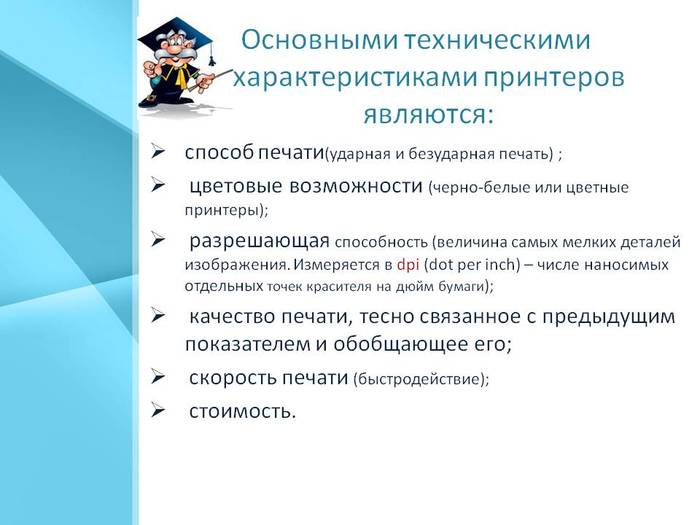

- containing dye;
- pigmented;
- quick-drying.
Everyone is good in their own way. But dye ink, for example, has the disadvantage of bleeding and short-lived color brightness. Pigment ink is more durable, however, it also has a disadvantage - it clogs the cartridges, which makes them unusable faster.
The most important thing is to refill each cartridge with the type of ink that suits it, otherwise problems with them cannot be avoided.
Video: typing on a computer
Print text
Let's consider how to print text from a computer to a printer using print options.
The first thing you need to do is select the text or part of it and copy it from any document or web page.
If you want to print part of the text, check the box. Selected fragment.
If you are typing Word document(eg Word 2007) first check for readability, grammatical and punctuation errors.
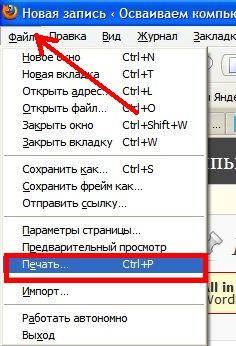
On the menu File click Preview(preferably), then Seal.
In the window that opens, you can select the necessary parameters:

- even
- odd;
- scale – you can specify how many pages to place on a sheet, and all pictures and diagrams are also scaled;
- by page size – specify the required page format;
- Effects tab – allows you to set background images;
- Paper/Quality tab – Set the print quality and paper size. This saves ink;
- tab Final processing– you can specify how many pages per sheet you want to get, and also set the text orientation.
In general, there is nothing complicated.
Black and white
You probably know about two modes: color and black and white.
To install the second one you need:

So, the current document will be printed in black and white.
Color print
Walking through the window Color management, You will see that you can view, change the default color printing values used.
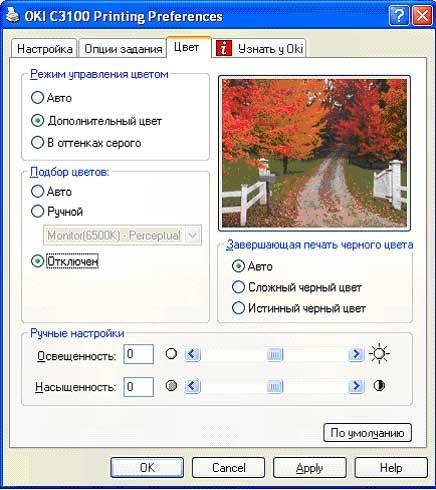
- click on Device Center, go to Color Settings, then, Color management. Here you can select the default settings;
- if you want more advanced options, click Professional settings;
- a window will open Advanced editing. Go to the option that displays the desired print option. Then click on the required value, then OK.
How to print photos from a computer to a printer
If you want to print Pictures,photos, this is where photo paper can come in handy.
To print an image:

- Printer
- Print quality
- Paper size
- Number of copies
- Printing style;
- at the end press Seal.
It is possible to print several images, photos on one page. For this:

Having looked at the methods of printing from a computer to a printer, you are convinced that there is nothing complicated. All operations are accessible, understandable and even somewhat similar. Just read carefully before setting the settings.
In addition, you can try any of them and choose best option for each file type. Try it! There is no limit to perfection!
What does a USB cable look like (click to enlarge)
The first thing you need to do is connect the printer to your computer. The most simple option is a USB connection. See the picture on the right for what the USB cord looks like (it may not be included in the kit - you will have to buy it at a nearby store). The connectors for connecting to the printer and to the computer are different, but it is impossible to confuse them since there is only one type of USB connector on the computer.
The advantage of connecting via USB is automatic installation drivers. (a driver is a program with which the operating system (read: computer) interacts with the device (read: printer)). Without a driver, you won't be able to print anything.
Automatic driver installation works even more efficiently if the computer is connected to the Internet. In this case, if the operating system (OS) does not have a pre-installed driver for your printer, the OS will contact the Update Center. There, the driver for your device will be found, downloaded and installed with a probability of 95-99%.
How do you know that the driver is installed and you can print? The OS will issue a warning or notification that the device is installed and ready to use. The connected printer can be found at
In my case, this is the first icon - Epson L800. You can get to the “Control Panel” by right-clicking on the START button on the taskbar or by pressing on the keyboard WINDOWS+X.
It happens that the operating system cannot automatically install the driver. In this case, please use the articles below:
- How to install a printer from a disk - (recommended as, most likely, you have a disk included with the device).
The most the hard part behind.
Printer settings
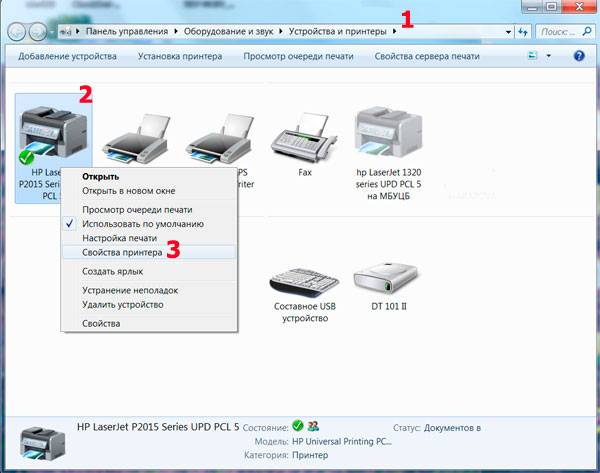
After the driver for the printing device is installed, you need to go in and check its settings. It is advisable to do this so as not to be surprised by the printed result. We go to an already familiar address
Right-click on the icon of the installed printer and select “Printing Settings”.
For Epson L800, duplex printing can be enabled on the
Are you dreaming of a mini printing house at home? This is quite real. You need a printing device and consumables for it. But it is important to know some of the nuances of the process. Let's look at a few useful tips for users who are learning how to print.
Printing to a printer from a computer
Open the photo on your computer in any photo editor, for example, Photo Viewer in Windows. Click on the “Print” button located on the top panel.

In the window that opens, select print settings: paper size, photo size, number of copies. Click the Print button.
Printing to a printer from smartphones
For Android smartphones
On your smartphone, go to the Play Market, type “Modules for printer” into the search bar.

Select the module that matches your printer model. Download it and install it on your smartphone. Select from image gallery required photo. Click on it and select the “Print” button in the menu that opens. Set the desired options and print the photo.
For Apple iOS devices
Make sure your printer supports Apple AirPrint, otherwise it won't work. A list of devices is available on the Apple technical support website.
Open on your gadget required photo, click on the “Sharing” icon. In the menu that appears, find the word “Print”. A new menu will appear in front of you; find the “Select a printer” section in it. Find your printer model and, if necessary, change the settings. Click Print.

If your printer does not support AirPrint, download and install the FingerPrint program on your gadget. To print a photo, follow the program prompts.
How to set margins when printing?
You should set margins in a Word document before you type the text. To change the margin size, open the Layout tab in the top panel and select the Margins command.

In the window that opens, select the appropriate parameters. If the ready-made templates are not suitable, click “Custom Fields” and set custom values.

Never set the margin size to zero! Then the text along the edges of the sheet will not be printed. This principle applies to printing from any program.
Another way to change the size of fields in Word is to hover the cursor over the top ruler slider and set the fields manually. If the ruler is not displayed, you need to go to the “View” menu on the top panel and check the box next to the ruler.

According to the requirements for document forms, the left margin should be 3 cm wide, the right margin should be 1 cm, the top/bottom margin should be 2 cm each. If the sheets will be filed on the right after printing, the right margin should be 3 cm wide.
Printing to a printer from a browser
If you want to print the entire page open in the browser, place the cursor anywhere on the page and click the right mouse button. A menu will appear in front of you. Select "Print". You will see a window with a preview of the document and print settings.

Choose the options you need: sheet size, color or black and white, leave only text or upload a background image. Here you can select the number of pages.
If you want to send only a fragment to the printer, for example, one paragraph of text, first select it in the browser. Then do everything described above.
To print a picture or photo from the browser, you must first move the cursor over the picture and open the image in a new tab. Then you can print on the printer as indicated above.

What to choose - PZK or CISS?
To print more economically and quickly, there are refillable cartridges (REC) and continuously supplied ink systems (CISS). Let's compare their pros and cons.
- Form. The PZK is similar in shape to the original cartridges. Their disadvantage is that it is impossible to monitor the actual ink level. If there is no ink left in the cartridges, the print head will become airy.
- Installation. The CISS consists of external tanks, a cable and cartridges similar to the original ones. The downside is that you will need an extra 10cm to accommodate it, but the external reservoir will allow you to monitor your ink levels. SPDs are installed in exactly the same way as original cartridges.
- Installation. CISS is carried out in 2 stages. The cartridges are installed, then the cable is laid and secured. The procedure is simple, and the CISS is installed only once.
- Refueling. To fill the PZK you will need syringes - separately for each color. CISS is not needed for refilling Additional materials. Simply remove the caps and add ink from the can.
- Impact on the printer. Each time the seal is removed there is a risk of air entering the print head. The CISS is installed only once, so mechanical impact and the risk of airing are minimized.
- Economical. The cost of printing photos is the same. When buying a CISS you will have to spend about 3 thousand rubles, but this will be a one-time purchase, a PZK costs about 300 rubles.
 If you print a lot, buy CISS
How to do without a driver disk?
If you have modern model printer and there is a USB cable, connect it between the printing device and the computer. Turn on both devices and connect them to the Internet. The drivers should download automatically.
If there is no USB cable or the driver cannot be loaded automatically, use the capabilities of the operating system. Through “Start” go to “Settings”. Select “Devices”, and then select the line “Printers and scanners”. Go to the “Add a printer or scanner” line. Click on the line with your device type and follow the prompts to install the drivers.

The program allows you to use only basic functions printer. To use all its capabilities, install drivers for the specific model and brand of printing device.
To download drivers for a specific printer and install them manually, you need to find out the model number. Look for this information on the front panel of the device.

Enter the name of your device and the phrase “download drivers” into the search bar of your browser. It is best to download from the official website of the manufacturer. Launch the drivers, install them following the program prompts.
How to check print quality (nozzle test)?
From the Start menu, go to Settings. Select “Devices”, and then select the line “Printers and scanners”. Select your printer and go to the “Printer properties” section. Then click the “Print test page” button.

For example, in the case of a Canon printer, you should get an image like this:

If the print does not match the sample, click the “Clear” button and correct the problems.
 Test print
What should I do if there are streaks on the sheet after printing?
If your inkjet printer prints with streaks, check to see if it is running out of ink. This is true? Refill the cartridge, change it, or fill ink into containers if you have CISS.
If the ink is fine, the nozzles may be clogged - they need to be cleaned. To do this, go to “Devices and Printers”, through the “Service” menu, select “Print head cleaning”. You may have to repeat this procedure twice or select the Power Clean option.

Sometimes the print head needs to be washed manually. It is best to entrust this to a repair service technician.
If the device began to “strip” after transportation or relocation, the carriage could move and the print head could miscalibrate. Then there will be streaks even if the nozzle test is good and the ink is normal. Find the “Print head calibration” item in the “Service” tab and follow the prompts.
What to do if the printer stops printing?
Restart your computer and printer. To do this, disconnect the device from the network. Turn it back on. Take out the USB cable and plug it in again. Go to Start and go to Settings. Select “Devices”, and then select the line “Printers and scanners”. Select your printer. Check if the “Use as default” checkbox is checked.
You need to print text or photos, but you are using a printer for the first time and don’t know where to start. Use simple tips to set up your HP printer to print.

The following video will tell you more about all HP printing settings:
If you need to print color pictures or photos, you should set the settings for their size and quantity in the “Select Layout” menu. Then click Next to have the HP printer begin printing.


If the printing device has not been connected to the computer before and you do not know how to set up the printer to print on your own, then use the following tips.
The correct sequence of installing and setting up the printer for printing
Latest Windows versions involve scanning new equipment connected to a computer and automatically setting the printer to print. But sometimes after self-configuration the printer still does not print, and the Epson CX4300 MFP does not copy documents. Why doesn’t the computer’s automatic setting for printing work and why does the device stop working normally? Try setting up your Epson CX4300 for printing yourself.

If the disc is lost or simply stops being readable after a while, you should download drivers from the official Epson website by selecting from the list the desired model printer or MFP, as well as the version and bit depth of the installedWindows.
If you want to download a driver for Epson, but don’t know where or how, watch the video:
Drivers for printers from HP, Brother and other companies can be downloaded in the same way; you just need to go to the corresponding official website.
- In the “Installation Wizard” that opens, go through all the setup steps, following the system prompts.
- Once the process is complete, try sending the text or photo for printing, following the above procedure.
For installation assistance, watch the following video:
Sometimes you may encounter a problem printing with a Brother printer, on which text and photos were previously printed repeatedly, but after a crash or reinstallation of Windows, the printing device stopped working.
Why Brother refuses to print or no longer copies
To figure out why the printer stopped printing from a computer, you need to consistently eliminate all possible problems.
 (1 ratings, on average: 5,00 out of 5)

