The largest naval battles in Russian history (12 photos). The largest naval battles in Russian history. Naval battles of World War II
Admiral Graf Spee became the third German “pocket battleship” built after the cruisers Deutschland (Lützow) and Admiral Scheer. In the early months of World War II, she sank British merchant ships with impunity, becoming the most famous ship of her type. And the results of his first and last battle provide rich material for analyzing the effectiveness of artillery weapons and armor protection of German heavy cruisers.Why is the Battle of La Plata and its results still causing such heated debate?
At the outbreak of World War II, the heavy cruiser Admiral Graf Spee, under the command of Captain Zur See Hans Langsdorff, was in the Central Atlantic. He received the order to open the cruising war only on September 25, 1939 - until that moment, Hitler still hoped to peacefully resolve the conflict with Great Britain. The war was to be fought strictly according to prize rules, so there was no question of unexpected artillery or torpedo attacks.
For almost two and a half months, the Spee and the Deutschland, together with several supply ships, operated with impunity in the Atlantic and Indian Oceans. To search for them, the British and French had to allocate 3 battle cruisers, 3 aircraft carriers, 9 heavy and 5 light cruisers. Eventually, Commodore Henry Harewood's Group G (heavy cruiser Exeter, light cruisers Ajax and Achilles) intercepted the Spee off the coast of South America, near the mouth of the La Plata River.
This battle became one of the few classic artillery naval battles of World War II, providing a clear illustration of the old debate about what is more effective - the caliber of the guns or the weight of the salvo?
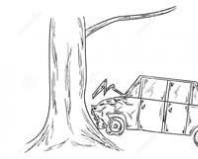
"Admiral Graf Spee" passes through the Kiel Canal, 1939
Source – johannes-heyen.de
In terms of total displacement, the three British cruisers were approximately twice as large as the Spee, and more than one and a half times greater in weight per minute salvo. To extol the achievements of their side, some British researchers compared the weight of a single salvo of ships without taking into account the rate of fire - these figures reached the Soviet press and for some time disoriented lovers of naval history. According to these data, a ship with a standard displacement of 12,540 tons was twice as powerful as three cruisers with a total standard displacement of 22,400 tons.
 Diagram of the heavy cruiser "Admiral Graf Spee", 1939
Source – A. V. Platonov, Yu. V. Apalkov. German warships, 1939–1945. St. Petersburg, 1995
“Spee” carried only six guns, but 283-mm caliber, firing 4,500 kg of metal per minute. In addition, it had eight 150-mm guns in light mounts, placed four per side (another 2,540 kg of metal per minute, 1,270 kg per side).
 Aft tower of "Admiral Count Spee"
Source – commons.wikimedia.org
The Exeter also carried six guns, but only 203 mm, as it was originally considered a B-class scout rather than an A-class. The weight of its one-minute salvo was only 2780 kg - more than two times less than that of the enemy. The same type "Ajax" (Harewood's flag) and "Achilles" each had eight 152-mm guns in two-gun turrets and at the maximum rate of fire (8 rounds per minute) could fire 3,260 kg of metal per minute (more than the flagship). Thus, the total broadside salvo of the British squadron was 9300 kg, that is, it exceeded the salvo of the Spee, if not two, then at least one and a half times (taking into account the fact that the average caliber of the “German” could fire on board only half of the guns) . Undoubtedly, the Spee was much better protected, but had a speed of 5 knots less. Thus, there was classic example“asymmetrical” battle, in which each side had its own advantages.
One against three
The opponents discovered each other on the morning of December 13, 1939, almost simultaneously (about 5:50 GMT), but the Germans quickly realized that in front of them were warships. True, they mistook the light cruisers for destroyers, so the raider willingly moved to approach. In the first minutes, no one opened fire, although the distance was a little more than a hundred cables.
At 6:14 am, Commodore Harewood gave the order to split up to engage the enemy in a pincer movement. The heavy Exeter moved straight towards the German, passing to his left, while both light cruisers moved in a wide arc, bypassing the enemy on the right and keeping a great distance from him. This maneuver looks strange: keeping a distance of a hundred cables, the British had little chance of hitting the enemy, while the enemy 283-mm cannons remained very dangerous for them. On the contrary, the most effective tactic for them was to quickly close the distance and approach to such a distance that 152-mm shells could penetrate the side of the Spee. In addition, this would allow the British to use torpedo tubes - the Germans were afraid of such a possibility (evidence of this is the behavior of “Luttsov” and “Hipper” in the “New Year’s Battle” on December 31, 1942). Exeter actually fired torpedoes at the beginning of the battle, but Ajax used them only at the end of the battle (about 7:30), when the distance was reduced to 50 cabs; a little earlier, Spee fired one torpedo. Even if the torpedoes had not hit the German cruiser, dodging them would, one way or another, reduce the accuracy of its shooting.
 English cruisers Ajax and Exeter (in the background). Montevideo, November 1939
In turn, Exeter, with its longer-range guns, had no need to reduce the distance. The only explanation for his maneuver is that the British exaggerated the defense of the Admiral Graf Spee and tried to get closer to him. However, this in no way justifies the division of forces: alone, the heavy cruiser was significantly inferior to the “pocket battleship”. In addition, by approaching from different directions, the British allowed the enemy to bring into action all eight 150-mm guns instead of four.
First phase of the battle: a crushing blow to Exeter
At 6:18, the Spee opened fire on the Exeter from the main caliber bow turret from a distance of approximately 90 kb. "Exeter" responded at 6:20 - first from two bow turrets, then, turning slightly to the left, brought the stern turret into operation. At 6:21, Ajax began firing, at 6:23, Achilles. All British ships fired semi-armor-piercing shells (“common”) - for 203 mm guns this was quite justified, but 152 mm shells had no chance of penetrating the “German’s” armor. It would have been more logical to use high-explosive shells, which had a greater damaging effect, but at the beginning of the war the British simply did not have enough of them.
The Germans fired in a “ladder” pattern - they fired the next salvo without waiting for the previous one to fall - but for greater accuracy, they first fired from the towers one by one, and switched to full six-gun salvoes only after they achieved the first coverage. At first, the Spee fired semi-armor-piercing shells, but after the first hits it switched to high-explosive instantaneous shells: the chief gunner of the German cruiser, Paul Ascher, hoped to achieve maximum damage, considering the Exeter’s defense weak and incomplete.
 Heavy cruiser Exeter in 1941
The Exeter was hit by the third salvo, receiving significant shrapnel damage to unprotected equipment (in particular, the plane on the catapult was destroyed). The fourth salvo gave one hit in the bow, but the semi-armor-piercing 283-mm shell pierced the hull without having time to explode. The next hit was equally ineffective - perhaps the Germans noticed this and therefore switched to firing high-explosive shells.
The first 283-mm high-explosive shell that hit the Exeter (at 6:25) exploded, hitting the second turret - its light 25-mm armor was not penetrated, but the turret was still out of action until the end of the battle. The shrapnel killed the people on the bridge (the ship's commander, Captain Frederick Bell, miraculously survived), and the cruiser lost control for some time, and most importantly, the artillery fire control system failed. It is unlikely that even an armor-piercing shell could have caused more damage.
After this, the Spee divided the fire, redirecting the bow turret towards the light cruisers - especially since after 6:30 the Exeter was covered with a smoke screen. The distance to the new target at this moment was about 65 cabs. At 6:40 a.m., a 283-mm shell exploded at the Achilles's stem, damaging the command and rangefinder post and wounding the ship's commander, Edward Perry (some sources write about the injury of an artillery officer), as well as disabling the radio station, which disrupted communication with the spotter aircraft . Soon after this, the Exeter was hit by two more shells: one of them disabled the first turret (and the charge in the breaker caught fire, and in order to avoid an explosion the British had to flood its cellars), and the second pierced the hull above the belt, destroyed the radio room and exploded under deck on the port side. The second hit disabled the 102 mm gun and caused a fire in the fenders of the first shots.
 Battle of La Plata December 13, 1939
Source – S. Roskill. Fleet and war. Volume 1. M.: Voenizdat, 1967
At 6:42, the last shell hit the Exeter - the location of the hit is unknown, but, apparently, it was in the bow near the waterline, since by the end of the battle the cruiser had a meter trim on the bow and a list to the left side, and its the speed dropped to 17 knots, although the vehicles remained undamaged. Finally, at 7:30, the water shorted the power cables of the aft tower and put it out of action - the cruiser lost all of its artillery.
In response, Spee received only two 203-mm shells from Exeter. One of them pierced through the high tower-like superstructure and did not explode. But the second, from a distance of about 65 cabs, entered the side almost at a right angle (at that moment the Spee turned sharply to the left, from 6:22 to 6:25 changing course by almost 90°), pierced 100 mm of the armor of the upper part of the belt above the armor deck, then pierced the 40-mm upper longitudinal bulkhead and at a very acute angle came into contact with the 20-mm armored deck, where it exploded in the food storeroom. The main fire line was cut off and a local fire broke out, but overall the German ship was lucky: the damage was minor. The “spaced” reservation system worked - it can be argued that it provided protection from 203-mm armor-piercing shells at a distance of at least 65 kb and when hit at angles close to 90°.
Second phase of the battle: "Spee" against light cruisers
At approximately 6:45, the Spee transferred all its fire to the light cruisers, which had already been firing at it for a long time and scored several hits (though causing virtually no damage). At that moment there were about 90 cabs before them, and this distance increased as the Spee left the British exactly abeam. Seeing this, Harewood, who was on the Ajax, ordered his ships to turn around and catch up with the enemy, still keeping to his right.
At 06:55, Harewood's ships swung 30° to port to engage all of their turrets. At this point, the distance between the opponents was 85–90 cab. According to the British, after this the second salvo produced hits, but the German ship began to maneuver, knocking down the sight. After 7:10, “Spee” again fired for some time at the “Exeter” that appeared from the smoke from a distance of 70 cabs, but did not achieve any hits.
The actions of the German commander were extremely unsuccessful - by maneuvering, Langsdorff prevented not only the enemy from shooting, but also his own gunners. At the same time, Harewood, taking advantage of his speed advantage, was steadily closing the distance, and this brought more benefits to the light cruisers, all of whose 152 mm guns were now in action.
 Light cruiser Ajax in 1939
Source – S. Patyanin, A. Dashyan, K. Balakin. All cruisers of World War II. M.: Yauza, Eksmo, 2012
Thanks to high speed shooting and the presence of a spotter aircraft, the British began to achieve an increasing number of hits from a distance of 80 cabs. By 7:10, the Spee was hit by 4 to 6 shells. One hit the 150-mm installation No. 3, destroying it along with the crew, the other hit the stern behind the armored citadel, killed two people, but did not explode (according to English data, it was a training blank). Two more shells hit the tower-like superstructure: one exploded above the upper director of the main caliber (three people were killed, but the damage was again minimal), the other destroyed the right rangefinder and caused damage to the directors of the anti-aircraft and main calibers (the connection of the latter with the towers was disrupted for some time) . The explosion disabled the poorly protected system for supplying shells to the bow group of 150-mm guns.
To get closer to the enemy, after 7:10 Harewood changed course, and now only the bow turrets could fire at his cruisers. At this time, the German ship was also strictly stern to the British. As a result, despite the reduction in distance, the hits stopped. However, at 7:16, Spee began to maneuver, bringing both turrets into action and achieving coverage. The distance between the opponents began to quickly decrease.
The British took aim again: one of their shells hit the rear of the Spee and disabled the equipment. remote control torpedo tubes, another one disabled a 105-mm universal installation, and the third exploded at the base of the catapult, destroying the plane standing on it. Two more shells hit the rear turret without causing any damage. Finally, it is known that one of the 152-mm shells hit the surface part of the armor belt (thickness - 100 mm) in the area of the aft turret, but did not penetrate it.
At 7:25, a German 283-mm shell from a distance of about 50 cabs pierced the barbette of the third Ajax turret and hit the barbette of the fourth turret, disabling both (it is not clear whether an explosion occurred). At the same time, the supply to one of the guns in the second turret failed. There were only three intact guns left on the cruiser, but Harewood did not leave the battle.
Mutual maneuvers again disrupted aiming for both sides for a while, but at 7:34 from a distance of 40 cabs, Spee again achieved coverage: fragments from a close explosion demolished the top of the mast along with the antennas on the Ajax (S. Roskill describes this as a hit and dates to 7:38).
 "Admiral Graf Spee" enters the Montevideo roadstead after the battle
Source – V. Kofman, M. Knyazev. Hitler's armored pirates. Heavy cruisers of the Deutschland and Admiral Hipper classes. M.: Yauza, Eksmo, 2012
During this period of the battle, the Spee received three hits at once in the superstructure, which destroyed the galley, but again did not cause serious damage. Another shell hit the bow turret, not penetrating its armor, but, according to some sources, jamming the middle gun - perhaps temporarily.
The ships of both sides began to run out of ammunition, they fired more slowly and more carefully, so no one else scored any hits. On the Ajax there were 7 killed and 5 wounded, on the Achilles there were 4 killed and 7 wounded. At 7:42, Harewood laid a smoke screen, and under its cover the British ships described a zigzag to sharply increase the distance to the enemy. The British tried not to let the German ship out of sight, but at the same time keep a distance of one and a half hundred cables from it, and as a result, they “guided” the enemy almost to Montevideo.
Results of the battle
During the entire battle, “Spee” was hit by two 203 mm and up to eighteen 152 mm shells. The latter is explained big amount and the high rate of fire of six-inch guns: in a minute the British cruisers could fire over a hundred shells and by the end of the battle they had almost exhausted their ammunition. But the Exeter could fire only two dozen 203-mm shells per minute, and it did not participate in the fire battle until the end of the collision.
Not all 152-mm shells had any effect on the Spee. Some of them did not explode, and some simply passed through the high superstructure without much harm to the ship.
 Damage received by "Admiral Graf Spee" during the battle of La Plata
Source – V. Kofman, M. Knyazev. Hitler's armored pirates. Heavy cruisers of the Deutschland and Admiral Hipper classes. M.: Yauza, Eksmo, 2012
The locations and consequences of hits from 14 out of 18 shells are known (they are described above). At least one shell (possibly more) hit the main belt without penetrating it. Three shells hit the main caliber turrets, which had a 140-mm front (one in the bow, two in the stern), also without penetrating the armor and only temporarily disabling one 283-mm gun. Only two 152-mm shells had a more or less serious effect: one of them destroyed the 150-mm gun, the other disabled the supply of 150-mm shells and for some time disrupted the fire control of the main caliber. It is known that the Spee had two holes with an area of about 0.5 m2 each (above the waterline and at its level), which were completely removable at sea. Thus, the main impact of six-inch shells affected only the deck and superstructures of the German ship.
The impact of the 203rd shells turned out to be even less significant. One of them also went right through the superstructure, as the British used semi-armor-piercing shells. Another (most likely not a “common”, but a purely armor-piercing one) hit the “Spee” at a very favorable angle, pierced the belt and the internal bulkhead, but exploded on the 20-mm armored deck.
152-mm shells also accounted for most of the German casualties: 36 people were killed (including one officer), another 58 were wounded (albeit, most of them lightly). However, the damage to the ship itself practically did not reduce its survivability and had very little effect on its combat effectiveness. At the same time, the fact that the armor was almost completely penetrated suggests that only 203 mm shells posed a real danger to the survivability of the “pocket battleship” (at least in theory).
The impact of German 283 mm shells on British ships was much more noticeable. Although the Spee, even firing on its entire side, could fire no more than twelve main-caliber shells per minute, the Exeter was hit by six such shells (although two of them pierced the ends and did not explode). As a result, the British heavy cruiser lost all its artillery, slowed down and took on a significant amount of water, and its flow could not be stopped for quite some time. 61 people died on the ship (including 5 officers), and another 34 sailors were injured. If Langsdorff had acted more decisively, had not “pulled” his ship from side to side and had not constantly changed targets, it would not have been difficult for him to overtake and sink the “wounded man” (at least with torpedoes).
 Exploded and burning "Spee"
Source – Illustrated London News, Dec. 30, 1939
The Spee's shooting at the light cruisers turned out to be much less successful - in fact, the Germans achieved only one hit with the main caliber on the Ajax and two very close falls, mainly causing damage to the control and communication systems of both cruisers (in particular, it was disrupted for some time communication with the spotter). But just one successfully hit 283-mm shell disabled half of the artillery of the flagship Ajax, forcing Harewood to actually stop the artillery battle. It is noteworthy that the 150-mm Spee guns did not make a single hit - partly because their fire control system worked much worse (largely due to the fact that they had limited aiming angles and were forced to constantly change when maneuvering the ship goals).
In general, the Spee spent the second half of the battle (the battle with light cruisers) noticeably worse than the first. The British achieved twice the percentage of direct hits - and this despite the fact that at a distance of 70–80 cabs, German 283 mm guns should have been significantly superior in accuracy to the enemy’s 152 mm guns. Such poor shooting is partly due to unsuccessful and ill-conceived maneuvering. On the other hand, the only German 283-mm shell that hit the target directly caused more damage to the enemy than two dozen British 152-mm shells did to the Spee itself.
 The sunken Spee. Photo taken by the British in 1940
Source – V. Kofman, M. Knyazev. Hitler's armored pirates. Heavy cruisers of the Deutschland and Admiral Hipper classes. M.: Yauza, Eksmo, 2012
Langsdorff's mistaken decision to go to Montevideo, which became a deliberate trap, was made not because of losses and damage, but after the Spee commander received a message that 60% of the shells had been spent. Perhaps the psychological effect of the unsuccessful course of the second phase of the battle, which began so promisingly for the Germans, also played a role. On the evening of December 17, 1939, the Spee was blown up and scuttled by its own crew in neutral waters four kilometers from the Uruguayan coast. The ship's commander, Langsdorff, shot himself. This also indicates the emotional instability of the German commander, which prevented him from adequately leading the battle and achieving victory.
Bibliography:
- V. Kofman, M. Knyazev. Hitler's armored pirates. Heavy cruisers of the Deutschland and Admiral Hipper classes. M.: Yauza, Eskmo, 2012
- S. Roskill. Fleet and war. Volume 1. M.: Voenizdat, 1967
- http://www.navweaps.com
The Battle of Gangut, which took place on July 27 (August 7), 1714, became the first victory of the created Peter I regular Russian fleet.
The Baltic, abounding in skerries, required powerful rowing forces along with sailing squadrons. By the campaign of 1714, the Russians managed to create the strongest galley fleet of 99 half-galleys and scampaways, to which the tsar set the task of breaking through to the Åland Islands in order to facilitate the offensive of the coastal flank of the ground forces.
Countering these plans, the Swedish fleet blocked the Russians' exit from the Gulf of Finland near the Gangut Peninsula. The enemy's rowing ships protected the coastal fairway, and the sailing fleet located more seaward covered them from the flank.
To avoid a head-on attack by strong Swedish forces, Peter I decided to build a “transport” (wooden flooring) in the narrowest part of the Gangut Peninsula, designed to transport galleys by dry route to the enemy’s rear. This maneuver forced the Swedes to divide their forces, and the ensuing calm deprived their sailing ships of maneuverability.
Taking advantage of the situation, the Russian vanguard bypassed the Swedes, remaining out of reach of their fire, and attacked a detachment under the command of Rear Admiral Nils Ehrenskjöld, boarding the enemy ships.
The victory off the Gangut Peninsula provided the Russian fleet with freedom of action in the Gulf of Finland and the Gulf of Bothnia, which made it possible to effectively support the ground forces operating in Finland. Since then, the Swedes have ceased to feel like masters Baltic Sea. Success was ensured by the ability to create superiority in forces in the main direction. 11 galleys were concentrated against the Swedish flagship - the Elefant.
 Boarding the Elefant pram
In September 1714, the winners solemnly marched in St. Petersburg under the Arc de Triomphe, which depicted an eagle sitting on the back of an elephant. The allegory was explained by the inscription: “The eagle does not catch flies.” Currently, the anniversary of the battle of the Gangut Peninsula (August 9) is celebrated in Russia as the Day of Military Glory.
 Battle of Chesme on the night of June 25-26, 1770
After the start in 1768, another Russian-Turkish war In order to divert the enemy's attention from the Black Sea theater, Russia sent its ships to the Mediterranean Sea. This was the first in Russian history group passage of ships from one sea to another. June 23 (July 4), 1770, two Russian squadrons (nine battleships, three frigates, a bombardment ship and 17–19 auxiliary ships) under overall command Alexey Orlov discovered the Turkish fleet (16 battleships, six frigates, six shebeks, 13 galleys and 32 small vessels) in the roadstead of Chesme Bay.
The next day, an artillery duel ensued between the opponents, during which the battleship St. Eustathius tried to board the Turkish ship Real Mustafa. However, the burning mast of a Turkish ship fell on him. The fire reached the crew chamber, and “Eustathius” exploded, and 10 minutes later “Real-Mustafa” also took off. After this, the Turkish forces retreated into the depths of Chesme Bay under the cover of coastal batteries.
The Russian command decided on the night of June 26 to destroy the Turkish fleet with the help of fire ships, into which four ships were hastily converted. The battleships were supposed to fire at the enemy ships crowded in the bay, and the frigates were supposed to suppress the coastal batteries. Soon after being hit by an incendiary shell, one of the Turkish ships caught fire. The enemy fire weakened, which made it possible to launch an attack with fireships. One of them managed to set fire to a Turkish 84-gun ship, which soon exploded. Burning debris scattered across the bay, causing fires on other ships. By morning, the Turkish squadron ceased to exist.
Victory was achieved due to the skillful concentration of forces in the main direction, the bold decision to attack the Turkish fleet, which was protected by coastal batteries, and the use of its crowded location in the bay.
 Fedor Ushakov
April 19, 1783 Empress Catherine II signed the Manifesto on the annexation of Crimea to the Russian Empire. In 1878, Turkey presented an ultimatum demanding the restoration of the vassalage of the Crimean Khanate and Georgia and, having received a refusal, again declared war on Russia.
Russian troops besieged the Turkish fortress of Ochakov, and a squadron under the command of Rear Admiral left Sevastopol Marko Voinovich, to prevent the Turkish fleet from providing assistance to the besieged. On July 3 (14), the opponents discovered each other in the area of Fidonisi Island. The Turkish squadron was more than twice as large as the Sevastopol one, and Marko Voinovich had no desire to fight, while confident of his victory Hassan Pasha, adhering to classical linear tactics, began to approach the range of an artillery salvo. However, the commander of the Russian vanguard, brigadier Fedor Ushakov ordered his end frigates to add sails and take on the enemy with two fires. The maneuver of the frigates put the Turks in an exceptionally difficult position. They also added sails, but this led to the fact that their formation was greatly stretched, and the ships lost the ability to support each other with fire.
At the very beginning of the battle, Fyodor Ushakov cut off two Turkish ships, concentrating the fire of the battleship "St. Paul" and two frigates against them. The battle had already unfolded along the entire line. Unable to withstand the Russian fire, the Turkish ships ahead began to leave the battle one after another. Soon the flagship of Hassan Pasha also came under concentrated fire. This decided the outcome of the battle. Following the flagship, the Turkish ships began to leave the formation and, taking advantage of their speed advantage, retreated to the Rumelian shores.
In the battle of Fidonisi, the naval leadership talent of Fyodor Ushakov was revealed for the first time, who perfectly implemented the principles of concentration of fire and mutual support. Soon Grigory Potemkin removed Marko Voinovich, and transferred the Sevastopol squadron to Fyodor Ushakov, who received the rank of rear admiral.
 Monument to Ushakov at Cape Kaliakria
The Turks prepared very thoroughly for the campaign of 1791. The fleet under the command of Kapudan Pasha Hussein consisted of 18 battleships, 17 frigates and many small ships. The Algerian Pasha, distinguished by his courage and enterprise, was appointed assistant to the Kapudan Pasha. Saita-Ali. The Turks quite reasonably believed that with such a numerical superiority and led by such famous admirals, they would be able to defeat the Russians. Sait-Ali even promised to deliver the chained man to Istanbul Ushak-pashu(Fedor Ushakov) and carry him around the city in a cage.
On July 31 (August 11), 1791, the Turkish fleet was anchored off Cape Kaliakria. In honor of the Ramadan holiday, some of the teams were released ashore. Suddenly, Fyodor Ushakov’s squadron appeared on the horizon, consisting of six battleships, 12 frigates, two bombardment ships and 17 small ships. The famous naval commander made a bold decision to attack the enemy from the shore. The appearance of the Russian fleet took the Turks by surprise. Hastily cutting off the anchor ropes, they began to retreat seaward in disarray. Sait-Ali with two ships attempted to take the vanguard of Fyodor Ushakov in two fires, but he, having figured out the maneuver, on the flagship ship "Rozhdestvo Khristovo" overtook the head of his squadron and attacked Sait-Ali's ship, starting a battle at the closest range. Then Ushakov skillfully came from the stern and fired a longitudinal salvo at the Turkish ship, knocking down the mizzenmast.
Within an hour, the enemy's resistance was broken, and the Turks fled. Most of the defeated Turkish fleet scattered along the Anatolian and Rumelian coasts, only the Algerian squadron reached Constantinople, while the flagship Saita Ali began to sink. The Russian fleet dominated the Black Sea. Residents of the Turkish capital were gripped by fear. Everyone was waiting for Ushak Pasha to appear at the walls of Constantinople. In this situation, the Sultan was forced to make peace with Russia.
 Fortifications of the island of Corfu
In 1796–1797, the French army under the command of a young and talented military leader Napoleon Bonaparte occupied Northern Italy and the Ionian Islands belonging to the Venetian Republic. Russian Emperor Paul I joined the anti-French coalition. In St. Petersburg, a plan arose to send a squadron under the command of Fyodor Ushakov to the Mediterranean Sea. This time the famous naval commander had to act in alliance with his former opponents - the Turks. Napoleon's landing in Egypt forced the Sultan to turn to Russia for help and open the straits to Russian ships.
One of the tasks assigned to the joint Russian-Turkish squadron was the liberation of the Ionian Islands. Soon the French garrisons were driven out of Tserigo, Zante, Cephalonia and Santa Mavra, although the enemy continued to hold the most heavily fortified island, Corfu. The French command was confident that the Russian sailors would not only not be able to take the fortress by storm, but would also be unable to wage a long siege.
First, Fyodor Ushakov decided to storm the rocky island of Vido, which covered Corfu from the sea. On February 18 (March 1), 1799, Russian ships began a massive shelling, under the cover of which they landed troops. With the help of skillful flank attacks, the landing force managed to capture the coastal batteries on the move, and by 14 o'clock the landing forces were already in complete control of Vido.

Now the way to Corfu was open. Russian batteries installed on the captured island of Vido opened fire on Corfu itself, and the landing force began to storm the advanced fortifications of the island. This demoralized the French command, and the next day they sent envoys to Fyodor Ushakov’s ship to discuss the terms of surrender. 2931 people surrendered, including four generals. The Russian trophies included the battleship Leander, the frigate Brunet, a bombardment ship, two galleys, four half-galleys and several other ships, 114 mortars, 21 howitzers, 500 cannons and 5,500 rifles. The victory was achieved thanks to the right choice Fedor Ushakov, the direction of the main attack, the creation of superiority in forces over the enemy in this sector, as well as the bold and decisive actions of the landing force.
Having learned about another brilliant victory of Fedor Ushakov, the great Alexander Suvorov wrote: “Why wasn’t I at Corfu, at least as a midshipman!”
On the liberated Ionian Islands, under the temporary protectorate of Russia, the Greek Republic of the Seven Islands was created, which for several years served as a support base for the Russian fleet in the Mediterranean Sea.
Andrey CHAPLYGIN
Well, as always, I again remembered about my abandoned LiveJournal six months later. Becoming more disciplined is mine the most important task now, and it consists of such small things as maintaining a LiveJournal. But, on the other hand, during these six months this happened... no, THIS! However, I will try to talk about this as quickly as possible in the next post. In the meantime, I remembered the long-delayed photographs of naval battles of the Second World War.
There were no fewer artillery battles of ships in it than in the First, and by that time photography technology had significantly stepped forward. But...there are still few photographs of battles. Why? The point here is probably that the battles themselves became more fleeting and unpredictable, and there was no time to prepare for filming. In rare cases, when special preparation was made for this, the result has long been well known. The most famous of them is Operation Reinubung, the Bismarck raid. And even then the photographs were preserved because the material was prudently transported to the Prinz Eugen before the German ships separated in the ocean, so as not to meet again... The vicissitudes of war. And the opposite case is the death of the Japanese Navy archive in Nagasaki - no one knows how many priceless materials burned in the fire of a nuclear explosion! In general, according to the campaign Pacific Ocean As you know, most photographs are either taken from the air or reflect battles between ships and air enemies. And one moment. Many photographs are... parts of filming. Most often, also a survivor.
Let's start, as they say, from the beginning... From Westerplatte. The first salvos of the war were those fired by the old battleship Schleswig-Holstein at the Polish coastal fortifications. Here the Germans were well prepared, even filming was preserved.The view is almost peaceful, it is not clear what it is, are they shooting? However, that’s how it was. 
This photo - real color or painted? 
And here from on board the battleship itself:

So the war began. One of the first major operations of the fleet in it was the Norwegian operation, and one of its most dramatic episodes was the feat of the English destroyer Gloworm, which alone took on the heavy cruiser Admiral Hipper on April 8, 1940. The photos captured the last moments of the battle, when the destroyer, hiding behind a smoke screen, goes to ram, 

And already drowning:

Through the eyepiece of the Hipper rangefinder:

Meanwhile, other battles were unfolding in Norway. From their photographs, I still know photographs of the second battle for Narvik on April 13, taken by the English side:
"Warspite" fires in the Ofutfjord:

Boyesmintsev, filmed from English. Airplane (something vague, hard to say specifically)


And these photos from the filming are of the sinking of the English aircraft carrier Glories by the German battleships Scharnhorst and Gneisenau in the Norwegian Sea on June 8, 1940. Of course, the German newsreels modestly kept silent about the subsequent attack of the battleships by the escort destroyers Ardent and Acasta, which ended with an unpleasant for the Germans hit by an Acasta torpedo in the stern of the Scharnhorst.

Fire "Scharnhorst"


And "Gneisenau":

Destroyers cover the Glories with a smoke curtain:

But it doesn't help


"Ardent" sunk...

And behind him is “Glories” himself:

And now - the attack of "Acasta" - its triumph and death:

Now let's move to Africa - to Algeria. Mers el-Kebir - this name immediately speaks for itself for military historians and amateurs military history... Most of the photographs of this battle are also newsreels.
Mers el-Kebir under fire from the English squadron:

Explosion of a shell near the Brittany complex

The volleys fall in heaps behind the stern of the Provence and Strasbourg, which has already set in motion:

"Strasbourg" leaving the harbor:

Another photo of Strasbourg coming out under fire:

Leaving the harbor, the battleship accelerated and opened fire:

And after him, destroyers and leaders go for a breakthrough

This photograph is sometimes attributed to "the British battleships Hood and Valiant under fire from French ships at Mers el-Kebir." In my opinion, it looks more like an air bomb falling. If anyone knows, please tell me what exactly this photo shows:

And 6 days after Mers el-Kebir, the first military clash of English and Italian linear forces took place - the battle at Cape Punta Stilo. Unremarkable in itself, it was, however, honored to be captured on film by the Italian side, which gives us an excellent chance to see the battle of linear forces, as they say, from the inside, through the eyes of its participant. The film footage was distributed into photographs that even ended up in Soviet books on the history of the Second World War.
Perhaps the most famous of them is the Conte di Cavour firing. Taken from the Giulio Cesare:

Again:

And now - on the contrary, “Cesare” with “Cavour”:

And - from the side, from the destroyers, who wisely stayed away from the “battle of the giants”:

Failure in this battle led to the Italians losing dominance in their own naval theater and the fleet losing its very fighting spirit. Therefore, they no longer carried out such large-scale filming of naval operations. But they filmed it anyway. For example, in the battle at Cape Teulada on November 27, 1940.
Italian heavy cruisers under fire:

The heavy cruiser Fiume fires at the British cruisers:


Manchester and Sheffield fire:

"Vittorio Veneto" and "Giulio Cesare" in the battle of Spartivento: 
This was one of the battles with varying success, limiting the initiative of the English fleet in convoy operations.
The year 1941 came, and the most famous of the battles, including in terms of which we are interested in, was Operation Reinubung - the first and only raid of the German battleship Bismarck. Preparations for the raid were thorough in German, and correspondents and cameramen were sent to the battleship. The film was shot, including during the battle in the Danish Strait, but... Some of the materials were transported to the Prinz Eugen, and he safely “delivered” them to Brest, thanks to which we can now see them. The film materials remained on the Bismarck, and when it became clear that the battleship with its rudders disabled would soon be overtaken by the main forces of the English fleet, they tried to send them to France on board a seaplane. But the catapult was damaged in the battle, which was not immediately noticed, and the Arado fell into the sea.
These photographs, in principle, have already been widely circulated. But something new is constantly appearing.

The shells of the "Prince of Wales" began to cover the "Prince Eugen":
 And then the Prinz Eugen gave way to the Bismarck in front:
  English ships under fire (on the left is the Prince of Wales, on the right is the Hood under cover):
  The key moment of the battle is the death of “Hood”:
Enlarged photo of the ship's agony with details:

The damaged Bismarck (the trim on the bow is noticeable) continues to fire at the Prince of Wales, forcing it to withdraw from the battle:

And on May 27, at 08:00, British battleships and cruisers opened fire on the damaged and almost immovable Bismarck. Photographs of this battle, which actually became the shooting of a German battleship, were taken by the British side, and at a considerable distance, and not from the ships participating in the battle, as was the case with the Germans and Italians. But there are probably photographs of battles from English ships; this is unlikely to be explained by character traits or something similar. As we find such pictures, we will try to publish them.
Splashes from the Rodney and King George V shells fall next to the Bismarck:

End of the battle. "Rodney" fires at "Bismarck" from a direct shot distance:

Burning and sinking Bismarck:

I did not find photographs of later major battles in the European-Atlantic theater of operations. There are few photographs of artillery battles in the Pacific theater of operations. These pictures are presented American side- for obvious reasons. Accordingly, there are no or almost no photographs of the battles at the first stage of the war, when the Japanese held the initiative. The fact that the Japanese did not take pictures is doubtful (remembering the photographs from the times Russo-Japanese War!) Well, both himself and the naval battles of the second stage of the war
(until approximately November 1944) - were fleeting and often unexpected for both sides, sometimes occurring at night.
Such was the battle at Savo Island, one of the Eastern Solomon Islands. In August 1942, the Americans and their allies began landing on the islands, and the Japanese launched countermeasures. On the night of August 8-9, the Japanese formation entered the strait between the islands and attacked the landing cover formation, as a result sinking 4 heavy cruisers and damaging one more and two destroyers. The picture (very famous) shows the American heavy cruiser Quincy burning and sinking into the water, hit by torpedoes and artillery from Japanese cruisers: 

And on this, no less famous, from the cruiser Chokai - the Allied cruisers Australia, Canberra, Chicago, illuminated by Japanese searchlights and flare bombs, from seaplanes. By the way, here is a photo of “Tyokai” firing - not in that battle, of course, but back in 1933, the picture just came in handy:

From November 12 to 15, 1942, two decisive naval (precisely classic) battles in this campaign took place near the island of Guadalcanal, after which the advantage in it finally leaned towards the Americans and their allies. Both battles took place at night (this was the tactics of the Japanese, who sought to avoid daytime activity due to the superiority of allied aviation). Pictures of the battle are practically unknown, except for one - the firing of the Washington battleship at the Kirishima in the second battle on the night of November 14-15, as a result of which the Japanese battleship was disabled, and subsequently abandoned by the crew and sank.

And finally, the last major (one might even say the largest) naval battle to date was and remains the Battle of Leyte Gulf. It itself consisted of several naval battles, including artillery battles. The photographs are American, although there were also those on the Japanese ships who took photographs. And although there are photographs of the Japanese of their ships before the battle, I have not yet seen photographs of the Japanese themselves in battle. It is unlikely that, given the position of the Japanese in this battle, they cared about filming.
On the night of October 25, a battle took place in the Surigao Strait, as a result of which Admiral Nishimura’s “Force C” was completely destroyed. The battle took place at night and was quite fleeting. Little can be discerned from the photographs except this:

True, this silhouette is more reminiscent of the Ise-class battleships that did not participate in this battle, and it’s difficult to say whether this is still a photo. Taken from the book by Anthony Tully.
And this is a confirmed photo. The battleship West Virginia fires at the Japanese formation:
Fire from American cruisers of Task Force 77.2:

On the morning of October 25, the main forces of the Japanese fleet entered the battle, led by its flagship, the world's largest battleship Yamato. But his target was simply the escort aircraft carriers White Plains and St. Lowe. American pilots, attacking the Yamato, took a photograph of the Japanese flagship firing:

The covering destroyers counterattacked the enemy, suffering heavy losses (in the picture - Johnston, Hoel, Heerman under fire:

Meanwhile, the Japanese cruisers, having bypassed the American aircraft carriers from the north, opened fire, sinking the Gambier Bay and damaging the others. A Japanese cruiser (marked with a circle) shoots Gambier Bay:

One more photo:

On the left - "Gambier Bay", on the right - "Kitkin Bay" under fire from Japanese cruisers:

Gambier Bay is very close:

The unfortunate Gambier Bay was eventually sunk, but the resistance of the destroyers and aircraft pilots from the aircraft carriers led to the withdrawal of the main Japanese forces. Of course, this was not the only reason for the withdrawal, but nevertheless this battle also showed that a battle between aircraft carriers and artillery ships without air cover was now futile for the latter.
The finale of the battle in Leyte Gulf was the battle at Cape Engaño, in which the last Japanese aircraft carriers in service were destroyed. Since the Americans had complete superiority in forces, especially in the air, the battle essentially turned into a hunt for the Japanese ships of Ozawa’s formation (not very successful, by the way). In the photo: fire from the cruiser Mobile on the destroyer Hatsuzuki:

But the battleship Ise (in the picture, firing) managed to return to base almost unharmed:

This marked the end of the era of large naval artillery battles. Until the end of the war, and after, such battles still took place. And, perhaps, in the future everything can happen - after all, artillery is an indispensable feature of today’s ship - a boat, a corvette, a frigate, a destroyer, a cruiser... And its caliber is growing. The most promising ship under construction today, the American destroyer Zumvolt, is equipped with a 155-mm gun mount with guided projectiles. So naval artillery battles may still take place in the future. Although it would be better to never have them again. No artillery, no missiles. None.
Adventure, historical, documentaries, in which they show naval battles, always take your breath away. It doesn’t matter whether it’s frigates with snow-white sails near Haiti or huge aircraft carriers abeam Pearl Harbor.
The spirit of wandering haunts human imagination. Read on and you will briefly get acquainted with the most large-scale and grandiose naval battles in the new history of the world.
Navy in military history
Let's take a closer look at what happened in Chesme Bay from July 5 to July 7, 1770.
Two squadrons were sent to the Black Sea from the Baltic, which merged into one on the spot. Command of the new fleet was entrusted to Count Alexei, brother of Grigory Orlov, a favorite of Catherine II.
The squadron consisted of thirteen capital ships (nine battleships, one bombardier and three frigates), as well as nineteen small support ships. In total, they had about six and a half thousand crew members.
During the transition, part of the Turkish fleet was discovered standing in the roadstead. Among the ships there were quite large vessels. For example, the Burj u Zafer had eighty-four guns on board, while the Rhodes had sixty. In total, there were seventy-three ships (of which sixteen were battleships and six frigates) and more than fifteen thousand sailors.
With the help of the skillful actions of Russian sailors, the squadron managed to win. Among the trophies was the Turkish Rhodes. The Turks lost more than eleven thousand people killed, and the Russians lost about seven hundred sailors.
Second Battle of Rochensalm
Sea battles in the eighteenth century were not always victorious. This is explained by the deplorable state of the fleet. After all, after the death of Emperor Peter I, no one cared about him properly.
Twenty years after the stunning victory over the Turks Russian fleet suffered a resounding defeat from the Swedes.
In 1790, the Swedish and Russian fleets met near the Finnish town of Kotka (formerly called Rochensalm). The first was commanded personally by King Gustav III, and the admiral in the last was the Frenchman Nissau-Singen.
176 Swedish ships with 12,500 crew and 145 Russian ships with 18,500 sailors met in the Gulf of Finland.
Hasty actions on the part of the young Frenchman led to a crushing defeat. The Russians lost more than 7,500 men, in contrast to 300 Swedish sailors.
Scientists say that this is the second battle with the largest number of ships in modern and recent history. We will talk about the grandest battle at the end of the article.
Tsushima
The cause of defeats was often various shortcomings and excessive zeal. For example, if we talk about the Battle of Tsushima, it occurred precisely when the Japanese fleet had an advantage in all respects.
The Russian sailors were extremely tired after a months-long journey from the Baltic to the And the ships were inferior to the Japanese in fire power, armor and speed.

As a result of the admiral's rash act, the Russian Empire lost its fleet and any significance in this region. In exchange for a hundred wounded Japanese and three sunk destroyers, the Russians lost more than five thousand people killed, and more than six thousand were captured. In addition, out of thirty-eight ships, nineteen were sunk.
Battle of Jutland
The Naval Battle of Jutland is considered the largest battle at sea during the battle. During the battle, 149 British and 99 German ships fought. In addition, several airships were used.
But the beauty of the events did not lie in the enormous displacement of the equipment or the number of wounded and killed. Not even in the consequences of the battle. Main feature, which only the Jutland naval battle can boast of, was a surprise.

Both fleets accidentally collided in the Skagerrak Strait, near Due to an intelligence error, the British walked very slowly and slowly towards Norway. The Germans were moving in the opposite direction.
The meeting turned out to be completely unexpected. When the English cruiser "Galatea" decided to inspect a Danish ship that accidentally found itself in these waters, a German ship was just leaving the "At the Fjord", which had already inspected it.
The British opened fire on the enemy. Then the rest of the ships arrived. The Battle of Jutland resulted in a tactical victory for the Germans, but a strategic defeat for Germany.
Pearl Harbor
When listing the naval battles of World War II, we should especially focus on the battle near Pearl Harbor. The Americans called it the “Attack on Pearl Harbor,” and the Japanese called it Operation Hawaiian.
The goal of this campaign was to proactively gain superiority in the Pacific region. The United States expected to enter into a war with the Empire of the Rising Sun, so military bases were created in the Philippines.

The mistake of the American government was that they did not seriously consider Pearl Harbor as a target for the Japanese. They expected an attack on Manila and the troops based there.
The Japanese wanted to destroy the enemy fleet and, with the help of this, simultaneously conquer airspace over the Pacific Ocean.
Only chance saved the Americans. The new aircraft carriers were in a different location during the attack. About three hundred aircraft and only eight old battleships were damaged.
Thus, the successful Japanese operation played a cruel joke in the future for this country. We will talk about her crushing defeat further.
Midway Atoll
As you have seen, many great naval battles are characterized by the suddenness of the battle. Usually one or both parties do not expect any trouble in the near future.
If we talk about Midway Atoll, the Japanese wanted to repeat Pearl Harbor again in six months. But they set their sights on a second powerful American base. Everything could have happened according to plan, and the empire would have become the only power in the Pacific region, but US intelligence officers intercepted the message.

The Japanese attack failed. They were able to sink one aircraft carrier and destroy about one and a half hundred aircraft. They themselves lost more than two hundred and fifty aircraft, two and a half thousand people and five large ships.
The planned superiority overnight turned into a crushing defeat.
Leyte Gulf
Now let's talk about the largest naval battle of the war. Apart from ancient battles near the island of Salamanca, this is the most ambitious battle at sea in the entire history of mankind.
It lasted four days. Here again the Americans and the Japanese clashed. The expected attack on the Philippines in 1941 (instead of Pearl Harbor) nevertheless happened three years later. During this battle, the Japanese first used kamikaze tactics.
The loss of the world's largest battleship, the Musashi, and the damage to the Yamato, put an end to the empire's ability to dominate the region.

So, during the battle, the Americans lost about three and a half thousand people and six ships. The Japanese lost twenty-seven ships and more than ten thousand crew.
Thus, in this article we briefly got acquainted with the largest naval battles in Russian and world history.
Author Vitaly Borisovich Kharlamov, Volgograd. To put it briefly, there are not just a lot of letters, but a lot.
When on May 31, 1916, the captain of the English light cruiser (*) Galatea ordered to open fire on the German destroyers (2*), he had no idea that these salvoes would be the first in the largest naval battle in the history of mankind. On this day, in the North Sea, the two most powerful fleets of their time, the British Grand Fleet and the German High Seas Fleet, met. We met to put an end to the dispute: whose fleet dominates the sea. And as a result, the following flared up:
By the spring of 1916, the land front had finally stabilized. Turning land battles into “giant meat grinders” that did not live up to the hopes placed on them. And the submarine war unleashed by Germany could not bring it quick victory. The war increasingly turned into a war of resources. In a war of attrition. Which could not bring victory to Germany, with its limited capabilities. And then the German command decided to use the last “trump card” remaining in Germany. Its second largest battle fleet in the world. With the help of which, the German General Staff hoped to win the long-awaited victory at sea. And thereby take England out of the war. Most strong countries coalition opposing Germany.
The High Seas Fleet is on the move.
What was required was to lure part of the English fleet out of their bases and try to destroy it with a blow from the main forces. For this purpose, German cruisers were sent on a raid to the shores of England. In the hope that after this, part of the Grand Fleet's forces will relocate from Scapa Flow to the south. They succeeded. Under the influence of public opinion, the Grand Fleet was divided into 4 squadrons. Based at various bases along the east coast of England. But the intensification of the actions of the main forces of the German fleet alerted the British. After the German battlecruisers' raid on Lowston, they expected another sortie. Intending, using a scenario similar to the German one, to lure part of the German fleet under the muzzles of the heavy guns of the Grand Fleet. And thereby finally establish their dominance at sea. Thus two huge fleets put to sea. And their admirals had no idea what forces they would face. As a result, the collision of the fleets turned out to be purely accidental. Not provided for by any plan of the warring parties.
Grand Fleet at sea.
Prelude to battle.
The German fleet left the main fleet base at 1 am on May 31st. And headed north, towards the Skagerrak Strait. At the forefront of the fleet were 5 battlecruisers (3*) of Vice Admiral Hipper, supported by 5 light cruisers and 33 destroyers. With the task of bringing part of the Grand Fleet's forces to the entire High Seas Fleet. Light cruisers and destroyers sailed in a semicircle ahead of the battlecruisers at a distance of 7-10 miles. Behind the ships of Admiral Hipper's squadron, 50 miles later, were the main forces of the German fleet.
The High Seas Fleet from a Zeppelin.
But even earlier, 16 submarines were sent to sea. Which were supposed to take positions near British bases. And stay on them from May 24 to June 1. Which predetermined the Germans’ entry into the sea on May 31st. Despite the weather. Moreover, most of the submarines, 7 units, were deployed against the Firth of Forth, where the fleet of battlecruisers was based. One was located at the exit from Kromary Bay, where the 2nd squadron of battleships was located. Two submarines were deployed against Scapa Flow, where the main forces of the English fleet were located. The remaining submarines were deployed along the east coast of England. The main task of these submarines was reconnaissance. However, they had to set up minefields along the expected routes of the British ships. And subsequently attack the ships leaving the bases. Direct reconnaissance on the battlefield was to be carried out by airships. But 5 German airships that took off at noon on May 31, due to unsuccessfully assigned routes, found nothing. They were not even above the battle site.
Torpedo compartment of a German submarine.
The Grand Fleet went to sea before the German fleet. As soon as human intelligence and radio interception reported that large ships of the High Seas Fleet were preparing to go to sea. Safely escaping a curtain of German submarines. Although some ships received erroneous signals about the detection of German submarines.
4th Grand Fleet Dreadnought Squadron ("Iron Duke", "Royal Oak", "Superb", "Canada") in the North Sea
However, it took time to gather the ships from different bases into a single fist. So the 2nd squadron of battleships (4*) was able to join the main forces of the British fleet only at 11 o’clock. And Admiral Beatty's squadron was still south of Admiral Jellicoe's ships. Only at about 2 p.m. did Admiral Beatty order to turn north. Intending to join up with his fleet. The trap set by Admiral Jellicoe for the German fleet was about to be sprung. When suddenly the unexpected happened.
2nd squadron of battleships of the German High Seas Fleet.
Chance meeting.
Shortly before Admiral Beatty's ships turned north, smoke was spotted from the German light cruiser Elbing. And 2 of the destroyers accompanying the cruiser were sent to inspect the spotted ship. It turned out to be the neutral Danish steamer N.G. Fjord. But fate would have it that at the same time as the Germans, the Danish steamer was discovered by the English light cruiser Galatea. Guarded by Admiral Beatty's squadron. And as a result, at 14 hours 28 minutes, the Galatea, together with the light cruiser Phaeton that approached it, opened fire on the German destroyers. Who hastened to retreat from the battlefield. However, the Elibing soon joined the destroyers and the battle broke out with renewed vigor. At 14:45 a seaplane was lifted from the Engadine air transport. Which at 1508 hours discovered 5 enemy battle cruisers. The pilot tried three times to contact his command and provide information. Which never reached Admiral Beatty.
British battle cruiser "Lyon".
At this time, both squadrons set a new course. And at full speed, cutting the waves with their stems, they rushed towards each other. Thus, by chance, the British battlecruisers met the enemy separated from their main forces. They could only act according to the previously planned plan. And try to bring enemy ships to the main forces of your fleet.
Deployment of Admiral Beatty's squadron before the battle.
At 15:30 both squadrons made visual contact. And seeing the British advantage in strength, Admiral Hipper turned his ships to join the main forces of the High Seas Fleet. However, Admiral Bitte's battlecruisers, taking advantage of their advantage in speed, began to gradually catch up with the German ships. But the British, who had longer-range artillery, did not open fire. Due to an error in determining the distance to the target. The Germans remained silent, waiting for the British to come closer so they could fire more effectively from their smaller guns. In addition, the 5th British battleship squadron was still out of sight from the German ships. And without receiving an order from Admiral Beatty to change course, she continued to go east for some time. Moving away from the battlefield.
Development of the battle from 15-40 to 17-00.
Free cheese without a mousetrap.
Only at 15 hours 50 minutes, being at a distance of 80 cables (5*), the battle cruisers of both squadrons opened fire. By order of the admirals, the ships of both sides fired at the enemy ship corresponding to it in the ranks. But the British made a mistake and the German battle cruiser Derflinger was not fired upon by anyone at the beginning of the battle. The distance between the squadrons continued to decrease and by 15 hours 54 minutes reached 65 cables. Anti-mine artillery entered the battle. The ships sailed surrounded by columns of water from continuously falling shells. By that time, the squadrons had reformed and rushed south.
"Derflinger".
At about 16 o'clock, Admiral Beatty's flagship cruiser "Lion" was hit by a shell, which almost became fatal for it. The shell hit the third turret, pierced the armor and exploded under the left gun. All the gun servants died. And only the courage of the mortally wounded tower commander, Major Harvey, saved the ship from destruction. However, the cruiser was forced to withdraw from service. This allowed his enemy, the German battlecruiser Derflanger, to transfer fire to the battlecruiser Queen Mary. “Seydlitz” also fired at it.
Battlecruiser Queen Mary.
At 16:02, the battle cruiser Indefatigable, which was at the end of the British column, was hit by a salvo from the battle cruiser Von der Tann, which was firing at it. And disappeared into smoke and flames. Most likely the shell pierced the deck and hit the artillery magazine of the aft tower. The Indefatigable, diving astern, rolled out of formation. But the next salvo also hit the dying ship. A terrible explosion shook the air. The cruiser lay on the left side, turned over and disappeared. The agony of "Indefatigable" lasted only about 2 minutes. Of the huge crew, only four managed to escape.
Battlecruiser "Invincible".
But the fight lasted. Seeing the difficult situation of his linear forces, Admiral Beatty at 16:10 sent the 13th destroyer flotilla to attack the Germans. 11 German destroyers headed by the light cruiser Regensburg advanced towards them, crossing the course of the battlecruisers. And they entered the battle, covering their ships. When the destroyer formations dispersed, they were missing 2 destroyers. The Germans are “V-27” and “V-29”, and the British are “Nomat” and “Nestor”. And if the “Germans” died directly during the battle. Moreover, “V-27” was sunk by a torpedo from the destroyer “Petard”, and “V-29” was killed by artillery fire. Then the “English” lost momentum, but remained afloat. And they were finished off by German battleships. Having time before death, fire torpedoes at the battleships of the High Seas Fleet. True, to no avail, the torpedoes did not hit the target.
The British destroyer "Abdiel" alongside the light cruiser.
At this time, the battlecruiser Lion again took its place in the ranks. But the Derflinger continued to fire at the Queen Mary. Until at 16:26 the second tragedy broke out. The 11th salvo of the Deflanger hit the Queen Mary (6*). The explosion of ammunition tore the ship apart so much that the next in line, the Tiger, was covered in debris. But when a few minutes later the Tiger passed through the site of the death of the Queen Mary, it found no traces of the deceased battle cruiser. And the column of smoke from the Queen Mary explosion shot up half a kilometer. Within 38 seconds, 1266 English sailors died (7*). But, despite such heavy losses, the British continued the battle. And they even increased their strength. The 5th squadron of battleships joined the English battlecruisers.
Meanwhile, torpedo attacks from both sides followed one after another. At 16:50, 6 German destroyers attacked the British ships to no avail. Of the 7 torpedoes fired, not one hit the target. On the other hand, 4 British destroyers attacked the battle cruiser Seydlitz. Of the torpedoes fired by the destroyers, one still hit the bow of the German ship.
At the same time, the main forces of the German fleet appeared on the horizon. Admiral Beatty turned north. The German ships, repelling the attacks of the British destroyers, followed the enemy in front formation. The German fleet had overwhelming superiority in everything except speed. Taking advantage of this, Admiral Beatty withdrew his battle cruisers from under enemy fire.
Battlecruiser Indefatigable
And the battleships of the 5th squadron began to lead the enemy to Admiral Jillico’s squadron, firing at the lead ships of the German fleet. Which were hit by 5 to 10,381 millimeter shells. But the British ships also received significant damage. The battleship Warepite received 13 hits, and having a damaged steering gear, was forced to leave the battlefield. The battleship "Malaya" received 8 shells. At the same time, one of them pierced the armor of the mine artillery casemate, caused a cordite fire, the flames from which shot up to the level of the masts, and disabled all the starboard artillery and 102 crew members. The battleship Barham received 6 shells.
Battleship "Malaya".
Fighting continued between the light forces of the fleets. At 17:36 a 19-minute battle took place between the cruisers of both sides. Moreover, due to decreased visibility, the German light cruisers came under fire from the British armored cruisers (8*). Part of the vanguard of the main forces of the Grand Fleet. As a result, the German light cruisers Wiesbaden and Pillau were damaged. Moreover, the Wiesbaden vehicles, which were damaged, lost speed. And the ships of the English 3rd squadron of battlecruisers, appearing from behind the haze, turned the Wiesbaden into a blazing bonfire. At this time, there followed an attack by 23 German destroyers on 4 British destroyers and the light cruiser Canterbur. As a result of this battle, the British destroyer Shark was sunk, and the remaining British ships received significant damage. In response, the British destroyers successfully attacked the battle cruiser Lützow with torpedoes. This German cruiser fired back from the enemy ships surrounding it until 19:00. So far, the torpedo of the English destroyer Defenger has not finished off the Wiesbaden. And the waves of the North Sea did not close over him. The crew of the Wiesbaden perished along with their ship. Only one person managed to escape.
Battlecruiser Lützow.
At the same time, carried away by the shooting of German light cruisers, the British armored cruisers came too close to the German battle cruisers. As a result, the armored cruiser Defense exploded after receiving 2 salvos from the Luttsov. And after 4 minutes, the depths of the sea swallowed the ship along with 903 crew members and the commander of the 1st squadron of armored cruisers, Admiral Arbuthnot.
British armored cruiser Defense
The cruiser "Warrior" was threatened with the same consideration. But he was obscured by the battleship Warspite. As a result of damage to the rudders received in a battle with German battleships, it rolled out of action. And by chance he found himself between the Warrior and the German cruisers. And he took the blow. True, as a result of mutual maneuvers, both “Warrior” and “Waspite” collided several times and, due to the damage received, were forced to leave the battlefield.
Light cruiser "Wiesbaden"
The “moustrap” that never slammed shut.
At 18:14 the main forces of the British fleet majestically appeared from the haze. The High Seas Fleet was still trapped. Fire was concentrated on 4 English ships on the lead German ships. The hits followed one after another. But the German gunners were not in debt either. A salvo from the battle cruiser Derflanger turned out to be fatal for the English battle cruiser Invincible. At 18:31, shells ripped open the side in the area of the middle towers. "Invincible" split in half. Taking with him into the depths of the sea almost the entire crew, and Admiral Hood, commander of the 3rd squadron of battlecruisers. Only 6 people were saved. But this was the last major success of the German fleet. The British began methodically shooting their opponents.
Development of the battle from 17-00 to 18-00.
"Lutzow" gradually fell silent. The bow of the battle cruiser was engulfed in flames, the superstructures were destroyed, and the masts were knocked down. Admiral Hipper left the Lützow, which had lost its combat value, and transferred to the destroyer G-39. Intending to transfer to another battlecruiser. But during the day he failed and the captain of the Derflinger commanded the battlecruisers. But the Derflinger itself was a pitiful sight. 3 towers out of 4 were destroyed. Columns of fire from gunpowder burning in the towers rose higher than the masts. In the bow of the cruiser, at the waterline, British shells created a hole measuring 5 by 6 meters. The ship took on 3,359 tons of water. The crew lost 154 people killed and 26 wounded (9*). The Seydlitz looked no less terrible.
All that remains of the battlecruiser Invincible.
Seeing such a deplorable state of his fleet, Admiral Scheer ordered the entire fleet to turn “all of a sudden” and set on a reverse course. And he sent the 3rd flotilla of destroyers to attack the enemy. Hoping to get out from under the fire in this way. The destroyer attack was successful. At 18:45 the battleship Marlboro was torpedoed. But the ship maintained 17 knots and did not leave the battlefield. True, a day later, having sank almost 12 meters, with a list to starboard, the battleship barely reached the base. The torpedo was fired by the destroyer V-48. Achieved success at the cost of his own death. This destroyer was chalked up to the gunners of the Marlboro.
British armored cruiser "Warrior".
At this point in the battle there are two interesting moments. The first point is that the Germans claim that a 381-mm projectile hit the main armor belt of the Derflinger. Allegedly, the projectile hit the armor and ricocheted. But the English battleships opposing the Germans at that moment had only 305-mm and 343-mm guns. And ships with 381-mm guns were on the flanks of the English column. And they did not fire at the German battlecruisers. The second point is to relate to the only, in the entire history of the ship, full broadside, the only seven-tower battleship in the world, the Egincourt. This salvo caused the ship to tilt dangerously and there was a danger of the ship capsizing. Because of this, such salvos were never fired again. And on the neighboring ships, seeing pillars of flame and smoke enveloping the Egincourt, they decided that another English ship had exploded. And the English officers hardly managed to prevent the panic that was emerging on the ships of the Grand Fleet.
And "Erin" too. But in the background, and so "Edzhikort"
The British fire weakened, but continued to harass the German ships. Therefore, at about 19 o'clock, Admiral Scheer turned his fleet on the opposite course, again giving the order to raise the "all of a sudden" signal. Admiral Scheer intended to attack the end British ships and slip under the stern of the Grand Fleet. But the German ships again found themselves under concentrated fire from the British battleships. The thickening haze increasingly interfered with aimed fire. In addition, the English ships were on the dark side of the horizon. And they had an advantage over German ships. Their silhouettes stood out clearly against the background of the setting sun.
English battleship "Iron Duke"
At this critical moment of the battle, seeing that he was being tried from the bases, Admiral Scheer sent all the remaining destroyers to attack. The attack was led by heavily damaged battlecruisers. The battle cruisers closed with the enemy to 8,000 meters, and the destroyers at 6,000-7,000 meters. At 19:15, 31 torpedoes were fired. And although none of the torpedoes hit the target. And the destroyer S-35 was sunk by the British. This attack achieved its goal. Forcing the English ships to change course. What saved the High Seas Fleet. Which, with the start of the attack by the destroyers, turned again “all of a sudden” and began to quickly leave the battlefield. And at 19:45, having escaped the ring of British ships, the German fleet headed south.
Airship L-31 over the battleship Ostfriesland
But the fight is not over yet. At 20:23, British battle cruisers suddenly emerged from the haze. And they opened fire on the German battle cruisers that had greatly annoyed them. Clearly intending to settle accounts with them. But at this difficult moment for the ships of Admiral Hipper, help came to him. After the turn, they found themselves in front of the entire squadron, obviously taken into battle for the sake of numbers, the obsolete battleships (10*) of the 2nd squadron were just in the process of changing formation. To take a more appropriate place for them, at the end of the column.
As a result, these battleships found themselves to the east of other German battleships. And by changing course, they were able to shield their battlecruisers, taking the blow upon themselves. This bold attack, held up by the destroyers, forced the British ships to turn and disappear into the darkness. The night was coming into its own more and more. A night that allowed the British to somewhat brighten up, for them, the joyless result of the battle.
Development of the battle from 18-15 to 21-00
Flame in the middle of the night.
The sun disappeared behind the horizon. The sky was getting darker. But at 20:58 the horizon was again illuminated by gunfire. In the beams of the searchlights one could see the Germans and English lungs cruisers. As a result of this battle, several cruisers on both sides were damaged, and the German light cruiser Fraenlob, damaged in the day's battle, was sunk.
German battleship "Prince Regent Luitpold"
A little later, the British 4th destroyer flotilla launched an attack on the German battleships. At the same time, the destroyer Tupperer was sunk and the destroyer Speedfire was damaged. The attack was unsuccessful, but while performing an anti-torpedo maneuver, the battleship Posen rammed the light cruiser Elbing. The British only managed to damage the destroyer S-32. Which lost speed, but was taken in tow and brought to the base.
At 22:40 a torpedo from the British destroyer Contest hit the light cruiser Rostock, which had been heavily damaged in previous battles. During this attack by the British 4th Destroyer Flotilla, the British destroyers Sparrowheavy and Brooke were damaged. At 23:00 the 4th flotilla attacked the German ships for the third time, albeit unsuccessfully. At the same time, the destroyer Fortuna was sunk and the destroyer Roproid was damaged. At 23:40 there was another British torpedo attack. 13 destroyers, from different flotillas, attacked the German battleships to no avail. And the destroyer "Turbulent" was added to the list of losses of the Grand Fleet.
"Deutschland" from the 2nd squadron
Around this time, the High Seas Fleet crossed the Grand Fleet's course. Located about two miles from the last battleship of the Grand Fleet. And from the battleships of the 5th squadron they saw attacks by destroyers. And on one of the battleships they even identified the enemy. But during the battle, the commander of the Grand Fleet, Admiral Jellicoe, never learned about the battles of the light forces of the fleet with German battleships, or that these same battleships passed by the guns of the battleship entrusted to him. And literally at a direct shot distance. Pointlessly continuing the search for the German fleet. From now on, only moving away from the High Seas Fleet.
German light cruiser "Ariadne" of the same type as the cruiser "Fraenlob"
At 0:07 a.m., the British armored cruiser Black Prince and the destroyer Adent approached the German battleships at a distance of 1000 meters and fired upon them. A few minutes later, the ships engulfed in fire lost speed. A huge fire raging on the deck of the cruiser illuminated the sides of German battleships and cruisers passing by. Until there was an explosion and the Black Prince sank into the sea. The Adent sank somewhat earlier than the cruiser.
But the British quickly got even for this loss. At 0 hours 45 minutes, the 12th destroyer flotilla, led by the scout (11*) "Iturling", went on the attack. 20 minutes later, one of the fired torpedoes hit the obsolete battleship Pomern. The explosion detonated the ammunition and the ship almost instantly disappeared in a huge cloud of smoke. Along with the ship, its crew - 840 people - also died. This was the heaviest loss of the German Navy in the Battle of Jutlan. In addition to the battleship, in this last clash of the fleets, the German destroyer V-4 was lost along with its entire crew.
Explosion of the battleship "Pomern"
The death of the destroyer "V-4" became one of the mysteries of the Battle of Jutland. The ship was guarded by the German fleet on the opposite side of the battlefield. There were no submarines or minefields in this place. The destroyer simply exploded.
German destroyers searched for English ships throughout the night. But only the cruiser Champion was discovered and attacked to no avail. German torpedoes missed.
According to the plan, the high-speed minelayer "Abdiel" on the night of May 31, on June 1, renewed the minefields on the approach to the German bases. Exhibited by him a little earlier. On one of these mines, at 5:30 a.m., the battleship Ostfriesland was blown up. But the ship retained its combat capability and returned to base.
Damage to the light cruiser Pillau after the Battle of Jutland
According to the plan, the British covered the approaches to enemy bases with submarines. On May 31, 3 British submarines E-26, E-55 and D-1 took up positions. But they had orders to attack enemy ships only from June 2. Therefore, when the German ships returned to their bases, passing over the heads of the British submariners, they lay calmly on the seabed. Bidding for time.
Battleship Posen
The German submariners also did not distinguish themselves. At 10 o'clock, the damaged Marlboro was attacked by 2 submarines. Walking to the base. But the attacks were ineffective. The Warspite was also attacked by a single German submarine. But the ship, which had a speed of 22 knots, not only dodged the torpedoes. But he even made an attempt to ram the enemy
German submarine UC-5
But the ships continued to die. At 1 hour 45 minutes the battle cruiser Lützow was abandoned by the crew and sunk by a torpedo from the destroyer G-38. In the daytime battle he received 24, only large-caliber, shells and a torpedo. The bow of the cruiser was almost completely destroyed; about 8,000 tons of water entered the hull. The pumps could not cope with so much water and the increasing trim on the bow exposed the propellers. It was impossible to continue the journey. And the command of the High Seas Fleet decided to sacrifice the ship. The surviving 960 crew members transferred to destroyers.
At 2 o'clock on June 1, the light cruiser Elbing sank. The cause of the death of the cruiser was the destroyer Sparrowheavy. Damaged during a night battle and having lost its stern section. At 2 o'clock in the morning, the Sparrowheavy sailors saw a German light cruiser emerging from the fog and prepared for the last battle. But the German ship, without firing a single shot, suddenly began to sag and disappeared under water. This was “Elbing”. After the collision, the cruiser lost speed and was abandoned for the most part crew. But the captain of the cruiser and several dozen volunteers remained on the ship. Trying to use the wind and currents to escape into neutral waters. But at dawn they saw the English destroyer and hastened to scuttle the ship. Following the Elbing, at 4 hours 45 minutes, the German light cruiser Rostock followed to the bottom of the North Sea. The crew fought for the life of the ship until the last minute. The British armored cruiser Warrior sank at 7 o'clock, having received 15 heavy and 6 medium shells in the day's battle. And at 8:45 a.m., the Sparrowheavy was finished off by friendly fire after its crew had been removed.
Personally, the commander of the Grand Fleet was never able to find the German fleet. And at 4 hours 30 minutes the British ships headed for the base. Not knowing that his fleet was discovered by one of the five German Zeppelins that took off to replace the first five. And the German commander had all the information received by his subordinates.
Development of the situation from 21-00 until the end of the battle.
Jutland's last exploit.
The gun salvos died down, but the battle was not over yet; the battle cruiser Seydlitz was still at sea. In the battle, the ship received 21 shells with a caliber of 305-381 millimeters, not counting smaller shells and a torpedo in the bow. The destruction on the ship was terrible. 3 towers out of 5 were destroyed, the bow generators failed, the electricity went out, the ventilation did not work, and the main steam line was interrupted. The strong impact caused the housing of one turbine to burst and the steering gear to jam. The crew lost 148 people killed and wounded. All nasal compartments were filled with water. The stem almost completely disappeared under water. To level the trim, the aft compartments had to be flooded. The weight of water that got inside the hull reached 5329 tons. Already at dusk, the oil filters failed and went out. latest boilers. The ship completely lost its combat value and swayed helplessly on the waves. All mechanical means of combating the survivability of the ship have failed. Admiral Scheer had already included Seydlitz on the list of battle casualties. And leaving the lost ship, the German fleet went south. Firing back from British destroyers. Who, carried away by the pursuit, did not notice the stopped Seydlitz.
"Seydlitz"
But the crew continued to fight. Buckets, vetoes, and blankets were used. Mechanics, in complete darkness, were able to climb under the foundation of the boilers, replace the filters and start up some of the boilers. The cruiser came to life and crawled stern-first towards its native shores. But to top all the troubles, during the battle all the nautical charts on the ship were destroyed and the gyrocompass failed. Therefore, at 1 hour 40 minutes the Seydlitz ran aground. True, not for long. The crew managed to bring the ship to clean water. At dawn, the light cruiser Pillau and destroyers approached the battle cruiser to help. But at 8 o'clock the uncontrollable Seydlitz was again stranded. And when a few hours later, through the incredible efforts of the crew, the cruiser was refloated, a storm broke out. Attempts by the Pillau to take the Seydlitz in tow were unsuccessful. And Seydlitz once again found itself on the brink of death. But wayward Fortune remained favorable to the ship's crew. And late in the evening of June 2, the ship dropped anchor at the mouth of the Yade River. Thus, putting an end to the Battle of Jutlan.
Pyrrhic victory.
Historians are still arguing. Finding out the winner in the Battle of Jutlan. Fortunately, both commanders reported the victory to their admiralties. And at first glance, Admiral Scheer was right in his report. The Grand Fleet lost 6,784 men killed, wounded and captured. Of its composition, 3 battle cruisers, 3 armored cruisers and 8 destroyers (a total of 111,980 tons of displacement) were lost. And the High Seas Fleet lost 3,029 people and lost an outdated battleship, a battleship, 4 light cruisers and 5 destroyers (62,233 tons of displacement). And this, despite the one and a half times superiority of the British. So if you look from the tactical side, the victory remained with the Germans. The Germans also won a moral victory. They were able to sow fear in the hearts of English sailors (12*). The Germans were also able to demonstrate the superiority of their technology over the English (13*). But then why, after Jutland, did the German fleet enter the North Sea only at the end of 1918? When, under the terms of the truce, he went to surrender at the main base of the Grand Fleet.
"Westfalen"
The answer is simple. The High Seas Fleet failed to complete its assigned mission. He was unable to defeat the English fleet, gain supremacy at sea and bring England out of the war. And the Grand Fleet, in turn, maintained its superiority at sea. Even despite very heavy losses. And for another quarter of a century the English fleet was considered the greatest fleet in the world. But Jutland was a “Pyrrhic victory,” a victory on the brink of defeat. And this is precisely why there is no ship in the English Navy with the name "Jutland". And it’s clear why the German Navy doesn’t have a ship with the same name. Ships are not named after defeat.
Bibliography.
1. G. Scheer “The Death of the Cruiser “Blücher”. St. Petersburg, 1995. Series “Ships and Battles”.
2. G. Haade “On the Derflinger in the Battle of Jutlan.” St. Petersburg, 1995. Series "Ships and Battles".
3. Shershov A.P. "History of military shipbuilding." St. Petersburg, 1995 "Polygon".
4. Puzyrevsky K. P. “Battle damage and loss of ships in the Battle of Yutlan.” St. Petersburg 1995
5. "Valecne lode", "Druni svetova" "Nase vojsko pnaha".
6. Model designer 12"94. Balakin S. "Super-dreadnoughts". Art. 28-30.
7. Modeler designer 1"95. Kofman V. "New hypostasis of the battleship." Art. 27-28.
8. Model designer 2"95. Balakin S. "The incredible return of Seydlitz." Art. 25-26.
In addition, materials from numbers 11"79, 12"79, 1"80, 4"94, 7"94, 6"95, 8"95 "Model Designer" were used.
"Thuringen"
Fleet organization:
1. English fleet:
1.1 Main forces:
2 squadron of battleships: "King George 5", "Ajax", "Centurion", "Erin", "Orion", "Monarch", Conqueror, "Tunderer".
4 squadron of battleships: Iron Duke, Royal Oak, Superb, Canada, Bellerophon, Temeraire, Vanguard.
1 squadron of battleships: "Marlborough", "Rivenge", "Hercules", "Edjicourt", "Colossus", "St. Vincent", "Collingwood", "Neptune".
3 squadron of battlecruisers: "Invincible", "Inflexible", "Idomitable".
1.2 Vice Admiral Beatty's squadron: flagship - Lion.
1 squadron of battlecruisers: "Princess Royal", "Queen Mary", "Tiger".
2 squadron of battlecruisers: New Zealand, Indefatigable.
5th squadron of battleships: "Barham", "Valiant", "Warspite", "Malaya".
1.3 Light powers:
1, 2 squadrons of armored cruisers: "Defence", "Warrior", "Duke of Edinburgh", "Black Prince", "Minotaur", "Hampshire", "Cochran", "Shanon".
1, 2, 3, 4 squadrons of light cruisers (23 in total).
1, 4, part 9 and 10, 11, 12, 13 destroyer flotillas (total 3 light cruisers and 75 destroyers).
"Edjicourt"
German fleet
2.1 Main forces:
3 squadron of battleships: "König", "Grosser Kurfust", "Markgraf", "Kronprinz", "Kaiser", "Princeregent Leopold", "Kaiserin", "Frederick der Grosse".
1 squadron of battleships: "Ostfriesland", "Thuringen", "Helgoland", "Oldinburg", "Posen", "Rhineland", "Nassau", "Westphalen".
2nd squadron of battleships: Deutschland, Pomern, Schlesien, Hanover, Schleiswing-Holstein, Hesse.
2.2 Admiral Hipper's reconnaissance detachment:
battlecruisers: "Lutzow", "Derflinger", "Seydlitz", "Moltke", "Von der Tann".
2.3 Light powers:
2, 4 light cruiser detachments (9 in total).
1, 2, 3, 5, 6, 7, 9 destroyer flotillas (total 2 light cruisers, 61 destroyers).
"Von der Tann"
Notes
* A ship with a displacement of 2500-5400 tons, having a speed of up to 29 knots (up to 54 km/h) and 6-10 guns with a caliber of 102-152 mm. Designed for reconnaissance, raiding and raiding operations, protecting battleships from enemy destroyers.
2* A ship with a displacement of 600-1200 tons, with a speed of up to 32 knots (up to 60 km/h), 2-4 small-caliber guns and up to 4 torpedo tubes. Designed for torpedo attacks on enemy ships.
3* A ship with a displacement of 17000-28400 tons, having a speed of 25 - 28.5 knots (46-53 km/h) and 8-10 guns with a caliber of 280-343 mm. designed to combat raiders, support light forces, and pin down enemy battleships in a squadron battle.
4* A ship with a displacement of 18,000-28,000 tons, having a speed of 19.5 - 23 knots (36-42.5 km/h) and 8-14 guns with a caliber of 280-381 mm. Constituting the main forces of the fleets and intended to seize and maintain dominance at sea.
5* cables - 185.2 meters (80 cables - 14816 meters, 65 cables - 12038 meters).
6* It is assumed that the Queen Mary was hit by 15 305-millimeter shells.
7* 17 people were saved from the Queen Mary.
8* An obsolete type ship with a displacement of up to 14,000 tons, with a speed of up to 23 knots (up to 42.5 km/h), which had up to 20 guns with a caliber of 152-234 mm. Performed the same functions before the advent of battlecruisers.
9* During the battle, the Derflinger was hit by 21 heavy shells.
11* An obsolete type ship with a displacement of up to 14,000 tons, with a speed of up to 18 knots (33 km/h), which had 4 guns of 280 mm caliber. And before the advent of "dreadnoughts" they performed the same functions.
12* Light cruiser of small displacement.
13* The Germans were able to strike fear in the hearts of English sailors. And so Admiral Jellicoe did not risk pursuing the High Seas Fleet. To force a day battle on the Germans on June 1st. Although he could oppose the 1 remaining battleship squadron of the Germans with 3 of his own. And that's not counting light forces.
14* So the battle showed that the 305 mm. the German shell penetrated the side armor of the British battle cruisers already from 11,700 meters, and the English 343 mm. the shell penetrated the thicker armor of German battlecruisers from only 7880 meters. In addition, the survivability of English ships, unlike German ones, and their critical devices wanted much better. The Germans, having fired 3491 shells with a caliber of 280-305 mm, against 4538 British shells with a caliber of 305-381 mm, achieved 121 hits on British ships, against 112 English shells that hit German ships.
 (1 ratings, on average: 5,00 out of 5)