How to check the performance of a capacitor using a tester. How to check a capacitor with a multimeter - detailed instructions. A classic example of a capacitor.
With the help of a special technical equipment you can detect various radio elements that are out of order or worn out. But things get tricky when testing is required. capacitive elements with the help of a multi-tester, because the elements of this type are not afraid of the most common “rings”.
Why do capacitors go wrong?
The lifetime of capacitors largely depends on the operating conditions. high time engine switching and high temperatures environment shorten the service life. This is also the reason why capacitors garden pumps and lawn mowers love to break down in the summer. The devices are located in the sun, and in the case of sometimes very high temperatures.
Simple checklist: solve simple hardware problems yourself
To check the self-standing voltage, turn off the power from the main board. Cables have color coding: the black cables are grounded and one green cable provides a voltage of 4.5 to 5 volts in standby mode, as soon as the power supply is suspended. With a multimeter you can measure it - no risk.
What is a multimeter? This is a versatile device that allows you to perform electrical measurements. Using this device, you can measure the indicators of current of direct and variable types, as well as measure the power indicator of the network, the capacitance of the capacitor, the power of the resistance and radio components.
At the moment, all devices of this type are divided into two main types:
Attention, high voltage! Opening the power supply is also not recommended for experienced hobbyists and is associated with a risk of injury. electric shock even if the power supply is disconnected from the power supply. Built-in capacitors are still under high voltage for a long period of time. Another sign of a faulty power supply is when its fan no longer works.
Motherboard: pay attention to error codes
The first step is to find the physical damage on the board. If nothing is found, remove the motherboard to rule out a built-in error. Common problems are short circuits due to bent plates, as well as loose screws that slide behind the main board. The next step is to dismantle the system until only necessary components. In case nothing is done even in the minimum configuration, even if the power supply is OK, this indicates a defect on the main board.
- digital - this device displays all the results obtained on a digital display;
- analog - a special digital scale is used to display indicators.
A special regulator is installed on the body of the device. In some cases, there are several such controllers. They are necessary in order to switch modes and measurement values. In order to perform the measurement, probes are used (a special wire at one end of which there is a connector, and at the other end - a metal tip).
These codes are the most important tool for further detailed troubleshooting. The codes are different for each motherboard manufacturer and are described in the manual. Coloring on the front and back indicates that the processor has been damaged - for example, due to poor cooling, a short circuit, or a faulty voltage regulator.
According to their design features, they are divided into
In the vast majority of cases, this breakdown is simple and the card does not take any damage. Be sure to attach the card to the case and screw it into the slot. Electrolytic capacitors permanently soldered on the graphics card can burst. These are mainly aging or overvoltage phenomena that occur due to a faulty power supply. If the capacitor breaks, the card is faulty, even though it should still work. Depending on the graphics card, up to 10 of these electrolytic capacitors may be present.
The electrolytic capacitor can be checked with a multimeter without soldering. Especially for this, an ohmmeter is used, which is part of a device of this type.
Resistance indicator electrical capacitor will be above the mark of 100 Mohm:
- The device is discharging. To do this, arrange short circuit on legs.
- Directly on the body of the device, the corresponding measurement value is set.
- Both leads lead to the legs. Left to minus and right to plus.
- If the resistance indicator is higher than the specified value, then the device is working.
To visually familiarize yourself with the conduct of this technical process you can use the video below:
If one of them fails, the other capacitors do their job, provided they are connected in parallel. Then the remaining electrolytic capacitors have a higher load to handle them and usually for a very short time.
What applies to the processor also applies to the graphics card. Overclocking can increase power consumption and make the graphics card too hot. If the cooling is too low, it is switched off. By the way, the monitor can also give up its spirit. This allows you to exclude a defect in the graphics card.
To measure the capacitance of a capacitor with a multimeter, you must follow the instructions:
- The measuring instrument is transferred to the capacitance measurement state.
- Probes are connected twice. The second time they are swapped.
- Fix the result. Compare both readings.
- In the event that “0” appeared on the screen for the first time, and “-” in the second, then the device is absolutely serviceable. If the readings are the same, then the device can be considered inoperative.
This method is used to determine if a leak or break exists. If it is necessary to check the capacitor on the board using a multimeter, they use the device to charge and discharge it, while almost completely changing the polarity. According to experienced professionals this option is highly questionable.
The worst thing that can do HDD It's a head crash. This is a direct contact of a spinning hard disk magnetic disk with a read/write head. This results in mechanical damage to the storage layer. IN last resort the head can also get stuck on the surface of the cymbal during a head crash and then come off by the rotation of the plates. After a head crash, the hard drive will usually no longer boot or only work for a short time until it finally expires. In most cases, this is caused by abrasive material that is deposited as thin film and thus further damages the heads and the surface of the plates.
Checking different types
When checking ceramic capacitor(non-polar) using a multimeter, various dielectrics are used. For example, it can be paper, glass or air.
The whole process comes down to this:
- Switch the device to real resistance measurement mode.
- The maximum limit is set on the device.
- The device is set up and the probes touch the leg

Data on such a damaged hard drive can often only be recovered by head-crash data recovery companies. By using free program you can determine the lifespan of conventional hard drives and solid state drives and thus protect yourself from imminent failure in time.
In addition, the program monitors the temperature of the drives and warns of excessive heating. You will find this on the manufacturer's web pages. Multiply this number by the usable capacity and you get the full lifespan.
In the event that the device is working, then a value of 2 MΩ will appear on it. If the indicator is less, then the device is out of order.
Checking the film capacitor with a multimeter, check the resistance indicator. If there is a “leak” in the device, then nothing will change. If there is an internal break, then on the analog multimeter the arrow will go to infinity.
Expect Hard Drive Life Expectancy: For ferromagnetic drives, manufacturers predict life expectancy versus annual failure rate. The tool combines all relevant parameters into an automatic calculation and warns of a general hard drive failure. Open command line in advanced options. It allows you to manage, create, delete, merge, split, move, copy, format and resize partitions. In addition, the program can copy full disks or partitions and recover deleted partitions.
If using a multimeter it is necessary to check the performance of the starting capacitor, then the starting mechanism is initially removed. Then check it for leaks. electric type. Attach the probes to the terminals. After that, a capacity test is performed.
When it comes to checking a non-polar capacitor, you should refer to the material provided above, because in terms of principle device a device of this type is no different from a ceramic capacitor.
Checklist: Solve simple hardware problems yourself
Use a disk scan tool for lost partitions. The data can then be saved. In many cases, our advice can help. Check the power strip and connect other devices to the same power supply. Refer to your motherboard manual for the cause of the sound.
Open the case and look for defective electrolytic capacitors on the motherboard or graphics card. They can be cracked and smell burnt. If the electrolytic capacitors are defective, the corresponding component must be replaced. Make sure all cards are securely seated in the designated slots and that the hard drives are properly connected.
Checking the smd capacitor is carried out in the same way as a conventional device. Using measurement maximum indicator resistance.
Attention! Checking high voltage capacitor all you need is to charge it above the norm. Then everything will be visible immediately.

Capacitor test process
If their characteristics differ from the previous ones, a mixed operation is usually not possible. If you now add more hard drives or a more powerful graphics card, the existing power supply is too weak. Avoid if dust is added to the vents and the fans are almost never polluted with dust, the heat in the cases can get too much.
The hard drive may be marked with small knocks. A loud bang indicates a break electrolytic capacitor. A constantly spinning fan can shut off too much heat. Three phase motor alternating current works because the three-phase alternating current in the motor generates a circulating field. This requirement is not met single-phase voltage. A capacitor is required to obtain the required phase shift.
The AC capacitor is checked with a multimeter by measuring this indicator twice with a change in polarity. Then they are compared and on the basis of this a conclusion is made. If indicator No. 2 is higher, then the device is working.
How to check in household appliances?
In some individual cases, it is necessary to check the capacitor, which is located in the housing of household appliances:
Resistance test
Engine capacitor design. Right choice working capacitor is rather difficult when the reference capacitance is unknown. The exact capacitance of the capacitor depends on the power of the motor, on the torque, on the design of the motor, and also on the design of the winding. However, much of this data is usually unknown to the user. Therefore, only generally accepted statements can be made here, which do not claim to be complete and correct in all cases. This value varies inversely with the ratio of the auxiliary winding to the main winding.
- capacitor from washing machine– measured with a multimeter or tester. The measurement is made to the maximum resistance of the device. If it is working properly, then the arrow of the device will deviate.
- microwave capacitor - when connecting a multimeter, the resistance indicator must be infinite (provided that measuring device stands in the Rx 1000 position).
- automotive capacitor - for this use the standard method.
How to check without a multimeter?
In order to check the capacitor for performance without the use of special measuring equipment, it is necessary to work with high power capacitors. At the same time, they use one of the properties of a capacitor - to accumulate charge and recharge. the capacitor is charged with a high voltage (more than the rating indicated on the device case). Do this for a few seconds.
The voltage on the capacitor in the nominal mode is approximately 1.41 times higher than when the mains voltage is applied. During idle, the capacitor voltage increases again by about 15%. If the auxiliary winding has more than twice as many turns as the main winding, a factor of 1 plus turns squared should be used instead of a factor of 1.41. Usually the number of windings of the auxiliary winding is much higher than that of the main winding. We also never wanted and should have.
So if you can't read anything on your capacitor, this statement might be a hint. However, we cannot guarantee any guarantees. If this is not clear, and if the capacitance is not readable on the capacitor or on the motor, the manufacturer or official dealer engine can provide information.
Attention! Hands must not touch metal elements devices. Iron must be completely isolated from humans. After that, the capacitor contacts are carefully closed with an iron element. A spark will appear.
Video
Watch the video on how to check the capacitor:
Checking motor capacitors: If the motor capacitor is not damaged, it must be measured. Since the end user cannot be expected to have expensive, high-tech equipment available, it is safe to say that even with simple analog meters, very impressive measurement results can be achieved. Digital meters are not suitable. The capacitor must not be connected to the motor winding for measurement. It must also be fully discharged!
Today created a large number of technical means, designed to measure and measure various electrical and technical indicators. With the help of them, problems can be detected in time and replaced. In addition, it will be possible to avoid serious expenses for the purchase of new equipment. The weight that is required is to repair or replace the worn element.
Set up your meter for continuity testing and capacitor measurement. The pointer will first strike to the right and then return to position 0. Depending on the power, the stroke is different. Also the time during which the pointer needs position 0 is different. Repeat the test by changing the connections. Note that the pointer can be quite small for small capacities. If the pointer does not turn off or remains in correct position, the capacitor is faulty. Please note that you do not touch the measuring points during the measurement.
Oct 5, 2015 Tatyana Sumo
Consider how to check the starting capacitor of the circulation pump. According to this principle, any starting capacitors.
An asynchronous motor is used to rotate the pump turbine. To start the armature, you need to create a phase shift on initial stage launch. This action is achieved by means of a capacitor placed on the auxiliary winding.
Operating principle.
The capacitor consists of two parallel placed, relative to each other, metal plates and interconnected by a dielectric spacer. The larger the area of the plates, the greater its capacitance, which is measured in microfarads, picofarads, etc. When a positive voltage is applied to the capacitor contacts, this energy accumulates between the plates, and when a negative voltage appears, it is returned to the circuit. Because AC voltage consists of constantly changing negative and positive charges, thanks to the capacitor, the alignment of oscillations towards positive voltage is achieved. This contributes to the creation, at the initial stage of work induction motor, magnetic field, which rotates the anchor.
Symptoms of a malfunction.
In the event of a breakdown or loss of capacitor capacity by more than ± 15% of its nominal value, in the first variant the circulation pump will not start, in the second case the engine will rotate jerkily.
Capacitor check.
There are several ways to test capacitors. safe way- for testing, a special device for testing capacitors or an ohmmeter is used, and a dangerous method - conclusions about its performance are made by discharging a charged capacitor. Also, a broken capacitor has external characteristics malfunctions: electrolyte leakage, swollen housing. Measure the capacitance of a capacitor special device not difficult. To do this, you just need to turn it on and set the lever to a higher value than the value being checked, touch the probes to the contacts. Then compare the obtained value with the specified information on the body.
If the deviations are small (± 15%), the part is OK, if the values are missing or below the acceptable range, then the starting capacitor should be replaced. We will not consider a dangerous method, since it violates safety precautions when working with capacitors.
Let us dwell on an indirect method for determining the state of a storage device using an ohmmeter.
Capacitor performance test with an ohmmeter.
To check the performance of the starting capacitor:
1. Disconnect its contacts from the engine.
2. For the convenience of measuring readings in some circulation pumps should be separated outer cover and clamps.
The passage resistance of your body would distort the measurement result and possibly mislead you into incorrect conclusions. Of course, you can compare with working capacitors of comparable capacity. If the pointer is roughly equal, and the pointer takes about the same time at position 0, then the questionable capacitor can be considered ordered. However, for accurate measurement containers you will need measuring device containers.
Attention! Make sure that there is no voltage in all measurements and that the capacitors are also completely discharged! Danger of electric shock! Use of motor capacitors. When starting a capacitor? Many users have trouble deciding whether they need a start capacitor or a run capacitor. This is often why start capacitors are used erroneously when a run capacitor would be correct. The consequence of this is that the start capacitors do not work immediately, and the supplier is falsely accused of delivering a "crutch".

3. Before testing, discharge the capacitor by closing its contacts, for example, with a flat-head screwdriver.
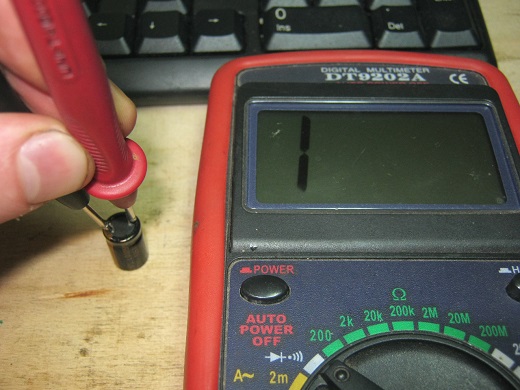
4. Switch the multimeter to the 2000 kilo ohm resistance test position.
5. Examine the findings for mechanical damage, oxidation. A poor connection will adversely affect the accuracy of the measurement.
6. Connect a probe to the capacitor leads and watch the readings. If the values begin to change in this way: 1...10...102...159...1, then the capacitor is good. The numbers may be different, the main thing is that changes occur from 1 to 1. If the instrument values do not change (the number 1 is lit on the displays) or zero is displayed, then the part is faulty. For re-check, the capacitor should be discharged and repeat step No. 5 again.

The provided method will not allow to fully measure the capacitance of the capacitor, but it will reveal its condition without a special device.
 (1 ratings, on average: 5,00 out of 5)

