LED screwdriver indicator. Types of measuring devices. Screwdriver phase indicator. Video explanation
Don't know how to use indicator screwdriver? It's not scary, because... To work with a modern indicator, no special knowledge is required, especially if the probe is electronic. Next we will provide you with useful tips on using an indicator with a battery, without a power source and electronic. In addition, consider video reviews of the use of the most popular models of screwdrivers!
Existing types of devices
First, let's tell you what they are indicator screwdrivers and what are the advantages of each type. Today it is customary to use the following types of indicators:
So we looked at the most popular types of indicator screwdrivers. Next, we'll look at how to use each model for the most common situations that can happen at home.
At home, an indicator may be needed for the following reasons:
- find phase and zero in a socket or lamp;
- make sure there is voltage in the electrical network;
- determine the electrical device from which the phase breakdown occurs on the housing;
- check the functionality of the electrical extension cord;
- find the wire in the wall under the tiles or plaster.
Before using the indicator, you need to check it. To do this, it is recommended to check the operation in the live area (this way we will know whether the indicator light lights up at all). In addition, if the probe has a battery, you can check it as follows: touch the tip with one finger, touch the coin with the other, and if the light comes on (as shown in the photo), then the device is working.
So, take a look at the instructions on how to properly use an indicator screwdriver in each situation.
Phase/zero search
The first and most popular situation in which you have to use a probe is when you need to find phase wire nickname, if absent. In this case, you need to touch one of the wires with the tip of a screwdriver. If the light comes on - you have found the phase, if not - 0. 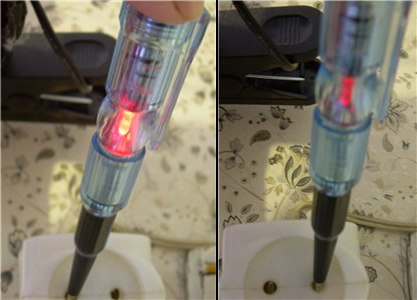
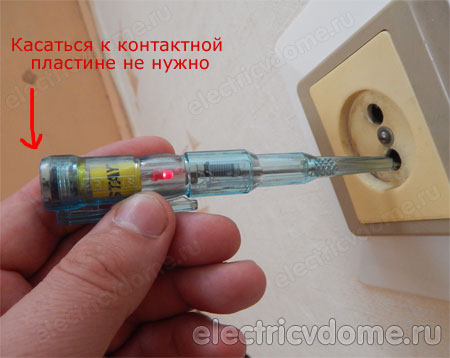
When using a regular probe, do not forget to touch the penny with your finger, otherwise you will not be able to determine the polarity! If the indicator screwdriver has a battery, there is no need to touch the coin.
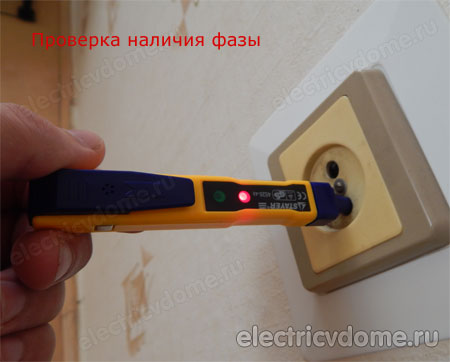
To determine whether there is voltage in the network, simply touch the socket connectors with a tip. The LED is on - there is voltage, no, that means no.
Leak detection
The second reason why you need to use an indicator screwdriver at home is when you need to find where a breakdown occurs, or in other words, a breakdown on the body of an electrical appliance. In this case, both a regular probe and an electronic version can solve the problem. In this case, it is simple to use - you need to bring the tip to the grounding antenna in one of the sockets. If the LED lights up, there is a leak. 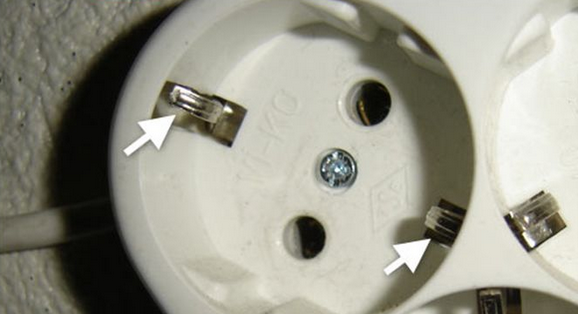
- disconnect all electrical appliances from the network;
- turn on each device one by one and check for leaks;
- the light does not light up - the equipment is working properly, if it lights up - a leak occurs when the device is turned on.
We immediately recommend that you familiarize yourself with similar material - because... when there is a leak it triggers immediately this type automation, as a result of which the electricity in the house is turned off. If the indicator lights up at zero, it means neutral wire The nick has burned out and you have two phases in the wiring. This is very dangerous and you need to immediately proceed to troubleshooting. We advise you to immediately check the electrical network to understand how dangerous it is.
Looking for a broken wire
If electricity does not flow to the sockets and electrical appliances in the room, but there is power at the input, you can try to determine the wire break with an indicator screwdriver. The probe, of course, will not show so well the location of damage to hidden wiring, but, nevertheless, electronic device will be able to detect the approximate area of the cliff. To do this, it is necessary, based on the electrical wiring diagram in the house, to draw a sting along the location of the cable in the wall from distribution box to the socket. Where the break occurs, the light bulb should stop burning. 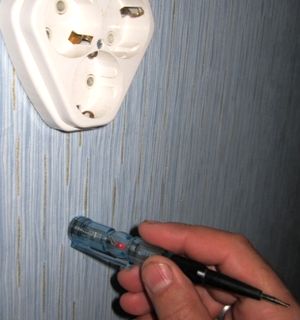
The second search method is to check the entire line. In this case, you will not be able to determine with the indicator exactly where the contact break occurs, but you can at least make sure that it is there. By the way, in this case you can use even a simple indicator screwdriver with a battery. All you need to do is turn off the power on the panel, take one bare wire in one hand, and touch the second wire with the tip of the probe. This method creates a closed circuit and if there really is a break, the light bulb should not light up.
We immediately draw your attention to the fact that it is necessary to check the break on the lamp when the power is turned off, but the light switch is on. If you forget to close the circuit on the switch, the screwdriver indicator will show that the circuit is broken, but this does not mean that there is a break!
Here I would like to add one more case that often occurs in everyday life. To check whether the light bulb is working, you need to take it by the base with your fingers and touch the central contact with the tip. In this case, the finger should lie on the heel of the handle. If the indicator light in the handle lights up, then the lamp itself is working!
Checking the extension cord
Well, the last point I would like to dwell on is to tell you how to correctly use an indicator screwdriver when checking an electrical extension cord. Here things are a little more complicated, so pay more attention to the material described below.
First you need to disconnect the “carrying device” from the network and other electrical appliances. After this, you need to make a jumper from the wire and insert it between the sockets of one of the sockets of the block (short circuit). Next, everything is quite simple - you need to take one of the electrodes of the plug with your finger, and touch the second with the tip of the probe. The result is determined as always - the indicator light is on, which means everything is working, no, therefore, no. 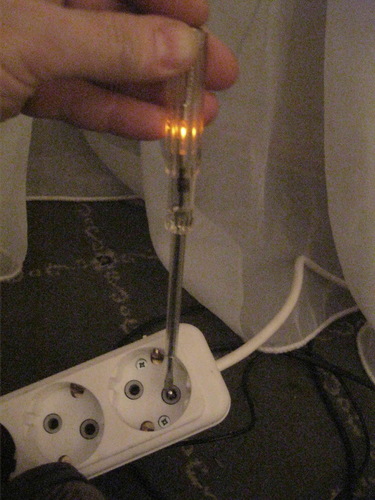
Video instructions for using the MS-18 tester
How to determine the network voltage?
Video review of the Stayer electronic model
Like( 0 ) I do not like( 0 )
It’s worth saying right away that the indicator screwdriver is very important tool, which, along with pliers and a hammer, should be in any house and apartment.
Almost every person has had to find themselves in such an unpleasant situation - suddenly the lights in the apartment go out. What happened? Why did this happen? Most people immediately ask the question: “Did the lights turn off just me or everywhere?” Well, if you have an indicator screwdriver at hand, you can find the answer to this question very quickly. Moreover, having minimum set skills, in some cases you can even fix the problem yourself.
For example, if the contact in a switch or socket is simply lost, you can fix the breakdown very quickly - you just need to find problem area. But how to do that? Use special, bulky, complex and rather expensive devices? No, if you have it at hand. Moreover, if you use it, then you will not have to disassemble the wall to get to the wiring.
A serious plus is that no one needs to be taught how to use an indicator screwdriver - it is as easy as possible to use. And at the same time, it allows you to instantly determine the absence or presence of voltage at a switch or outlet.
In this article we will look at what an indicator screwdriver is, their main types and design, as well as.
How does a screwdriver indicator work?
To use any device, you need to understand how it works. Of course, this fully applies to the indicator screwdriver. If you at least roughly know how it works, this will give you the opportunity to easily use it without making any mistakes.
This will also give you the opportunity to do without a multimeter, which is much more expensive and much more difficult to use. Today you can see various indicator screwdrivers in specialized stores. And each type has its own operating principle.
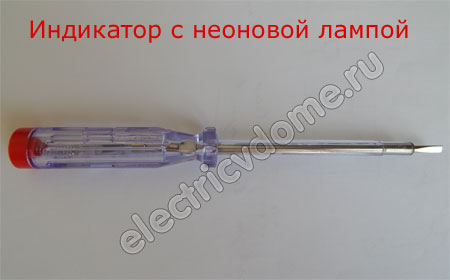
A regular screwdriver indicator is the simplest solution
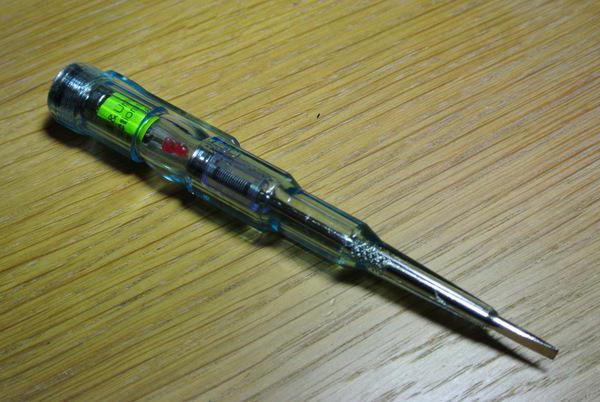
The simplest and most common probes are equipped with neon lamps. The principle of their operation is as simple as possible.
When you check the voltage at an outlet, electricity passes through a resistor installed inside the indicator (this resistor limits the current, its nominal value is at least 0.5 mOhm) and is transmitted to the first contact of the neon light bulb.
In this case, the second contact of the light bulb is closed to the user through a contact located on the handle.
In such screwdrivers, the human body resistance and capacitance are part of the light bulb circuit. In other words, when you touch the contact with your fingers and the live wire with your sting, you will see the light bulb glow (provided that there is voltage in the network).
If there is no contact with the user, the lamp does not light up. The main disadvantage of this type of screwdriver is the rather high voltage threshold - not lower than 60 V.
Therefore, they are only suitable for detecting phase presence and voltage. It will not help determine open circuits. So this one screwdriver indicator is not multifunctional - it only allows you to determine the absence or presence of voltage in the network.
Indicating screwdriver with LED – greater functionality
The indicator screwdriver, equipped with an LED, has a lot in common with the model described above. Their operating principle is the same. But there is still a difference - LED probes are suitable for working with electrical networks in which the voltage is significantly less than 60 V.
Another factor that distinguishes led indicator from the usual, this is the presence of its own, autonomous power source - batteries. They are also distinguished by the presence of a transistor, most often bipolar.
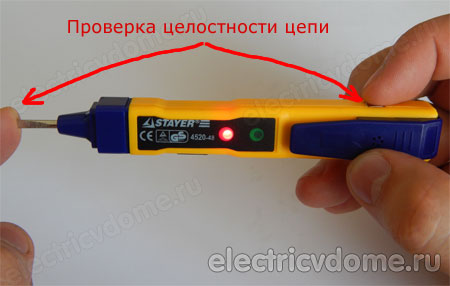
Therefore, this type of indicator screwdriver can already be called multifunctional. With its help, you can not only check the presence or absence of a phase in a contact or non-contact way, but also check the integrity of circuits - fuses, wires and cables.
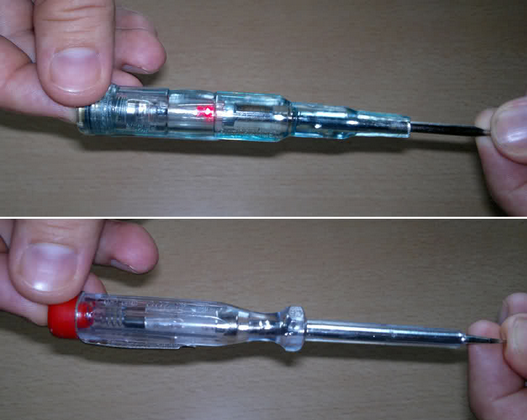
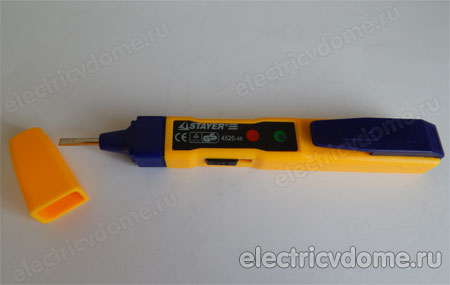
The index consists of two working parts. The first one looks like a flathead screwdriver. It is used when working with direct contact with live elements.

The second part is suitable if it is necessary to determine the presence of voltage without contact. When used with the first part, it also allows you to determine the integrity of the network
IN insulated handle There is an LED made of transparent material, which indicates the presence of voltage in the network.
Universal indicator screwdriver STAYER 4520-48
But today you can find special indicator screwdrivers on sale, when working with which you can test the line in both contact and non-contact ways. It also allows you to “ring” the wiring for short circuit or cliffs.
Such an indicator screwdriver is STAYER 4520-48. It is perfect if you need to test elements of DC and DC circuits. alternating current in vehicles, household electrical appliances and other devices. With its help, you can easily determine the polarity and carry out dialing using sound or light indication.
This indicator compares favorably with most analogues by the presence of not only light, but also sound notification. Thanks to this, work related to checking the presence of voltage becomes even simpler, more comfortable and safer.
If the voltage is normal, the user hears a sound signal accompanied by the green indicator lighting up. Alas, this It also has a serious disadvantage. The fact is that it runs on a battery, which runs out faster than we would like.
How to use a screwdriver indicator
Well, we looked at three types of indicator screwdrivers, now we’ll look at how to use an indicator screwdriver and test them in operation.
Regular indicator
The pointer of this indicator screwdriver is equipped with two working areas. The first one looks like a flat-head screwdriver - it comes into contact with electrical wiring elements that are energized. The second provides sufficient resistance and is located on the handle of the screwdriver. It also has a two-pole switch.
Let's consider an example in which a phase wire is connected to the first contact, and a neutral wire is connected to the second. Voltage indicator determined by what goes to the wire phase.
To determine it is enough to press the contact on the voltage indicator handle with your thumb, then bring the working area of the indicator alternately to both contacts of the circuit breaker. At the same time, you need to ensure that thumb remained naked - do not wear gloves when using the device.
How to use an LED indicator screwdriver
As mentioned above, these indicators are distinguished by the presence of a function not only for contact, but also for non-contact use in the presence of a light warning.
If you are using the classic contact method and you need to find out where the phase is, it is enough to bring the working part closer to both contacts of the circuit breaker. When you bring the device to the zero contact, you will not notice any changes. When you check the phase one, the signal light will immediately light up, which will allow you to immediately find out that there is voltage at this contact.
To determine the presence of a phase using a non-contact method, it is sufficient to use the second working part, also known as the heel. It must be brought close to the cable insulation. You don’t even need to touch it - if there is a phase, the diode will light up long distance from the cable.
A serious plus is the ease of testing (detection of breaks in the circuit). It is necessary to connect one working part to the first end of the circuit that is being tested, and the other to the second. If the circuit is working properly, it will light up light. Otherwise nothing will happen.
If the contact is energized, the indicator will immediately signal this - a red light will light up in it. If you bring voltage indicator to zero contact, no signal will follow.
How to use the STAYER 4520-48 indicator screwdriver
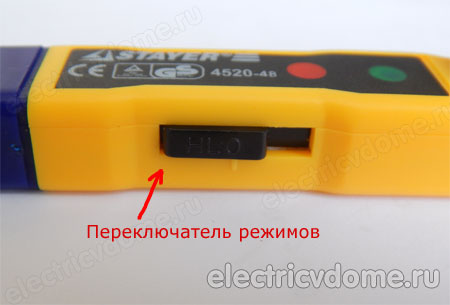
This one is equipped with a plastic handle with an operating mode switch. It can be installed in three different positions:
- - 0 – this is contact use with light warning function. Signaling is carried out by lighting up a red light;
- - L – non-contact use with low sensitivity. At medium sensitivity, a sound alert is possible. Voltage can be detected over a short distance even when using double insulated wire. When voltage is detected, the green light comes on;
- - N – non-contact use with high sensitivity – sound notification is used. The sensitivity is such that it allows voltage to be detected over a long distance - not only through the dense insulation of wires, but also through thin layer plaster on the wall. In this mode, it is possible to determine the route of wires laid in the wall. Voltage detection is accompanied by a lit green light.
The protective cap hides the working area, made in the form of a flat-head screwdriver. The second end side of the indicator has a special contact used to determine the presence of breaks in the circuit.
To perform this action, it is enough to connect the wire of one end of the circuit to the voltage indicator, and the other to the continuity contact. In cases where the circuit is not damaged, the indicator screwdriver will indicate this to the user accordingly. When operating in “O” mode, the red diode lights up.
If the “L” or “H” mode is turned on, a green light comes on, and this is accompanied by a certain sound signal. If the circuit is damaged in some area, the indicator will not react at all.
As an example, we can tell you when checking the integrity of an incandescent lamp. We hold the device in one hand, with the contact plastic in contact with the hand. We bring the tip of the screwdriver to the metal part of the lamp base. With the other hand we touch the second end of the lamp, thus closing the circuit.
If there is no break, you can see the red indicator light up. Switch the device to “O” mode - contact indication. First, connect the indicator to the zero contact of the circuit breaker - nothing will show here. And then we combine it with the phase contact. The indicator light immediately lights up.
Now switch to the non-contact “L” mode. We don’t touch the pointer contacts, but simply bring them closer to circuit breaker or socket. A green light will light up near the phase one and a sound will also sound. sound alarm. And near zero the indicator will not show itself in any way.
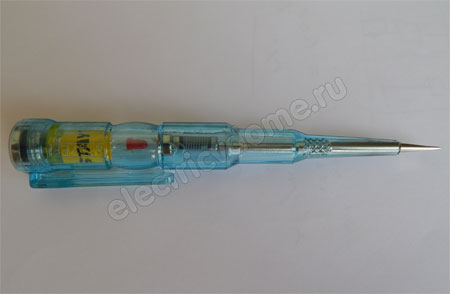
The article will focus on a simple indicator screwdriver with a battery, which contains a simple circuit based on a field-effect transistor.
It is the use of a field driver that expands the possibilities of using this indicator compared to simple screwdrivers containing only a neon light bulb. 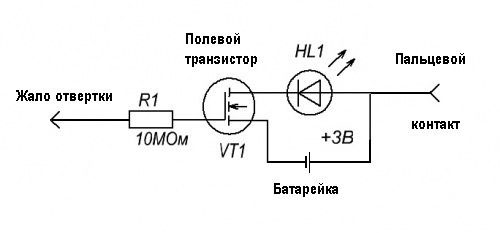
Differences and functionality
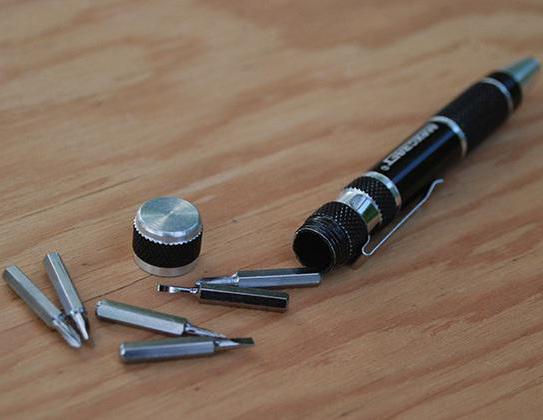
The first thing I would like to pay attention to is the blade of the screwdriver. Most of the models are not designed for full-fledged work on tightening and unscrewing screws.
This is their additional opportunity. So for such work, always use regular screwdrivers with hardened blades or appropriate bits, and not indicator versions. 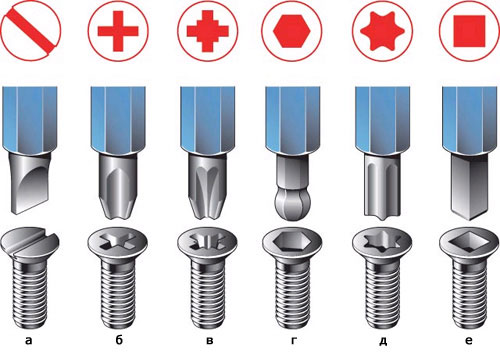
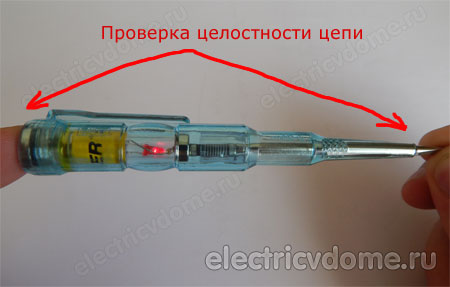
The most useful feature This model is the glow of the LED when your hands simultaneously touch the tip and the contact at the opposite end. 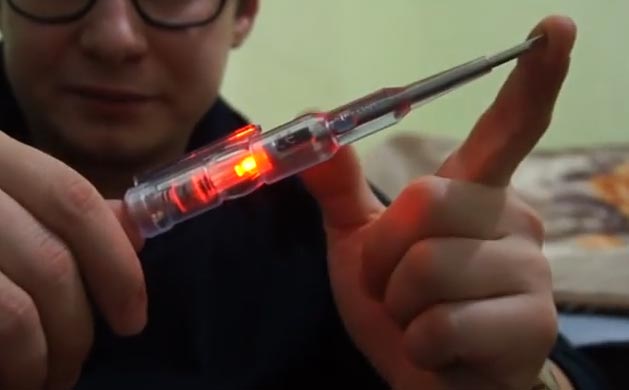
This is actually a continuity check indicator. How it can be used in everyday life will be discussed below.
You can also use this screwdriver to:
- look for hidden wiring, if it is not deeply laid with a layer of plaster
Be careful, if the indicator lights up all over the wall, you may have a leak or short circuit somewhere.
- find out whether a wire is live or not without removing the insulation from it
- find a break in the wire
- and of course, the screwdriver copes well with its direct responsibility - determining the phase
![]()
Finding the phase
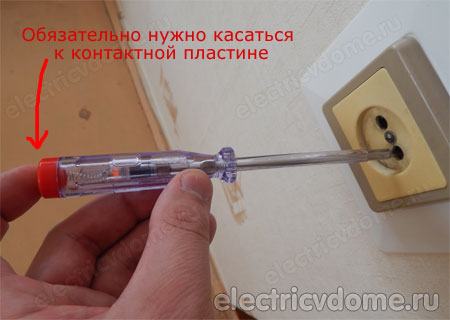
To find a phase in a socket or on a cable, you need to touch the contact being tested with a screwdriver. Do not touch the metal patch at the end of the indicator!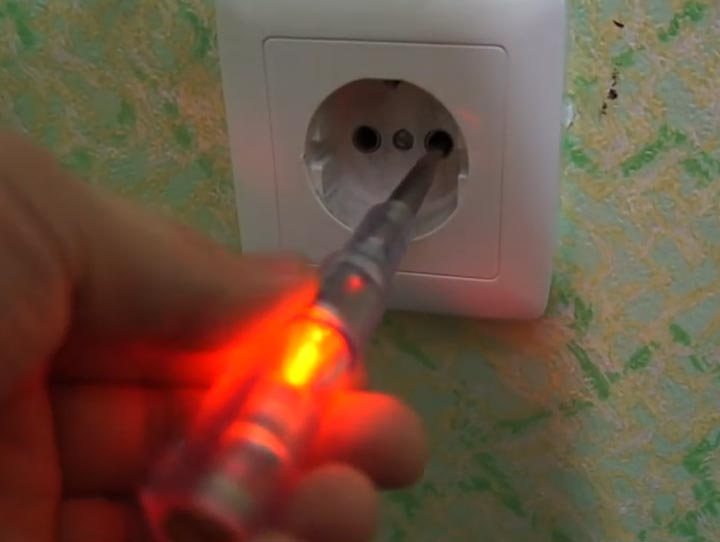
If you do this, the indicator will glow equally in both sockets of the socket, and it will be impossible to figure out where the phase is and where the zero is.
True, the sensitivity of such a screwdriver can be not only an advantage, but also a disadvantage.
For example, in three-phase network 380V, when the phases are close to each other, the tool may be affected by the induced voltage.
Therefore for simple definition lack of voltage, battery-free indicator with a neon light bulb, still more reliable. 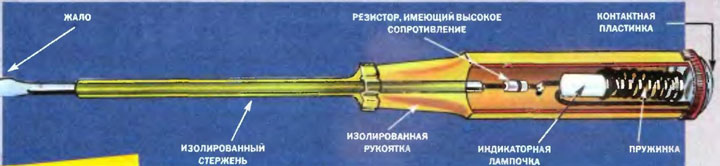
It is better to use this device precisely because of its additional capabilities.
Additional possibilities for using the indicator
The capabilities of a simple indicator screwdriver can be significantly expanded, and many simply do not know that in addition to the usual check for the presence or absence of voltage, this device can perform many tasks and look for various faults.
Here's how you can use it in practice. 
Checking the serviceability of incandescent lamps
This check can be done directly in the store, without having anything on hand other than a screwdriver. Take an ordinary light bulb, grasp the metal base with one hand, and touch the contact at the top of the screwdriver with the finger of the other hand.
After this, use the sting to touch the central contact on the light bulb. 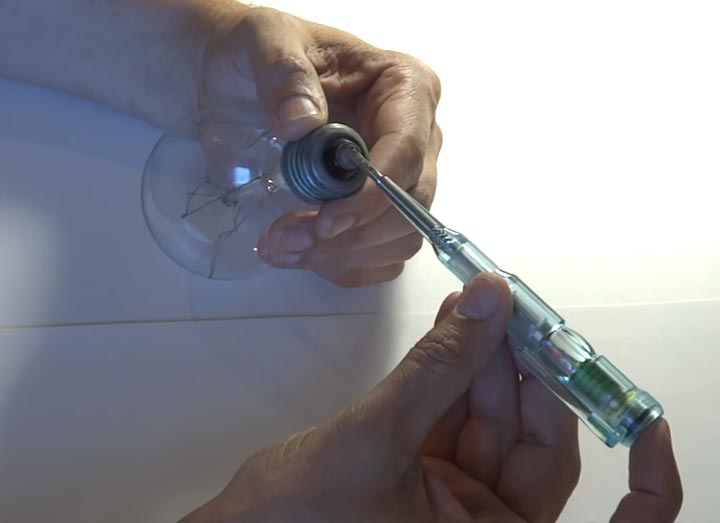
If the lamp is working properly, the LED will light up.
True, this test does not give 100% confidence, since if the lamp is depressurized, it will not glow, although the circuit remains intact.
Checking the heating element
You can also easily check the serviceability or breakdown of the heating element. In this case, it does not even have to be pulled out of the equipment.
It is enough to provide free access to contacts. Before this, all extraneous wires connected to them must be removed. 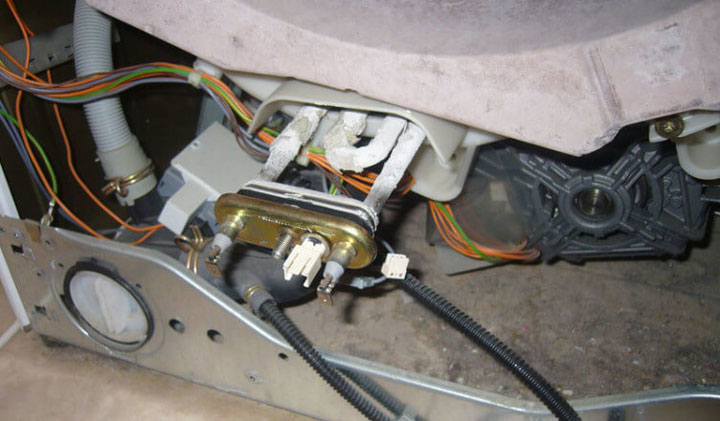
The check is very simple and not complicated. With one hand you touch one contact of the heating element, and with the tip of a screwdriver the other. The finger of the other hand should again be on the metal patch of the probe. 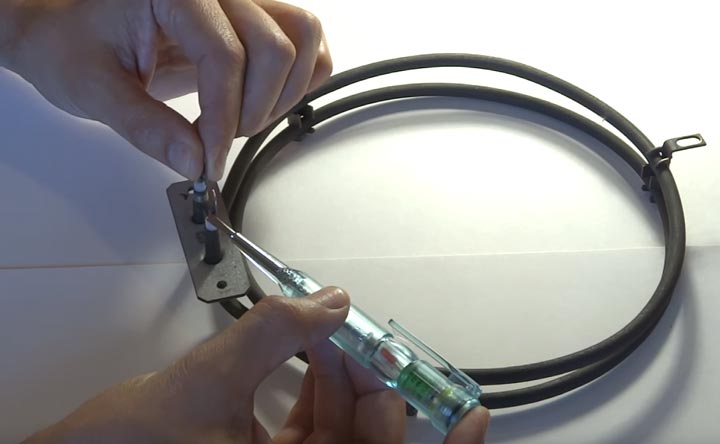
If the indicator light does not light up, then the heating element is faulty and there is a break in the heating coil inside it.
This way you can check any heating elements. For example, the boiler is checked directly on the plug itself; you don’t even need to disassemble anything. 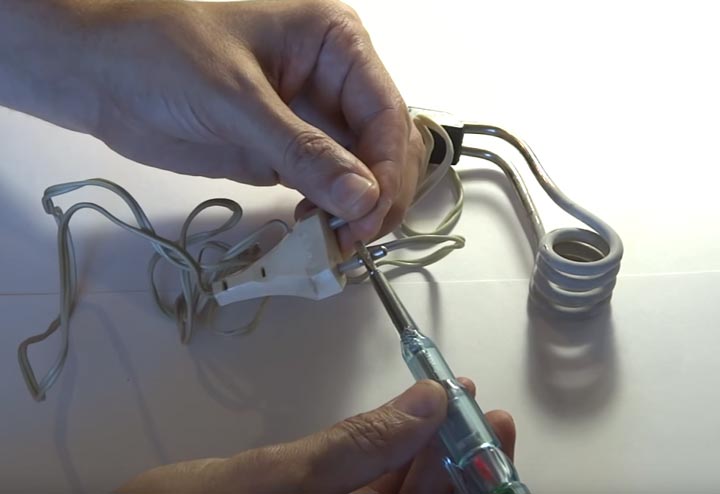
Definition correct position switch
To mount the switch correctly during repairs, that is:
Up key
the light turns on
Down key
the lights turn off
You can also use a probe and call your contacts. 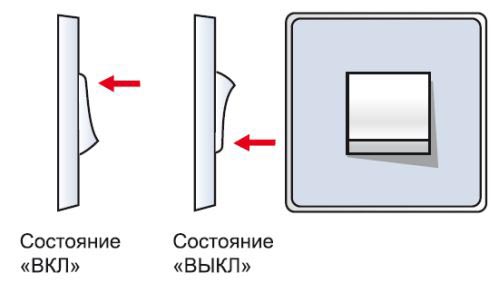
The switch is first disassembled. Its contacts are usually closed and therefore you won’t be able to simply reach them with your hands.
Take any metal object, such as a paper clip or a nail, and touch one of the contacts. It doesn’t matter which one - upper or lower. 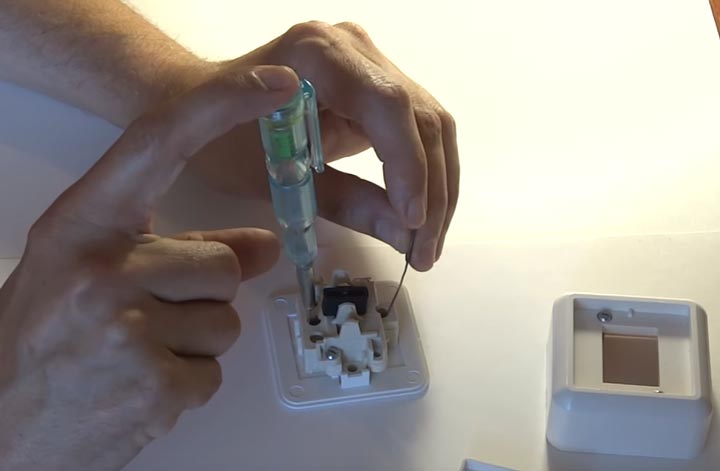
Not long ago it experienced a surge in popularity in various segments. Users highly appreciated the advantages of the concept, noting the versatility and ergonomics of such models. But manufacturers have not always been able to achieve the proper level of direct performance qualities of such a tool when performing specific functions. Only certain segments were free from this drawback, one of which featured an indicator screwdriver. How to use this tool? To do this, you need to know the intricacies of determining phase and zero using an indicating device. Professional electricians are familiar with such operations, but this process can cause a lot of problems for home craftsmen, not to mention the risk of making a mistake.
How does an indicator screwdriver work?
Traditional devices of this type consist of a resistor inside each screwdriver, which is connected to a metal rod that acts as a conductor. Professionals usually use a special set of screwdrivers with different characteristics, which are focused on electric installation work. They differ both in mechanical qualities and in the ways of providing information about the parameters of the circuit under study.

In the most simple models the presence of the same voltage in the line will be indicated by an LED light integrated into the housing. Contact models assume that the user will touch a special plate on the handle, thus closing the circuit. If the indicator light comes on, it means the phase has been detected. In case of a reverse reaction, we can state that a zero has been found. A non-contact indicator screwdriver is also common. How to use such models? The technique for detecting line breaks in this case is similar to contact tools, only the user does not have to close the circuit himself.
Determination of zero and phase
The most common problem faced by users of this instrument. Typically, difficulties in determining zero and phase arise in situations where the wires are not correctly marked and the colors do not correspond to the actual characteristics of the circuits. Before using an indicator screwdriver to determine the phase, you must turn off the power at the input panel. Next, use the functional surface of the screwdriver tip to touch one of the cores. The indicator will light up if the circuit is in phase. It is important to note that some models do not provide light signal, but work with a sound alert. Accordingly, the phase in this case will be recorded by an audio signal. If the screwdriver does not give any reaction, then the status of the core is zero.
![]()
Also, do not forget about the need to touch the penny, that is, the plate, due to which the circuit occurs at the moment of determining the polarity. This is important if a contact indicator screwdriver is used. How to use the contactless model? It has already been noted that it works on the same principle, but does not require the user to touch a special plate. But these screwdrivers are supplied with batteries, so you should check the power supply before starting work.
How to find current leakage?
Another popular electrical problem that can be identified with an indicator screwdriver. First of all, you should bring the tip of the tool to one of the grounding antennae of the socket being tested. If the indicator is activated, we can talk about the presence of a leak. But here we must take into account the initial voltage parameters. It is advisable to use a set of screwdrivers in which individual models are designed for use in different conditions chain operation. If you need to check specific electrical appliances, the leak is detected by testing each device one by one. That is, the devices are connected to an outlet, and the light bulb also gives a reaction in the form of a light or sound alert.
How to detect a broken line?
It should be noted right away that such screwdrivers are not capable of showing exact location, in which the break occurred. However, the tool will help determine the problem area in which this place is located. To do this, you need to take a power distribution diagram and check all sockets for power. But there is one nuance in working with lamps, which can also be checked with an indicator screwdriver. How to use the tool in this case? A break in such places is checked with the power off, but with the lights on. If the circuit on the switch is not closed, the screwdriver LED will show a break, but in fact there may not be one.
General operating instructions
The testing instrument requires special maintenance measures. Screwdrivers should be stored in a dry place protected from moisture. If it is possible to perform a non-contact examination, then it is better to carry out operations with gloves. You should also clean the surface of the tool from debris and dust every time after a working session. For example, the MS-18 indicator screwdriver from STAYER allows you to detect microwave radiation and hidden wiring. The effectiveness of performing these tasks largely depends on the condition of the case and, in particular, its cleanliness.
Conclusion
Despite the advanced functionality, these screwdriver models are inexpensive. Even large manufacturers, producing quality products, implement modifications entry level at prices no more than 200 rubles. A professional indicator screwdriver, the price of which can be about 500-600 rubles, is also endowed with additional features. In addition to determining the phase and neutral, such a tool is capable of working with electromagnetic radiation, recording its boundaries. However, for the same price you can also purchase a set with screwdrivers, each of which will perform these functions in a separate order and with greater efficiency.
 (1 ratings, on average: 5,00 out of 5)

