DIY cardboard bread box. Original bread bins. Bread box made of bamboo napkins and cardboard
 DIY bread box made of wood: drawings and dimensions.
Our family also wanted to have a wooden bread box.
But it was still not possible to purchase one: either they were not available for sale, or the money was needed more at the moment when the bread box could be bought for something else.
Then I decided to make a bread box myself - and at the same time become more skilled in carpentry and save money at the same time.
Moreover, the case turned out to be fascinating.
How I made a bread box with my own hands
I used it as material for the bread box.
- planks hardwood wood from discarded shipping boxes from a grocery store.
I carefully dismantled the boxes and stacked the boards next to the heating radiator.
After about a week of drying, I used a hand plane to more precisely adjust the edges of the boards to each other and, smearing them with PVA glue, joined three or four pieces together into small panels.
He tied the boards in the shields with a cord, and placed the shields on a level table on top of each other and pressed them with a stack of heavy books.
The next day (after work) I planed the surfaces of the shields with a plane and, having marked the contours of all the parts of the bread box, sawed them out with an ordinary (children's) with a hand jigsaw. At that time we lived in a private apartment.
The landlady showed up and warned that she would evict us for noise and litter. On other evenings I had to finish the bread bin secretly and on the sly.
Assembling a bread box using glue and nails
I assembled the parts of the bread box into a single structure using PVA glue and small nails. After the glue had dried, I carefully sanded all joints and surfaces. I assembled the curtain-door of the bread bin from slats with a cross-section of 15×10 mm on two pieces of nylon fishing line.
To pass the fishing line, I drilled two holes in each rail. To attach the curtain to the bread bin, I also drilled two inclined corresponding holes in its lid - inserting the ends of pieces of fishing line into them and tying them tightly.
After that, I attached a handle (with glue and nails) to the door, and runner legs to the bottom. I also installed a grate at the bottom inside the bread bin, made from the same slats as the curtain. Finally, I coated the outside of the bread box with clear varnish.

DIY bread box manufacturing ideas
Bread box made of bamboo napkins and cardboard
We sew two bamboo napkins.


So, it will be useful for a DIY bread box cardboard box or just cardboard. It’s better to take a large format, but, of course, it’s better to start from your own wishes.

The main thing that required size bread fit.

You can process the sides of the cardboard at your discretion - you can apply original drawings, or you can make appliqués.

Simple and good decision– attach pieces of fabric you like with a stapler.

This should be done carefully, in the most remote areas, without stretching the fabric. But for the lid you will have to buy a thin bamboo stand for hot dishes - it not only has the ability to take on the required shape, but also holds the temperature well, which means that hot bread will remain so in the bread bin for a long time.

You can attach the stand for the bread box with your own hands using glue to the top of the products. But in order for it to lie correctly and gradually, going down, the cardboard must first be cut into a rounded shape at the top.
How to decorate a bread box with your own hands
Walking through supermarkets in the hardware departments, we often see all sorts of kitchen items. Appliances and functional accessories, such as, for example, cute little colored bread bins made of fabric, which we really need - all this pleasant trifles, creating comfort in our home. So, no matter how many times I saw this cheerful bread box (oh, my hands were reaching out to it), just as many times I told myself that it’s not worth spending money on such a cute bread box, since I can sew it myself in half an hour . But, my hands never got around to sewing, until I finally had to sit down to sewing machine, because, I promised my friend to give this very bread box.
Of course, there is nothing better for preserving the taste and freshness of bread than a bread box made with your own hands from natural fabric. If you have at least some knitting or sewing skills, you will definitely be able to make such an invaluable accessory. And now we will do this with you.
How to make a bread box from fabric with dimensions 200 by 200 by 70 mm.

Necessary materials:
1. Cotton fabric 370 by 370 mm, two pieces
2. Cardboard or plastic, 2 mm thick, with dimensions 180 by 180 mm and 180 by 60 mm.
3. Threads
4. Chalk
5. Ruler
6. Scotch tape
7. Tailor pins
8. Sewing machine
9. Iron
10. Ironing board
Preparatory stage:
1) Cover the cardboard parts with tape on all sides
2) Iron seam allowances (15 mm) inside out on all sides of the fabric pieces
3) Use chalk to draw a stitching line for the bottom of the bread box, 200 by 200 mm square.
1) Fold the fabric parts inside out, aligning the cuts
2) Sew three sides along the 200 by 200 mark, insert the cardboard onto the bottom of the bread box and sew the fourth side
3) Using a straight stitch or zigzag, sew the edges of the bread box with an overlay stitch, covering the edges. We insert the cardboard edges in advance, using a one-sided foot, or first stitch the edge, then insert the cardboard (on three sides) and stitch the fourth side with the cardboard
4) Place marks with chalk at a distance of 60 mm on all sides of each corner
5) We connect the marks so that we get a corner of the bread box and fasten it manually with an overcast stitch.
You can also sew a round bread box to your own size. It's up to anyone's liking.


Breadbox, crocheted dimensions 200 by 200 by 60 mm.


Materials:
1). 100 g of yarn (it is advisable to choose natural yarn - linen, cotton, folded in several rows)
2). Threads
3). Needle
4). Hook No. 4 - No. 5
Stages of work:
1. We knit the side of the bread box in rows consisting of half single crochet stitches (you can use another dense pattern) 200 by 60 mm.
2. On each side of the product we knit a chain of air loops 60 mm long,
3. We knit the fabric in rows consisting of half single crochets 320 by 200 mm
4. We knit the last side of the bread box, retreating 60 mm from the edge. The result is a canvas in the shape of a cross (See Fig.)
5. We form the volume of the corners by folding and sewing the sections.


If desired, you can sew a bread box with open sides.


Now our work is ready! A bread box made with your own hands will definitely be appreciated by your friends and you will understand that it turns out that you can make a bread box like this in unusual ways and from such environmentally friendly materials.
If you have basic sewing skills, we suggest you make a bread box or candy bowl from textiles. A homemade bread box will wonderfully decorate the table in your kitchen.
The kitchen is rightfully considered the heart of the home. Any man would agree with this, but a woman already spends time in the kitchen most of its time. That’s why it’s so important that everything in the kitchen is arranged rationally and thoughtfully. And comfort in the kitchen is created by little things dear to the heart: napkins, tablecloths, coasters for dishes and a teapot, towels, oven mitts, candy dishes, bread bins, etc.
How to make your own textile bread box with dimensions 200x200x70 mm
Materials:
- any cotton fabric, two squares 370x370 mm;
- plastic 2 mm thick or thick cardboard: bottom 180x180 mm, 4 sides – 180x60 mm;
- scotch;
- threads in the color of the fabric;
- chalk;
- ruler;
- tailor's pins;
- household sewing machine;
- iron;
- ironing board.
The preparatory stage of making a bread box
- Cover the cardboard parts with tape on all sides;
- Iron seam allowances of 15 mm to the wrong side on all sides of the fabric parts;
- Make chalk markings for the stitching on the bottom of the bread bin (Fig.), 200x200 mm square.
Installation
- Place the fabric parts on top of each other with the wrong sides inward, aligning the cuts;
- Sew 3 sides according to the 200x200 marking, insert a cardboard bottom, sew the fourth side;
- Sew the edges of the bread box with a zigzag (or straight) stitch using a closed seam. You can insert the cardboard sides in advance and use a one-sided foot, or perform the operation in stages: first stitch the edge, then insert the cardboard (and so on on three sides, the fourth side will have to be stitched with the cardboard already installed).
- Place chalk marks on all sides at a distance of 60 mm from each corner;
- Connect the marks to form a voluminous corner of the bread box and secure by hand with a blanket stitch. You can sew ties from thin ribbons to the marks, even at the stage of stitching the sides, and then form a three-dimensional corner by simply tying them. Also, the protruding “ears” can be turned inside the bread box.
Source: Internet
Other Master classes from the section
We know that pompoms can be made from wool. The process of creating T-shirt pompoms is similar to wool and is quite simple. But we still suggest that you familiarize yourself with detailed photo master class.A beautiful and comfortable textile rusk bowl will decorate both a festive and everyday table. It is very simple to make it with your own hands; for this you need to prepare cotton fabric that matches the color, padding polyester, scissors, threads in the color of the fabric, decorative buttons and lace. A sewing machine will help speed up the sewing process.

Cutting out the parts
Decide which fabric will be inside the cracker and which will be on the outside. In this case, the inner part will be made of white fabric with large red polka dots, and the outer part will be made of a single-color red fabric. Cut out one circle with a diameter of 24 cm from fabrics and sinetpon.

Assembling the cracker
Place a padding polyester on the red circle, and a polka dot detail on it front side up. Pin all the pieces together with tailor's pins.

Connect the pieces with a simple stitch. To ensure that the seams of the stitches are parallel to each other, use a special foot with a guide or a self-disappearing marker to draw parallel lines on the fabric.


Place a simple basting stitch along the edge of the circle.

Tighten the thread and distribute the folds evenly.

Edge processing and decoration
To beautifully design the cut of the cracker, measure the diameter of the neck. In this case, it is 16 cm. Multiply the resulting number by 3.14 - this way you will find the length of the neck circle and add 2 cm to the assembly. The result will be 52 cm. This is the length you will need the binding. To cut it out of fabric with small polka dots at an angle of 45 degrees to the main thread, draw two parallel lines with an interval of 4 cm. Try to ensure that the length of the resulting strip is equal to or slightly greater than 52 cm. Otherwise, connect several strips of binding with a stitch and so on tape the edge.

Sew bias tape to outside bread crumbs right sides to each other.

Lift the binding, fold it inside the cracker, fold it over and baste the edge.


Using tailor's pins, secure the lace around the neck and only after that make a straight line, connecting the trim, lace and breadcrumbs together.

Decorate the product with a textile rose, decorative button and invite guests to a tea party! Your DIY rusk bowl is ready!
Master class from Elena Tregub
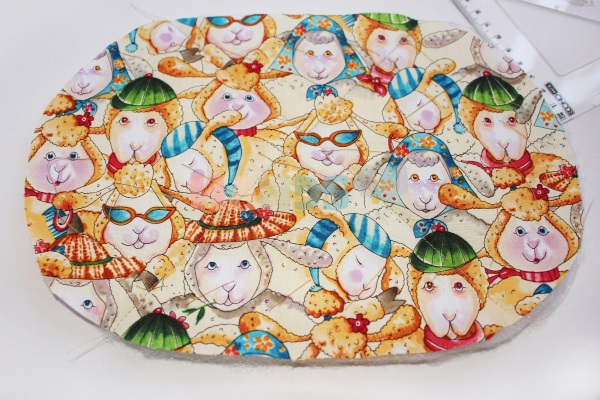
Sewing master class textile bread bin made of denim and cotton with a bright print.
Hand-sewn homemade interior items from natural materials. With the help of our master class you can sew from denim and cotton with funny lambs.
- a piece of dark blue denim fabric 0.3 m wide 1 m;
- a piece of cotton fabric with a bright print, 0.3 m, 1 m wide;
- non-woven or double-lined 0.3 m;
- padding polyester 0.3 m;
- dark blue threads for denim and light beige threads for cotton fabric;
- two wooden buttons in the shape of hearts;
- decorative patch;
- pins, ruler, scissors.
We sew a bread box:
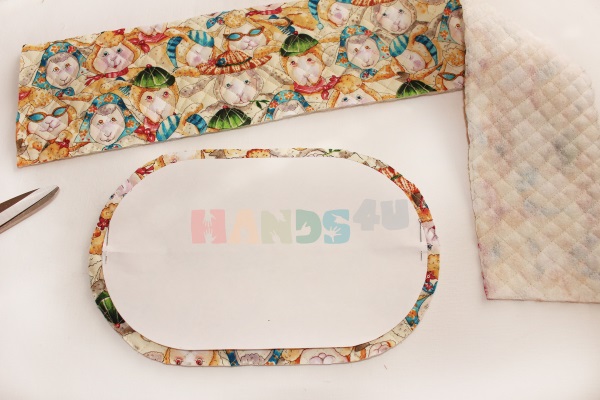
1. Before cutting natural fabrics usually washed and then steam ironed to prevent further shrinkage. Prepare a pattern for the bottom, place it on the denim and cut out the part with an allowance of 1 cm. Place marks according to the pattern.


2. Fold the flap in half and cut out a transverse side piece 10 cm wide and 29.5 cm long on one side from the fold, and 30.5 cm on the other.


4. Cut the side part from cotton and synthetic padding to a width of 13.5 cm and a length of 31 cm on one side and 32 cm on the other, as shown in the photo.

5. Glue denim parts with doublerin or non-woven fabric to give the product additional rigidity. You need to iron with an iron without steam in the “cotton” mode through a thin cotton fabric, Special attention paying attention to the edges of the parts.


8. Connect the bottom and the side piece along its short side with a stitch. To make it more convenient to control the distribution of fabric on the circles, you need to stitch from the bottom.


11. Baste cotton and padding polyester pieces together to avoid unevenness on the fabric during stitching. In the center of each part, at 45 degrees to the grain thread, draw two lines intersecting at right angles. Then sew lines along these lines with a stitch length of 3 mm.

12. Place the needle on sewing machine to the extreme left position and sew parallel lines at intervals of 1 cm. To ensure a neat stitch, the fabric should not be pulled or seated, you need to move from the center to the edges and change the direction of each line. Quilted parts cannot be ironed, as the padding polyester becomes flat from a hot iron.

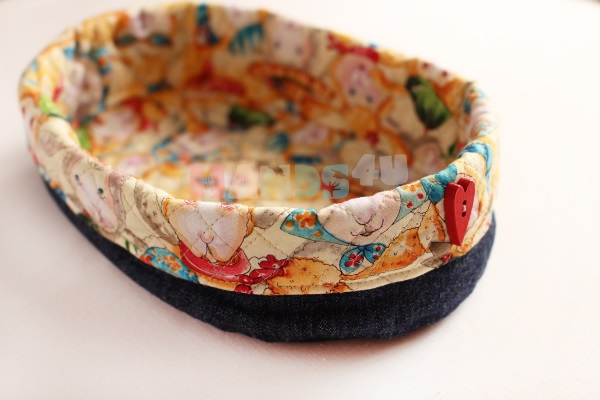
14. Then sew the side piece into a ring and stitch the short side to the bottom. Make notches along the circles.


16. Invest inner part bread bins made of cotton with an outer denim fabric. Using a blind stitch, sew both parts along the bottom seam line.


 (1 ratings, on average: 5,00 out of 5)

