Techniques for applying decorative plaster. Do-it-yourself decorative plaster of walls: step-by-step finishing of walls with decorative plaster. Plaster stretching method
Hello again everyone! Warmth has finally come to us, and at the same time, our most favorite pastimes - picnics in nature, family active recreation and conscientious feeding of mosquitoes - moved into life with an orderly gait. But we somehow learned to cope with the latter using all sorts of means. We'll get serious about picnics and campfire menus someday. Here's what's on our agenda today: active games with kids. One of them is launching a kite into space. Therefore, I declare the creative workshop open. And very soon there will be a do-it-yourself kite with drawings and dimensions. Forward?
Materials and tools that can be used for design
The beauty of this craft is that whatever material you have at home, you can choose for yourself suitable model. And I will convince you of this now!
First, I will give a small visual example. Windy weather occurs periodically in cities. This is when the wind blows and blows for days, blowing away everything that is not lying right. Various light objects fly up, just as all sorts of things are torn down from the balconies. But one day the wind subsides. And the period comes. Which I call "Chinese lanterns". And indeed, the trees are neatly “decorated” with plastic bags. And why? Yes, because all these windy days the bags were carried on their own, no worse than gliders. Got the idea? Then I will develop it.
What can you build an aircraft from:
- from paper;
- plastic bag;
- thin tracing paper;
- old umbrella;
- from fabric;
- and even newspapers and magazines will be used.
So, look around and you will realize that you have the most basic material. But what else is needed in order to make the design:
- Main material;
- Thin strips. These can be hollow metal rods, bamboo sticks, or grape branches (they are lighter than usual);
- Scotch tape or glue;
- Rope, fishing line or strong thread;
- Spool to adjust the length of the thread;
- Scissors.
- Pattern.
I want to say right away that the model, as well as the complexity of the craft, will depend on how old our little one is, for whom we are making. And the conditions under which we do this. For example, if the baby is very, very small, and will not be able to run around the field, flying a kite, but we want to give him new emotions, or if we are already in an open field, and before that we did not plan to create anything, because of the materials we have We are not even half the list, you can still come up with something.
Ideas and DIY
Craft for kids
For example, here is the most basic, but no less cool craft:
- take a simple one plastic bag T-shirt;
- tie her arms in the middle with a thread.
All that's left is to catch the wind! It is so simple! But believe me, the little one will be delighted. Moreover, you won’t have to run much, the kite will “inflate” itself and take off, as soon as a breath of wind touches it. True, it won’t fly high, but children under 5 years old will still find it interesting.
But let's talk about something more complex that you can do at home with our helpers.
A paper kite that flies high in 5 minutes
This option seemed to us the simplest and fastest, so we immediately made it at the first wind. I, my son, and even my husband really liked it, although he was very skeptical.
Details in our video:
The simplest kite design
It’s the same package, or rather, I’ll describe it with a package, but instead of it you can use any of the above materials.
We will need:
- Package – 1-3 pcs. (depending on their size);
- Wooden sticks (choose light ones) – 2 pcs.;
- Scotch;
- Knife and scissors;
- Fishing line;
- Glue;
- Marker;
- Coil;
- Strong rope.
Manufacturing: 
- We cut the sticks so that one is 60 cm, and the second is 35. We fold them crosswise. We place the shorter one on top of the longer one, retreating 15 cm from above. We fix them by tying them with tape.
- We cut each edge of the stick in the middle to a depth of 1 cm. wrap it with tape under the cut. This will make the structure more durable.
- We stretch the fishing line into the cuts and pull it tight.
- We wrap it with tape several times to secure the fishing line.
- We fold the bags, perhaps if they are too small, they will have to be firmly glued to each other to get right size. We place the “skeleton” on top of the cellophane “canvas” and outline it. After adding 1.5 cm of cellophane on each side for tucking, we cut out the base.
- We attach the frame to the base and tuck the edges. We secure them with tape.
- We tie a 50 cm fishing line to one and the second edge of a short stick.
- We also tie a 25-40cm rope to the top of the model. Its length will depend on the kite angle you choose. If you want the structure to fly almost horizontally, then its length should be minimal; vertically – maximum.
- We tie the middle of the fifty-centimeter fishing line to the fishing line that is attached to the top.
- We tie a rope to the junction of the lines. Secure it firmly with tape.
- Decorating our balloonist. We tie another rope, small, about half a meter, with cute bows attached to it to the lower end of the frame.
We draw a picture on the “front” side of the base.
According to the same scheme, but with different materials of construction. Cocktail straws, paper and rope are used here.

Based on materials
Parchment paper snake
To work you will need:
- parchment paper 36*51 cm;
- wooden sticks or light slats: 2 x 60 cm, 48 cm and 36 cm;
- colored crepe paper;
- strong thread;
- reel with fishing line;
- glue stick and PVA;
- small metal ring;
- scissors.
Fold the parchment sheet in half to mark the middle line. Place the smallest stick along the top edge of the narrow side of the rectangle, stepping back a centimeter from the edge. Lubricate the free edge of the sheet with glue and wrap it so that the stick is inside, it should be tightly fixed.
Grease a 48 cm long stick with PVA and glue it to the center line of the workpiece. 
Place the remaining sticks along the diagonals of the rectangle. 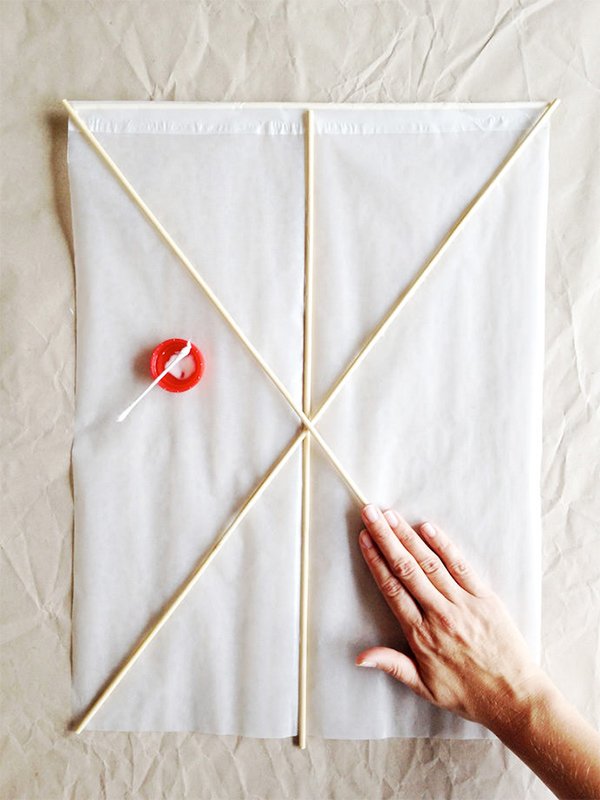
Glue them with pieces of paper as shown in the photo. 
Cut out squares or random shapes from colored paper and stick them on front side rectangle.

Make a hole on both sides of the intersection point of the diagonals.
Using pieces of thread, tie the ends of the sticks along the upper corners of the rectangle, pulling them together a little.

Tie a long piece of thread to the upper right corner of the kite. Thread a ring onto a thread, it will help control the flying machine. Then thread the thread through the holes previously made in the center of the rectangle and pass it through the ring again. Tie the end of the thread to the upper left corner of the product.

Tie the end of the line tightly to the control ring. 
Glue long strips of corrugated paper to the bottom of the kite. These “tails” will help him balance in air currents. Their optimal size 5 cm*2.5 m. 
The air wanderer is ready to surprise you with its flight characteristics. Have a good flight!

Simple DIY box kite
Snake Rokkaku
More serious design.
Convenient kite reel
Draw a circle with a diameter of 20 cm. Cut out two such blanks from cardboard. Cut convenient slots for your fingers on them; they should completely match on both circles.

Cut several strips 2.5 cm wide.

Mark the inner circle, use a compass or a suitable template.

Roll the cut strips along the contour of the cutouts and glue them with hot glue.

Glue the inner ring in the same way.

Glue the second circle on top of it.

Glue the end of a long thread to inner surface spools and wind the thread.

To prevent it from getting tangled, tie a match to its end and secure it with glue. Thread the thread into the slot on the outer ring.

With such convenient device your flying kite will conquer not only the sky, but also the hearts of your children.
* based on materials
Mechanical bird
Not quite a kite, but it also flies. And even without a motor and wind. Anyone can make such a homemade toy; you don’t need any special skills or tools for this. All you need are skewers, paper clips, super glue and plastic. This mechanical bird is very light and strong, and it is very interesting to play with it.
As you can see, everything is very simple and doable! I wish you fruitful collaboration with your little one in creating a kite! Also, have a great launch! I hope you’ll tell us how your weekend spent outdoors and whether you managed to amuse your baby (and yourself too; I’m still in awe of the flights of this wingless “beast”). I say goodbye until we meet again and remind you to subscribe for yourself and your friends!
Instructions
Select right place to fly a kite. An open area measuring 40 by 40 meters will be sufficient. Make sure the area is not overly crowded and there are no wires or obstructions to the wind, such as hills, houses or trees, that would make its speed and direction unstable. Ideal place for launch there will be a seashore with a wind blowing from the water.
Make sure the wind is strong enough to start kite. The grass under your feet and tree branches should move noticeably, and ripples should be visible in the water. When not enough strong wind the kite may break, and the wind blowing in your face will make the flying process uncomfortable and ruin all the fun.
Determine the direction air flow, exposing your face to the wind or paying attention to grass, branches, flags or smoke.
Ask a friend to take the kite in his hands and unwind 20 meters of the line towards the wind. Standing with your back to the wind and facing the kite, pull the line lightly. At your request, your friend must release the kite. In strong winds, stay where you are as the kite will rise up on its own. If there is not enough wind near the ground, run back a little until you feel that the kite that has caught the wind is rushing upward.
Hold the kite in your hands or get help from a friend. Start stepping back without unwinding the line all the way. When the kite rises to the maximum height corresponding to the free part of the handrail, pull it to the ground and, fixing the handrail at the bottom, begin to step back, thereby again raising the kite to its maximum height. Perform this maneuver several times to reach the height where the wind will allow the kite to rise into the sky without your help. Use this method in light or rough winds or when there is not enough space to launch.
Sources:
- flying a kite
Assembling a kite is a fun but challenging activity. You will need to attach a bridle and a rail to its body and tie a thread-rail. There are designs of kites without a batten or without a bridle - each of them has its own assembly features.
Instructions
The first kites were invented in China in the 2nd century BC. At first they were used only for entertainment. Since the 17th century, snakes began to be used for atmospheric research, meteorological observations, raising to the height of radio antennas, etc.
Typically, a kit made for kites includes the frame itself with a synthetic fabric stretched over it, a spool with a thread-line, a rail and a bridle. The batten is a metal or plastic rod, and the bridle is used to connect the kite to the line (often the bridle is called a harness, in accordance with its purpose).
To assemble the kite, grab the frame and insert the bridle into the holes provided for it. Depending on the design of the kite, the bridle may have one or more attachment points, have a keel and adjusting rings.
Turn the frame over with the back side facing you and thread the rail into the loops or holes located at the ends of the bridle.
Find the grooves on the frame located along the edges of the canvas. Thread the ends of the strip into these grooves. Please note that the rail should be located “on the back” of the kite, and not on the side to which the rail is attached.
Turn the frame over front side towards you and tie the spool thread to the bridle. If the kite has a tail, secure it.
If the snake kit does not include a rail, simply secure the bridle in the holes provided for it, attach a rail to it and secure the tail.
What could be better than a wide open field, a warm gentle wind and a kite dancing in the air?
We present to you a training manual that is useful for all novice pilots to familiarize themselves with. There will be a little science, physics, history and culture. For adults, this is a chance to plunge back into youth.
Flying a kite is fun, but only if you know how.
Here the kite behaves calmly and with minimal effort. It is mainly used for short breaks while driving. Window perimeter. This is the area where you need to land. Flight area. This is the so-called “power zone”, where the wind puts the most pressure on the kite.
Kneel on the ground so that the wind blows from your back. Spread the kite as its nose points towards you and its belly points up. This position will push the kite down onto the ground. Once you have assembled the kite, turn it on so that it is lying on its "belly", with the nose resting on the ground. Move in the direction of the wind, unwinding the ropes.
Environment
Kites love open space. The more open the place you choose to fly, the better the kite.
Wind that has to bend around trees, buildings, or hills becomes rough and rough. This is "turbulence".
You won't be able to see it, but it will be difficult for the kite to fly and perform tricks in such conditions.
Note. Kites that are opened for the first time require a little "practice" before they can reach their full potential. The seams and knots should lie, and the fabric should stretch well. Depending on the wind power, this may take 1-4 hours. Body Position As with other sports, body position is very important to driving success. Stretch the ropes and keep them parallel to each other. Stand slightly, cross your arms at the elbows and move forward. Depending on the wind strength and the size of the kite, be prepared to move forward when flying the kite.
Therefore, the first piece of advice is to choose a place as far as possible from various kinds of obstacles that interfere with the smooth passage of the wind.
Has everyone heard of “Tree-Eater-Kite-Flyers”?
Make sure that there are no trees in the kite's path; they do not interfere much with flying, but a kite flying past may get caught in the flow of air around a tree. As a result, he will get stuck between the branches and the fire brigade will have to be called to save the poor fellow...
It's like you are pulling ropes. Often beginners open their arms or raise them. This incorrect position, so the kite is more difficult to control. Another common mistake is going overboard. There is no reason for this. Regardless of the direction the kite is moving, keep your arms parallel to each other when you hold the wheel on the bike.
Control If you pull the rope into your right hand, the kite turns to the right if you pull left-left. Keeping your hands in a neutral position, the kite continues in its current direction until it reaches the edge of the window. When handling the kite, first try holding it several times, near the zenith. Use slow, relaxed movements until you become aware of it. If the kite is spinning and twisting your ropes, don't worry, carry on steering. Modern ropes allow multiple turns without affecting the ability to control the vehicle.
And, of course, avoid proximity to dangerous objects, such as highways or power lines.
The best places to fly a kite are in a large open field, park or beach. The more open place you will find, the more fun and less trouble you will have.
Wind
A kite needs wind to fly. How strong depends on the type of kite you are planning to fly. 
Here are some numbers that may impress observers. They are in a difficult position in four categories. For more information on each of these you will need to obtain Additional information in the Internet. A power kite is usually an aerodynamic wing made of high quality material and controlled by rudders. When controlling and maneuvering the kite, control beams generate different levels strength. When the kite inflates its aerodynamic shape, it causes it to move forward and rise.
Some are heavy and therefore require a strong wind. Others are specifically designed for flight in light winds.
However, most kites are designed for use in the mid ranges of 1.5 - 5 m/s.
In most cases, you can determine the strength of the wind yourself, guided by your own sensations or observations of the behavior of leaves on trees. If the leaves barely move, then most likely the wind is too weak, and if the whole tree is swaying and you can hear a linen flag fluttering, then it is even too strong.
The control line holds the kite at the appropriate angle to the wind, thereby achieving the speed and power of the kite's movement. The larger the boom, or as soon as the kite moves, or the stronger the wind, the more thrust is created. The fighter who flies the kite takes full responsibility for the safety of himself and others during the flight.
The wind window is the area in which the kite flies without pushing the fighter into the air. This window generates variable quantity and another direction of movement, maneuvering the change. The force decreases sharply as the kite approaches this window. If you are not sure how much force will be generated, the safety kite will be released.
Also, you can use special devices to measure wind force.
Over time, experienced pilots get used to assessing the wind by eye by its effect on surrounding objects.
Kite
There are many varieties of kites. Each type is initially designed for specific purposes.
To ensure kite safety, keep the kite on the edge windshield and maneuver it away from you to the power zone. If your skills do not allow you to fly a kite, modern kites have a safety system that allows you to reduce the attraction of the kite without leaving the kite.
This kite is designed to create significant gravity. However, among humans, the classification of kites based on their use and the name of the kites has arisen more frequently. Kite sport of this force became widespread much earlier than water damage. They roll on hard surfaces. These sports are very close to kiteboarding, kitesurfing and snowboarding and are equally attractive and provide a huge dose of adrenaline.
These can be simple diamond-shaped (diamond), triangular (delta), box-shaped (box), inflatable (parafoil) or controlled sports with two or four handrails.

Before launching, make sure that your kite is suitable for the current wind strength, whether the kite needs a tail, and whether the line is securely attached.
What is the difference between two ropes and four?
At the same time, these are the only types of shaking when it comes to summer and winter. Kayaks with two ropes are controlled in the simplest way without the ability to pause the kite. In this case, it is necessary to take into account the possible maximum speed wind and the energy it generates. Four course kites have more control and are most suitable for active pairing such as bumpy, roller or snowboarding.
The top ropes are strength ropes. By controlling them, the kite is controlled and its energy is generated. Bottom ropes are brake ropes that allow you to change your speed by pushing them towards you. Brake cables also make it easier to control runways and takeoffs.
If everything is in order, you are ready to launch.
Launch
Running with a kite is fun, but not very smart; you can't look where you're running and enjoy the sight of the flying kite at the same time.
This frivolous approach can lead to trouble for both you and the snake.
What is the difference between 4 rope control cables and 4 rope feeders?
Four rope handles allow you to control the kite safely, easily and precisely with maximum maneuverability. Four rope handles allow you to pause the kite, keep it in the air, flip the kite over, or lower it safely to the ground. If the kite lands nose-first on the ground, the kite can be turned over by pulling on the brake ropes and then lifted back into the air. This kite control is most suitable for bumpy, snowboarding or leisure boarding.
A four-rope strip usually has special system safety that allows you to lift and release the kite. Aitvaro's power is distributed equally in both hands, making it easier to fly, but at the same time you have less control over the kite. This is due to the special bar control and rope system, which can be adjusted to different power rise and wind speed. Raising the bar will increase the power of the kite.
Instead, try a smarter approach.
Stand with your back to the wind and raise the kite as high as you can. Make sure the kite is pointing straight up and release it easily. Don't overdo it, don't try to "throw" the kite into the sky, just let go and let it take off on its own.
If the wind is strong enough, the kite will rise into the sky and begin to fly. Pull the line slowly and the kite will fly back towards you.
You will need an energy kite, a helmet with an articulated post, a board, a trapeze, a life jacket
Using the hood type for kites requires a trapeze. Damage is an extreme sport, so we recommend starting with a kite kite. You will not only learn how to safely manage changes, but also get to know kite creators and kite models. Experienced instructors will help you choose the right equipment.
Each manufacturer has several types of kites in its range
For several years it has been named the king of the surf kite category. This kite gives you a great feel for breaking waves.Then, before it hits the ground, release the line and the kite will rise up again. All you have to do is repeat this process until the kite is caught in a steady stream of wind.
 In light winds, you may need the help of a friend. Ask him to hold the kite at a distance of 15-20 meters from you and release it as soon as you pull the line. The kite should rise into the sky just as if you had let it go yourself in more pain. strong wind. Soon, the kite will rise into a zone of stronger wind and the difference will disappear completely. At the same time, you will look much “smarter” than the people running around trying to help the kite take off.
Flight control
Continuously monitor the kite during flight. If something goes wrong, you will have time to do something to avoid the situation getting worse, even to the point of structural failure. Don't be tempted to let go of the line too much: 30-60 meters is plenty. On long distances It is quite difficult to watch the flight for you and surrounding observers.
 If the line is loose, tighten it; if the line is too tight and the kite behaves unstable in the air, release it a little. The main goal is to pilot the kite and not just let it fly.
To complete the process, begin to slowly wind the line onto the reel. If the wind suddenly weakens, you can do it faster. As a result, throw the line along with the kite on the ground so that the line lies freely in the open space, this will soon allow you to lift it into the air again without additional difficulties.
In strong winds, you may need to attach the line to an anchor on the ground, and also use gloves to avoid damaging your palms.
Remember that tension on the line increases the force of the wind on the kite. If the kite is acting unstable, there is no need to tighten the line even more, trying to bring it closer to the ground. Instead, release the tension and allow the kite to rise freely higher into the sky before gently pulling back.
If the kite begins to rotate in a large loop closer and closer to the ground, once again, when it is close to the ground, pull it towards you, this additional effort will land the kite on the ground. At this point, you'll probably be glad you didn't let him go too far.
Leer
You can purchase the rail in the same place as the kite itself. Quite often, kites are supplied with a handrail, although this is not always the case.
Special handrails are usually lighter, stronger and thinner. All these qualities have a positive impact on the piloting process. Ideally, it is better to use the thinnest railing that can withstand specific type snake.
Customization for different strength wind
![]() Many snakes can be "adjusted" to a certain wind force. The adjustment is made by changing the point at which the line is attached to the kite. By moving the attachment point, you change the angle of the kite to the wind.
Many snakes can be "adjusted" to a certain wind force. The adjustment is made by changing the point at which the line is attached to the kite. By moving the attachment point, you change the angle of the kite to the wind.
The larger the angle, the better than snakes will be able to fly in strong winds, a smaller angle will allow the kite to fly even in a light breeze. Too much high angle can cause the kite to flip over in the wind and break, too small will not allow the kite to fly.
Experiment! You'll be surprised how such a small change can make a big difference in the quality of your flight.
Tail
 Many kites are designed with a tail. The long tail, fluttering after the snake, serves as an undoubted decoration of the overall picture. But tails also have a practical value: the added weight to the bottom tilts the kite upward with the leading edge and provides better flight stability.
So, if your kite flies unstable, try adding a tail, and conversely, if the kite flips over and falls to the ground, you need to reduce the length of the tail or remove it altogether.
It's good to have a balance with tails. One tail should be attached in the center of the kite next to the rail, two tails should be attached symmetrically on the sides, also make sure that they are the same length/weight.
Problems
Even an experienced kiter sometimes encounters a tangled line or finds his kite hanging from a high tree.
Do not panic! Keep calm and everything will be fine
Snake in a tree? Don't try to climb; if you fall, it will hurt. Yes, and don’t pull the rail, it’s unlikely to help, it’ll probably do more harm.
It is best to release the line and wait until the wind blows the kite through the tree. After this, unhook the kites from the line and pull out the line. back.

If your kite's line gets tangled up with another kite's line, simply go up to the owner and say hello. Surprisingly, both tangled rails will descend to the ground right to the place where you both stand
What if the rails are intertwined on the ground? In principle, you can avoid this ambush by carefully handling them, but if this does happen, all you can do is carefully unravel the ball. Life isn't perfect
Doesn't the kite fly?
Not all flights go smoothly. If your kite is not taking off, you may be experiencing one of the following problems:
- "Wrong" wind. Maybe too weak, or too strong. The required wind force depends on the kite; if there is a tail, try unhooking it or, alternatively, attaching a longer one.
- Turbulence. Trying to fly a kite near a building or big tree? Not sure it's going to happen.
- "Reconfigured." Maybe you or someone else has already driven this kite to a different wind and left it that way? Try to return it to how it was.
- "Whirlpool." If the kite is circling, try adding a tail or moving the line's attachment point.
- "Lethargic." If the kite does not want to rise into the air, unfasten the tail and move the attachment point of the handrail. Maybe the rail is wet?
- Technical difficulties. Make sure that the kite is assembled correctly, read the instructions again.Safety
Every pilot should be concerned about safety. A snake that has lost control can cause physical harm to a random person.
An unwound line lying unattended on a field can pose a danger to passers-by people or animals.
Please be careful when flying the kite near other people.
In particular, never fly a kite across a road; if the kite lands on the ground and the handrail crosses the road, this could cause road accident. Never fly near an airport or power lines.
Be polite and courteous to your neighbors, good pilots They always treat other pilots, and even complete strangers, with respect.
Remember that the sky is shared resource, try to be sensitive to competitors for the attention of viewers.
This way you will get much more joy and pleasure!
(c) David Gomberg. GKPI.
Translation - IM "GlavZmey"
The idea of flying a ready-made kite is still in the air.
1. When choosing a place to fly a kite, you should pay attention to open areas. Any nearby wind barriers, trees, stalls, statues of leaders, etc. the wind will be turned away from the true path and give it unnecessary turbulence. Ideal for kites sea coast. But if you have to catch the breeze by jumping on bodies laid out on the beach, you can take a closer look at other spaces. The selected clearing should not be located next to a busy highway (glider pilots often run with their faces raised to the sky and pose a danger near roads) and away from power lines and airfields.
2. After slobbering on your finger, find out the direction of the wind. Hand the kite to your friend, whom you prudently took with you, and stand opposite him, but so that the wind blows at your back. Let the reel with the handrail be in your hands. Take a few steps back while unwinding the line. Please note that your friend should not be typing SMS at this time: the kite should be held with both hands above your head, trying to position it perpendicular to the direction of the wind.
3. Having moved 15-20 m away, shout to your friend: “Let go!” - and jerk the rail towards you. If the wind is decent, the kite will rise up on its own, and you will only have to stand with the reel, joyfully watching its flight. Otherwise, you will have to run a few more meters until the wind catches the kite.
4. If the kite flies only when you run, it means the wind is weak today. Even if it’s a shame to admit it after the marathon you just completed with a lifeline in your hand. In a normally blowing monsoon, the flying structure flutters in height while it is simply held outstretched arm. The optimal wind speed for a beginner is 3-6 m/s. At a lower speed, only the lightest structures will be able to rise; at a much higher speed, the kite will be torn from the hands and will only be subject to the control of a kite specialist.
5. If the handrail pulls too much, you need to unwind the reel a little. Flight when the wind subsides is regulated by pulling the kite towards you. With a successful combination of circumstances, the kite will dangle in the air for several hours, and you will have time to take a break from the hustle and bustle.
6. To finally go home, the snake is pulled to the ground, gradually reeling in the rope. Announce to the children and onlookers gathered around that today you will not start anything else except the engine of your car. Maybe this will help them break up.
 (1 ratings, on average: 5,00 out of 5)

