Make a pirate chest from a box. DIY chest from a box. How to make a magic chest with your own hands using a template
Quite often, there is a catastrophic lack of space in the bedroom to store pillows, blankets and blankets. Of course, most people solve this problem by simply storing bedding in the closet, but this approach is irrational, since this greatly reduces the capacity of the closet. Therefore, making a chest with your own hands for storing bedding will be the best option, which will help you solve the problem of lack of space.

It’s worth saying right away that making a wooden chest with your own hands will be quite difficult, especially if you want it to look beautiful. But if you know how to make a chest and put in some effort, then you will definitely succeed.
In order to get started, you will need quite a lot of tools, since making chests is a rather labor-intensive process; here you need not only to process external surfaces, and also make grooves at the ends; in addition, you will need clamps with clamps to assemble the parts and the entire chest at the end.

The most important thing is to take your time, and before gluing the pieces together, try laying them dry first without glue and see how they stick.
Side walls
start doing wooden chest, best from the side walls. Below you can see a drawing of the side wall and the dimensions of the parts you need to make to fold it.

There is actually nothing complicated here, just follow the instructions and use high-quality dry wood. Be sure to monitor the depth and width of the tongues (grooves) for the liners. You can make them in many ways, but the best way is to use a simple one. manual frezer. The most important thing is to use a cutter of the appropriate size and side stops that will allow you to make even grooves. It is best to clamp the workpiece itself in a vice while working, since otherwise you simply will not be able to hold it in your hands.

It is important that when the side wall of the chest dries, it inside, you will need to make tongues to secure the bottom and side walls. Since the entire structure is held on by glue, so as not to spoil the appearance of the product.
The time has passed when chests were an integral attribute in every Russian home. People kept valuables and expensive things in them. For travelers, this item played the role of a suitcase. Today, such storage for things is practical chests of drawers, cabinets and safes. The fashion for chests gradually began to be revived by designers who are constantly searching for new solutions for the interior. Making your own chest out of wood or cardboard is easy. This does not require special skills or equipment. All you need is desire, a little imagination and a set of necessary tools.
In order not to complicate your search suitable materials To create a chest, solids from different types of wood are most often used. But besides this type of raw material, you can also experiment with other materials, such as:
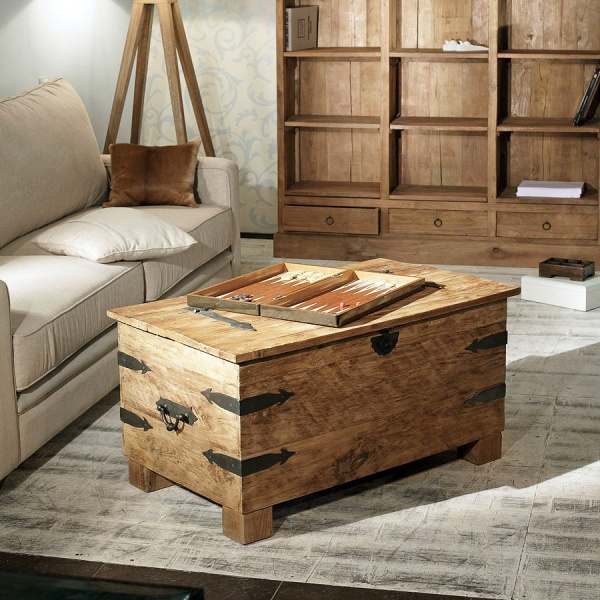
You can see what an original practical do-it-yourself chest looks like in the photo.
DIY chest of drawersBefore you make a chest with your own hands, decide on its location in the room. Then come up with a suitable drawing and set all the necessary parameters of the product. To work you will need:
Preparing partsThe chest parts will be cut from 1.6 cm thick plywood sheets. Take a pencil and mark the dimensions of the parts indicated below on the plywood. Use the drawing.
Make the legs of the chest from boards 1.5 cm thick.
For decoration, we suggest making rhombic frames from boards with a cross-section of 0.9 x 3.3 cm.
Manufacturing technologyHaving collected necessary set tools and parts, you can begin assembling the chest structure. First, process wooden elements sandpaper and then follow the following manufacturing procedure:
Wooden chestA real wooden chest will be an excellent gift for any occasion. It can advantageously decorate the premises of a restaurant or cafe. To work you will need:
Manufacturing stagesIt is much easier to purchase ready-made sanded sheets of wood suitable sizes, so all you have to do is shape them with a jigsaw.
Cardboard chestA decorative cardboard chest is easy to make if you have a regular cardboard box suitable sizes. To work you will need:
First of all, draw a sketch of the future chest with a pencil on the box. Around the box there are two lines for cutting, on the sides there are semicircles for the lid of the chest. Using a knife, cut off all excess from the end along the bend and cut off the top.
In such a chest you can put both things and toys and other not too heavy objects.
Money chestToday it is fashionable to use a money chest at wedding celebrations. According to many best gift This means money for a wedding, which means that for such a gift you need to come up with a safe storage place. A homemade chest decorated in the style of the main wedding theme will work well. Before you make a money chest with your own hands, you need to take care of the materials. To work you will need:
Before you start creating the product, create a pattern for the chest and stock up on one extra box.
You can see in detail how to make a chest with your own hands in the video. |


It all started with the fact that I felt sorry for throwing away boxes from under glasses. But once you understand the principle of operation, you can turn almost any box into a cute wedding money chest.
There were partitions in this box that I got rid of... I brought the box to the same look as in the photo!
On one of the sides we draw this outline, typical for the lid of a chest. You can stick to any size. You can do it “by eye”, whatever suits you!
We do the second side in exactly the same way! but on the “profile” we draw two stripes: the first connects the lower points of each arc on the side panel, and the second is the height of our future cover.
Now we take scissors in our hands and cut off the “excess”. Create a “bulge” for the lid. I think the photo shows what I mean.
Next step: the lid of my box is quite tight and just doesn’t want to bend nicely. Therefore, with the blunt side of the scissors I make these grooves (along the inside of the box). The distance between the beards is arbitrary - for me it’s about 1.5 cm.
Now I cut along the bottom line in three!!! to the parties. I did this with a sharp knife.
“Finishing” the lid of my chest. Personally, I take adhesive paper tape, which is sold in hardware stores called construction tape;) Well, I take exactly that, tear off the pieces and use them to secure the lid parts together
This photo shows it better. I cut off the “extra” part of the lid with scissors (you can also use a knife). I connect everything with the same adhesive tape.
Well... something is already emerging...
If money is thrown into this chest, then it’s time to think of a “hole”... to do this, I draw contours on the inside of the lid and cut it out with a sharp knife.
Tip number 1:
if you simply cut along the “bottom” line, then after we cover our chest it will not be able to close well. Therefore, it is worth increasing our slot, as I tried to show in the photo, to about 3 millimeters.
Let's start gluing our chest. It was for this chest that I again picked up the wallpaper that I bought especially for this.
I cut off the first piece: length = two widths of the side walls + the width of the front wall + two folds (I have 5 centimeters each... but less is possible). Height = wall height + two folds.
I glue it with glue from a spray can (as in the photo), but this is my personal choice!
I start gluing it: first the front and two sides, then I fold it over the back, then I cut it at the corners and tuck it in. After everything, I smooth it out, expel the air and press it well again.
Next step: I trace the sides of the lid and cut out these blanks.
I glue the sides of the lid.
Having measured the width of the chest, I cut out the next part. You will need to paste it over: the bottom, back wall and a lid. So you will need to calculate the length taking into account all these details.
While the glue has not yet hardened, I make a cut like this.
This is how the hole for envelopes looks like.
At this stage our wedding money chest looks like this...
Tip number 2:
If you feel that the lid of the chest is a little heavy and is constantly “trying to fall off” when you open it, then before gluing the inside of the chest, glue a piece of ribbon on one side from the inside as in the photo. Try to find the position of the lid in which it already “leans back” and in this position we glue such a ribbon. After this, you can safely start gluing the inside of the chest.
I figured that my lid wouldn’t “fall off” anyway, so I removed the ribbon and started covering the inside with the same wallpaper. If you want to tinker, you can decorate the inside with material - it turns out beautifully, but there is a little more fiddling.
How to paste it over - I don’t think it’s worth going into too much depth. I'll make a cut for the envelopes later - when the glue dries.
Now we cut off a cardboard strip (I have about 5 cm wide and long = 2/3 of the width of the side panel + width of the front wall + 2/3 of the width of the side panel).
Let's try it on from the inside... as in the photo. The cardboard peeks out about 2 cm above the edge of the chest.
I also covered this cardboard with the same wallpaper, and so that the “seam” was at the bottom.
I coat it with glue to about the middle and glue it to the inner wall(s) of the chest. I used nail scissors to cut a hole for the envelopes...
I pulled out all sorts of things from the bins that are associated with a wedding...
I glued it with a hot gun, added doves and hearts...and...
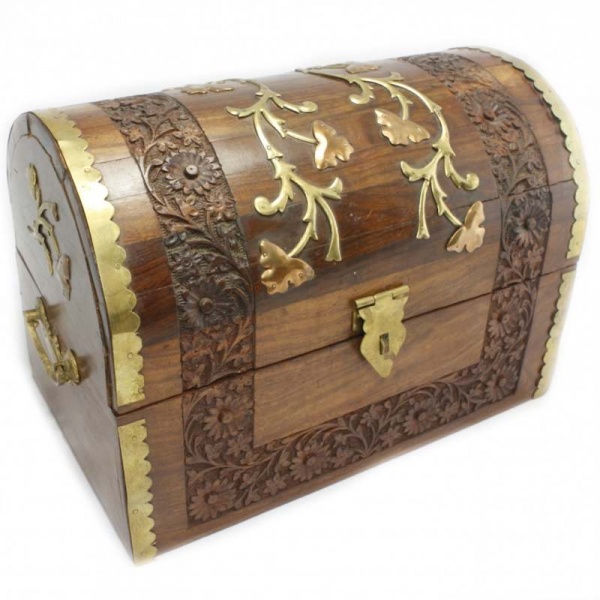
Chest (sandyk) - a product with a folding top cover. It is mainly used to store various things, jewelry, books, toys or other items. But it can also serve as a table or decorative element. Often chests are made of wood, with elements of forged products. However, they come in both heavy iron and lighter, but not so reliable, cardboard.
Previously, if there was a chest in the house, this indicated the wealth of the family. Such a thing was useful both before and can be useful in our time.

Handsome and original chest will not only decorate your interior, but will also an original gift for your friends. Of course, you can buy it, but we invite you to try your hand at making it yourself. After all, you will agree that a thing made with your own hands is valued much higher than something purchased.

And it will require much less money for production. For example, a chest made of cardboard is very cheap. In this article we will look at how you can make two types of chests yourself.
Wooden chest
Wood is a classic. Usually all storage products were made from it. Material for long years deserved a lot positive feedback. It is easy to work with, natural and 100% environmentally friendly. The tree will serve as a chest long service. And the cost of the material is not so high. In Russia, wood is considered one of the available materials.

So, to make it yourself, you need to prepare the following tools and materials:
- jigsaw;
- hacksaw;
- screwdriver;
- screws, bit;
- roulette;
- pencil;
- construction gun;
- hot glue;
- clamps;
- emery cloth;
- masking tape;
- paint brush;
- wood glue, paint, varnish.

In addition, you need to prepare boards of the required thickness in advance and dry them well so that your chest will last for many years and not crack.
Note! Wet boards are not recommended to be used. It is better to initially buy dry material, ready for processing.

Where to start
For those who have never worked with wood, but are excited about this idea with a chest, of course, it will be a little more difficult than for those who have at least some idea in this matter. But with great desire and patience, you will succeed. In fact, there is nothing overly complicated about assembling the chest. First you need to make a drawing or diagram of all the parts, then cut them out with a jigsaw. You can use the first piece as an example for the second. For convenience, you can number all the parts with a pencil on the inside.

The sizes of the chest can be different, depending on what it will serve you for and what will be stored in it. This article will not indicate specific sizes, since it is better for you to know which chest will look good in your interior.

Once you have decided on the dimensions and cut out all the parts, you need to assemble the sides, and then attach them to the bottom, which is a solid plate. Top part(the cover) will be attached last. To create the lid, simply hammer boards onto pre-cut pieces in a semicircle. To connect the parts, use self-tapping screws, but take into account the length of the screw so that its end does not stick out in the middle of the chest.

If you do not want the caps of the screws to be conspicuous, you can disguise them with special putty or use overhead corners. This will give your chest a more antique look, making it original and beautiful. Other details of the main part and lid are provided by the fittings you choose. Next, with the same screws you need to secure the decorative hinges and lock, and these details will not only give your chest an attractive appearance, but will also make it more durable.

Decorating a wooden chest
After the chest is ready, it's time to use your imagination. At this stage, you need to make a robot from a simple, inconspicuous box beautiful element decor. First of all, you need to sand the surface and corners with sandpaper. In order to give the chest an antique look, it needs to be covered with stain or a special varnish.

The varnish can be applied with a regular brush or roller. After the varnish has completely dried, we apply a transparent coating, which will give the furniture a fresh look.

If you wish, you can draw some kind of design on the chest. You can do this using a stencil. If you are good at drawing, then try coloring it by hand. You can make a pirate chest with your own hands by drawing a skull and crossbones on it. Here your imagination can run wild.

There are many design options wooden furniture- this is forging, inlay, carving and many others. If you are interested in the idea of a pirate chest, then they will help you with this Forged Products, which can be ordered or simply bought at a hardware store. The main thing is don’t be afraid to experiment! Then the product you make will delight your eye and also surprise your guests.
Master class on how to make a chest from a cardboard box
If the first version of the product is more complex, then making a chest from cardboard will not be difficult. And the cost of construction will be scanty. You don't need any special complicated tools. You will need something that is always at hand.

So, in order to make such a chest, you will need:
- Cardboard box.
- Scissors.
- Cardboard and paper.
- PVA glue.
- Paints (gouache or watercolor) black and gold.
- Sponge.
- Ruler.
- Two brushes.
- Pencil.
- Napkins.

Having prepared everything you need, you can begin manufacturing work.
Stages of manufacturing a cardboard product
The first thing you need to do is the lid. We will make it from the top of the box. To do this, you need to draw lines from the inside using a ruler and pencil. Thanks to this, the cardboard can easily bend in those places. Then cut out two identical semicircles, leaving teeth along the edges of the curve. Then glue them on both sides, bending the teeth onto the lid and gluing them with PVA glue. Next, you need to glue the outer and internal corners masking tape or a napkin well soaked with PVA glue. In addition, you can strengthen your chest if you glue an additional box covered with fabric or wallpaper inside the box. After that, wallpaper the entire chest, attach handles on the sides, and start painting and decorating.

Note! Use for decoration soft materials, such as fabric, leatherette, cardboard, napkins, etc.
There is no need to use materials such as wire, copper, bronze, or rivets for a cardboard chest. The thing is that they can only ruin your fragile structure. And somehow attaching such material would be almost impossible. You can cut belts from leatherette that need to be glued with PVA glue. You can decorate the chest using baked clay. Just roll it out like dough and cut out shapes that interest you with a knife. Then stick it in the oven. After the clay has baked, glue it to the chest using glue.

Now all you have to do is paint the entire chest one color, let it be black. After the paint has completely dried, you need to gild the surface of the finished product. A sponge will help you with this. Apply a little golden paint to a sponge and rub it over the surface in certain places, for example, on belts and other decorative elements.
To make the legs for this chest, you can use regular bottle caps, or wooden blocks, which will also be painted and glued. At this stage, you can say that your chest is ready. It can be used to store various small items, or simply to decorate your room.

Conclusion
This is how easy and simple you can transform your home and make for yourself convenient design for storage various little things. These masterclasses will help you. Try, experiment, and surprise yourself.
Bamboo chest
A chest is used to store various household items, valuables and other things. Since ancient times, people have become accustomed to such containers for storing things. Chests were most often made from wood and decorated with various metal elements. In the same master class you will learn how to make a marvelous chest from improvised materials at minimal cost.
Materials
. Cardboard.
. PVA glue.
. Tubes made from consumer paper.
. Glue "Moment".
. Tailor's pins.
. Decor.
. Side cutters.
Manufacturing stages
. Mark the chest on any box. Cut it out.
. Cover the outside of the box with the main background, extending about 6 cm inside.
Along the long side of the chest model, attach flattened tubes with tailor’s pins as in the photo.
Now take long strips of a different color. Pin the ends on the left side. Now make the weaves, the distance can be taken equal to the width of the tube.
When you reach the top, fold the ends of the strips inward and glue them.
This is what it looks like inside
. While the glue dries, work on the lid of the chest. In this MK, the width of the bottle is equal to the width of the chest, so you don’t have to adjust anything to fit. Wet the cardboard and attach it to the bottle with tape. When the cardboard dries, cover it several times with PVA glue.
For greater reliability, you can glue it with newspaper.
. While the lid is drying, continue braiding the sides of the chest. Where necessary, stripes should be extended.
The high side part is ready. Trim off the excess from the strips and glue well.
Continue braiding the chest. Don't forget to glue the stripes to the bottom; the stripes in this MK are yellow.
As a result of your labors, you will get such a neat and beautiful chest.
Did you admire it? Now keep working.
. Tape the edges to make it look neat and beautiful.
Cover the lid of the chest with the same color as the chest itself, going up 6 cm.
. Try it on so that the structure fits evenly.
. Decorate the lid as desired. Use your imagination and go ahead.
The result of the work done should be the following.
But, of course, the chest requires decoration. Imagine and create. Let things made with your own hands give you kindness, beauty and warmth.
In ancient times, chests were one of the valuable pieces of furniture where various things and treasures could be stored. Do you want to make such a chest yourself? Then let's get to work.
Materials for work:
. Cardboard (thick);
. Simple pencil;
. Ruler;
. Scissors;
. Double-sided tape;
. Glue "Moment";
. Corrugated paper;
. Wooden mat;
. Acrylic lacquer;
. White paper;
. Paint brush;
. Beads;
. Sandpaper;
. Decorative ribbons.
1. Cut out three cardboards - 17x8.5 cm in size and two squares - 8.5x8.5 cm in size. Glue them to white paper. We leave a space of 2 mm between them to make it easier to bend them along the contour.
2. Glue the frame of the chest, and glue it inside corrugated paper.
3. Cut out parts from a wooden mat that should match the dimensions of the sides of the box. We take into account that the bottom should also be decorated with this rug.
4. Immediately prepare the materials for the lid and cover them with corrugated paper. We need 3 semicircles with a diameter of 8.5 cm and 4 squares with sides of 8.5 cm. Immediately drill a hole in the squares in their lower part.
5. Glue two semicircles to two squares using satin ribbon and glue "Moment". We need tape so that the cardboard joints bend well, but do not crack.
6. Now you can paste over the frame with the prepared wooden elements.
7. We cover the part of the wooden mat that will serve as a lid with corrugated paper on the inside.
8. Glue the wooden mat to the sides of the chest.
9. Next we glue it into two semicircles, cut off the excess parts with scissors and sand them with sandpaper.
 (1 ratings, on average: 5,00 out of 5)