Stages of making an owl pillow. We sew cool pillows: step-by-step master classes. Volumetric heart made of roses
Cute and beautiful soft toys have long been used to decorate the interior, creating a special, unique atmosphere in it. The real favorites are pillow toys made in the shape of funny and charming creatures. Let's look at how to sew an owl pillow using a simple pattern.
What is needed for sewing
The owl pillow is an excellent gift or interior decoration. Especially if it is made by your own with my own hands. The sewing process is very interesting and exciting - the main thing is to successfully choose the pattern, materials for the base, as well as decorative accessories.
So, to sew this charming little thing, you will need:
- pattern of a pillow in the shape of an owl - you can draw it yourself with a pencil or print it out;
- scissors for paper and fabric;
- several safety pins;
- dense fabric of one or several shades;
- thread and needle;
- sewing machine;
- for filling - cotton wool or other similar material;
- decorative elements - eyes, etc.;
- fabric glue.
To make your pillow more interesting and effective, you can use a variety of decorative elements at your own discretion.
The finished result largely depends on how well the pattern was chosen for sewing a do-it-yourself owl pillow.
In this regard, there can be two options - make the image yourself or use a found template. Decide for yourself what to give preference to.
If you decide to make such a product for the first time, it is recommended to use a pattern with a small scale - no more than 30 cm. For a debut experience, this is quite enough, because larger specimens require a significant investment of time and materials, and small ones are difficult to make.
You can also design a pattern yourself, based on the templates you found. This is not at all difficult to do; moreover, it’s even interesting, because with your imagination you can achieve a unique result. Since all the details of the owl pillow are usually symmetrical, its pattern is completed quite quickly. Having drawn the silhouette you need, carefully cut it out and start sewing.
How to sew a decorative pillow correctly
We present to your attention a small master class on sewing a decorative pillow in the shape of a cute owl.

- Take the prepared pattern, attach it to the fabric, fasten them safety pins and make blanks of two identical parts - do not forget to leave small seam allowances.
- Securely sew these parts together - carefully baste and then stitch.
- Turn the resulting cone-shaped piece inside out, and then use a pin to separate the upper tip.
- Stuff the workpiece with padding polyester or other soft filling, and then sew it up.
- Bend the remaining free upper tip evenly and sew it to the main part of the owl’s body so as to form a beak and ears.
- An important detail is this decorative pillow-toy– these are eyes, large and wide open. To make them, you can use two fabric circles different colors and sizes, as well as large beads.
This is the simplest owl pillow pattern that you can easily make with your own hands from fabric. However, there are other options that will also be of interest to you.
Owl pillow with pockets
An owl pillow with pockets will be not only a very beautiful, but also a functional accessory. Your child will certainly appreciate such a wonderful thing - after all, you can play with it, sleep on it, and also use it for convenient storage various items, be it a phone, a remote control remote control or colored pencils.
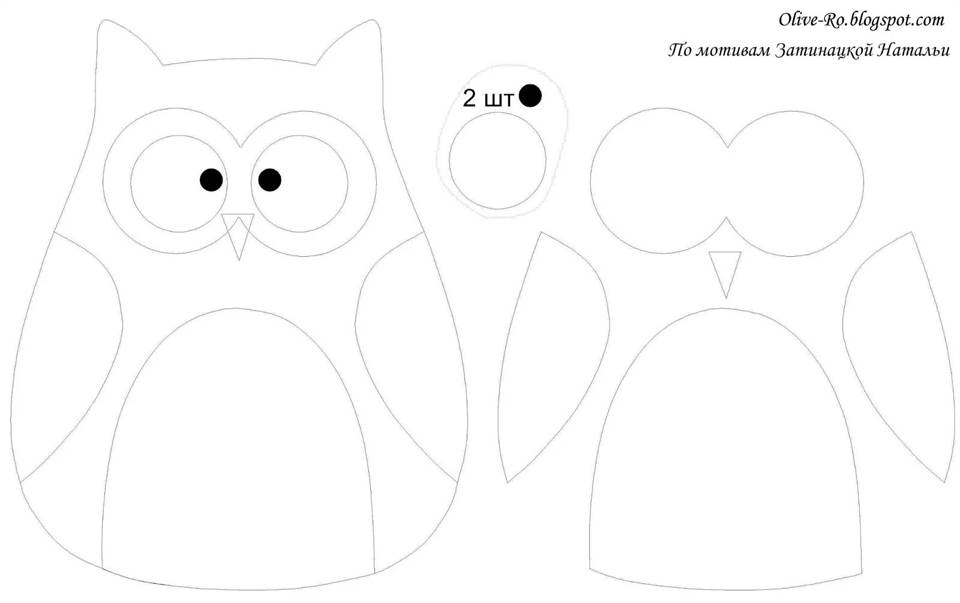
So, using a simple pattern, you can make a pillow with your own hands. This option includes details of the body, wings, paws, eyes with eyelids and pupils, beak and paws.

Before you make such a toy, you need to select all the necessary materials and accessories:
- several pieces of fabric of different colors, preferably cotton;
- interlining;
- as a filler - or holofiber;
- wooden buttons;
- ruler, pencil and scissors.
The manufacturing process is as follows:
- The pattern must be printed in duplicate, all the details cut out, and then transferred to the fabric.
- Place one of the body parts on work surface, place a pocket on top of it, and then connect them together with a strong seam.
- Sew on the eyes with eyelids and beak.
- Sew together the parts of the wings and legs one by one, and then stuff them with padding polyester and carefully baste them into place.
- Place the second part of the body on top and stitch, leaving a small space between the legs for turning.
- Turn out the resulting workpiece and fill it with padding polyester. Carefully close the hole using a hidden seam - and the pillow is ready.
It’s easy to make a funny pillow in the shape of an owl with your own hands. The pattern can be varied at your discretion, and then you will create a truly unique and attractive element interior
Sometimes comfort in a home can depend on inconspicuous, unobtrusive details. So, they will help give your home an atmosphere of comfort unusual pillows, made in the form of an owl. You can easily make such a pillow yourself. Very important point in its production is a correctly selected pattern. The owl is considered a symbol of wisdom and will a good gift for any holiday.
Owl shaped pillow
There are many variations of how an owl pillow can look, it all depends on what pattern is used as the basis.

So, it can completely repeat the shape of the animal or have a standard square shape, with an applique on the front side.

- Patterns on graph paper
- Buttons or beads for eyes
- Needle and thread
- Pieces of fabric in variegated colors
- Sintepon for filling pillows
- Fabric glue
- Pencil


The toy does not have to be large - it all depends on the amount of materials used. From a paper stencil you need to cut out the silhouette of an owl with ears and transfer it to the fabric. It is necessary to keep in mind that the pattern must take into account the fabric allowances for the seams. You need to start work by finishing the front side.
An owl pillow must have eyes. To do this, circles made of fabric in a contrasting color are glued to the front side and beads or artificial eyes will be sewn onto them.
The toy can also sit with its eyes closed; to do this, it is necessary to sew drooping eyelashes at the bottom of the fabric circle. If the eyes are made entirely of fabric, you can give the sleepy owl half-closed eyelids. Don’t forget about the beak – it will add expressiveness to the toy’s face.
When the owl's face is ready, the front and back parts of the pillow need to be sewn together. Be sure to leave a small hole through which it will be filled with padding polyester. If desired, you can make paws for the owl - the pattern will look like a flower petal. The paws can not be stuffed with padding polyester, but simply made double-sided.
Terry owl
The toy made of fleecy terry cloth looks very nice. The pattern contains almost all the elements that make up the craft - wings, eyes, body, beak.

List necessary materials:
- Terry fabric for the body
- Linen or cotton for wings
- Yellow, white and black felt for beak and eyes
- Thread and needle
- Sintepon for stuffing


It is necessary to cut out all the elements one by one and transfer them to the fabric. All parts are assembled as in the first case. If desired, the wings of the toy can be sewn incompletely, forming pockets for various little things. Thus, the craft will have not only an aesthetic, but also a practical function.

In general, any pattern can be used to create an owl; you can draw it yourself. This is how designer toys are made:


Pillow with owl applique
The easiest way for novice seamstresses to make a pillow regular form, with various applications on its side. You don't need a pattern to sew it.

As in the first master class, both sides of the pillow are sewn together only when all the applications are applied to the front side. To create them, any pattern with an image of an owl can be used.

List of required materials and tools:
- Scissors
- Thick fabric for pillowcase
- Needle and thread
- Sintepon
- Bright pieces of fabric for applique
- Fabric glue
- To make a pillow you need to use 3 pieces of fabric.

The first cut for the front side should allow for a 1cm seam allowance. The second cut should be 5 cm larger than the first and will be used to make the back of the pillow. Subsequently it will be divided into 2 identical parts.
All parts for appliqués must be duplicated, they are sewn together. After all the parts are fixed on the front side, you can sew the two parts of the pillow together, leaving a hole for stuffing.
A homemade toy will be an excellent gift for any occasion and will not require large expenses. You can make it from leftover fabric or from a damaged favorite T-shirt.

And here is a video master class: How to sew an owl pillow from felt!
Textiles in a home play a big role in interior design and help create the overall impression of the apartment’s design. Home textiles traditionally include curtains, curtains, tulle, rugs and furniture upholstery, and sofa cushions. The last item is very popular - after all, it is these little things that not only create coziness, but also add comfort, allowing you to relax.
If we talk about the shapes of pillows popular among housewives, then in great demand original emoji-shaped pillows are used, as well as representatives of the animal world: hares, foxes, owls. The techniques for making pillows are very different - patchwork, simple sewing, appliqué, crocheting and knitting.
The usual rectangular and square pillows They also strive to ennoble it with interesting embroidery, voluminous detail or other original addition.
Owl pillows - simple and complex
Despite the widest range offered by textile manufacturers, it can sometimes be difficult to find something suitable for a particular interior. Handmade will always come to the rescue - having certain skills and armed with a master class from experienced craftswomen, you can complement your interior original pillow in the form of an owl.
Fabric applique
If there is old pillow, whose pillowcase has long been worn out, or damaged by a stain, hole, etc., this is a great reason to sew a new one for it, with an original applique in the form of an owl. To work you will need:

 The first stage of work. First you need to cut the fabric for the pillowcase. The front part, on which the applique will be, is a square of 30 by 30 cm, plus 1 cm seam allowances are made on each side. If you have a ready-made pillow, the size of the pillowcase should correspond to its dimensions. The back of the pillowcase is larger than the front and consists of two parts - due to the fact that there will be an overlap with loops and buttons. The size of the total piece of fabric is 32 cm+6 cm=38 cm. 38:2=19. Accordingly, for the back half you need two rectangles, 32 cm long and 21 cm wide (1 cm seam allowances each).
Second phase. Transfer the applique details to the fabric and cut them out using seam allowances. Cut out the owl's body in duplicate . Duplicate all the details with non-woven fabric, except those made of felt and the body of an owl. Place the part of the owl's body with the right sides facing each other, stitch along the edge, leaving 2 cm unstitched so that the part can be turned out. Turn it inside out, straighten it out, and sew the remaining piece with a blind seam.
Third stage. Place the appliqué details on the front side of the pillowcase and pin together with tailor's pins. Machine stitch on the owl's body detail. Sew on the pieces starting with the largest ones. It can be done sewing machine, if it has a corresponding seam, or you can do it manually. The front side is ready, you need to move to the back of the pillowcase.
Fourth stage. Take the ribbon, cut it into 2 parts, fold each part in half, forming a neat corner in the fold. Secure it with a pin, or make a basting, and then stitch it so that the corner does not unfold.
 Fifth stage. Take one of the rectangles, bend it along the long side with an indentation of 0.5 cm and iron it. Place the ends of the ribbon loops there at an equal distance from each other, and sweep them in with thread. Fold the edge again by 0.5 cm and iron it, bending the ribbons to outside. Sew the edge using a typewriter, remove the basting.
Sixth stage. Front and back of pillowcase fold with loops facing each other and secure with pins. Place the second part of the back part of the pillowcase, overlapping the first part, and fasten with pins. Stitch. Cut off the corners remaining behind the stitching at an angle.
Seventh stage. Turn right side out and iron. Sew on the buttons and you can put them on the pillow, the job is finished.
Owl stencil for DIY applique
A stencil is a reusable template made from thick cardboard or thin plastic, in which the drawing itself inside is free for filling with paint (or for contouring). This thing is useful if you regularly make panels or pillowcases with appliqués. You can use a general silhouette, each time complementing it with different details - wings, eyes, beak and other elements different shapes. To make such a stencil with your own hands, you will need:

First step. Separate the cover from the file folder - cut it off with scissors or a stationery knife. Place the carbon copy on it, smooth side down. Place the printout on top, aligning all the edges. Secure all three sheets with paper clips.
Second step. Carefully trace the outline of the owl. If there are other elements in the drawing outside the main template that you also need, you can circle them too.
Third step. Remove the paper and carbon paper and trace the resulting outline with a felt-tip pen. Cut along the contour inner part stationery knife. Cut out part If it turns out neat enough, it’s better to save it, it may come in handy. The owl stencil for appliques is ready.
Owl pillow pattern
An abundance of ready-made patterns and options cannot always satisfy a given need, and then all that remains is to take matters into your own hands. How to make an owl pillow pattern yourself?
First you need to pick up everything you need for this creative process:
- A sheet of wallpaper, a newspaper (one spread will be enough).
- Pencil, bright felt-tip pen, eraser, ruler, compass, scissors.
 First step. Decide on the height and shape of the pillow. As a rule, 30 cm is the optimal size for such a product. If it is a rectangular pillow, then it is better to take a size 25 by 40. Draw a figure with the selected dimensions on the wallpaper.
Second step. Take a newspaper spread and fold it in half along the original line. Relative to the fold, draw half of the owl with a felt-tip pen. It is better to avoid sharp transitions - if your owl must have ears, then it is better to make them smooth, rather than sharp. Cut out the picture and unfold it. The result is a perfectly symmetrical owl. Place it in the outline drawn on the wallpaper, adjust the dimensions if it goes beyond the frame.
Third step. Place the finished owl into the drawn outline and trace it. Rectangle can be wash. Use a pencil to draw the inside of the owl necessary details- eyes, beak, wings, abdomen. Owl pillow pattern life size ready.
Scops Owl with a pocket on its belly
A cute pillow that looks more like a toy, but is suitable for decoration and to put under your head, can be even more functional. To do this, you need to equip such an owl with a pocket on its stomach - and what to put there, owls, a TV remote control, or a small candy stash is up to you. What you will need for work:

 First step. We draw an owl pattern on a large sheet of paper and draw out all the details. On the belly we draw an additional pocket - a line crossing the owl’s belly perpendicularly from edge to edge, 0.5 cm larger on each side.
Second step. Transfer the pattern pieces onto the fabric with a 1 cm seam allowance. The eyes and beak are made of felt, the rest is made of fabric: 2 main pieces, four pieces for the wings, one pocket piece. Cut two parts for the wings from sheet padding polyester.
Third step. Cut out all pieces with seam allowances. Place the wing parts in pairs face to face and stitch, leaving open the side that will be sewn to the main part. Turn right side out, straighten, insert filling.
Fourth step. Place felt parts on the front part - eyes, beak. Sew them on. Since we have a scops owl, embroider a strip on the white part of the felt with black thread - closed eye. Next, lay out the remaining parts - the pocket and wings. The edges of the pocket should match the edges of the main piece. The resulting fold is a reserve for the volume of the pocket. Secure the position with pins. Place the wings on top in the same way, the edges should match. If necessary, trim the padding polyester. This multi-layered place is better secure not with pins, but stitch with basting, and remove the pins.
Fifth step. On top of the resulting composition, front part inside, put the second part of the base. Secure with pins. Carefully stitch on the machine, leaving a slit of at least 10-15 cm on the side, above the wings.
Sixth step. Turn out to the front side future pillow , straighten, iron. Fill with holofiber. Sew the remaining opening with a blind stitch. Give the wings a position as if an owl is hugging itself by the stomach, and tie the wings to your pocket with a thread. Mask these places with buttons. The owl is ready!
Knitted owl options
In fact, knitted items are very cozy, and this applies not only to clothing, but also to interior items such as pillows. Options for making an owl can be different:

Attention, TODAY only!
Decorative pillows can transform any interior. A funny pillows in the form of owls are suitable not only for a children's room - they will fit into the interior of the living room, the kitchen, and the adult bedroom.
DIY owl pillow: pattern and preparation for sewing
A funny owl will perfectly complement the interior of a children's room. To create it you will need:
- a piece of plain fabric or fabric with a small pattern for a pillow;
- companion fabric for eyes, wings, paws and ears;
- thin felt of two colors to decorate the pupils, beak and tummy of the owl;
- padding polyester;
- threads, needles, scissors.
Transfer the pillow pattern to the main fabric. Fold the cut in half and in half again and attach the pattern of the owl's body to the fold. Trace it and cut out two parts of the pillow with seam allowance - the back and front of the owl's body. Transfer the details of the ears, eyes, wings and paws onto the companion fabric, and the details of the beak, belly and pupils onto the felt. Cut out all pieces without seam allowance.
Sew an owl
To one main part, to its front side, attach and pin with pins first the circle of the abdomen, then the inner parts of the ears, then large circles of fabric in place of the eyes, and on top of these circles - smaller ones made of felt. Pin the beak piece between the eyes. Pin the wing pieces on the sides of the breast. Once all the pieces on the front of the pillow are in place, they can be sewn on.

It is better to sew the parts on a machine, choosing a zigzag seam with a short stitch length. You need to stitch all the elements sequentially, starting from the bottom.
We fold the finished part with the image of an owl with another part of the backrest face to face, sweep it together, leaving a small hole at the bottom for turning and stuffing the pillow. Stuff the finished owl with padding polyester or holofiber and manually sew up the hole at the bottom.
From the companion fabric, cut out 4 parts of the legs, sew them together, turn them inside out and stuff them in the same way as the main parts. Sew the legs to the bottom of the pillow. This cute owl pillow is ready to be placed on your sofa.
Owl guardian of remote controls
This pillow option is more suitable for the living room and can be given as a gift to both the hostess of the house and the head of the family if he likes to sit in front of the TV. The pockets on this pillow will perfectly accommodate several remote controls; they will always be at hand and you won’t have to frantically search for one of them.

The owl pillow has a pocket for one remote control sewn onto its body, and long wings folded toward the chest form two more pockets on the sides. To sew such an owl, take:
- cotton fabric of two or more compatible shades;
- interlining;
- pillow stuffing material;
- threads, scissors, pattern paper.
How to sew an owl with pockets

From the main fabric, cut out two pillow pieces in the shape of an owl. Cut out a rectangular pocket from the companion fabric, fold a strip of fabric and glue it with non-woven fabric so that the pocket holds its shape well and does not wrinkle. Cut out the wings from the main fabric and also glue them with non-woven fabric.
Sew eyes, beak and pocket onto the front part. Attach the latter only at the bottom and along the edges. Sew the wings and leg parts into place and only then grind the front and back of the pillow. Don't forget to leave a hole!
Stuff and sew the pillow. Place the wings on the owl's chest and sew them on; the seams can be covered with decorative wooden buttons. Decorate your owl with other details, such as a flirty bow on her ear.
DIY square owl pillow
This option is simpler, but no less interesting. You can make an owl applique on a regular square or rectangular pillow.

You can make an owl pillow yourself; to do this, sew two squares of fabric together, turn them inside out and stuff them with filling. But you can buy a ready-made plain pillow and decorate it. However, in any case, remember that you need to sew the appliqué parts onto one side of the pillowcase so as not to touch the other side.
You can draw a sketch of the future owl yourself or take a ready-made one. Here you can experiment, for example, by making the owl’s eyes not large and round, but by embroidering the closed eyes of a sleeping owl with thread. You can sew round buttons in place of the eyes. You can imitate the plumage of a bird using fabric with grass or small scraps of fabric sewn onto the chest of your owl.

You can complement the composition with a tree branch on which the owl sits, other birds, flowers, or an image of the moon and stars for a sleeping bird - your owl pillow can be completely different and individual, photo variety of options- this is an excellent confirmation of this.
Round thought in the form of an owl
In addition to the usual flat pillows, there is definitely a place on your sofa for a small round pillow-thought in the shape of an owl. This owl pillow is stuffed quite tightly and is perfect for placing under your head or neck and lying down comfortably.

Choose two types of fabric that go well together. The back and head of the owl will be made from one, and its chest from the other. From the main fabric, cut out a piece in the form of a triangle slightly convex on the sides. From the companion fabric, cut out the same triangle, but smaller. Make the dimensions of the parts whatever you like, since your owl pillow can be absolutely any size. The pattern is very simple, so you can draw it on the fabric directly by hand.

Attach the small triangle to the large one, facing inward and so that the lower left corner of the two blanks aligns. Sew along the left side of the small triangle. Then fold the large triangle in half lengthwise and align the corners of the parts on the other side, again sew the blanks along the edge of the small part.
Turn the workpiece inside out and straighten it. The top corner will be the owl's beak; it does not need to be stuffed, so secure the tip with a pin. Stuff the owl's body well and tightly. So you will see that the ball is formed due to the straightening of the back. Sew the workpiece along the bottom with a regular stitch and pull off the ball, secure the thread with a knot and cut it.
Remove the pin from the top of the workpiece, fold the loose triangle forward onto the owl’s tummy and sew it on. Make eyes for your owl using threads or small beads and you can safely send it to the sofa.
The symbol of wisdom and kindness is represented by an owl; you can create cozy things with the figure of this bird from fabric with your own hands. Owls are emotional birds, somewhat reminiscent of children, they are just as laid-back and funny. Why not bring this mischievous bird into your home? We offer you three master classes on making textile owls.
History of textiles
Magnificent fabrics, which are sold in a wide range in specialized stores, are produced in large textile factories. But in the old days everything was completely different. People did not have special equipment and still produced fabric. Since ancient times, man has grown cotton and flax, collected the finest silk threads, and cut animal hair. All these materials were only of natural origin and helped to protect themselves from heat or cold and give themselves an attractive appearance. The ancient Greeks and Romans were famous throughout the world for their fabrics - fine linen and muslin. Due to the labor-intensive process of weaving and processing them, the price was too high. Only emperors and their entourage could afford to wear outfits made from these materials. These fabrics are so durable that even after thousands of years their fragments are found in the tombs of ancient kings.

China strictly guarded the secrets of sericulture, and there could only be one punishment for their distribution and sale. For a very long time, the Chinese had no competitors in silk production. But the eastern princess, who married an Indian prince, was so afraid that she would be left in another country without her favorite silk dresses that she secretly took silkworm cocoons to another country. Since then, India has become the second power producing silk fabrics.

The development of maritime trade routes inevitably carried fabrics around the world. Because of high price many countries began to abandon the product and decided to produce the materials themselves. Of course, their quality was worse than that of the original manufacturers, but the price dropped significantly. After implementation own production fabrics were no longer considered a luxury item; they entered the everyday life of every person.

Scientific and technological progress has made it possible to create fabrics from synthetic fibers. Now light industry flourishes, but there is nothing better than time-tested cotton, linen, wool and silk.
Cozy paintings
So, back to the owls. A cozy picture with this cute bird can decorate a corner of a children's room. They say that an owl can give children perseverance and the ability to learn.
To create an applique, it is better to choose fabrics that do not fray at the edges. Felt or denim (denim) is perfect for this.
If you are planning bright craft made from beautiful scraps of cotton fabric, don’t be upset. It just needs to be prepared in the right way:
- If the fabric is new, wash it thoroughly. This will protect your product from premature shrinkage and deformation.
- After washing, the fabric should be starched and ironed; it will become stiff enough so that it can be cut and glued to the base without fear.
Choose a suitable drawing. You can use one of the templates provided below.


Transfer the image to thick paper and cut out the parts. Trace the pattern onto the prepared fabric and cut out the details of the future painting. Glue the details of the craft to a base made of colored cardboard or fabric stretched over a stretcher. It is best to use PVA glue; when it dries, it does not leave marks on the fabric. The owl applique is ready!


Useful decorative element
This master class will tell you how to sew a pillow in the shape of an owl. To complete the work, prepare:
- Beautiful fabrics with various patterns;
- Felt;
- Scissors, thread, tailor's chalk;
- Pins;
- Filler (sintepon, holofiber).
To sew any product, a pattern is required. Choose an owl to your liking.
Transfer the pieces onto the fabric and cut out taking into account the seam allowance.

It is better to make the bird's eyes and beak from felt. Sew the resulting parts along the contour according to the pattern. Leave a small hole so they can be turned out and filled with stuffing. Put the pillow together and decorate it to your liking. If you sew a small pocket to the owl's belly, the pillow will turn into a convenient organizer.


soft friend
Children love soft toys. Sewn by the caring hands of a beloved mother, they will not only become best friend, but also a talisman for your baby. Manufacturing principle soft toy in the form of an owl is no different from sewing a pillow:
- Choose a suitable fabric;
- Decide on the pattern of the bird;
- Transfer the pattern to the material and cut out the parts;
- Sew the parts of the toy according to the pattern, leaving a small hole;
- Turn each piece right side out through the hole, fill it with padding polyester and carefully sew up the hole;
- Connect the parts of the toy together;
- Decorate the finished owl by adding decorative elements.
We offer you several patterns of a soft toy in the shape of an owl.
 (1 ratings, on average: 5,00 out of 5)

