Ideas for craftswomen on how to sew toy pillows with their own hands. DIY decorative pillows: how to set the mood for any interior? (100 selected photo ideas and master classes) Sewing toy pillows
Sewing pillows with your own hands means not only saving on bedding, but also decorating your interior and giving it individuality using simple and inexpensive means. Looking at photos of homemade pillows on the Internet, it may seem that this requires a lot of experience or innate talent. But the same problems can be solved much more simply, and certainly, when sewing pillows, it is possible to go from simple to complex, ultimately creating things worthy of prizes at amateur art exhibitions. This article is intended to help readers overcome several stages of this path.
What you need to know right away
It is not always possible to sew original pillows as simple sleeping pillows, in the form of a base and a pillowcase. That's why Special attention You need to pay attention to the choice of fabric and padding. The pillow is conducive to sleep, and someday someone will fall asleep on it. Probably tired, with unwashed and unkempt hair: when your eyes are stuck together, there is no time to look at beauty, it would be a good place to lay your head. That is, the covering fabric should not only accept finishing well, but also be cleanable. And the best thing is that the stuffing can be removed and the cover washed without spoiling its decor. In addition, the filling itself should maintain hygienic qualities, elasticity and be moderately pliable for as long as possible. We will return to materials for pillows that meet these requirements, but for now we will discuss ways to decorate them from simple to complex, keeping in mind the above.
Methods for decorating pillows
Colors
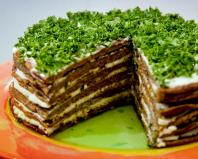
The easiest way to sew decorative pillows in the same way as regular sleeping pillows is to choose the color of the fabric. And the simplest of all simple solution– several pillows different colors, forming an ensemble integrated into the interior. In this way, you can not only turn a cocotte’s boudoir into something like a soft fluffy cloud, but also express the individuality of laconic interior styles. This kind of work, I must say, is mentally very difficult, but technologically and financially elementary. For example, on the left in Fig. It’s no wonder that a sofa with a composition of pillows is placed against the backdrop of a window (painting?) with living greenery contrasting with the overall tone, and a flower in a vase is placed to the right of the sofa.

In the center in Fig. a method based on similar aesthetic principles, but not requiring a laconic interior and special organization of the placement of its objects. The point here is that the background of the furniture upholstery and the cushion cover is the same, as is the tone and density of the pattern in both, but the designs of the patterns are slightly different. And the pillow is highlighted wide, the so-called. French, edging, the same as the general background, but of a darker color; The color is slightly lighter on the lower and side parts of the furniture upholstery.
Finally, on the right in Fig. shows a way to give a pillow, by choosing the color of the fabric, what is said to be aesthetic self-sufficiency, i.e. the ability to express the meaning inherent in it by the craftswoman in any environment. Imagine such a pillow in... a garbage dump. Will she look worse there? And the point here is not only and not so much in the choice of 2-3, no more, catchy colors that make up a fairly large pattern, but also in the arrangement of stylized images of flowers on the visible surface of the thing.
Applications and printing
Decorating pillows with appliqués can be just a little more technically difficult, but no less expressive. Here, as before. In this case, the key to success is the artistic taste of the author and, preferably, the combination of at least 2 things into an ensemble, and, unlike the use of colors, its meaning can be absolutely clear to the point of frivolity, as on the left in the row of photos, but obscenity is morally healthy a person will see in this composition no more than in a normal marital relationship.

An expanded multi-valued composition of pillows with appliqués is technically more difficult to execute, and there is a risk of running into flickering. However, these days, photo printing on fabric is affordable, and the images are durable and of the same quality that the texture of the material allows. So, when considering a multi-pillow group with pictures, first of all it is worth considering the option of photo printing on blanks, in the center in the figure, especially since you can select/create pictures and model the entire ensemble in advance on a computer.
Note: modern technology Photo printing on fabric allows you to create images that are visually equivalent to embroidery. Flaps with printed pictures can also form the basis of an applique, on the right in Fig.
Form and fragment
Majority good designers prefers to work with form, considering it the root cause of the expressiveness of things, and color, texture and design/pattern as factors of the next orders of magnitude. One-, two-, or three-tone sofa cushions, the aesthetic value of which is achieved by the form, can also be technologically simple (item 1 in the figure) due to the use modern materials, see below.

Working with form, it becomes possible to apply a new approach to meaningful decoration of a thing: modularity, poses. 2. Technologically, in this case, labor intensity only monotonically increases without the emergence of fundamental difficulties, because All modules assembled into the product are structurally similar and simple. But in such cases, you need to think about how to clean it, unless you want to completely redo it at least once every 1-2 years. A furniture vacuum cleaner and cleaning products for it are understandable, but it is necessary to use them less often.
The modular principle also allows, without a significant increase in labor intensity, to create sewn items of simple shape, in which the form nevertheless works for aesthetics. This is the so-called. patchwork technique; simply patchwork. Patchwork is not necessarily something deliberately rough, rough, or even tacky.
Decorative pillows Using the patchwork technique, it is possible to sew graceful and neat without painful thoughts and looking at samples/sketches until it hurts your eyes, poses. 3 and 4. You only need a key element (mainly in the center), which is in harmony with the overall design of the thing, but also stands out in some way. At pos. 3 this is achieved by a pattern of the same tone, but much larger than that of the elements of one diagonal and at the same time, naturally, smaller than the solid color filling of the squares of the other. And at pos. The 4th key, on the contrary, is distinguished by its shape, small size and relief (convexity).
Key element
In general, a compact key element(s) can add elegance to a pillow made in any technique. For example, at pos. 1 pic., the key is a simple button combined with a turn of scraps of fabric with a trivial black and white geometric pattern, right down to scraps of an old mattress. In case of using a brighter and more colorful material instead of a button, covered with fabric, Maybe, would be better suited button with round gathered bow, pos. 4.

At pos. 2 tassels and a button elevate pillows made of modestly colored fabric. This approach is attractive because it is possible to use furniture upholstery and even technical fabrics that do not get dirty easily, are easy to clean, but are not bright and shiny. And at pos. 3 is an example of how brushes add aesthetic value to a pillow with a pattern that is too small for this purpose. Perhaps the larger pattern somehow didn’t fit into the overall design, but the pillow still needed decorative self-sufficiency, so the brushes came to the rescue.
Note: a single brush on the corner of the pillow can play, without losing its aesthetic value, a purely utilitarian role, hiding the last seam, see below. In this case, it can be successfully replaced with a pompom. How to make a brush and pompom with your own hands, see next. Fig., but in general, you need to be careful with tassels and pom-poms as numerous elements of the main decoration of pillows, see below.

Lace, knitting and embroidery
All these methods of decorating pillows (see fig.) have in common that things, on the one hand, are labor-intensive and difficult to perform (unless ready-made lace or organdy is used). On the other hand, lace and knitted pillows on the sofa provide not only a magnificent aesthetic effect, but also respect with prestige: complex quality work speaks for itself. Moreover, all such things are cleaned and washed many times: people have been weaving lace and knitting for centuries; Both skills are quite adapted to washing much more harshly than in a modern washing machine with synthetic detergents.

In knitted ones sofa cushions there is one more advantage: they mask the last seam without any difficulty, see below. And, by the way, thanks to this same circumstance, knitted decorative pillows can be very simple to make if you sew them from old sweaters, as on the right in Fig.
About knitwear

Knitwear as a material for covering a pillow retains all the advantages of knitted items, incl. the ability to conduct a hidden facial seam. It also has its own special advantages. Firstly, the softness of the surface - wool sometimes “bites” the face, and knitting from mohair or down is more difficult. Secondly, accessibility: who hasn’t had to wonder what to do with the sweaters and blouses of a grown child? Stuff with holofiber (see below), sew up the armholes, embellish a little - and in an hour and a half a good one is ready original pillow from scrap materials, see fig. Will it fit in the living room? general design, but as a pillow for a nursery it will be quite in its place. You can also sleep on it without risking button marks on your cheek: you turn it over, and that’s it.
About embroidery on pillows
For those who know how to embroider, a pillow is a beneficial canvas in all respects, see figure:

If you want to embroider across the entire field, you will need a special frame-shaped hoop; the canvas in it is stretched (unfolded) harsh threads. Drawing, pattern - everything here is at your discretion and skill, but there are some features compared to embroidery of other things:
- There is no need to embroider with beads, it will be unhygienic and inconvenient. Any by known methods When cleaning pillows, it is impossible to completely remove dirt particles from the holes in the beads, and lying down on the beaded surface is also not very pleasant;
- Cross stitch: satin stitch embroidery under the head/body quickly gets dirty and slips, and wrinkles when washed;
- When embroidering across the entire field, make a continuous wide edging: it is just as easy to hide the last seam in it as in a knitted pillow.
Relief
Relief decor: fringe, bows, frills, puffs, intarsia, weaving, voluminous appliqués (stripes), quilting, etc., etc., see fig. – widely used for finishing pillows, because allows you to achieve stunning aesthetic effects. However, when starting your first (or next) masterpiece, keep in mind, firstly, that creating beauty using the “I want a lot of everything!” And more!”, is wrong in principle. You need to understand what you feel, what you want, and express it through the means available to you. Which do not necessarily have to be sophisticated and intricate.

Secondly, remember - you are not the trusted seamstress of the Marquise of Pompadour or the Countess deMoncero. The beauty you created with your own hands is unspeakable and you have to wash it once. And the point is not only whether this thing can withstand washing, but also whether the machine can withstand washing such a thing. Not so, the hour is uneven, you will have to master interesting ones, but not simple ways washing machine repair. The fringe with tassels can still be torn off and sewn on again, but for a stained, labor-intensive pom-pom pillow, it’s hard to think of anything better than throwing it away and making a new one. If you have enough spirit for it after such an opportunity.

However, dissuading people from striving for beauty is pointless, and even unbecoming. So about every case in Fig. Above are 2 ways to make roses from felt or cotton pads. If necessary, such flowers can be easily removed and then sewn on again. Or simply make new ones to replace worn ones.

And in Fig. on the right - advice about bows: take as a basis the same principle of laconicism, it will never let you down, and make simple bows so that they can be untied and tied for caring for the pillow. That pillow is made of burlap, but does it look good?
About buffs
Puffs on a suitable fabric, smooth and glossy, are another matter. When done correctly, they can be vacuumed and hand washed without any problems. And making all this splendor is not as difficult as it seems. First you need to learn how to read the diagrams for assembling puffs (assembling them, as sewing makers say).
As an example, diagrams for assembling simple puffs are shown in Fig. below. All puff patterns are built on an orthogonal-diagonal grid, the module of which (the side of the square) is 2-7 cm, depending on the size of the product and the density of the fabric. The grid in the diagram can be shown explicitly, as on the right in the figure, or its nodes can only be marked with dots, as on the left. The mesh is applied to the back of the workpiece with a textile marker in a mirror image.
Further, areas that are contracted (collected, assembled) into a buffer are marked either with converging arrows (on the left) or red lines (on the right), and those that are not contracted are marked with simple thin lines. The puffs can be assembled either with one thread or separately. The first method is for the lazy, because... a web of threads is formed from the inside. In any case, each puff is assembled with at least 3 stitches 4-5 mm wide, unless otherwise indicated in the notes to the pattern.

Then, the assembly sequence. It is produced in horizontal or vertical rows, again, unless otherwise indicated in the description of the pattern. In the case where the rows are indicated explicitly (on the left), they are displayed in numbering order and the buffs in the row are also assembled by numbers; here – Row 1 1-2, 3-4, etc., then Row 2 and so on. In the absence of an explicit indication of the rows (on the right), the puffs are assembled simply in numerical order; according to the diagram on the right - 1-2, 3-4, 5-6, 7-8, etc.
Try to collect in buffs according to these, entry level, diagrams, any scrap of fabric, and you will see that it will take little time, even if you put it together one at a time. And then watching a selection of master classes on making pillows with puffs that are much more spectacular and complex won’t seem like a nightmare:
Video: DIY buffalo pillows, master classes
About figurine pillows
The principle “You don’t need a lot of things! And simpler!” It is especially appropriate in relation to decorative pillows, which work aesthetically primarily through form. They are often sewn using patterns for soft toys, forgetting that a sewn cat does not know how to wash its own tail. And he will have to take on not only room dust, but also grease. Perhaps, especially when it comes to children's pillows, there are, so to speak, volley emissions of pollutants of biogenic origin.
In addition, they not only jump and ride on children's pillows; They not only fight and throw them around, they also sleep on them. And sleeping with your head askew, with your head slid to one side, is in no way beneficial to your developing skeleton. This especially needs to be taken into account when sewing a children's toy pillow; For example, we give the patterns in Fig.

On the left is a fish pillow. The shape and execution technique seem to have been chosen correctly: it is quite easy to care for, the last seam can be covered with a tail or fins. But the sleeper’s head may slide to one side, the shoulder will follow it and it will turn out that we are sleeping hunched over. The owl pillow, top right, is free from this drawback: the “ears” will hold. For those who toss and turn a lot in their sleep, it is better to place such a pillow with a deflection between the “ears” towards the neck; This pattern can easily be adapted for a cat pillow, only without the tail. In both versions, it is advisable to make the cut diagonal for better ergonomics as a sleeping accessory, see below.
Note: for children - irrepressible sleepy fidgeters - below right is a pattern of a special pillow on which the child automatically learns to sleep on his back or on his side, stretched out freely.
Pillows in the form of letters (see figure) have moved even closer from pillows to soft toys than pillows-figures: there are a lot of holes in them, where to sleep. It is believed that letter pillows are educational, developing, etc. Well, perhaps to coordinate movements and orientation in space, to climb between them large, like in a maze. As for the speedy learning of literacy, this has not yet been confirmed by science. However, no harm was noted from pillows in the form of letters, and the fun for the child is already a benefit for him.

Large letter pillows must hold their shape well and withstand the appropriate operating conditions, in relation to which small users show amazing ingenuity. One of the design options of this kind is shown in Fig.:

Foam rubber 45 is furniture foam rubber highest density; We’ll talk about what holofiber is below. Of course, other methods of sewing letter pillows are also possible, see for example. next video.
Note: diagram in fig. It is also suitable for stuffing bolster pillows, if it is desirable to have their ends rounded.
Video: do-it-yourself letter pillows, manufacturing option
About puzzle pillows
Pillows in the form of elements of prefabricated Puzzle mosaic paintings are also quite popular. It is believed that, if necessary, they can be assembled into a mattress. It is possible to collect something, yes, then yes. But anyone who has tried to sleep on such a mattress knows: it is impossible, it is crawling under you. Pillows, unlike puzzle pieces, are soft and pliable, otherwise you’ll end up with some kind of bunks instead of pillows.
Materials and technology
We will not expand on the fact that when sewing you need to give cuffs of 20-30 mm, iron them, sew from the inside out and then turn the product inside out, etc., which is well known. In this section we will talk about things that are not always known to beginning seamstresses.
Textile
To properly sew a pillow without a pillowcase that is comfortable, hygienic, practical and durable, you need to choose the right fabric. Firstly, dirt particles should not stick to its fibers so that they can be sucked out with a vacuum cleaner without the use of detergents. Secondly, the covering fabric should, as far as possible, prevent dirt from migrating into the padding, which is difficult to clean and change. Silk, satin, crepe-satin and their synthetic analogues satisfy these conditions of light, smooth and bright textile materials. Light but soft - calico, flannel and other linen fabrics. From rough, but very durable - any furniture upholstery materials. Also, depending on the style of execution, it is possible to use any technical fabrics, except, perhaps, propylene matting and the like - too slippery, but at the same time rough and harsh.
Warp and weft
When cutting a pillow, the orientation of the warp and weft threads of the fabric matters. Orthogonal (straight) orientation, when the warp and weft are oriented perpendicularly (along) respectively. sides, allows you to more accurately maintain the shape of the pillow according to the pattern. But, if the pillow is straight cut with sharp corners is filled with fairly dense material, its corners may be empty and sag, pos. 1 in Fig.

In pillows with a diagonal cut (the warp and weft are at 45 degrees to the sides), the corners will always be full, but a “waist” will appear that is larger than provided by the pattern, pos. 2. If the pillow is elongated, the thinnest “waist” will be on the long sides, pos. 3, which is not always desirable. In this case, the use of satin or twill weave fabric, pos. 4.
Padding
However, feather/down filling, firstly, is not elastic enough for decorative pillows; they are not fluffed like sleeping pillows, due to the rapid deterioration of the finish from such treatment. Secondly, small soft feathers and natural down for stuffing pillows are difficult to obtain. In the old days, the whole family collected feathers and down for years for the future bride for her wedding feather bed (an indispensable attribute of the dowry).
Nowadays, almost ideal stuffing materials for pillows have been developed - synthetic down and holofiber. In terms of hygiene, they are not inferior to swan's down; however, not for the lifetime of generations, but up to 7-10 years. On the other hand, the decor of the pillow no longer lives. But these materials have undoubted advantage: they are moderately elastic and retain this quality for years.

In essence, synthetic down and holofiber are the same material based on the finest tangled polyester fibers; This is the same polyethylene terephthalate (PET) that food utensils and bottles are made from. Synthetic fluff is produced in the form of fluffy granules (on the left in the figure), and holofiber undergoes additional molding and goes on sale in sheets (plates), on the right there.
Sheet holofiber holds its shape no worse than the best furniture foam rubber. By the way, in letter pillows (see above) you can make the entire base from it, but it will not be cheap: sheet holofiber is much more expensive than foam rubber, and the waste of material in this case is large. But where sheet holofiber is indispensable is in the manufacture of cloud pillows and other complex irregular shape: the workpiece needs to be trimmed with scissors, and then covered with fabric in place without a pattern.
Another filling material that is particularly suitable for baby pillows is rounded silicone beads. They don't get wet, that's it. Two - silicone granules can be poured into the case through an armhole only 2-4 cm wide, which greatly simplifies the problem of the last seam. Three - the cover from them can be emptied through the same armhole, and the granules can be washed manually in a basin. In a car - under no circumstances, it will fail instantly! Washed and dried silicone granules can be put back into the same case; the pillow will be the same as before.
Note: All of the above regarding the sanitary and hygienic properties of silicone granules does not apply to polystyrene foam granules that fill frameless furniture.
The last seam...
...he is the most difficult. You probably already guessed that this is the same seam that needs to be sewn up from the face when the pillow is already turned out and stuffed. It is usually recommended to sew in a zipper in advance for this purpose. In relation to, say, a bean bag or other frameless furniture it's really best option.

But the pillow does not have a bottom or a back, on which people never sit, sleep, or lean on them, and there is no point in waking up with the imprint of a fastener on your cheek under any circumstances. As for the stronger sex, a pillow with a zipper can cling to their mustache, beard and just 3-5 day stubble. The pillow stuck to the person harmonizes perfectly with the rumpled face, but only in a comic sense.
With knitted, knitted and embroidered pillows with piping there is no problem at all if the thread for the last seam is taken to match the material of the face: stitches of only 1-2 mm in this case are completely pulled into it and turn out to be quite durable. Good options are also a solid narrow textile edging in a color that matches the overall color, see picture, lace or ruffled border, trim, etc. However, the universal solution for the last seam is a narrow, 2-4 cm, armhole in the corner. Through it, you can stuff the pillow with synthetic down or silicone granules, and disguise the front seam with a brush or pom-pom. If necessary, synthetic fluff is pulled out in shreds using a crochet hook. At first, the silicone granules are simply squeezed out like paste from a tube, and the remainder is removed from the inside-out case.
About seamless pillows
Representatives of nomadic professions and residents of student dormitories from the pre-Khrushchev era have long been familiar with such things. A beautiful scarf allows you to make decorative seamless pillows in just minutes; the base can be either an ordinary pillow, a piece of foam rubber cut to shape, or just a wad of rags. How this magnificent illustration of the saying “The need for invention is cunning” is created is shown in the figure:

You can tie a curly knot or straighten its ends into a socket and grab it with threads; however, this would be a formal violation of the “seamless” principle. In this case, something like the rosette described above will also fit in the center.
In conclusion: form functionality
Quick navigation through the article
To update the interior of a children's room and make your baby's crib more comfortable, just decorate it with a couple of decorative pillows. We offer creative mothers to sew them with their own hands, because it is done quickly, simply and on a budget. The main thing here is to come up with interesting design and choose the right materials.
In this article, we have collected 30 inspiring photo examples of children's pillows for beginners and experienced craftswomen, and also prepared 3 step-by-step master class for DIY sewing:
- Toy pillows in the shape of a cloud.
- Letter pillows.
- Patchwork style pillows.
- Combine different pillows with each other to make the interior more fun. The composition can be united by the shape, color or print of the products. When selecting fabrics, it is easiest to focus on the colors and patterns of the wallpaper, as well as the rest of the textiles in the children's room. For example, pillows can match curtains, sofa upholstery and, of course, a blanket.
- When coming up with the style and decor of the future product, take into account the style of the interior. If, say, for modern interior You can sew bright toy pillows, but products of calm colors and traditional styles in the form of bolsters and pillows with ruffles or tassels, as in the photo below, are more suitable.


- To sew children's pillows, it is advisable to use natural and dense fabrics (linen, cotton), which are much easier to wash, say, felt, and look much more beautiful than synthetics like fleece.
- Before sewing, you should wash and iron the fabric, then you will sew taking into account the shrinkage of the material.
- It is clear that children's pillows should be washed often, but how to wash decorative pillows that do not have pillowcases and must always retain their shape? We recommend using the following as a filler for children's scops owl toys and soft bumpers:
- Sintepukh (not to be confused with padding polyester);
- Holofiber.
These materials are hypoallergenic, hold their shape well after washing, and can be washed in washing machine at low temperatures even with spinning. Unfortunately, synthetic winterizer, natural down, buckwheat, batting, foam rubber and other fillers do not have such properties.
- If you want to make a decorative and sleeping pillow at the same time, for example, a bolster or bumper for a crib, then it is recommended to sew not just a pillow, but a bedspread with a pillowcase. After all, removable pillowcases are much easier to wash; besides, by sewing one pillowcase and a pair of matching pillowcases, you can update the interior according to your mood.
Master class No. 1: Sweater cloud pillow
As you know, the world of children's interiors has its own trends, and cloud-shaped pillows are at the peak of popularity. They are good because they are easy to sew, look cute and are suitable for decorating the room of both a boy and a girl. In this master class we will tell you how to sew a soft cloud with your own hands from any sweater in a pleasant color.

Materials:
- Sweater (preferably made of polyester, not acrylic. By the way, instead of a sweater, you can take an old cotton sweatshirt, T-shirt, etc.);
- Synthetic fluff;
- Sewing supplies;
- Sewing machine (if you have one);
- Paper for making patterns.
Step 1. Draw a pattern on paper in the form of a cloud or any other shape that you like.

Step 2. Turn the sweater inside out (!) and attach the resulting template to it (including the back layer of fabric) using pins as shown in the photo. Then we outline the outline of the cloud and begin to cut out the blanks with an indentation of approximately 0.7 mm (for allowances).

Step. 3. Now we begin to sew the two parts of the pillow along the previously drawn outline, but be sure to leave about 10 cm unsewn.
Step 4. We make cuts in the places where the cloud is rounded and in the corners - this will make the shape of the pillow neater and more correct.
Step 5. Turn the pillow inside out and stuff it tightly with filling, helping yourself, for example, with a Chinese chopstick. Finally, close the opening with a blind stitch.

Woo-ala! The baby pillow is ready!

Based on this master class, you will be able to sew pillows of various shapes and colors. For example, a cloud can have arms and legs, beady eyes and rosy cheeks made of felt.


Instead of a cloud, you can sew a star, a raindrop, a moon, a heart or a candy. See the following selection of photos for examples of such pillows.


Master class No. 2: Letter pillow
And now we propose to sew another simple but original letter pillow, which will help to personalize a nursery or a bed, if, for example, there are more children.

Materials:
- Textile;
- Synthetic fluff;
- Sewing supplies;
- Sewing machine.
By combining 3 types of fabric, you can use leftovers and make your pillow design more fun.

Step 1. Select a letter, draw it (or print it in A4 format) and cut it out along the contour.
Step 2. Now we need to cut out two parts of the pillow - the front and the back.
- To cut out the front part of the pillow you need: on the fabric lying front side up, put our template also face up, trace it and then cut out the blank.
- To cut out the back side of the letter you need to do everything the same way, but first turn the template “wrong side” up, that is, according to the principle of mirror reflection.
Step 3. Now you should prepare the side of the pillow.
- Its length should be equal to the perimeter of the letter + 2 cm for allowances. You determine the width of the sidewall yourself, for example, it can be 4 cm, then taking into account the 2 cm seam allowance, the width of the workpiece will be 6 cm.
But since you most likely won't be able to cut a single strip of fabric, you will need to cut several strips of the same width and stitch them together so that you end up with one strip of the desired length.

Step 4. Sew the side panel to the first letter. To do this, we fold them facing each other and begin to grind along the entire perimeter of the workpiece.
- For convenience, the side strip can be attached with pins.
We repeat the same procedure with the second half of the pillow, but leave a small section unfinished.

Do you like to make accessories for interior decoration? You can do original Patterns It's easy to use ready-made ones or build your own. Interested? Read on to find out how to do everything.
Tools and materials
Use the list below to gather everything you need to make your own pillow toy:
- patterns;
- paper, pencil, scissors;
- material for base and decoration;
- filler (sintepon, holofiber, fabric scraps);
- pins, chalk;
- threads with a needle;
- sewing machine.
If you do handicrafts, you have all this at home.
DIY pillows for the sofa (toys): patterns
The photographs in the article clearly demonstrate how cute and original homemade accessories for sofas look.

There are several technologies for manufacturing such products:
- Regular square or round form supplemented the necessary details(ears, tail, muzzle).
- Two parts of a complex contour in the form of the corresponding animal are sewn together.
- A volumetric soft toy big size, comfortable to rest your head on.
Options are presented by degree of complexity. So if you are a beginner, choose the first method. For advanced craftswomen Any will do method.

If you decide to take a ready-made sample, you just need to print it to the desired scale. If the template does not fit on an A4 sheet, you will have to glue it in two parts using tape.

We present to your attention the easiest template that even a schoolgirl can use to complete the work. You need to cut out two mirror parts from the fabric, sew them on the wrong side, leaving a hole, turn them inside out, fill them with padding polyester and sew them all up with a hidden stitch.

The next template is made in the same way, only the final step is to make the tail as a separate part and sew it to the base.

You can add a muzzle to any of the previous templates, the details of which can be easily used from the pattern previous section. The owl shown in the figure below is also performed in the same way. All small parts are attached with front side one of the base parts. If you make them from fleece, they can even be glued on last.

These are such simple, and at the same time original, pillow toys you can make with your own hands. Patterns (photos below) of dogs and bones will allow you to make an interesting composition for your sofa.

The collar can be easily decorated by tying finished item satin ribbon or braid. The pattern of the bone shows the cuts that should be made after sewing the seams from the inside out, so that it is more convenient to turn the product inside out and the fabric does not warp.


Even if you choose the simplest pattern option, using bright fabrics or a variety of textures will turn out to be quite spectacular.

So, you have seen that you can easily make toy pillows with your own hands. The patterns selected in the article are very easy. Even a beginner can handle such templates.
IN modern stores furniture sells a myriad of different items for decorating sofas, beds and rooms in general. But why buy a finished product if you can make it just as well yourself? Hand-sewn decorative pillows are an indispensable piece of furniture in any home. The number of design options is endless, and the pleasure from the work process is immeasurable.
Like any other type of handmade, the process of creating a pillow begins with preliminary preparation. Before you start work, you must decide on the design future crafts and, starting from the concept, select everything necessary to implement your idea.
Choosing fabric
Fabric is the most important component of our future creation. Her choice must be approached with complete seriousness and responsibility. It should not only be beautiful, but also pleasant to the touch, so that you can admire your product and enjoy the sensations of touching it.
In fact, there are virtually no restrictions in the choice of this material. The main thing is that it is pliable and does not create problems in work. And, of course, it should look impressive and be of good quality.
If you are unable to decide on a design in advance, you can simply go to a fabric store, look at the product, dream up your imagination, and you will definitely come up with a couple of brilliant ideas for certain materials, which you will immediately purchase.
You can sew a decorative pillow with your own hands from furniture upholstery, linen and cotton fabrics. In some cases, even knitwear works well, but you need to be very careful when working with it. Canvas and denim will also come in handy. And from felt and fleece it’s possible to create very soft, cute crafts that will delight you for a long time.
Alternative materials
Don't be afraid to use unconventional approaches. For example, like this unexpected material, like fur, is an excellent basis for creating very stylish and unusual interior items. And it’s good for work old fur coat both with long and short pile.
Any old things are perfect as a base. In this case, you won't have to spend money. You can make something beautiful out of pieces of clothing that you've already written off.
If you know how to knit, feel free to use your talent to create decorative pillows with your own hands. It doesn't matter what technique you have. And the material used is both standard threads and strips cut from clothing, connected into a continuous ribbon.
Remember important detail. During work you will have to combine different variants fabrics. It is very important that you use materials that have a similar texture. Under no circumstances combine stretch models with those that do not stretch, otherwise, after the pillow is stuffed, it will not be able to keep its shape correctly and will become severely skewed.
Entrails
The padding of a product is no less important than its shell. Remember right away important rule: Do not use regular cotton wool for this purpose. It quickly bunches up into a ball, which is why the pillow is greatly flattened and loses not only its attractiveness, but also its comfort.

Fibertech and synthetic fluff are also ideal. Their uniqueness lies in the fact that they are able to maintain their volume for a long time and not get lost.
In addition, these materials are hypoallergenic, so they can be used for any room, including a child’s room. They will retain their quality even after you wash the product.
Additional funds
You will also need foam rubber for your work. It is ideal for pillows called bolsters. It is produced different thicknesses, and this allows you to choose the best option for a particular craft.
If you don’t want to spend money on filling, use fur and shreds cut from old clothes. Please note that pillows with this material are not always neat. Although if you are planning to make a floor accessory from hard fabric, this option may well suit you.
Those who do not want to sew decorative pillows with their own hands can buy a ready-made accessory, and then simply create a pillowcase for it with the desired design. But in this case, your options in choosing a shape will be limited, since ready-made interior items of this type are most often only square and rectangular.
Deciding on the decor
When choosing the design of a future craft, the main rule to follow is this: don’t hold back your imagination. You can create any craft you want. Some models require less effort and time, others more.

There are the most different kinds decorative pillows. You can make an accessory of any shape and color, decorate it with any accessories you like. Many needlewomen use ribbons, braids, cords, buttons, sequins, buckles, lace, beads and other various accessories to create unique designer crafts.
You can also make some design elements yourself. These include, for example, beautiful appliqués, cute bows and luxurious flowers. In addition, in your work you will need fabric paints to apply designs on the product, and embroidery.
Choosing threads
When you make decorative pillows with your own hands, correctly selected threads play no less important role than other materials. They should work well with your fabric, match the color and be of sufficient thickness.

You will also need floss and knitting accessories to create beautiful seams and such individual elements, such as tassels decorating the product.
Preparing the tools
To make your fantasy come true, you cannot do without needles, scissors, and crayons. The last element is needed in order to transfer patterns of decorative pillows from paper to fabric. Instead of crayons, we also use soap, markers, pencils, pens and any other tools that can draw on our material.
If you plan to use knitted elements, do not forget to prepare knitting needles or a suitable hook. If you want to embroider something, take care in advance of a hoop, special fabric and threads.
A sewing machine will also come in handy. But if there is none, it’s not scary. Decorative pillows for a sofa can be made just as well by hand, although it will take more time.
WITH preliminary preparation We figured it out, now let's get down to business. Let's look at several master classes on creating this accessory.
Hexagonal pillow with tassels
This model is made using the patchwork technique, which is based on working with various fabric flaps. You can choose two main tones that will alternate with each other. Or make multi-colored sectors. The main thing is that the composition looks harmonious and pleases the eye.
First, cut out 12 triangles of the same size from the fabric. To make the work process more convenient, first sketch out the shapes on paper and then transfer them to the base material.
The design of decorative pillows of this type resembles an umbrella. Lay out two such hexagons from the finished fragments. These will be the top and bottom parts of the craft.

Sew the triangles of each half together, and then connect the sides, placing them with their front surfaces facing each other. Do not forget to leave a small part of the craft unsewn, so that you can then turn the product inside out and stuff it.
After filling the pillow with padding polyester or other selected material, close the free hole. Sew buttons in the central part of both sides, connecting them all the way through. Thus, depressions should form around them. Pre-glue their caps with fabric. Now decorate your creation with a tassel. This concludes your work on this accessory.
Knitting pillows
A decorative crochet pillow is the simplest product that can be crocheted. Even a novice craftswoman can cope with this task. Any type of yarn is suitable for creating this craft.

If you plan to combine several types of thread, make sure that they are the same thickness. You can achieve uniformity of the pattern and ensure that the surface of the accessory is smooth.
pillows, crocheted, look elegant and sophisticated. They fit perfectly into the interior of any room. If you want, make your creation monochromatic or, conversely, variegated. Decorate it with the simplest or most intricate patterns and designs, sew on voluminous flowers.
Don't be discouraged if the first craft made using this technique doesn't turn out perfect. Over time, you will get better at it and create products of incredible beauty. To begin with, try the most simple options, knitted using regular chain stitches and double crochets.

Buffs - what are they?
Decorative pillows, a master class on the creation of which is presented in the article, can be not only elementary in execution, but also very complex, even intricate. These techniques include buffs.
They look luxurious both on the bed and on the sofa, and can delight even a person who is not into hand-made things. But the technique of working on them is very painstaking and requires a lot of patience.

How are these decorative pillows sewn? Buffs, the schemes for the creation of which form the basis of the work, are carried out according to the following principle. Connections of specific points are marked in advance on the fabric, which are then fastened together and form beautiful folds. Shiny materials like satin are best for these crafts. The size of the workpiece should be approximately twice the desired parameters of the finished product.

Principle of operation
Cut about a meter of thread, thread it through a needle and tie. Then insert the needle into the top point of the first marked segment. Pull the second top and connect them with two tight knots.
Without cutting the thread, move to the next fragment and do the same operations with it. Process the entire workpiece in the same way. It will be top part pillows. Connect with the bottom fragment. Place the finished cover on the pre-sewn regular pillow and enjoy the result of your labors!
 (1 ratings, on average: 5,00 out of 5)