How to connect another light bulb from a light bulb. Connecting a chandelier to a double switch: work procedure and examples
Connecting a chandelier to the lighting wiring is an integral part of any renovation, both in an apartment and in a separate room. And although this operation is associated with work in electrical circuits, absolutely anyone can cope with it. You just need to comply certain rules, and then the work will be done quickly, efficiently, and the question of how to connect the chandelier correctly will not arise.
Primary requirements
The most important requirements when working with electrical wiring are compliance with safety rules and rules for installing electrical devices. There is no point in studying the “bible” of electricians: “Rules safe operation electrical installations of consumers" (PBEEP) and "Rules for the construction of electrical installations" (PUE). Such documentation is necessary mainly for those people for whom working with electricity is their main activity. For home renovation To connect a chandelier with a switch, you just need to know and follow simple rules.
- Rule 1. All tools that will be used to perform work on electrical wiring must have high-quality insulation of the handles.
- Rule 2. Most work should be performed only on de-energized wires. It is not enough to flip the light switch. To completely cut off the power, there is a main switch on the apartment panel, which must be turned off before starting work.
- Rule 3. The light switch is mounted exclusively in the break of the phase wire.
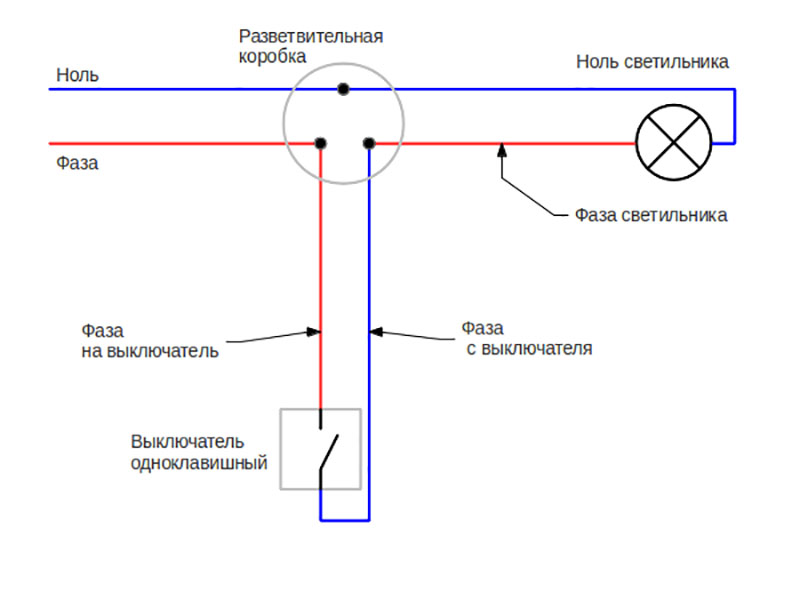
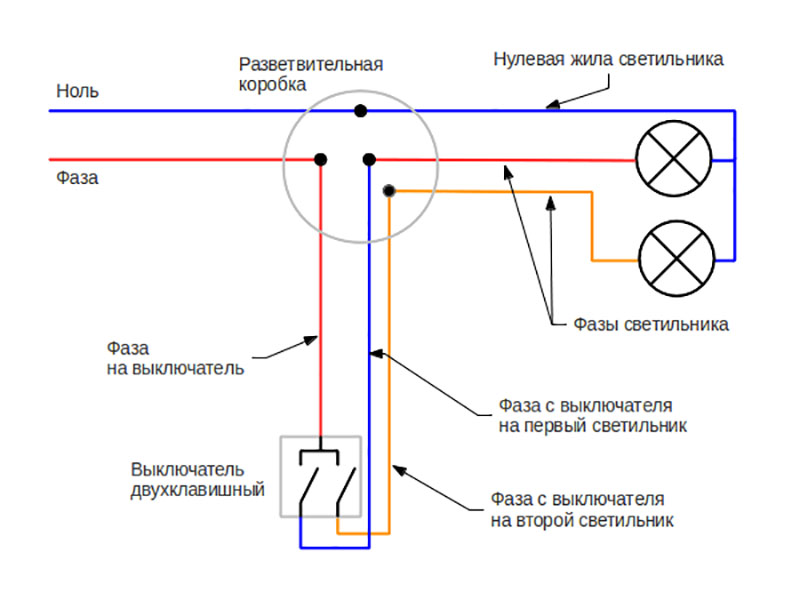
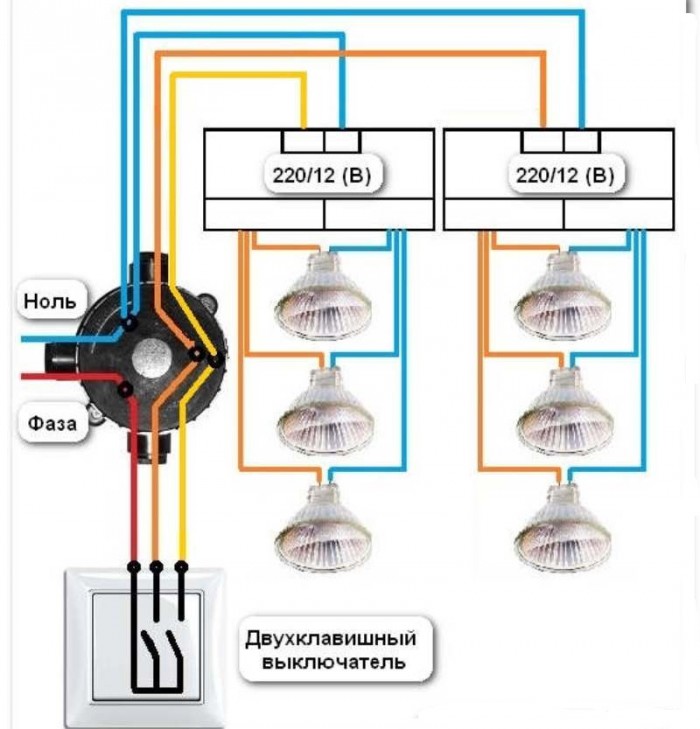
Wiring diagram for a chandelier with a double switch
As can be seen from the figure, there are three wires suitable for the double switch, one of which comes from distribution box, and the other two are used to connect the lamp. Therefore, when installing new wiring, you need to use a cable with 3 wires.
Connecting the chandelier to double switch is carried out according to the same rules as connecting a conventional lamp.
What are the risks of polarity reversal?
Quite often you can hear from non-professional advisers that the switch can be installed on any wire. Like, what difference does it make, because when the contacts are open, no current flows through the lamp and that’s enough. This is wrong. The fact is that if the switch breaks the neutral conductor, then no current will flow through the chandelier lamps, but there will be a phase potential on all wires, which threatens an electric shock during work.
A less dangerous, but unpleasant feature of such switching is fluorescent lamps and housekeeper lamps may glow dimly or flicker even when turned off.
Tool
To connect a chandelier or other lamp you will need the following:
- Straight and Phillips screwdrivers;
- Side cutters;
- Pliers;
- Sharp knife;
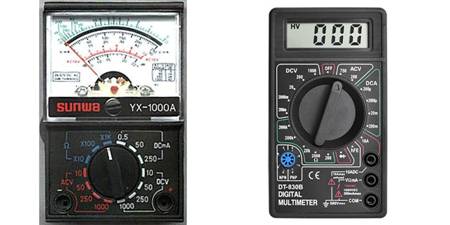
- Measuring instrument, digital or pointer;
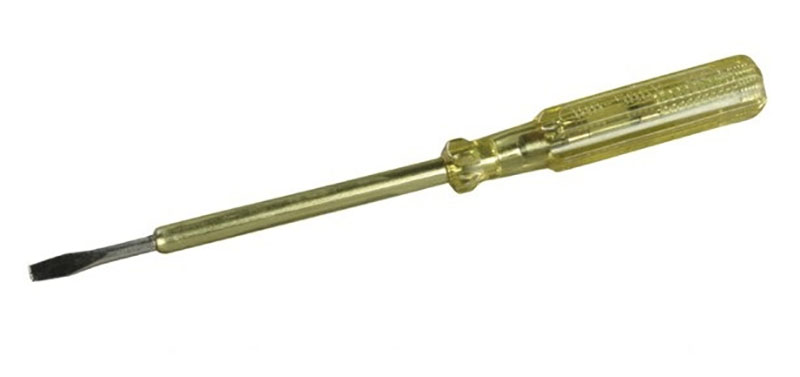
- Indicator screwdriver (probe);
- Insulating tape.
The purpose of most tools is clear without comment. Why do you need a knife? In some cases, namely when stripping insulation from single-core conductors electric cable, side cutters or pliers cannot be used, since a transverse cut of the core on the connected wire will lead to its fracture. This is especially true for aluminum wires.
Insulation needs to be cut sharp knife just like sharpening a pencil. Longitudinal scratches on wire strands are not dangerous.
The indicator screwdriver is used to search for the phase conductor. And although its end provides the possibility of using it as a screwdriver, this is not necessary, since the mechanical strength of the indicator is very low and it is almost impossible to tighten the screw normally without breaking the tool (it is possible, but the tool will not last long).
You should dwell in more detail on measuring instruments. They are digital and pointer. For most parameters, digital is preferable. They have high accuracy, are not afraid of shocks and falls from heights, and are protected from overload.
The pointer device should be used only in the position for which it is intended (most portable devices should be placed horizontally); a fall from a height will with a 100% probability disable it, as will overload if the regulator is incorrectly set. The undoubted advantage of a pointer device is that voltage measurements can be made without a built-in power source.
Note for all types of instruments: the operating range must include measurement AC voltage not less than 500 V.
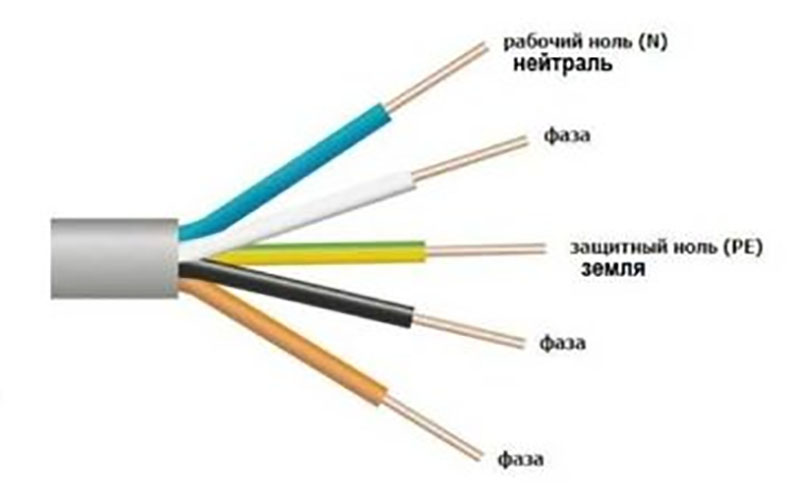
Wire marking
To facilitate the continuity of wires and eliminate errors, it is used color coding insulation of conductors in the cable. The generally accepted standard is the marking of the grounding conductor yellow with a green stripe.
You should never use a conductor with this color to connect devices! This conductor is used for grounding only.
For the zero (neutral) conductor, conductors with blue or light blue colors are used. Phase conductors may have different colors other than those listed.
Problems arise when working in houses with old wiring. Once upon a time, the insulation of wires was made the same for all cores, so before starting work it was necessary to test the wires.
Wiring continuity
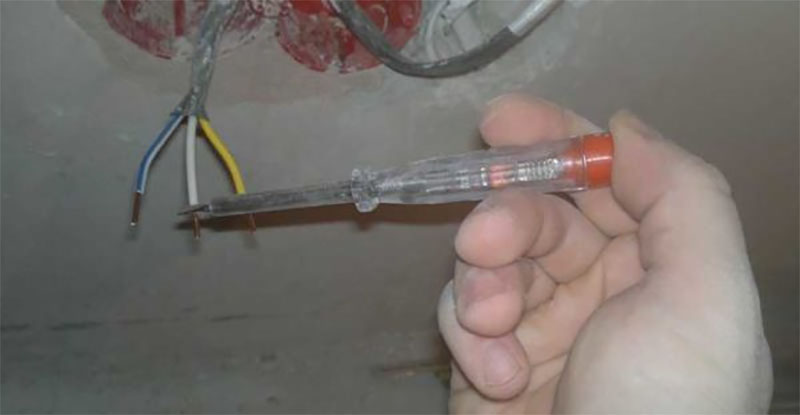
First of all, you need to check that the switch is connected correctly. In the open position, the indicator screwdriver should show the presence of a phase on one of the conductors. If the phase cannot be found, this means that the switch is not connected correctly or there are problems in the distribution box.
In the place of the ceiling where the lamp will be installed, there must be at least two wires coming out - neutral and phase from the switch. When connecting a multi-arm chandelier, the number of wires may be large. One of them remains neutral, the number of others corresponds to the number of keys on the switch.
Using the indicator
Determining the purpose of each wire is very simple. When the switch is on, only one of the wires should not have voltage. The rest should cause the indicator to glow. By turning off the light switch keys one by one, you can determine which wire corresponds to a particular key.
Using a voltmeter
When checking measuring instrument you need to find a wire relative to which voltage will be present on the other wires. This wire will be zero. The device will show no voltage between the remaining wires. Next, leaving one of the device probes connected to the neutral wire, turn off the switch keys one by one to determine the identity of the wires.
Connecting wires
Connecting the luminaire wires to the lighting wiring can be done by soldering, twisting and using special adapter terminal blocks.
Soldering is the most reliable method, but it is quite difficult to do it at height in the limited space between the base of the chandelier and the ceiling. Therefore, this method is practically not used.
Twisting can only be used when twisting conductors of approximately the same diameter. Single and multi-core wires must not be twisted together.
Such a connection forms an electrochemical couple and, in the presence of even traces of humidity in the room, quickly oxidizes, causing a breakdown in contact and heating the joint. Most fires are caused by poor wiring connections.
The twisted area must be carefully wrapped with insulating tape so that the tape touches the insulation of both wires being connected. It is better to use special insulating caps.
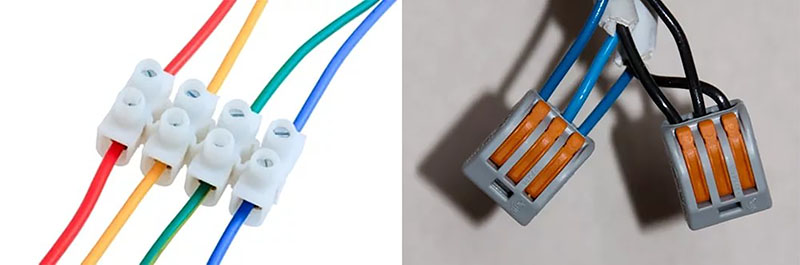
The most optimal connection method is to use connecting terminals. You can find a wide variety of terminal types on sale - from simple screw terminals to spring terminals.
What to do if the type of switch or chandelier does not match the required
It may happen that old chandelier had several groups of lamps and turned on from two-gang switch, and after the repair it was decided to install a conventional single-horn one. Or vice versa, instead of a simple chandelier, a multi-arm chandelier was installed. How to properly connect the lamp?
There are more keys than conductors in the chandelier
If more wires come out from the double switch (and from the ceiling, respectively, to the chandelier) than are necessary to connect the chandelier (most often - four, one of which is grounding), then the most radical way is to replace the switch and leave some of the wires free.
Or you can connect a simple chandelier to a double switch. You can combine the wires coming from different switch keys. The connection can be made on the ceiling in front of the chandelier connection block or in the switch itself (in this case, the second wire to the chandelier must be left free). Then the chandelier will be turned on by any key, and to turn it off you need all the keys to be in the off position.

The number of keys is less than the number of conductors in the chandelier
If you do not repair the wiring, then connecting a chandelier with two arms or more to two wires is possible in only one way - by combining all separate groups of lamps into one.
IN as a last resort If the wiring allows, two switches can be used.
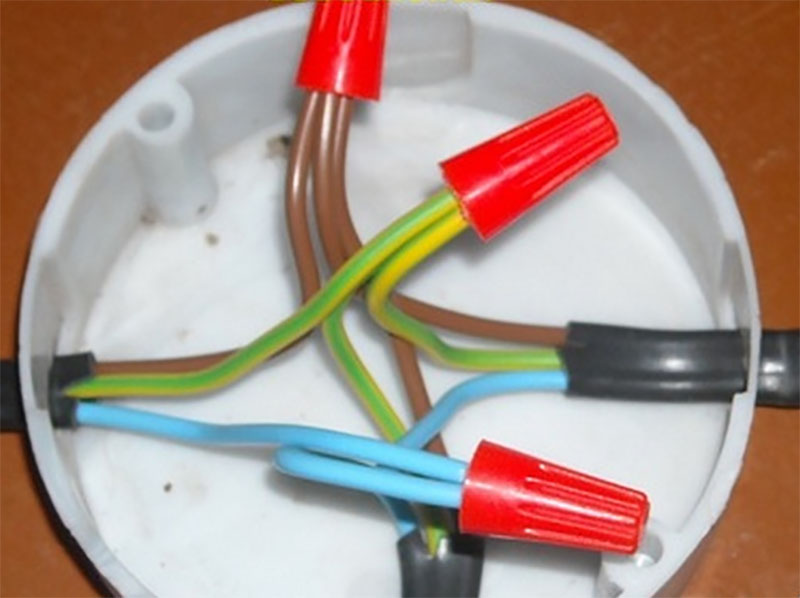
When connecting the wires inside the chandelier using twists, you must carefully insulate them. Installation is greatly simplified when using special terminals. The most common are Wago terminals.
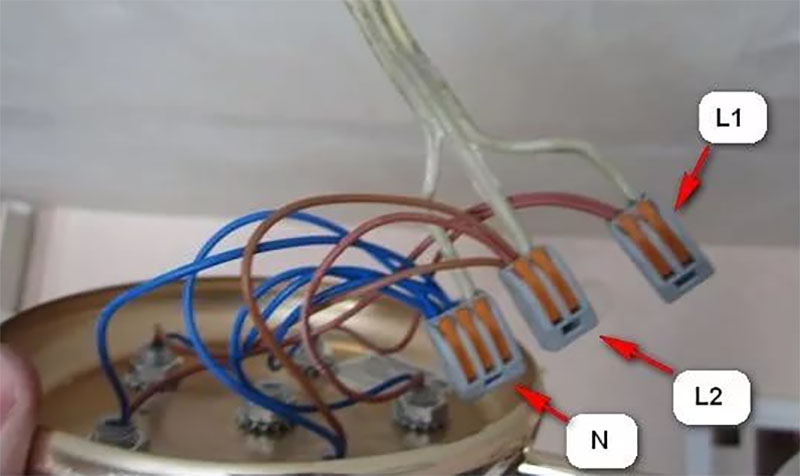
The figure clearly shows that the wires connected together of blue color connected to the neutral wire, brown wires divided into two groups - to separate wires from the two-key switch.
When connected to one switch, they are also connected in parallel.
Using Grounding
New buildings to comply existing standards must be equipped with electrical wiring with grounding conductors. As already mentioned, such wires are marked with yellow-green colors. In this case, for a chandelier with two groups of lamps, 4 wires will come out of the ceiling: grounding, neutral and two phase, from the switch.
On lamps with metal parts A ground terminal is usually provided. Therefore, when connecting a lamp, you must also remember to ground it to the chandelier. If there is no ground terminal, the ground wire does not need to be connected. You just need to insulate it and hide it under the lamp body.
Before you begin connecting the light bulb, you need to prepare and purchase basic set tools and materials that will always be at your fingertips:
- Electric chuck;
- Lamp;
- Cable of the required length;
- Electrical plug;
- Insulating tape;
- A sharp knife for stripping veins;
- Screwdriver.
Work should begin by searching for the source of electricity closest to the installation site of the light bulb. Connecting directly to a functioning electrical wiring would be completely impractical due to its internal location. A working, used outlet can be an excellent source.
- Having previously exposed and stripped the wires at the end of the wire, insert them into the inlet hole of the cartridge and secure it with terminals, thus connecting the cartridge to the wire on one side;
- The plug, which will subsequently be inserted into the socket, is connected to the other side of the wire. To do this, unwind it, carefully insert the stripped conductors, secure it with terminals and tighten it;
- Wrap thoroughly with insulating tape open spaces On the wire. Your safety will depend on how well this is done.
- Screw the light bulb into the electric socket until it stops, but using moderate force;
- Plug the plug into the socket and if the light comes on, it means you did everything right. Thus, you have created a closed area electrical circuit, ensuring contact between all its components.
All very popular in Lately Halogen lamps began to be used. And it’s not surprising, because the incandescent lamps we are used to provide almost 2 times less light than halogen lamps. In addition, the latter are more durable and, due to the variety of colors and shapes, are more aesthetically attractive.
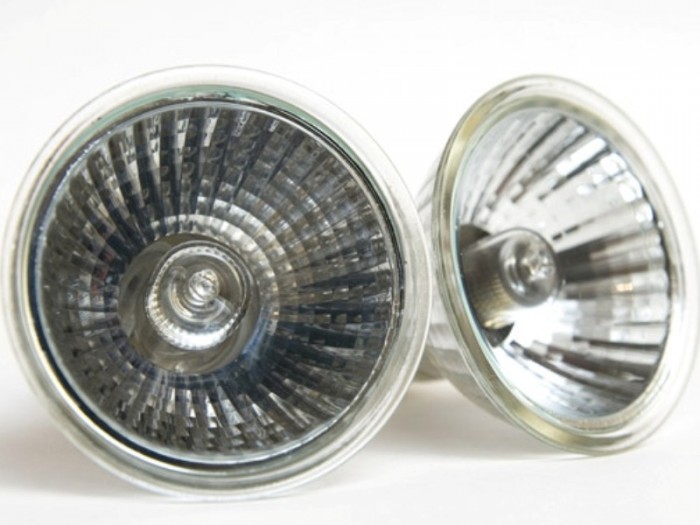
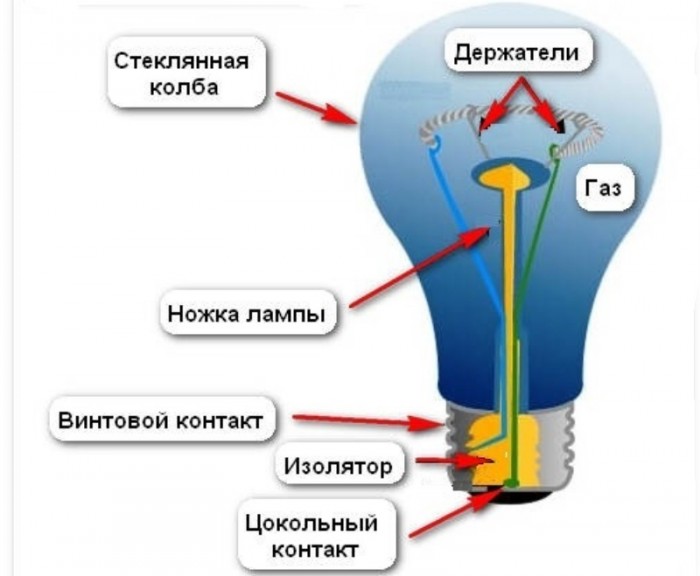
However, their main structural difference is the gas present inside the lamp.
Halogen lighting sources are divided into three types:
- Universal;
- Low voltage;
- Mains voltage.
Of these three types, only universal light bulbs are connected via a transformer. Low voltage and mains voltage have a built-in transformer, so they do not require additional elements, you just need to connect them to the network. In this case, the lamp power should not exceed the power specified in the instructions for the lamp in which they are installed.
Since low-voltage lamps are connected similarly to incandescent lamps, we will not dwell on them, but will consider in detail another connection method - through a transformer.
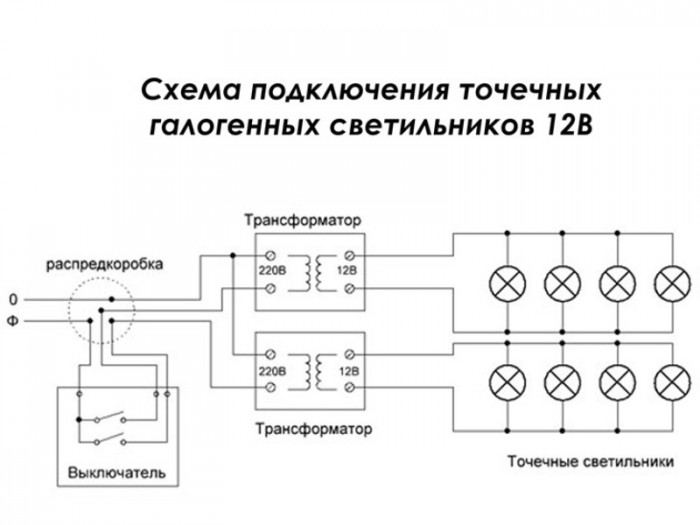
In this case general power All lamps powered from a transformer must not exceed its rated power.
But what to do if the sum of the powers of all lamps exceeds maximum power transformer? The way out of this situation will be partial connection of lamps, the total power of which will be within the normal range. You may need to purchase one or more additional transformers, the number of which directly depends on the number of light bulbs.
For example: a lamp contains seven lamps of 35 Watt each, but the transformer is designed for only 150 Watt. Thus, only four light bulbs can be connected to it, and the second group can be connected to another device.
The other side of the issue is that in technical specifications transformers is also indicated as a minimum permissible load. Thus, it is prohibited to connect a light bulb whose power is lower than this indicator.
Every house, every apartment has lighting equipment, a chandelier. The connection diagram for a chandelier with a double switch will tell you how to install it correctly. Similar difficulties arise for residents when they need to install a new lamp or an old one after renovation or moving. Connecting a chandelier to a switch with your own hands is not difficult. Everything needs to be sorted out.
- Preparing for work
- How to connect a chandelier?
Preparing for work
To connect the chandelier you will need a set of tools:
- voltage indicator or tester;
- pliers:
- insulation tape:
- terminal block for three terminals.
You will need to place a stepladder or a stable and reliable support under the lamp.
Open the passport for your lighting device. There should be a connection diagram and all the batteries, their purpose, and connection method should be indicated. According to the standard, conductor insulation is marked in the following colors:
- phase - brown or white;
- zero - blue;
- grounding - yellow-green.
How to connect a chandelier?
The chandelier is mounted in the central part of the ceiling. Completed different set lamps, from three or more. The switch for a chandelier with a set of lamps of more than six must be double in order to start it in stages, changing the lighting from minimum to maximum.
To properly connect the chandelier to the switch, you will need to deal with the wires. Which of them are phase, supply and zero. A voltage indicator will help you identify them. You should turn on the keys of the double switch and bring it to the stripped ends. If it lights up, then this wire is phase, and if not, it is neutral. It is not recommended to focus on the color of the insulation; the phase should be determined only with an indicator. Mark the found phase conductors with a marker.
If there is no voltage indicator, you will have to remove the cover from the double switch and look at the connection. One wire coming from the input circuit breaker, supplies voltage to our double, others will come from its contacts. Zero is pulled from the junction box.
There are 3 wires hanging from the ceiling where the lamp is supposed to be installed. You should find out which of them are nourishing and which is neutral. We turn off the automatic start and completely turn off the power to the apartment. We use a knife to remove the insulation from the ends up to about 1 cm. If the wire is not monolithic, but consists of several thin wires, it needs to be crimped with a tip. We separate the veins in different directions and mark them with a marker.
Connecting the lighting fixture
How to connect a chandelier with your own hands, having completed the preliminary preparatory work? Each light bulb is connected by two wires. They are laid in the so-called shaft. The color of their insulation is different, since one connector is phase and the other is neutral. Let's say the first one is red and the second one is white. Each lighting fixture can have its own colors. It is important that phase and zero have different shades. We divide the light bulbs into two groups. We clarify that one of them will be connected to one contact of the double switch, and the second to the other.
We connect the phase, red, conductors first in one group, then in the second. Then we do the same with zero, white ones, in a row, crimping the ends. The result was three twists. Two s phase wires from two groups and one common large twist with neutral wire. To ensure reliable connection, you can use terminal blocks. We secure the wires to them using terminal bolts. The twist must be reliable, otherwise the connection may heat up and oxidize, which can break contact.
And finally, we connect our chandelier to the wires located on the ceiling. Phase wires lighting fixture to the corresponding ones on the ceiling and zero similarly. We remove the shades from it to make it easier and hang it on a hook. After final installation and connection of the lamp, we start the machine on the panel, that is, we apply voltage and check our work to see if the chandelier is connected correctly.
When you press one switch key, the first group of lights should light up. Press the second key and the lights of the other group should light up. This is how the chandeliers are connected to the double switch.
Luminaire with ground wire
A chandelier with a metal body requires grounding, according to the standard. All electrical networks in homes, power and lighting, must be grounded. IN modern homes A special wire is laid, it has a yellow-green color. If you have new flat, then it will be enough to connect the grounding wire of the illuminator with a similar one in the room using terminal blocks or twisting.
If the house is old, then after connecting the phase conductors, the grounding wire of the chandelier with metal body should be isolated.
Safety requirements
Working with electrical appliances, you need to be extremely careful and careful. When making connections, you must make sure that the switch is turned off and there is no voltage at the ends of the conductors. Twisted wires must be separated using insulation tape. If you are unsure of your capabilities, do not take risks. It would be safer to entrust this work to a master.
 (1 ratings, on average: 5,00 out of 5)

