Baby bed frame. Technology of manufacturing a metal frame for a bed. bed base
Ready-made beds are quite expensive, and if you choose some unique model, its cost can be simply prohibitive. Not everyone can afford such luxury, but many people want to have exclusive pieces of furniture at home. If you are also one of these, pick up the tools and start assembling the bed frame with your own hands.
In our article, we will tell you how to make a unique and very reliable bed yourself. A piece of furniture has a non-trivial look, and you do not need unique carpentry or carpentry skills. Your basic skills will be enough for you and regular set tools.
Assembled by yourself wooden bed is not only exclusive, but also very economical furniture.
Required Tools

For work, you may need the following tools:
- Miter saw;
- roulette;
- hammer and nails;
- square;
- pencil;
- roulette;
- drill and screwdriver;
- rubber mallet;
- clamps;
- saw goats;
- socket wrench with heads.
Preparatory work
First, decide what size mattress you need. Of course, everyone dreams of a large comfortable bed, but most often you have to be content with what is available. The mattress is single, double and one and a half. Having chosen the option that is optimal in all respects, get to work.

For example, consider the manufacture of a bed frame for a mattress in such popular sizes as 2000x1800x220 mm. This mattress is enough for two people of average build.
First of all, pay attention to the selection of material for the future frame. If you want to make a wooden frame, pick up quality material properly finished and free from any noticeable defects.
Wooden bed frame
First you need to mark and saw the boards, not forgetting to take into account inner dimensions frames that must match the selected mattress. If you have never experienced anything like this, you should follow our professional recommendations. Having certain skills, you can change anything at your discretion.
It is necessary to prepare a drawing of the future bed, indicating the exact dimensions of all the details. The drawing below is suitable as a basis. You can change any dimensions by adjusting the frame to fit your mattress or room dimensions.

Preparation of structural elements
The cut lines must be distinguished as accurately as possible along the ruler using a cutter. To make the same type of parts perfectly identical, cut out one part first, and then use it as a template. It is better to take glued blanks that have predetermined geometric dimensions and shapes. Thus, the side walls should have a length of 2040 mm, and the front and rear walls 1500 mm each.
The front wall must be divided into three equal parts along the length. On the borders different parts you need to make a markup, and then repeat this operation for the back wall.

In our case, the depth of the mattress should be 5 cm. Do not forget to add 2 cm to the thickness of the slat cover and 4 cm to the thickness of the longitudinal support bars. Therefore, a total of 11 cm will be obtained. Thus, measure 11 cm from the top of the workpiece, and attach support bars at the marks. Screws of suitable length act as fasteners.
Assembly process
On wooden planks, from which the side walls will be created, you need to measure 7 cm from the top (5 cm for the deepening of the mattress and 2 for the thickness of the rails). After that, beat off the line with a chalked cord. After that, screw the support beam 192 cm long along the entire length. Step back 6 cm from the edges, and screw the screws from the inside.
Measure the thickness of the beam and board in advance, and also compare them with the length of the self-tapping screws. Don't spoil front side frame and screw vertical segments to the sidewalls wooden beam. Step back 2 cm from the edges.

Attach an extra board to the front wall of the bed - it will act as a headboard. Before that, coat the end parts with wood glue and properly trim the workpiece. WITH outer side reinforce the headboard with three additional slats glued with wood glue and secured with self-tapping screws. You also need to round the upper corners of the workpiece or give them a different shape that you like best. For these jobs, you will need an electric jigsaw.
Completion of works
At the end of the work details wooden frame beds need to be covered with stain. A quick-drying polyurethane-based varnish is applied on top. Two layers are required. After that, you can begin to assemble the bed frame by twisting the blanks. After assembling the frame, 2-3 bearing bars are laid on the support bars of the two walls. They are screwed to the support beams at an angle of 45 degrees with self-tapping screws. If there is not enough timber, pull several rails together.

Stepping back from the front or back wall 2 cm, lay 25 rails on load-bearing structure in 4 cm increments and screw them on. To increase the reliability, two legs can be added to the bearing bars. Place the selected mattress on the frame. The total height of the bed should be approximately half a meter. Thus, if you did everything right, you should have a reliable and durable design that fits well into the interior of any bedroom.
This version of the bed frame has a more complex design, as it requires the ability to work with a welding machine, grinder and other tools.
Preparation of materials
For work you will need the following materials:
- corner 40x40 mm;
- channel 32x65 mm;
- profile pipe 20x20 mm.

The dimensions of the frame depend on the dimensions of the selected mattress. Basically, frames come in the following sizes:
- length 200/195/190 cm;
- width 200/180/140/120/90/80 cm.
Creating a back
First of all, you need to make the back of the future bed. To do this, cut profile pipe and lay the blanks on a flat horizontal surface. Attach your workpieces securely and get to work using welding machine. In this case, you need to constantly monitor right angles and diagonals. Opposite sides of the frame must be of equal length.
Frame manufacturing
Take the channel and prepare the grinder. You need to make 4 side and 2 center brackets that will hold the frame. Each bracket is complemented by a spike with a bevel of about 5 degrees relative to the vertical. Bed frames are laid on them.
Weld the manufactured brackets to the backs of the frame 35 cm from the floor. They will carry the main load, so they should be welded with a continuous seam.

Next, make a frame from a channel and a corner. Cut the blanks from the channel to a length corresponding to the length of the side of the frame. Use a corner to connect them. On the horizontal shelf of the corner, cut off the corners for docking with the channel. Weld these joints with a continuous seam.
Construction assembly
Place the backs of the future bed vertically. Place the frames and mark the places for the grooves on the lower shelf of the channel. Drill holes with a drill with a diameter of 8-9 mm. Fit the groove under the spike with a soldering iron with a square section.

Weld the grate on which the mattress will lie. You will need a steel strip. After that, install the thrust bearings to the uprights of the backs and do not forget about the plugs on the upper ends. These structural elements are cut in the form of a flat circle from a metal sheet.
Using a grinder, process the welds, remembering to clean them of slag. Also treat the design with special finishing materials. You need to focus on the interior of the room and your preferences.
Good day to all.
Today, furniture stores sell a huge amount of different furniture, it can differ in appearance, size, material, etc. We just need to point a finger at the photo in the catalog, and in a couple of hours she will be at our house. But unfortunately, not everyone can afford to do this, due to the fact that the prices are very high.
The author of this article invites us to choose more economical option, namely, to make furniture with your own hands. Let's talk about your own makeshift bed, which we will make step by step together with you!
And now about everything in detail!
We'll need
Material:
2 boards 5x10 cm, 240 cm long;
- 4 boards 5x15 cm, 240 cm long;
- 13 rails 2.5x7.5 cm, 240 cm long;
- screws for oblique connection flush with a length of 40 mm and 60 mm;
- self-tapping screws 60 mm long
- joiner's glue;
- dye;
- wood putty.
Tool:
Screwdriver;
- wood saw;
- clamps;
- drilling conductor.
First of all, let's start with cutting wood, for this we use the existing cutting tool. We select the size of the construction blanks according to the dimensions of the mattress we have. I give an example of the size of foreign firms.

Let's start assembling the bed frame.
It may seem that putting everything together is very difficult and impossible, but it's easier than it seems, especially the main part preparatory work we have already done, so we will not stop there, we continue!
First of all, we assemble the front and rear walls of the structure, we will fasten it with an oblique connection, for this you need to use a drilling jig.
Front side of the bed


Rear end


Next, we take the sidewalls and connect them to the front and rear sections, fix the boards to each other with the help of several clamps, this will simplify screwing in the screws.


Then you need to strengthen the structure with the help of corner inserts, place them on four sides, fasten them to self-tapping screws.


Next, retreat 5 cm from the top lateral edge side, and with the help of carpentry glue we fasten the rail along the entire length of the sidewall, it will serve as a support for the slatted bottom of the bed, we additionally fix it with self-tapping screws.


In the middle of the structure, you need to install a support beam, which will also serve as a support for the rack bottom. In the center of the beam, add another leg. This is recommended for double beds; in the case of a one-and-a-half bed, a support leg is not required.


The support beam must be placed at the same level with bottom structures, while top part must be at the same height as the side rails.


Now it's time to install the rack bottom, put the first and last rails close to the walls of the frame, and place the rest at a distance of 10 cm from each other.


Here is the bed almost ready. We install the headboard to the frame. Next, you need to slightly process the surface of the boards. In order to hide all the bumps and joints, we use putty on wood, then we grind the surface, and we paint the frame. The author applied two coats of paint before assembling the structure and one coat after.
You can easily find and buy in one of the many furniture stores a bed that would fully correspond to your ideas about perfect location for sleep - there would be money for it. However, the situation is such that on average only a quarter or a fifth of the cost of a bed falls on a mattress. Everything else you have to pay for the frame, brand and additional elements decor.
Figure 1. Diagram of the dimensions of the bed frame.
But with a little preparation and basic skills in working with carpentry tools, you can make a bed frame with your own hands, saving an impressive amount of money. The bed frame can be made of metal or wood. Wood, of course, is more convenient and easy to work with, however metal product, especially when it comes to a double bed, looks stylish, chic and thorough.
Preparing for production
First of all, it is necessary to solve the issue with the dimensions of the mattress. Of course, everyone would like to have a huge and comfortable bed in their bedroom, but you have to be content with what you have. The mattress can be single, one and a half and double. At this stage, the choice is yours. If optimal solution found - you can get to work.
As an example, the procedure for manufacturing a wooden frame for one of the most popular options will be considered - spring mattress 2000x1800x220 mm.

Figure 2. Diagram of a double bed.
This is quite enough for two people of average build.
First of all, you need to pay attention to the choice of material for the frame. If you decide to make a frame from wood, then choose a high-quality material that has undergone appropriate processing (must be confirmed by a certificate) and does not have external defects.
Prepare the tools for work:
- electric drill and drills;
- jigsaw;
- furniture stapler and staples;
- scissors;
- construction knife;
- Screwdriver Set;
- hammer.
It is necessary to add tolerances to the dimensions of the mattress - 1-1.2 cm on each side.
For the frame itself, a calibrated planed board 3 cm thick is used - a product of sufficiently high strength will be obtained from such a material.
To make a frame for the mattress mentioned earlier, you will need:
- 2 boards with dimensions 2070x300 mm for sidewalls;
- 2 boards 1810x300 mm for the back and front back.
Back to index
wood frame

Figure 3. Varieties of frames.
Mark and cut the boards. When doing this, take into account the internal dimensions of the frame, which should ideally fit the mattress you have chosen. If you are doing it for the first time similar work then strictly adhere to the following recommendations. With experience, you will be able to change anything at your discretion.
Prepare with the exact dimensions of the parts. As a basis, you can use the drawing shown in the following image, changing some parameters if desired: Fig. 1.
Make a list of parts and necessary materials. In this case, the cut lines must be marked with a cutter along the ruler. In order for the parts of the same type to be the same, you first need to cut out one part and later use it as a template. It is best to take glued blanks - they differ in pre-seasoned geometry. As a result, your side walls should be 2040 mm long, and the back and front walls should be 1500 mm each.
Divide the front wall lengthwise into 3 equal parts. On the borders separate parts make a markup. Repeat the same for the back wall.
The mattress landing depth in this particular case is 5 cm. Add 2 cm for the thickness of the slatted cover and 4 cm for the thickness of the supporting longitudinal bars. The result will be 11 cm. So you need to measure 11 cm from the top of the workpiece and attach support bars at the marks. Use screws for fastening.
On the boards intended for the side walls, it is necessary to measure 7 cm from the top (5 cm to the depth of the mattress and 2 cm to the thickness of the slatted coating), and then beat off the line with a chalked cord. Next, you need to screw the support beam along the entire length. In this case, a timber with a length of 192 cm is used. There should be an indent from the edges of 6 cm. Self-tapping screws at this stage are screwed in from the inside.

Measure the thickness of the board and timber in advance. Match them with the length of your screws. It is important not to spoil the front side of the future frame. To the sidewalls you need to fasten the vertical segments of the timber. Indentation from the edges - 2 cm.
Then you need to attach an additional board to the front wall, which will later become the headboard. Pre-lubricate the ends with wood glue and perfectly level the workpiece. WITH outside the headboard should be additionally reinforced with three battens glued to the same wood glue and screwed onto self-tapping screws. Round the top corners of the workpiece in advance or give them some other shape of your choice. At this stage, you will need a jigsaw.
Back to index
Shutdown
Next, all the workpieces need to be covered with stain. On top, apply a quick-drying varnish based on polyurethane in 2 layers. Now you can assemble the bed frame by twisting the blanks. After the frame is assembled, 2 or 3 bearing beams are laid on the support bars of the rear and front walls. They must be attached to the support bars at an angle of 45 ° using self-tapping screws. If the beam is not enough, you can pull together a couple of rails.
Stepping back 2 cm from the back or front wall, lay 25 rails on the supporting structure in 4 cm increments and screw them. For greater reliability, you can screw 2 legs to the bearing bars. Lay the selected mattress on the frame. The total height of the structure will be half a meter. As a result, if everything was done correctly, you will get the following: Fig. 2. This sturdy and durable design will fit perfectly into any bedroom decor.
When it became necessary to add another one in the country sleeping area, then at the family council it was decided that it would be a double bed. The dimensions of 1.6 by 2.0 meters were determined for a reason, but because this is a very common mattress size (the same in a city apartment) and its purchase will not cause problems. And so it turned out later.
I will make a double bed according to my drawings and of course with my own hands. I will carry out the installation right at the installation site, having previously prepared all the details.
The article turned out to be voluminous detailed, so be patient.
If you are going to make such a double bed with your own hands, then below you will find details, drawings with dimensions, photographs, as well as a 3D model of this bed.
Since the project is quite difficult, before starting work, you need to prepare tools and materials.
Tools
- Circular saw.
- Drill.
- Set of drills.
- Screwdriver.
- Electric jigsaw or wood saw.
- Sander.
- Construction corner.
- Clamps.
- Roulette.
- Pencil.
- Putty knife.
materials
- Bar 100*100*330 mm - 4 pcs. (bed legs).
- Board 195*45*1690 mm - 4 pcs. (front - back frame board and headboard).
- Board 95*45*1690 mm - 1 pc. (back of the bed).
- Board 195*45*2000 mm - 2 pcs. (side boards of the frame).
- Board 95*45*1400 mm - 2 pcs. (internal front and rear frame boards).
- Board 95*45*1800 mm - 2 pcs. (inner side boards of the frame).
- Board 95*45*1910 mm - 1 pc. (internal longitudinal frame board).
- Lamel for a bed (820*63*8 mm curved plywood) - 24 pcs.
- Latoderzhateli laid on for shooting (under the lamella 63 * 8 mm) - 48 pcs.
- Birch dowel 10x50 (30pcs)
- Steel corner 50 * 50 mm - 12 pcs.
- Self-tapping screws 5 * 80 mm - 150 pcs. (for assembling bed parts).
- Self-tapping screws 3.5 * 35 mm - 50 pcs. (for fastening steel corners).
- Self-tapping screws 3.5 * 12 mm - 100 pcs. (for attaching lat holders).
- Joiner's glue.
- Wood putty.
According to materials:
As a result, I bought 2 boards 195*45*6000 mm and 2 boards 95*45*6000 mm. All boards are dry and planed.
Sawing to size was made on the spot in the store (for a fee), so all the materials fit into the trunk of my car with folded rear seats.
As a result, I "killed" two birds with one stone: they sawed the boards exactly to size and saved on shipping.
I had a piece of timber 100 * 100 mm after the construction of the barn, and that is why I decided to use it to make the legs of the bed. You can use any other material as legs.
Look for lamellas (lats), as well as lat holders, in specialized stores or online stores; they are rare in ordinary building hypermarkets, and if there is, then in a small assortment.
By size:
Using the base dimensions right size mattress (I have 2000 * 1600 * 180 mm), you can change the dimensions to those that are convenient for you. For example, the height of the legs of the bed or the height of the boards of the sidewalls.
The only thing that is not worth it is to reduce the thickness of the inner longitudinal board (45 mm), which divides the bed in half, because. this value is determined by the seat of the lato-holders on one side and the other.
Bed assembly: diagrams and dimensions
So, if all the tools are prepared, and the materials are cut to size, then you can start assembling the bed. And let's start, of course, with the base frame.
Frame manufacturing
We start the assembly with the main boards and legs of the bed, fastening them together with self-tapping screws.
Using clamps, we fix the legs to the side boards. We drill holes in the boards - the diameter of the drill should correspond to the diameter of the self-tapping screw. Don't forget to countersink the holes for the screw head.


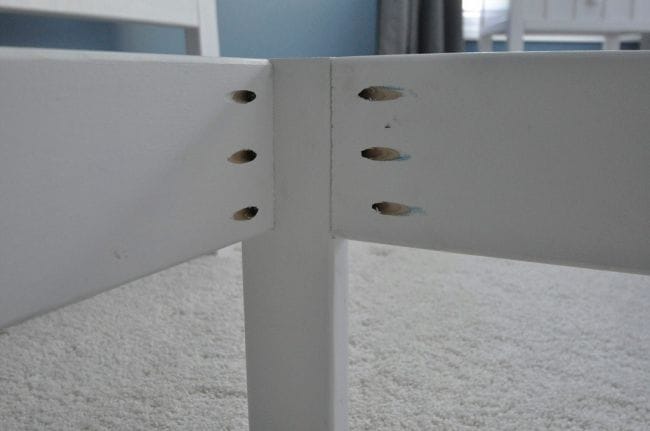
Side and center boards should be fastened 10 mm lower, because. they will be equipped with lato-holders with lamellas. The photo below shows why this should be done.

Before assembly, I smeared all the details with carpentry glue and for reliability (reliability is never superfluous), I reinforced all the corners in the joints of the bed frame with steel corners. You can see it in the photo below.

Under the middle board for reinforcement, I made and installed a leg-stand from a piece of timber. You can use any other design, for example, make boards from scraps or buy a finished cylindrical metal if you find the right size.

Sanding and sanding the frame
Now that the bed frame is basically ready, you can start ennobling appearance, namely to the puttying of mounting holes, as well as other visible wood defects. To do this, use a special wood putty.

Apply the first layer of putty, trying to fill the holes as much as possible, leave to dry, following the manufacturer's recommendations on the package.
Important! Do not try to putty everything the first time problem areas- still won't work. Correct puttying should be done in 2-3 stages, with intermediate drying and abrasive treatment.
Treat the dried putty with a sandpaper with a coarse abrasive, for example P80. I used an orbital sander with velcro pads. It is possible to grind with a piece of skin on a flat bar, but this is more laborious.
After blowing off the remaining dust, apply a second layer of putty and repeat the drying-sanding stage.
At the end, we grind the entire surface of the frame to a pleasant smoothness. First with P80 abrasive and then with finer P120-180 abrasive. Of course there was a lot of dust...
While the putty dries, we do not waste time - you can start making the headboard, unless of course you need it. Below I will tell you how I did it.
Assembling the backboard
Since the double bed turned out to be quite heavy, I decided to make the backrest removable, in case the bed needs to be moved to another room.
For the headboard, you can take ready-made furniture board, but you can do it yourself. I bought two six-meter boards and from the leftovers, I just got three trimmings for making the back (they are higher in the list of materials).
I decided to splice three boards into a shield using dowels and glue. In order for the holes for the dowels to match perfectly, I applied the following “trick” - marking the centers of the holes on the edge of the board, I punched carnations without a hat into them.
So that all the cloves stick out at the same height, I hammered them with pliers as in the photo below.


Having combined the second board from above along the edges, he tapped on top with a mallet and received reciprocal dents on it.
To drill holes for the dowels to a certain depth, I glued red tape on the drill - so that it could be seen.


Having prepared the holes (clean from sawdust and cut off burrs), I put dowels on the glue (pictured below). Having smeared the mating edge with carpentry glue, with the help of a mallet I drive the second board into place.
The same operation must be done with the third board of the headboard.
Due to the lack of wide clamps (I will definitely have to buy), I am smart and with the help of a car jack (I used it for laying floors) I squeeze a shield of three boards in the doorway and wait a couple of hours until the glue dries.


After gluing, I send the shield for trimming and grinding. The most suitable place for this dusty work is the yard.
Having cut off the upper corners, I grind with an orbital, P80 abrasive. By grinding, I remove small steps at the junction of the boards and sharp corners.


The result is a pretty decent shield for the headboard.

It remains to put the back in place and fix it. To do this, I do the same operation with dowels, only without glue. 
Installation of slats
Since the length of the lamellas exceeds the required one, they should be cut to the desired size.
Having put on the ends of the lamellas the lato-holders, we fix them to support boards self-tapping screws 3.5 * 12 mm. The distance between the lamellas in my case is 92 mm.


3D model of a double bed
Click on the picture, wait for it to load and use the left mouse button to rotate the model. Rotate the mouse wheel to zoom in and out. Watch in full screen - icon in the lower right corner. exit from full screen- Esc key.
To fully view 3D models, you need to download the SkethUp viewer program from the official website (for free) and install it on your computer. Download this model You can view it by clicking on the logo in the lower left corner of the preview window.
 (1 ratings, on average: 5,00 out of 5)

