Matchstick houses. How to make a matchstick house with your own hands with and without glue. How to make a castle from matches
Probably many people want to New Year put under the tree original composition. A match house decorated with cotton wool “snow” will become interesting solution. Step-by-step instruction How to make a house out of matches without glue will help you make a durable toy that will not fall apart when you pick it up. For creativity you need matches and a little patience.
Ordinary matches can be used to create original compositions
Before you start construction, stock up on the necessary materials:
- block of matches (10 boxes);
- two-ruble coin;
- a flat, solid base (a piece of plywood, a CD box).
A drawing is not required for the proposed model.

You can diversify the structure thanks to interesting additions
How to make a matchstick house without glue: step-by-step instructions
Before you start building a house without glue, you need to place a solid base (cardboard, plywood) on a flat surface. horizontal surface. While the first steps of construction are being taken, the structure is fragile and may crumble.
Assembly of the model is simple:
- Place 2 matches in parallel on the prepared surface at a distance of 2 cm.
- We lay a floor of eight matches on the match sticks, with the heads pointing in one direction. The space between the parts corresponds to the width of the match.
- We do the second row in the same way, but lay it out perpendicular to the previous layer. This results in a square lattice.
- Next, we place the sticks in a well, making sure that the ends with sulfur are directed in different directions. You will need to make a log-well from 7 parts in height. If you build higher, the product will not be able to be made durable without glue.
- We make a flooring on top of the log house, placing the parts parallel to the first row.
- On top of the resulting overlap, evenly retreating from the edges, we lay 6 sticks.
- Insert 4 matches vertically into the free corner cells with the sulfur ball facing up. To prevent the structure from falling apart during the operation, place a coin on top and lightly press with your finger to secure it.
- Now, along the perimeter, we insert a layer of matches, heads up, into the “cells” formed during assembly, so that the ends are at the bottom of the lattice. The product has become stronger. Later we will add another match to the corners to increase strength.
- You don't need the coin yet. We remove it and take care of the house. To increase strength, we press on the walls, ensuring a tight fit of the parts.
- Now we turn the product over. Next, we place 6 matchsticks on the foundation, press it with a coin and strengthen the structure. We insert elements around the perimeter in the same way as at the top of the product. The result was a beautiful cube with smooth walls.
- We form the attic. To do this, carefully pull out the sticks by the heads along the entire perimeter, and between them we place the parts in parallel, making sure that the direction of the sulfur balls alternates. The laid elements should resemble a hut.
- Next you need to make the roof of the house. To do this, we place sticks on the finished “attic”, forming a roof ridge from sulfur balls. We fix the roof by pressing on the previously pulled out matches.
- The pipe remains. For this, we insert 4 sticks into the roof with their heads up.
- To make windows and doors for the house, you will need to break off part of the match with the head and lay out elements of the entrance to the house on the walls.
If desired, to increase the strength characteristics, you can insert more match sticks into the corners of the finished building.
The proposed simple option for making crafts without glue can be used as part of a complex building. To do this, using the described method, it is recommended to assemble cubes without a roof, and then, fastening them with matches, make original building structures.
Models using glue
If houses made of matches without glue seem difficult, you can glue the parts.
As a diagram for beginners, you can take the previous diagram, but at the same time fasten the sticks together with glue. An additional advantage of glue is that it will be possible to eliminate the “lattice” that is characteristic of the glueless model. To do this, when laying out the well, glue a shortened match into the space formed between the long parts.
There is another way to make a match house with glue. Step-by-step instruction:
- The sulfur heads need to be cleaned or cut off. It is more convenient to do this using a stationery knife.
- For a house with glue you need a drawing of the base. You need to draw a square on a thick sheet of cardboard, the side of which is equal to the sum of the length and width of the match.
- We lay out the prepared sticks along the sides of the square. The short end should rest against the edge of the long side. The base is ready.
- Next, apply to the surface of the resulting square. thin layer PVA and lay out the next 4 elements. It is important that the long part lies on the joint made below.
- By connecting the rows to each other with glue, we build a log house. How many rows to make depends on the selected wall height. Before drying, the structure is not yet very strong. To avoid unwanted movement of parts, it is better to pause after every 3-5 rows laid out, waiting for the glue to dry.
- After leaving the log house to dry, you should begin to create the base. To do this, the matches are glued together along the long side. After drying, the base is glued to the bottom of the building.
- The roof must be formed in the same way as the corner of the house, connecting the parts at right angles. Irregularities in the lower part of the slope are cut off with a stationery knife.
- Now you will have to take a break from work for 5-6 hours until the glue dries completely. It's worth taking this time to prepare. decorative design: glue the door, porch, window casings. To make the decor beautiful, it is recommended to draw a sketch on cardboard, and then lay out the part, trimming the protruding ends.
- After the frame has dried, we build attic space. To do this, shortened matches must be glued to two parts of the log house, gradually reducing the size. If the ends of the elements forming the attic are not very smooth, then it is better to wait until it dries and clean off any pieces that may prevent the roof from fitting tightly.
- Now we sand the outer surfaces using fine-grained sandpaper. The manipulation will eliminate the roughness of the matches and remove protruding particles of dried glue.
- Next we coat it with glue top part log house and apply the roof. You can immediately attach decorative details.
- While the product dries, a pipe is formed: 4 matches are glued together and part of the resulting bar is cut off at an angle. We glue the pipe to the roof and leave it to dry.
Glue in the same way big house. But to form long walls, you will have to glue not only the corners, but also short joints. If when laying out next row a long element will be located at the junction of the match ends - the structure will be durable.
The advantages of glue are that you can add an extension to the house and attach the original porch.
It is almost impossible to meet a person among the people around us who does not know that quaint and original houses, churches, palaces, etc. can be made from matches. Such crafts, even in the form of a simple small neat house, look quite original. And the openwork design of a multi-domed cathedral or an entire castle evokes genuine admiration.
Moreover, despite the apparent complexity, the creation of such structures from matches does not require mastering complex technologies. As with paper using the quilling technique, creating a match house with your own hands is not that difficult. The only thing you will need to stock up on is large quantities in both cases it is patience. And material for crafts can be easily found in every home.
Making crafts from matches serves good remedy relaxation after a hectic working day. By focusing on building match walls, you will calm your nerves and help your brain detach from urgent, pressing and worldly problems. At the same time, unlike the Lego sets that are so popular today, crafts made from matches will not affect your budget at all. Also, according to bioenergeticists, contact with such natural material, like a tree, can significantly improve a person’s well-being.

The construction of a house, like the development of all match architecture, begins with the construction of a cube. There are several options for constructing a forming wall match house cube. You can start by laying two matches horizontally, on which a flooring of a certain number of matches is then laid. But there is an easier option for beginners.
We take an empty matchbox and stick four vertical matches into it to a depth of several millimeters, so that they do not fall. The distance between them should be such that a match placed horizontally protrudes from both sides onto the match head. Then we place a horizontal layer of 7 matches between them, on which we place another layer, also of seven matches, perpendicularly.
Now we build walls on this flooring on the outside of the vertical standing matches. To do this, we lay two matches horizontally at the same time on opposite sides, alternating layers. We place the matches with their heads in different directions so that they are located in a circle around the perimeter, one after the other. On each side of the future house, the walls should be 7 matches high. Then we cover our structure with the same flooring in two stands of 7 matches, which we initially laid on the matchbox.
Let's continue the “construction” and begin to strengthen our still rather flimsy structure. To do this, press the top flooring with a coin. Then, carefully using a knife blade or the tool you have chosen, we move the matches of the upper and lower flooring apart and insert them into the gaps with inside walls in a circle horizontally, a row of matches with their heads up. Now we carefully squeeze the resulting cube from all sides to obtain a stable structure.
Having compacted our structure, we remove it from the no longer needed matchbox. We press down the still protruding matches of the last inserted row to the level of the heads. Thus, we received a basic cube, on the basis of which many castles, fortresses and other structures are built. In the future, we can strengthen the two-layer walls of our cube to three or even four layers. But to ease the efforts of those who are making a house for the first time, we will follow the simplified version and move on to the roof.
We turn our cube over so that the heads of the matches of the last row we inserted are at the bottom. Now we insert into the gaps between the matches of our “attic” floor from the inside of two opposite walls along a row of four horizontal matches, forming the gable walls of the roof. Then, in the spaces between the ends of the matches of the other two walls, we insert the matches of the slope of the “roof” of our house at an angle. That's all, the main part of the “building a house of matches” action is completed.
Having finished with the main work, you can move on to decorating our match house. For example, so that it does not get lost on the shelf with souvenirs, raise the house on a “pedestal” of four matches. Since a house without windows and doors is not a home, we make them by sticking shortened matches into the gaps in the walls. You can also make a chimney quite easily - simply by sticking four matches into the roof. In general, it's up to your imagination.
Master Class Vladimir Savchenko
Crafts from small items, like matches, is not only entertainment, but also an activity that develops fine motor skills and patience. And if adult family members build construction projects made of wood chips seems like a waste of time, then for the child it is both interesting and useful.
The instructions for a match house with or without glue are simple and straightforward. The main thing is patience and perseverance.

Materials
For the craft you will need:
- 6–7 boxes of matches depending on the size of the object;
- PVA glue - it is the safest;
- colored cardboard for decoration;
- stand – a sheet of cardboard or a DVD box.

How to make a match cottage with glue
Step by step assembly is very simple. The version with glue is somewhat more difficult to construct, but it is stronger. To build it yourself, you should follow the step-by-step instructions.
- Clean the sulfur from two matches and place them parallel to each other, otherwise the building will not stand level. Apply a drop of glue in the places where the next 2 matches will be placed. They are laid so that the elements form a square - this is the foundation of the craft.
- All subsequent matches are laid in the same way and secured with adhesive. It is recommended to lay the heads with sulfur next to each other, but in different adjustments across the row, so that they form the correct order.
- Apply the composition to the length of the top two matches and lay 8 or more matches parallel to each other - this is the ceiling. It is recommended to alternate elements - head with gray towards the end, so that the ceiling is even.
- Now you need to assemble the roof. To do this, 19 matches are placed so that the head is facing outer edge- one to the right, one to the left. The matches are placed offset: the heads protrude beyond the ends.
- The two elements are cleaned of sulfur, coated with glue and laid on the flooring - you get 1 roof slope.
- With your own hands, repeat the steps to make a second match slope.
- On one side, the sulfur is removed from the “slopes” - otherwise the roof cannot be connected.
- The outermost matches of the ceiling are coated with glue and the connected slopes are installed on top.
When the adhesive has dried, match craft will be ready.

How to make a match house without glue
Building it with your own hands is not much more difficult, but in order to prevent such a building from falling apart, measures are taken to strengthen it.

Step-by-step instructions for a match house without glue suggest the following sequence of actions.
You don’t yet know how to make a house out of matches, create from these wooden elements paintings? Watch the master classes, which are illustrated with 57 photographs!
How to make a house out of matches?

To create it you will need only 3 items:
- matches;
- plasticine;
- coin.
- Place 2 matches parallel. Pin them on work surface using plasticine.
- Place 8 matches on top, perpendicular to the data, so that the heads and tails peek out from both sides of the first two matches. Lay these “beams” at the same distance at home.
- The first tier is ready. The second also consists of eight matches, we lay them perpendicular to the first layer.
- Place 4 matches on top, around the perimeter.
- In total, you need to complete 6 such fragments, consisting of 2 rows of 8 and one of four matches.
- The creation of the frame of the building is completed with 8 matches laid parallel to each other and 6, which you place perpendicular to them. Here's how to make a match house next.
- To make the frame strong, press its fragments from above with a coin and from below with your hand. Holding the workpiece in this way, stick 4 matches in the corners of the house, and then around the entire perimeter.
- Place a coin inside the “logs”, press on it so that the structural elements are pressed tightly against each other, and the heads of the vertical matches are well defined. Insert 6 matches between them, and the same number perpendicular to the data.
- Here's how to make a matchstick house next to form the roof. Stick 4 matches into the corners of the frame, and then 7 more into the top of each wall.
- We place matches horizontally in the resulting roof box so that in each subsequent row there are fewer of them than in the previous one, and a triangular roof begins to form.
- There will be 6 matches left on one side and as many on the other side gable roof, while their heads will cross each other, and the reverse sides of the matches will be held on vertically placed “blocks”.

Here's how to make a matchstick house without glue.

Such a structure will become an original gift, and it is made from cheap material. If you liked this idea, don’t stop there, see what else you can make from matches. Such wooden objects look great, and you can organize a home display by placing them on a table or on shelves.

What can you make from matches?
Once you know the answer to this question, you will be able to make not only a house, but also many other interesting things. Do you want to have a whole composition made of wood? Then see how to make a well and a fence from the same material.

For this you will need:
- matches;
- stationery knife;
- wood glue;
- thin brush;
- toothpick;
- board;
- thin thread.
- First prepare your matches. Place one at a time on the board, cut off the heads with sulfur. Instead of throwing them away, they can be used for firecrackers.
- Place 4 matches, forming them into a square with ends extending beyond it. To do this, place the first one, place the second one perpendicular to this one, but so that at the point of their contact the end of the first one extends 5 mm.
- The edge of the second will come out the same amount and in the same way when you connect it to the third match. Using this technique, fold all 4 parts, gluing where they meet.
- In total you will have 9 rows of “beams” for the well house. In each subsequent one, the edges of the matches should come out so that with these elements of the previous one they form an angle of 90°.
- To make pillars supporting the roof of the well, place 2 matches parallel at a distance of 3 mm. Cut the third into 2 pieces, glue one to the top and the other to the bottom to connect 2 paired elements. Make another similar column.
- Insert a toothpick into the hole formed on one and the other side, having first wound a thread around it. Glue to the posts. Bend the toothpick on one side to create a handle for rotation.
- Making a roof. Place 2 matches in parallel, stick 13 matches on them perpendicularly, placing them close to each other. Also create the second half of the gable roof. Connect them by threading the top of two matches into the first slope, and the top of the other two into the second. At the bottom, glue a match horizontally on both sides so that the roof appears triangular from the side.
- Next to the well, place a fence made of two parallel matches, to which several more elements in the form of a picket fence are glued perpendicularly.

If you want, fashion a bucket out of plasticine or make it out of a thimble and attach it with bottom side ropes.
You can make a cart out of matches and add it to the landscape of village life.

To work you will need:
- matches;
- knife;
- glue;
- cloth
Now we will make an axle for the wheel. The first one will be the longest; this is necessary to connect the structure. Place the second axis so that it is perpendicular to this one.

Place four small pieces that will become the radii of this circle. Make the second wheel in the same way.

Glue them together with one match. Use the same technique to perform the second pair of wheels.

Now you need to connect these two blanks with three crossbars.

Let's start making the following fragments, which will tell you how to make matches an excellent building material for home creativity. For each of them, take two matches, place a small fragment of this material in the center, connecting the elements with glue. The second part is identical to this one.

Now place these two blanks in parallel, connect them with three matches, as in the photo. We glue two matches to the resulting part, placing them slightly diagonally.

There is very little left, and soon you will learn that you can make such an interesting cart from matches that will become an almost exact copy of the real one. We glue two diagonal pieces of wood together using a third one. We perform the same manipulation on the other side of the part.

Glue one matchstick on both sides of the cart and flip it over to the other side to fill each side with three small wooden sticks.

You can place the top of the cart on the wheel part and place a new home exhibit wooden creativity next to others.

After you've done a lot of useful things, you'll still have empty boxes, but they can be put to use.
The child will be simply happy if, together with him, you make a train like this, in which you can put small toys.

Here are the items that were taken for this creativity:
- match boxes;
- glue for cardboard;
- toothpicks - 9 pcs.;
- wine corks - 2 pcs.;
- several matches;
- threads;
- scotch;
- cotton wool;
- thick needle.

Make other cars in the same way. Connect them with a thread and a needle.
In order for the carriages to withstand the weight of the toys placed in them, take a strong thread, it is better to use yarn for this.

Now you can make a steam locomotive. To make it, glue an inverted box to a ready-made carriage, connect them together with another one, which needs to be placed on its small side.

To make a pipe that produces safe smoke, place several matches next to each other and place a toothpick in the center. Place some cotton wool on top of the pipe and wrap it all with tape to secure it. Attach this finishing touch to the locomotive by inserting a toothpick into its cardboard surface.
The kids will be interested not only in this idea. If you tell them what can be made from matches, they will be happy to make a funny picture. Depending on the age of the child, it can be simple or more complex.
How to make a portrait, a picture from matches?
If the child is small, before giving him matches for creativity, cut off the sulfur from them. After all, the baby can taste it, and the substance is very harmful.
Once the wooden sticks are ready, you can begin. So, for this picture you will need:
- matches without sulfur;
- sheet of cardboard;
- pencil;
- glue;
- paints with a brush.
Once the donkey is created, have your child paint over the background of the picture. You can glue a few small branches, and the masterpiece is ready.

See how to make a house out of matches so that it is flat.

The walls are square, the roof is rectangular. For trees, a trunk is first made, then branches are laid out from matches.
For older children and adults there is a very interesting idea. After reading it, you will learn how to make a portrait from matches.

You will need a lot of them and it is necessary preliminary preparation, since it is necessary to remove sulfur. To do this, matches are placed in a basin of water and the unnecessary parts are washed off. further work spraying Then they need to be dried.

Using an awl or other sharp object, make 4 holes in the box, it is important that they are at the optimal distance. If it is small, then all the matches may not fit, and if it is too large, then the formed cube will become too loose and crumble.

Next, you need to make some kind of well, the walls of which consist of seven rows of matches.

Fill in inner part blanks, placing matches here around the entire perimeter. We align them with a coin, after which we remove this cube from the box and, very carefully, so that it does not crumble, we squeeze it on all six sides.
We place this square blank on its side and fill the top side with a horizontal row. We also decorate the other three sides.

During this work, do not forget to carefully crimp the cube so that the wooden components fit more tightly to each other.
Now about how many matches you will need. Approximately 150 pieces will be used for one cube. In total you need to make 30 of these figures. Place them next to each other so that the heads of the unwashed matches with sulfur are at the edges. Then they will form a beautiful frame.

Connecting the squares is very easy. Stick 4 matches along the edges of the first and second, press slightly so that these two figures begin to fit tightly to each other. Create the first row this way.

Then, also, connecting the elements with four matches, build a canvas for the picture.

To make a matchstick portrait next, print out the image. This could be a favorite hero, a friend, or a self-portrait. Print the image in black and white using checkered paper. If this is not possible, then simply line the photo by drawing rows with a ruler and pencil. The lines delimiting a square measuring 10 by 10 cells should be more distinct.
This is what the portrait should look like on the grid. For example, let's create the appearance of Paul Walker from matches.

Looking at the alignment, place the matches with the sulfur heads first where there are dark fragments in the photo. This will highlight them and you can take a portrait.

All that remains is to disguise the joints of the cubes so that these places look more neat, and you can put your work in the most visible place and be rightfully proud of it!

If you still have any questions, watch the three videos. From the first story you will learn how to make cubes for the base.
The second shows how to connect these fragments into a whole canvas.
The third plot will teach you how to transfer the image you like onto a stencil and lay it out from matches.
Among the options for what can be done with matches, there are both simple models and complex ones that amaze the imagination. Making incredible things requires perseverance, time and imagination. The basic techniques for making match crafts are described in master classes, which you can follow on your own or create new solutions.
What can you make from matches with your own hands?
Among novice craft lovers, the question may arise of what to make from matches. This henchman wood material inexpensive, accessible to everyone and allows you to make it amazing crafts. Match buildings can be voluminous or flat, miniature or impressive in size - it’s better to start with simple models, gradually increasing complexity. Here are some ideas on the topic:
- volumetric buildings - houses, ships, airplanes, mills;
- boxes, caskets;
- paintings, panels;
- decorations;
- doll furniture;
- chess.
Matchstick buildings
The most popular are crafts made from matches in the form of buildings - these can be houses, castles, towers and even churches. The child can start with the basics - make small house, by which you can understand the principle of creating buildings. Then it will be possible to make large models that are exact copies of scaled-down famous buildings. You can come up with your own building options by creating fairy houses for princesses and knights.
How to make a matchstick house without glue
If a craftsman is interested in what can be made from matches without glue, then he has the right to try to make a house, for which he will need to take:
- base stand;
- 7 matchboxes;
- collection scheme, instructions;
- 2-3 coins with a face value of 5 rubles.
Stages of making a match house:
- Place 2 matches parallel to each other on the stand, on which 8 matches are placed perpendicularly. This will be the foundation, which will have equal gaps.
- Another 8 pieces are placed perpendicular to the previous layer.
- The base is made - match heads are laid out in a circle around the perimeter - 7 rows of 4 pieces.
- In the last row, 8 pieces are placed, with their heads facing in the direction opposite to the foundation.
- Put 6 pieces on top in the middle, put a coin on top.
- Between the last 2 rows, insert 1 match into the holes, carefully holding the structure.
- One more piece is inserted into each gap along the walls, covering the perimeter. For clarity, you can use a picture when creating.
- Compress the structure tightly so that the elements settle down.
- To build more tall house You can stick matches with their heads up along the perimeter of the walls.
- To make a horizontal coating - insert sticks with alternating heads and ends, pressing in the pieces starting from the head.
- To make a roof, sticks are inserted along walls opposite each other, alternating directions. It is better to insert it perpendicular to the ceiling.
- The first layer includes 2 pieces, the second - 4, then - 6, and in the center in two layers - 8 each.
- Using the picture diagram, a roof, a window, a door, a pipe are made (a half is taken for it).
How to make a castle from matches
An option for crafts made from matches would be a beautiful medieval castle or church. The manufacturing is based on the same house simple type, only without a roof. The assembled base cubes can be connected in two ways:
- Add-on - using ready-made cubes or improved ones. In the first case, the structure is stronger, and in the second, fewer elements are used. To add advanced cubes, you need to take out 4 non-corner matches, grind them from sulfur and insert them into the top element.
- By gluing - use office glue or double-sided tape.
Showing a little imagination won’t hurt anyone, so crafts in the form of grandiose buildings attract attention. Many craftsmen make interesting copies of the Kremlin and temples using the creation of triangular prisms. Decoration is done with wheels, wells, masts, flagpoles. To create domes with crosses, you need to gradually reduce the layers, forming an elongated shape. All elements can be secured with any wood varnish.

Figures made from matches
Crafts from matches made in the form of figures are simple and elegant. These can be cubes, wheels, trihedrons. The basic elements, which are easy to make, can be used in the further construction of fortresses, castles, ships, and airplanes. For example, making a wheel may not require glue, but the work itself will consist of the following:
- draw a diagram of a circle with 15 elements of equal size;
- make a panel for weaving - fill holes around the circumference with nails, where to insert matches;
- for weaving you will need 90 elements - they need to be laid overlapping between the supports, lifting the first stick - it will secure the entire structure;
- the pre- and last elements must be inserted under the previous ones, securing them especially securely;
- Each layer is compressed, pressed, and at the end the supporting pieces are carefully removed.
How to make a cube from matches
The basis for crafts made from matches is a cube; to make it easier to make, you can take a stand with holes around the entire perimeter. You need to insert the missing elements into these holes, and lay the bottom between them. Then the perimeter is assembled - the elements are laid perpendicular to the base, compacted in each layer. Finished model removed from the stand, strengthened by gluing 4 missing matches. The result is a rigid structure that will last a long time.

Modeling from matches
An alternative to crafts made from matches can be modeling, which is a hobby for adult men. They make planes, ships, tanks. Women also enjoy modeling, creating paintings, portraits or massive designs. Building large projects requires a large number of matchboxes, perseverance and a certain amount of skill that must be spent assembling the basic materials and connecting all the parts together.
match ship
Among the crafts made from matches we can highlight step by step diagram ship creation:
- cut out the base of the deck from paper;
- carefully adjust the size of the base of the sticks, cleaned of sulfur and polished, you need to glue them to the base, make sure that the layers fit tightly;
- build up the ship layer by layer, using overlapping elements so that the early layer overlaps the joints of the later one;
- the sides are polished, a deck in the form of a parallelepiped and a pipe in the form of a cylinder are created in the same way;
- All parts must be glued together after careful sanding and drying.

How to make an airplane out of matches
To make an airplane or glider, you can use the diagram from the ship, assembling each part separately and eventually gluing them together. You can also assemble a mini-model in half an hour using the picture diagram:
- take 2 sticks, break them with a knife, fasten them with a fuselage - a crossbar;
- break the stick in three places to make a tail;
- glue parts;
- make 2 wings from 4 pieces, a cabin and landing gear from 1 piece, and blades from three pieces;
- glue all the parts together.
Video: how to make products from matches with your own hands
Due to the difficulty of understanding collection, even the most simple crafts text only, there are videos that describe and show in detail all the stages of production. Experienced craftsmen share their own experience of making a house using glue, a well, figures and wheels. All that remains is to carefully monitor the movements of your hands and repeat in your models.
How to make a match house with glue
Well of matches
Matchstick figures for children
Wheel of matches without glue
No glue is used to create these crafts. The design holds its shape due to the frictional force that occurs between the matches. Using it, you can create either a hut on chicken legs or an entire city, where each house is different from the other. This is a very exciting assembly method that makes you feel like the architect of an entire castle. But to create a masterpiece you will need patience and an accurate eye.
How to make a house out of matches
You will need up to 7 boxes of matches, a disc box (or a book, the assembly will take place on it) and a coin with a diameter of about 24 mm.
Place 2 matches parallel to each other on the disc box, at a distance of slightly less length matches.

Place 8 matches perpendicular to them on top. The distance between them should correspond to the width of the match. (The heads of the matches in each row should be directed in one direction, their direction in subsequent rows alternates).

Place another layer of 8 matches on top, perpendicular to the previous one.


Place the matches along the edges and lay out a “well” of 7 rows.

Perpendicular last row lay out 8 matches (heads pointing in the opposite direction from the first row).

Place 6 matches perpendicularly on top.

Place a coin press on the resulting structure.


Pressing down the coin with your fingers, insert matches into the corners of the cube, head up, so that their ends come out from the bottom of the flooring (first row).


Stick matches along the walls in the same way.

Squeeze the walls of the cube from 4 sides, moving them towards the inner matches. Now the coin can be removed.


Take the cube in your hands and squeeze it on all sides.

“Drown” the matches that were stuck around the perimeter so that the heads pressed the top layer.


Place the figure bottom up.
To form walls, insert matches vertically on 4 sides of the cube.

Now form the walls by inserting matches horizontally.


Remember that at the bottom the outermost row consists of 6, not 8 matches. Insert the missing ones into the corner holes. At the same time, push the vertical wall matches upward.


Roof matches are laid perpendicular to the top row of the “ceiling” from the edges to the middle. The first row consists of 2, the second - 4, the third - 6, the fourth - 8 matches.


Place “tile” matches between the vertically protruding wall matches, their heads should be directed towards the middle. After this, press the wall matches all the way back.

Cut the matches into 2 parts. Insert 4 halves of matches with sulfur side by side into the roof (pipe). Insert the rest into the walls, depicting the contours of the door and windows.
DIY products made from matches. Making a wheel
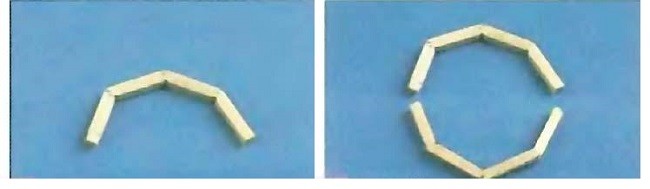
You will need a compass, pencil, ruler, thick cardboard(creating a template), glue, awl and matches.

Print or build the template according to the instructions.

Paste the template onto cardboard. Using an awl, make holes at the nodal points according to the thickness of the matches.

Insert matches vertically into the holes (support matches). They must be free of damage and defects.

Place supporting matches between the supporting matches. They are laid overlapping, the heads are oriented in one direction. The last and penultimate matches pass under the first; to do this, you need to lift the end of the first match.

When the row is closed, press the carrier matches to the base.

Using the same principle, 4 more rows are assembled.

When the rows are assembled, turn the craft over with the cardboard side up and begin squeezing out matches according to the pattern.


If you use skewers instead of supporting matches, the wheel will be higher. Instead of squeezing it out of cardboard, it can be used as a cup for pencils.
You can make the template smaller, but with big amount corners and lay the supporting matches through 2, 3 or 4.

19-gon. The supporting matches are laid through 2 supporting ones.

21 square. The supporting matches are laid through 3 supporting ones.

22-gon. The supporting matches are laid through 4 supporting ones.
How to make a castle from matches with your own hands

The basis of the locks is match cubes. Before starting construction, fold required amount blanks
The cubes are fastened together without glue.

Pull out 4 matches (NOT corner ones) from the side of the cube and clean off the sulfur.

Place the second cube on the matches.

To prevent the matches from moving back, support them with toothpicks. Make sure the cubes are oriented the same way.


DIY crafts from matches. Paintings
Pictures from matches can be made in a variety of complex ways.

You will need a sheet of paper, glue, matches and the selected pattern. Lay out the matches to create a landscape. When you like the result, start coating the matches with glue and laying them out in the same order on a sheet of cardboard. Even if you are confident in the design, first lay out the pattern without glue. This will help you decide which matches to attach first and which ones last.

Transfer the drawing or inscription onto thick cardboard. Glue matches together and fill your drawing with them. Matches are glued to the paper vertically.

Collect cubes from matches and fasten them together in flat design. Stick matches, alternating ends with and without sulfur, forming a pattern. If you can’t make cubes from matches, but want to create such a picture, then you can use a box lid or a sheet of foam plastic for the base.
Crafts from small objects, like matches, are not only fun, but also an activity that develops fine motor skills and patience. And if for adult family members constructing construction projects from wood chips seems like a waste of time, then for a child it is both interesting and useful.
The instructions for a match house with or without glue are simple and straightforward. The main thing is patience and perseverance.

Materials
For the craft you will need:
- 6–7 boxes of matches depending on the size of the object;
- PVA glue - it is the safest;
- colored cardboard for decoration;
- stand – a sheet of cardboard or a DVD box.

How to make a match cottage with glue
Step by step assembly is very simple. The version with glue is somewhat more difficult to construct, but it is stronger. To build it yourself, you should follow the step-by-step instructions.
- Clean the sulfur from two matches and place them parallel to each other, otherwise the building will not stand level. Apply a drop of glue in the places where the next 2 matches will be placed. They are laid so that the elements form a square - this is the foundation of the craft.
- All subsequent matches are laid in the same way and secured with adhesive. It is recommended to lay the heads with sulfur next to each other, but in different adjustments across the row, so that they form the correct order.
- Apply the composition to the length of the top two matches and lay 8 or more matches parallel to each other - this is the ceiling. It is recommended to alternate elements - head with gray towards the end, so that the ceiling is even.
- Now you need to assemble the roof. To do this, 19 matches are laid so that the head is on the outer edge - one to the right, one to the left. The matches are placed offset: the heads protrude beyond the ends.
- The two elements are cleaned of sulfur, coated with glue and laid on the flooring - you get 1 roof slope.
- With your own hands, repeat the steps to make a second match slope.
- On one side, the sulfur is removed from the “slopes” - otherwise the roof cannot be connected.
- The outermost matches of the ceiling are coated with glue and the connected slopes are installed on top.
When the adhesive dries, the match craft will be ready.

How to make a match house without glue
Building it with your own hands is not much more difficult, but in order to prevent such a building from falling apart, measures are taken to strengthen it.

Step-by-step instructions for a match house without glue suggest the following sequence of actions.
It is almost impossible to meet a person among the people around us who does not know that quaint and original houses, churches, palaces, etc. can be made from matches. Such crafts, even in the form of a simple small neat house, look quite original. And the openwork design of a multi-domed cathedral or an entire castle evokes genuine admiration.
Moreover, despite the apparent complexity, the creation of such structures from matches does not require the development of complex technologies. As with paper using the quilling technique, creating a match house with your own hands is not that difficult. The only thing you will need to stock up on in large quantities in both cases is patience. And material for crafts can be easily found in every home.
Making crafts from matches is a good way to relax after a hectic day at work. By focusing on building match walls, you will calm your nerves and help your brain detach from urgent, pressing and worldly problems. At the same time, unlike the Lego sets that are so popular today, crafts made from matches will not affect your budget at all. Also, according to bioenergeticists, contact with such natural material as wood can significantly improve a person’s well-being.
Let's look at how to make a house out of matches without glue. For this you will need: matches from 3-4 boxes, one box itself, an even flat stand that can be freely moved and rotated (board, book, plastic Slim box for a CD, etc.), a coin with a diameter of about 2 cm (2 Russian rubles or 5 Ukrainian kopecks) and a tool to facilitate the movement of matches (a toothpick, tweezers or a knife with a thin blade).
The construction of a house, like the development of all match architecture, begins with the construction of a cube. There are several options for constructing a cube that forms the walls of a match house. You can start by laying two matches horizontally, on which a flooring of a certain number of matches is then laid. But there is an easier option for beginners.
We take an empty matchbox and stick four vertical matches into it to a depth of several millimeters, so that they do not fall. The distance between them should be such that a match placed horizontally protrudes from both sides onto the match head. Then we place a horizontal layer of 7 matches between them, on which we place another layer, also of seven matches, perpendicularly.
Now we build walls on this flooring on the outside of the vertical standing matches. To do this, we lay two matches horizontally at the same time on opposite sides, alternating layers. We place the matches with their heads in different directions so that they are located in a circle around the perimeter, one after the other. On each side of the future house, the walls should be 7 matches high. Then we cover our structure with the same flooring in two stands of 7 matches, which we initially laid on the matchbox.
Let's continue the “construction” and begin to strengthen our still rather flimsy structure. To do this, press the top flooring with a coin. Then, carefully using a knife blade or the tool you have chosen, we push the matches of the upper and lower flooring apart and insert a row of matches with their heads up into the gaps on the inside of the walls in a circle horizontally. Now we carefully squeeze the resulting cube from all sides to obtain a stable structure.
Having compacted our structure, we remove it from the no longer needed matchbox. We press down the still protruding matches of the last inserted row to the level of the heads. Thus, we received a basic cube, on the basis of which many castles, fortresses and other structures are built. In the future, we can strengthen the two-layer walls of our cube to three or even four layers. But to ease the efforts of those who are making a house for the first time, we will follow the simplified version and move on to the roof.
We turn our cube over so that the heads of the matches of the last row we inserted are at the bottom. Now we insert into the gaps between the matches of our “attic” floor from the inside of two opposite walls along a row of four horizontal matches, forming the gable walls of the roof. Then, in the spaces between the ends of the matches of the other two walls, we insert the matches of the slope of the “roof” of our house at an angle. That's all, the main part of the “building a house of matches” action is completed.
Having finished with the main work, you can move on to decorating our match house. For example, so that it does not get lost on the shelf with souvenirs, raise the house on a “pedestal” of four matches. Since a house without windows and doors is not a home, we make them by sticking shortened matches into the gaps in the walls. You can also make a chimney quite easily - simply by sticking four matches into the roof. In general, it's up to your imagination.
Master Class Vladimir Savchenko
I won’t explain why to build such a house. Those who want to do it will do it.
In some of the photographs below, there is an image of a magnifying glass in the upper right corner:
The presence of a magnifying glass in the corner of the images means that you can click on them to enlarge and view everything in detail.
So, we will need:
- Several boxes of matches
- Box for CD/DVD discs
- Two-ruble coin
One of our users gives a very useful tip for assembling a matchstick house:
“I suggest using a thinly rolled sheet of plasticine or dough instead of a CD, then you can put vertical matches right away instead of having to worry about inserting them, then it turns out much more convenient and faster and nothing falls apart!!!”
Instead of a CD box, you can take anything similar or nothing at all. Just on the "platform" future house You can easily move and twist without fear of falling apart.

We take the first 2 matches, place them parallel at a distance of a couple of centimeters from each other.

We make a flooring of eight matches on them. The match heads all point in the same direction. The distance between the matches should preferably correspond to the thickness of the matches.

We make another flooring on top, also from eight matches, but perpendicular to the previous flooring.

We lay 4 matches on top in a well, so that the heads in each layer are directed in different directions, as in the photo below.

In the same way, we lay six more similar rows of 4 matches in a well. As a result, we will get a well of 7 rows of 4 matches. We direct the heads in the same way as in the previous step. Everything is according to the photo below.

Here's what we've got so far:

We lay a flooring of eight matches on the well in the same way as the very first lower flooring.
![]()
On this flooring of eight matches we lay another one perpendicularly, but this time of six matches. We'll add the remaining two later.

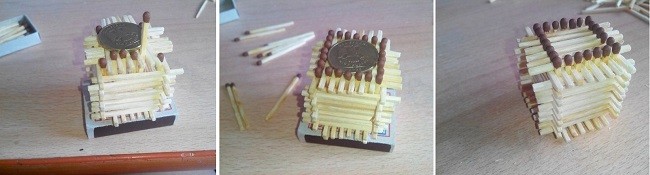
Insert 4 matches vertically into the corners of the resulting “grid”. Needed places in the photo below are circled in red. First, you can cover the entire structure on top with a coin and press it with one finger so that the matches do not fall apart. It will be more convenient this way. Although you can completely do without a coin.


When installing vertical matches, for convenience, you can correct and guide with an auxiliary match. At the bottom, these matches should be installed in the same way as at the top, that is, in the corners.

At this moment, our future house is still quite flimsy and could fall apart if we are careless. Don’t be alarmed if your top matches “move in” and “move apart”. Everything will get better a little later.
 (1 ratings, on average: 5,00 out of 5)