No image on TV via hdmi. New memory for SSD. Errors caused by DVD playback software
A typical modern TV with a “wide” flat screen is capable of not only showing regular TV programs, but also showing a picture with personal computer, such as footage from a game, images from a digital photo archive, or video played from a hard drive or optical drive.
Such TVs work with images in digital format (even an analog TV signal is digitized after reception), which opens up wide possibilities that were previously unavailable.
However, in order to achieve maximum image quality when playing it back from a PC on a connected LCD screen, it is necessary to meet a number of conditions and take into account some subtleties.
In this article, you will learn what you need to pay attention to when connecting an LCD or plasma TV to the video output of a personal computer.
What are the video card requirements?
First of all, the PC video card must have two outputs.
Digital connectors are optimal for image output, so video cards equipped with a pair of DVI connectors, or DVI and HDMI.
These digital video interfaces provide best quality Images.
How to connect the display to a computer?
The connection method depends on the “range” of connectors on the TV and the outputs of the PC graphics card.
A digital connection provides the best quality.
Connecting a widescreen TV via analog interfaces such as S-Video or composite (tulip connector) is also possible, but gives less than ideal results.
It is recommended to use it only if there are no other options.
How is the sound signal transmitted to the TV?
Using HDMI (digital interface) or Scart (analog interface) cables, sound is transmitted to the TV simultaneously with the image.
Through the composite interface, as well as VGA and DVI interfaces, only the image is transmitted to the computer.
Therefore, when using these interfaces, an additional cable will be required to carry the audio signal from sound card to the audio system (built into the TV or external to the latter).
Such cables can be equipped with mini-jack and “tulip” connectors, depending on the type of sound card jacks and audio inputs of the TV.
How to set up a PC to display pictures on a TV?
To achieve a sharp and clear image on the connected display, you must first configure correct resolution(this is done using the video card driver).
Setup is often required in cases where the computer automatically recognizes the TV connected to it.
Only if the graphics card settings exactly match the physical resolution of the TV screen, for example 1366 x 768 pixels, will the image quality be optimal (of course, the graphics card must also support this resolution).
Fewer problems arise when using TVs whose resolution corresponds to PC standards, for example 1280 x 720 pixels - in this case, the number of setup steps can be reduced to a minimum.
Most graphics cards support the high resolution with which the latest TV models work - 1920 x 1080 pixels (Full HD or True HD).
True, a number of widescreen TV models use a resolution that is not typical for computer screens, for example 1024 x 720 or 1024 x 1080 pixels.
Such parameters for a graphics card are often impossible to configure using standard tools in the Image Properties window.
However, there is a solution to this problem:
Using the Powerstrip utility program, you can set almost any resolution.
Below we will tell you how to fix the most common problems that arise when connecting a TV to a computer.
1. Cropped image
Many TVs support the Overscan function for HDMI and DVI interfaces.
Like picture tube TVs (CRT TVs), they scale the picture to minimize noise when broadcasting TV shows or playing DVD movies.
Because of this, when connected to a computer, part of the image is lost.
Some video cards equipped with a graphics chip from NVIDIA can enable Overscan compensation.
If you cannot disable Overscan on digital TV inputs, you can often achieve the correct image size by connecting via analog VGA interfaces or YUV.
2. “Black square” on the TV screen
Sometimes it happens that the screen of a TV connected via an HDMI connector remains black when feeding an image from a computer equipped with a DVI output.
The reason for this may be the activation of HDCP - protection against unlicensed copying.
Actually, HDCP protection should only work when playing copy-protected content from a PC.
However, sometimes HDCP is enabled when transmitting unprotected video signals.
If your TV has a DVI connector, use it to this problem can be solved by connecting PC via this interface.
If you absolutely want to play high-definition movies, your graphics card must support HDCP anyway.
The corresponding cards have appeared in the product range of popular manufacturers such as ATI, MSI and Sapphire.
3. TV is not recognized
The computer correctly recognizes the TV, which is connected to the PC and turned on during Windows startup.
Then the TV will independently “tell” the computer what resolutions it supports.
4. The TV is not recognized correctly
Automatic TV recognition does not always function correctly.
For example, a computer can automatically transmit a low-resolution image of 640 x 480 pixels to an HDTV, although the physical resolution of the TV screen is 1920 x 1080 pixels.
In such cases, you need to disable the automatic TV recognition function.
You can then set the correct resolution for your external TV through the Picture Properties window.
5. Incorrect aspect ratio
The resolution of some widescreen TVs does not work well with the typical graphics card settings used in the Windows operating system.
Yes, many plasma TVs work with a resolution of 1024 x 768 pixels, but the pixels of their screens are rectangular shape, which is necessary to display a widescreen image with an aspect ratio of 16:9.
The pixels of computer display screens are square; video card drivers for Windows OS are designed for this, so when transferring a picture from a PC to a TV, the image turns out distorted.
In such cases, it is impossible to adjust the optimal resolution using standard tools.
The only effective approach in this case is trial and error.
Try it different settings, select those that provide the highest image quality when visually assessing it.
Select the resolution in the video card driver so that it matches the resolution of the TV screen with pixel accuracy - in in this example 1024 x 768 pixels.
An alternative is a resolution with any suitable number of lines that corresponds to the 16:9 format, for example, 1360 x 768 pixels (16:9).
6. Distorted Image
Often it is not the computer’s fault that the frame on the screen is stretched or, conversely, flattened, and the inscriptions look fuzzy and blurry.
Every LCD TV supports Zoom features to help minimize black bars that appear at the edges of the screen when playing movies and when converting 4:3 aspect ratio TV to widescreen.
Enabled frame scaling on the TV “kills” the fine resolution adjustment made using the graphics card.
Before adjusting the resolution on your PC, make sure the Zoom function on your TV is disabled.
An even better option is to turn on the dot-to-dot pixel matching mode, which many LCD TVs have.
This mode allows you to output the video signal from your computer “as is”, without scaling or interpolation.
7. Errors caused by DVD playback program
If none of the above helps, check your DVD playback program settings to see if the widescreen TV compatibility options are enabled.
Setting the video card resolution
Some widescreen TVs cannot be adjusted to the appropriate resolution because the graphics card driver does not recognize the connected TV.
However, you can configure the driver to provide the required resolution for your TV screen.
1. Right-click on an empty space on the Windows Desktop, then select the “Properties” command - the “Display Properties” window will open.
After that, click on the “Options” tab, then on the image of the TV, for example, and then on the “Advanced” button.
2. The “Properties: Monitor Connection Module and NVIDIA” window will open; in it, go to the “Monitor” tab.
Check if the “Open modes...” checkbox is checked.
If yes, remove it with a mouse click. Then click on the “OK” button.
Drag the slider to the right or left to select the desired resolution, for example "1280 x 720".
Save the changes by clicking "OK" and "Yes".
3. If you still cannot select the desired resolution, then it is not supported by the graphics card driver.
In this case, the appropriate resolution must be set using the Powerstrip utility.
Attention!
It is necessary to be able to separately configure the video outputs, which will allow you to set the optimal resolution for both the monitor and the connected widescreen TV.
This feature is present in most modern graphics cards.
Difficulties arise only with outdated and integrated graphic cards, which transmit the same signal to both screens.
This is bad because the screen aspect ratio of a PC monitor and a widescreen TV are different (4:3, 5:4 or 16:10 for a monitor and 16:9 for a TV).
The consequences are a stretched or cropped image.
What do the “HD Ready” and “HDTV” logos say?
Many widescreen TVs carry the "HD-ready" logo.
This logo is used to mark devices that are ready to receive high-definition television (HDTV) signals.
To do this, the TV must meet certain technical specifications, that is, display frames consisting of at least 720 lines.
This is important because the minimum frame resolution of an HDTV signal is 1280 x 720 pixels.
The next requirement is the presence of a digital input for a video signal, DVI or HDMI.
Component or YUV jacks are required to transmit high quality analog video signals.
Since some TV channels broadcasting in HDTV (however, they are not yet available to Russians), as well as manufacturers of Blu-ray and HD-DVD discs provide their programs and films with copy protection, the TV must also support HDCP technology.
Without this function, it will not be able to play protected video at all or will show it with greatly “reduced” quality.
However, without additional devices TVs with the “HD-ready” logo can only receive regular TV programs.
To watch HDTV broadcasts they need additional module, for example Universal-LNB.
An alternative is to connect the TV to a computer equipped with an HDTV tuner, such as the Pinnacle PCTV Sat HDTV Pro USB.
Again, for Russian users, the ability to watch HD video from home players or optical drives that support HD-DVD or Blu-ray is more relevant.
Televisions that receive a high-definition television signal (HDTV) without additional tricks are usually marked with a different logo.
Intel's plans for the next six months
On October 5, the company will announce the availability of Core i3/i5/i7-8000 (Coffee Lake-S) desktop processors.
Next, in a few weeks, Intel will introduce dual- and quad-core 14nm Gemini Lake SoCs, and in the first quarter of 2018 it will expand the range of 8th generation Core desktop CPUs with additional models with two, four and six cores.
The Pentium Silver brand debuts with the Intel Gemini Lake SoC.
It will mark the quad-core J5005 chip for budget mini-PCs and laptops.
The thermal package of this processor will be 10 W.
The same TDP level will most likely be characteristic of both the Celeron J4105 and Celeron J4005.
The official announcement of the Gemini Lake family will be scheduled for one of the days between October 23 and November 7.
Public interest in expanding the Intel Coffee Lake-S processor family for the LGA1151 platform will be higher than in modest Gemini Lake chips.
The announcement will take place in the first quarter of next year - presumably at CES 2018 (January 9-12) or in March, after the Chinese New Year.
Logically, additional Core i5 and Core i3 models with six and four physical cores, respectively, as well as inexpensive Pentium and Celeron CPUs will see the light of day.
The appearance of 35-W Coffee Lake-S processors in the chipmaker's plans means the upcoming release of economical Core, Pentium and Celeron models with the T suffix (for example, Core i7-8700T).
For such CPUs, well-organized passive cooling is often sufficient.
Those wishing to upgrade their PCs will receive wide choose motherboards based on Intel Z370 (announced recently), H370, B360 and H310 chipsets.
The last three will not support overclocking processors by increasing the multiplier.
In the second quarter of next year, it will be the turn of the Q370 and Q360 system logic sets for the corporate segment of the market.
Solutions based on them will pay increased attention to network security and tools for remote management of computer resources.
27th October current year Intel will introduce Optane SSD 900P drives with capacities of 480 and 280 GB.
Optane SSD 900P devices are made in the formats of a 2.5-inch U.2 SSD and a PCI Express expansion card with an interface bandwidth of 32 Gbps (four PCI-E 3.0 lanes).
The drives are based on 3D XPoint memory, which, together with a proprietary Intel controller, provides peak performance of 550 thousand.
IOPS when reading and 500 thousand IOPS when writing data.
The maximum sequential read and write speeds are 2.5 GB/s and 2 GB/s, respectively.
As we see, the limit bandwidth PCI-E 3.0 x4 is not that far away, and Intel, as well as motherboard manufacturers, will have to introduce the PCI Express 4.0 interface with 16 Gbps per lane into the ecosystem of desktop PCs and workstations in the foreseeable future.
In the future, the Optane 900P series will be expanded with 960 GB and 1.5 TB models.
The power consumption of the Intel Optane SSD 900P is quite high - it is 5 W at idle and 18 W under load.
Accordingly, these drives require either a heatsink or heat transfer to the case (in the case of 2.5-inch devices).
According to Intel, typical tasks that can be solved with the 900P in the system are graphics and video processing, physics simulation, high-resolution image and video creation, and resource-intensive games.
It is curious that the Optane 900P are positioned as SSD drives optimized for the universe of the space simulator Star Citizen.
AMD Releases Radeon Driver 17.9.3
AMD introduced the third September driver Radeon Software Crimson ReLive Edition 17.9.3 for its graphics accelerators.
Key innovations include support for new games: the racing simulator Forza Motorsport 7 and the fantastic strategy Total War: Warhammer II.
For the latter, the Radeon Chill profile was also added and support for multi-GPU configurations was activated.
In addition to the mentioned innovations, several bugs have been fixed.
For example, the Enhanced Sync mode setting is no longer lost on some video cards of the Radeon RX Vega family.
In multi-GPU configurations on some systems with AMD Ryzen chips, the secondary accelerator clocks are now at normal idle speeds.
Finally, F1 2017 no longer experiences negative performance scaling on systems with multiple Radeon RX 580s.
Unfortunately for fans of the competitive team-based action game Overwatch, there is still no fix for a bug that can cause the game to randomly freeze on some configurations.
If the problem is observed, it is better to stay on the July driver 17.7.1 until the AMD developers release a new build with a fix.
Radon 7000 series and higher graphics cards are supported.
32- and 64-bit versions are available for download for Windows 7 and 10 operating systems.
New memory for SSD
At this stage of development of computer technology, the main type of non-volatile memory for solid-state drives is NAND flash memory.
However, this flash memory is not without its drawbacks, the main one being the limited number of rewrite cycles.
Given this, many manufacturers are working on alternative types of non-volatile memory, and Intel and Micron have achieved the greatest success with their 3D XPoint memory, releasing the first mass solutions based on it for the consumer and corporate markets in the first quarter of this year.
Another alternative to the current NAND flash could be resistive random access memory ReRAM (Resistive random-access memory).
The basic principle of its operation is to change the resistance of some dielectrics after applying a high voltage to them, which is why conductive areas with low resistance are formed in them.
By using appropriate voltage levels, conductive areas can be either destroyed (and the material becomes a dielectric again) or formed again (and the material becomes a conductor again).
One of the pioneers in the development and production of ReRAM is the American company Crossbar, which presented experimental samples of such memory back in 2013.
And more recently, at the beginning of 2017, the production of Crossbar ReRAM chips for embedded solutions began at the facilities of the Chinese contract manufacturer Semiconductor Manufacturing International Corporation.
Now it has become known that Crossbar, together with another American company Mobiveil, are engaged in a very ambitious task - introducing ReRAM technology into the SSD form factor.
Mobiveil already has experience in developing PCI-E 3.0 controllers, so they will be responsible for the set of logic in the new SSDs.
The slides showed beautiful numbers - an increase in IOPS by ten times and a reduction in read/write latencies by the same amount compared to classic SSDs.
But whether this technology will reach the mass market and in what form it will be - only time will tell.
Many people who buy a new TV sooner or later decide to connect it to a computer, since watching movies on a big screen is much more convenient than on a small monitor. And playing on TV is much more pleasant than on a computer. However, having connected the TV to a computer or laptop using an HDMI cable, people quite often encounter the fact that everything is fine with the image, but for some reason there is no sound. Let's try to figure out why this happens and how to fix it.
- Check the sound settings on your TV. Make sure the TV is set correctly and the volume is not at zero. If everything is in order here, then most likely the cause of the malfunction should be looked for elsewhere.
- Check your HDMI cable and make sure it is working properly. Remember that to transmit sound you need an HDMI cable version no lower than 1.3
- If everything is fine with the cable and TV, then you should start setting up your computer. So, for this you need:
Right-click on the “Speakers” icon, which is located on the right side of the taskbar in the notification area. Here you need to select the “Playback devices” item. Then you need to click the “Playback” tab, then “Digital Output” or “Digital Output Device (HDMI)”. After that, click on “default” and then on the “OK” button. After this, the sound should appear. If you do not see the “Digital Output” and “Digital Output Device (HDMI)” items, then most likely the problem is that the IntelAudio HDMI driver is not installed on your computer. Find the appropriate driver for your computer and install it, then try turning on the TV again.
- Check if your video card supports audio transmission. If you are trying to connect a TV via a PCI-E video card, then in this case, in order to transmit sound, the video card must be connected to the SPDIF output on the motherboard using a special adapter. If all this is connected, then in the sound driver properties you need to set audio output via SPDIF.
- If you don't know what video card you have and don't want to take your computer to a workshop, you can run the audio separately from the video. To do this, you need to purchase a special jack 3.5 cable (the so-called tulips) and connect the audio outputs of the computer to the audio outputs of the TV. After this, the sound should appear.
- If after this the sound does not work on the TV when connected to a computer, then perhaps the fact is that in some TV models, by default, when the HDMI input is turned on, sound should be output only through it. And not all models can use additional analog inputs. Therefore, you must carefully read the instructions for the TV. If it does not know how to use analog inputs in parallel with HDMI, then you will have to output sound to separate speakers. This is not very pleasant, but the plus is the fact that the sound will be much better in quality than just through a TV.
All of the above is far from full list There are quite a lot of reasons why the sound does not work when connecting a TV to a computer, so determining exactly what is wrong can sometimes be very problematic. Therefore, you should contact the TV Service Center, since we have experienced technicians who will help you connect your TV to your computer, carry out diagnostics and fix all problems directly at your home.
If you connect your LCD TV to your computer, you can enjoy watching movies on the big screen while playing them from your hard drive. To do this, you just need to connect both devices correctly.
Why are PC and TV compatible with each other?
The screen of any LCD or plasma TV has a fixed number of dots. For example, simple LCD TVs are capable of displaying 1366x768 pixels, and most modern expensive models of both categories are capable of displaying 1920x1080 pixels.
Since usual television signal has a rather low resolution - only 720x576 pixels; flat-screen TVs themselves adjust it to their eigenvalue points. This scaling can be performed by a PC instead of a TV - by calculating from regular TV programs or DVDs and digital photographs, the computer receives pictures that absolutely exactly match the resolution of the TV.
This method is even more interesting: powerful modern processors can significantly amplify the video signal, and new software can improve image quality. Signal processing on most TVs cannot be improved.
What type of connection is best to use?
Digital video outputs are best suited for connecting a PC or laptop to a TV.
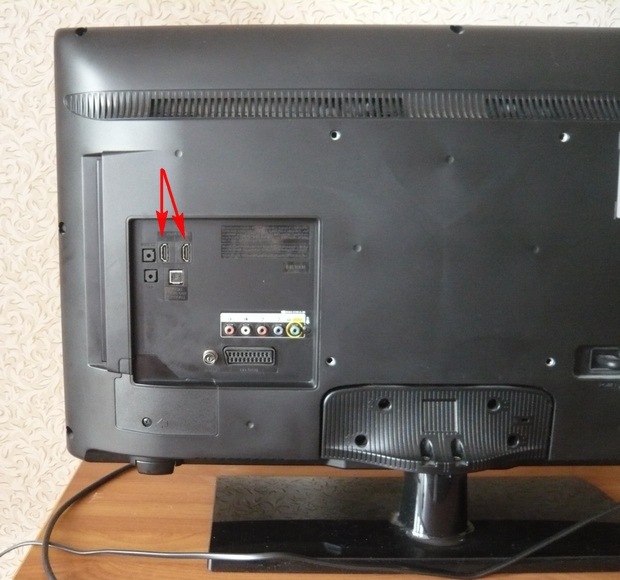
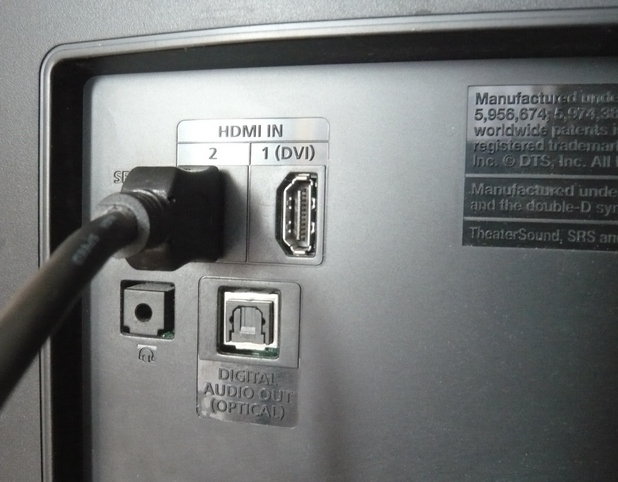
- HDMI: Optimal choice- This is a connection using HDMI. Typically, a modern flat screen TV has two or three HDMI connectors.
- DVI: DVI is much more common than HDMI and carries the same video signals. Using the appropriate adapter or cable, you can connect the DVI output on your computer to the HDMI input on your TV.
- VGA: On a computer that does not have digital video outputs, the VGA connector provides the best picture quality. If your TV does not have a VGA input, you can use an adapter for the YUV input.
- YUV: Some video cards have YUV output. It can also transmit high-resolution signals - up to 1920x1080 pixels. But the image quality is often a little worse than when transmitting a video signal through the VGA output or digital video output.
- Video Connectors: Classic video connectors such as Scart, Video or S-Video are not well suited for connecting a large screen TV to a PC. The quality of the signal they transmit reaches, at best, the level of the original TV image. The picture will appear blurry on a flat screen TV.
What is important when connecting via HDMI?
If an additional monitor is not connected to the computer, but only a TV via HDMI output, then after the OS starts, the desktop will automatically appear on the TV screen. Of course, there are exceptions, since most video cards have an HDMI output configured for a display with a resolution of 1280x720 or 1920x1080 pixels. If the TV fits these dimensions and has a resolution of, for example, 1400x900 pixels, the screen will, in the worst case, remain black.
But you can still set the video card to the TV resolution using a little trick: additionally connect a computer monitor to the system unit via a VGA or DVI output. It will show the image in any case, and this will allow you to configure the correct resolution for the TV in the video card driver (see the figure on the right).
What should you pay attention to when connecting via DVI?
DVI was originally designed solely for connecting a monitor, and was not designed to transmit audio signals. But today there are video cards on the market that can add an audio signal to the DVI output data stream - for example, many models with AMD Radeon HD 2000 and 3000 series graphics processors. The included DVI to HDMI adapter transmits image and sound to the TV.
For all other computers, you can purchase adapters starting at about $25 that will connect the DVI output to the HDMI input on your TV. In this case, the audio signal from the sound card must be supplied through a separate cable. Picture and sound may not arrive synchronously to the TV. This flaw can be corrected using an additional utility such as Reclock.
The DVI output must be equipped with HDCP copy protection, as only then can you enjoy high quality most Blu-ray and HD-DVD discs. Some flat screen TVs will refuse to work at all if they receive signals from a DVI output without HDCP. You can find out whether the DVI output is protected, for example, using the CyberLink BD/HD Advisor program.
What is important to consider when using a VGA socket?
Some TVs cannot properly display the 16:9 picture they receive through the VGA output. Instead of full-length photos and videos, they show a compressed image with black margins on the right and left. Aspect ratio correction can be done using the appropriate utility included with the video card driver. It is capable of stretching the image on the TV screen both vertically and horizontally.
It should also be noted that many TVs do not use their full resolution when feeding images through the VGA output. Even modern televisions of the possible 1920x1080 pixels, the maximum 1360x768 is often used. The reason is that they do not “tell” the computer that they are higher resolution. Experienced users can try to set the appropriate resolution using PowerStrip 3, but this method is not always successful. The program can change the settings of the video card in such a way that the TV will not show at all. The only way to get the image back on the screen is to restart Windows in safe mode and then uninstall the PowerStrip program.
How to get optimal sound?
Users who want to enjoy large, high-quality images will certainly not be content with mediocre sound from their laptop or PC speakers. If the computer and TV are connected using HDMI, the same cable will also transmit the audio signal. Truly full and surround sound can only be reproduced by a home theater, so you should connect an HDMI cable from your computer to it, and another from the home theater. hdmi cable will transmit the image to the TV.
If a connection using HDMI is not possible, the PC will need to transmit sound signals via a separate cable - best via a digital output.
How should the TV be configured?
So that the TV electronics do not have to do the calculations again, it must receive an image exactly in its resolution. For LCD TVs this is, respectively, 1366x768 or 1920x1080 pixels.
However, a correctly configured resolution on a PC does not mean that the TV will display the same number of dots. The reason for this is historical: since old picture tubes tended to distort the image at the edges, on classic TVs the edges of the picture tube (which is a sealed glass bulb) are hidden by the housing.
Modern flat screens are capable of displaying images without distortion over the entire surface, including the edges. And yet, many TVs use the so-called Overscan technology: the image is enlarged electronically by approximately 5% and is trimmed at the edges so that LCD and plasma TVs show the same portion of the image as CRT TVs. As a result, the number of pixels of the video card and the screen do not always match - the sharpness of the image deteriorates.
Most TVs allow you to turn off this magnification. On some models this function is called Underscan, on others Only Scan or Pixel for Pixel. But it also happens that the Overscan function is always active when connected via HDMI and DVI. Many graphics cards smooth out this by making the overall image smaller (see picture below). In this case, the entire Windows desktop fits on the screen, but, unfortunately, pixel-accurate image transmission is impossible. Thus, TVs with a switchable Overscan function are more preferable.
How should the computer be configured?
There are four options for setting up your computer.
- Ideally, the video card will recognize the connected TV using the EDID and automatically adjust the screen resolution and refresh rate.
- But data exchange is not always possible, since many flat-screen TVs have a resolution of 1366x768 pixels, and the video card only transmits 1360x768 pixels (EDID values must be a multiple of eight). To solve this problem, right-click on an empty area of the Desktop. If you are using Windows Vista, click “Personalization”, “Display Settings”, in Windows XP - “Properties”, “Options”. Then in the window that appears, move the slider until you get the desired resolution.
- If this option is not available, you need to unlock all driver permissions: click on and uncheck the checkbox. Now you can set not only the resolutions automatically recognized by the operating system, but also others supported by the video card driver.
- Other customization options are provided by additional utilities that come with the video card, such as Nvidia Control Panel or ATI Catalyst Control Center. The resolution can also be adjusted using the special PowerStrip program.
Attention! If you are connecting your TV to your computer as a second monitor, then the monitor and TV must be configured separately. In this case correct setting The screen will say “Extend the desktop onto this monitor”. You can display the settings of the program playing the video on the monitor, or continue working on it while watching a movie on the TV screen.
HD video slows down - how to deal with it?
Blu-ray and HD-DVD discs are currently actively replacing DVDs; they can be played by an increasing number of computers (for example, a laptop from Toshiba Satellite A200-1KH. Such discs contain films in a special film format - 24 frames per second. At the same time, If the computer uses a frequency of 50-60 Hz, the image “slows down.” The picture will be as clear as possible if you switch the video card to a refresh rate of 24 frames per second.However, this can only be done if the TV supports the “24p” mode.
What resolution should the TV have?
You can enjoy the high quality of Blu-ray and HD-DVD discs on a TV with a resolution of 1920x1080 pixels. Models that support lower resolutions, such as 1366x768 pixels, are also quite suitable for this. A viewer sitting more than three meters away from the TV is unlikely to notice the difference.
Are there TVs that do not show images from a computer?
Hardly ever. But digital image transmission devices can be quite tricky. Problems arise when connecting HDMI TVs to the DVI output, as they send different EDID data to the video card. This is why it is impossible to set the correct resolution when connecting via DVI. In addition, some TV manufacturers create their budget models in such a way that they display images only from devices that support HDCP. If the video card uses HDCP only for playing Blu-ray or HD-DVD, then the picture will be transmitted to the TV exclusively when playing these discs.
How else can you transfer photos, music and videos to your TV?
A direct cable between your computer and your TV is just one option for transferring photos, music and videos to your living room TV, but it's not the only one. If the computer is located far from the TV and you do not want to pull a finger-thick cable across rooms and lay it under doors, then the image and sound can be transmitted over the network. To do this, connect your PC, for example, to a DSL router, with which you can easily organize a home network. You just need to allow access to photo and video materials or music files on your computer, for example in Windows settings Media Player 11. A multimedia receiver connected to the TV (connected to the router) will access the data on the computer and transcode it into signals that the TV can process. Signal transmission via WLAN can often be intermittent, so if you want to enjoy high-quality images without stuttering, you need to connect your multimedia receiver using network cable. If you're connecting a flat-screen TV to your computer as a second monitor, enable the "Extend desktop onto this monitor" option.
Digital stereo connection
Live-action DVDs and new Blu-ray and HD-DVD discs have up to 8 audio tracks. Maximum sound quality can be obtained by connecting your PC to a home theater. The best way to do this is to use your computer's digital audio outputs. The SP/DIF jacks support all DVD audio formats. If you want to hear the sound in the new HD-DVD or Blu-ray formats, you need to transfer it from your computer to your home theater amplifier using an HDMI cable. It will separate the video signal and send it through its own HDMI output to your TV, while the audio will go through your home theater speakers. All sound formats are transmitted only by HDMI version 1.3, but the difference between conventional and new sound formats can only be heard on very high-quality and expensive equipment.
I answer all questions in detail.Friends! Everything you do on the computer, watch movies, cartoons, chat on Skype, play, view photos, slides or Internet pages in a browser, all this will be shown on the screen of your TV if the TV is connected to the computer via an HDMI cable. Nowadays, almost any TV has an HDMI input, and most produced video cards have an HDMI output.
The HDMI interface was invented in order to connect two high-tech digital devices (which are undoubtedly your computer and TV) and transfer information from device to device without loss of quality. Such transmitted information can be an image and multi-channel high-quality sound. If you have a movie or cartoon on your computer, in any HD, Blu-ray or AVI, MOV, MPG, MP4 format, then you can watch it all on your TV. There are slides or photos, please look. I’m not talking about games, because I’m not a supporter of them; they take up a lot of time from young people, which can be spent on studying. We connect the TV to the computer via HDMI second monitor To connect the computer to the TV we will use an HDMI cable, it looks like this and can be up to 20 meters long, choose the cable of the length you need.

For example, let's take a Samsung TV, not quite the new 4 series ( LED type), purchased several years ago, but it already has two connectors for connecting HDMI devices.
The computer that we will use to connect to the TV was also purchased about three years ago, it has an Nvidia video card installed and also has an HDMI connector.

As I already said, on our TV there are two HDMI connector. With the TV turned off, connect the HDMI cable to HDMI connector 2,
We connect the reverse end of the cable to the HDMI connector of the video card of the desktop computer. The computer, in turn, is already connected to the monitor (also Samsung SyncMaster 971P) with a DVI cable.

We turn on the computer and TV. There may not be an image on the TV right away, instead we see the following message: “Cable not connected” “Check cable connections and source parameter” or “Weak signal or no signal”

On Samsung TVs, to display a list of all available sources video signal, you need to press the Source button on the remote control.

A menu appears on the TV, in this menu, using the remote control, select the HDMI 2 connector,


Now, on our TV, an exact copy of our computer’s desktop should appear. But again there is nothing, the same error appears on a black screen. So we go to the “Screen Resolution” settings. Right-click on the desktop and select “Screen Resolution”.

As we can see in the window that appears, our main screen is set to the second (2) Samsung SyncMaster 971P monitor, and in the “Multiple Screens” parameter we have set “Display desktop only on 2 monitor”, which is why the image is only present on the computer monitor screen, but it's not on the TV

We bring everything in this window to this state. Select a parameter
Multiple screens: "Duplicate these screens"
In the “Screen” parameter, “Multiple monitors” is automatically set, click Apply and OK.

The desktop of our computer appears on the TV.

The resolution of our small Samsung TV is 1366 x 768. If your computer monitor supports this resolution, then it will automatically be set to the same resolution of 1366 x 768. If not, then either the TV or monitor will have the wrong resolution. For example, my Samsung SyncMaster 971P monitor has maximum resolution 1280x1024. When using a TV and a computer monitor at the same time, the main thing for me is to set the resolution on the TV correctly, otherwise why would I connect it then. I put it on Samsung TV The resolution is 1366 x 768, the image is perfect.

And on a computer monitor such a resolution of 1366 x 768 looks like this.

And nothing can be done here. If you want the perfect image on your TV and computer monitor, then they must support the same screen resolution, that is, have the same characteristics. There is no sound on the TV after connecting the TV to the computer via HDMI Friends! Do not forget that HDMI interface transmits video and sound over one cable and we can specify in the settings operating system Use the TV's built-in speakers to output sound.
Let's fix the problem by using a TV instead of a monitor. Go to Start->Control Panel->

Hardware and Sound->Sound

If you don’t have anything in this field, right-click on an empty space and in the menu that appears, check the “Show disabled devices” items. "Show connected devices"
Now we look at the name of our TV, in my case it is Samsung, we need to turn it on and turn off the rest. Right-click on Realtek and select Disable.

We also turn off the speakers.

Samsung – Enable, Apply and OK.
 (1 ratings, on average: 5,00 out of 5)

