Connectors for connecting a monitor. What is a DVI connector? Connectors for connecting output devices
But so far there are simply no monitors on the market that support this interface. What is there? This article will talk about the main modern interfaces for connecting monitors and TV panels, their features and differences, and also give advice on how to choose a connection interface for specific needs and not make a mistake.
Note: the picture before the cat shows the connection panel for the Dell UltraSharp U2711 monster monitor.
Brief educational program
All existing interfaces differ from each other in three main parameters: the type of transmitted signal (analog or digital), the maximum supported resolution and throughput. Of course, there are many more parameters, but these three give a basic understanding of what a particular interface can do.In the competition between analog and digital interfaces, the latter have long won a convincing victory. The digital signal reaches the output device without much distortion, which allows you to get a high-quality picture without interference. In addition, any modern video card initially produces only a digital signal, and its conversion to analog - and on the monitor, unless, of course, we are talking about cathode-ray antiques, again to digital - leads to a significant loss of quality. However, analogue connections today still have their place in the sun.
When it comes to bandwidth and resolution, these two parameters are closely related. The greater the bandwidth provided by the interface, the greater and maximum resolution Images. If someone does not understand what we now mean by the term “bandwidth,” then we explain: this is the number of bytes of information that the interface is capable of transmitting to the monitor per second after receiving a signal. It is obvious that interfaces designed to support the operation of wide-format monitors and LCD/plasma TVs with their high resolutions must have high bandwidth.
4K2K, 3D content and how to play it
Before we start talking about the actual ways to connect monitors and TVs, I would like to touch on a fashionable and current topic: ultra-high resolutions and 3D in consumer electronics.4K2K is modern standard, implying a resolution of 3880 × 2160 pixels - four frames 1920 × 1080, a standard that for a long time ruled the roost among high-definition videos. Accordingly, each uncompressed frame requires four times the video interface bandwidth. And if you take into account the fashion for 48 FPS and 3D video... (multiply by two and by two more if you want 48 frames for each eye, and even in 3D).
Firstly, 4K2K content now is a big deal. Therefore, it will be difficult to enjoy anything other than the demo videos that come with your expensive TV in native resolution. To do this, many manufacturers install a special chip that allows you to stretch FullHD content to 4K2K using special algorithms: perhaps not as cool as 4K2K live broadcast, but very, very good for upscale. Ask any GT user who has such a TV - they won’t let you lie.
Secondly, there are two types of 3D different types- with passive and active glasses. In the first case, the content receives interlaced scanning, and polarized glasses, inertia, a bright picture and an interesting movie make you forget that half-frames come with an “unfair” resolution. In the second case, a double frame rate is used, and here the main problem awaits us: not all video interfaces are capable of transmitting a FullHD image with 48 frames per second.
Modern connection methods
We should start our review of the main interfaces used with VGA. This is the oldest of the popular interface types used today - it was developed back in 1987. Since then, however, it has been somewhat improved following the development of monitors.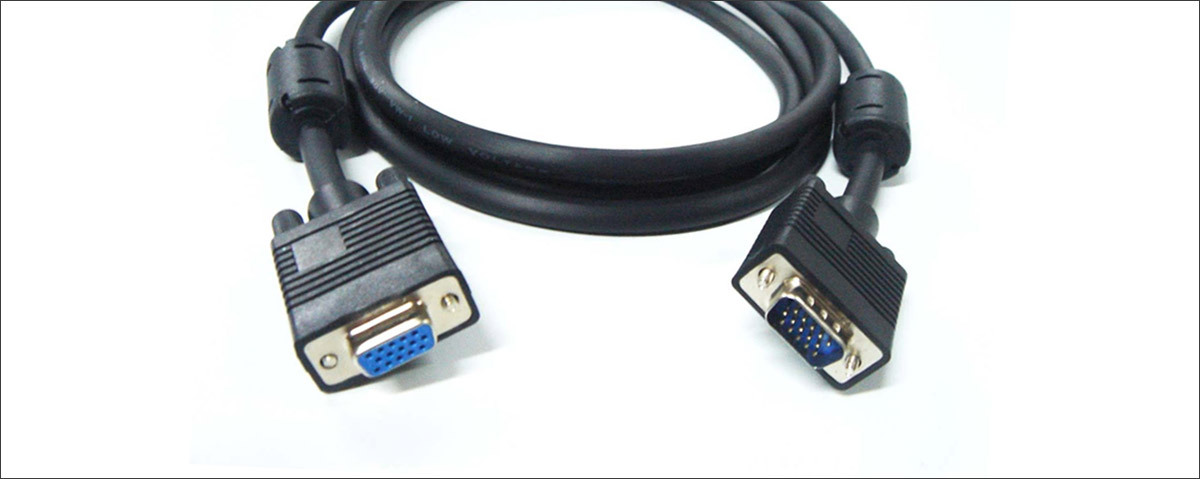
This is the only analog interface that is still actively used today - its “colleagues” S-Video, YP b P r and digital-to-analog SCART are no longer found in new modern devices. Almost all large manufacturers computers plan to completely abandon VGA this year. In essence, it simply has no advantages compared to other types - it is a morally and technically outdated standard that is about to disappear from the market. The maximum supported resolution is 1280x1024 pixels. Most often found in office monitors and various projectors.
The most popular digital interfaces today are DVI and HDMI.
DVI exists in three varieties: DVI-D (digital signal only), DVI-A (analog only) and DVI-I (both signal types). This interface provides good quality images, is built into almost all modern monitors and video cards. Its disadvantage is the strong dependence of the signal quality on the cable length.
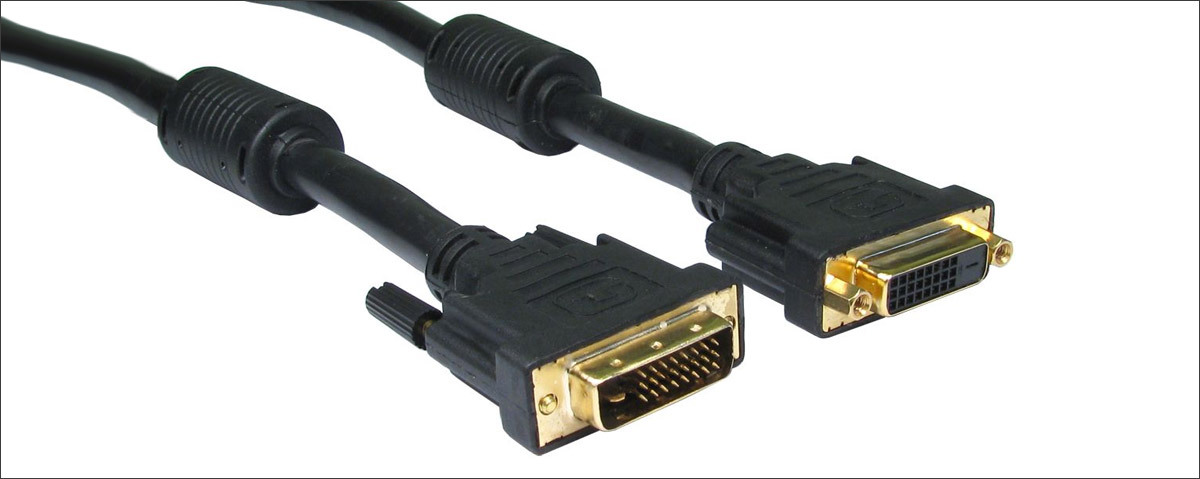
Optimal data transfer via DVI is ensured by cables up to 10 meters long, which is sometimes not enough (however, for use in stationary home computers this is usually sufficient). The maximum supported resolution is 1920x1080 for single-channel and 2560x1600 for dual-channel models.
HDMI- a more modern and developed alternative to DVI. Unlike " younger brother", is able to transmit not only video, but also sound signals, therefore, connectors of this type are available on all wide-format monitors with built-in speakers, projectors, and plasmas. Please note that when “docking” different versions HDMI the final set of functionality will correspond to the older one.

Here, by the way, lies a serious disadvantage of HDMI - many older cables are not marked in any way, and many features (in particular, 3D support) of HDMI versions 1.4 and older simply will not work, since the cable can easily turn out to be outdated. For the interface to work correctly, it is necessary to combine the versions of all three connection elements (input, cable, output), otherwise the throughput of the “lowest” element will be similar to a bottleneck. In conclusion, we note that, like DVI, HDMI suffers from insufficient recommended cable length (up to 5 meters).
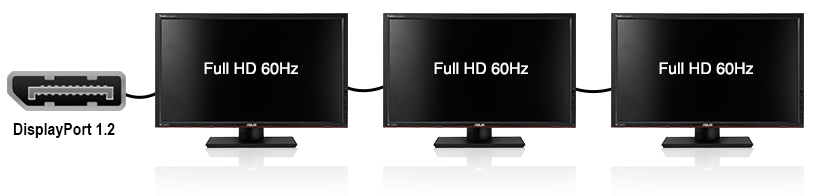
Of the more modern interfaces, the first thing that attracts attention is DisplayPort. This type of connection was developed in 2006 and was planned as a replacement for DVI (but not HDMI, since these interfaces are aimed at different market segments).
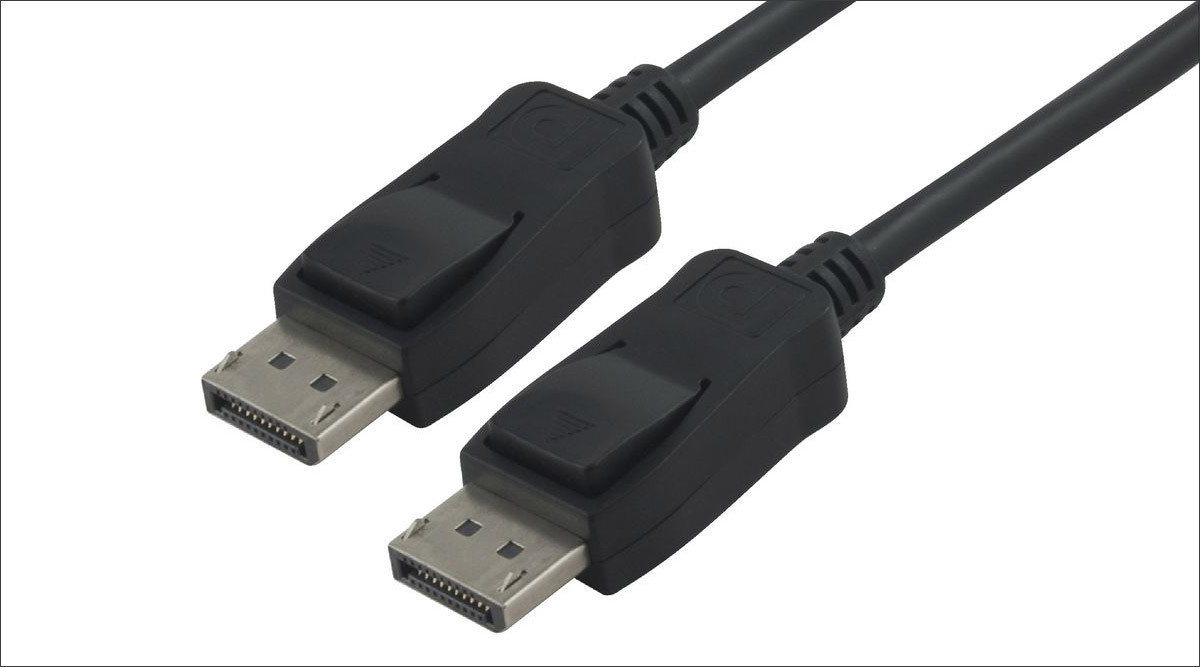
The latest versions (1.2 and 1.3, which is just beginning to gain popularity) support FullHD 3D mode and ultra-high resolution 4K2K, provide highest speed data transmission, allow you to connect professional screens with 48-bit color, and also provide a double level of protection for the transmitted content. What’s important is that DisplayPort allows you to connect entire chains of monitors to one connector using MutiStream technology, without loss of picture quality.
Maximum length cable is limited to three meters for full resolution and 10–15 meters for FullHD.
VGA, DVI, HDMI and now DisplayPort are the base of interfaces for connecting monitors and TVs today. However, there are also less common options, among which the most notable ones are the Apple and Intel product - the universal Thunderbolt port and the latest high-speed version of USB - 3.1 with Type-C connectors.
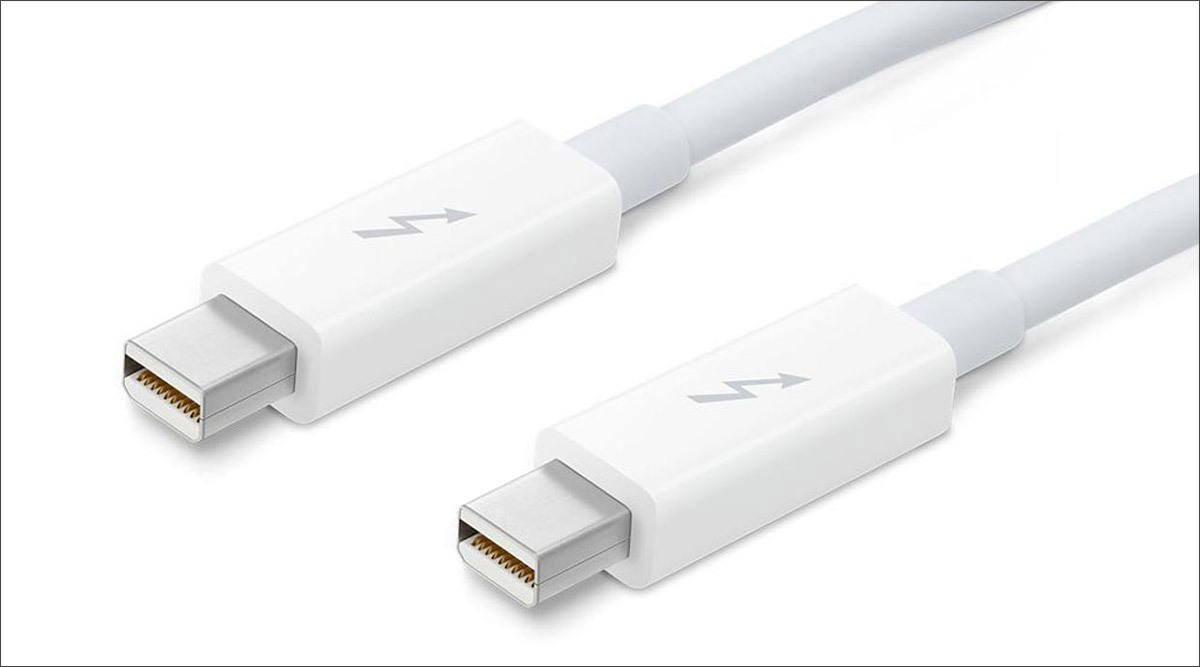
 Thunderbolt- a connection interface that combines DisplayPort and PCI-Express connectors within one connector. Data transfer speeds are very high - 10 gigabits/sec for the first generation and 20 gigabits/sec for the second. The video signal is transmitted via TV using DP protocols - accordingly, like DisplayPort, Thunderbolt is capable of providing 4K2K resolution (in a MacPro using TV you can connect three monitors with this resolution at once), 3D support and in general everything they can latest versions D.P. By the way, recently announced monitors with a resolution of up to 5120×2880 are planned to be equipped with Thunderbolt. Both generations of the interface are fully compatible with each other and with other interfaces using adapters.
In general, Thunderbolt looks like an extremely promising universal peripheral interface, with its characteristics capable of meeting all the needs of top-end monitors and the latest TVs. So far, however, its prevalence in gadgets leaves much to be desired.
The maximum cable length is 20 meters, however, such a wire costs about five hundred dollars, supports only the second version of the protocol and contains both copper lines and optical fiber. Cables more standard sizes- two and three-meter ones cost quite reasonable money.
Screen without wires
Modern technologies make it possible to provide an excellent picture on a monitor or TV without a wired connection. If your monitor or TV supports wireless data transfer, you may want to consider this option. From the software that ensures the monitor operates according to wireless network, usually ordinary users hear three standards - Miracast, DLNA and WiDi. No wonder they are the most popular on this moment. Let's go over them now.Miracast- the most common standard for wireless data transmission using Wi-Fi. Unlike many competitors, it does not require a buffer device - transmission is carried out directly, which is extremely convenient. Another important advantage is that the transfer occurs not in files, but in packets of raw data. Miracast is relatively “young”, but more than 500 manufacturing companies are already implementing it into their devices, which gives the right to consider it almost universal. The maximum supported resolution is 1920×1200 pixels. Of course, by modern standards this is not much, but for wireless transmission it is the best option.
DLNA (Digital Living Network Alliance)- a very widespread technology for transmitting data over a wireless network. It is integrated into many smartphones, modern televisions, laptops and even game consoles. Allows you to freely transfer data between devices connected to a single network, including, of course, transmitting video from devices to screens. A serious disadvantage of DLNA is the specific supported encoding standards - the program almost always starts transcoding before playback, which wastes time and device resources.
WiDi (Intel Wireless Display)- developed by Intel, it is, if possible, an analogue of DLNA. The product is very easy to set up, which makes it ideal option for creating a home theater or storing a movie collection. The main disadvantage is that many note a noticeable signal delay, which makes WiDi a poor choice for games on a large screen.
How to choose an interface to connect to
The choice of an interface for connecting a monitor or TV to a computer should always be based on your needs and goals - as well as the choice of any accessory and components for digital equipment in general. Ask yourself what you need. Do you intend to watch movies on a widescreen monitor? high quality? Work with 3D graphics? Or do you not run anything heavier than Word on your computer at all, and you only need one thing from the picture on the monitor - to have it?It’s clear that even if you have VGA connectors on your video card and monitor/TV next to some digital interface, you don’t need to take cables for the analog standard. VGA is almost history, leave it to live out where it still exists: in projectors and the worst models of monitors. Focus only on digital interfaces.
The vast majority of current devices have connectors for DVI and HDMI, and top models also have DisplayPort, so you will have to choose first of all from these three. The basic advice is this: to output a signal to desktop monitors not in ultra-high resolution, DVI is sufficient, but to play it on a plasma, projector, Blu-ray player, etc. It is worth using HDMI, since in addition to video it can also transmit other data (sound, special subtitles, and so on). DisplayPort puts DVI and HDMI on both sides in terms of image transmission capabilities, but for now it remains the domain of professional and semi-professional equipment. In addition, there are problems with sound output: not all equipment supports audio/video interconnect technology. Its closest relative, Thunderbolt, can do even more: transfer not only a picture, but also, say, a USB hub.
Brief reminder
VGA: supports a maximum resolution of 1280x1024 pixels, cannot do Full HD, not to mention 3D, is only suitable for use on the simplest office computer or projector. And yes, it is morally outdated.DVI: built into literally every modern video card and monitor, which is its huge advantage. Available in single- and dual-channel versions, differing in maximum resolution (1920×1080 and 2560×1600, respectively). Supports digital and analog signals depending on the variety (DVI-A for analog, DVI-D for digital, and DVI-I for both). Suitable if you want to play and watch movies on a large good monitor. There are technologies for connecting 4K2K screens with two cables, so it’s too early to throw DVI into the dustbin of history.
HDMI: Ideal choice for connecting TV to a receiver, computer or laptop, as it also transmits audio signals and some types of subtitles. Available in almost any modern reproducing technology. Supports FullHD 3D, maximum resolution 3840x2160 (4K2K), up to 32 audio channels. The current version is 2.0. To create a home theater, feel free to choose HDMI.
DisplayPort: This standard is superior to “consumer” HDMI in almost every way, but for now remains the preserve of professionals and geeks. There are simply no inexpensive monitor models with DisplayPort. If you are a designer or modeller, then this is your choice, since this interface not only has high bandwidth and supports 4K2K and Full HD 3D, but also allows you to connect several monitors in a single chain without loss of quality, which is convenient if you have a laptop, and you can’t put additional connectors on it. The latest DP version is 1.3, but the most common connectors and wires are version 1.2.
Thunderbolt: At the moment, this is also more of a professional interface than a mass one. The most important plus is full compatibility with DP and data transmission using its own protocol. Thunderbolt can be recommended primarily to users
Without equipment to display text or graphic information, any computer turns into a meaningless collection of boards, wires and controllers, from which it is difficult to get any benefit. In order not to be left without your favorite game, movie or the required document, learn how to connect a monitor to a computer.
Three interfaces are used for connection:
- VGA- analog interface, which was once the only option to play a signal from a video card. At the moment it is obsolete and practically not used in computers.
- DVI- a modern format that provides high-quality images, and therefore is used most often.
- HDMI- a modern format developed on the basis of DVI, often used to connect to the system unit of a TV.
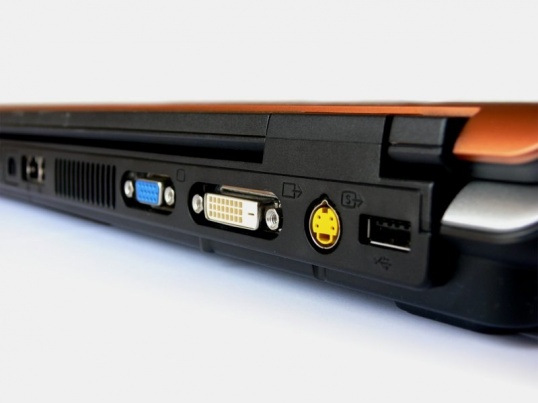
Before connecting the monitor, inspect back wall system unit. Find the video output: as a rule, there should be a DVI interface here. If it is not there, but there is a VGA output, you will have to use it.
If the interface of the monitor and the video output on the system unit do not match, you will have to worry about buying an adapter or a new video card.
An adapter is not the best solution: it does not always cope with its functions, so the image may be displayed on the screen with significant interference.
The best option would be to buy a more modern video card that supports the required interface.
Connecting to a computer
Attention: before starting work, the equipment must be de-energized!
If the interfaces are identical, you can connect the cable. After making sure that the connection is successful, turn on the system unit and monitor. If the screen remains black, turn off the computer and check the connection again.
After starting the computer, you need to configure the system to interact correctly with the monitor. Do this using the drivers that come with the kit. After installing them, you will be able to adjust the screen resolution, update the video card firmware, work with color and change other more significant characteristics Images.
If you need to connect a monitor to a laptop, you will have to do this via HDMI or VGA.

It is these two interfaces that can most often be found on a laptop case, while DVI is practically never found.
Connecting via HDMI is no different from other types of connecting a monitor to a computer or laptop. You can also connect via this interface very quickly by simply connecting the corresponding ports using an HDMI cable.
Connecting a monitor to a laptop
The procedure here is no different from a similar procedure for a computer:
If you managed to connect the equipment correctly, an image should appear on the screen. If this does not happen, try switching to the image transfer mode to the monitor. This can be done using one button from the “F1-F12” row, which shows the screen. Press it simultaneously with the “Fn” key. For example, for Asus laptops this will be the combination “Fn+F8”.
All you have to do is adjust the screen resolution, its frequency and color display parameters.
Probably every user of a personal computer or laptop has encountered issues with connecting a monitor or TV to it, as well as the quality of the resulting image. And if earlier getting a high-quality picture on the screen was quite problematic, today this problem does not exist at all. Of course, if your device has a DVI connector. This is what we will talk about, and also consider other existing interfaces for displaying images on the screen.
Types of connectors for displaying images on a computer monitor or screen
Until recently, everything personal computers had an exclusively analog connection to the monitor. To transfer images to it, a VGA (Video Graphics Adapter) interface with a D-Sub 15 connector was used. Experienced users still remember the blue plug and 15-pin socket. But, besides this, video cards also had other connectors designed to display images on a TV screen or other video device:
- RCA (Radio Corporation of America) - in our opinion, “tulip”. An analog connector designed to connect a video card to a TV, video player or VCR using a coaxial cable. Has the worst transmission characteristics and low resolution.
- S-Video (S-VHS) is a type of analog connector for transmitting a video signal to a TV, VCR or projector, dividing the data into three channels responsible for a separate base color. The quality of signal transmission is slightly better than “tulip”.
- Component connector - output to three separate “tulips”, used to output images to the projector.
All of these connectors were widely used until the late 1990s. Of course, there was no question of quality, since both televisions and monitors at that time had very low resolution. Now we can’t even imagine how it was possible to play computer games looking at a television screen with a cathode ray tube.
With the advent of the new century, thanks to the introduction of digital technologies in the development of video devices, RCA, S-VHS and component output began to be used less and less. The VGA interface lasted a little longer.
A little history
The operating principle of a conventional video card was that the digital image output from it had to be converted into an analog signal using a RAMDAC device - a digital-to-analog converter. Naturally, such conversion is already initial stage deteriorated image quality.
With the advent of digital screens, it became necessary to convert the analog signal at the output. Now monitors have also begun to be equipped with a special converter, which again could not but affect the image quality.
And here, in 1999, DVI appeared, seemingly out of nowhere, the latest digital video interface, thanks to which we can today enjoy the perfect picture on the screen.
The development of this interface device was carried out by a whole group of companies, which included Silicon Image, Digital Display Working Group and even Intel. The developers came to the conclusion that there is no need to convert a digital signal to analog, and then vice versa. It is enough to create a single interface, and the image in its original form will be displayed on the screen. And without the slightest loss of quality.
What is DVI
DVI stands for Digital Visual Interface. The essence of its work is that a special TMDS encoding protocol, also developed by Silicon Image, is used to transmit data. The method of transmitting a signal through a digital video interface is based on the sequential sending of information previously implemented by the protocol, with constant backward compatibility with analog VGA channel.
The DVI specification allows for a single TMDS connection to operate at up to 165 MHz and a transfer rate of 1.65 Gbps. This makes it possible to obtain an output image with a resolution of 1920x1080 with a maximum frequency of 60 Hz. But here it is possible to simultaneously use a second TMDS connection with the same frequency, which allows you to achieve a throughput of 2 Gbit/s.
Having such indicators, DVI left far behind other developments in this direction and began to be used on all digital devices without exception. 
DVI for the average user
Without delving into the jungle of electronics, a digital video interface is just a special encoding device that has a corresponding connector on the video card. But how do you know that a computer or laptop has a digital output?
Everything is very simple. The connectors of video cards with a digital interface cannot be confused with others. They have a specific appearance and shape, different from other nests. In addition, the DVI connector is always white, which makes it stand out from the rest.
In order to connect a monitor, TV or projector to a video card, just plug in the plug the right wire and secure it with special hand-screwed bolts.
Resolution and scaling
However, neither digital coding nor special video card connectors have completely solved the problem of computer-monitor compatibility. A question arose about image scaling.
The fact is that all monitors, screens and televisions that already have a DVI connector are not capable of producing a higher output resolution than that provided by their design. Therefore, it often happened that the video card produced a high-quality picture, and the monitor showed it to us only in a quality limited by its capabilities.
The developers caught on in time and began equipping all modern digital panels with special scaling devices.
Now, when we connect the DVI connector on the monitor to the corresponding output on the video card, the device instantly configures itself, selecting optimal mode work. We usually don’t pay any attention to this process and don’t try to control it.
Video cards and DVI support
The first video cards of the NVIDIA GeForce2 GTS series already had built-in TMDS transmitters. They are still widely used today in Titanium cards, being integrated into rendering devices. The disadvantage of built-in transmitters is their low clock frequency, which does not allow achieving high resolution. In other words, TMDS do not make the most of their advertised 165 MHz bandwidth. Therefore, we can say with confidence that NVIDIA at the initial stage failed to adequately implement the DVI standard in its video cards.

When video adapters began to be equipped with an external TMDS, working in parallel with the built-in one, the DVI interface was able to produce a resolution of 1920x1440, which exceeded all the expectations of the company's developers.
The Titanium GeForce GTX series had no problems at all. They are without special effort provide an image with a resolution of 1600x1024.
ATI took a completely different path. All of its video cards that have DVI outputs also operate from integrated transmitters, but they are supplied complete with special DVI-VGA adapters that connect 5 analog DVI pins to VGA.
Maxtor specialists decided not to bother at all and came up with their own way out of the situation. The G550 series video cards are the only ones that have a dual DVI cable instead of two signal transmitters. This solution allowed the company to achieve a resolution of 1280x1024 pixels.
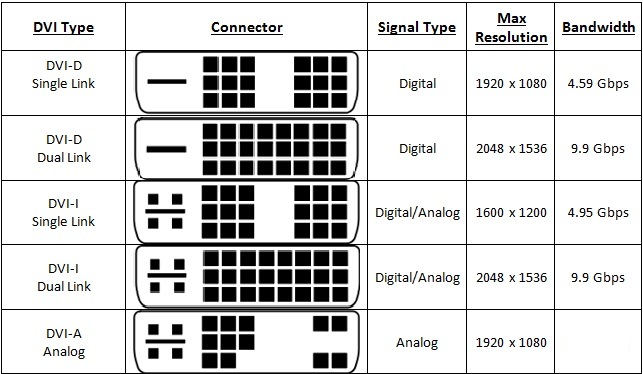
DVI connector: types
It's important to know that not all digital connectors are created equal. They have different specifications and designs. In ours with you Everyday life The most common types of DVI connectors are:
- DVI-I SingleLink;
- DVI-I DualLink;
- DVI-D SingleLink;
- DVI-D DualLink;
- DVI-A.
DVI-I SingleLink connector
This connector is the most popular and in demand. It is used in all modern video cards and digital monitors. The letter I in the name means “integrated”. This DVI connector is special in its own way. The fact is that it has two combined transmission channels: digital and analog. In other words, this is a DVI+VGA connector. It has 24 digital pins and 5 analog pins.
Considering that these channels are independent of each other and cannot be used simultaneously, the device independently chooses which one to work with.
By the way, the first such integrated interfaces had separate DVI and VGA connectors.

DVI-I DualLink connector
DVI-I DualLink is also capable of transmitting an analog signal, but, unlike SingleLink, it has two digital channels. Why is this necessary? Firstly, to improve throughput, and secondly, it all comes down to resolution again, which is directly proportional to image quality. This option allows you to expand it to 1920x1080.
DVI-D SingleLink connector
DVI-D SingleLink connectors do not have any analog channels. The letter D informs the user that this is a digital interface only. It has one transmission channel and is also limited to a resolution of 1920x1080 pixels.
DVI-D DualLink connector
This connector has two data channels. Their simultaneous use makes it possible to obtain 2560x1600 pixels at a frequency of only 60 Hz. In addition, this solution allows some modern video cards, such as nVidia 3D Vision, to reproduce three-dimensional images on a monitor screen with a resolution of 1920x1080 with a refresh rate of 120 Hz.
DVI-A connector
In some sources, the concept of DVI-A is sometimes found - a digital connector for transmitting exclusively an analog signal. In order not to mislead you, let us immediately indicate that in fact such an interface does not exist. DVI-A is just a special plug in cables and special adapters for connecting analog video devices to the DVI-I connector.
Digital connector: pinout
All of the connectors listed differ from each other in the location and number of contacts:
- DVI-I SingleLink - has 18 pins for a digital channel and 5 for an analogue one;
- DVI-I DualLink - 24 digital pins, 4 analog, 1 - ground;
- DVI-D SingleLink - 18 digital, 1 - ground;
- DVI-D DualLink - 24 digital, 1 - ground
The DVI-A connector also has its own unique pin arrangement. Its pinout consists of only 17 pins, including ground.
HDMI connector
A modern digital video interface also has other types of connecting communications. For example, the HDMI DVI connector is in no way inferior in popularity to the listed models. On the contrary, due to its compactness and the ability to transmit an audio signal along with digital video, it has become a mandatory accessory for all new TVs and monitors.
![]()
The abbreviation HDMI stands for High Definition Multimedia Interface, which means “high-definition multimedia interface.” It appeared for the first time in 2003 and since then has not lost any of its relevance. Every year new modifications appear with improved resolution and bandwidth.
Today, for example, HDMI makes it possible to transmit video and audio signals without loss of quality over a cable up to 10 meters long. The throughput is up to 10.2 Gb/s. Just a few years ago this figure did not exceed 5 Gb/s.
This standard is supported and developed by the world's leading radio electronics companies: Toshiba, Panasonic, Sony, Philips, etc. Almost all video devices today manufactured by these manufacturers must have at least one HDMI connector.
DP connector
DP (DisplayPort) is the newest connector that replaced the multimedia HDMI interface. Possessing high throughput, minimal loss of quality during data transmission and compactness, it was designed to completely replace the DVI standard. But it turned out that not everything is so simple. Most modern monitors do not have appropriate connectors, and changing their production system in short time- it’s an impossible task. In addition, not all manufacturers are particularly keen on this, which is why most of video equipment is not equipped with the DisplayPort standard.
Mini connectors
Today, when computers are often replaced by more mobile devices: laptops, tablets and smartphones - using conventional connectors becomes not very convenient. Therefore, manufacturers such as Apple, for example, began to replace them with smaller analogues. First VGA became mini-VGA, then DVI became micro-DVI, and DisplayPort shrank to mini-DisplayPort.

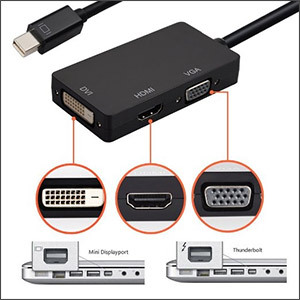
DVI adapters
But what if, for example, you need to connect a laptop to an analog monitor or another device that has a DVI connector to a digital panel with HDMI or DisplayPort standard? Special adapters will help with this, which can be purchased today at any radio electronics store.
Let's look at their main types:
- VGA - DVI;
- DVI - VGA;
- DVI - HDMI;
- HDMI - DVI;
- HDMI - DisplayPort;
- DisplayPort - HDMI.
In addition to these basic adapters, there are also varieties of them that provide connection to other interfaces, such as USB.
Of course, with such a connection there is a loss of image quality, even between devices of the same type that support the DVI standard. An adapter connector, no matter how high-quality it is, cannot solve this problem.
How to connect a TV to a computer
Connecting a TV to a computer or laptop is not difficult, but you should determine which interface is equipped with both devices. Most modern television receivers have built-in connectors that support DVI. This can be either HDMI or DisplayPort. If a computer or laptop has the same connector as the TV, it is enough to use the cable that usually comes with the latter. If the wire was not included in the kit, you can freely buy it in the store.

The computer operating system will independently detect the connection of the second screen and offer one of the options for using it:
- as the main monitor;
- in clone mode (the image will be displayed on both screens);
- as an additional monitor to the main one.
But do not forget that with such a connection, the image resolution will remain the same as provided for by the screen design.
Does cable length affect signal quality?
Not only the signal quality, but also the data transfer speed depends on the length of the cable connecting the device and the screen. Considering modern characteristics connecting wires for various digital interfaces, their length should not exceed the established parameters:
- for VGA - no more than 3 m;
- for HDMI - no more than 5 m;
- for DVI - no more than 10 m;
- for DisplayPort - no more than 10 m.
If you need to connect a computer or laptop to a screen located at a distance exceeding the recommended one, you must use a special amplifier - a repeater (signal repeater), which can also distribute the channel to several monitors.
If you need to connect two monitors to a computer or a second monitor to a laptop, this is usually not difficult at all, except in rare cases (when you have a PC with an integrated video adapter and a single monitor output).
Connecting a second monitor to a video card
In order to connect two monitors to a computer, you need a video card with more than one output for connecting a monitor, and this is almost all modern discrete video cards from NVIDIA and AMD. In the case of laptops, they almost always have an HDMI, VGA or, more recently, Thunderbolt 3 connector for connecting an external monitor.

This will require that the video card outputs be those that your monitor supports for input, otherwise adapters may be required. For example, if you have two old monitors that only have a VGA input, and the video card has a set of HDMI, DisplayPort and DVI, you will need (although perhaps more optimal solution here will be a monitor replacement).
Note: From my observations, some novice users are not aware that their monitor has more inputs than they use. Even if your monitor is connected via VGA or DVI, please note that it may back side There are other inputs that can be used, in which case you will just have to purchase the necessary cable.
Thus, the initial task is to physically connect two monitors using the available video card outputs and monitor inputs. It is better to do this with the computer turned off, and it would be wise to also turn it off from the power supply.
If it is impossible to connect (there are no outputs, inputs, adapters, cables), it is worth considering options for purchasing a video card or monitor suitable for our task with necessary set inputs.
Setting up dual monitors on a computer with Windows 10, 8 and Windows 7
After turning on the computer with two monitors connected to it, they are usually detected automatically by the system after booting. However, it may turn out that when you first load the image, it will not be on the monitor on which it is usually displayed.
After the first launch, all that remains is to configure the operating mode of two monitors, while Windows supports the following modes:
- Screen duplication - the same image is displayed on both monitors. In this case, if the physical resolution of the monitors is different, problems may arise in the form of blurred images on one of them, since when duplicating the screen, the system sets the same resolution for both monitors (and this cannot be changed).
- Displays the image on only one of the monitors.
- Expand screens - when selected this option operation of two monitors, the Windows desktop “expands” onto two screens, i.e. on the second monitor there is an extension of the desktop.
Operating modes are configured in the Windows screen settings:

In all cases, if you are having problems with image clarity, make sure that each monitor is set to its physical screen resolution (see,).
Additional Information
In conclusion, here are a few additional points that may be useful when connecting two monitors or just for information.
I think we can conclude here. If you have any questions, something is not clear or does not work, leave comments (detailed if possible), I will try to help.
It's time to look at how the system unit works from the outside, so I'm starting a series of short articles devoted to individual devices and how to connect them.
In this lesson you will learn how to connect a monitor to a computer and where to connect the monitor. So, in previous articles you learned about how a computer is structured, types of monitors, as well as about the structure of the computer system unit and the fact that it is “the head of everything.” Now this knowledge will help us a lot.
So, we have a monitor that needs to be connected. As you already know, the video card is responsible for displaying the image on the monitor screen, so it is logical to assume that the monitor will somehow interact with it. And this assumption will turn out to be true! And if you have read about computer connectors and their types, then you already know where to look for the right socket. We also need two cables for the monitor: the first is the power cable.
It is usually plugged into the outlet after you connect the monitor to the system unit. However, it is better to purchase an extension cord to connect not only the monitor, but also all other devices, or even better to buy network filter, which will also protect against sudden power surges in the network; the second cable for connecting the monitor is exactly the one that connects to the mother socket of the video card.
These connectors come in several types; they differ slightly in shape and number of pins in appearance. I'll tell you about the two most common ones.
Eat VGA connector, which can be deciphered as video graphics adapter, which is needed to connect CRT monitors (cathode ray tubes). You may also come across this designation: 15-pin D-sub You've probably seen such large monitors as a box. Take a look at this connector in the picture:

And there are “thinner” liquid crystal monitors that connect to a connector called DVI, which can also be of several types (see photos of different connectors).

It must be (or maybe more than one) on a modern video card, but it’s also on my (quite old) one. It just has both connectors, you can see what they look like in the photo.

The names of the connectors will most likely be labeled on the video card, this can also help you.
However, the essence of the connection is the same: connecting the monitor to the computer must be done carefully so that the pins fit into the grooves. No extra physical strength, if you do everything correctly, you shouldn’t apply it. Fortunately, the shape of the socket also tells you how to connect, because if you look closely, you will see that in the picture below its edges are more rounded than at the top.

After the socket is seated, you need to carefully tighten the 2 screws along the edges clockwise, do not clamp it too tightly, do not overdo it! After this, you need to make sure that both cables are also connected to the monitor sockets and plug the power cable into the outlet. That's it, the monitor is connected to the computer!
Checking the monitor and its connection to the computer
VGA/DVI cable. The monitor and system unit can connect several different cords - most often these are power, USB and video cables.

We are interested in the latter, and today it comes in two types: VGA and DVI. They can be easily identified by the same colored D-shaped connectors on both sides. In the case of VGA connectors of blue color, DVI – white. Make sure the cable is connected to both the monitor and the computer and is not damaged.

Damage most often comes in three types:
Do you think teeth are a joke? Hell no! Cats, dogs, hamsters, and rats have more than once chewed computer cables with gusto almost before my eyes. We live in the IT era, everyone is in a hurry to join.
Bent connector pins.
A broken or severely bent cable near the colored plastic connector casing.
Pet teeth marks.
Examine the back of your computer's system unit carefully.
It is very likely that you will find several connectors suitable for a monitor there. If we think theoretically, there may be, for example, seven of them there.
In this case, you should try connecting the monitor to a different connector. Even if you are sure that at the time the problem occurred, the monitor was connected to the desired video output, you cannot exclude spontaneous switching of the primary video card due, for example, to a software failure or failure of one of the video devices installed in the computer.
The situation with the absence of an image on the monitor often occurs after connecting a TV, projector or another monitor to the computer.
If you shut down if available additional device output, and then remove this device and start the computer again, then the poor imagination of the video card driver may not withstand such a difficult test.
Monitor. On front panel monitor must be led indicator. If it does not light up, then you need to check the power buttons (sometimes there may be two of them - on the front panel and on the back cover) and the power cable. The monitor may be connected to another electrical outlet than the computer itself. Then you need to check the outlet or connect the monitor to a known good power source.
If everything is fine with the power supply, then the easiest way to check the monitor itself is by connecting it to another computer. When using a laptop as such, do not forget that the video output may have to be activated with a special button on the keyboard.
Sometimes the backlight in the monitor stops working - in such cases, the image can be seen by illuminating the screen with a bright lamp or flashlight.
If you don’t have a computer at hand, try your DVD player, game console or any other device associated with video playback - they may well have a VGA connector.
If it is absolutely impossible to find any source of the format we need, then we need to try to call up the monitor menu or diagnostic message. The menu is called up by the corresponding button on the monitor, but this, to be honest, is an ineffective way to check.
Most devices do not display a menu in the absence of a useful video signal, and therefore the lack of response to the “menu” button does not at all indicate a malfunction of the monitor. Another thing is a diagnostic message about the disappearance of this very signal. It should appear when you disconnect the cable from the computer.
To prevent anything from burning, the procedure should be as follows:
Turn off the monitor using the button on the front panel
Disconnect the VGA/DVI cable from the computer
Turn the monitor back on and wait a few seconds.
Most modern monitors will show a “No Signal” message or something similar in this case.
Having obtained at least some image from the monitor, we can temporarily exclude it from the list of suspects and move on to checking other devices.
 (1 ratings, on average: 5,00 out of 5)

