Rules for electrical installation of wiring in utility rooms. European standards for electrical wiring, installation of sockets and switches. Modern standard for installing sockets and switches
The rules for laying electrical wiring in an apartment differ from other rules for carrying out electromechanical work, they allow for freedom of interpretation and are needed, first of all, to protect the electrical wiring itself from accidental accidents. mechanical damage when carrying out regular repairs, installing furniture, assembling technical devices. Of the variety of methods for laying electrical wiring, the above rules are applicable when installing an indoor electrical network from copper wire, in a closed way, according to the TN – S and TN – C – S systems, which use three conductors in single-phase network(phase L, zero N, ground PE) or five conductors in three-phase network(three phases L1 – L3, zero N, grounding PE).
Basic rules for laying electrical wiring in an apartment
- The wires are laid parallel or perpendicular to the floor. Vertical sections at a distance of 20 cm from the edges of walls, door and window openings. Horizontal 20 cm from the ceiling. The distance from the floor depends on the height of the sockets. Different sources give different figures, but actually this does not matter, the distances can be any, the main thing is that uniformity is maintained in all rooms of the apartment with the exception of the kitchen and bathroom, where the location of the electrical wiring is based on other considerations.
- The passage route should be located no closer than 50 cm from heating radiators and other metal pipes.
- Kitchen furniture is distinguished by a large number wall cabinets, for fastening which you will have to drill the wall many times and it will be very good if there is no conductor hidden under the plaster in the way of the drill. Therefore, it is better to place the horizontal part of the gasket in the kitchen at the bottom of the wall.
- A special feature of installation in a bathroom and a combined bathroom is the use of waterproof electrical sockets with a protection class of at least IP44, which provide protection from splashes flying in all directions. Electrical sockets should be located no closer than 60 cm horizontally and 1 m vertically from the water source. Electrical outlets in the bathroom must be connected to a separate dedicated line. Wires in the bathroom should not have connections or branches, so junction boxes are not needed there.
- The rules even stipulate the number of electrical outlets. Russian, departmental building codes, provide for the installation of at least one socket for every 6 m² of a living room, in the kitchen more than 8 m², 4 pieces, in corridors with an area of 10 m² or more, at least one must be installed. German standards are closer to modern realities: 7 – 11 pcs. in the kitchen; 3 pcs. In bathroom; 3 – 11 pcs. in the living room.
- Electrical wiring hidden under ceilings: tension and plasterboard ceilings, interior plasterboard partitions, is laid along the shortest path.
- There should not be too many consumers in one circuit. It just means that you don’t need to “connect” all the sockets to one wire and the light bulbs to another. Read about what principles can and should be followed when drawing up groups of electricity consumers in the article “”.
- To power high-power electrical equipment: electric stove, Dishwasher, water heater, washing machine, a separate dedicated line must be used. Although household refrigerator and does not consume a lot of electricity. It is better to connect it to a separate circuit. Depending on how important the safety of files stored on your computer is, you should consider connecting it to a separate dedicated line.
- All branch connections are made and hidden in junction boxes.
- Electrical switches are located 90 cm from the floor, so that they are not blocked by opening door leaves. As with all other points of the rules for laying electrical wiring, this is a non-categorical requirement; the distance can be any.
- In places where the wiring exits from under the plaster, it is more convenient to use plastic bushings to connect lamps, although it is quite possible to do without them. Decorative covers that come with all kinds of lamps will cover the exit points.
- Theoretically, the electrical wiring should be replaceable. To do this, the wires are pulled through metal or plastic pipe, corrugation laid and walled up in a pre-cut groove. If necessary, a section of damaged electrical wiring is pulled out and new wires are pulled in its place, without destroying the plaster. In practice, only wires are laid and plastered in the groove, without any pipes. This kind of frivolity is explained, oddly enough, practical calculation. The problem-free period of operation of correctly selected electrical wiring is several decades and is comparable to the period between repairs of a plaster coating.
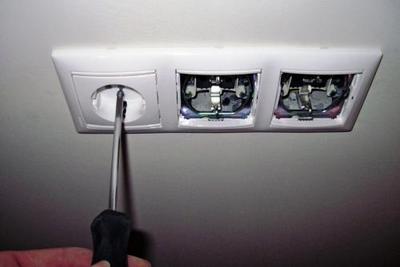
- As already noted in the article “Electrical sockets for hidden wiring”, it is better to avoid the use of paired, triple sockets, and use single sockets combined into one block and having a common decorative frame.
- Simultaneously with the installation of electrical wiring, you need to start laying other networks: television, information, telephone. This will allow you to design sockets of different networks in the same style.
No matter how confident you are in the trajectory of hidden electrical wiring in the apartment, it is better to use a hidden wiring detector (finder). This easy-to-use device will help you avoid many troubles during repair and installation work.
How to properly connect electrical wires
Perfect electrical circuit, integral, i.e. a separate line is laid for each consumer. This approach is justified in wooden houses, where fire safety is at the forefront, eliminating all potentially dangerous causes of fire. For a city apartment in a multi-apartment residential building, this approach is too wasteful and unnecessary. Various connections electrical conductors are quite possible and even mandatory in lighting circuits, sockets of the same group.
Electrical wiring connection methods
Twisted. The most common and most incorrect method from the point of view of electrical engineering. Despite the “wrongness”, a well-made connection using twisting will last for decades. “Correct” twisting differs in that it connects conductors of a homogeneous material. The length of each contacting conductor is 5–7 cm. Tight crimping is ensured by using pliers.
- Soldering. It is considered the most reliable way to connect conductors, but with one significant caveat. It is necessary that the soldering be done with high quality, otherwise such a connection will turn into a difficult to identify, problematic section of the circuit.
- Connecting insulating clamps (PPE). Contact stability is ensured by a spring located in the insulating cap. Essentially, connection using PPE, a modernized twisting method.
- With a screw. Provides reliable connection of any wires from various materials(copper, aluminum) the most problematic worn-out networks. Unfortunately, the connection design together with the insulation turns out to be quite large sizes, therefore, this method of contacting conductors is most suitable for repairing an indoor electrical network. Read about all the features of repairing old electrical wiring in the article ““.
- Walnut type pads. Specific method. The design of the device ensures fairly reliable contact of the conductors when connected to the main cable.
There are many other connection methods electrical wires: welding, using crimp pipes, piercing clamps, transition couplings, but their use in a city apartment is either ineffective or unreasonably expensive.
Any repair necessarily involves electric installation work which are held during preparatory work. Eurostandard - work carried out in strict accordance with certain standards can guarantee the electrical and fire safety of the premises. In accordance with safety requirements, it is necessary to use electrical wiring with grounding.
Any repair necessarily involves electrical installation work, which is carried out during preparatory work. - work carried out in strict accordance with certain standards can guarantee the electrical and fire safety of the premises. In accordance with safety requirements, it is necessary to use electrical wiring with.
It is advisable to replace all electrical wiring in the room to avoid connections between copper and aluminum wiring. It is best to use copper wiring. It is necessary to install sockets and switches. In case of special layout, use special channels for laying the cable. Do not lay wires under baseboards or through openings in windows.
Use high-quality fittings for work that comply with GOST standards. In addition to the features of the technology, it implies the professionalism of specialists and high-quality warranty service.
At the request of the client. Our company will install switches clearly in those places where it will be convenient for you. Regardless of any standards and without compromising safety.

Installation of sockets.
Sockets can also be installed at different distances from the floor, but in this case, it is most rational, since they are installed at a distance of 30 cm from the floor. This is much more convenient than the Soviet version we are used to, when they were installed at a distance of 90 cm from the floor, this allows you to comfortably use Appliances and hide the wires. But here, too, you need to remember the purpose of the room in which the sockets are installed, since, for example, in the kitchen, sometimes wires are needed above the table where the equipment is directly used. And a few words about the technical part of the topic of installing sockets; we all use European standard sockets, since those sockets that were installed in the recent past do not allow the use most household appliances. There is such a thing as adapters, but their use is far from safe, as it can lead to fire. In European standard sockets, the diameter of the pins is 0.8 mm larger than in domestic ones. The distance between them is also different. The current strength in European sockets is 10 A or 16 A, in domestic ones - 6.3 A or 10 A. That is, in this case, the European standard for installing sockets provides great opportunities for using household appliances.
European standard for installation of sockets and switches.
When it comes to renovation, everyone is faced with the question of how to install sockets and switches in their home. There is no single standard in this matter, since it depends only on the convenience and needs of each person.
To understand this issue in more detail, let's start with switches.
There are three options for installing switches:
Soviet. It consists in installing switches at a distance of approximately 160 cm from the floor. For many people, this option was and remains the most suitable. Firstly, people are accustomed to the switch being at eye level, and secondly, this option is the most rational when there is low furniture in the area of the switch that does not allow the switch to be installed lower. Also quite a lot important factor is the presence of children, kids love to play with light, and this option this is impossible.
European standard for installation of switches. This option is more modern and, for some, more comfortable. With the European standard, switches are installed at a distance of 90 cm from the floor. This allows you to turn the light off and on without raising your hand or just passing by.
Installation of switches at the request of the client. Our company's electricians will install switches clearly in those places where it will be convenient for you. Regardless of any standards and without compromising safety. 
Installation of sockets.
Sockets can also be installed at different distances from the floor, but in this case the European standard for installing sockets is the most rational, since they are installed at a distance of 30 cm from the floor. This is much more convenient than the Soviet version we are used to, when they were installed at a distance of 90 cm from the floor, this allows you to comfortably use household appliances and hide wires. But here, too, you need to remember the purpose of the room in which the sockets are installed, since, for example, in the kitchen, sometimes wires are needed above the table where the equipment is directly used.
And a few words about the technical part of the topic of installing sockets; we all use European standard sockets, since those sockets that were installed in the recent past do not allow the use of most household appliances. There is such a thing as adapters, but their use is far from safe, as it can lead to fire. In European standard sockets, the diameter of the pins is 0.8 mm larger than in domestic ones. The distance between them is also different. The current strength in European sockets is 10 A or 16 A, in domestic ones - 6.3 A or 10 A. That is, in this case, the European standard for installing sockets provides great opportunities for using household appliances.
It is obvious that the location of electrical installation devices in rooms largely determines their level of comfort. It is no less obvious that optimal location and the number of sockets and switches, from the point of view of ease of use, assumes that when installing them, functionality, interior features of the premises, and planned location are taken into account household electrical appliances.
The standard arrangement of sockets and switches at almost a meter high - at one and a half meters and higher (see photo), of course, cannot be called an example of ease of use. Therefore, it is quite understandable that most homeowners want to change this location when repairing (replacing) old electrical wiring, maximizing the degree of ease of use. 
About the “European standard”. However, this certainly good initiative is very often limited by the “requirements” of the so-called “European standard” that replaced the “Soviet standard”, which requires the installation of sockets at a height of 0.3 m, switches at a height of 0.9 m. In different regions of our country, the data Sizes may vary slightly, both up and down.
In fact, there are no “European standards” regarding the location of electrical installation devices. In the Electrical Installation Rules, the requirements of which are drawn up taking into account IEC standards, there is a mention of the recommendation to install plug sockets at a height convenient for connecting electrical appliances to them (chapter 6.6.30).
Therefore, when designing installation locations for sockets and switches, one must be guided, first of all, by the convenience of their operation, while observing, however, existing restrictions regulatory documents related to the location of electrical installation devices (PUE-7 Internal electrical equipment, chapter 7.1.48-7.1.54).
The ease of use of electrical installation devices according to the above-mentioned “Soviet” standard is rather doubtful. As practice shows, the notorious “European standard” is more preferable for most of us.
Indeed, a block of low-mounted sockets located in close proximity to household electrical appliances is less “conspicuous” than a pair of sockets with “tees”, to which the power cords of all electrical appliances in this room are connected.
And the convenience of using switches installed directly at the entrance to the room, at the level of an adult’s lowered hand, i.e. at a distance of 0.8-0.9 m from the floor, is obviously no less. This arrangement will allow you to quickly find the switch at the entrance, without having to spend a long time searching in the dark.
Of course, we must admit that sockets and switches installed according to the “European standard” greatly benefit in ease of use. However, it is definitely not worth accepting a height of 0.3 m for installing sockets and 0.9 m for installing switches as the only correct one.
In long rooms, to control lighting, it may make sense to install two pass-through switches in different places premises. Agree, it is not very convenient to make your way in the dark at the risk of hitting a protruding corner of the cabinet or tripping. 
Switches and plug sockets, not protected by switching devices for current leakage to ground (difavtomats, RCDs) directly in the bathrooms. All electrical installation devices, including sockets for washing machines, it is necessary to “take it” outside, for example into the hallway.
Sockets in the kitchen Particular attention should be paid to the installation locations of sockets in the kitchen - a room with a large number of household electrical appliances. The sockets in the table area are located just above its surface - 5-10 cm above the tabletop.
As a rule, a group of several sockets for a food processor, electric kettle, mixer, microwave oven etc. As practice shows, a pair of sockets installed “in reserve” will not be superfluous. It is very often necessary to verify the demand for such a reserve when it is necessary to connect additional electrical appliances.
The number of sockets and switches in the apartment should ensure convenient operation of lighting and household electrical appliances. when designing, the degree of comfort should be taken into account, guided, of course, by common sense, while observing all the requirements of regulatory documents.
Modern standard for installing sockets and switches
In the 1920s, during the implementation of the electrification plan, an old standard for installing electrical communications such as sockets and switches was developed. The standard was developed taking into account the then existing specifics of electrical installation work. Installation of electrical wiring was then carried out mainly externally, that is, the electrical wire and electrical installation elements, sockets, switches, and wiring boxes were mounted on a flammable base, wood or plaster covered with wallpaper. Wires of that time were made mainly in rubber or fabric insulation, which made them extremely fire hazardous under current overloads and. The fire hazard of electrical wiring was further aggravated by the lack of modern electromagnetic circuit breakers (automatic circuit breakers). So at that moment old scheme installation of electrical wiring, sockets 1.2 meters from the floor surface, and switches at human height was necessary. In addition, the presence of electrical wiring in the house was or was then prestigious, with all the ensuing consequences from this fact. 
Hidden electrical wiring.
When switching to hidden electrical wiring, which is absolutely fireproof if it is laid in concrete or brick, this transition occurred gradually, starting in the 50s of the last century, they began to carry out it according to the old configuration designed to meet the old requirements fire safety. There were few sockets and switches back then and they did not greatly spoil the design of the room.
Modern standards.
Modern standards adopted in most European countries require the installation of sockets in rooms at a height of 0.3 meters from the floor surface of the living space, and switches 0.9 meters. In the kitchen, sockets are installed at a height of 110 centimeters above the floor level of the room. This is determined by the table height standard kitchen furniture, usually 90 centimeters. Television and telephone sockets are installed at a height of 30 centimeters from the floor surface of the living room, their installation is usually carried out in combination blocks together with electrical sockets.
Over time, the electrical wiring in the apartment wears out and needs to be completely changed in order to avoid undesirable consequences in the future. This article will also be useful for those who are planning to install electrical wiring in a new building. This must be done according to European standards. Before you begin laying it, you need to accurately determine the location of the meter and panel, sockets and switches, lamps and junction boxes.
How to lay electrical wiring
First of all, it is necessary to mark the places where the main cables pass, then the places of branches, turns and entrances to the walls. In this case, the cables must be located only vertically or horizontally, that is, the rotation angles must be 90°. Horizontal wiring should be 10-20 centimeters away from the ceiling, and run parallel to it. This is necessary to reduce the risk of any damage.
Switches in the room must be installed so that they do not touch the door trim. It is best if the distance from electrical cables to the doors will be more than 10 centimeters. The same rule applies when installing a switch near a window. The level of installation of sockets and switches will depend on the purpose of the room, the arrangement of electrical appliances and the interior of the room. Switches can be located at a distance of up to 1 meter from the floor, and sockets according to European standards should be at a height of about 30 centimeters.
According to safety precautions, sockets should not be placed close to kitchen stoves, plumbing and gas pipes, sinks and heating appliances. The shortest distance from them to electrical wires should be 50 centimeters. It is not advisable to install switches and sockets in rooms with high humidity. If this is still necessary, they must have additional protection.
If in adjacent rooms the installation of sockets takes place opposite each other, then they are connected in parallel through through hole in the wall. A panel with an electric meter is usually installed at the entrance to the home at a height of about 1.5 meters from the floor. I would like to note that when conducting wires, it is worth making marks not only on the walls, but also drawing a corresponding diagram on paper. This will be useful in the future when possible repairs or re-wiring when the walls are painted or there is wallpaper on them.
The output of wires, for example, to a lamp, socket or switch, must be done through special insulated tubes. Separations or connections of electrical cables should only be done in junction boxes, which can be made of plastic or any other material with insulating properties. Metal boxes can only be used if they are equipped with insulated gaskets inside. To connect the lamps to the electrical network, it is necessary to use a flexible copper wire with a cross-section of 0.75 mm2. In this case, the length of wires in rooms with high humidity should be minimal.
Hidden installation of cables can be carried out in holes in panels or slabs made of reinforced concrete, under layers of plaster, in small gaps, which are subsequently sealed with alabaster mortar, or in gaps that form between bricks. If there is a wooden base, then the electrical wires are laid under the plaster. In this case, the thickness of the plaster must be at least 5 millimeters.
The electrical network is one of the most important components of any home. Without it today it is difficult to imagine our life, whether in country house, office or apartment. On the other hand, we are all so accustomed to it that often when renovating an apartment we do not attach due importance to work related to electrical wiring, which includes wires and panels, sockets and switches, lamps and electrical appliances. Electrical installation work in an apartment - the rules and advice for the implementation of which are given in this article - is the provision of electricity to the entire apartment, the installation of lighting systems various types, emergency lighting systems, as well as, if necessary, installation of warranty power systems.
The electrical wiring diagram in the apartment is necessary for installers as a guide and for owners to make calculations before purchasing cables and electrical installation products
It must be convenient and safe to use, because electricity is an area where negligence is unacceptable. When renovating apartments, electrical installation work usually consists of 2 stages.

This is what the electrical panel looks like: it contains protective automation for each of the installed groups
The first stage is marking
It is carried out at the beginning of the renovation, after the redevelopment and dismantling work has been carried out.
At this stage they perform following works:
The second stage is the actual installation
The work is carried out immediately after finishing the walls, floors, and ceilings of the room. These include:
- installation of sockets;
- installation of lighting fixtures - chandeliers, spots, lamps;
- installation of power consumers.
Electrical installation work in the apartment
Electrical installation generally consists of:
- dismantling works;
- markings;
- mechanical work;
- cable laying;
- wiring gaskets;
- installation of electrical installation equipment (switches, sockets, lamps, etc.;
- cable connections in unified system;
- commissioning works.
Attention! All electrical work in the apartment must be performed only by professionals!
How to dismantle
This type of work includes the removal of old switches, sockets, and, if necessary, wires.
First rule: to avoid defeat electric shock When dismantling old equipment, as well as old wiring, it is necessary to turn off the power at the distribution board.
Rules for marking
Marking is applied in accordance with project documentation. On all surfaces (where necessary) of the room, lines for laying cables and wires, installation locations for switches, sockets, and lamps are indicated. Currently, sockets are installed at a level of 40 cm, and switches - 80 centimeters from the floor. The exception is sockets in the kitchen: here they are placed 10 cm above the level of the countertop.
At this stage of the work, the laying of other networks (water supply, sewerage, heating, air conditioning, television and computer networks, security system).
Mechanical work - gating
This type of electrical installation work includes the process of drilling walls (making grooves) for hidden electrical wiring and for introducing the power cable into the room.
Grilling is done using a hammer drill, an angle grinder with a diamond blade, or a wall chaser. This is a dusty and noisy job, so you need to wear a respirator, goggles and headphones.
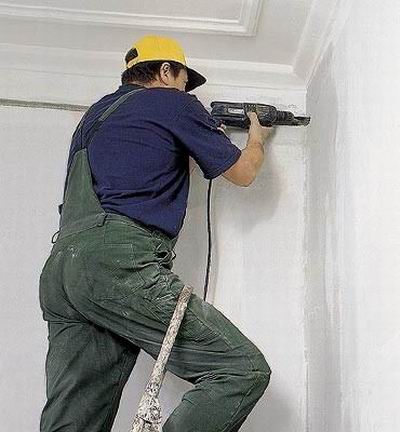
Most often for gating stone walls use a hammer drill
Rule two. Before gating, it is imperative to check the wall to find hidden wiring, since intersection with previously laid electrical wiring can lead to a short circuit or even a fire.
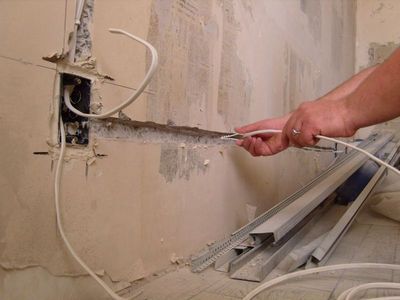
After installing the wire in the groove, the hole is covered with plaster, small areas can be sealed with alabaster
For electrical wiring, you need to make a hole exactly vertically at a distance of at least 10 centimeters from the corners of the intersection of walls, windows and doors, and horizontally - 15-20 centimeters from the baseboard, 20 cm from the ceiling, 10 centimeters from the cornices and beams. This is done precisely so that later, when performing other finishing and decorating work on the walls, it does not damage the electrical wiring.
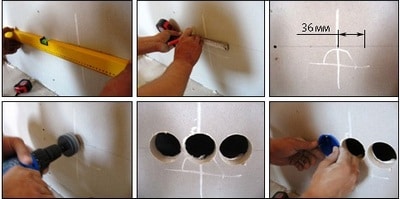
Rule three. Recesses for switches and sockets are made by drilling a hole round section with a diameter of 80 mm.
Electrical wiring and tv cable- there will be great interference.
It is advisable to make a wiring diagram after completing the electrical installation.
Laying cables, electrical wiring
After marking, having determined the installation method, cables are laid either in open form in special boxes, or hidden behind plaster, suspended ceilings, building structures. Most often used indoors hidden installation.
![]()
Convenient routing of wires in a plinth with a cable channel makes it possible to easily find the location of damage and repair without problems
This method is safer, however, in the event of a breakdown, the installation site is inaccessible, and as a result, it becomes necessary to install new wiring.
Advice! To purchase a cable the required section, it is necessary to calculate the total load of all electrical appliances in the apartment.
To avoid overloads, the power supply system is divided into several lines and certain consumers are connected to each of them, including sockets, switches, lamps and various electrical equipment. The total power on any line should not exceed 4 kW.

Connecting wires in distribution box: to eliminate errors, the wires are equipped with a sheath different color
For equipment with high energy intensity - electric stoves, washing machines, electric fireplaces, hydromassage baths, electric heaters are connected to separate lines, and each of them must be equipped with its own circuit breaker allowing to protect electrical network from overloads and short circuits.
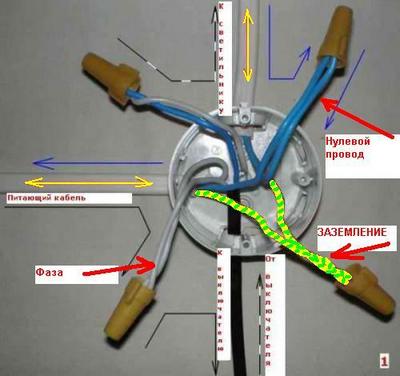
Advice! When distributing power supplies throughout the apartment, it is necessary to observe the principle of one color: neutral working wire - of blue color, phase wire – red or brown, ground wire – yellow-green.
Installation of electrical installation equipment
When performing this type of work, it is mandatory to comply certain rules guaranteeing the safety of the home and the people living in it.
Rule four . At open wiring installation of switches and sockets is carried out on socket boxes with a thickness of 10 mm and a diameter of 70 mm, made of non-conducting materials - wood, plexiglass, etc.
Rule five. The boxes are installed in special recesses in the wall, then secured with gypsum mortar.
Rule six. Switches are installed in the gap phase wire(not zero), which goes to the cartridge lighting fixture. This will allow you to quickly de-energize the power grid when short circuits, and will also ensure safe replacement of sockets and lamps. Switches should be installed in such a way that the lighting is turned on by pressing the top button or top part keys.
Rule seven. Sockets must be connected parallel to the main electrical wires.
Sockets are mounted parallel to the main channels
Rule eight. Dividing boxes, as well as sockets and electricity meters must be installed in places that are easily accessible for maintenance and repair.
Connecting wires into a single system
When disconnecting junction boxes, special terminals are used.

Wires entering junction boxes must be marked.
This is necessary for subsequent maintenance of the electrical wiring.

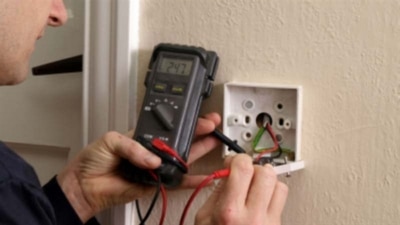
Checking connections in the junction box
Commissioning works
include:
Regardless of what room and how electrical installation work is carried out, it should be carried out exclusively by specialists, since it has many specific features. If you can paint the walls or, for example, hang wallpaper yourself, then it is better to entrust such a complex and responsible task as installing electrical wiring in an apartment to specialists with special knowledge.
 (1 ratings, on average: 5,00 out of 5)

