Covers for brick pipes. How to make a protective cap for a chimney pipe with your own hands? Making a Simple Round Umbrella
Decorating chimneys with artistically designed and very simple caps is a long-standing Russian tradition. This is especially striking when visiting dacha cooperatives. Even the chimneys of the most modest houses are decorated with carved finials and weathervanes.
This device is not just decoration - it has a purely functional purpose and more.
The cap is not the only name for these devices; they can also be called:
- chimney umbrella;
- fungus on the chimney;
- chimney;
- head
- pommel;
Of course, this is not a complete list. There are many more different designations.
A similar design is also called a “wind vane”, speaking as a stand for.
However, first of all, the functional purpose of these devices is important:
- Protecting your home from moisture of various origins.
- Chimney protection from getting inside foreign objects, birds, garbage and more.
- Increased draft in the chimney due to the targeted direction of air flows.
The cap on the chimney pipe can be arranged in the form of an umbrella or a house with various forms roofs, can generally be presented in the form of bizarre structures. If only it fulfills its protective and auxiliary functions.
 Wind vane
 The design of the caps depends on the shape of the pipe, which can be square, rectangular or round. Also, the shape of the roof, the angles of inclination of its elements and even the dominant direction of wind flows (“wind rose”) matter.
Caps can be divided into the following types:
- Standard weather vane(resembles a house with a 4 pitched roof).
- Umbrella on chimney pipes– used as a top for round chimneys.
- with a flat top.
- Windcocks With gable roof.
- Cap with a semicircular roof.
- Cap with an opening lid.
Various possible Constructive decisions for hoods, used various materials for their manufacture. But theirs is important protective function from snow, water, foreign objects, and birds getting into the pipe.
Materials for production
 For the manufacture of caps, various sheet materials. In some cases, remnants of roofing materials (seam roofing) are used, where sheet roofing materials are used.
The main materials for caps are:
- Sheet steel;
- sheet aluminum;
- copper sheet;
- stainless steel sheet;
- sheet of their zinc-titanium alloy;
The durability of the materials used varies. Steel caps usually last from 2 to 5 years. Sheet aluminum – 5-8 years. The most durable finials are made of stainless steel, copper and zinc-titanium alloy. Their service life can reach 50 – 100 years.
Copper flat caps are commonly used on the chimneys of homes built in the Art Nouveau style. For a European-style home, caps with a semicircular top are installed.
Gable roof hoods are used in cases where chimney also performs a ventilation function. Tops with an opening lid are convenient for cleaning the chimney from soot. Most often, this need arises when using firewood or peat briquettes as fuel.
In the manufacture of weather vanes, artistic forging products are often used. To increase the service life of forged parts, they must be blued. The weather vanes themselves, in addition to their aesthetic merits, show the direction of the wind.
Prices
 Ready-made caps can be purchased if the pipe has a standard cross-section. For example, umbrellas made of galvanized sheet for an asbestos-cement pipe with a diameter of 100 mm can cost from 800 rubles with external fastening in the form of a clamp, to 1200 rubles with internal fastening.
A modest hipped cap on a 2×2 brick pipe can cost from 1,500 rubles apiece.
It is not always possible to select a standard pommel. If your system stove heating laid by a private stove maker, the pipe will probably turn out to be non-standard and a special project will have to be made.
In addition, the price of the cap depends on the material from which it is made. The most expensive ones will be finials made of copper or zinc-titanium alloy. The price of such heads can range from 20 to 30 thousand rubles.
Parts of an artistic weathervane system have an unpredictable price depending on the imagination of the artist and the manufacturing method. Elements with artistic forging are especially expensive.
DIY making
 Scheme for making chimneys
 Let's set ourselves the task of making a vaulted cap for a pipe. The simple design of such a chimney is accessible even to a person who rarely holds a tool in his hands.
You only need to make five simple parts: the vault itself - arched sheet of metal, and four support corners.
How to do it:
- Cut a rectangle from a sheet of metal, the dimensions of which, when bent, cover the opening of the chimney with a noticeable margin.
- Along the long sides of the sheet you need to mark a line at a distance of approximately 20 mm from the edge. Using metal scissors, make slits from edge to line, slightly bevelling the cut so that trapezoidal shapes are obtained. Alternately bend the shapes in opposite directions through one.
- Prepare four corner posts, bending them as shown in the figure. Make sure that the distance between the posts is no greater than the clearance of the chimney. At the ends of the corners you need to drill mounting holes.
- Attach the posts with rivets to the manufactured rectangle.
- Holding on to the racks bend the rectangle so that the posts fit inside the chimney.
- Through holes in racks drill holes in the masonry and secure the cap to the pipe.

This cap is a pyramid formed by four isosceles triangles.
Manufacturing:
- Using the cardboard pattern, mark and cut out the sheet part using metal scissors. It is better to make bends on metal on a workbench with a hammer (a hammer is a piece of a corner attached to the workbench tabletop through holes).
- Bend the tent in the same way as the cardboard pattern was folded, and make a fold on the butt folds of 6 and 12 mm, as shown in the sketch. When making folds and folds, you need to use a wooden mallet. When using a hammer, dents may form on the surface of the part.
- Bend the outer edges, forge them. To increase the rigidity of the structure, it is better to forge steel wire about 3 mm in diameter.
- Bend four posts and rivet them to the tent with steel rivets.
- Secure the chimney in the pipe with steel pins.
Round pipe cap

The diameter of the sheet metal blank for the chimney should be approximately 1.5 times the diameter of the pipe.
The work is performed in the following order:
- Cut a circle from a sheet of roofing iron diameter depending on the diameter of the pipe.
- We measure the distance R along the contour of the circle. Along the arc AB this will be 1/12 of the circle.
- Cut out a sector. Leave edges to form a fold.
- Bend the edges at an angle of 90 degrees. Bring them together and form a fold as in the previous example. If the size of the taper is not satisfactory, you can increase the cut along the arc, then the angle will decrease. In a good way - it is better to first model the cone out of paper, make sure that it meets expectations, then do it in metal.
- Make three or four legs from roofing metal doubled and secure them to the cone with rivets.
- On metal pipe It’s better to secure the finished cap with rivets, running the legs inside; you can fasten it to an asbestos-cement pipe by making a clamp from the same roofing metal and tightening it with a screw.
Tools:
- bench scissors;
- hammer;
- mallet;
- electric drill;
- drill;
Materials:
- rivets (short rivets can be used);
- screws, nuts, washers;
This operation is usually performed when installing the roof during the process of sealing the chimney.
 When repairing or replacing a hood, you must first of all take care of safety during the work:
- It is prohibited to perform such work in unfavorable weather conditions - rain, wind, snow.
- During work It is necessary to use a special roofing ladder (it must be securely attached to the ridge of the roof).
- The presence of the insurer is required on the ground.
- Anyone working at height must have a safety belt and hook it to a reliable object (the same pipe).
- Before starting work make a blind area at least 80 cm wide around the pipe.
Having lifted the cap onto the blind area, you need to install it on the pipe. As a rule, the heads are made with a base in the form of a cap. In this case, fastening is made to the pipe laying. You need to drill holes and secure the cap with dowels.
- For fixing copper heads you need to use copper or copper-plated fasteners.
- For securing zinc-titanium alloy caps galvanized fasteners are used.
A cap on the chimney will not only protect it from exposure atmospheric influences and will improve draft in the chimney, but will also decorate the house.
We often see beautiful and unusual caps that home owners place over chimneys. At first glance, it seems that they only perform decorative role, however, they have functions that are very important when it comes to the safety of the chimney system. Let's consider why a cap on a chimney pipe is needed, what principle is used to select it, what types of designs exist and how to make it yourself.
Caps on the chimney pipe are a fairly common occurrence. However, many people are confused about what they are needed for. There is an opinion that they protect the pipe from condensation. However, this is not quite true. Evaporation and collection of moisture occurs in the inside of the pipe and a cap on the chimney pipe (photos on the Internet clearly demonstrate the principle of its operation) can do little to help here.
What is a chimney pipe cap actually needed for? Let's look at a few of its main functions:
- protection of the inside of the pipe from various foreign objects, dust and debris;
- extending the operational life of the pipe by protecting it from precipitation;
- some caps, due to their design, increase the draft in the pipe and do not allow strong winds to overturn it;
- perform an aesthetic function, giving the pipe an attractive appearance.

It is worth recognizing that most of the decorative vanes on the chimney pipe do not improve the functional characteristics of the chimney at all, but, on the contrary, reduce these indicators. The only exceptions to this rule are nozzles that have the following types of design:
- Weather vanes-deflectors.
- Nozzles with similar industrial exhaust deflectors.
The first option is much more effective than the second. The semi-cylindrical body remains movable due to the bearing. It can rotate depending on weather conditions, and like the petal of a weather vane, it is fixed so that its back is always turned to the wind. As a result, smoke draft increases due to the vacuum generated inside.
The principle of operation of the second mechanism is as follows: a certain vacuum appears inside the deflector itself, due to the fact that the air flow formed as a result of wind load goes around the head on the brick chimney pipe. As a result, such an “umbrella” functions differently, depending on weather conditions: in windy weather it increases traction, and in calm weather, on the contrary, it reduces it.

Note! A strong argument in favor of the first option is that the design chimney pipecompletely eliminates the danger of the draft being blown away by the wind, which still sometimes happens when using the second type of system.
Types of chimney caps
In addition to the designs already discussed, there are many others that are also widespread. They are all united general principle actions and devices are devices that serve to cover the pipe cut, while leaving a small gap so that combustion products can exit the pipe to the outside. The shape of the deflector on the chimney pipe can be almost any, but according to the material of manufacture they can be divided into several groups:
- made of galvanized (roofing) steel;
- made of galvanized metal, on top of which is applied powder coating polyester;
- stainless steel;
- copper;
- alloyed from titanium and zinc.

If we talk about making a cap with your own hands, then most often they use galvanized steel with a thickness of about 0.8 mm. This option is most preferable due to its availability, as well as a fairly long service life (about 20 years). To better understand the design of such a chimney cap, photos and diagrams will serve as an excellent guide.
Galvanized steel has only one serious drawback - it quickly loses its original appearance and becomes dull. She is exposed to various external factors which have a negative impact on her. Metal that is additionally powder coated can withstand this impact much better, but such material is much more expensive.
All other metals retain their appearance for a long time, but their cost is several times higher. However, the price is reflected not only in their appearance, but also in their service life. And although copper also tends to tarnish over time, here we are talking about decades rather than years.

How to choose and buy a chimney cap
Choosing a cap of the correct design is not an easy task. And first of all, it is worth considering the type of boiler house used and the type of fuel that is used. As an example, we can consider the fact that only nozzle-type nozzles are suitable for chimneys of gas boilers. They have an open top and are the only ones suitable for use in this case.
Note! Installation of nozzles on pipes that provide smoke removal from gas boilers is adjustable regulatory documents, which prohibit the use of umbrella hoods for this type of chimney.
There is a very logical justification for such a ban: winter time When temperatures drop below zero, the chimney cap is susceptible to freezing and may become covered in ice. Over time the ice may close most an opening designated for the exit of smoke, which will lead to its accumulation inside the structure. In this case, there is a serious danger to the health of the residents of the house, since smoke accumulating inside can cause serious poisoning.

Freezing occurs as a result of the formation of condensation, which appears on the surface of a cold metal upon contact with sufficiently warm foods combustion. The situation is different only with . Due to the fact that its efficiency almost never exceeds 70-80%, the gas temperature accordingly remains within the range of 150-250°C. This is not dangerous and the use of the nozzle is completely acceptable.
Helpful advice! Do not forget that if you use solid fuel, the cap will very quickly become covered with black soot. So you should not choose relief models that are too complex and cannot be cleaned.
What types of chimneys are there depending on their shape?
The variety of shapes of modern chimneys is very large. Here you can find almost any options. Let's consider the most popular of them, which have an unusual geometric shape and can decorate any pipe:
- a weather vane of a standard shape: it looks like a house with a hipped roof;
- chimney in the Art Nouveau style: designed like a standard one, but additionally has a flat top;
- European style chimney: has an unusual appearance due to the semicircular top;
- caps with a gable roof, which has four slopes (a very functional design that is well ventilated and at the same time protects the pipe from snow);

- weather vane with weather vane;
- weather vane equipped with a detachable lid.
Wind vanes with a weather vane are distinguished by the fact that a special damper is located inside the structure, allowing combustion products to calmly exit the chimney even in the windiest weather. And an additional opening lid provides easy access to the chimney channels for cleaning.
Depending on the shape, chimney roofs are divided into the following categories:
- tent;
- gable;
- hipped;
- semi-cylindrical (or vaulted);
- flat;
- spire-shaped;
- four-pincer.
However, in most cases, this parameter does not affect the functionality of the device and serves solely for aesthetic purposes, providing the chimney pipe with a unique appearance.

Which chimney pipe cap to buy, taking into account the structure of the pipe
Another parameter that you should focus on when choosing a cap is the structure of the chimney. Ideal option It is considered to be a three-layer structure made of modular sandwich panels. In this case, there is simply no need to protect the chimney from precipitation. All moisture that gets inside has no effect negative influence on the pipe, but on the contrary, it is beneficial, cleaning the pipe and collecting in the condensate collector.
If we are talking about a gas boiler, then there are no other options except a nozzle. But if you are dealing with a solid fuel system, then there are many options, although the most popular and functionally justified is the weather vane deflector. They demonstrate the beauty of such chimneys on a photo pipe, in large quantities offered on the Internet.
Many questions arise when it comes to arranging a brick pipe. There are no contraindications here if you are dealing with a solid fuel system. In this case, you can choose any cap you like. But if a gas system is used, then installing an umbrella on the chimney pipe is prohibited in this case.
But here a completely logical question arises: what to do with the destructive power of moisture that eventually gets inside? For this case, special structures are provided that can completely cover the brick base of the pipe.

Do-it-yourself chimney deflector: drawings and photos
A do-it-yourself canopy for a chimney pipe is not uncommon, and many people try to make it. If you have a sheet of galvanized metal and available tools, you can save a lot of money on the purchase and installation of a deflector. To do this you will need the following:
- a drawing set, a fairly long ruler, as well as a tape measure and a marker;
- metal scissors, fastenings (drill screws with 15 mm press washer or rivet gun);
- drill with various drill bits;
- material for the cap (galvanized, aluminum or stainless steel) with a thickness of 0.3-0.5 mm;
- additional metal parts for making rigid fasteners.
In order to make a smoke hood for a chimney pipe with your own hands, you need to make the appropriate measurements, and then, guided by the drawing, you can start working.
Using metal scissors, you can make a smoke vane with your own hands. To do this you need to cut out the parts required size. Then roll up the diffuser body and drill holes in the top and bottom so that once the rivets are secured, you have a solid structure. Do-it-yourself chimney cap drawings will help you assemble it correctly.

After this, you can begin making the upper cone. You can attach the paws directly to it (usually you need about 6 pieces).
Before you completely assemble the wind vane onto the pipe with your own hands, do not forget to fix the fasteners with which the diffuser will be connected to the lower cone of the structure. The same rivets can be used as fastening. In order to install the cap on the pipe, it is best to remove it top part to place the cap on the studs or legs, and then reinstall the entire structure.
Helpful advice! Do not neglect the quality of installation of the deflector on the pipe. Being under constant wind load, poor-quality fastenings will very soon lose their characteristics and the structure will fall apart.
Of course, a DIY fungus on a chimney pipe has no decorative value. Its design is primitive, but it can increase traction by 20-25%, and also protect the roof from accidental sparks. Using the drawings, you can make a cap for a chimney pipe with your own hands quite simply and at the same time spending a minimum of resources.

Chimneys for brick pipes and forged chimney caps: features and prices
On the Internet you can find many tips on how to make a chimney cap with your own hands. However, not everyone wants to bother with this, and many prefer the opportunity to purchase a ready-made product.
Prices for chimney caps vary widely, and you can buy a chimney cap for a chimney starting from 700 rubles. At the same time, the simplest umbrella to buy for a chimney pipe will cost 300-400 rubles.
If you want to buy a deflector for a chimney pipe that can truly become a decoration of the roof, you will have to spend a lot of money. Forged chimneys cost from 7,000 rubles and above. The price of the chimney is brick pipes largely depends on its size, material of manufacture, as well as complexity forged elements, which are very diverse. You can look at photos of forged chimneys on specialized websites.

Another one is quite expensive, but very nice option- smoke vane. It comes in a wide variety of shapes and sizes, and at the same time it perfectly replaces a simple umbrella on a chimney pipe. Many craftsmen believe that using drawings, it is quite possible to make a weather vane for a chimney with your own hands. However, this requires considerable skill. Price ready-made version will cost from 5000 rubles.
Depending on your preferences, you can buy a ready-made canopy for the chimney pipe or make self-production chimney cap. In any case, it would be a good idea to look at photos of chimneys that are on sale to get general idea about their diversity and purpose.
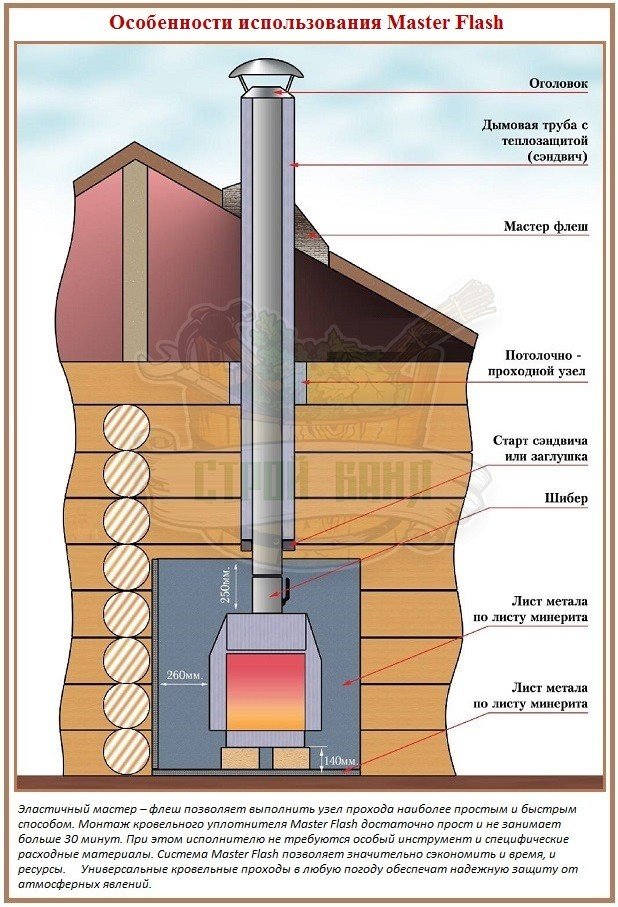
Chimney passage through roofing system It is not without reason that they are recognized as the most complex structural unit. It must be arranged in such a way as to ensure tightness and eliminate the possibility of fire. To achieve the goal, an impressive series of actions were previously carried out; the work was trusted only to experienced roofers. Tin, asbestos, roofing felt were attached to problem areas, and the seams were filled cement mortars and bitumen compounds. The result of labor-intensive operations did not last long due to atmospheric and temperature influences. The new kind roofing sealant - Master Flush for chimneys provides the opportunity to refuse grueling procedures. With its help, you can arrange a reliable penetration with your own hands, spending a minimum of time and effort and funds.
Master Flash - getting to know the device
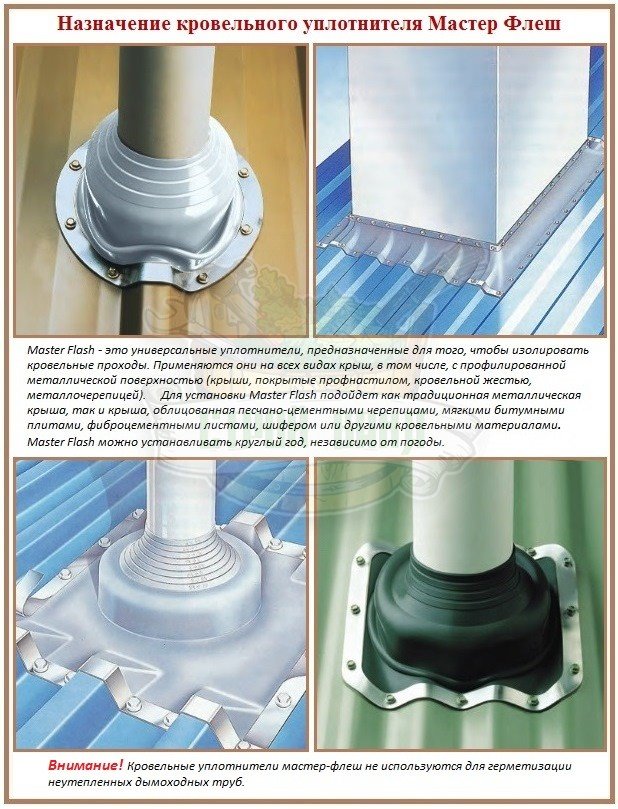
Master Flash is a series of elastic sealing systems designed to seal areas where roof pipes intersect. They are used in the organization of penetrations of chimneys, sewer and ventilation risers and other communications.
Produced in formats suitable for arranging roofs from all known species materials. Seals are produced for flat and pitched roofs with profiled coverings and for counterparts without relief.
The undeniable advantages of Master Flash seals:
- Elasticity, allowing you to create a tight connection to the walls of chimneys.
- Resistance to sudden temperature changes, trouble-free operation in a wide range temperature range.
- Inert to ozone, resistant to oxidative processes.
- Ultra-low porosity providing excellent sealing.
- Fire resistance.
- The ability to return to its original size and shape after thermal linear expansion.
- Warranties from manufacturers are about 30 years.
- No special tools or equipment are required to attach sealing systems.
- There are no weather restrictions during the installation period.
A significant advantage of elastic seals is a significant reduction in the consumption of materials used in the organization of penetration. When using them, there is no need to lay additional waterproofing around the penetration.
Design features of seals
Roof sealing systems have replaced traditional pipe flashings. Structurally, they resemble their predecessors, but include only two main parts, these are:
- A flexible cuff made in the shape of a truncated cone from rubber with EPDM markings or from silicone. It is the cuff that ensures that the junction of the roof and the pipe is sealed, preventing the penetration of dust and atmospheric water. In the working position, the upper part of the cone tightly frames. The lower part is connected to the base of the sealing system - with a flange made in the shape of a round or square skirt.
- Flange - the base of the system, made of EPDM rubber, silicone, galvanized sheet, lead or aluminum. The silicone and rubber base for installation on a roof with large relief corrugations is equipped with aluminum strips around the perimeter. Aluminum inserts help shape the flange into a profile for maximum tightness.
Cuffs roofing seals for pitched roofs are located at an angle to the base. The cone-shaped element has corrugations indicating the contours of round holes with a clear gradation in diameter.
Corrugations are also necessary to improve the accuracy of pipe cutting: they allow, if necessary, to change the angle of inclination of the seal within the limits specified by the manufacturer.
If the imaginary central axis of the cone is located strictly perpendicular to the surface of the base, then Master Flush is intended for arranging flat roofs.

General installation principles
Flexible seals are significantly ahead of outdated construction methods roof penetrations according to technical specifications. They can withstand a much wider temperature range without loss of quality, last longer, and require repairs less often.
In terms of ease of installation, Master Flash for the chimney is also undoubtedly the leader - the system is installed in the most basic way. To carry out the work, the contractor will not need either theoretical knowledge or practice in the roofing business.
The top of the cone-shaped cuff is cut so that the diameter of the resulting hole is 20% smaller than the diameter of the chimney being installed. The notched cone is simply put on a round pipe and carefully moves down to the attachment point. To facilitate the promotion process, manufacturers recommend wetting or soaping the surface of the chimney.

The method of fixing the flange determines the type of roofing material, depending on which the model of the sealing system is selected:
- The flange is glued to a flat roof with a roll covering using bitumen mastic or silicone glue.
- The flange base is first glued to the pitched roof with silicone, then screwed with self-tapping screws and fixed with rivets. If the back side of the flange is equipped with a sealing porous gasket, it is screwed without prior gluing with silicone.
After installation, the upper cut of the cone and bottom edge flanges are machined for reliability silicone sealant. A metal clamp can be used to secure the top edge.
The firmly fixed passage device remains movable. Those. in the event of thermal expansion, fastening seams and points will allow the pipe to move relative to the penetration site without losing its tightness. The cuff will behave similarly in the event of shrinkage of the walls and foundation.
How to choose Master Flush wisely
Dimensional information is not sufficient to accurately select a roofing sealant to seal a chimney, although this is an important aspect. To purchase a usable system, please note that:
- For the arrangement of pitched roofs with a slope from 10º to 40-45º, covered with profiled metal, non-relief roofing steel, bitumen shingles, polymer membrane, plastic, flat slate and ceramic tiles Seals with a flexible square and round base are suitable. Their installation is carried out with preliminary gluing to silicone and subsequent fixation with self-tapping screws.
- For the installation of pitched roofs with a slope from 45º to 60º with similar types of coating, seals with an elastic flange reinforced with an aluminum strip are used.
- For the installation of flat roofs and roof structures steeper than 60º, Master Flash models with an increased flange area are used.
- Penetrations for flat roofs are equipped with cuffs perpendicular to the base plane. They are glued to bitumen roofs using bitumen mastic, and to polymer coatings using a silicone compound.
- Installed on slate and tile roofs elastic systems with metal flanges of increased area. The bases of the seals are placed according to the set of rules for installing tin aprons: the upper part is placed under the row of tiles or slate located above.
In addition, it is necessary to take into account the temperature range in which the device can operate without loss of technical characteristics. These aspects are directly related to the material from which the main part of the chimney cuff is made.

Master Flash systems are manufactured by:
- Made from ethylene-propylene rubber EPDM, which can withstand temperatures in the range from -50º to +160ºС without destruction. A number of manufacturers limit the upper limit to +140ºС.
- Made of silicone, absolutely “indifferent” to temperatures in the range from -60º to +200ºС. There are silicone cuffs, the data sheet of which indicates the upper limit of +240ºС.
The standard temperature of the flue gases at the entrance level to the chimney is approximately 120-140ºС. For gas and liquid fuel boilers it is slightly lower. In principle, both options fully satisfy the conditions for equipping sauna chimneys.
However, according to experts, the indicated values can be considered valid if there is a distance of at least 1 m between the combustion part and the smoke exit from the stove. If not, then it is better to give preference to products made of silicone, the additional advantage of which is quite rightly recognized as its rich color and impeccable compatibility with sealing compounds. True, the service life of EPDM products is somewhat longer than that of silicone seals. But in regions where frosts below -50ºС rarely or rarely occur, they cannot be installed on bathhouse roofs. Moreover, chemists claim that synthetic rubber begins to correct at tº = +135ºС.

If a waterproofing sleeve made of EPDM has already been purchased for the chimney pipe equipment, but there are doubts about the real temperature conditions, there is no need to despair.
Eat folk method adaptation of the rubber device to undesirable temperature influences. Before installing the cuff around the chimney, you need to install a sleeve that creates a small gap between it and the pipe wall. Placed on top of the sleeve basalt wool, then another sleeve is put on, the shape of which is close to the configuration of the cuff. Finally, Master Flush is installed using the standard method.

Master Flash sealing systems are produced not only for equipping the chimneys of a house under construction. The product lines include models for carrying out repair work and for installation in cases where it is simply impossible to put the elastic device on the pipe.
The cones of such products have a slit on the side with clips or a lock that snap together when connected. Models with a fastener are also used for sealing square pipes with a wall size of up to 150 mm. More solid square pipes are framed with a rubber or silicone strip on an aluminum base.
How to install roof sealant?
The general principles of organizing roof passages using Master Flash were given above. In addition, manufacturers are making detailed description installation process. However, there are differences in the installation and fixation algorithms of different models, which are best familiarized with before purchasing.
Installing a seal with a flexible flange
The sealing system with an elastic base is mainly used in the installation of chimneys crossing metal roofs.
Work algorithm:
- We determine the location of the groove on the cone for the upcoming cut. Do not forget that the Ø of the removed segment must be 20% less than the Ø of the pipe.
- Carefully cut off the excess with cable cutter's scissors, trying to make the cut as even as possible.
- We moisten the surface of the pipe to optimize sliding. We put the cuff on the chimney and pull it to the place of fixation, holding the cone and not the flange.
- Having reached the seal to its place, we draw a line around the edge of the flange.
- Slightly lift the cuff to apply adhesive around the perimeter of the flange according to the markings.
- We install the seal in place.
- Apply elastic sealant around the top cut and edge of the base.
The adhesive must match the type of coating. Rules and restrictions on selection are indicated in the instructions attached to the product. For example, glue bitumen mastic master flush to a roof with a polycarbonate coating or polymer membrane is prohibited, because the materials will begin to deteriorate and the connection will become unusable.

Master Flash Mount with Rigid Edge
The procedure for installing a seal with an aluminum strip along the edge follows a similar pattern. Before the fastening stage, all work is carried out in the same order. The difference is that during fitting, before outlining the outline of the flange, it must be profiled to ensure a tight fit to the surface of the coating.
Fastening is done with self-tapping screws with a hex head. The fasteners are screwed into the low profile flanges. If desired, for reliable fixation with self-tapping screws, you can buy a counter metal part, installed on the back side of the roof.
For roof passages under chimneys big size and on roofs steeper than 45º, it is recommended to place the square flange in the form of a diamond. With a view to more effective protection To prevent leaks in roofs with a pronounced ribbed surface and steep slopes, it is recommended to purchase seals with an enlarged base.

In the line of cuffs with metal edging flange there are models with a porous seal located with back side. To fix them, there is no need to treat the surface with an adhesive. The system is simply screwed to the roof without gluing or filling the seams with silicone. The porous material ensures perfect tightness without additional manipulation.
Insulation for repair operations
Roof seals with a cut are required where it is not possible to put insulation on the chimney from above. Most often they are in demand for repairing worn-out chimney insulation.

Installation algorithm:
- Using cable cutter's scissors, we cut off the top of the cone along the edge, the Ø of which is 20% smaller than the same size of the chimney.
- Remove the toothed fastener from the lock and wrap the cuff around the pipe.
- We connect the sides of the cuff cut and put the fastener back on, without fanaticism squeezing the teeth with pliers.
- Lifting the edge of the flange, we apply silicone sealant to the roof.
- We press the system and apply silicone glue to the fastener and all problem areas of the insulation.
On roofs with an increased likelihood of leaking, systems with an increased base area are installed.

Roll insulation device
Available for cutting large pipes roll material, reinforced with aluminum strip. It allows you to seal chimneys of round, square, rectangular configurations. Thanks to its elasticity, pipe bypass parts can be easily formed, and thanks to the built-in aluminum, the sealing system adheres flawlessly to the roofing surface. Installation method roll insulation similar to those we presented in another article.
In order to seal a round chimney, you need to cut a piece of material 30 cm larger than the circumference of the pipe. This must be done so that the insulation is secured with an overlap. Before gluing, the segment must be bent like metal corner so that the vertical shelf is 17cm wide. This part will be glued to the vertical surface of the chimney. Before fixing, the horizontal shelf should be given the shape of a skirt by stretching. The edge of the roll seal can stretch up to 25%. After complete molding and a couple of fittings, the flexible roofing flashing is glued to the pipe and covering.

Square chimneys are covered in four steps in the following sequence:
- Cut out 4 parts of the apron, leaving 30cm allowances at the corners. We stretch the material before gluing, because after that its shape and dimensions cannot be changed.
- We fill the recesses of slate or coverings with a similar profile with silicone or sealant so that the cutting fits tightly. The sealing composition should be no more than 1 cm. There is no need to fill in the corners.
- Glue the top part of the insulation to the walls of the chimney without touching the corners. First we glue the bottom strip of the apron, then we put it on it and glue the two side parts. Then we apply the top strip so that its edges overlap the tops of the sides. As a result atmospheric water will drain without getting into the butt seams.
- Flatten the apron and glue its lower part to the roof with silicone, not forgetting to glue the corners. We lay a metal strip around the perimeter and secure it with screws or rivets.
Roll insulation can be painted in any color that matches the roof.
Installation of cuffs on tiles and slates
For arranging penetrations through roofs, covering with bitumen and ceramic tiles, slate tiles and slate, sealing systems with a lead or aluminum base are produced. The cone is traditionally cut to fit the collar tightly around the chimney. The upper part of the metal flange must be placed under the covering; on the sides and bottom it is laid on top of the roof.
The upper edge of the base is bent to prevent atmospheric moisture from penetrating into the system. After installation, all problematic connections are filled with silicone compound.

A selection of videos will show you the details of the installation of master-flash systems for chimneys:
Set of rules for installing chimney waterproofing:
Installation and fastening of the split sealing collar:
How to install a seal on metal tiles:
The use of Master Flash roofing sealants is attractive due to the speed and ease of installation. An important advantage of elastic penetrations is significant savings in money, reliable waterproofing and long service life. However, the most convincing argument in favor of new materials for arranging tunneling is the ability to install them with your own hands without the involvement of workers.
A cap on the chimney pipe is not only a decoration, but also protection from debris and moisture, in addition, it can significantly improve draft. Its functionality directly depends on its size, shape, and design.
Found in stores the following types caps:
- hipped wind vanes. Especially often installed on brick pipes;
- semicircular umbrella. They are used for roofs designed in European style; they serve a more decorative function and do not increase draft;
- standard weathervanes. Made from sheets of metal, mounted on brackets;
- flat. The umbrella has a flat, rectangular shape. Installed on buildings designed in Art Nouveau or minimalist style. In winter, snow does not fall off such caps on its own, which can lead to deformation of the fastenings during heavy snowfalls;
- round weathervanes. Intended for round pipes, are made of stainless steel.
When the chimney simultaneously performs ventilation function, hoods with a gable roof are used. The opening lid is convenient for cleaning from soot, which is important if the room is heated with wood or peat briquettes.
When choosing a cap for a chimney pipe, first of all, you need to take into account the type of heating device and the material from which it is made. Thus, the chimney for a brick stove is fundamentally different from the chimney of a gas boiler. The differences lie in different efficiencies and gas temperatures.
Constructions brick kilns may be different, but traditional option A brick pipe of square or rectangular cross-section is considered. Due to the formation of turbulence inside the pipe, the thrust weakens. Windy weather and low atmospheric pressure can generally reverse the draft and direct smoke into the room.
Rough surface brick wall traps soot, soot and dust. In the summer, the pipe can become a place where leaves and other debris accumulate, which leads to poor draft or its complete absence.
To avoid such consequences, a cap is installed on the brick pipes, which will protect it from moisture and foreign objects. The design of the umbrella on the chimney pipe improves the draft force and ensures its consistency. This umbrella is called a deflector. Due to its design, it ensures vacuum of the pipe in the upper part and air suction.

Cap for solid fuel boiler
Solid fuel boilers (coal, wood, pellets) are often installed to heat houses. Their chimneys are made of metal double pipe or ceramic. Due to smooth surface the traction is constant and stable. Given that correct installation, precipitation collects in the condensate collector and does not interfere with the exit of flue gases.
Constancy and traction force are ensured by the correctly selected pipe height. Chimney length of coal boiler model without forced draft can reach 8 meters. By installing a deflector, this figure can be reduced by 15-25%. A cap - a deflector - is installed on the pipe of boilers in which the main fuel is anthracite or brown coal. The operation of wood or pellet boilers is similar to coal boilers; they can be equipped with caps or deflectors, closed with a lid on top.
The efficiency of pyrolysis boilers is particularly high and amounts to 92%. The fuel is burned almost completely, because of this the temperature of the flue gases at the outlet can reach 180 degrees. This leads to the appearance of condensation, ice, soot deposits, narrowing of the lumen, and, as a result, carbon monoxide entering the room. That is why it is recommended to install hoods for pyrolysis boilers industrial production with an open top. Its design prevents the ingress of precipitation and dust, while not preventing smoke from escaping.
Cap for the chimney pipe of a gas and diesel boiler
In boilers of this type, the fuel burns almost without residue, and the smoke at the outlet contains carbon dioxide, carbon monoxide, sulfur compounds and water vapor. Smoke temperature is from 120 to 150°C. During long-term operation, the reaction of aggressive condensate can cause corrosion of the chimney elements. This is why it is recommended to install caps with an open nozzle. Chimneys - deflectors will be impractical here, since the gas boiler is equipped with forced draft.
To make a cap for a chimney pipe, we use sheet metals. In addition, these may be leftovers roofing materials. The most commonly used are:
- sheet steel, aluminum;
- copper;
- stainless steel;
- zinc-titanium alloy.
The service life of steel caps can reach 5 years, depending on the intensity of use and the aggressiveness of the gases. Aluminum will last from 5 to 8 years on average. The most durable are chimneys made of stainless steel, copper or an alloy of copper and zinc. They can easily last up to 100 years without losing their shape or corroding.
Purpose and application
Deflectors are designed for:
- protecting the chimney from precipitation. When the level of moisture in the chimney is increased, the active spread of fungus begins. Dampness also leads to increased fuel consumption;
- protecting the pipe from debris. Foreign objects entering the chimney can lead to fire or smoke;
- optimization of chimney operation. A correctly selected and installed umbrella increases efficiency by up to 15%, and also ensures consistency and increased traction.
The cap on the ventilation pipe is functional element, therefore, when choosing it, you should focus on its quality and strength.
Buy or make it yourself?
Cap for chimney You can buy it or make it yourself. If you decide to follow the path of least resistance and choose the first option, then you need to approach the choice of an umbrella very responsibly. The main thing to consider when purchasing is the structure of the chimney. The best option for purchase is a three-layer chimney made of modular panels arranged in the form of a sandwich. Such a device will protect the chimney from precipitation, because all condensate will be collected in a collector.
If the boiler is gas, then it is preferable to purchase a cap with a nozzle made of chromium-nickel acid-resistant sheet metal. For solid fuel system installing a deflector - weather vane would be an excellent option.
For a solid fuel system together with a brick pipe, you can choose any cap you like. In a house with a fireplace, boiler or stove, it is recommended to install a removable cap to make cleaning the chimney easy.

How to do it yourself?
You can make a chimney cap yourself. You will need galvanized steel sheets, tin snips, a welding machine, bends and a marker. Observe the following sequence:
1. take measurements from the chimney;
2. draw patterns on cardboard. The diameter of the umbrella should be 10 cm larger than the pipe so that it fits easily onto the chimney. The slope angle is 30-45 degrees. The minimum distance from the chimney cut to the cap is 10 cm;
3. copying the drawing onto a sheet of steel and cutting out the umbrella blank using metal scissors;
4. cutting out the remaining elements, bending the parts. At the connection points, you need to drill holes at a distance of 15 cm from each other to ensure reliable adhesion. Fixing the visor with rivets;
5. manufacturing metal brackets, welding them to the umbrella. Welding areas must be treated with a metal primer to avoid corrosion;
6. application anti-corrosion protection. When the coating is completely dry, the cap can be installed on the chimney.
A spark arrestor mesh is often additionally installed into the design of a standard cap. In addition to its direct function, it prevents debris, animals, and birds from entering the chimney. It is very important that the grille should have large holes to prevent smoke from entering the room.
Strength and consistency of traction is the main condition for the uninterrupted operation of the heating system. That is why you should pay special attention to the chimney cap, the material from which it is made and the correct installation. If you are not sure that you can do everything correctly yourself, from manufacturing to installation, then it is better to buy a cap right away. It will last a long time, and its price is low. The average lifespan of a steel smoker is 28 years. Repair or replacement of the cap must be carried out taking into account the following nuances:
- work only in favorable weather conditions;
- be sure to use a special one roof ladder, which is securely attached to the edge of the roof;
- do not carry out work alone; someone must insure you below;
- use a safety belt that must be securely fixed, for example to the chimney itself;
- make a blind area around the pipe, the width of which is at least 80 cm;
- It is better to fasten copper heads with copper or copper-plated fasteners, and zinc-titanium alloys with galvanized ones;
Installing a cap on a chimney pipe will not take much time, but will save a lot of time in the future. Now with the onset heating season you will not need to clean the pipe from debris; it will be protected from precipitation. This will eliminate corrosion and destruction of the brick and ensure many years of trouble-free operation.
Collapse
Making a smoke hood for a chimney simplest form doing it yourself will not require much effort and time. Enough experience in performing simple plumbing work and a protective umbrella will appear over your home, preventing water and gusts of wind from entering the chimney.
What is a cap?
Half a century ago, chimney caps could be found in the Baltic countries and Europe. Gradually, these protective devices appeared on all roofs of the country.
The main function of the devices is This is the creation of an obstacle to the entry of water and gusts of wind into the pipe.
Different designs allow you to increase the draft in the chimney, increase the productivity of stoves and boilers operating on different types of fuel, create forced ventilation premises of the house, basement.

Classification
When choosing a visor, consider several characteristics.
By material
The durability of the visor depends on the quality and type of materials. When choosing options, pay attention to copper fixtures. Such material, as it ages, becomes more attractive and will serve reliably for 50 years. 
The main part is the umbrella, which is best made of stainless steel or galvanized. Or you will have to remove the cap every year and re-paint it.
Inferior to a copper visor in terms of service life by 15-20 years, stainless steel parts are much cheaper.

Titanium is attractive for its durability and good properties metal, but costs more than stainless steel.
Therefore, in this question (which cap is better?) there is no clear advice.
Someone buys a copper cap with an architectural composition, or a simple galvanized umbrella - any design must reliably protect the chimney. And appearance is a secondary concept.
By shape
Here the choice is so individual that it is impossible to give advice. We’ll just list the shapes of the caps, and the choice depends on the preferences of buyers or home craftsmen:
- semi-cylindrical or vaulted;
- hipped, the simplest and most popular design;
- hipped - closer to the European style of buildings and roofs;
- with two slopes, found on half the roofs in the country;
- made in the form of a tower spire, reminiscent of caps in Gothic castles;
- flat with a slight bevel - this design is usually installed on the modern style of building architecture.

You can often find hoods with built-in weather vanes, with a special damper designed to provide sufficient draft and exhaust gases to escape even in strong gusts of wind.
The air flow entering the chimney creates an air lock and reduces the amount of oxygen in the combustion chamber to a minimum.
By purpose
According to their purpose, protective devices are divided into:
- a cap installed on the chimney of a stove operating on solid fuel;
- for servicing heating boilers and pyrolysis furnaces, install canopies with open nozzles;
- Boilers operating on gas or diesel fuel are equipped with deflectors with an open nozzle. Such devices create additional draft and can serve to ventilate the entire room and create favorable conditions for fuel combustion.
Design and principle of operation
The standard device consists of:
- cylinder;
- diffuser;
- umbrella
Depending on the type, it can be equipped with additional ring baffles located at the bottom of the device and around the diffuser. The principle of operation of any protective device same:
- A device is installed on top of the chimney that prevents strong gusts of air from entering the chimney and creating an air lock in it.
- The flow, hitting and spreading along the walls of the cylindrical part, loses its strength and breaks up into small streams of oxygen. One part of such flows rises, pulling hot vapors out of the pipe. An air vortex is created, throwing smoke upward. Thanks to this property, the level of traction increases.
- Thanks to the rising air masses, moisture is prevented from entering the chimney pipe, and the performance of the units is increased by up to 20%.
How to choose the right chimney cap?
The operating characteristics and reliability of deflectors are directly dependent on the types of heating device and fuel.
 If you use a gas boiler, you can choose a design open type with nozzle. The canopy for the chimney must correspond to the type of installation and fuel; this rule is enshrined in regulatory documents.
Gas boilers have a low combustion temperature, which means the gases escaping into the chimney are heated to a certain low temperature. At the point where steam escapes, especially when low temperatures, the condensate begins to freeze and the air channel gradually closes with ice. If the pipe is made of brick and the boiler operates on natural gas– in this case, installing a deflector is prohibited.
But stoves and boilers operating on solid fuel heat the gases to 260 0 at the exit from the chimney. Therefore, such pipes can be protected with caps of any shape, made of different materials.
If high-quality pallets are used, the efficiency level and temperature of the exhaust gases increases significantly, such chimneys are equipped with an open nozzle design. But on brick pipes, you will need to install protection with an umbrella. It will prevent water from entering the channel and destroying the brick.
Bottom line - when choosing a hood for a gas boiler, it is better to buy one with an open nozzle. For heaters burning all types of solid fuel or diesel fuel, all types and shapes of structures can be installed.

DIY making
The work is carried out in several stages. For the manufacture of simplest design You will need to prepare several types of tools and materials.
 (1 ratings, on average: 5,00 out of 5)