Termex rzb 50 d leak repair. Repair of a Termex water heater: device, principle of operation, troubleshooting instructions. The boiler does not heat the water well. Causes and methods of eliminating them
Installing a boiler allows you to not depend on utility companies: the equipment provides the user 24/7 hot water. The Thermex brand is especially popular due to its ease of installation and affordable cost. But even the Thermex water heater is subject to malfunctions. From our article you will learn the causes of breakdowns and what to do when they occur.
Typical malfunctions of the Thermex heater
Wide the lineup Thermex allows you to choose a 100 liter boiler for big family, 10-15 liters for use in a small kitchen, etc. The device is a metal heating tank, inside of which the heating element is located. The operation of the heater is controlled by a relay, as well as a thermostat. The magnesium anode helps to “soften” tap water.
It is worth noting that modern water heaters are equipped with a control unit that has a self-diagnosis function. The system detects the faulty unit and displays an error code. Having deciphered the meaning, you can understand where to look for a breakdown and how to fix it yourself.

Error table for Thermex water heaters
| Error codes | What does it mean | How to fix it yourself |
| E1 (Vacuum) | Insufficient filling of the tank with water. Premature switching on. | This can lead to combustion of the heating element. To correct the situation, turn off the device and wait for normal filling. After this, reconnect. |
| E2 (Sensor) | There are problems with the temperature sensor. | Try disconnecting the boiler from the network by rebooting. If after this the code is displayed again, then test the sensor with a multimeter, and if there is a malfunction, replace it. |
| E3 (Over Heat) | This error indicates that the water has heated to a critical temperature (95 degrees). | The thermostat is probably broken. Replace it. |
The video will help you deal with error E1:
Other problems with an electric water heater include:
- The appliance does not heat the water or takes too long to do so.
- Noise is heard during operation.
- Runs only for a short time.
- Doesn't work, won't turn on.
- The tank leaked.
- Unpleasant odor and color of water.
If you notice one of the signs, then proceed with inspection and repair.
How to repair Thermex yourself
Let's look at how to deal with problems on your own.
Replacing the heating element
If the body is vertical, then the heating element is located at the bottom and you don’t have to think about how to remove the cover. If there is a malfunction, the machine on the dashboard can knock out, and the body can give an electric shock. If you notice heating for too long, the element is overgrown with scale - as a result, heat transfer decreases.
Perhaps the part has worn out due to constant use or burned out due to a power surge. Read in a separate article. In it you will find general ways to diagnose and test for functionality. We will describe the sequence of actions specifically for the Termex brand:
- Turn off the water supply and drain the liquid from the tank. To do this, loosen the nut on the hot water pipe.
- Disconnect all hoses and remove the device from the wall.

- To access the bottom, turn the body over.
- Many models are equipped with two heating devices. To avoid confusion when connecting, take a photo of the wiring.
- To gain access to the heating element, you need to disassemble the fasteners.
- Remove the screws and nuts that hold the flange of the part.
- Take it out of the tank.

If scale formation is severe, the heating element may not come out of the socket. Then carefully clean it with a thin screwdriver.
Before changing the heating element, select a replacement in accordance with serial number models. If your appliance has two heaters, try to distribute the work evenly so that the appliance lasts longer.
Eliminating noise during operation
Magnesium and calcium salts create deposits not only on parts, but also settle at the bottom of the tank. Therefore, when switched on, noise may be heard and the circuit breaker may trip. To avoid serious problems, you need to clean the Thermex boiler at least once a year.
- Prepare the equipment: unplug it, drain the water.
- Unscrew the bolts from below and pull out the heating element.
- Clean the tank of scale deposits. If it has not dried out, it will be easier to remove it with a wooden spatula.

- Can be used for cleaning chemicals"Antinscale" type. Or dissolve 25 ml of vinegar in 10 liters of water.
- You can clean the heater in the same solution.
- If magnesium anode fell into disrepair - .
Due to impurities in the water and scale, the water from the boiler could become cloudy and acquire an unpleasant odor.
Rinse the inner walls with warm water, wipe and connect the equipment.
The boiler turns off quickly or does not work at all
The main reason is the tripping of the RCD. This is possible due to a short circuit or current leakage to the housing. Besides:
- No electricity supply. Check the integrity of the power cord, plug, and the serviceability of the socket.
- Water pressure sensor malfunction. Thermex supplies water when pressure builds up in the tank. Therefore, in the event of a malfunction, the part must be replaced.
- Low pressure in the water supply. We just have to wait for its restoration.
- Electrical contacts have become loose or oxidized. Check and tighten contacts.

- Thermal sensor is faulty. Needs replacement.
Repairing housing leaks
If the housing is leaking, immediate action must be taken. Causes:
- After purchasing the equipment, no preventive inspection was carried out.
- The magnesium anode has not been changed for a long time.
- A large number of impurities in the water.
- Current leakage to the housing.
- High pressure in the pipeline (more than 2 atm), which leads to deformation of the housing. It is recommended to install a reduction gearbox.
- The sealing gasket is deformed.
To determine the location of the leak, unplug the device and use a flashlight. Carefully inspect the body. If a leak is found in the pipe connections, drain the water and reconnect the elements.
The gasket may leak. First tighten the boiler cover screws. If this does not help, install a new gasket.
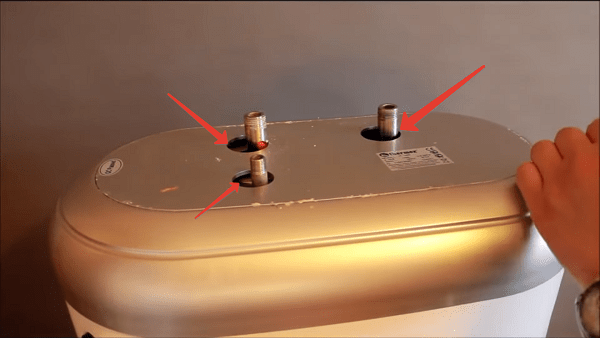
Is there a leak where the heater is attached to the body?

Manufacturer household appliances Thermex attracts users not only with the quality and durability of its products, but also affordable prices. Therefore, the number of buyers is increasing every day. Unfortunately, even the most reliable equipment cannot be operated completely without breakdowns - Thermex water heaters also require periodic intervention human hands. And if a reliable device has stopped working, then read on, as this article contains everything possible malfunctions Termex water heaters and methods for their elimination.
What you need for work
Before you begin solving the problem, you need to acquire a tool. If you do not want to start repairing water heaters, then it is better to purchase inexpensive tools. Chinese manufacturers are ideal for small household solutions.
Scroll the necessary tool for repair of Termex boilers:
- Pliers. The most common ones, without ergonomic handles, made of environmentally friendly material.
- Flat and figured screwdriver of medium length. It will come in handy more than once in the future for housework.
- Multimeter. Probably the most expensive device on the entire list. Allows voltage measurements electrical network, current strength, resistance and test the wires for integrity.
- Spanners. In order not to waste time, it is better to purchase a small set, which will also be useful in the future.
The above tools are quite enough to troubleshoot water heaters. But besides this, some consumables are also required:
- Insulating tape. Adhesive tape, having high electrical insulating qualities. Necessary when restoring the integrity of wires. The insulating tape can be replaced with a more convenient heat shrink tube.
Heat shrink tubing in different colors
- Plumbing sealant. Liquid sealant, used when replacing gaskets; when hardened, it forms a layer that prevents liquid leakage. If desired, you can replace it with a more expensive automotive sealant.

Example of a simple plumbing sealant
Classification and design features
Knowledge of the water heater structure will help to carry out high-quality diagnostics and quickly determine the malfunction. Thermex electric water heaters are divided into 3 main types:
Storage boilers
The main feature of such household appliances for 100 or 80 liters is the presence of internal and external tank. The internal tank, as a part that is constantly in contact with water, is covered with a layer of glass porcelain. This technological solution eliminates the occurrence of corrosion. Polyurethane foam is poured between the outer and inner tanks - a material that prevents heat loss.

Thermex storage water heater
At the bottom of the device there are water supply and drainage tubes, as well as all electrical components: thermostat, temperature relay and heating element - the main heating element. The heating element is a hollow metal tube with a spiral located inside, made of material with high resistivity. Water is supplied to the boiler and heated by the heating element when it turns on.
Main disadvantage storage boilers Termex is a high corrosion of the internal cavity of the tank, due to the exchange of ions between the heating element and the walls of the boiler. To minimize this effect, a magnesium electrode is installed, which supplies the water with the necessary ions.
Termex instantaneous water heaters
They differ from storage boilers in their smaller size and different operating principle. The design of instantaneous water heaters includes several heating elements - usually 2, but models with three or more heating elements are also available.

Thermex instantaneous water heater
Heating elements are made of ceramic materials and are usually placed in a special copper cylinder. The installed power regulator allows you to control the temperature of the liquid passing through the boiler. Also, in addition to the regulator, a pressure sensor and a temperature sensor are installed. The pressure sensor turns off the water supply if the permissible quantity in the water heater is exceeded. And the temperature sensor is set to certain values, if exceeded, it turns off the heating elements.
Combined type
Such water heaters include a small-volume tank from flow-through devices and a storage principle from simple boilers. The heating element has a different design, which is why it can operate in two modes: both a storage and a flow device.
Termex combined water heaters have received universal recognition due to their positive qualities:
- Compact size, does not take up much space.
- They are practically not subject to corrosion, which means they have a long service life.
- Combined operating mode.
- Average power, which is usually 2.5 kW. High-quality heating and low energy consumption.
List of main Termex malfunctions and methods for solving them
Now you can move on to the most frequent breakdowns Termex boilers, and find out how they can be repaired, spending a minimum amount of time and effort.
The water heater has stopped working, the indicator lamp does not light up
This problem is quite rare, and the household appliance is not always to blame in this situation. The main reason for the water heater not working may simply be a faulty socket, which will require a multimeter or an indicator screwdriver to check.
The sequence of checking the operating voltage in the socket:
- Turn on the multimeter, set the measurement parameter AC voltage, and place the probes in one and the second hole of the socket. The indication of the probes does not matter. Achieve quality contact. If the device shows 220 V with a slight deviation (plus or minus 10-15 V), then the socket is working. If the value is less than 200 V, or 0, then the outlet must be repaired.

Checking voltage with a multimeter
- You can also check the outlet using indicator screwdriver. Insert a screwdriver into the first and then into the second hole of the socket. Where the phase is located, the signal LED on the screwdriver will light up. When it comes into contact with zero, the screwdriver will not burn.

Checking the socket with an indicator screwdriver
If the socket is working, you should use a multimeter to check the serviceability of the water heater wire. To do this, turn the multimeter into the continuity mode and apply the probe on one side to the plug, and on the other to the boiler terminal box, where the supply wire fits. Sound signal indicates the integrity of the wire. If one or both wires are damaged, they should be replaced with new ones.
The boiler does not heat the water, but the indicator lamp is on
This problem can only be solved in one way - by replacing heating element. The indicator lamp shows that power is supplied to the heating element, but it does not work.

Removing the heating element from the water heater
The sequence for replacing heating elements in Termex water heaters:
- Disconnect the water heater from industrial network by unplugging the appliance from the socket.
- . Remove the pipe from the drain tap, put a rubber tube on it, which then leads into the bathroom or any container.
- Remove the protective plastic casing, which is secured with metal screws hidden under the manufacturer's stickers.
- Next, remove the operating voltage supply terminals from the heating element. They can be bolted or attached to the heating element using special connectors.
- Unscrew the six bolts that secure the heating element flange to the water heater body.
- Remove the heating element and replace it with a new one. Installation of a new heating element is carried out in the reverse order.
Before replacing the heating element, you should always make sure that it is clearly faulty. To do this, you need to use a multimeter, which turns on the resistance test mode. If the device shows zero, this means a breakdown dielectric material and shorting the wire to heating element housing A. If it is one, the wire inside the heating element tube is broken.
Water heating is too slow
There are 3 possible causes of the malfunction:
- The heating element is covered with a layer of scale, preventing the liquid from heating quickly.

Example of a large amount of scale on the heating element
- The thermostat is partially out of order. Upon reaching a certain temperature (much less than the set one), the thermostat turns off the heating element if it breaks or passes insufficient voltage to the heating element.
- More modern water heaters have control and monitoring units installed. If it breaks down, there may be an insufficient supply of electricity to the heating element; this will appear on the display as an error.
To clean the heating element from scale, it must be removed from the water heater (described above) and placed in a plastic bath with a liquid that has active chemical elements. For example, you can use household product“Mole” works very effectively when you need to get rid of scale or rust.

Cleaning the heating element from scale with your own hands
To replace the thermostat, you will need to remove it from the water heater. To do this, disconnect the device from the electrical network, remove the protective casing and get to the liquid supply tube to the household appliance. Usually it is on this tube that the thermostat is installed. It is secured with four bolts that need to be unscrewed and the supply voltage terminals removed. New element installed in reverse order.
Unfortunately, the control and monitoring unit is quite difficult to repair on your own. This requires appropriate education related to electronic circuits, as well as having a good multimeter, soldering iron and solder. Therefore, when stripping the control unit, it is best to send it for repair.
Thermex water heater is leaking - what to do?
Thermex boiler can start leaking both at the beginning of operation and after several years of operation. The main reasons for such a breakdown:
- Numerous corrosion of the inner surface of the tank. It occurs if you do not pay attention to the serviceability of the magnesium electrode.
- The seal under the flange of the heating element has become unusable.

Water leaking from under the heating element flange
- Manufacturing defects.
- The body of the water heater moved due to exceeding permissible temperature and a thermostat not working.
Of all the above causes of leakage, only a leaky seal can be fixed on your own. To do this, simply remove the flange, remove it completely from the boiler and change the seal. For better effect, sealant can be applied to the sealing gasket on both sides.
If the housing has become unusable, the water heater can only be replaced, since it cannot be welded. On inner surface The tank is coated with a glass-ceramic layer, which can be damaged by exposure to excessive temperatures, resulting in corrosion of the housing. A new boiler must also be purchased if the casing is damaged, which cannot be repaired even in a workshop.
Factory defects can be detected almost immediately; all you need to do is install the water heater and connect it to the network. If the body of a new boiler leaks, it can be replaced under the factory warranty.
Live water heater housing
The situation is dangerous and requires immediate attention, as one of the people in contact with the household appliance may be harmed.
The reason that the Thermex water heater begins to “punch into the body” when it starts up is a malfunction of the outer tube of the heating element. Because of this, water gets inside the heating element and comes into contact with the conductive coil. There will be a small but life-threatening voltage on the housing. Therefore, at the first sign of such a malfunction, the heating element should be replaced with a new one.
Less common, but still leading to the spread of operating voltage, is a breakdown of the control unit, which must be immediately taken for repair.
Termex boilers have long proven themselves to be reliable and unpretentious in maintenance. Appliances. But, like any other equipment, they are prone to malfunctions. Some of the breakdowns can be fixed by yourself, but in case of other faults, the repair of the Termex water heater should be carried out by a specialist.
Before disassembling the device, you need to have at least a little idea about its design and operating principle.
What does the boiler consist of?
- The body material is sheet steel with anti-corrosion coating;
- alloy steel, durable and corrosion-resistant, is used to make the internal tank;
- the elements of the device (heating element, magnesium anode and thermostat) are installed on a metal flange;
- magnesium anode It is a rod coated with a magnesium alloy - this part protects the tank from corrosion;
- drain pipe through which hot water(the intake occurs at the top of the tank, where the water temperature is higher);
- the space between the outer shell and the tank is filled with polyurethane foam for good thermal insulation- thanks to this, the liquid in the switched off unit maintains its temperature for a long time(like in a thermos);
- a heating element is used to heat water;
- when the water heats up to certain temperature, heating turns off thermostat located at the bottom of the device, it also turns on the heating when the liquid cools down;
- At the bottom of the tank there is a tube through which cold water flows.
The water heater is working based on the principle of convection:
- through the supply tube, water enters the storage tank;
- the thermostat turns on the heating element to heat the liquid to the temperature value set on the thermostat;
- thanks to physical law convection, warm water begins to rise;
- in the upper part of the tank there is an entrance to the pipe for collecting heated water, which goes to the consumer;
- When the hot water is used up and the temperature in the tank drops, the thermostat will turn the heat back on and the process will repeat.

Frequent malfunctions
The design of the water heater is quite simple and there can be several causes of malfunctions. There are breakdowns in which it is possible to repair Termex water heaters yourself:
- the device does not heat the liquid;
- the unit heats the water slowly;
- the boiler often turns off or does not turn on;
- water leaking from the tank.
The device does not heat the liquid
When the liquid in the apparatus does not heat up, then possible reason The heating element may be faulty. Signs of its failure, in addition to the lack of heating of water, may be the following: knocking out the automation on the panel, constant shutdown of the RCD (device protective shutdown), receiving an electric shock through water.
The heating element may fail if:
- the unit was turned on without water and the overheating protection did not work;
- The heating element was “overgrown” with a thick layer of scale and failed due to overheating;
- there was a sharp surge in voltage in the network;
- The heater has expired.
To check the heating element for damage, you need use the tester (special device for measurements). If the device, switched to resistance mode, shows infinity, it means that the heater coil has burned out. If the device displays zero, a short circuit has occurred. In both cases, the heater must be replaced.
Heater replacement procedure in a 50-liter Thermex boiler is not difficult, but it requires patience and attention.
- Before draining water from a failed Thermex water heater, the unit should be de-energized. After this, release the water from the device’s container and unscrew all hoses or pipes from the nozzles.
- Remove the device from the wall and turn it over.

- Carefully, using a screwdriver, pry up the decorative plugs and remove them.
- Please note that a screw is hidden under the sticker, which often causes craftsmen to break the cover when trying to disassemble the unit.

- In order not to confuse the location of all the wires during assembly later, they must be marked with construction tape (by signing them), or photographed.

- Now you will need to unscrew the nuts holding the flange. In this model of the unit there are 4 of them on each heating element.

- Remove the pressure washer. If it gets stuck, you can use a screwdriver.

- Remove the heating element. It also often sticks to the body and requires light prying with a screwdriver to remove it.

- The second flange contains more wires. They all need to be disconnected.

- After disconnecting the wires, unscrew all the nuts, remove the washer and remove the heater.


- Now you need to completely unscrew the entire electrical part, which is held on by 4 screws.

- There is also a screw hidden under the board that needs to be removed.

- After that decorative cover comes off easily.


- The next step will be tank flushing. It is necessary to fill and drain water until the liquid that comes out is clean. Scale in the container can accumulate in large quantities, sometimes reaching several kilograms.

- After cleaning, we place the heating element back in its place. The bolts are inserted into special grooves and moved until they stop.

- Next, you need to put on the pressure washer and tighten the nuts (not forgetting to put in the groovers and washers).

- Be sure to screw a magnesium anode to the body of the second heating element (it significantly increases the “life” of the entire unit, protecting it from corrosion).

- To insert a second heater, repeat steps 15-16.

- Now you should put the decorative panel back on.

- We screw on the board with thermal sensors, connect all the wires, using labels or pre-taken photos.

- We install the lower roof in place and tighten the countersunk screw.

- The assembly ends with the installation of decorative rings. At this stage, the water heater is ready for installation on the wall.

The method of replacing heaters in a Thermex 80 liter boiler is not much different from that described above.
The unit heats the water slowly
This is a fairly common malfunction that appears during prolonged use of the device without preventive cleaning. If you hear noises coming from the tank when the boiler is on, and the water takes a long time to heat up, this means that the heating elements are “overgrown” with scale. Its thick layer prevents the complete transfer of heat from the heater to the surrounding liquid. Because of this, the element may overheat and burn out. With such a problem, it will be easy to make repairs yourself.

How to disassemble a water heater to replace heating elements was discussed above. In a situation where the heating elements are working properly, but there is a large layer of scale on them, then it must be removed from the heaters. Use mechanical cleaning(file, sharp objects and sandpaper) is not recommended due to possible damage heating element housing.
To safely remove scale, you can use chemicals specifically designed for this purpose. You can buy them in the store household chemicals or at a service center.
To remove scale, you should prepare a container the depth of which will be slightly larger than the heater itself, for example, a bucket.
- It is necessary to dilute the descaling agent (which is an acid) in a bucket, observing the concentration percentage, which is indicated in the instructions. If the concentration is less, the cleansing will be ineffective.
- Dip the heating element into the acid solution and note the time. Dissolution may take from a few minutes to 2 or more hours. The cleaning time depends on the thickness of the formed layer and the properties of the solution.
It is important to follow the instructions for the descaling agent and not overexpose the heaters to acid. After cleaning, it is enough to rinse the heating elements with running water.
The boiler often turns off or does not turn on
The reason that the Termex water heater turns off without dialing desired temperature, or does not turn on at all, it may become faulty thermostat. It is checked by a resistance tester. If it is missing, the part should be replaced. To do this, just remove the bottom cover of the device, disconnect the wires and replace the thermostat.

Water leaking from the tank
If a leak is detected from the container, the problem is solved by replacing it. Here you should calculate how much it will cost you to replace or repair the tank, and what the price of a new unit will be. It is recommended not to spend money on repairs, but to purchase a new boiler.
If you still decide to do-it-yourself repair Termex boiler tank, the following difficulties should be taken into account:
- when dismantling the tank from the outer casing, you will definitely damage the shell;
- If the device has a plastic tank, then it cannot be restored.
- if the material of the container is copper or stainless steel, then you can try to solder it, but do it properly without special tool at home it will be problematic.
Some models of water heaters have containers coated with glass enamel. When you try to repair such a tank by soldering, you will inevitably damage this layer, after which it will be impossible to repair it.
In a situation where water is leaking from under the flange, the problem may lie in rubber gasket, which has worn out. To replace it, you need to turn off the power to the unit, drain the water, disassemble the device according to the instructions described above and replace the sealing gasket.
When you need specialist help
Some types of Termex boiler malfunctions can only be repaired by a specialist, and it is highly not recommended to carry out repairs yourself in such cases. Problems that only a specialist can solve:
- incorrect operation and emergency shutdowns of new equipment that is not out of warranty;
- settings on the electronic thermostat are reset;
- The RCD often turns off the unit;
- tank leaks, although the effectiveness of such repairs is questionable - it will be cheaper to purchase a new device.
But before you call the service, make sure that the line through which cold water is supplied is there is pressure. There are models of units that turn off the boiler if there is no pressure in the supply.
Electric water heater in modern apartment You won’t surprise anyone anymore. Residents of modern high-rise buildings do not want to depend on leaky communications and the whims of public utilities, and owners of private houses simply have no other choice. These electronic assistants are produced by a large number of companies around the world. TERMEX products have earned great respect among users. They are reliable and economical, and thanks to the latest developments of the company, they have an increased service life. However, the quality of the water supplied to our homes, as well as the variability of voltage and frequency of electricity, sometimes lead to boiler breakdowns. And then Termex water heater repair inevitable.
All water heaters manufactured by TERMEX are divided into three groups:
- storage type water heaters;
- instantaneous water heaters;
- instantaneous storage water heaters.

Termex storage water heaters
The design of Termex storage water heaters is based on two steel tanks - external and internal. The internal tank is covered with a layer of glass porcelain to protect it from water.
This coating is applied by spraying and firing at a temperature of 850 o C. This material perfectly protects inner side tank from oxidation and corrosion. IN bottom part The container has a flange installed in which electrical components and pipes for supplying cold water and extracting hot water are installed.
The space between the tanks is full heat-insulating material– high-density polyurethane foam. The outer steel tank is covered with enamel.
An indication and control unit is also installed on the external tank for ease of use of the device.
Tap water supplied to the boiler via a pressure line is heated by a tubular electric heater (TEH). The design of the heating element is a copper tube, inside of which a spiral of fechral wire is installed as a heater. The space between the spiral and the tube is filled with a dielectric, a material with very low electrical conductivity. With the help of water heated in the tank, ion exchange occurs between copper tube Heating element and steel parts of the Termex water heater. In this case, the metal parts of the boiler corrode. To reduce this effect, the water heater contains a magnesium electrode that supplies ions to the water. Thus, ion exchange occurs mainly between the magnesium rod and the heating element, and then the metal parts of Thermex suffer less.
However, the magnesium anode also degrades quite a bit. When it completely corrodes, nothing will help preserve the metal of the boiler. Periodically replacing this element will allow your boiler to last much longer.
The Termex water heater design includes an adjustable thermostat with double protection. When overheating occurs automatic shutdown heating (thermal relay is activated).
Termex instantaneous water heaters

They differ from those discussed above in their smaller size, as well as the design of the heaters. As a rule, these are ceramic heating elements (usually two, less often three or more) placed in a copper cylinder located inside instantaneous water heater Termex. The inlet pipe is equipped with a pressure sensor that protects the device from overheating. The temperature sensor will also turn off the device if the temperature exceeds the permissible values.
Termex flow-storage water heaters
These water heaters have a small tank and heating elements of a different design than those of storage devices. In general, their design incorporates the features of both flow-through and storage models.
Typical malfunctions and causes of their occurrence
In design electric water heaters There is nothing complicated about Termex, so there are only three types of breakdowns, but each of them can have several causes.
The boiler does not heat the water at all, or heats too slowly
Most likely, the tubular electric heater has failed. It could either burn out completely, or become covered with scale to such an extent that the heat exchange process between the heating element and water decreased.
The second reason may be a breakdown of the thermostat, which simply turned off the voltage supply to the heating element.
The third reason is that the control and monitoring unit has failed (if it is provided for in the design of the water heater).
Thermex water heater body is energized
This malfunction occurs when the heating element overheats due to a thick layer of scale. In this case, the tube of its body cracks, and water gets inside, coming into contact with the energized spiral.
Some breakdowns electronic unit control and monitoring (or control boards in simple water heaters) also cause the boiler to “electric”.
Water leak from boiler
The device may leak due to malfunction of the heating element, cracking of the seal, or corrosion of the internal tank.
Do-it-yourself repair of Termex water heaters
First of all, you need to remove the boiler from the wall. To do this you need:
- disconnect the device from the AC mains;
- shut off the pressure line of the water heater (close the supply valve cold water);
- (to do this, put a rubber hose on the drain pipe);
- open the check valve handle;
- unscrew the hot and cold water hoses;
- remove the Termex boiler from the wall (horizontal models do not need to be removed).
Video on how to drain water from a boiler
To troubleshoot and troubleshoot, the vertical water heater must be placed in a convenient position (most often, repairs are carried out with the device turned upside down).
The order of further disassembly storage water heaters Termex is as follows:
- unscrew the protective cover (often the mounting screws are hidden under the manufacturer’s stickers). Vertical models have a lid that covers electronic components, is located below. For horizontal ones - on the left, and for flow models it is usually located at the front.
- remove fastons (contact tips) from the heating element and thermostat;
- unscrew the screws securing the heater and the protective thermostat;
- remove the thermostat and remove the temperature sensors from the heater body;
- disconnect the heating element, having previously unscrewed the six screws securing its flange.
Warning : The thermostat capillary tubes are a very thin and fragile element of its design. Exercise maximum caution. A damaged tube cannot be repaired; the thermostat will have to be replaced.
Checking the functionality of the thermostat and thermostat

In order to check the thermostat, you need a multimeter. We set it to resistance measurement mode (measurement limit of hundreds of kOhms). We measure the resistance between the input and output contacts of the thermostat. If the device does not show anything, the thermostat is faulty. Most likely, the contact group in it has failed, and it will be impossible to repair it. This thermostat must be replaced with a similar one.
The safety thermostat can be checked using a regular lighter or matches. By pressing a button on its body, a flame is brought to the tip of the temperature sensor. A working thermostat will respond by opening the contacts and pushing the button. A faulty device must be replaced without any options.
Checking the serviceability of the heating element
To check the health of the heating element, you will also need a multimeter. On it, select the resistance measurement mode (measurement limit of hundreds of ohms). The resistance at the contacts of the electric heater should be several tens of ohms.
If the device does not show anything, this indicates a break in the heating element inside.
They also measure the breakdown of electricity on the heating element body. To do this, the multimeter is set to a measurement limit of thousands of kOhms. When measuring the resistance between the heater contacts and the heating element body, the multimeter should show an infinitely high resistance, otherwise it will have to be replaced.

Situations when the water heater stops turning on are not uncommon and are always unpleasant. You can try to fix the problem, but first you need to figure out the reasons.
So, in front of you is a seemingly functional boiler, but it does not heat the water, and no light bulbs, sensors or displays work. You can determine why the water heater does not turn on only by disassembling it. But before that, you should still check the presence of current in the network - the wire may be damaged, the socket or plug may fail.
Naturally, in this case the water heater will not work, although the device itself will not need repair. Just connect any other working device - and you will see if the outlet works. Emergency operations on the panel cannot be ruled out - if the water heater is used simultaneously with other powerful appliances in an apartment where the wiring is not designed for such a load.
Checking electrical elements and heating elements
If everything is in order with the electricity supply to the device, but the Ariston water heater does not turn on, then the tank is de-energized and all the water is drained. After this, you need to dismantle the housing cover - wires, thermostats and circuit boards are located under it.

Then we use a tester - with its help we check the supply of electricity to the terminals of the heating elements. It is quite possible that the integrity of the power wires is broken, or there is no contact between the wire and the terminal on the heating element. The tester is also used to check the performance of the heating elements themselves, because they can burn out or pierce the housing.

If the coil inside the heating element fails, the boiler will not turn on, since it will not be able to heat water. It will also not work with a breakdown to the housing, since immediately after switching on the residual current device (RCD) will trip.

Keep in mind that a burnt heating element cannot be repaired - only replaced, and if you are in doubt about choosing a suitable heating element, it is better to contact a repair technician. They will select a heating element that matches the brand, power and dimensions, and you will not have to deal with dismantling a heavy tank.
Disabling the triggered thermal protection
If the problem is not in the heating element, but the Termex water heater does not turn on, then it is possible electrical circuit opened due to thermal protection tripping. Thermal protection - required element water heater, it does not allow water to overheat above the critical level of 90°C. Thermal protection is triggered due to the following:

Thermal protection button returns to working position pressing - this will close the circuit again and ensure the operation of the device, but there are two points here. The first is that the thermal protection button in almost all round and flat water heaters is located inside, and in order to press it, you will need to drain the water from the tank and remove it plastic cover. Secondly, it is imperative to eliminate the reasons for the thermal protection operation: in practice, this means that the boiler will have to be cleaned (most often it is the heating element that is descaled). After cleaning, the boiler is assembled in the reverse order, the entire chain of wires, starting with the plug and ending with the heating element, is called, after which the equipment starts up.
 (1 ratings, on average: 5,00 out of 5)