Aerial cable for entry into the house. How to install electrical input into a private house
When a house is built, electricity is supplied to it first of all. Although this procedure is not very complicated, it should be performed in strict accordance with existing rules so that the introduction of electricity does not create any threats either to the house itself or to the people who will live in it.
Methods used to connect to an electrical line
It should be especially emphasized that connection to the electrical line should only be carried out by specialists authorized to carry out work of this kind. All other actions can be performed by the homeowner on his own.
To supply power to your home, you can use any of the following two methods:
- Air, which is the most inexpensive and simplest. However, having chosen this method, we must not forget about the disadvantages with which it is associated - the possibility of damage to the supply by gusts of wind, snow falling from the roof, or branches of neighboring trees.
- Underground, the aesthetics and safety of which are beyond doubt. Its disadvantage is the high labor intensity of the work and its significant cost.
Air input
When introducing electricity in this way, the cable running from the pole to the house is simply suspended in the air. On the house itself, it should be fixed on porcelain fittings, and the entrance to the building should be arranged on minimum height 2.75m.
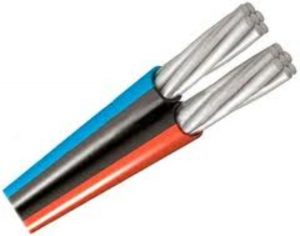
For wiring, a SIP cable must be used, the advantages of which are: increased strength and in the presence of insulation that is not subject to negative impact ultraviolet. For input, VVGng or KVVGng cables should be used, connected to self-supporting insulated wires on porcelain reinforcement rollers. Passing the SIP cable through the thickness of the wall is prohibited by fire safety rules.
Work on hanging the supply cable must be carried out by specialists. It falls to the owner to prepare the entry point where it is necessary to insert a metal sleeve or thick-walled pipe. The input hole should be selected where the formation of moisture or ice is excluded, and located in the wall.

When choosing an input bushing, you should proceed from the fact that the thickness of its walls should be:
- with a cable cross section of 4 mm 2 -2.8 mm;
- with a cable cross section of 6-10 mm 2 -3.28 mm.
Outside the house, the sleeve should protrude at a distance of 20-30 cm.
Underground input
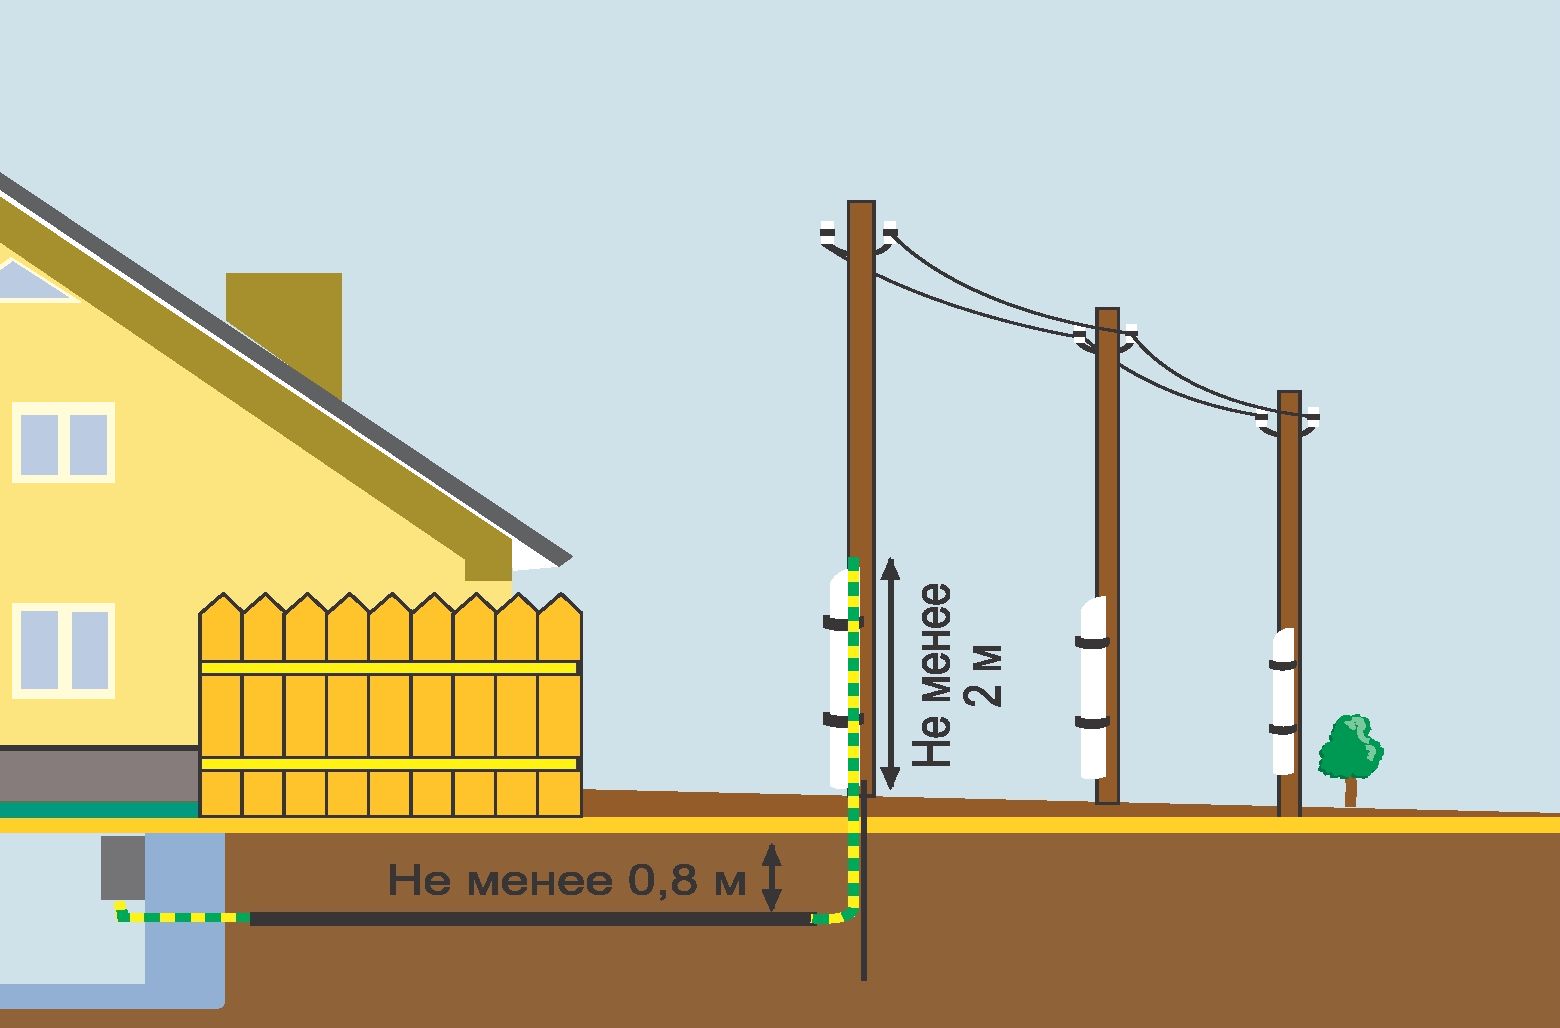
To make connections using this method, the VVBShv cable is laid in the trench, located in a pipe laid at a depth of 1.2-5 m. The minimum cross-section of the cable used must be 16 mm 2. Pipes are laid up to input device with a slight slope towards the street. The ends of the pipes must be sealed so as to prevent the penetration of water and moisture into them.
The cable must be inserted through the thickness of the foundation, and not under it.
Protection of the cable laid in the entry hole
Since the input cable located in the thickness of the wall poses the greatest danger, it must be protected using one of following methods or both at once:
- laying in a thick metal pipe, as described earlier.
- installation of additional protective device on the outside of the wall

Inputting electricity into a brick house
Speaking about a wooden house, it would be a kind of discrimination not to mention the procedure for introducing electricity into a brick house.

Fortunately, there is no need to present much information here, since everything that has been said about wooden house, fully applies to a stone house, although its fire hazard is much less.
We hope that what we have told you will allow you to properly arrange the electrical input in your home, making it as safe as possible.
Or maybe you have Additional Information? Please share it with our readers in the comments.
In general, the question posed in the title is somewhat provocative. Even in technology, there is practically nothing unambiguously “correct”. But there are frankly erroneous technical solutions. To avoid them, we will try to consider in detail the air input device using a modern and increasingly popular SIP.
1. Why SIP?
So, SIP - self-supporting insulated wire. Replaced the usual non-insulated multi-wire aluminum wire, which can still be observed as part of private sector overhead lines in many regions of our country. Bare wire was used previously simply due to the lack of reliable insulating materials, capable of serving in harsh outdoor conditions.
Due to the lack of insulation of the overhead line wires, during its installation it was necessary to use support insulators. Transmission lines occupied large space, because it was necessary to maintain the distance between the wires. But, despite this, the wires often overlapped with each other, for example, when strong wind. Then there were short circuits, broken lines... In general, there were enough problems.
With its appearance, SIP immediately eliminated almost all these problems and issues. Cross-linked polyethylene insulation is not afraid of rain, wind or sunlight and is capable of serving faithfully for at least 25 years. For such conditions, the period is impressive. Installing an “air” using SIP does not take much time and effort, since a wide range of different fastening fittings have been developed for this wire. Everything has been thought out to the smallest detail: not installation, but pure pleasure.
2. How to install?
Before installing a new input, it is necessary to obtain technical specifications from the local Energosbyt branch. You can, of course, act without these conditions, but in the future disagreements may arise, and something may have to be redone due to the “stubbornness” of energy sales technicians.
For entry into the house, SIP 4 is used without a supporting cable with conductors of the same cross-section of 16 square meters. mm. , and the use of aluminum with a cross-section of less than 16 square meters. mm. on this moment prohibited by the PUE. A wire with a larger cross-section is simply not needed, since 16 squares is more than enough.
The number of SIP cores per input is two or four, depending on what we organize.
The easiest way to create a branch from the main line is to use standard piercing clamps for SIPs. When using such clamps, the SIP cores do not need to be stripped, and the clamping force is regulated by a breakaway hex head. The required number of clamps is determined by the number of wire strands.
If the distance from the main overhead line to the house exceeds 25 meters, then technical specifications Most likely, you will need to install an additional support on which the input cable will be secured using a support clamp. But this is extremely rarely required, since the location of power supply lines is taken into account even before the construction of any residential building begins.
On the way to external wall At home, SIP can be secured using an anchor clamp on the bracket. This is also standard fittings for SIP and special problems may arise during its installation. Here, too, the number of clamps and anchors corresponds to the number of input wires.
If the material from which the house is built is non-flammable, then the cable can be laid openly along the outer wall. True, this is not particularly aesthetically pleasing: thick black wicker SIP directly on the wall. It is especially unpleasant if the wall is a façade. Therefore, it is usually better to spend time and effort installing a plastic box or. And if the house is wooden, then this requirement becomes mandatory.
3. How to get inside?
We bring the SIP to the point of entry into the house, and this is where disagreements begin. The main question is: should the SIP be installed directly inside the house, or should it be broken and inserted with a more “home-made” cable, for which VVGng with a cross-section of 6 or 10 square meters is usually recommended. mm.?
Most electricians say that SIP is an exclusively outdoor cable, and it’s made of aluminum, and it is categorically not recommended to run it inside the house. In their opinion, SIP and VVGng must be connected immediately before insertion using the same piercing clamps or ordinary “nuts”.
On the other hand, Energosbyt is very sensitive to any breaks in the input cable, since it sees everything as a direct opportunity for theft of electricity. In addition, it seems reasonable to note that SIP - a wire that can withstand outdoor conditions - is unlikely to be less reliable indoors. And “nuts” or piercing clamps are an additional weak point in the wiring, representing an increased danger.
Therefore, even design organizations often propose to install SIP directly on the input machine of the internal distribution board. And such projects are successfully completed without encountering any opposition from supervisory organizations.
Perhaps the most significant problem is that the SIP is a rather rigid wire, and it is not very convenient to mount it inside the panel. But, nevertheless, it is possible.
And yet, the best way to organize the input seems to be: installing an additional two- or four-pole circuit breaker (depending on the number of phases) before entering into the wall. The machine can be installed in a separate sealable box. Before the machine there will be SIP, and after it - VVGng v. It is better to choose the rating of the machine one step higher than the machine in the input distribution board, so that in case of overloads and short circuits inside the house you do not have to climb the outer wall of the building.
Outer circuit breaker will protect the cable inside the wall from short circuit and will protect the whole house from fire. After all, you never know what can happen over the years of operation.
Hole for input cable the wall needs to be reinforced. You should not rely on corrugated pipe alone in this matter. Pieces of rubber hose are absolutely not suitable for protecting the input. Over time, rubber loses its dielectric and mechanical properties, it becomes brittle and conductive. There will be only one harm from such protection - it will fail at the most unexpected moment.
Due to all the listed subtleties and disagreements, it is strongly recommended that you first coordinate the plan for organizing electrical input into the house with representatives of Energosbyt. Even in different areas of the same city, there may be no agreement between energy sales technicians on these issues, and the homeowner will always be at the extreme.
Alexander Molokov
Instructions
There are three ways to connect electricity - using a SIP wire, laying a cable in the ground and laying a cable using a cable. The easiest and most common is air way, with the help of self-supporting insulated wire, abbreviated SIP.
Electrical entry into the house begins with the selection of materials. The length of the SIP wire consists of two values, the distance from the support to the house and from the entry point to the electrical cabinet. We measure the distance using a tape measure, take the wire with a reserve, taking into account sagging and installation.
The main points of the work are fastening the SIP wire to a support, installing the wire on the wall of the house, entering the house through the wall and laying it along the wall of the house to the electrical cabinet. If the input power supply is 220 volts, then use a two-wire SIP, if 380 volts - a four-wire one.
To install SIP on the wall of a building, special fittings are used. The anchor clamp compresses and holds the wire using internal thermoplastic wedges without damaging its insulation. It is used to tension the wire.
To secure the anchor clamp to the wall, use an anchor bracket, which is attached to the wall using dowel nails or metal anchors.

Installation of fittings and entry into the house is carried out at a height of at least 2.75 meters from the ground. If the height of the building does not allow this condition, it is necessary to install a pipe stand to raise the wire to a given level. SIP is brought into the house through a thick-walled metal pipe. This will protect the cable from mechanical damage, for example, subsidence of a house. For additional protection insulation, a corrugated pipe is put on the wire. The metal pipe must slope toward the street to prevent water from flowing into the building and causing icing. After entering the cable, the installation site is covered with a solution.

Laying the wire inside the building to the electrical cabinet can be done open method or closed. That is, in a cable channel, corrugated pipe or under plaster.
Did you like the video? Subscribe to our channel!
Underground cable entry into the house has many significant advantages. Here are the main ones: the risk of fire is minimized; the cable is reliably protected from theft, vandalism and adverse weather influences; does not spoil architectural design. To experience all these benefits, you need to know not only how to run a cable into a house underground, but also what kind of cable to put into a house underground?
Underground cable entry into the house using armored cable
To connect a house to the electrical network, it is necessary to use a cable that can withstand the pressure of soil masses and other similar influences. Take armored cable for example. Underground cable entry into the house must be carried out in the following order:
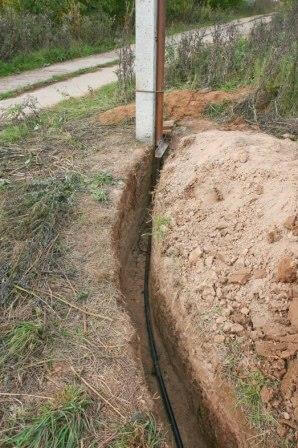
1. Dig a trench from the pillar to the entrance to the building through the foundation (its depth should be 70-90 cm).
2. Pour sand into the trench (the sand layer should be 20 cm thick). Sand is needed to remove excess moisture in autumn and spring.
3. Place the cable in the trench. It is important that it lies in a wavy manner. Lowering from the pole into the ground must be done in a pipe (its height should be 2 meters).
4. Enter the cable into the house underground. This can be done through a wall or foundation. In the first case, a hole is drilled in the wall. A pipe is laid in it. The end of the cable is passed through a pipe made of metal or plastic.  5. If you decide to enter through the foundation, then create a hole of a suitable diameter in it. Insert a piece into the hole metal pipe and put the cable in it. The pipe must be fixed using cement-concrete mortar. The pipe should be insulated on both sides. This will require non-flammable material. This must be done in order to prevent the penetration of water and soil.
6. Connect the cable to the protective device in the distribution panel, and on the support to the wires overhead line- using piercing clamps. The cable is fixed to the pole with metal tapes with a pitch of no more than 100 cm. Be sure to ground the armor, both from the side of the pole and from the side of the shield.
7. Once you are satisfied that everything is done correctly, dig the trench. After some time, the soil will shrink, so a mound should be created above the trench (its height should be 15-20 cm).
Underground cable entry into the house using an unarmored cable and HDPE pipe
 It is also possible to supply power using an unarmored cable to the house underground. In this case, you will need an unarmored cable and a HDPE pipe. Such a pipe can withstand very severe frosts. It does not smoke or burn, is characterized by high strength, increased ductility, and resistance to chemicals.
Before you begin connecting, carefully inspect the VVG cable. It is important that the shell is not damaged. Otherwise, the HDPE pipe will not be able to perform its intended functions. Then you can safely perform the following steps:
Dig a trench.
. Place a pipe of the required diameter in it.
. Pull the cable. It is important that it is not in tension.
. Enter the cable into the house underground. This can be done above the foundation (on the outer wall of the house) or through it. When entering through a wall or foundation, a passage of suitable diameter must be created. Place a pipe and cable into this passage.
. Backfill the pipe. Use sand first (the layer thickness should be 10 cm). Then fill in the soil (layer thickness should be 15 cm).
 Now you know how to run a cable underground into a house. But before you do this, you must obtain the appropriate permission. To do this, it is necessary to develop an energy supply project (drawings and plans). The permit will have to be approved by the services that are responsible for various facilities and communications (gas pipeline, water supply, communication systems, heating mains, etc.). If one or another communication is located near the installation, it is necessary to call the person responsible for it in order to coordinate the location of the trench.
The company "Kabel.RF" is one of the leaders in the sale of cable products and has warehouses located in almost all regions Russian Federation. By consulting with the company’s specialists, you can purchase the brand you need at competitive prices.
 (1 ratings, on average: 5,00 out of 5)

