Decorative nozzle for the chimney. Do-it-yourself chimney cap - design and drawings. Choosing a hood depending on the chimney
A reliable, stylish and durable chimney cap can be purchased or made independently. Moreover, many are attracted by the second option, because this is another opportunity to craft, show ingenuity and give the exterior of their home another original touch. Let such a chimney not have perfect seams and brought to the perfect geometry of every millimeter, it will still look good, “like home,” and from a distance small errors will not be noticeable.
Just first, decide what exactly you want to get as a result: a simple but nice classic cap for the chimney pipe or a more complex design with additional functions And creative design. Both of these can be brought to life! And we will tell you in detail how to make each of these options and what you will need for this.
They came up with a cap for a pipe a long time ago. This solution not only allows you to give the chimney decorative properties, but also important practical ones:
The most important and first task of a chimney cap is to protect the latter from external natural phenomena: snow, rain, strong wind and excessive ventilation. Secondary - serve as an additional decoration for the roof. Believe me, it's fantasy modern designers, as never before, amazes the imagination! And some masterpieces of home and industrial craftsmanship attract the eye from afar.
Moreover, each detail can have its own shape, giving the chimney a particularly decorative original look. But, no matter what shape you make the cap, the main thing is that it protects the chimney from precipitation and wind, preventing weather conditions from destroying its walls. And at the same time it turned out to be durable in practice, because the conditions of its operation are simply extreme!
You need to select a cap for the chimney in accordance with the diameter of the hole and the type of channel:
- if the stove in the house is heated with gas, then the cap should be made of chromium-nickel acid-resistant sheet metal;
- if a fireplace, boiler or stove is heated solid fuel or firewood, then it is better to install not a stationary cap, but a removable one, so that it is then easy to carry out an inspection.
The overall classification of chimney caps is simple: with a square base or round, made of black or chromium-nickel sheet, stationary or folding. Also, many today are made only of caps without a base at all - they are fixed directly on the chimney duct. In Russia, the most popular forms of caps are:
It also matters architectural form cap:
- The multi-slope weather vane has excellent protection from snow and other precipitation getting into the chimney.
- A chimney with a weather vane looks especially impressive; metal figurines of objects for animals are specially installed on this one.
- A flat surface cap is most often installed on European style buildings.
- A hood with an opening lid is also becoming popular, which helps to carry out unhindered maintenance and maintenance of the chimney.
- Finally, the deflector, which is equipped with opening ventilation holes, is designed to significantly improve traction.
If you noticed, chimney caps are not always used. For example, in areas where there is almost no wind and there is rarely precipitation, there is no cap on the chimney at all. But for Russian latitudes with the appropriate climate such roofing element necessary.
6 of the most successful chimney cap designs
Noble enough and modern look for chimneys and weather vanes, which are made of stainless steel or galvanized iron. If they are also coated with colored polymer, then they look especially beautiful. But, if you add a little more ingenuity and make the smokehouse decorative, the roof of the house will begin to resemble a fairy-tale palace. And even a standard weather vane looks like another one small house on the pipe.
European cap: foreign minimalism and practicality
European caps are usually rounded in appearance, more designed to prevent condensation. For example, from a steel sheet and hand-made holders, you get a completely elegant chimney of this type:

And now - step by step, as in our master class:
- Step 1. Take a regular metal sheet and carefully, without breaking it, bend it around the pipe (you can directly along the contour of the chimney).
- Step 2. Attach legs for which the cap will be attached directly to the pipe. The easiest way is to involve a welder in this process or use a special machine. Or make transverse cuts (not all the way through), and use pliers to carefully bend the strips.
- Step 3. You can make these same cuts not transversely, but longitudinally, if the piece is long enough and you need a smaller umbrella. Then cut out a rectangle at their edges and leave the tails in the centers. Next, roll the sheet into a semicircle and press the tails with a clamp.
- Step 4. Bend the legs as carefully as the cap so that the fold is smooth.
- Step 5. To install such a cap on a pipe, you can use a regular clamp for chimney pipes.
Interesting idea, isn't it? Therefore, if you have never made similar products from metal, then we advise you to start with this option. It is simply a bent semicircular sheet that has only four legs. Of all the materials you will only need a piece sheet metal and a disc for an angle grinder.
Classic umbrella: harmony of aesthetics and reliability
Making a standard chimney umbrella will not take you much time:

Installing a homemade umbrella on a chimney pipe is also not difficult:

Here is a video instruction for making such a simple but elegant chimney umbrella:
A cap with a spark arrestor: how to create a barrier to sparks
Additionally, the design of a standard hood is often equipped with a spark arrester mesh, which, as a bonus to its main functions, prevents birds from getting inside the chimney (and wind-blown debris). But at the same time, the mesh itself must have large enough holes so that the smoke then easily comes out of the pipe.
Here is an example of the simplest installation of a spark arrester on a chimney pipe:

Copper spark arrestor caps are especially beautiful and noticeable from afar:

By the way, copper caps are not a luxury item at all. As for the material of manufacture, really the most suitable option for the cap it is copper, which is not only durable, but also aesthetically pleasing.
By using copper, they create particularly impressive accents on the roof, which emphasize the status of the owners of the house. But, if you decide to make the cap from this particular material, given that then all its components must also be copper (even the fastening). After all, in contact with other materials, copper causes unwanted chemical reactions eg oxidation. But over the years, the copper cap will acquire a valuable, noble shade.
Cap for a ceramic chimney pipe: resort to tricks
Now let's move on from the common metal chimney pipes - to ceramic and brick.
The main problem of making caps on ceramic pipes The problem is that it is quite difficult to attach any device to them. Therefore, we offer you this simple and elegant solution:

Of course, such a cap is a seasonal solution, but during the absence heating season the chimney will be closed, rain will not fall into it, snow will not fall in and debris from the wind will become clogged. And, most importantly, no animal will get into such a chimney (raccoons, by the way, are very cute in appearance), and the bird will not build its nest. Those. Thanks to such a simple installation, you save yourself from many problems that usually occur at the beginning of the heating season.
Deflector caps: creating the necessary draft
Modern deflector caps have many advantages over conventional visors, creating excellent traction:
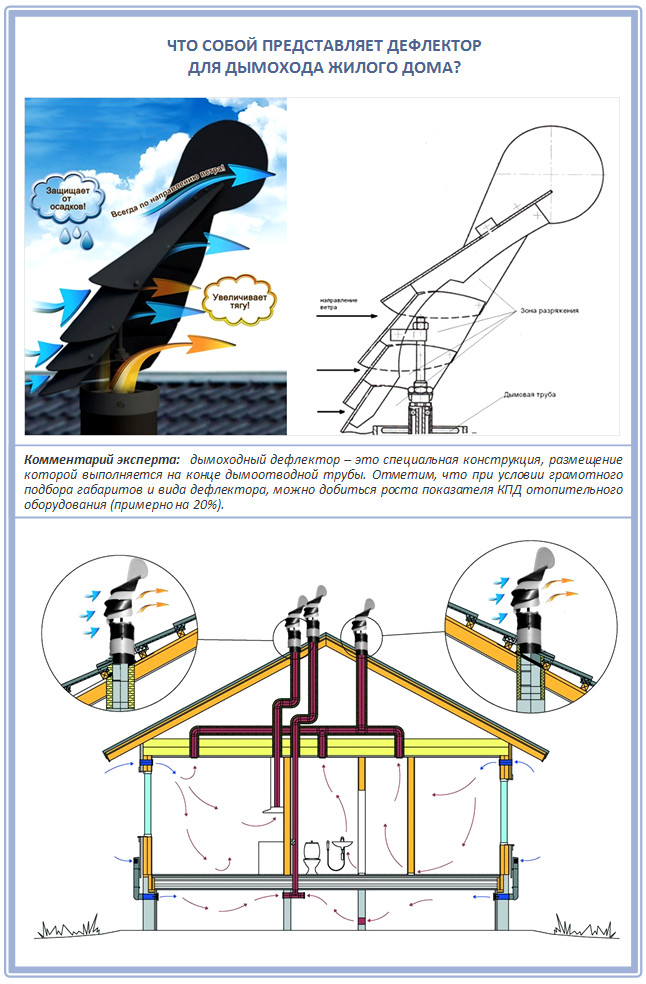
Here is more information about why such a cap is so valuable and why it is worth making every effort and purchasing high-quality material:
The simplest deflector visor is made from just one metal sheet:

Multi-level chimney cap: architectural masterpieces
If you dream of making a chimney canopy with your own hands that is especially durable, “for centuries,” then the illustrated option below is just right for you.
For this venture you will need square pipe 15x15 mm, steel strips and galvanized metal grid with cells 25x25 mm, which will serve as an excellent spark arrestor. Such a cap will consist of two individual elements, which are fastened together with bolts. You will also secure the cap to the chimney itself using bolts.
All you need is cooking work. Weld the mount directly onto the frame so that when installing it on the roof, all you have to do is tighten the nuts. And everything else is according to the instructions:
- Step 1. Make a support of the required length for the rectangular base of the hood.
- Step 2. Weld the base for rafter system the top of the visor.
- Step 3. Make corner rafters.
- Step 4. Now weld on the top base mounting profiles under the second level and make a representative hole of 8 millimeters.
- Step 5: Now tighten it all up from the inside.
- Step 6. The top level is much easier to do. After all, in essence, it is just a supporting frame.
- Step 7. Cover all open parts of the canopy with galvanized mesh (it is easiest to attach it to plastic ties).
- Step 8. It is also better to make the roofing elements of such a canopy from galvanized steel.
- Step 9. Assemble all connections with rivets and lubricate them silicone sealant(only roofing, because at the top of the pipe there will be heat due to rising flue gases).
- Step 10. Now all that remains is to paint your visor, preferably with hammer paint. It does not fade in the sun and holds up well.
Here is the device of such an unusual two-tiered cap in step by step photos:

Another good option for protecting such a chimney from moisture and snow getting between the contours is to create a concrete cap:

Note that for many, such an option for completing a chimney seems surprising: why, when making a cap for a chimney, should you also make a screed at the exit? In fact, such a screed prevents sparks from entering the shaft, and rainwater flows exclusively onto the street.
Another suitable option is to make such a cap wide enough to completely cover the entrance to the pipe:
Study our master classes, choose suitable design and make preparations for the future object of your own pride!
A private house is equipped with a stove, boiler or fireplace, and as a result the chimney is removed. That is why a building rises above the roof of the house, and a cap is put on it.
It is this design that often attracts the eye, since in Lately, its very diverse design solution. At the same time, you can easily do it yourself, even without special skills.
Cap function
 Before starting work, you need to know exactly the full range of functions that the cap can perform in order to take into account all the subtleties during manufacturing.
It is installed in order to:
- the following did not enter the pipe space: debris, snow, rain, birds;
- for a long time the pipe itself did not collapse under the influence of temperature changes, moisture, or icing, because in most cases the pipe is laid out of brick;
- strengthen upper layer chimney masonry;
- increase traction up to 20%;
- create a windproof exhaust gas outlet;
- decorate the highest point in the house structure.
Atmospheric phenomena put pressure on waste gases, even if the ventilation pipe is made according to technological requirements.
However, according to physical law aerodynamics, when a flow of cold air comes into contact with the hood and goes around the installation, a discharged area is obtained, then the air begins to move at a higher speed, which increases the draft in the chimney and allows heating devices to operate more efficiently.
Materials and tools used
 Among people, the cap is called a visor, a chimney, a fungus. Its scientific name is deflector.
Forged deflectors are very original, but their price is not always justified. After all, you can make a cheaper structure from the following metal material:
- galvanizing;
- stainless steel;
- steel with paint and varnish coatings;
- aluminum;
- copper
The most convenient, practical and cheapest is galvanized sheet.
Availability required the right tool. List of what you may need during work:

- rubber or wooden hammer;
- small iron hammer;
- screwdriver;
- electric drill;
- drill required diameter fasteners;
- rivets;
- fastenings;
- roulette;
- marker;
- construction corner;
- bends;
- special clamps;
- metal scissors;
- metal ruler;
- iron corner up to 1 meter in size.
Expert advice: To comply with safety precautions, use thick work gloves.
Deflector shapes

 The shapes of the deflector or head can be striking in their diversity.
Therefore, you need to decide which shape of the deflector will be ideal for ventilation pipe while looking neat.
They are:
- round,
- square;
- hip;
- conical;
- tent;
- standard hipped;
- with a flat umbrella;
- with a semicircular umbrella;
- gabled with four slopes and a high roof;
- with weather vanes.
Expert advice: the shape of the cap can be simple, but at the same time, fit perfectly into the overall ensemble of the house, emphasizing its style.
Types of exhaust hood

 The types of exhaust hood also have a variety, but the most popular are:
- tsagi is simple model, which can be made in the workshop;
- Grigorovich;
- It is difficult for a beginner to make a spherical “Volper” with his own hands, since machines are required;
- H-shaped;
- star shape "Shenar";
- ASTATO open.
You can find plastic hoods on sale; they are best used for basements and garages; for high-rise structures they are fragile and do not last long.
Manufacturing technology of the Tsaga deflector with drawing
First you need to decide on the dimensions of the external and internal pipes. Measurements must be accurate.
The outer diameter of the stove hood fits tightly onto the chimney pipe.
The main parts are made in proportion to the internal diameter:
- the inlet pipe is placed on the pipe;
- the outer cylinder is a diffuser, its size should be approximately 30% larger than inner diameter pipes;
- cover, its size should be about 90% of the pipe diameter.

Note: Although the installation of a deflector or nozzle may be simple, the proportion must be maintained, and if it is violated, the expected result of traction will be lost.
- A drawing is made on paper to match the shape and dimensions of the cap.
- Patterns are applied to metal surface and cut out with metal scissors.
- The resulting parts must be bent according to the design and connected with rivets.
- The finished parts of the deflector are assembled in the workshop, and at a height they are only fixed above the pipeline.
Note: install the smoke shaft correctly at a height of up to 2 meters above the roof level. Remember that work carried out at height requires special care and compliance with safety regulations.
Manufacturing technology of a rectangular exhaust unit with a weather vane
- Cut a rectangle out of a sheet of iron, taking into account when bending it so that there is 10 cm for the chimney to fit.
- Oblique cuts are made on the sides at equal distances; when joined, these cuts will produce trapezoidal segments.
- Next, four posts are made, attached to the corners of the rectangle, secured with rivets.
- Bend the ends, you get a hole, as in the drawing.
- Separately, cut out a rectangle: bend it into an arch, fasten it - this is a ready-made hood; for originality, you can make a weather vane.
- The finished structure is installed in the chimney pipe.
The pipe is attached to the installation according to what the chimney is made of.
Making a weather vane with your own hands
Decorative figures, patterns, and hoods on exhaust deflectors are called weather vanes or weather vanes.
You can make the outline of a rooster weather vane from the drawing provided, if you enlarge it to natural size, print it, apply it to a steel surface, and cut it out.
To make a weather vane, additional welding work is required.
The work of making a weather vane consists of the following steps:
- cut out the figure;
- make an arrow;
- prepare the rotation mechanism.
We can summarize the above that you can make a deflector with your own hands with good preparation, the availability of tools and a great desire.
Watch the video in which a specialist explains in detail how to make a chimney cap with your own hands:
-
Pipe caps, pipe heads, umbrellas and covers for chimneys, weather vanes, smokers - and that’s not all the names of these interesting architectural elements roof decorations that have returned to us from the distant past. They not only decorate the roof, but also protect the pipes from the destructive effects of snow and rain. The fashion for installing hoods returned simultaneously with fireplaces, which have already become a mandatory attribute in a country cottage.
in the photo there are weather vanes
Among such a wide variety of varieties of smokers, the following can be noted:
- with multi-pitched roofs - provide the most effective ventilation, preventing the accumulation of snow masses in winter;
- equipped with a weather vane of any shape and content: heraldic symbols, stylized images of mythical heroes or animals, etc.;
- with an opening lid - this design greatly simplifies the work on maintenance chimney;
- >with a ventilation hole – it allows combustion products to escape freely;
- with a spark arrester - designed for stoves heated with wood and peat in houses with roofing made of flammable materials.
Forged chimney caps, weathervanes with carvings and perforations can be considered real works of art. Making chimney caps that match the architectural style of the building is akin to the work of an artist and is quite labor-intensive.
Ventilation vane Name Size Galvanization Color 1 Simple 
40 x 40 900 1100 40 x 52 1050 1250 52 x 52 1200 1350 2 Simple + grid 
40 x 40 950 1150 40 x 52 1100 1300 52 x 52 1250 1400 3 Strip 
40 x 40 1000 1200 40 x 52 1200 1350 52 x 52 1350 1500 4 Decorative 
40 x 40 1200 1350 40 x 52 1350 1500 52 x 52 1500 1650 5 Difficult 
40 x 40 1300 1450 40 x 52 1500 1650 52 x 52 1600 1750 6 Double 
40 x 40 1300 1450 40 x 52 1500 1650 52 x 52 1600 1750 chimney caps :sizes, price
How to make a chimney cap with your own hands
 The easiest way is to make weather vanes yourself from sheet metal, for example, sheet steel. You can gain experience by completing simplest option chimney
But in any case, for proper assembly and installation of chimney caps, you need to prepare the following special tools:
- metal scissors;
- mallet;
- special hammers of different shapes;
- metal corners and rods for fastening.
Instructions for sketching and making a weather vane
For beginners, it is best to give preference to chimney structures in the form of a roof or a pyramid. First of all, a sketch must be made on paper.
The chimney cap should completely cover the chimney, but should not be made too large.
Having data on the width of the pipe, the sketch is made in life size. Using a trial version of paper provides certain advantages:
- by making a cap for a chimney pipe, the dimensions of the product itself and the chimney pipe can be more easily coordinated;
- The assembly features are thought out on a paper model.
Cap on chimney also called a weather vane or a chimney. It is necessary to enhance traction so that dirt does not get into the pipe. The weather vane is an innovation, but it is also a tribute to antiquity. Now all cottages are equipped with hoods.
Installation of a canopy on a chimney
- You need to draw a plan for assembling and installing the visor.
- The drip tray must have a skirt to prevent precipitation from falling onto the chimney. This way the cap will prevent moisture from getting in or out.
- The visor is located in a place where there is no access to constantly monitor it. Therefore, to make it weather resistant, you need to choose quality material.
Materials suitable for making a visor
- Galvanized iron.
- Stainless steel iron.
- Copper alloys.
- Copper.
- Steel sheets.
- Titanium.
- Titanium alloys.
- Chromed iron.
- Zinc alloys.
Tools you will need to create a visor
- Scissors for cutting metal.
- Wooden hammer.
- Metal rods.
- In order to attach the visor. Corners.
- Special hammer.
To do correct calculations , you need to draw a visor on paper and write everything required sizes. And from this drawing it will be easier to make a visor with your own hands.
According to the drawing it is necessary start cutting the titanium sheet and begin bending the sheet according to the drawing.
DIY chimney canopy
The first example of attaching a visor

Second fastening example
- Need to use bolts and nuts M5 and secure the racks that are located in the lower cylinder.
- The upper cylinder must be attached to the lower cylinder.
- You need to attach the cone cap with rivets. All this can be assembled yourself using welding.
- For everything to work out, you need to take into account the diameter of the pipe and what size the visor will be.
Purpose of the pipe cap
- The cap is called different expressions: weather vane or smoker.
- The cap is needed for better traction.
- And also, it prevents snow from getting into the chimney pipe, as well as rain when it rains slantingly.
- When installing a mesh in the weather vane, dirt and birds, which like to nest in the chimney, will not get into the chimney.
- If the wind vane is performed by a professional, then noise and vibration are prevented.
Functions performed by a weather vane

What kind of caps are there?
- Flat caps.
- Semicircular caps.
- Four-slope caps.
- Cap with weather vane.
- Hoods that open.
- For a four pitched roof.
How is the cap for the chimney pipe constructed?
- Lid.
- Net.
- A drain of water or otherwise called a drip.
- The angle of inclination of the roof should be 45 - 50 degrees, but you can make the inclination angle larger or smaller, or make the height of the lid.
- The net will make it possible for birds not to settle and make nests. This will solve many problems in the future.
- The cover is designed to prevent precipitation from entering the pipe.
- The water drain or drip is designed to allow water to flow down from the hood.
Operating principles of a chimney cap
- Does not allow water to drain.
- Prevents ice from forming, which contributes to the durability of the masonry and the entire structure as a whole.
- Air flows they hit the walls and go around from all sides.
- Air jet picks up the smoke and lifts it higher.
- Because of, that the air moves, it becomes stronger and the thrust becomes greater.
- If the chimney is made by professionals, then this will easily allow the house to remain warm when you heat the house.
What may be on the weather vane
- Net.
- Skirt.
- Spark arrestor.
The size of the weather vane depending on the diameter of the chimney
Pipe height (mm) Pipe width(mm) Diameter (mm) 145 245 120 170 285 145 250 430 210 500 840 420 658 1100 520 Classification of visors by shape
- In the form of a tent.
- Four-slope visor.
- Gable visor.
- In the form of a flat sheet.
- In the form of a spire.
- Vaulted canopy.
- In the form of four tongs.
- The visor is in the form of a flat sheet, made of copper sheet. They do it on houses in the Art Nouveau style.
- If the house is built, as in Europe, then a semicircular canopy is installed on such a house.
- When installing a four-gable visor, the chimney will not fill with snow.
Classification of visors by metal type
The service life of the visor depends on the material. You should pay attention to the material from which it is made. Since the visor is in inaccessible place, there is no way to constantly monitor him. If the cap does not withstand weather conditions, the system will not operate stably.
- The most popular materials are copper alloys and copper itself.. Copper canopies are the most reliable. At correct installation visor made of copper, the visor will last 70 years.
- In second place is galvanized iron steel. In terms of durability quality, it is on par with copper and copper alloys.
- In third place comes canopies made of steel sheets. They are inferior to copper in terms of operating time. They will last about 40 years.
- Iron made of stainless steel.
- Alloys made of titanium and titanium itself. They have proven themselves well. Durability is guaranteed, soft, durable.
Why do pipes smoke?

Causes of breakdowns and their elimination
There are three types of work and troubleshooting:
- Preventive maintenance
- Major renovation.
- Partial renovation.
Prevention is carried out to remove soot. No professional help needed. It is necessary to monitor all parts of the stove and clean them from soot and ash.

Operational breakdowns
- Poor draft and accumulated soot in the chimney pipe.
- The material in the structure is destroyed.
- Destruction occurs at the wall channels.
- The heads begin to freeze.
You can also buy a cap for the chimney pipe; the price is relatively inexpensive.
 (1 ratings, on average: 5,00 out of 5)

