How to make a beautiful toy box. Toy storage box. DIY creative boxes for children's toys and more
Children are the flowers of life! We love them and want them to have the best. What is so valuable for young children? That's right - toys. And here we are talking not about quality, but about quantity. The more there are, the better.
However, parents are faced with a common problem - all these toys are scattered throughout the house or apartment. So that you do not step on them, and the rooms are in order, you can make a special box in which the child will store these toys.
The product is convenient, simple and practical. In this article you will learn several ways to make a toy box with your own hands. Then the child will be accustomed to order.
Box from waste cardboard box
Everyone should have an extra box after shopping. Shoe boxes, household appliances or products. Anything will do. Basically, you pretty much already have a storage box ready, it just needs a little sprucing up and strengthening to hold the toys. Check in advance whether the cardboard is soft, as it will not last long.

So below is detailed instructions How to make such a toy box from cardboard. All you need for the job is a box, a glue gun and a piece of beautiful fabric. The instructions are as follows:
That's all, the toy box is ready. All that remains is to turn the box over, pin clothespins on top and put books inside so that the fabric sticks tightly to the cardboard. To ventilate the toys inside the box, do not cover it.
Advice! This is a simple option that anyone can do. You can cover such a box not with fabric, but with paper and attach handles to it. This is done very simply.
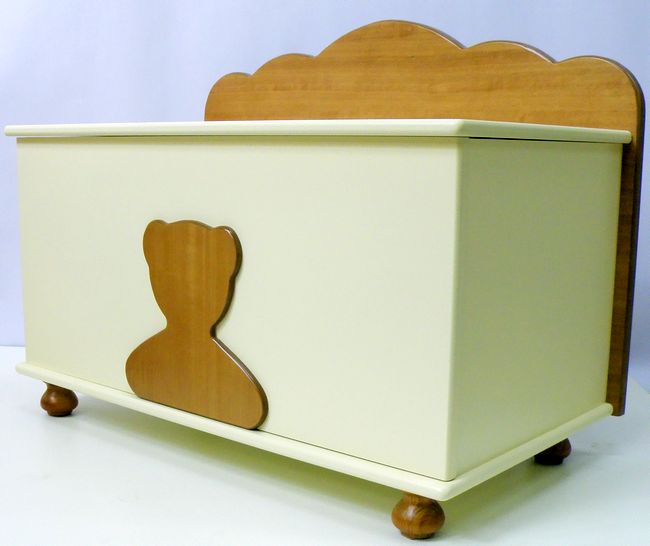
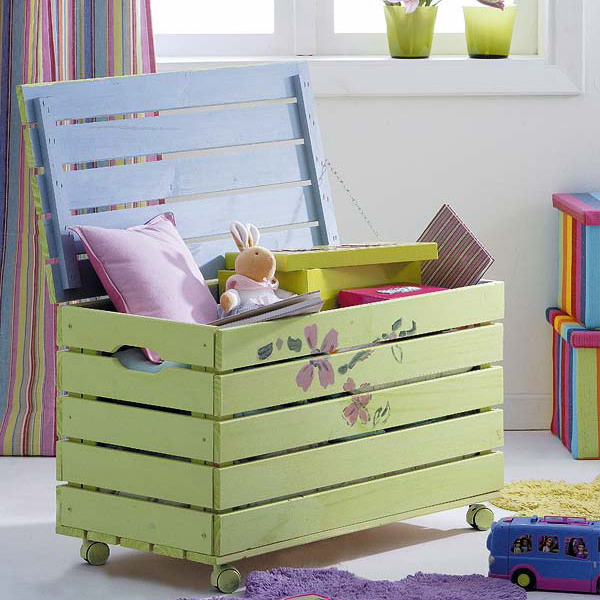
Durable wooden toy box
It is clear that a cardboard box is not entirely reliable and children can simply bend it. To prevent this from happening, it is better to make the product from wood. This requires a little more effort and skill, but the results are worth it. The box will be strong, durable and reliable.
In addition to its practical value, it will perform decorative role, complementing the interior of the room. Yes, and it can be used as a chair if you install it under the wall, cover it with a blanket and put pillows. We will consider two types: a box in the form of a box and from boards.
Making a wooden box
The technology is not easy, so you need to be especially careful and work according to the instructions. The photo shows what you can do.

The instructions are as follows:
At this stage, the box is ready and can be used for its intended purpose. You can decorate it, attach a handle and legs.
Advice! To protect the material, it can be opened with varnish or stain.
Wooden box
This option is a little more complicated, but looks pretty nice. Outwardly, it resembles an ordinary food storage box. To work, you will need boards of a certain size, plywood for the bottom, a hammer and nails.
On the plywood you need to fix four equal bars in vertical position. They must be firmly secured. Then you need to fill the boards on them from the bottom, moving up. This is done around the perimeter of the frame. You can make gaps between the boards - large or small, as you wish. So, the box will be ventilated.
Advice! You can nail a piece of plywood to the bottom on both sides and fill it with planks. So, you can make legs for the structure. Another option is to use rollers.
Why is it seemingly bad when children have a lot of toys? And the fact that they are scattered throughout all the rooms and their owners do not really like to collect them. Proper storage toys in an apartment or house are a guarantee of order and tranquility (mothers first of all), because even simple maintenance of order in this case is a task of increased complexity. It can and should be made easier. To do this, you will need furniture for children's toys - racks, shelves or a closet, as well as a decent number of boxes, drawers, bags and pouches.
Furniture for storing toys in the nursery
Furniture for a child's room is needed from the first days of life. And most often this is a chest of drawers and a shelving unit. Only at first they are occupied mainly with linen and children's clothing, and toys take up little space. But gradually funny things - rattles, bears, cars, dolls, etc. It’s getting bigger, they require a separate place, and sometimes more than one.
Most convenient option- rack. Not a cabinet with doors, but a rack with open shelves on which drawers can stand. Storing toys in this form is optimal - it’s convenient for the child to get them out and put them away quickly.
At first, you can buy or make one rectangular rack, preferably with square cells. Now you will understand why...
While the child is small, he can be placed “lying” - as in the photo, with the long side on the floor. This is more convenient for a small child - he will first master what is below, then move on to the upper shelves. And it’s safer - older children can use the shelves as a ladder, but in this position they won’t be able to climb high))
In a couple of years, the child will grow up, there will be more toys. You can turn the rack over and put it “in height”, and install a second one in the free space or make shelves. By combining several racks different heights get a children's toy storage system.

You can increase the volume gradually: buy a single rack or, as they used to say, a bookcase, then another one. The beauty of a nursery is that they don’t even have to be the same color. And if you care, paint them or choose neutral color"under the tree".
Different baskets - plastic or wicker Plastic chests of drawers in the nursery - convenient and hygienic
How to organize toy storage: ideas
You can put different boxes in the racks, into which small and not very toys can be loaded. Please note right away that wooden boxes (or made from, and other similar materials) are not suitable for small children. the best option. They are too heavy; children often injure their fingers when trying to reach toys. They also have hard, traumatic corners that can, of course, be rounded a little, but they still remain hard. Such boxes are suitable for schoolchildren. They already have more strength and better coordination. And it is better to organize the storage of toys for children in softer and less traumatic plastic containers/baskets or in thick boxes covered with colored paper or fabric.

It’s not so difficult to buy or make furniture for a wound, but teaching a child to put his toys there is a more difficult task. For girls, the rack can be decorated in the form of a house. Then she herself will resettle the “tenants” and create conditions for them.

This option will not work with boys. They usually have a lot of cars and the main task of storing the boy's toys is to arrange the cars. To do this, you can make an entire wall-mounted garage. These are long narrow shelves on which the entire fleet is located. Other options are transparent fabric pockets (sold as shoe storage systems) or a shelf assembled from plastic pipes.

To stimulate the desire to “drive” cars into the garage, you can use the floor masking tape make markings along which “after their shift” they enter the parking lot.

In principle, such pockets can be used to store collections of dolls and soft toys.

When there is no longer enough space on shelves and racks in the nursery, more ideas are needed. In addition to pockets, you can make drawers(large) under a bed or table.

Drawers under the bed don’t take up space, and you can hide boring toys there
To prevent everything from being piled up in large boxes, you can put it under small items plastic baskets. This way everything will be found faster than in a general heap.

Boxes can be installed in racks not only on shelves: it is possible to hang them. To do this, grooves are cut out in the side walls into which the sides of the baskets and baskets are simply inserted. You can take plastic baskets (if you find them with sufficiently rigid sides), or you can take metal ones - from the complete set of dressing rooms or wardrobes.

The largest free surfaces in a room are the walls. They can be used. For example, attach a strip of Velcro to a wall (the side wall of a cabinet, lamp shade, etc.). Soft toys Sew small pieces of this tape onto the backs too. They will be easy to put in place and take off. And the decor will also become more diverse.

Velcro is one of the simple ways find a place for soft toys
You can hang mesh pots made of wire or plastic on the walls. They also perfectly accommodate small dolls, bears, bunnies or cars.

You can borrow an idea from the kitchen: attach different bags to a horizontal pipe. To make the necks tougher, you can tighten them with a hoop or sew in elastic wire.

Pockets or bags on a pipe are another idea for storing toys in a nursery.
Pockets are also made on wooden bases. It can be cut out of plywood, painted, and several hooks, pockets and bags can be nailed on. The mini toy storage system is ready.

But not everything can be attached to the walls. Some items require baskets or boxes. For example, sports equipment - all balls, soccer balls and other equipment. They are conveniently stored in wire bins.

If desired, you can attach baskets to the walls and practice hitting the ball into the basket (away from breakable objects and windows).
Storing toys from the “cheap and cheerful” category - folding fabric baskets. Of course, they are inexpensive and look good, but they tear very quickly. Especially mesh ones: the toy gets caught, the child pulls it... there is a hole.

No matter how hard parents try, children don’t really want to put away toys. Or rather, they don’t want to at all. In this sense it's simple perfect option bag-mat.

This is an ingenious solution: a small “wall” is sewn along the edge of the round rug, and along its upper edge there is a drawstring through which the cord is threaded. To remove the toys, you just need to tighten the cord. The edges of the mat will rise and the mat will turn into a bag.

Then these bags can be placed somewhere near the wall or hung on special hooks. Really ideal.
DIY toy boxes
Looking at the not childish prices for cute wicker or plastic baskets in stores, you think that the idea of making colored toy boxes with your own hands is not so bad. You will need cardboard boxes made of thick (not corrugated) cardboard, most likely from household appliances. You can try your luck with your friends: many manufacturers provide warranty repair only if packaging is available. So people keep the boxes. The warranty period has long passed, and they forgot to throw away the packaging. These boxes are the best option for children.
Another option is to ask in department stores. They also often receive goods in hard packaging. For example, diapers, wipes, etc. come in these.
Cover with paper
Cut off the lid from the found boxes. We cut holes-handles in the side walls (narrow). We seal all joints from the inside with tape.

Take colorful paper. The wrapping paper used to wrap gifts is perfect. It is dense, there is a large number of different drawings. You can also use scrapbooking paper. If the trim is made of paper of different colors, we cut it into strips of equal width; if we paste it with one pattern, we measure the strip along the height of the box.

We take glue (PVA), brush the surface of the box and start gluing it from the corner. We try to glue without bubbles, smoothing the paper gradually, from edge to edge. We place the next sheet with a slight overhang, not the previous one. Continue this way until we have covered all the surfaces.

After looking at the light, we cut out the handles with scissors. To make the edge more neat, we glue the sections of the handle with a thin strip of paper. We also decorate the top cut with a stripe.

We cover it with fabric
In this case, all corners of the box can be taped on both sides - it will last longer. Next, take the fabric and cut out two sets of blanks to fit the box. One is strictly in size, plus a seam allowance, the second is 1 cm smaller and also with an allowance. Add 0.5-1 cm to the seams on each side. You can cut the workpiece immediately in the form of a cross, but this way the fabric consumption is greater - it is more economical in separate pieces))

We first sew the parts together in the form of a cross, then make a bag from the blank. Let's try it on the box. We stretch one (the larger one) from the outside, and straighten the second one from the inside.

Now we take universal glue and glue the fabric around the perimeter of the bottom, inside and out. Then we glue it in the corners. This way the fabric will not move.

We fold the edges of both bags inward and trim the box around the perimeter by hand.

We trim the top of the toy box, cut out the handles
Using scissors, cut through the handles. Just don't cut it out big pieces. You need to leave about 1 cm of “extra” fabric. We wrap it inside, hemming the handle.

Having decorated the handles, we get a ready-made box for storing toys.

Decorated with self-adhesive film
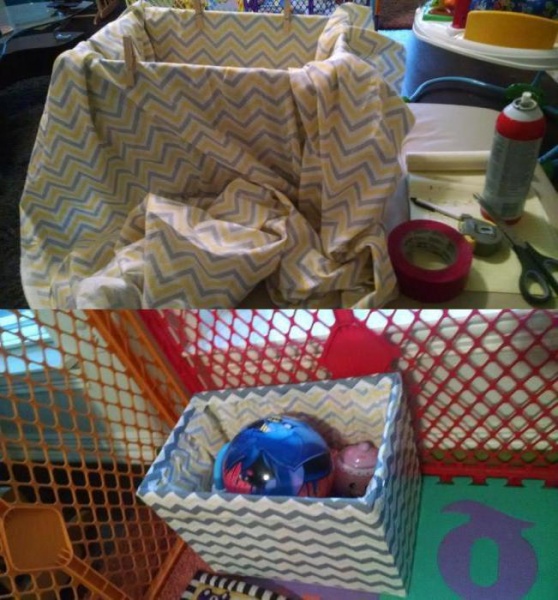
As a rule, we buy a lot of different toys for our children (dolls, cars, soft toys, educational toys, and so on). As a result, they are all scattered in different corners of the apartment. To prevent this from happening, we suggest you find out how and from what you can make a box. At the same time, you can teach your child to be in order.
We use an unnecessary cardboard box
Large boxes from shoes, household appliances, etc. can be reused. Just decorate them and you will succeed comfortable spot for storing children's dolls and cars.
A master class on how to make a toy box with your own hands is described below.
- You will need cardboard box, a large piece of fabric.
- Coat the bottom of the box around the perimeter with glue from a gun.
- Unfold the fabric and cover the bottom of the box with the middle, carefully straightening the flap and pressing it against the glue.
- Coat all the walls from the inside, stretch the fabric and glue it to the sides.
- Fold the fabric over the outside of the box and glue it to the bottom of the sides.
- Turn the box over and fold the fabric over the bottom. The flap should be pressed evenly against the wall. Glue the fabric and cut off the excess.
- To strengthen the bottom, coat the fabric with glue around the perimeter of the box and glue the cardboard on top.
- Turn the box over.
- Pin clothespins on top, and put something heavy inside so that the fabric sticks well to the box.
The box is ready!
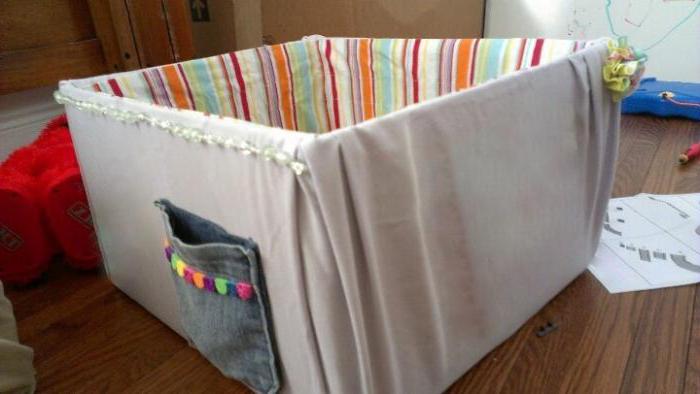
Boxes with handles
Instructions on how to make a box for children's toys with handles will help you in this matter.

- Take two types of fabric, thick tape or rope, glue, and a glue gun.
- Cut a strip of fabric. Its width should be greater than the height of the box (it is necessary that the flap can cover the bottom and wrap slightly inside the box). The length of the fabric should completely cover the perimeter of the box.
- Glue the cut rectangle of fabric to the sides of the box.
- Wrap the excess fabric inside the box on one side and glue it to the bottom on the other.
- Measure out a piece of fabric of a different color. It should cover the bottom and walls inside the box.
- Coat the inside of the bottom with glue and glue the fabric.
- Coat the inside walls and also glue the fabric. Make folds along the edges.
- Glue the folds at the intersection of the two types of fabric.
- Measure the tape and glue it at the bottom, around the perimeter of the box, using a glue gun.
- Measure out two identical pieces of tape. Handles will be made from them.
- Glue two strips to the sides of the box.
- Glue another tape around the perimeter of the box on top. It should overlap the bottom of the handles.
The toy box is ready!
Pasted box
The easiest way for this purpose is to take self-adhesive wallpaper. Then you don’t have to fuss with glue and wait until all the walls are dry.

But, regardless of whether you cover the future toy box with self-adhesive or paper wallpaper, the operating principle is the same:
- Cut a piece of wallpaper long enough to fit around the perimeter of the box.
- If necessary, coat the walls with PVA glue.
- Glue wallpaper around the perimeter of the box.
- Make cuts at the top and bottom of the protruding parts of the wallpaper.
- Fold any protruding pieces inside and onto the bottom.
The box is ready!
We use wood
Making a wooden toy box with your own hands is quite difficult. But such an item turns out to be very reliable and will last much longer than a cardboard box.

Also, it can not only be used in the interior as decorative element. Such a box can become a functional part of the room.
For example, if you put a box under the wall, put a blanket on top and sofa cushions, then it will appear extra bed for sitting.
How to make a box?
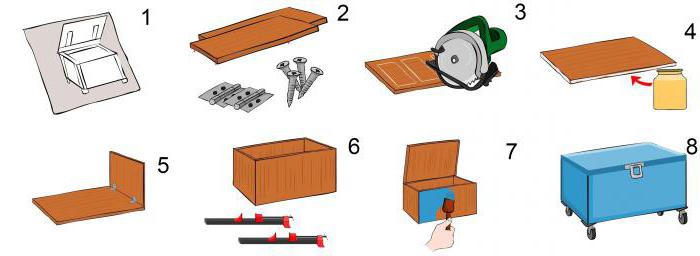
For convenience, here is a guide on how to make wooden box for storing toys with your own hands.

- Create a sketch of the future box (picture 1). Think about its dimensions, what the height, depth and width will be. Will it be on legs or with its bottom on the floor? Will there be handles and where should they be located?
- Prepare everything necessary materials and tools (picture 2). To start, you will need plywood or MDF board. They are sold at a hardware store. But if you have old furniture(for example, a table, chest of drawers, closet), then you can disassemble it and get the necessary materials. You will also need screws and corners, hinges, PVA or wood glue. The tools you need are a simple saw or a circular saw.
- If you buy materials in a store, you can ask them to cut the boards for you. required sizes. If this is not possible or you use improvised material, then do everything yourself (picture 3). To do this, cut the board into pieces and saw it. As a result, you should have the following number of parts: four walls (all the same or two different), a bottom and a lid.
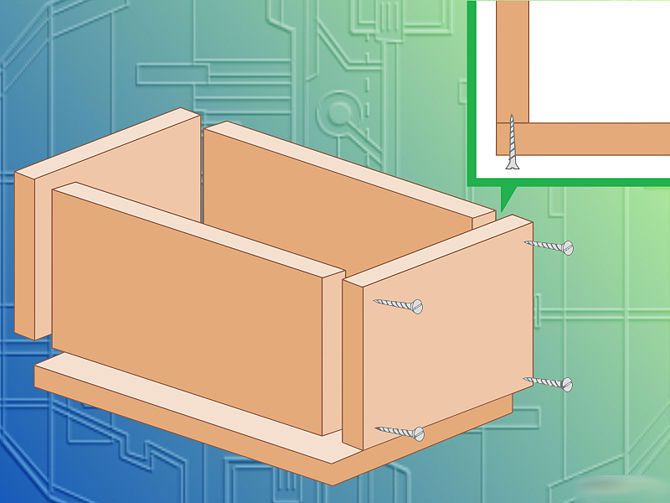
- Start assembling the box. For this purpose, coat the wall joints with glue (picture 4).
- Then connect the two parts with corners (picture 5).
- Attach the lid to the box using hinges (picture 6).
- Wipe off excess glue with a cloth and leave the box to dry.
- Decorate the box. For example, sand it and paint it (picture 7).
- Attach a handle and legs as desired (picture 8).
The storage box is ready!
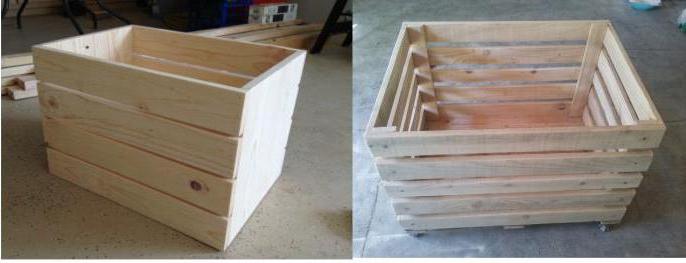
Box of planks
A wooden toy box can be made from planks. There are two collection methods.

- Take plywood for the bottom and nail four pieces of wood in the corners. Then nail the boards to them with thin nails. You can make gaps between the wood for better ventilation.
- Nail plywood to the bottom of the box on both sides. And nail planks to it. Thus, the sides of the box will be solid, and the sides will have slots.

- a task of increased complexity. After all, small family members sometimes have a larger arsenal of household belongings than other household members combined. Educational toys, blocks, books, construction sets, dolls - all this tends to be piled up in a child's room in a chaotic disorder.
But modern, prepared parents will not be intimidated by either the abundance of play “props” or the activity of their children - ergonomic drawers, shelves and containers for toys , as well as other thoughtful options for storing children's toys, which we will discuss in detail below.

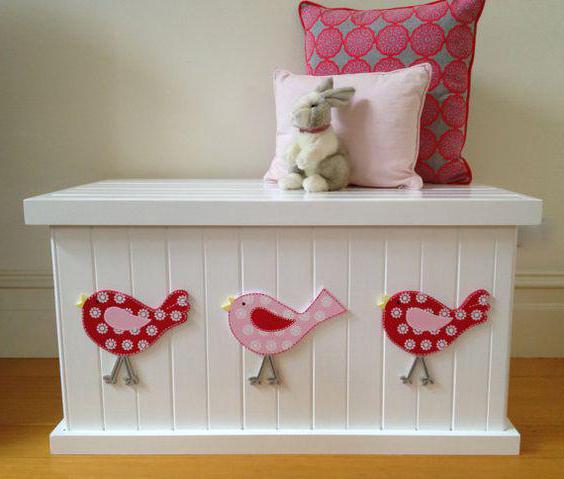
Toy box
The easiest and most obvious way to use it is for orderly storage of “game stuff” boxes. And it doesn’t have to be specially purchased, you can do it without any problems DIY toy box . Containers made of natural or artificial rattan, utility boxes, painted in cheerful colors and decorated with simple decor: ribbons, beads, fabric frills, flowers and sequins are appropriate in children's rooms decorated in modern styles.


Toy storage baskets
Baskets for toys various forms and sizes also perfectly complement and accommodate a sufficient amount of game “props”. Choose baskets different colors that match the interior of the room, place them one on one to save space.
Involve your child in the creation process DIY toy baskets : a shoebox covered with colored paper or a painted wicker one garden basket will become inexpensive, but a worthy alternative purchased options.


Are you interested in how sew a basket for toys? Take a bright printed fabric and cover it with a pre-prepared frame made of strong wire or wooden beams.
DIY toy basket: video
Organizers for children's rooms
With minimal sewing skills and a bit of imagination, you can please your child with functional and ergonomic organizers for toys – hanging fabric “containers”, divided into several sections, or simply small bags of colored felt, sewn together if necessary.
The advantage of this storage method is its compactness: organizers hang on the wall, the side wall of a cabinet or bookcase. They are convenient for storing not only toys, but also socks or handkerchiefs. By the way, we recommend choosing shelves or toy shelves open type, without doors, with which children do not always get along.


But not only baskets, drawers and organizers are used for storing toys in . Chests, hanging bags, colored buckets, ottomans with pockets, trunks, stylized suitcases will certainly interest the little family member and awaken his interest in order. Besides, toy bags or toy nets due to its soft shape, it is easy to “hide” in closets, pull-out shelves, under the beds, which is convenient when there is a shortage of free space.


- Remove everything that is not interesting for the child - measure the number of toys by choosing several different types of fun: everything that is not suitable for its age or is broken, give it as a gift or send it to waste. Otherwise, the child will have problems with concentration and perseverance, and children's toy chest will be overwhelmed with unnecessary “good”.
- Subscribe and sort toy storage boxes : separately for dolls, cars, puzzles, development toys, cubes, books. This will make it easier for the child to clean up the room and find the right thing.
- Decorate containers and toy storage boxes bright ribbons, felt, dried flowers and involve the child in this process - he should like the “tools” that help keep his favorite room clean.


To save space, place the boxes on top of each other, you can hang toy basket to the wall or ceiling, hide it in a niche or under. If the child’s space allows it, select a separate toy cabinet , and place trunks or boxes on its shelves, taking into account the height of the shelves and the height of the child - in the nursery everything should obey the needs and desires of the little owner.


If you usetoy rack, put the most popular amusements on the lower shelves, and those that are used less frequently on the higher shelves. Children's toy rack - in general, an irreplaceable thing; on its shelves you can place everything related to the leisure time and life of a child: not only toys, but also Board games, books, some things and hygiene items.

By the way, the task toy storage It becomes more complicated if there is not just one baby living in the room, but a couple at once. In this case, everyone is allocated a personal corner for games and storage of game “props” - his own territory. Sign the boxes To avoid confusion and unnecessary quarrels, teach children to respect each other’s personal space and together maintain order in the room.


But even the presence of functional furniture for toys , wardrobe trunks and organizers will not save the nursery from chaos if the child is not accustomed to returning everything to its place at the end of the day. The cleaning process should be part of it exciting game, well, colorful design and creativity toy boxes designed to attract the attention of the baby and develop a sense of housekeeping in him, with your help, of course.
All parents know how difficult it is to achieve perfect order in the house when the children are still very young. Especially in the nursery, where toys are scattered on the floor, on the table, on the beds, under the bed, and in other unexpected places. But this problem can be easily solved, armed with a creative spirit and the necessary materials at hand, which can be found in any home.
Our task now is to make or sew with our own hands an interesting, spacious and safe container for storing children's toys. Its types can be different: box, organizer, bag, drawer, etc.
In any case, be it a container for storing large toys or a bag for children's small items, the resulting item should be fun and original element interior
To make a special toy box with your own hands you will need:
- Chipboard panels (side walls and bottom);
- Self-tapping screws;
- Screwdriver;
- Measuring tool (tape measure or long ruler);
- Small supports (legs) or furniture wheels;
- Materials for external decoration (fabrics, decorative film, paints);
- Scissors.
This box is suitable for storing large toys. But in order to make it you need at least a little carpentry skill.
Therefore, it is better to entrust this matter to a man who will connect all the parts of the box together and attach special supports or wheels to it (so that the box can be easily moved around the room).
And mom can already take care of the exterior design of the toy storage container by covering it with decorative film or drawing some funny design on it. The inside of the box can be lined with a furniture stapler for softness, using dense natural fabrics and filler (foam rubber, padding polyester).
We can offer a simpler and more effective version of the box:
DIY box for storing toys

Necessary materials
- Large strong box;
- Beautiful self-adhesive film;
- A package with a picture from a children's gift;
- Scotch;
- Scissors or stationery knife;
- Glue.
This box is similar in appearance and purpose to a toy storage box, but unlike it, it is simpler in design.
Another advantage of such a box is that the child himself can turn it over and take everything he needs.


- First, carefully cut off the lid of the box and cover the sections with tape.
- Cover the box with film from the outside and inside, including the bottom.
- Take a gift bag and cut out interesting colorful details (animals, flowers, etc.).
Glue them with tape or glue to the sides of the box. You can also come up with other options for decorating such a container. For example, if you have a girl, make fabric flowers, bows, etc.
DIY basket for toys made of fabric

You will need:
- Fabrics 2 different colors;
- Sewing machine;
- Strong threads;
- Scissors;
- Non-woven fabric.
You can sew a basket for toys with your own hands from any fabric you like. It is very simple to cut it out, guided by the fact that in finished form the basket has square shape with smoothed corners.
In order for the basket to keep its shape, the fabric parts are additionally glued with thick non-woven fabric.
For interior and exterior decoration, it is advisable to use fabrics of different colors. Also, the handles of the basket are additionally cut out and attached with a strong seam.
Toy storage bag

To sew such a bag with your own hands you will need:
- Dense polyethylene;
- Textile;
- Scissors;
- Sewing machine;
- Threads.
Structurally, the bag consists of a bottom, main part and drawstring. Cut 2 round pieces from the fabric that will serve as the bottom. Determine the size at your discretion - you can sew both a bag for storing large toys and a bag for small items.
Measure the width of the bag based on the diameter of the bottom and, having determined the height, open the main part of it. However, do not forget to take into account that the bag consists of woven material and transparent film.
In the upper part of the bag, which consists of fabric, you need to make a line for the lace. The lace can be sewn from the same fabric.
Organizer for toys

Necessary materials:
- Thick fabric;
- Scissors;
- Sewing machine;
- Strong threads.
This wall organizer It's quite easy to do it yourself. It is sewn according to the accordion principle. A rectangular piece of fabric is folded like an accordion (or ladder) and stitched on the sides and in the middle in certain places (depending on the number, width and height of the pockets).
This unusual organizer is usually hung on the wall and small toys and various creative items are placed in pockets.
 (1 ratings, on average: 5,00 out of 5)