Manual meat grinder - how to assemble it correctly, review of the best models made of cast iron, aluminum, stainless steel and plastic. Meat grinder: device, principle of operation, reviews Components of a meat grinder
Manual meat grinder – necessary tool in the kitchen, because, unlike an electric one, it will never stop working due to power outages
Most modern hand-held devices are made of high-quality and reliable material to last for centuries. There are also modern meat grinders made from durable plastic. Such a meat grinder, of course, is easier to break than a cast iron one. Therefore, you should handle it more carefully.
Manual cast iron meat grinder
A cast iron meat grinder is a faithful assistant in the kitchen. It will serve for a very long time. And to break it, you need to try very hard. This is her advantage. The disadvantage of a cast iron meat grinder is that it is very heavy compared to other devices.

The cast iron meat grinder is very heavy, but it works flawlessly
Meat grinders made of aluminum alloys and plastic models
A meat grinder made of aluminum alloys is much lighter than a cast iron one. And during operation it will serve faithfully for a very long time. There is only one drawback of such a device - sometimes your hands get very tired of grinding a large number of meat or other products.
Plastic models of meat grinders are made of high quality and very durable materials. But, nevertheless, this model is not as durable as a cast iron meat grinder, and its parts can quickly fail. Therefore, it is important to use the meat grinder carefully.
Operating principle of a manual meat grinder
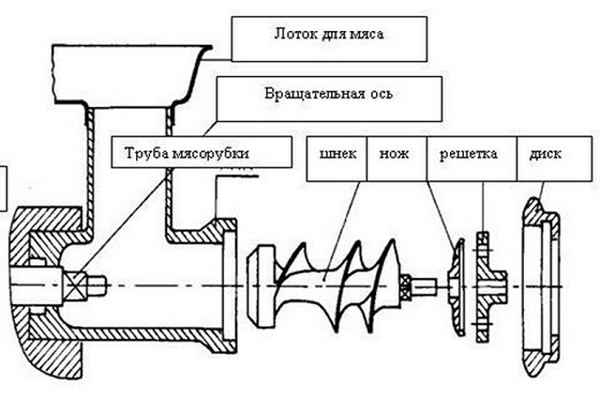
A manual meat grinder, from a design point of view, is a fairly simple device. His work is based on two things - manual drive and mechanical pressure created by the screw. The grinding process looks like this:
- meat, fish or any other product is placed in the receiver and falls onto the screw shaft;
- then the product is pressed against the grid and cut off with a special four-blade knife, which slides along the surface of this grid;
- the products are crushed continuously: the meat is placed in the receiver and then comes out through the grate.

The principle of operation is simple: add food and get minced meat. Simply and easily!
What does a meat grinder consist of and what is the purpose of the parts?
What does a classic hand-held device consist of:
- Frame:
A. Meat receiving area;
B. Fastening clamp; - Lever;
- Auger with left-hand thread;
- Bearing bushing;
- Cutting knife with 4 blades;
- Lattice;
- Union nut;
- Eye bolt for attaching the handle

Meat grinder disassembled
The device can also be supplied with additional grates with different hole diameters, knives, attachments for making sausages, frankfurters and freshly squeezed juice.
IMPORTANT!
The attachments must be sharpened regularly and should not be used for cutting too hard or stringy semi-finished meat products.

The screw shaft is an important and basic part. It has the appearance of a spiral, which during operation grinds excess meat, moving it towards the nozzles with knives. It is this mechanism that requires the use of durable metal.

Screw shaft - conductor of products inside the device
Knife and special cutting attachments. They do all the work of grinding, cutting and crushing meat or any other products. It is made mainly from stainless materials. It is necessary to sharpen knives for better and high-quality work, even though the steel is sharpened on the grate during rotation.

The knife must be installed correctly, otherwise the device may jam
IMPORTANT!
The structure of the knife and its shape affect the grinding of the product. For example, if a knife has a curved blade, it means that it will easily chop the veins and fibers of meat, while preventing the auger shaft from clogging.

The grid has three types of hole diameters:
- Very large - 12 mm. Grille with three or four holes. Used for stuffing sausages. Not always included.
- Large holes - 8 mm. This rack is ideal for preparing sausage mince.
- Middle holes - 4-4.5 mm. Universal grid. Suitable for preparing minced meat for cutlets. Included.
- Fine holes − 3 mm. Pate lattice. It is ideal for making pate or puree.

Using these grates you can get coarse or finely ground minced meat. It all depends on your preferences
The nut (fixing ring) clamps and secures the grid, knife and auger shaft. Sometimes it can be difficult to unscrew it after finishing work. But this problem can easily be solved with the help of ordinary cloth thrown over the nut. So, the hand does not slip, and the part can be easily unscrewed.
A manual cast iron or aluminum meat grinder, especially from Soviet times, is attached to work surface using a threaded device (foot). And therefore, in order to prevent the device from moving on the table, you need to place something under metal base. This can be a newspaper folded several times. IN modern models The mounting base is plastic or rubber, and therefore the device is attached to the table much more securely.
How to properly assemble a manual meat grinder step by step with photos of the process
So, how to properly assemble a manual mechanical device? The easiest way is to follow the assembly procedure according to the product's operating instructions. But if the instruction is lost then follow the step by step assembly method. So here we go.

The first stage is to prepare all the elements and carefully lay them out in front of you
Installation of auger shaft
| Illustration | Description of action |
 |
For models with a collapsible body, it is necessary to install a meat feeding cylinder. |
 |
Next, we insert the screw shaft into the housing so that the wide part of the shaft is at the place where the handle is attached. That is, in the narrowest hole of the meat grinder. The thin side of the auger should end up in a wide and round hole. The knife will also be attached there. |
How to properly insert a knife into a meat grinder
There are two types of knives: with a single-sided and double-sided cutting part.
| Illustration | Description of action |
 |
Once the auger is installed, take the single-edge blade and install it onto the auger shaft. ATTENTION! The flat part of the blade should face the grate and slide along it. But not the other way around.
|

IMPORTANT!
It happens that the knife is installed incorrectly. And then such a meat grinder is of little use. The meat is not ground, but only choked. And in this case, the device may simply jam.

A knife with a double-sided cutting part can be placed on either side. There is no difference. You can see how to properly install a knife in a meat grinder, and what they are like, in this video.
Installing the grille and screwing the handle
| Illustration | Description of action |
 |
After the knife is in place, you need to install the grill correctly. It's easier than a knife. The main thing is to install it so that the recess on the grill coincides with the protrusion on the body of the kitchen assistant. |
 |
Then simply secure the entire structure with a locking nut, also called a union nut, on the body of the meat grinder. |
 |
Next, we secure the meat receiver. |
 |
And put the pressure shaft in place. |
Now all that remains is to screw the handle from the back using a screw. All. The meat grinder is assembled. You just need to install it on the work surface, and you can start working.

Let’s remember once again what elements a manual mechanical meat grinder consists of.
Installing the meat grinder on a work surface

The meat grinder should be as stable as possible, otherwise you will have to make efforts to hold the unit in place while working on it
It is easy to screw the meat grinder to the work surface. You need to attach the device to the table using a “claw”. And to firmly fix the kitchen unit, you can put newspaper or soft cloth between the table top and the foot. Thick rubber is even better suited for this role.
How to properly assemble a manual meat grinder if you need to install an attachment
Most meat grinders are equipped with various attachments and grates for making sausages, sausages, juice and many other delicacies. But not everyone knows how to correctly insert an attachment, knife or grid into a meat grinder. After all, the procedure for assembling a meat grinder with an attachment is slightly different:
- insert the screw shaft into the main body. The wide part of the shaft is placed in the place where the handle is attached. The thin one should be in the place where the grille is attached;
- then put the grate. It can have very large or medium holes. It all depends on the recipe and your preferences;
- then install the nozzle. Just make sure that there are no chips or roughness on it. Otherwise, you risk tearing the intestine, which is put on the nozzle when making sausages and kebbe;
- unscrew the handle;
- then unscrew the fixing nut. If your hand slips and you can’t unscrew it, use a cloth. Just throw it on the nut, and then everything will work out;
- remove the grill and knife;
- remove the screw shaft.

Making delicious sausages with the meat grinder attachment is as easy as shelling pears!
Rules for caring for a manual meat grinder
After grinding the meat, it is very important to wash the grinder immediately. Some housewives advise passing a piece of cracker through a meat grinder, they say, it cleans out all the remaining meat, and you don’t have to wash it anymore. But no, pieces of meat may remain, and then a very unpleasant rotten smell will appear in the kitchen. It will not be difficult to get rid of it, but it will be very unpleasant. Therefore, after work you need to immediately rinse the unit. First you need to disassemble it:
After this, clean the parts from pieces of meat and rinse them under running water with any detergent for dishes. Then place the parts on a dry and clean towel and dry well. It is best to store the meat grinder directly disassembled.
So, definitely nothing will rust from water accidentally getting inside. Collect only before work. So, as you can see, the process of assembling the kitchen helper is very simple. The main thing is to pay attention to how you install the main elements. Good luck to you!
The meat grinder is mechanical household appliance from metal or its alloys for processing various products nutrition. The manual version has long been outdated and has been replaced by modern and powerful electric models. The design of a new type of meat grinder and the principle of its operation is the topic that we will cover in this article.
Before we thoroughly understand the structure of an electric meat grinder, we will list its advantages over another household appliances, in particular, its mechanical progenitor.
- An electric meat grinder is more powerful than any food processor in a similar mode, not to mention the muscular strength of an ordinary person.
- An electric meat grinder will grind any product faster than a human can do it. manual version products save time and effort.
- The electrical appliance copes well with stringy meat- there is no need to constantly unwind the product, clean the knife and reassemble it.
- A meat grinder with an electric motor can work on any flat surface without additional mounting.
- Work safety with them, a narrower neck is provided with sufficient length so that fingers cannot reach the auger. The kit includes a special plastic pusher.

Design
A modern electric meat grinder is equipped with the following basic parts and components:

- a device made of durable plastic for pushing products inside the device;
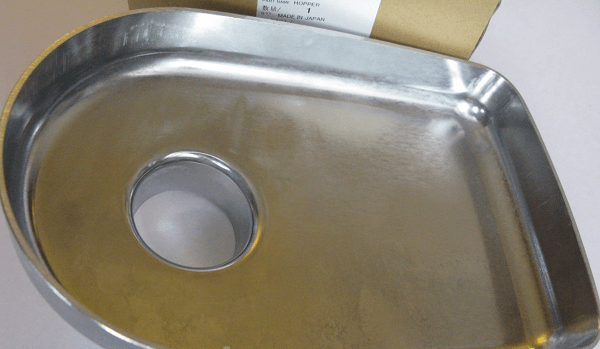
- tray or bowl;
- meat grinder body made of metal alloy;
- drive by electric motor;
- gearbox;
- main body of the product made of plastic;
- Electrical engine;
- rubber feet to prevent slipping on the table while working;
- LED indicating that the meat grinder is on;
- reverse;
- emergency stop button;
- start;
- grille for the exit of heated air;
- clamp block;
- retainer;
- input for power cable;
- ground clamp.
The schematic diagram of the meat grinder shown in the figure is arbitrary - the design of different models of electric meat grinders has its own nuances, but the main components are the same for all.
The body of the meat receiver, where the products are processed, consists of similar parts as the manual version:
- metal case;
- receiver and tray or bowl;
- screw shaft;
- lattice;
- fixation nut.
Depending on the model, the main parts may include:
- gratings with various diameters holes;
- additional knives;
- original attachments or graters for processing vegetables and fruits;
- devices for forming dough;
- conical attachment for making homemade sausages, frankfurters and sausages.
All of the above parts are the working parts of the meat grinder. For housewives to visually familiarize themselves with the configuration and purpose of various additional devices, there is a video using the example of the Belarusian electric meat grinder KEM 36 “Assistant”:
Main details
The working parts of a modern meat grinder have various purposes. We have already described in detail what an electrical product consists of, now we will talk about functional features all components.
Electrical engine
This is the heart of the product; the quality of food processing depends on its proper operation; it drives the auger of the meat grinder. Some models have several speeds, but we will talk about those options that all products necessarily have.
- Auto reverse— thanks to this function, users do not have problems when the wires get wrapped around the auger and get in the way normal operation. Just press the button and the motor, rotating in the opposite direction, will return the stuck parts of the product to the tray.
- To protect the motor from possible overload there is emergency stop button, which blocks the current supply, the motor stops.

This is the main part of the meat grinder, which ensures the passage of products inside the product until it exits. The screw is made of durable metal or its alloys, it looks like spirals with powerful pushers, which during advancement chop off the excess or grind it when it gets between the end of the hard ribs and the body of the device.

WITH back side A special bushing is placed on the auger shaft to prevent liquid formations from leaking into the connection with the gearbox.
Cutting part
The knife performs its inherent functions - cutting and chopping products before passing them through special steel devices. All models of modern household appliances of this class are equipped forged knives from stainless metal , since they always work in an environment where there is the presence of liquid.
During operation, during rapid rotation, they self-sharpen on the steel of the grate, but sometimes they need to be sharpened separately on emery to give the edge a special sharpness - the thinner cutting edge, the better the products are processed.


Chopping and cutting depend on the structure of the knife and its shape - if its blade is curved, then it easily cuts all the small veins and fibers, preventing the auger from clogging.
Lattices
They are made in the form perforated steel discs and have three main types, depending on the diameter of the holes:
- small: 3.0-3.5 mm;
- medium: 4.5-5.0 mm;
- large: 8-9 mm.

With the help of these devices, minced meat of various consistencies is obtained from coarse to very fine grinding: the first option prepares a mass of nuts well, and the third option produces juicy minced meat for homemade chebureks with herbs.
The design is completed by a knurled nut, which firmly fixes the stationary grid and the rotating knife adjacent to it; in addition, it secures all the attachments for various purposes.
During operation, this pressure is often self-tightening due to rapid rotation internal parts, therefore high-speed models have a special device that makes it easier to unscrew the nut. In models with standard speed, this device can be easily unscrewed using a cloth thrown over it - it prevents your hand from slipping on a wet surface.

This equally important component of any model is attached to the upper part of the bell of the mechanical part of the meat grinder and serves to place products for processing on it. Made from very durable plastic, its dimensions depend on the power and performance of the product.
For elite models, the trays are made of stainless metal, like the main body of the product.
Adaptations
Many models of electric meat grinders are equipped with additional attachments and devices that help squeeze juice, chop vegetables, make homemade pasta, original form cookies from shortcrust pastry or deli meats in the form of sausages or frankfurters.
For squeezing juice
Almost any model of a modern electric meat grinder is equipped with devices for producing juice, the only difference is in their location:
- the auger squeezes out the juice along with the pulp through grille with large holes;
- the auger rotates inside cylindrical graters, and almost the entire vegetable or fruit is ground into juice.

For shredding
A meat grinder can replace food processor, which is good for cutting vegetable salads when you are expecting guests, while a lot of the product remains inside the product. When you need to prepare the same thing, but in smaller quantities, the electric assistant will handle it.
There are special attachments for shredding; you can quickly and efficiently prepare vegetables for salad for the whole family, saving time and effort.

For sausages
What man would refuse homemade aromatic sausage with pepper and finely chopped lard? To do this, you don’t need to go to the market or run to the nearest supermarket - do everything at home with your own hands using a special attachment; by the way, your husband will be happy to help you.

For cookies
Homemade cookies various shapes can be done using an electric meat grinder, for this there is special devices, and everyone has a dough recipe experienced housewife. Delight the whole family and guests with original shaped pastries that you can’t buy in a store.

Operating rules
Before starting to process meat or other product, it is necessary cut it into pieces so that they pass freely along the cylindrical part of the receiver. The pusher is used to push the product towards the auger, which moves it towards the cutting tool.
Attention! It is necessary to cut out large veins from the meat, in this way you will protect the electric motor of the meat grinder from excessive load, and the knife from rapid dulling.
The auger of any meat grinder has special ribs that direct the product to the outlet, grinding it as it moves. This process, like the actions of the knife, occurs continuously: new portions placed in the meat receiver squeeze the already ground product through the grate into a container placed at the neck. By using electric models It is easy to make delicate pates: grinding is done several times, passing the finished product through finer meshes and adding the necessary ingredients.

In order for the meat grinder to work efficiently and the product to function for as long as possible, it is necessary to strictly follow the manufacturer’s recommendations and simple rules operation.
- Check the meat carefully when cutting it into portioned pieces to put into the receiver; if a small bone gets in, it will cause the knife to break.
- The knife in the product must always be sharp - this facilitates the rapid processing of any product.
- Immediately after use, the product must be disassembled, all parts must be washed thoroughly, and after drying, put into a storage box.
- Before assembling the shaft, knife and grid on the side where the knife is adjacent, experts advise rub with sunflower oil- this will provide best walkthrough products inside the meat grinder and quality work rubbing parts.
Never store the body of the product, where the main grinding takes place, assembled; remember that in a free state, all parts oxidize less, and their assembly does not take much time.
As you can see, the design of an electric meat grinder and the principle of its operation are extremely simple, but it has many advantages, because with the help of simple attachments you can prepare original homemade delicacies, aromatic dough products and many other delicious dishes.
The meat grinder was invented back in the early 1800s by the German inventor Baron Karl Dres. This device immediately gained popularity, since before it, minced meat was obtained by finely cutting meat and lard. And this took a lot of time, and apparently this prompted Drez to invent this device.
Today the market offers you a wide range of electric meat grinders, which not only do their job efficiently, but also save your time and effort. All models have their own differences, which determine the quality of the device, its operation and service life.
If you decide to replace your manual meat grinder with an electric one, then we give you a list of parameters that you should pay attention to when choosing a device.
1. Power. There are two powers here: nominal and maximum. The first tells about the speed and power with which the device operates in a familiar environment; it ranges from 220 to 750 W. This power allows the device to operate for a long time without interruptions to cool the electric motor. Maximum power is used to turn a stuck auger or knife. It can reach 2000 W. However, the operating time of the device is maximum power should not exceed the established barrier, as a rule, this is a few seconds (the maximum operating time of the device at maximum power is always indicated in the accompanying instructions).
Let's summarize. Remember that the more power, the faster you can complete the job, and the tougher meat the device can process.
2. Productivity. Many buyers choose a device not by power, but by productivity, which indicates how many kilograms of meat can be processed in a minute. Productivity, depending on the model, varies from 05 kg/min to 3 kg/min.
Let's sum it up. This parameter is taken into account based on your needs and the number of family members.
3. Noise. This parameter directly depends on the power of the product: the higher the power, the noisier it will be “ kitchen helper" Of course, buyers do not always pay due attention to this parameter, on the one hand this is correct, because the device always works for a short time, a maximum of 10 minutes, and during this time you can process from 8 to 25 kg of meat. Agree, this is a lot, and not everyone needs such an amount of minced meat. Speaking about the amount of processed meat, we would like to note that it is not recommended to store it for future use, since only fresh minced meat can boast the best taste and nutritional qualities.
Let's sum it up. You should not pay attention to this parameter a lot of attention, since the device, as a rule, is in working condition for no more than ten minutes, and this time is not enough for the noise of the meat grinder to cause you some inconvenience.
4. Non-stop work time. This parameter tells how long the meat grinder can operate without a cooling break. Typically this figure is about 10 minutes. And as already mentioned, during this time the model is capable of processing a large amount of meat, so you should not focus your attention on this point.
Let's summarize. The continuous operation time is selected based on your needs. If you regularly prepare minced meat in large quantities, then only in this case you should pay full attention to this parameter.
Now a few words about the components of the Moulinex, Bosch, Braun meat grinder, which in turn consists of an electric motor and a screw part.
- Frame. Here it is better to give preference to stainless steel, it is less hassle, lasts a long time and has good hygienic qualities.
- Screw. As a rule, there are two of them in a set: metal and plastic. The first is used for preparing minced meat, and the second for processing soft fruits, berries and vegetables.
- Knives. The best are considered to be self-sharpening ones made of stainless steel with a saber-shaped cutting edge.
- Lattices. The consistency of the minced meat depends on their size; the smaller the hole in the grate, the finer the minced meat.
- Neck. The ideal option would be one with a long and narrow neck, which will protect your fingers from accidents.
- Pusher. It makes the operation process easier. It is strongly recommended not to use sharp objects (knives and forks) as a pusher.
- Trays. Give preference to metal ones, as they are stronger, more reliable and more durable.
- The presence of a special recess in the body allows you to store attachments and the power cord, which in turn helps you save kitchen space.
Separately, we would like to say about the “reverse” function, which allows you to clear the auger of wires. Operating principle: in this mode, the device rotates the auger with the knife immediately clockwise and then counterclockwise. This bells and whistles make it much easier to use, since there is no need to interrupt work to clean the auger from wound wires.
In conclusion, I would like to say that an electric meat grinder is a precious assistant in any home; it helps you in a matter of minutes without special effort get several kilograms of processed minced meat, while saving your energy and time. In addition to everything, a modern meat grinder has attractive price, so every family can afford it. We wish you a successful purchase!
Comments and reviews
Huawei has announced a new operating system open source. This OS is designed for...
The Verge has discovered that Sonos is working on its first portable Bluetooth speaker, the S17. ...
In order for the item to fully function, you need to familiarize yourself with its structure and understand how to assemble a meat grinder. Then she will not “chew” the minced meat and you will definitely get a soft, homogeneous mass.
Design Features
Manual device consists of the following components:
- Body and meat receiver made of durable metal alloy.
- Screw shaft. This is a spiral that is located inside the body and guides the meat to the blade.
- The knife chops the food, turning it into minced meat. In classic meat grinders there are two types of knives: disk and with wings.
- Lattice. Regulates the degree of grinding.
- Nut for clamping. Fastens the elements of the meat grinder.
- Handle and lock (sometimes a nut).
The Soviet manual meat grinder is attached to the edge of the table with a special claw, which must be screwed tightly. To prevent the device from sliding on the surface, you need to place a soft cloth between the foot and the tabletop. In newer models, the foot is not metal, but plastic. It attaches more securely.
The design of an electric meat grinder is almost identical to a manual one:
- The biggest difference is that instead of a metal body and handle, a plastic one is used, which has a built-in motor. Actually, it will serve as a handle in the previous version. All you have to do is press the start button and enjoy the process.
- The meat receiver requires attachment to the body (not in all models).
- There is an additional pusher that helps push the meat to the auger.
- There is no clamp on the body.
- The knife is a little different. It has bulges for finer cutting.
- The auger is attached using a plastic grooved rod.

Assembling a manual meat grinder
Before you begin assembly, check that all components are clean and dry. Otherwise, the meat grinder will quickly fail.
Now let’s take a step-by-step look at how to assemble a manual meat grinder:
- Take the auger shaft and place it in the center of the housing. Please note that the wide part should be on the side where the handle will be attached, and the thin part should be on the knife side.

- Place the handle on the wide rod and screw it in place.

- On the other side of the auger, install the blade so that the flat side faces outward. If you are dealing with disk knife, then there should be a corrugated part with edges near the grille.

- After installing the knife, place the mesh on the tip of the rod. It should fit as tightly as possible to the blade.

- Secure the structure with a clamping nut.

How to assemble an electric meat grinder
If you know how to properly assemble a manual meat grinder, then folding an electric meat grinder will not give you any problems.
- First of all, connect the gearbox housing with metal body auger To do this, you need to insert it into the groove and turn it counterclockwise until it clicks. If the parts are not connected tightly, the motor will not be able to fully control the screw shaft.

- When inserting the auger, make sure that the protrusion fits neatly into the hole in the housing, as shown in the photo.

- Install the blade and grid, secure the parts with a clamping nut.

- After installing the loading bowl, the meat grinder is ready for use.
How to disassemble and clean a meat grinder
After use, be sure to disassemble and clean the household appliance. Washing in assembled form is prohibited! IN manual meat grinder You won’t be able to remove the remaining minced meat so easily, and washing with an electric one can lead to short circuit.
- If the meat receiver is removable, first of all, get rid of it by removing it from the neck.
- Now turn the clamping nut, carefully holding the contents.
- Remove the grid and blade. Unscrew the screw holding the handle.
- Remove the auger from the housing.
- Carefully rinse all parts; you can clean the grill using a toothpick or match.
- Place all the parts on a napkin and leave to dry.
Do not put the meat grinder away wet! If liquid is retained on the body, rust is likely to occur. And water in an electric meat grinder will cause the motor to burn out.
Assembling a meat grinder: video
If you still can’t figure out the instructions, watch a video on how to assemble an electric and manual meat grinder. The authors describe in detail the configuration of the models and the sequence of assembly/disassembly.
Assembling a meat grinder is not that difficult, just a couple of training sessions and you will be able to cope with this task in a few seconds! It is best to store the meat grinder disassembled. Make sure that all parts are stored in one place, as replacing any component from the kit may affect performance kitchen appliance.
In contact with
There are three holes in the body, by looking at which you can answer the question of how to assemble a manual meat grinder.
- Meat receiver, where is he going loading of products required processing.
- The rear large exit of the auger shaft is intended for a handle that will rotate it. To ensure that it sits firmly, manufacturers can equip the meat grinder with a special nut. Some housewives remove it because it interferes with their work. Therefore, it is sometimes missing on old meat grinders.
- The front outlet is for the thin end of the shaft on which the knife and mesh are attached.
At the bottom of the housing is equipped with a special device, with the help of which the unit is tightly attached to kitchen table for work.
What is included in the set of kitchen unit parts:
- The screw shaft is a large spiral necessary for delivering processed products to the knife.
- A knife in the form of a disk or a four-wing propeller, properly positioned, is capable of grinding many products.
- Grate – a flat disk with big amount holes, which determines how well the final product will be crushed.
- A clamping nut that is screwed on top and secures the grid and knife to the shaft.
- Handle attached on the opposite side. It can be freely installed on the outgoing end of the screw shaft or attached to it with a special screw.
Having dealt with all the details, you can learn how to assemble a manual meat grinder.

How to assemble all the parts correctly
At the beginning of the assembly, housewives collect all the parts from the meat grinder and arrange them on the table near them. First, they pick up the all-metal housing and insert the screw shaft into it so that its thick edge comes out from the back into a narrow hole. A handle will be attached to it. If there is a nut for securing the handle, it must be installed immediately, tightened firmly with a screw. If there is no fastening, the handle is attached last.
The thin side of the auger fits into a wide round hole. It is long enough, and two parts are held on it. First, put on a knife. Installing this part of the meat grinder is the most important point in this whole process. The knife must be installed correctly, otherwise it will not work.

On one side, the meat grinder knife has flat wings, on the other they are convex. The flat side should be on the front side of the meat grinder and clearly visible, and the convex side should remain inside near the auger.
The disc-shaped knife is installed so that its cutting edges are on the outside.

It is important to preserve the knives that came with this particular unit, because parts from another manufacturer may not fit the structure of the all-metal body, and the process of chopping products will be disrupted.
 (1 ratings, on average: 5,00 out of 5)

