How to sew night curtains with your own hands. How to sew beautiful and elegant curtains with your own hands? Ideas for sewing curtains: which curtains you can sew yourself
Textile window decoration is not as difficult a question as it initially seems. Upon registration beautiful curtains you should think about color, pattern, fabric, style. In addition, they must be combined with common interior rooms. Sewing curtains yourself is not difficult if you have sewing skills. The most important thing is correct selection color range, sketches, finished patterns and exact amount of fabric. It’s better, before sewing curtains with your own hands, you should watch a master class from specialists.
To sew curtains, you need to know step by step execution works The curtain is made in several stages.
To create any curtains, you should follow this sequence:
- We sew the curtains ourselves - stage two: choosing a model, depending on the room and its design;
- We sew curtains - stage three: measuring the window (with a tape measure you should measure the length of the cornice and the height of future curtains);
- Scaled creation of curtain sketches;
- We sew the curtains ourselves - stage four: determining the amount of fabric for curtains, if planned - for a lambrequin (you can watch a master class on making curtains to understand how to correctly make calculations and choose fabric);
- We sew curtains - stage five: creating patterns for curtains and lambrequins;
- We sew the curtains ourselves - stage six: cutting woven fabrics;
- We sew the curtains ourselves - stage seven: processing the cut out parts;
- Eighth stage: connecting the curtains with the lambrequin;
- Ninth stage: production of decorative elements - tiebacks and other decorations.
After watching a master class on making curtains with your own hands, you can be convinced that cutting and sewing is not a complicated procedure.
Sketches of curtains
The cut of the curtains depends on the correctly created sketch. How to correctly create sketches of curtains with your own hands and calculate the amount of fabric for a certain model - these are the most important and important questions. To calculate the amount of fabric, you should measure the width of the cornice, multiply it by two + 5-6 cm. In the event that two canvases are planned that will hang, then the width of each canvas will be equal to the width of the cornice + 5 cm.

When calculating the height, you should take into account the processing allowance for the upper and lower parts of the canvases. Another quite a few important factor– you need to add 20 cm to the height number in case the curtain “shrinks” when washed.
A master class on creating sketches and sewing curtains can be seen in the video.
Curtain bracket
The brackets must match the design of the room, the shape of the window opening and the curtains. First of all, a curtain rod with a bracket is a functional accessory.
There is quite a wide variety of cornices with brackets:
- Profile;
- Metal;
- Forged;
- Round;
- Strings.

Profile cornices with brackets are equipped plastic fittings, bend to any radius, have a light weight. Used for windows in the form of arches. Such a cornice can be single-track or multi-track. Attached to the surface using plastic brackets. The cornice can withstand light weight. The brackets have different lengths, this helps to secure a profile cornice with a certain overhang to the wall.
Metal curtain rods with brackets are more durable and can support heavy fabric. These accessories are great for classic style rooms. But such products do not look good with lambrequins.
Forged cornices are made mainly according to individual order. The brackets add a special charm to the cornice, as they are also made by forging.
Round cornices with brackets are the most popular and versatile option.
A string cornice, equipped with brackets, contains a string that is attached with a baguette. Disadvantages include low load-bearing capacity.
It is better to install any of the curtain rods on windows with 3-4 brackets, especially if the curtains are heavy and the set contains tulle, thick curtains and a lambrequin.
It is better to install the brackets outside the edges of the window opening. This will make it possible to move the curtains and open the window completely.
The optimal distance between the brackets is 1.5 m. In this case, they will securely hold the cornice and the rods will not sag.
When choosing a bracket, you should first think about the weight of the curtains and select the mounting material that suits the interior. Remember that it must match the interior.
For classic interior baguette cornices with brackets are suitable. The minimalist style is combined with a string cornice. With Roman or Japanese species curtains match perfectly aluminum profiles. If the decoration of the space contains stone natural materials, then forged cornices with brackets - perfect option. For a room with low ceilings, the brackets are installed under the ceiling. This will make the ceiling appear higher. For visual increase length of the window, the brackets are installed 15-20 cm away from the window opening.
Fillet knitting pattern for curtains
Fillet knitting is called imitation lace. Fillet knitting patterns for curtains resemble single-color cross stitch patterns.

The initial stage of knitting with your own hands is chains of air loops. The number of loops in one cell is 3 (one for the column, two for the bottom area of the cell). Loin curtains are not always woven from the first row. Some cases involve casting on the centerline and then knitting into the top and bottom. Do-it-yourself fillet curtains can have different shape, color. The edges are very shaped like teeth and waves. Such products are great for the garden.
What is fillet crochet (video)
Curtains from curtain scraps
How to sew curtains from scraps? You should never throw away remaining curtains that have been damaged over time. From them you can sew stylish, imperial window decorations with your own hands, which, by the way, are now at the peak of fashion.

To make a curtain from scraps, you will need scissors, a tape measure, and a ribbon. Having decided on the size and shape of the curtains, you can begin to work. The pieces are sewn together with double seams so that the curtains do not “creep” over time. Use braid to decorate and hide the seams.
First, you need to measure the width and height of the window itself to find out what size the future curtain will be. Take 3 pieces of fabric and connect them together like this: first on one side, then carefully turn them inside out and connect them on the other side. In the future, decorate the patches sewn together with beads and seed beads.
Many experts offer to watch a master class on sewing curtains from scraps with your own hands.
How to trim a curtain evenly
Open the curtains - one of important points. To cut and trim a curtain evenly, you should know some rules. The canvas is folded in half, and the edges of the edge are marked with cuts. Then you need to carefully fold the canvas in half again lengthwise. Very carefully smooth the fabric with your hands, aligning the middle and edge. Make a cut at the bend.

Without lifting the canvas, fold it in half. Using a long ruler, connect the cuts on the edges with the central part and draw a line with chalk or soap. Cut this line with scissors.
How to sew curtains with your own hands (video)
Thus, cut the entire canvas into the necessary pieces. When cutting, it is important to set aside the required length and align along the edge, then the curtains will always turn out even.
Examples of do-it-yourself curtains (photo)


Julia Pyatnitsa
How to sew simple Roman blinds?
Are your windows of such a size that it is difficult to fit standard store curtains? Dont be upset! It’s better to stock up on tips on how to sew curtains at home to get unique items decor that suits your home.
Types of curtains
Despite the fact that there is one basic principle on how to sew curtains, their methods differ somewhat depending on how they are attached to the cornice.
Simple curtain
A classic type of curtain that is easier to sew than others.
All you need is to prepare a piece of fabric the right size and finish it around the edges.
Loops and ties
Making a curtain with loops and ties is as easy as sewing a classic one.

If you want the product to stay on the eaves and not fall off, sew loops along the top edge, both with Velcro and solid ones. But curtains with decorative ties are easier to attach and remove.
Kuliska
Interesting design solution allows you to firmly hook the curtain onto the rod and protect it from falling - especially if you have cats at home.

Fold the top edge of the product, forming a wide loop along the entire length, and stitch. The curtain can be hung in place using the clips.
Eyelets
Thanks to this method of fastening, the product acquires soft waves. At the top of the curtain, make several holes at the same distance from each other. Machine them or insert metal rings.

Now you can choose any clamps that suit your interior for fastening.
Simple curtains: master class
Before you start sewing simple curtains, learn how to correctly determine the size of the future product.
The diagram shows the parameters for the fabric: the length of the curtains corresponds to the length of the cornice. The width of the canvas should be equal to the length of the future product from the place of fastening (cornice or hooks on it).

- On the reverse side of the fabric, draw a pattern for the product with double seam allowances - for a double hem.

- Cut out the workpiece, cutting off the factory edges - they tighten the fabric.
- Smooth the product with an iron - smooth fabric is easier to handle than with wrinkles and creases. In addition, this way you reduce the likelihood of sewing uneven side seams.
- Fold 1 seam allowance over the side and iron.

- Turn up the seam allowance a second time and start sewing - sew the seams with a simple machine stitch.

- Iron the finished edge.

- Immediately after ironing, walk along the edge with a cold object - glass, for example - this action will additionally smooth out the fabric after machine stitching.

At this stage, the product can already be used by hanging it using special clips or clothespins. If you want to attach the curtain with hooks, sew along the top of the product curtain tape with ready-made slots.
To learn how to sew classic curtains with loops, watch the following video tutorial.
Depending on your wishes, the loops can be sewn solid with both ends sewn in or with Velcro fastener at one end. These curtains can be used to decorate windows, doorways, or be used as a screen to delimit the space of small bedrooms.
DIY Roman blinds
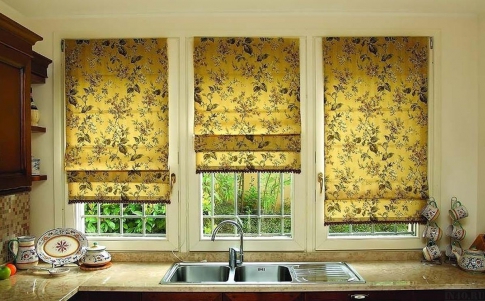
This type of curtain is perfect for decorating windows in the kitchen, living room or bathroom of a private home, as well as an office.
To sew Roman curtains, you will need materials such as adhesive tape, 7-8 twigs made of wood, metal about 3 centimeters shorter than the width of the product, plastic rings - 3 for each pin, 3 long identical cords, 2 strips - for hanging and weights, hooks, nails.
- You need to sew a Roman style curtain starting with cutting. Measure the window opening and add seam allowances to get the width of the piece. The length will be equal to the length of the window or 5-10 centimeters below the window sill.

- You can use the following table to determine the number of folds and the distance between them, guided by the future length of the item.

- Cut out the product according to the finished parameters. With a simple pencil or use soap to mark the places where the pins and rings will be inserted.
- Cut out a piece of fabric. Process the edges of the curtains according to the same principle as in the previous master class.
- Secure the wooden cornice beam into window opening or above it - depending on how you want to decorate the window.
- Attach Velcro tape to the finished plank. Attach the second sticky part to the top edge of the curtain - this way you can easily remove the items for washing.

- Turn and stitch bottom part curtains, forming a loop into which you need to insert a weight strip.
- On the wrong side of the product, sew a wide braid at the levels where the gathering twigs will be located.
- Sew 3 rings to each braid. They need to be fastened so that all the rings of one row are clearly above each other.

- Attach the curtain to the beam using adhesive tape. Starting with the top ring, thread 1 cord through each ring - you should have 3. Secure the cords by tying them in knots on the bottom rings.

- Bring all the laces to one side of the curtain, threading them through the top fasteners.
The curtain must hang completely straightened, only then can you tie a knot of 3 cords at the top. Attach the lifting mechanism part to window frame or in the opening, wrap the cord around it and tie the knot again. Trim the uneven ends of the cord. With its help you will adjust the lifting height and the size of the folds of the Roman blind.
To learn more about how to sew a product of this type, watch the video.
Remember that all the twigs must be removed before washing the curtain, otherwise the material from which they are made will deteriorate: the iron in the water oxidizes, and the wood swells.
To learn how to sew high-quality curtains like a real professional, use the secrets of our work experienced specialists. They will show you little tricks of pattern, design and sewing.
- To sew a curtain for the bedroom, use light-proof fabrics, such as blackout, which will help you protect yourself from bright light and get more sleep in the early morning.
- After each action, check the products for creases and dents and remove them with an iron. It is possible to sew using wrinkled material, but this increases the chance of getting lopsided seams and fabric.
- When working on a pattern, consider the properties of each fabric. Some materials are stretchy, so the finished product may become shorter after the first wash or, conversely, stretch.
Curtains can be assembled by draping folds using clips, pins and clothespins. Make such a clip yourself, decorating it with an artificial flower made of cold porcelain, paper, and beads.
Take it for yourself and tell your friends!
Read also on our website:
show more
Good afternoon friends! Today we will learn to sew classic curtains. In fact, this is one of the most simple types curtains, which can sew with your own hands. Thanks to step by step diagram With detailed photos it will be quite easy even for beginner craftswomen.
So let's get started.
1. What do we need for sewing classic curtains:
- curtain fabric (I took a piece 2 m wide, the standard height of the fabric is 2.80 m)
Curtain tape (in this case wide)
— threads: white and to match the color of the fabric
- tape measure and ruler
- scissors
- pins
- sewing machine
2. First we need to cut the fabric. The width of our piece is 2 m, the height of the finished curtain will be 2.50 m. We add 10 cm for hemming the bottom and 6 cm will be left on top under the tape. Accordingly, the height of the curtain pattern will be equal to: 250+10+6=266 cm. We set aside this height along the side cut of the fabric and make an incision.


3. Pull out the thread and cut off the excess fabric along the formed scar.


4. Side processing. Side processing width classic curtains You can choose for yourself. Usually it ranges from one to three centimeters. It all depends on your taste, some people like the look of a wider treatment, others a narrower one. I made a hem 1.5 cm wide. So, fold the side edge to the wrong side by 1.5 cm and iron it. Then we bend it again by 1.5 cm and pin it with pins.


5. We sew up the sides.


6. Processing the bottom. Iron on the wrong side 5 cm, and then again 5 cm.


7. We pin the double hem with pins and stitch it on the machine. The bottom edge is ready.


8. There is very little left - sew curtain tape. We already have almost ready-made curtain face up. We bend the side cut of the curtain tape to the wrong side by about 1-2 cm. Place the curtain tape with the loops up on front side curtains. We combine the top cut of the curtain and the curtain tape.


9. We pin the curtain tape to the curtain with pins in a checkerboard pattern so that the fabric does not move relative to the tape, i.e., alternately one pin is closer to one edge, the next one is closer to the other edge. Having reached the end of the curtain, we cut the tape about 2 cm longer than the curtain and bend these 2 cm inward so that the edge of the curtain and the edge of the tape coincide.


10. Change the color of the threads on the machine: the top and shuttle threads should now be white. We attach the curtain tape along the inner edge, retreating 1 mm from the edge of the tape.


11. Take out the pins and bend the tape to the wrong side of the curtain. The line we just stitched should be on top. We pin the ribbon to the curtain with pins.


12. We change the shuttle thread again to the color that was at the beginning, the top thread remains white. We attach the tape along the bottom edge, retreating 1 mm from the edge of the tape.


13. Don’t forget to stitch side edges ribbons to the curtain, having previously released the threads.

Curtains are a necessary element of apartment decor. Lately interior design is becoming more and more ambiguous and housewives do not find suitable models curtains that will harmoniously fit into the already formed space. Therefore, many dared to start looking for a pattern to sew curtains and curtains on their own.
This is actually not such a difficult task. Of course, it all depends on the model that you would like to see on your windows. But, if you carefully study the instructions and follow them strictly, everything will definitely work out.
Before you start sewing, you need to decide what kind of curtains you want. You should start from the color scheme of the room in which the product will hang, the style (minimalism, modernism, Provence, etc.), and the functions that the curtains should perform.
In order for you to be able to sew a product of any complexity and model, consider the proposed patterns for curtains of basic models and sewing master classes.

- sewing machine (optional);
- scissors;
- ruler;
- tailor's chalk;
- iron and ironing board;
- centimeter tailor's tape;
- safety pins.
Tulle
Whatever model you decide to sew, almost any option involves a combination with tulle. Therefore, first of all, it is worth considering this instruction.

Materials:
- thin translucent fabric;
- curtain tape;
- threads in the color of the fabric.
Step by step guide:
When sewing tulle yourself, you should start by measuring the windows, detailed instructions instructions for taking measurements correctly are given below.


Advice! It is better to lay slippery fabrics on a textured surface so that it clings and does not move. A carpet or any rough fabric will do.
Classic curtains
The easiest ones are classic ones. They are the most ordinary straight-cut curtains combined with tulle.

You will need:
- textile;
- curtain tape;
- threads in color.
Sewing such simple curtains is almost no different from sewing tulle.
Step by step guide:
- It is recommended to take fabric twice the width of the window opening. If you only need one curtain, you can use the tutorial for sewing tulle, as it will be no different. If you need two curtains, then each will match the width of the window. Thus, together they will create required amount folds and the desired size.
- Measure the required dimensions on the fabric, you can do it exactly the same as with tulle, and then simply cut the resulting fabric lengthwise into two curtains.
- Next, follow the instructions for sewing the tulle. You will have to go through all the steps twice, since you should end up with not one curtain, but two identical ones.
Advice! Do not rush to get rid of the pieces of fabric remaining after sewing. They can come in very handy when creating decorative elements, both for curtains and just for the home.

Roman curtains
Before you do, you need to take measurements as accurately as possible from the windows, since it is assumed that they will cover them tightly and completely.
You will need:
- dense or rough fabric;
- threads in color;
- special cornice for Roman curtains.
Step by step guide:
Sewing Roman ones is one of the simplest; they also do not require patterns.
- Mark and draw a curtain on the fabric according to the size of the window. The fabric for such curtains is usually thick, rough and non-slippery, so the process will be easier. To the drawn curtain, add 5 cm for allowances on the sides, and 12 cm at the bottom.
- Using an iron, make hems on all sides of the fabric and stitch along the edges.
- Now you only need to put the curtain on a special device.

Blinds
Another stylish and easy to sew curtain option. You can choose almost any thick fabric for them. It is better to avoid patterns, as the sun can quickly fade them and the curtains will lose their original appearance.
You will need:
- special devices for vertical blinds;
- textile;
- wooden panels;
- threads in color.
Step by step guide:
- First you need to determine the length, width and number of lamellas. Standard values are: 127 – 89 mm.
- Now cut out the slats according to your measurements and cut them out. Don't forget to add seam allowances.
- Fold each one front side inside and start the lines. Turn it inside out.
- Iron the resulting slats with a steam iron.
- Place them on the guides. Organize your vertical blind system.
The advantage of sewing blinds yourself is that the market offers a lot of different materials and devices for making them, so you can easily bring any of your ideas to life.
Advice! It is better to make any curtain patterns before purchasing fabric, since only after that you will be able to determine as accurately as possible how much of it you need.
Additional decorations
Even the most simple models curtains will sparkle in a completely new way if you complement them with various decorative elements.
Lambrequins
Lambrequins will give a sophisticated and chic look to even the simplest options.
You will need:
- fabric (usually the same as when sewing curtains);
- threads in color;
- bias tape.
Step by step guide:

The advantages of lambrequins are that they are not difficult to manufacture and, at the same time, significantly decorate the room.
Roses for curtains
There are two ways to make roses for decorating curtains:


As a result, you will get a very realistic and beautiful flower.
How to take measurements correctly
To ensure that your product turns out smooth, neat and beautiful, use the following tips By correct measurement windows:
- When measuring the height from floor to ceiling, do this in at least two places (depending on the width of the window), since the ceiling or floor may be crooked. In the event that the values turn out to be different, it is necessary to make a smooth bevel during cutting to the side with a smaller height.
- Make all measurements as accurately and carefully as possible, since any error can affect end result products.
- Measure the width of the window from one end of the curtain to the other, that is, the entire perimeter that the curtain will later have to cover.
- There is no need to add allowances when measuring! This is done during pattern making!
Sewing curtains yourself is not that difficult. Any housewife can do this. The resulting result will definitely delight and pleasantly surprise you and your loved ones.
You can choose a design solution according to your wishes, since the Internet is replete with photographs various options curtains

The main thing is to carefully familiarize yourself with the sewing technique. From the huge assortment of curtains, only a few stand out basic types, everything else is their modifications.

Having mastered the technology of how to sew basic curtain options yourself, you can safely take on curtains of any kind.

Types of curtains
Today there are many various types curtains, of which about a dozen are considered basic. Some of the main models differ from each other only in certain subtleties of the design solution.

All others are based on the top ten, so once you have mastered the sewing of the basic curtain options, there should be no difficulties with them.
The most popular types of curtains are:
- English curtains;
- Roman curtains;
- simple curtains with ties;
- lambrequins.

To sew any curtains you will need:
- Sewing machine;
- Material;
- Threads in the color of the curtains;
- Pins, scissors, measuring tape, chalk.

We sew lambrequins
There is nothing particularly difficult about sewing curtains with lambrequins. Despite their simple design, these curtains look quite beautiful.
First you need to make the necessary patterns, this will greatly simplify subsequent work.


The main thing is that the curtains and their decorative details are combined with the overall interior.


Don’t forget about the hems; they also need to be taken into account when calculating. You also need to decide whether to make folds and how many.
The next step is to bend the material at the top of the future curtain, thereby creating a pocket for the rod. It is recommended to process it using a reverse seam.


Making a lambrequin requires precision and accuracy at every stage. Lightweight material beads and organza flowers will perfectly decorate. Fringe is perfect for heavy fabric.
Note!


Step-by-step instructions for making Roman blinds
Roman style curtains are quite popular today. Let's look at how to make it yourself.
- We measure the window opening. To the resulting dimensions we add 5 cm for each side for seams and 12 cm for the length. Thus, the required amount of material is calculated;
- We select the fabric. This should not cause difficulties, since today's choice of materials is simply huge;
- Use chalk or soap to draw allowance lines;
- We attach a special adhesive tape to the beam and the upper edge of the curtain;
- Fold, iron and hem bottom edge curtains;
- Sew on the trim;
- Using wide stitches we attach rings to the curtain;
- We attach the entire canvas to the beam;
- We thread a rope through the rings, tighten it and cut off the excess.
- We get elegant and expressive curtains.

Master class on how to make English curtains with your own hands
English curtains look elegant and airy in any interior. Sewing them is not difficult.

First, we calculate the required length of fabric for a specific window. Don't forget about seam allowances and planned folds.
For English curtains Satin and muslin fabrics work well. We will also need a satin ribbon.

Mark the location on the material satin ribbons. We take the ribbons themselves, fold them 1 cm on each side, iron them, pin them to the fabric with pins and sew them on.

Note!

Then we secure the upper edges of the ribbons, hem and iron the bottom of the curtain. Our curtain is ready!

A thing made with your own hands is unique. It stores the energy of its creator and helps fill the house with warmth and comfort. Sewing curtains yourself is not at all difficult.

We hope that this article will help you with this. Good luck!

DIY curtain photo


Note!


 (1 ratings, on average: 5,00 out of 5)

