How to sew fashionable curtains with your own hands. Curtain patterns - where to start and what should a beginner know about when starting work? (111 photos). Master Class. How to sew Roman blinds with your own hands from scrap materials. ready-made roman blind
Roman blinds were borrowed from Roman sailors. And in those days and now, the Roman blind is made according to the same principle by which sails were made in those distant times: a piece of fabric that can be raised and lowered.
Moreover, this piece of fabric is completely straight, without any draperies.
Roman blinds are designed to either completely block out sunlight or, on the contrary, let it through, but at the same time reliably protecting you from indiscreet glances.
In the latter case, for Roman blinds you need to select translucent fabrics.


Sewing a simple Roman blind with your own hands is not particularly difficult. You just need to know how to do it.
A Roman blind can be made by purchasing a special curtain rod with a lifting mechanism from a specialized store, which will cost you quite a bit.
In this master class we will look at how to sew a Roman blind with your own hands from scrap materials, that is, from what is always inexpensive, available for purchase, or even available in the house.
But here, too, there are two options for making a Roman blind:
The first option: inside the window opening, so that the curtain fabric is close to the glass.
Second option: the Roman blind is attached to outside window. In this case, the Roman blind should extend 5-10cm. on both sides of the window relative to the slopes.
These two options differ only in the method of measuring the size of the Roman blind.
In the first case, we will measure the height of the curtain and its width (length along the cornice) inside the slopes, and in the second case, from above, as for a regular curtain. See picture:

Shown here is the installation of a bar for a Roman blind inside a window opening:

And here is shown the mounting of a bar for a Roman blind over a window opening:

By the way, earlier I wrote how to make one of the varieties of Roman blinds with soft folds
Here is a diagram for cutting a simple Roman blind. You need to cut along the dotted line:
 This is a diagram for a Roman blind in finished form:

Or you can take your own distances, whatever suits you. I personally tried to make the distance between the folds 40 cm, and it worked out great. The same distance is halved when the curtain is raised.
The length of the Roman curtain, the height that I will make in this master class is 115 cm, the width (length along the cornice) is 65 cm.
I will make it from two identical pieces of fabric, cut from the main material. That is, both the face of the curtain and its back are made of the same fabric.
Here is a pattern diagram for a Roman blind for these sizes that I will sew:

You can learn how to choose a purchased cornice for a Roman blind from
I took the fabric, folded it in half and cut out two cuts using this pattern according to the pattern:


I folded these cuts facing each other, pinned them and machine stitched them 1 cm from the edge.
I stitched the sides and bottom of the curtain. I left the top unstitched:


Now you need to turn the curtains through its top edge. You will get a bag like this:

Then I stitched the stitched edges of the curtain along the front side, first into the edge of the fabric, then stepping back from the previous line onto the foot:


Here is a semi-finished product of our curtain, which we will process as a Roman one:

Now I will make the bottom pocket of the curtain in order to insert a weight bar there. I measured my strap that I will insert into this pocket and it turned out that I should make it 6cm wide.
I measure 6cm from the bottom edge. across the entire width of the curtain:

I draw a line along the front side of the curtain:

I press the fold to the wrong side along the marked line:
 I secure it with machine stitching to the edge of the pocket for the placket:
Here's what the curtain looks like:

Now we put up the curtain front side on the table and on its wrong side we mark lines for making pockets for slats, according to the pattern laid out above:


Now, along the marked lines on the wrong side of the curtain, I will sew a narrow curtain tape, 2.5 cm wide, making pockets for the slats. You can take any other braid.


This is what you should get from the wrong side of the curtain:
Master Class. How to sew Roman blinds with your own hands from scrap materials. wrong side of curtains
 Master Class. How to sew Roman blinds with your own hands from scrap materials. wrong side of curtains
 And this front side curtains:
Master Class. How to sew Roman blinds with your own hands from scrap materials. face curtains
 Master Class. How to sew Roman blinds with your own hands from scrap materials. face curtains
Now let's start decorating the top edge of the curtain. To do this, place the curtain on the table with the front side facing you and mark its final length (height) from the bottom edge of the curtain. We draw a line along its entire width:
DIY Roman blinds DIY Roman blinds
 DIY Roman blinds DIY Roman blinds
 The fold should be 2cm (as in the pattern diagram). Iron by folding these 2 cm onto the wrong side of the curtain:

We place the soft part of the Velcro tape on this bend. We combine the top edge of the curtain with the edge of the tape, stitch first on one side of the tape, then on the other. The tape will cover the raw edge of the curtain because its width is 2.5 cm:

Master Class. How to sew Roman blinds with your own hands from scrap materials. sew on Velcro tape
 Master Class. How to sew Roman blinds with your own hands from scrap materials. sew on Velcro tape
DIY Roman blinds DIY Roman blinds
 DIY Roman blinds DIY Roman blinds
 This is what the wrong side of the curtain should look like:

How to sew different kinds curtains, watch video master classes.
The sewing of the curtain itself is finished. Now you need to insert slats and a weight bar into it and equip it with a lifting mechanism of your own making. And also make homemade cornice, on which our curtain will be attached.
For all this we need glazing beads for the slats, a block for the cornice, and for the weight strip I took a piece of cash:
Master Class. How to sew Roman blinds with your own hands from scrap materials. materials for lifting mechanism
 Master Class. How to sew Roman blinds with your own hands from scrap materials. materials for lifting mechanism
 It is necessary to cut 64 cm pieces from glazing beads, cashing and bars. 1 cm less than the width of the curtain.
For this I used a jigsaw:


First, let's make a homemade cornice. To do this, we cover the block with fabric. Hot glue and a stapler will help us with this:
Master Class. How to sew Roman blinds with your own hands from scrap materials. homemade cornice
 Master Class. How to sew Roman blinds with your own hands from scrap materials. homemade cornice


To the bottom edge covered with fabric glue the hard part of the Velcro tape with hot glue. To be safe, you can go around in several places with a stapler:


I attached fasteners to the back of our block so that the block could be hung on the wall. But this method is only suitable if your curtain will hang outside the window opening. To fasten the bar inside the window opening, it is better to use corners.
If there are men in the house, they will figure out how to do this:


That's it, our homemade cornice is ready. And we will attach our curtain to it with Velcro tape:

Now we insert the weight strip and slats into the curtain pockets:


This is what the curtain looks like from the inside out now:
DIY Roman blinds DIY Roman blinds
 DIY Roman blinds DIY Roman blinds
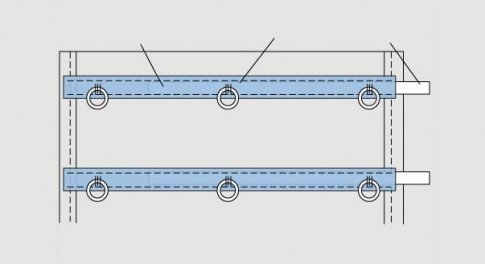
Now we place the curtain on the table face down and sew plastic rings in three rows to the pockets for the slats. The outer rows should be located at a distance of 2.5 cm from the side edges of the curtain:
Master Class. How to sew Roman blinds with your own hands from scrap materials. DIY roman blinds
 Master Class. How to sew Roman blinds with your own hands from scrap materials. DIY roman blinds


Layout of slats and rings on a Roman blind:

We place the curtain rod on the table and attach the curtain to it:


We turn the curtain along with the curtain rod with the wrong side facing us and on the curtain rod we mark the location of the iron lugs, which we will screw into the bar from its lower side to attach the curtain lifting mechanism:


For the ears, I bought these hooks at the store and bent them into rings with pliers:


There should be 4 lugs screwed in: three opposite the rings and one from the edge of the block through which you will remove the lifting bolt. I chose the right edge of the curtain.
Bar with screwed ears:

Here is a diagram for clarity, but there are only 3 ears on it:

According to this diagram, we will make a lifting mechanism for our curtains. To do this, take 3 pieces of cord. Each segment should be equal to: two heights of the curtain plus its width.
I took the cord I had. You can buy in the store in any other color:
how to sew roman blinds how to sew roman blinds
 how to sew roman blinds how to sew roman blinds
 We tie our cords to the lower rings.
We thread the cords to the top row of rings. You need to repeat this with all the cords. Then we bring the cords through the ears to one side of the curtain. In our curtain, we draw it to the right (from the inside to the left):


When all the cords are brought out through the last eye, we secure them together with a knot:


Then we continue to fasten our cords together, weaving them into a braid of the length we need:

I attached a ring from a round cornice to the end of our braid:

That's it, the curtain is ready:
Master Class. How to sew Roman blinds with your own hands from scrap materials. ready-made roman blind
 Master Class. How to sew Roman blinds with your own hands from scrap materials. ready-made roman blind
 Scheme of the finished curtain:

For clarity, I hung it on the wall, just like I sewed for a lesson:

I'll tell you about one more small nuance.
In order to fasten the curtain in a raised state, you need to attach to the wall near the window in a place convenient for you, a hook for attaching the cord, on which it will be wound in the position when the curtain is raised:

But since I didn’t have such a hook, I simply screwed a screw into the wall:


OK it's all over Now. Now you know how to sew a Roman blind with your own hands.
And this Roman curtain is sewn using the same technology, only a single piece of fabric is taken and the bottom of the curtain is decorated with a figured strip:

How to sew Roman blinds on a purchased cornice, see

Do you want to make roller blinds from wallpaper? Like these ones:

If you understand this master class, then you can easily sew a type of Roman blind - London blinds, which have the same lifting mechanism:

The principle of sewing such curtains, see.
I would like to draw your attention to some of the shortcomings that can occur when sewing Roman blinds.
Here is a photo of a curtain made by one of the visitors to my site for this master class:
 Cute curtain it worked, and the main goal was achieved - the room was darkened and there was no need to sew a curtain.
 However, when you lift the curtains, you get these uneven folds:
 This may occur because the thread tension in lifting mechanism miscellaneous. Or maybe the curtain just behaved this way when it was first raised. After sewing, you can hang the curtain, spray it with a little water from a spray bottle, lift it, lay the folds evenly and let it dry in this state. So the folds will accept the required form.
 And another piece of advice, do not attach the cord of the curtain lifting mechanism to the battery, as was done in this option:
 It’s not beautiful or convenient, especially since this is not just a master class. You have to deal with this inconvenience every day in your home.
 Sewing supply stores sell very nice and inexpensive hooks that are used for hooks. The price is reasonable - 30-50 rubles. And screwing it to the wall takes five minutes.
This is the hook I used to attach the cord of a Roman blind (color: silver, cost 40 rubles):
 Moreover, you can just make a few turns around it and not even tie knots, as shown in the photo with the battery. The curtain holds up perfectly and the cord does not unwind, despite the fact that it is heavy, double and made of curtain fabric on both sides:
ROMAN BLINDS AND TIPS FOR ITS MANUFACTURING OF SITE VISITORS WHO TOOK PLACE OF THIS MASTER CLASS:
Olga Sokolanski:
Today (03/29/14) I received an email from a visitor to my website:
Olga Sokolanski Here's what she writes:
"Good afternoon.
Thank you for the master class..
The windows of my apartment face west and in the summer the sun shines strongly and ordinary curtains are not suitable, and buying a good branded Roman blind is expensive for me.
I sewed a double curtain 140cm wide from cotton fabric that I found at home,
To reduce the weight of the curtain (due to the fact that the fabric is double and the curtain is wide), instead of glazing beads, I bought light and durable bamboo sticks, such sticks are sold in a flower shop:

In order for the wide curtain to rise well and fit neatly into the folds, I increased the number of lifting cords to five.
The curtain fits directly onto the cornice and to tighten it I sewed an additional drawstring and inserted a stick.
I calculated the number of folds and the width between them in my own way, guided by the length of the finished curtain and the number of sticks... according to this calculation: from the lower end of the curtain the distance is equal to half fold width, a Then I laid aside the full width of the fold.
Thanks to your master class, I finally managed to sew a Roman blind!!! Hurray!! and now in the summer my curtain will reliably protect the room from the sun!
I wish you great creative success."
I thought it wouldn’t be amiss to post Olga’s ideas in this article. Maybe they will be useful to someone.
And here is the curtain sewn by Olga:


Vorobyova Natalya:
Hello, Galina!
Thank you again for the master class! As promised, I am sending photos with a short description.


I really love designing various interesting things, so the need arose to sew curtains for the kitchen. The main difficulty was that the window sill is quite spacious and there are some household appliances on it. Therefore, for convenience, I needed some special option rather than simple curtains, and following your master class, I got such a functional and comfortable curtain.
I would like to note some points:
1. A huge question arises in terms of materials for the weighting material and strips. I used metal thresholds for the weighting agent (sold in hardware stores, they are used to join linoleum, I took 30mm wide). And as strips I used a cable channel, or rather it top cover, size 15 mm.

And today, November 23, 2014, another visitor to my site, Yulia Belyavskaya, sent me a photo of her work, which she completed in this master class. In my opinion, everything turned out very neatly and beautifully, in the spirit of minimalism. Such curtains emphasize the refined nature of simplicity and conciseness in the interior:

This is what Julia wrote to me in a letter with these photos:
Galina, I want to express my gratitude to you for the master class on sewing Roman blinds. THANK YOU!!! Everything is written out very clearly. I’ve been planning to sew it for a long time, probably about a year, but finally the Roman blind flaunts on my window in the kitchen :) I’m on the 4th floor, so the curtain is needed not to hide from prying eyes, but, as I wanted, translucent, for beauty. I sewed it single (since it is translucent), the slats were bamboo sticks from a flower shop (I took the advice of one of your students), I sewed the rings only in two rows (since the curtain is thin and narrow and I thought that this would be enough), My husband nailed the cornice bars directly to the window; I didn’t cover it, but I nailed Velcro tape directly to this cornice with tiny nails. Everything else is exactly according to your instructions. Thank you for your master class! Sincerely, Julia.
DIY Roman blinds Roman blind photo

I really liked this cheerful, flowery Roman blind made by Elena to match the curtains.
Thanks to all the craftswomen who share their works with all visitors to this site!
Well, in the end, I bring to your attention a video lesson on how to make an openwork lambrequin:
You can see how to make a roller blind
You can see how to sew a soft lift curtain (without slats)
If you want to perfectly master the technology of sewing various styles of curtains and lambrequins, as well as Roman blinds, then this will help you detailed video course » Sewing curtains and lambrequins. From simple to complex":

The video course includes 20 video lessons on sewing various styles of curtains and lambrequins, and these are very original elements, like a swag ear and a crossover with an overlap, sewing a lambrequin with swags with a vertical shoulder, as well as 14 ready-made patterns of those elements for lambrequins that were sewn in the video tutorials
<<<УЗНАТЬ ПОДРОБНЕЕ>>>
Curtains are a necessary functional element in the interior of any home. For a long time now they have become not only a necessity, but also important element in design. The wide variety of styles has led to the emergence of new fabrics and the sale of curtains that can satisfy the desires of any buyer. What to do if you want your own individual version or just want to make them yourself?
When sewing curtains with your own hands, it doesn’t matter whether you are an experienced craftswoman or just want to show your imagination and get creative. Do everything carefully, slowly, and the result will surprise not only you.
To create curtains, study the method of sewing basic options. Knowing them, you can choose the style and design you need and make your dream come true.

The lightest curtains
Of course, the simpler the design, the easier it is to execute. Sewing curtains with your own hands will not be a problem for the following styles:
· English;
· Roman;
· simple curtains with ties;
· lambrequin.

Browse the information on the request “do-it-yourself photo curtains” to choose options for beginners to start with.
List of required tools:
1. Machine.
2. Fabric and threads.
3. Pins, needles.
4. Ruler, centimeter, chalk.
5. Scissors.

Step-by-step instruction
You can start experimenting in the kitchen. Lightweight curtains with ties can be cute, but they won't be a hassle to care for or sew.

Follow these steps:
1. Buy fabric the width of the window opening. Length is at your discretion. Also buy a narrow satin ribbon and matching threads.
For the kitchen, it is better to choose a plain fabric made from blended or cotton fabrics. Natural fabrics create an atmosphere of airiness and lightness. Satin ribbon will play a decorative role. It is selected to contrast with the main type of fabric. It can be a combination of pink and gray, black and white.

2. Take a piece of fabric and lay it on flat surface. If there are any uneven spots, smooth them out.
3. Hem the top of the curtains, taking into account the width of the cornice.
4. Sew the side seams and gather them with thread. You will get about 6 stitches with 15 cm between them.
5. Hang the curtains on the curtain rod, check the length.
6. Turn over and stitch the bottom.
7. The curtains are ready. Add a couple of bows as ties and go for it!

Sewing curtains with a lambrequin?
Despite the apparent complexity, even a beginner can do such curtains. They perfectly complement the interior, making it rich and interesting.

1. Choose a material that can be different color and even from different fabrics. The main thing is that the combination of everything taken fits within the composition of the window and the room as a whole.
2. Having calculated required quantity fabrics for curtains; for a lambrequin, take into account about a sixth of the total length.
3. Calculate the width according to the width of the window. If folds are needed, increase the calculation for them and mark their location with tape. Don't forget about the hems (1.5 cm).
4. First, hem the top of the product, leaving room for the cornice (pocket) to be threaded through. Choose a reverse stitch for sewing.
5. The folds are secured with threads and ironed. The edges of the lambrequin are stitched until the folds are secured.
6. After the top seams, perform the side and bottom seams.
7. The finished product is decorated with fringe (for heavy fabrics) and ribbons, beaded chains (for light bases).

Roman curtains
Such simple curtains select to close the window. Fulfilling their main purpose, they are beautiful and easy to sew.
1. Measure the width of the window and add 10 cm to this value for allowances. The length needs to be added 24 cm.
2. When choosing a material, consider your taste and interior design.
3. Lay the fabric out on the table.
4. Mark the folds with chalk.

5. Sew the side seams.
6. Take the rail to which the curtain will be attached and attach adhesive tape to it.
7. Iron the bottom and stitch it.
8. Sew on the border for finishing.
9. Sew rings where the rail will be attached. Attach the curtain to the rail.
10. Pull the cord into rings, pull it well, and cut off the excess ends.

These curtains look quite nice and original. Add them to your interior, refreshing the room.
Nothing complicated, just get started!


Julia Pyatnitsa
How to sew simple Roman blinds?
Are your windows of such a size that it is difficult to fit standard store curtains? Dont be upset! It’s better to stock up on tips on how to sew curtains at home to get unique items decor that suits your home.
Types of curtains
Despite the fact that there is one basic principle on how to sew curtains, their methods differ somewhat depending on how they are attached to the cornice.
Simple curtain
A classic type of curtain that is easier to sew than others.
All you need is to prepare a piece of fabric the right size and finish it around the edges.
Loops and ties
Making a curtain with loops and ties is as easy as sewing a classic one.

If you want the product to stay on the eaves and not fall off, sew loops along the top edge, both with Velcro and solid ones. But curtains with decorative ties are easier to attach and remove.
Kuliska
Interesting design solution allows you to firmly hook the curtain onto the rod and protect it from falling - especially if you have cats at home.

Fold the top edge of the product, forming a wide loop along the entire length, and stitch. The curtain can be hung in place using the clips.
Eyelets
Thanks to this method of fastening, the product acquires soft waves. At the top of the curtain, make several holes at the same distance from each other. Machine them or insert metal rings.

Now you can choose any clamps that suit your interior for fastening.
Simple curtains: master class
Before you start sewing simple curtains, learn how to correctly determine the size of the future product.
The diagram shows the parameters for the fabric: the length of the curtains corresponds to the length of the cornice. The width of the canvas should be equal to the length of the future product from the place of fastening (cornice or hooks on it).

- On the reverse side of the fabric, draw a pattern for the product with double seam allowances - for a double hem.

- Cut out the workpiece, cutting off the factory edges - they tighten the fabric.
- Smooth the product with an iron - smooth fabric is easier to handle than with wrinkles and creases. In addition, this way you reduce the likelihood of sewing uneven side seams.
- Fold 1 seam allowance over the side and iron.

- Turn up the seam allowance a second time and start sewing - sew the seams with a simple machine stitch.

- Iron the finished edge.

- Immediately after ironing, walk along the edge with a cold object - glass, for example - this action will additionally smooth out the fabric after machine stitching.

At this stage, the product can already be used by hanging it using special clips or clothespins. If you want to attach the curtain with hooks, sew curtain braid with ready-made slots along the top of the product.
To learn how to sew classic curtains with loops, watch the following video tutorial.
Depending on your wishes, the loops can be sewn solid with both ends sewn in or with Velcro fastener at one end. These curtains can be used to decorate windows, doorways, or be used as a screen to delimit the space of small bedrooms.
DIY Roman blinds
This type of curtain is perfect for decorating windows in the kitchen, living room or bathroom of a private home, as well as an office.

To sew Roman curtains, you will need materials such as adhesive tape, 7-8 twigs made of wood, metal about 3 centimeters shorter than the width of the product, plastic rings - 3 for each pin, 3 long identical cords, 2 strips - for hanging and weights, hooks, nails.
- You need to sew a Roman style curtain starting with cutting. Measure the window opening and add seam allowances to get the width of the piece. The length will be equal to the length of the window or 5-10 centimeters below the window sill.

- You can use the following table to determine the number of folds and the distance between them, guided by the future length of the item.

- Cut out the product according to the finished parameters. With a simple pencil or use soap to mark the places where the pins and rings will be inserted.
- Cut out a piece of fabric. Process the edges of the curtains according to the same principle as in the previous master class.
- Secure the wooden cornice beam into window opening or above it - depending on how you want to decorate the window.
- Attach Velcro tape to the finished plank. Attach the second sticky part to the top edge of the curtain - this way you can easily remove the items for washing.

- Turn and stitch bottom part curtains, forming a loop into which you need to insert a weight strip.
- On the wrong side of the product, sew a wide braid at the levels where the gathering twigs will be located.
- Sew 3 rings to each braid. They need to be fastened so that all the rings of one row are clearly above each other.
- Attach the curtain to the beam using adhesive tape. Starting with the top ring, thread 1 cord through each ring - you should have 3. Secure the cords by tying them in knots on the bottom rings.

- Bring all the laces to one side of the curtain, threading them through the top fasteners.
The curtain must hang completely straightened, only then can you tie a knot of 3 cords at the top. Attach the lifting mechanism part to window frame or in the opening, wrap the cord around it and tie the knot again. Trim the uneven ends of the cord. With its help you will adjust the lifting height and the size of the folds of the Roman blind.
To learn more about how to sew a product of this type, watch the video.
Remember that all the twigs must be removed before washing the curtain, otherwise the material from which they are made will deteriorate: the iron in the water oxidizes, and the wood swells.
To learn how to sew high-quality curtains like a real professional, use the secrets of our work experienced specialists. They will show you little tricks of pattern, design and sewing.
- To sew a curtain for the bedroom, use light-proof fabrics, such as blackout, which will help you protect yourself from bright light and get more sleep in the early morning.
- After each action, check the products for creases and dents and remove them with an iron. It is possible to sew using wrinkled material, but this increases the chance of getting lopsided seams and fabric.
- When working on a pattern, consider the properties of each fabric. Some materials are stretchy, so the finished product may become shorter after the first wash or, conversely, stretch.
Curtains can be assembled by draping folds using clips, pins and clothespins. Make such a clip yourself, decorating it with an artificial flower made of cold porcelain, paper, and beads.
Take it for yourself and tell your friends!
Read also on our website:
show more
The magical place that gathers all the guests in the house must be perfectly decorated. The living room is the face of a house or apartment. And the curtains in it are a powerful decorative tool. Do not neglect the choice of this element; curtains can tell a lot about the owners and create a favorable atmosphere.
You don’t have to buy curtains; you can sew them yourself. For this not the easiest task, you need to decide on the type of curtains and fabric, choose the right color, prepare the material and then just sew. Different interior designs will have their own window decorations.
The type of fabric is selected based on:
- Living room volumes;
- Degrees of illumination;
- Interior style.
For modest-sized rooms, choose lightweight fabrics. If the room doesn’t get a lot of light or you don’t need to hide behind thick curtains from the eyes of neighbors, then just organza or tulle is enough.
For thick curtains jacquard, linen, velor, silk, satin, velvet are used. , will depend on your experience in cutting and sewing. Not all materials from this list are suitable for beginners to sew on their own.
- The length of the cornice (plus 6 centimeters for bending the sides);
- The height from the floor to the cornice (adding 10 centimeters for hemming if the curtains are long).
Tip: If you want drapery on your curtains, take three or two times the width.
Believe me, everything is much simpler than it seems!
Photos of curtains with a unique design, made by yourself
From beads  From scarves
  Cross-to-cross fastening
  Rainbow made of threads
  With lambrequins
  With buttons
Popular models and product designs
Several of the most popular types of curtains for the living room:
- Straight (with or without decoration);
- Thread curtains;
- "Bishop's Sleeves";
- French curtains;
- Austrian curtains.
Straight curtains look great in Country or Provence styles. On our own luxurious interiors It would be unnecessary to add lush or flashy curtains. Delicate or thematic motifs will be perfectly highlighted and emphasized by a straight curtain. It doesn’t have to be just hanging fabric; it can be complemented with lace, fringe, tassels, elegant tiebacks, and simple lambrequins.
With coming popular style hi-tech in interiors is gaining popularity filament curtains. Light and unobtrusive, they can highlight the main idea, or they can become a bright color accent. IN simple design Filament curtains also help to bring beauty to a room.
Tip: Try using threads for decoration. different lengths and textures, it will turn out to be an interesting design move.
Three latest models, created with your own hands, will fit perfectly into luxurious and expensive-looking rooms. Rigid lambrequins with straight curtains also fall into this category of curtains. These same types of curtains look great in a classic living room.
Photos of the indicated types of curtains for the hall, which you can sew with your own hands
Straight French Austrian Yarn Bishop Sleeves
Some important advice For needlewomen we will divide them into sections.
Working with material:
- Silk and satin are the most difficult materials for needlework, especially in large quantities, do not use them if you are sewing for the first time.
Product color:
- The warmer and lighter tone curtains, the wider the room will appear;
- Cool shades of blue (lavender, violet, blue) will help add depth.
Materials and interior design:
- Suitable for classic curtains: silk, velvet, etc.;
- Linen is suitable for ethnic and eco-style;
- Provence is perfectly complemented by cotton, linen, synthetic fabrics with imitation of rough textures, weaving, natural fabrics with floral patterns;
- In high-tech, in addition to thread curtains, light materials (organza, brocade, veil) are hung.
Directly sewing curtains:
- If in the process you will stitch two fabrics with an ornament, then you need to purchase fabric with a margin in order to evenly match the pattern;
- To make it easier to work with the fabric, you need to wet it, dry it and iron it.
Stylish curtains in classic color scheme in the living room interior

Patterns
Option for sewing a classic curtain:
- Hem the sides. We bend the fabric on the sides twice - the first time by 1 cm, the second by 2 cm. Sew.
- Hem the bottom. In the same way, but with turns of 3 and 5 centimeters.
- You need to bend the top 3 centimeters and iron it with an iron.
- We attach the braid to the ironed seam with pins, stepping back from the top edge by a centimeter. Length curtain tape 5-6 centimeters more than the width of the curtains.
- The edge of the braid on the wrong side must be pulled through, pulled out and tied. One seam allowance is folded inward, the second is not. It will mean the front side.
- Sew the braid along the top and bottom edges. The edges that have been folded are also sewn on. Only the laces are left on the front edge.
- We tighten the laces and form a gather on the curtains.
A way to make thread curtains with your own hands:
- We take the rail and required amount decorative threads.
- If the threads are attached directly to the cornice, then each thread should be twice the length. The thread is folded in half, thrown over the cornice and secured with a loop.
- If the threads are attached to rings or hooks, then you need to add a few centimeters to the length of the single thread to attach to the ring.
- We fasten the threads every 2-5 millimeters.
- To prevent the thread from moving along the rail, you can secure it with glue.
Below are useful patterns.
Probably nothing warms the soul of a housewife more than beautiful things made with her own hands. With all their appearance they say: “How smart you are! And a needlewoman!” What is the first thing that catches your eye in an apartment? Of course curtains. And in order for them to turn out really beautiful and of high quality, you need to know some subtleties. Moreover, knowledge of these subtleties does not guarantee that the curtains will fit perfectly into the interior. Therefore, I decided to do a mini-research and collect in it everything that could be useful in preparing for sewing and directly when sewing curtains.
Having started collecting material, I understand that it is impossible to get by with just one post here. Therefore, I am starting to publish a series of articles under a general title. All pictures are clickable.
In the first part:
- what is it called
- types of curtains
- styles
Moreover, I would like to immediately note this feature: the type and style of curtains do not always match. For example, you can sew Roman curtains in an ethnic style or Austrian curtains in Provence style.


First, let's decide on the style; it consists of several components: the size and shape of the window, general style interior, yours taste preferences. To understand all this you need to know some concepts.
CURTAIN on Wikipedia - the general name for household functional and decorative window curtains made of fabric materials. Curtain (French store) in a particular case is a window curtain that can be pulled apart or raised upward.

CURTAIN(from the French Portiere, derived from Porte - “door”) in Wiktionary - port-tiere-ra. 1. a curtain (usually made of heavy fabric) on doors or windows; this term is used to refer to thick, heavy (lined) curtains.

CURTAIN(from German Gardine), according to the Yandex dictionary, is a curtain made of heavy fabric for an alcove niche, etc., and Wikipedia believes that there is an idea that does not correspond to the norms of the literary language that a curtain is a massive stick on which a curtain is hung. And a curtain (Dutch Gordijne) is actually a soft curtain made of thin transparent fabric (tulle, organza, veil) that covers the window completely or partially.

All curtains consist of elements that form one or another style.
(from the French Lambrequin - decoration) - decoration in the form of drapery, which is placed in front of curtains or soft curtains and gives the window a decorative completeness, has many types and subtypes, comes in soft and hard forms;

directly a curtain or curtain placed behind a lambrequin;

A part made of fabric or other material for fixing curtains or drapes in the required position comes in several types;

A method of processing the back side of a curtain or lambrequin to give best view, to hide raw cuts, as well as for color (decorative) support of some interior elements;

TYPES OF CURTAINS:
All types reflect the style of the era and place of their origin.
— are a single-color fabric, gathered into uniform vertical folds along the entire length, creating a unique ceremonial atmosphere, installed on a rail cornice or on a cornice with a special lifting mechanism.

- just like French ones, they are horizontal folds of fabric gathered along the lower edge of the fabric. The curtain fabric can be fixed assembled, or hung unraveled. In these curtains, cords and special loops are sewn on the wrong side of the fabric, with the help of which you will get beautiful scallops when pulled together and soft folds along the bottom of the curtain when unraveled. An Austrian curtain made of thick fabric will create a cozy classic atmosphere, and a light transparent fabric will create a romantic atmosphere. In addition, the Austrian curtain can hang either independently or with a lambrequin. Despite all their luxury, curtains take up little space, making them suitable for rooms with limited space. For installation, a special rail cornice with a device for fastening cords is used. 
The curtains are distinguished by their original fastening - the fabric does not move completely apart, and the tiebacks are in a higher position. The curtains are gracefully supported diagonally by cords that are attached to the outermost parts of the cornice and create a beautiful silhouette of the window. This type of curtain looks good in narrow window openings and visually increases the height of the window. For Italian curtains, use a standard cornice with a rail or a curved cornice, which will ideally emphasize the arched shape of the window. 
Roman curtains - their original purpose is to protect the room from prying eyes and unwanted flow of light. The design of Roman blinds consists of horizontal folds, assembled by rigid slats sewn in or attached to the back, moving with the help of cords and rings sewn onto the fabric. Curtains are universal and can be an element of an interior decorated in any style. 
Crossed curtains are formed from two panels crossed along the top edge and attached to opposite sides of the window.

Roll (roller) curtains - are wound on a roller attached to the top of the window. Ascent and descent roller blinds it is controlled by a spring mechanism that fixes the curtain in the open and closed position, or by a rotary-chain mechanism that allows the curtain fabric to be raised or lowered to the desired level. Can be with left-handed or right-handed control mechanism. The advantage of these curtains is the ability to use fabrics with dust-repellent impregnation and varying degrees of light transmission. The fabric can be easily replaced without changing the mechanism itself. Curtains can be used on their own as a focal point, or used as a functional element in combination with curtains or tulle. 
Curtains pleated- the simplest of all existing curtains, but no less functional. They optimally distribute the light flux and combine, on the one hand, the clarity of lines, and on the other, the warmth of the fabric. Using side controls, they can easily be folded like an accordion to the required position. The use of dirt-repellent and sun-protective fabrics allows them to be placed in places unfavorable for ordinary curtains, in the bathroom or in the garage; they are indispensable when decorating inclined and skylights, on the windows non-standard shape(arched, triangular), since due to their plasticity they repeat the shape of the window opening. 
Japanese curtains - several solid, absolutely smooth canvases moving to the side, like a screen. There are rigid inserts at the top and bottom that prevent them from folding. Windows differ from other types of decoration in their minimalism, restraint and conciseness; they are best suited for spacious rooms with large windows. They can also be used as a partition screen that divides a room into several zones. Another plus is that such a curtain hardly collects dust. Any fabrics can be used. 
Panel (screen) curtains resemble a screen and look very stylish and laconic. Any fabric is stretched onto special frame fastenings, and the panels themselves can easily move in the plane of the window, locking in any required position. This mechanism can also be used not only to decorate windows, but also to create decorative partitions in room. For these curtains, only natural materials are used - hemp fabric made from tree trunks herbaceous plants, bamboo stems, cotton and silk fabrics with the inclusion of fibers obtained from palm leaves as an accent. 
Curtains on eyelets and loops- soft, straight folds formed using eyelets - great way show the beauty of the fabric. 

curtains are universal in use, light and practical, made from bamboo sticks sewn together. Cord control system: the curtain smoothly folds down “wave by wave” and is assembled in a similar manner. 
CURTAIN STYLISTS:
- involves the use of colorful national motifs of Arabs, Scandinavians, Indians, Africans, Japanese and other peoples, which are reflected in the interior. Ethnic style is divided into many segments. 
East style- a symbiosis of two eastern cultures: Arabic and Asian, bright, multi-colored fabrics of rich, deep colors, abundantly embroidered with beads, shiny beads and cords. Light chiffon fabrics combined with heavy cords and tassels will add an oriental flavor. 
Japanese style- minimalism, conciseness, restraint. Curtains can take the form of partitions, panels and screens. They can give a home in a minimalist style a discreet, laconic look. It is very easy to care for such curtains, and their choice of possible colors is very large. 
Scandinavian style- only light colors. Real curtains in Scandinavian style have a simple cut and natural color, are sewn from thin linen, translucent cotton, silk, muslin, muslin, and any light fabrics of satin and damask weave. They do not take up living space and soften the geometric shapes. 
RURAL (VILLAGE)- includes several directions united by natural fabrics, memories of summer and a bias towards nature. 
- cosy country style, which is characterized by cheerful colors, can be easily emphasized using linen or any other rough fabric with a checkered, polka dot or natural colors. You can add old buttons, stripes, stitching, ribbons from natural materials. Curtains in country style have a light style, their movement will evoke the thought of the pleasant smell of freshly cut grass and vacation... it is assumed to use two panels that can have tiebacks and be united by a lambrequin. The style allows you to decorate windows with homespun fabric or mesh. Curtains created using the patchwork technique look original.

- combines calm and soft colors of Mediterranean nature: white, pistachio, blue, wheat, pink, lavender. All pastel colors have a calming effect, giving a feeling of summer warmth and fresh field air. General trends are maximum lightness, simplicity, absence of elaborate details and a certain color scheme. The fabric used is light and airy (voile, organza and tulle), since these curtains should create the impression of air penetration into the room. 
- classic curtains consist of tulle and curtains, if you choose interesting fabric and with a little imagination you can achieve interesting effects. Considering the purpose and origin of this style, silk, velvet, taffeta and lined fabrics are used for curtains. Tiebacks, tassels, lambrequins and decorative cords are used here. With the help of beautiful drapery, curtains radiate solemnity and self-sufficiency. It also includes several subtypes that can not be used in every room, but only with high ceilings. 
French- heavy, dense fabrics - velvet and velor, dark, rich colors, large floral and plant patterns. Designed to emphasize the luxury of royal chambers, theaters and rich mansions. This style must be accompanied by rich antique furniture. 
Palace style- this style was most popular back in the 17th century. Then it was used to decorate palaces and houses of other nobility. Nowadays, this style has also retained its popularity; it differs from the French only in the use of gold-like decor and finishing. 
— the style is characterized by the use of lambrequins of a complex and rigid design, which are decorated with applique or embroidery in the form of fantastic flowers and leaves, and luxurious golden tassels that enhance the splendor of the composition. The fabrics used are dense, rich colors, matte or with a satin sheen. 
TO classic style can also be attributed English, Austrian, Roman- named after the method of manufacturing and fastening curtains and the surrounding environment corresponding to the style.
MODERN (MODERN)- may be well suited for those who are used to surrounding themselves with bright colors and bold combinations. But there is a small catch. Here you need to think through every detail to create a complete image. If you cannot choose the shape, fabric, fittings and color of the curtains in accordance with your interior, then no matter how skillfully the curtains are made, they will look ridiculous. 
- the style is the most daring, since it is customary to use a simple cut, and the effect is achieved through fabrics with a non-standard texture and decoration details. 
VINTAGE (RETRO)— things from the attic have found a second life: furniture is restored while maintaining obvious signs of time: cracks, abrasions, chips, scratches. Velvet, old-fashioned curtains, reminiscent of frames from an old movie of the last century, are taken out of the chests and knocked out of the dust. Treated with braid with bombs or tassels. 
— a combination of incompatible things is the essence of this style. If you manage to combine the two different styles— the uniqueness of the interior is ensured. The rule here is pomp multiplied by minimalism, pretentiousness is combined only with simplicity. An eclectic style can set the tone for the design of the entire room. If you are stuffed with ideas like a magic pot of porridge, then it is the eclectic style that will give space for activity. Any decor, in any combination - the only limitation can be the ability to sense the line beyond which bad taste begins.

I hope this information gives food for thought and when the next post comes out, you will already have an idea of what type and style of curtains you want to sew. Next time:
The materials were collected from open sources, systematized and described by Angelina Vine.
 (1 ratings, on average: 5,00 out of 5)

