How to make a tree stump with your own hands. Crafts from hemp: the best projects for the garden. DIY stump chair
Is there an old stump? You don't have to get rid of it right away. If desired, if you have free time, some practical skills and of course suitable tools, an old “poor” stump, can be turned into a real work of art. From wooden stumps you can do a lot of useful things.
Wood Stump Ideas for Home and Garden Decor
Let’s look at specific examples to see what this looks like in the end.
Wooden stump stools
Garden stools made from stumps.
Wonderful garden stools made from stumps with bright soft linings will definitely be useful to hospitable summer residents and will provide guests comfortable places for outdoor recreation.
Candlesticks made from stumps
Bright candlesticks made from saw cuts.
From saw cuts of small diameter, painted with a special glossy paint, you will get stunning candlesticks that will become original decoration coffee table, window sill or fireplace.
Flowerbed from an old stump
Flowerbed in a log.
An amazing flower bed that anyone can make from any dry log will become a real highlight of a country plot.
Stump cabinet
Cabinet with space for books.
A small original stand made of a stump with a hole for books in the center will fit perfectly into the interior of any home and become its stylish detail.
Mobile stands
Charming mobile stands made from tree stumps.
Wonderful carved cabinets on wheels, made from carefully stripped and lightly painted stumps, will become original and practical details in any modern home.
Armchair
Chair-chaise lounge made of birch logs.
A very unusual chair, made from small-diameter birch logs, will become a unique detail in a city apartment or a comfortable lounge chair for relaxing outdoors.
Bench
Bench made from logs.
A wonderful little bench made from several wooden log houses and decorated decorative pillows, will become an unusual detail of the interior of a modern city hallway.
garden path
Garden path made from saw cuts.
Wooden saw cuts can be used to make original garden paths, the creation process of which does not require special physical effort or expense, and final result will please you for a long time.
Lamp
A unique lamp made from saw cuts.
A magnificent lamp that you can make yourself from wooden cuts and a vertical lamp will become a real highlight of any space.
Fence
Log fence.
A large number of wooden logs can be used to create a beautiful and reliable fence that will protect the area from prying eyes and become a worthy decoration.
Garden set
Large table and stools made from stumps.
Huge dinner table, made from solid wood, and many stools made from stumps, will become wonderful solution for arrangement dining area on backyard, where large companies often gather.
Wine stand
Table stand for bottles.
A wonderful tabletop stand for wine, which you can easily make with your own hands from a small, pre-cleaned and varnished wooden frame.
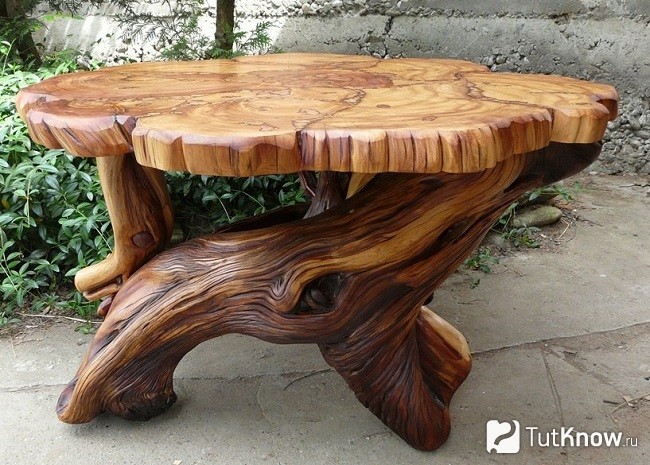
Coffee table
Coffee table made of tree stump and glass.
Amazing coffee table, which can be made from a massive stump and a round glass tabletop, will fit perfectly into the interior of a modern living room.
Mini bar
Mini bar and cabinet made from stumps.
A stunning minibar and kitchen sink cabinet made from stumps will become unique details in any kitchen.
Stump pot
Miniature pot for succulents.
Small wood cuts and succulents can be used to create unique decorative compositions, which will become charming details of any space.
Bird feeder
A small bird feeder in a wooden frame.
Small wooden log houses can be used to create creative feeders that will decorate trees and attract birds to the site.
In your garden plot you can find many stumps from trees that have dried out or fallen from the wind. It takes a lot of effort to uproot a stump and free up space, but don't rush to get rid of the snag. A dacha is a space for creativity, so many amateur gardeners have already found a use for stumps sticking out of the ground. In this article, we decided to offer several ideas on what you can make from stumps with your own hands. Photos of wooden ones will inspire you to create creative products that will decorate the landscape.
Furniture made from stumps and snags
In addition to plants and garden path There is a place for rest on the garden plot. Garden furniture must be durable, stable and withstand aggressive influences environment. Wooden garden furniture has enough high cost, so it’s best to do it yourself.
 If you have a large stump in your garden, try cutting it into a comfortable chair. Depending on the size of the hemp, the chair will be either for an adult or for a child. Using a chainsaw it is easy to cut out the seat, backrest and even armrests. You can also use the stumps themselves as a place to rest. If necessary, they should be treated with sealants and painted.

A snag from an ugly and crooked piece of wood will turn into original decor. A large piece of driftwood can be used as a table leg and to decorate chairs.

Sanded and varnished driftwood will add zest to any room.
 Here's another photo original furniture from snags and stumps:

If you have wood carving skills, the stump will become a beautiful flower stand in a matter of minutes.
 Carved figures with pyrography effects will decorate any area. To make a flower pot from a stump, you need to cut out the entire middle of it and fill it with soil.
 Depending on the size of the stump, you can plant different quantities plants and make an original flowerbed with your own hands.

Do you want your garden to be decorated with beautiful decorative figures? Take an iron bowl, paint it with enamel - this will be the mushroom cap.
 Now put the hat on the stump and it will turn out. The stump will be a good basis for sculpture, the main thing is to show your imagination.
 A small selection of photos of crafts made from stumps and driftwood

Such houses will not only decorate your garden or summer cottage, but can also become an excellent home for birds if they are placed a little higher.
 These crafts can scare away unexpected birds from the garden and attract the attention of guests with their originality and beauty!
 It’s better not to joke with these menacing stumps...
 And this one just lay down and rested for himself... one might say it opens the beach season.

Watch a useful video: crafts from stumps and snags
Wood is a valuable material for decoration, so don’t rush to uproot the stumps, try to give them a second life.
I found a simply wonderful, in my opinion, idea that makes it very easy to make unusual flower pots in the form of stumps. You can plant a plant in these “stumps”, or you can simply use them as decorative element in the green corner of your room.
To make the stumps, we will need:
- newspapers;
- wallpaper glue;
- glass jars;
- water;
- black and light brown gouache;
- wide hard brush;
- water.
Tear the paper into small pieces. We need the pieces of paper to come out in a variety of shapes with torn edges, so we don’t use scissors.
While the glue is cooling, let's start making “knots”; to do this, cut out a long, wide strip of paper, then bend it several times lengthwise to form a strip consisting of several layers, and twist it. Glue it so it doesn't unwind. Cut one of the ends of the “knot” obliquely and attach it to the glass jar using tape. The “knot” should “look” up.

When the glue has cooled, you need to mix it with pieces of paper, mix thoroughly to obtain a homogeneous mass of medium consistency (not liquid). If you have poured too much glue, try squeezing it out slightly.

Now spread this mixture onto the walls of the jar, spreading it over its entire surface. Using your hands or some other tool, try to outline the bark to make the stump look more natural. The lid of the jar must be decorated in the same way. Next, the jar and lid must be left to dry for several days.

When the papier-mâché is completely dry, cover it with a layer of black gouache. After the black paint has dried, the stump needs to be covered with light brown paint, but do not paint over its entire surface, but treat the stump with short strokes so that some of the black paint remains visible.

That's all, now you can plant a plant in the stump or come up with another use for it.

Rutarium will allow you to make furniture for your dacha out of driftwood and stumps. You can also make flower beds and sculptures with your own hands from these materials.
Rutariy - interesting direction V landscape design. It will help turn the cottage into an extraordinary corner. Stumps, various snags, and old wood are suitable for this.
DIY crafts from hemp
If you got a plot with a tree root system and its low aboveground part, do not uproot this element. To make crafts from hemp for summer cottage, you will need:
- stumps or one;
- colored wood chips;
- antiseptic;
- stones;
- flowers;
- the soil;
- brush.

- To make a stump craft last as long as possible, remove the rot from inside. Dry this inner hole. Remove the bark from the stump.
- Paint this one natural element wood outside and inside with two layers of antiseptic. When it is completely dry, you can start decorating the flower girl.
- Pour fertile soil inside the stump and plant low-growing flowers. Mulch the surface with regular or colored wood chips. Place stones next to the stump.

Instead of stones, you can use inverted glass or plastic bottles. The necks of the latter are cut off.
If you don’t know how to decorate the northern part of the territory at your dacha, then place the rutarium here and plant shade-tolerant flowers in it.
Not only hemp, but also all kinds of driftwood are suitable for the device.

If you have had an unnecessary log lying around for a long time, saw through the top, remove some of the wood, and remove the bark. Also treat the surfaces with an antiseptic, then add fertile soil and plant unpretentious plants.
Take a closer look, maybe the snag found in the forest resembles someone? In the photo she looks like a fairy-tale dragon, you just need to work out the details so that they become obvious. To do this, use a hatchet, hacksaw, and wood carving tools.
Crafts made from driftwood can be not only in the form of flower girls, check out the following ideas.
How to make garden furniture and wooden sculptures?
Look at the results the craftsmen achieve. Having outlined some details of the silhouette, you can make such a snowman or a good-natured Leshy.

To make this type of chair, take:
- driftwood;
- board;
- rope;
- stain;
- wood varnish for exterior use;
- brush;
- self-tapping screws;
- saw.
- To make the chair reliable and stable, choose only strong, not lightweight driftwood; oak is perfect.
- Saw off the parts that will turn into legs. The two front ones are short, the back ones together with the back are long. Make a base for the seat, place a couple of boards here, and attach them with self-tapping screws.
- Make armrests from durable driftwood, secure them with self-tapping screws and rope. For the backrest, take a reliable crossbar, which is fixed in the same way. Two small driftwood are attached vertically to the center of the back.
- All that remains is to cover the chair with stain; when 2 layers are dry, apply three layers of varnish with intermediate drying.

If you want to emphasize the natural structure of the wood, then do not coat it with varnish, but just go over it with an antiseptic, or transparent. Look what wonderful chairs you can make from stumps. The table is made from the same blank, only the tabletop is attached to the top.

Here's what you can make from a large stump by sawing it off top part. Then the thick, intricate driftwood will turn into table legs.
A bench made of wood will also turn out to be unusually interesting, delicate and even fabulous.
To do this, take:
- two strong boards, preferably floorboards;
- driftwood;
- self-tapping screws;
- wood glue;
- antiseptic;
To securely connect them to the legs, attach driftwood here using self-tapping screws. Additionally, they can be fixed using pins by cutting out two connecting elements holes of the same diameter into which glue is poured.
In the same way, fix the back, consisting of many driftwood. Sand some elements if your design idea requires it.

You can create a massive sofa using almost the same type. But its legs and base are logs.

You can leave the product as is or paint it with varnish, it also turns out very beautiful and unusual.

Not only will the old tree come out individual items, but also a whole set. Covered with antiseptic and varnish, it will be able to stand outdoors in the air.

On such country furniture It’s so nice to sit in the shade, eat food here, and have holidays.

If you use golden varnish in a spray can to decorate furniture made from driftwood, you will create, for example, a chic bench that will look like an antique one with a copper tint.

If you only have an old stump, remove the bark from it, take out the dust, prepare it as described above, put it on top strained glass, you will get a wonderful wooden table.

He may come out different. If you have a longitudinal cut of wood, process it, attach the legs from below, and place glass on top. Instead, you can make a tabletop from.

Rutarium made from driftwood: master class
We continue the topic of how a rutary is created. To make the crafts come out beautiful, you first need to prepare the driftwood. For this you will need:
- soda ash;
- laundry bleach;
- iron brush;
- Plastic container;
- sandpaper.
- Pour into container hot water, if it has a volume of 10 liters, then add two glasses soda ash, stir. Place driftwood here. To prevent them from floating, place weights on top. These can be plastic cans filled with water.
- After two days the wood will soften, then clean the surface with a wire brush. Since the wood will be of uneven color at this stage, wash the workpieces. Pour 10 liters of water into the same 10-liter plastic bowl and add one and a half cups of bleach. Place the driftwood here for two days.
- After this time, place them in the sun for 3 days. Then, using sandpaper, you need to sand the uneven areas.

Now you need to fold these blanks so that, if desired, you can use them for crafts, for example, make such a voluminous star.

For it you will need:
- plywood sheet;
- jigsaw;
- driftwood;
- hot glue;
- star template.

Sawing down pieces of driftwood required length, glue them to the star, starting from its outer edge.

Then, gradually move towards the center, try to cover all the plywood with lumps.

Wait until the glue cools down and cover your work with spray paint of the desired color. The silver star looks great.

A door is perfect for such a craft made from driftwood. country house. Attach finished work here so that the star decorates the building. You can make another rutary.
Look what a wonderful wooden shelf you can make.

For it you will need:
- strong driftwood;
- rosewood varnish;
- iron brush;
- construction hooks;
- corners;
- brush.

If you want, you can cover the hooks and corners with gold paint, when it dries, use these elements.
Screw on construction hooks to hang mugs or wine glasses on. Attach the driftwood shelf using metal corners to Wall.

Driftwood makes wonderful things not only for the street, but for the home. Watch the following master class, from which you will learn how to make a flower stand with your own hands. For this creativity you will need:
- small log;
- snag;
- shells;
- leg-split;
- river pebbles;
- hot glue;
- self-tapping screws;
- saw.

First you need to prepare the wooden parts. To do this, remove from wooden log bark This must be done extremely carefully so as not to injure your hands.

Saw circles about 5 cm thick from the log. You also need to remove the bark from the driftwood. If this workpiece is not of the correct type, then bleach it in the same way as described earlier.

While the driftwood dries, you will have time to decorate the flower stand. On lateral surface Glue the rope around the top and bottom using a hot gun. Using it, attach pebbles and shells. Paint the surface with varnish in 2 layers.
In the same way, decorate other pallets where the plants will stand, including the largest one, which will become the basis for the flower girl. Attach a piece of driftwood to it, and attach circles to the tops on which the flowerpots will stand.

Also paint the driftwood with varnish in 2 layers and let it dry. You can decorate the flower stand with artificial greenery.

In some places, glue shells with hot glue, you will get a very beautiful picturesque stand.

DIY rutary in the city
If you don't have personal plot, you live in the city, trees were cut down here, interesting snags and stumps remained from them, then you can decorate your yard using this idea. To implement this idea you will need:
- stumps and snags;
- dye;
- tassels;
- seedling;
- fertile soil.

If it is difficult to remove the middle of tree cuts, then just paint them; for others, remove this middle part, fill it with earth, and also paint these blanks so that they look more positive. In this case, you can use not only White color, but also any others.
Make a kind of well from the branches of cut trees, placing four in a row. Also add soil here and plant flower seedlings. If there is little sun in the yard, then use shade-tolerant plants, for example, hosts, vines, ivy.

If you have a lot of driftwood, you can make interesting sculptural compositions out of them. For example, these horses.

If you know how to carve wood, then try making a rutary with a sculpture of a funny person.

DIY wooden figures
They can also be made to decorate a yard in the city or country house. Such a rutarium looks great, adds individuality to the site, it is clear that a jack of all trades lives here.
If you want to know which wood is best to carve a sculpture from, then check out the following information.
- Lipa is one of the best materials. This wood cuts softly and easily. The structure of this tree is light, it almost does not warp or crack.
- Aspen is also easy to process. Products made from it don’t even need to be varnished, then after time they will have a beautiful silver color. But crafts made from such wood are prone to chipping, so it is used to create large sculptures.
- Alder lends itself well to carving and processing, and is resistant to cracks. Therefore it is also excellent material. Take this into account when you do rutaria on the site.
- If you want to make elements of fine art here, use walnut, it is very decorative, does not warp and is resistant to chips.
- Birch is not processed so well and warps. Therefore, if you want to carve wood, use this to create small parts and souvenirs. But birch is well painted and has a beautiful relief.
- Large carvings can be made from oak and will be durable. But such dense wood is difficult to cut, so you will have to make an effort or use an electric tool.
- Large ones include an axe, a hacksaw and even a chainsaw.
- Using cutters with a blade width of 1.5 cm, you can cut out small elements that are in hard-to-reach places. There are many cutters, each designed to perform a specific function.
- The adze is suitable for initial processing of small parts.
- Knives, jambs and chisels are also used for wood carving. The latter perform any notching and are intended for working out details. Cutting edge may be of various shapes.
- The Bogorodsky knife is perfect for carving sculptures from wood. It is named after the village where such work has long been carried out.
- A drill is suitable for drilling holes.
- To make the surface of the product smoother, use a rasp, grinder and sandpaper.

The photo shows how wood carving is done. You can see the stages of creating a sculpture from this material using the example of carving a bear.

This is preceded by the following work:
- creating a sketch on paper, it needs to be drawn from different angles;
- then this sketch is transferred to a workpiece, for which it is best to use a rectangular block;
- if you want to avoid mistakes when cutting a sculpture from wood, then first mold it from plasticine or clay and make adjustments;
- Now you can move on to rough cutting, which is carried out using a hatchet or saw;
- you will create small details using an adze;
- and a cutter and chisel will allow you to cut off excess corners.
Next, the details of the nose and sternum of the bear are worked out. Then he will acquire ears, front paws and hind paws. At the next stage, they are designated more clearly, and a stand for the wooden sculpture also appears.
For the next step, you need to use chisels, a Bogorodsk knife, shoals that will help make the facial features, bear claws, and fur more realistic.

On final stages You will need to sand and polish the wooden sculpture, then cover it with stain and varnish. You can use special wax.
If you want to see how a bear is carved from wood with a chainsaw, then refer to the next master class.
If you want to know what a rutarium at your dacha could be like, then turn on the following video material.
Another one will clearly show how you can decorate your yard using cut down trees.
I have a new doll! New Baba Yaga. It's boring to send her to new house on a prosaic mortar. New Yaga wanted to sit on a real forest stump.
1.
So what do we need!
1. Cardboard (well, what was it, sorry).
2. PVA (where without it), “Moment Crystal” (a few drops).
3. Scissors.
4. Toilet paper is the cheapest (0.5 rolls).
5. Acrylic paint.
6. Threads (I have wool about 1 meter).
7. Acrylic putty (optional).
There was no corrugated cardboard, so old box will come in handy. We decide on the size of the future stump. I am 16 cm tall so that Baba Yaga can sit comfortably. The length of the cardboard is 42 cm + 2 cm for the hem at the top + 2 cm for the hem at the bottom.


Using scissors, we cut the cardboard along the corrugated cardboard wave (not through one side) for the convenience of bending the cardboard into a cylindrical shape. At the top and bottom of the stump we cut the edges into a triangle and hammer it inside the resulting cylinder.

We seal the part of the cylinder that will be cut back with cardboard in the shape of a stump. The bottom of the stump has the remains of a stumpy root, so we glue cardboard to the bottom that resembles a projection of a flattened root.


Now the fun begins! Relon comes into play toilet paper. Dilute PVA glue with water in a ratio of 1 hour. glue and 2 hours of water. We tear off about 20 cm of paper from the roll, crumple it into a voluminous rope, dip it in liquid glue and apply it to the future stump with vertical “sausages”. These will be the future irregularities of the bark.


At the roots of the stump, the “sausages” will be more powerful and voluminous.

Let it dry thoroughly. We are looking forward to the result. The battery dried out overnight.

The next day I applied it diluted in water to the stump acrylic putty and applied it in a thicker layer to the upper cut of the stump and scratched the emission of annual rings with a stick. I think that the putty was unnecessary, it could have been done simply acrylic paint(one thin layer) and it’s easy to mark the rings when painting.
 (1 ratings, on average: 5,00 out of 5)