How to make beautiful jewelry from epoxy resin. A frozen miracle with your own hands: learning to make jewelry from epoxy resin. DIY resin products: how to prepare resin
Epoxy resin is in great demand among jewelers. This material is excellent for making brooches and bracelets, pendants and pendants. Transparent plastic mass is ideal for self made, and everyone can learn how to make jewelry. Jewelry resin in its finished, frozen form imitates glass, crystals, gems, looks elegant and original.
Description of jewelry resin
Epoxy resin - modern polymer material, actively used for construction, installation work, as well as castings of haberdashery, jewelry, and household products. Epoxy is very popular in handicrafts; it allows you to create real masterpieces with your own hands.

In appearance, jewelry epoxy resin is clear liquid with a rather thick consistency. This is a two-component product; it consists of the resin itself and the hardener. The latter is the most important component that triggers the polymerization (hardening) reaction. Without a hardener, the resin remains fluid, only this substance gives it certain properties. Here are the main ones:
- resistance to ultraviolet radiation, moisture, household chemicals;
- strength, lack of response to shock, vibration;
- heat resistance.
Before polymerization begins, various dry fillers can be added to the mass - for example, dyes, modifiers, plasticizers, wood chips or cork. They change the properties of the glaze in the right side. The hardener is added strictly in a certain proportion with the resin. Typically the ratio is 10:1 or 8:1, but may vary depending on the specific brand.

You can purchase transparent jewelry resin at any building materials, repair, arts and crafts store. It is quite inexpensive in cost, easy to use, and final result always makes me happy. Domestic brands are cheaper, but have excellent quality. Foreign jewelry resins are most often equipped with additional accessories - gloves, cups, mixing sticks. Sometimes the kit comes with molds - forms for pouring epoxy. It's better to buy quality material, otherwise it may turn yellow and cloudy over time.
Precautionary measures
When working with resin, safety precautions must be strictly observed. You need to immediately buy personal protective equipment:
- respirator;
- gloves;
- apron;
- protective glasses.
Do not work in an unventilated area. If there is not enough ventilation, you will have to breathe fumes, which is harmful to the body. Vapors may cause an allergic reaction and irritate the respiratory tract. The strong chemical smell is unpleasant, although some expensive brands of epoxy do not smell as bad. After curing, the epoxy resin is completely safe; various rings and brooches can be given even to children.
If resin or hardener gets on your skin, immediately wash the area with soap and then plenty of warm water. Epoxy should not be used on products that come into contact with food. When polishing, you should also wear a respirator - this way the smallest particles of the substance will not enter the respiratory system.

Working with jewelry resin
Costume jewelry is the most popular area for using epoxy among needlewomen. In order to make jewelry, you need to purchase the appropriate molds. This is the name for pouring molds that are made from silicone or other materials. They are easy to use and the finished product can be easily removed from them.
When working with resin, you must strictly observe the temperature regime. The polymerization reaction proceeds with the release of heat, and the epoxy heats up to +60 degrees. When overheated, it deteriorates irrevocably.
Preparation of the workplace
To work with jewelry resin you will need a level place - small table, tray The base coating should be glossy and not stick to the resin. Application plastic bags uncomfortable, drops of resin stick tightly to them. It is best to cover the tray with paper tape with a shiny surface. Can also be placed on the table ceramic tiles, sheet of cardboard.
Before work, it is important to prepare all the necessary equipment, fittings, and decor. The basic materials you will need are resin and hardener (usually included). Also useful:
- two syringes (no needles needed);
- dishes for mixing resin (you can take a disposable cup);
- wooden stick for stirring the mass;
- mini drill;
- attachments for a mini-drill for grinding, polishing, a drill attachment, a head for turning;
- individual protection means;
- sieve;
- vegetable oil or Vaseline;
- tweezers.

Accessories are selected depending on the type of jewelry being made. These can be bases, connecting rings, earrings, connectors, frames. You cannot skimp on fittings, otherwise the fasteners and fastenings will quickly deteriorate. The decor for the products is chosen independently. These could be the following items:
- cones;
- leaves;
- flowers;
- shells;
- dried flower;
- rhinestones;
- beads;
- glitters;
- sequins.
Natural material - plants, flowers - is pre-dried between the pages of the book. It must be prepared in advance, because the drying process can take up to a month. The buds are threaded through the stems using a sewing needle. The resulting “garland” is hung in a dark closet, it dries for 3-4 weeks.
Resin preparation
Before working, it is important to read the instructions for the jewelry resin. It will indicate what temperature in the room should be maintained, what are the proportions of resin and hardener. Typically, the manufacturer advises working at +25...+30 degrees and low humidity - up to 55%.
Since small portions of resin are used to make jewelry, there will be no strong heating during polymerization. Therefore, it is recommended to warm up the resins of many brands a little - this is done by placing the tube in hot water(60 degrees). After 5-10 minutes, remove the resin from the water and begin mixing with the hardener.
Operating procedure:
- take epoxy and hardener with different syringes without needles;
- pour into a disposable cup required quantity resins;
- add the hardener in small portions in the specified ratio, immediately mixing the mixture thoroughly;
- The product must be stirred for 3 minutes, but not too intensely - this will cause the appearance of air bubbles.

Bubbles are the main difficulty that beginners face. To maintain the transparency of the glaze, let the mixed resin sit for 10 minutes. The bubbles will come to the surface and can be pierced with a needle. The finished mass should have the consistency of thick honey.
If required, fillers are added to the product at this stage. Everything is done quickly, before the resin enters the polymerization stage. Wood shavings, sawdust, crumbs, and cork are usually added. It should be taken into account that they immediately fall down, so they must be distributed carefully.
The total mass of filler should not exceed 50%. The more foreign substances in jewelry epoxy, the more fragile the finished product will be. It is better to add a little plasticizer to it (a couple of drops of castor oil will do).
Fill
To begin the process of pouring resin, you should prepare a fine strainer. This method is not suitable if the mass contains fillers. The mold is first lubricated with Vaseline and parquet mastic. This is only required for molds homemade from scrap materials. Molds made of silicone and plexiglass do not need lubrication; the finished product can be removed from them without difficulty.
Next, the epoxy resin is poured into the mold; its depth should not be more than 30 mm. In the first 60-120 minutes, the composition will remain liquid, but will gradually begin to thicken. If you need to introduce decor, this is done using tweezers. It's important not to pour too much thick layer, otherwise the glaze will not be able to harden completely. If the decor is large, then pour in ½ of the mixture, lay the decoration, and then add the remaining resin. The mold must be covered to prevent dust from settling on the surface. Drying time for the product is 24 hours.

Polishing
The resulting resin products are needed. To do this, use a mini-drill with an emery attachment. The decorations are turned as required, while keeping the edges perpendicular to the drill. Next, the edges can be varnished or the resin can be diluted again and the edges can be smeared with a brush. After polishing, holes are drilled to secure rings and fasteners. The drill diameter should not be more than 0.5 mm.
Master class on making jewelry from jewelry resin
How to do various decorations, costume jewelry? There are a number of subtleties when making rings, earrings, brooches, and pendants; they will be described below.
Making rings
A master class on creating rings should begin with the preparation of molds and accessories. You need to purchase resin, hardener and a standard set additional materials, including glitters and other decorative elements.
The work is carried out like this:
- pour water into the container at a temperature of +60 degrees;
- lower the sealed tube of epoxy (it is important that not a drop gets inside), leave for 10 minutes;
- take resin and hardener, mix with epoxy in the required proportion;
- Usually 3 ml of the finished mixture is enough for a ring;
- to remove bubbles, the glass with the well-mixed mass is once again placed in a container with hot water;
- knead the mixture again directly in the container with water until all the stains and bubbles disappear;
- the remaining bubbles are blown out using a cocktail straw;
- pour the resin into the mold, do this in 2-3 steps, so that in each layer you put the required amount of decor - powders, glitters, sequins, dried flowers, pine needles;
- layer-by-layer pouring is done 2-3 hours after the previous one, so each time a new portion of resin is added;
- leave the ring to harden near the battery for a day;
- remove the product from the mold by hitting it from the back;
- sharp edges are sanded, you can do this with a nail file.

The ring made of wood looks original and epoxy resin. To do this, you can take sushi chopsticks or any scraps. wooden furniture, trim them. The pieces of wood are placed on the bottom of the mold and filled with prepared resin. You can pre-paint the material with special pigments; they are introduced before using the hardener.
DIY resin pendants
You can make artificial amber from resin, which makes very beautiful pendants. You can also make other crafts with the addition of paint of any shade, sparkles or other decorative elements. For pendants, wire must be prepared. The usual one darkens over time, so a material with a special coating is used. A soft, but not thin aluminum wire with a diameter of 1.5 mm is suitable. To secure a chain or lace, you need to roll up the wire ring and cut off its tail close to the junction.
The ring itself is glued onto wide double-sided tape, the other side of which is glued to a flat surface (tile, cardboard). After laying out the decor in the mold, fill it with ready-made epoxy resin with a hardener; first let the epoxy sit for 20 minutes. One layer is poured into the “lenses” to create a bottom and secure the pattern. Leave the product for 8 hours, then make another layer, then a third. A coiled wire ring is carefully immersed in the latter. Final drying takes 24 hours. You can also drill a hole in the finished pendant and simply insert a wire ring there, the effect will be the same.

Making earrings
The technology for making earrings can be even simpler; you don’t even need special molds. It is only important to buy high-quality resin and good hooks and fasteners, as well as get dried flowers, twigs, and any decor.
The work is as follows:
- prepare the epoxy resin, knead it, leave for 2 hours to acquire viscosity;
- draw stencils of oval, round or other shapes on paper;
- cover work area with oilcloth or rinse and wipe dry, lay out the stencils, cover them on top with stationery multicolors;
- start pouring the thickened resin directly onto the multifora, carefully distributing it over the stencil using a toothpick;
- the height of the workpiece should be no more than 1 cm;
- Cover the workpieces with dust domes on top and leave for a day;
- after hardening, attach to earrings the required form using a nail file;
- knead another portion of resin, let stand for 2 hours;
- put decor on the blanks, drop a little resin, let them dry a little;
- then apply several more layers with a brush, each one should dry for 2 hours;
- At the end of the work, let the earrings dry for a day, then sand them and drill holes for the hooks.

Resin brooches
To create brooches you may additionally need acrylic dyes. After combining the resin and hardener, let the mixture sit for 2-3 hours, then pour it into special molds for brooches. Previously, the edges of the molds can be coated with a mixture of PVA and dyes, then the products will acquire original look. The composition of dried flowers looks beautiful inside the brooches. To prevent them from floating to the surface, apply the first layer of fill, let it dry for 2 hours, and then glue the decor with PVA. The products are completely dried for at least 24 hours.
Cabochons at home
Cabochons mean a method of processing stones in which they acquire a smooth convex surface without edges. Cabochons are flat on one side and look like a lens on the other. The easiest way is to pour them into special molds, diluting the epoxy according to the instructions. The walls of the mold are coated with it thin layer, and after hardening, remove the workpiece. Now you can put any decor into it, then it is filled to the ground. After drying, the medallion is polished to perfect smoothness.
If you don’t have time to wait for the jewelry to dry for a long time, the process can be speeded up. To do this, heat the product in the oven at temperatures up to +50…+60 degrees. Many craftsmen, if a drill is not available, insert a cord into the product while the decoration is still soft. This will help avoid drilling.
When pouring, be sure to ensure that the form is absolutely smooth. In this case, you won’t have to spend a long time polishing the jewelry. Do not wipe the finished product with alcohol, this will ruin the glossy surface. Careful handling will allow you to wear rings, earrings or pendants for a long time no complaints.
One type of synthetic resin is an epoxy-based material. The versatility of this material determines the breadth and popularity of its application. Let's look at how to make products from polyester resins below.
Epoxy acrylic resin products - material features
If we consider the structure of the resin with chemical point From our point of view, it consists of synthetic oligomeric compounds. Epoxy-based materials are widely popular in various industries and activities. However, in order to obtain a polymerized material, a hardener will be required. With its help, the resin takes on a solid form.

If you combine different types of resin-based materials with each other, you can obtain substances of different densities. Among the advantages of epoxy resin are:
- resistance to acidic environments;
- resistance to various types of chemicals, such as halogens, alkalis;
- after curing, the resin does not release harmful substances, has slight shrinkage.
There are two main elements of epoxy composition. If they are mixed together, the polymerization process begins. By combining different types of resins with hardeners, it is possible to obtain materials with a hard, rubber or soft texture.
The use of phenols and tertiary phenols allows polymerization of the resin. The type and amount of hardener for the resin is determined by its composition and the desired curing result. Epoxy resins are thermoset, the process of combining the hardener with the resin is irreversible. After polymerization, the hardened resin cannot be dissolved or melted.

If added to resin a large number of hardener, or vice versa, add too little of this substance, then the quality of the resulting polymer will be insufficient. There is a risk of reducing its strength, resistance to heat, chemicals or water. If you add too little hardener, the resulting polymer will be sticky because the resin will remain insufficiently bonded. Excess polymers gradually reach its surface. The amount of hardener is determined individually and is indicated in the instructions for use of the epoxy resin. Most often, the ratio of resin to hardener is one to one or one to two.
Please note that the curing process takes time and you should not add too much hardener to speed it up. In order to speed up polymerization, it is enough to heat the material to a certain temperature. If you increase the temperature of the composition by ten degrees, then polymerization will take place two or three times faster.
Some epoxy compounds also harden when cold. However, the decisive factors on which the speed of hardening depends are the temperature of the work and the type of substance with which hardening is carried out.
Epoxy resin products photo:

Among the advantages of using epoxy resin are:
- high strength of connections;
- minimum shrinkage rate;
- low level of moisture absorption;
- high resistance to abrasive wear;
- excellent physical characteristics.
Polyester resin for casting products: application features
In order to harden the temperature resin, it is enough to use the material at a temperature of -5 +190 degrees, in relation to the composition used. There are two resin options:
- cold setting;
- hot polymerization.
IN living conditions Most often, a resin with a hardener of the first type is used. In addition, the use of this material is relevant if it is not possible to carry out heat treatment.
In order to produce products that are characterized by high strength, good resistance to high temperature And chemicals, hot polymerization resin should be used. In this case, it is possible to form a denser temperature grid. There is a version of epoxy resin that can polymerize even in sea water.

We invite you to familiarize yourself with the scope of use of epoxy resin:
1. Using these resins, fiberglass or fiberglass is impregnated. These materials, in turn, are used in the electrical, radioelectric, mechanical engineering and aviation industries.
2. Performing a waterproofing function. This material protects against moisture basements, pools, floors and walls.
3. Production of coatings that differ chemical resistance. Epoxy resin is part of paint and varnish materials used in the process of interior and exterior finishing buildings. In addition, this material is part of compounds that protect wood, metal, and concrete from damage.
4. B household use, in the design field, three-dimensional products are made from resin, which are an excellent decoration for the interior, exterior and household.
Most often, the use of epoxy resin is associated with its function as an adhesive. With help. Epoxy resins can bond materials that have a porous or flat surface.
In addition, some of the epoxy compounds act as an adhesive, since they have high adhesion to various types of substances. These compositions also differ high level rigidity and elasticity.
Some of the cold polymerization hardeners are easy to use, since they do not require a certain proportion of their dilution.
Epoxy resin-based adhesive is distinguished primarily by its strength and reliable connection of parts to each other. Therefore, it is widely used in various industries.
To cook this substance, you should add a little hardener to the epoxy resin. The approximate ratio of components is one to ten. The components are connected to each other manually.
DIY resin products: how to prepare resin
In order to prepare epoxy resin at home, you will need the resin itself and a hardener. Please note that when producing a large amount of resin, a lot of heat is generated during the polymerization of the material.
There are some epoxy resin options that cure instantly after adding a hardener. If you do not follow certain resin manufacturing technologies, there is a risk of it boiling, emitting smoke and spoiling the finished product. In some cases, the resin may catch fire.
Therefore, in the process of purchasing material, consult the seller about the technical properties of the material and the scope of its purpose. After polymerization, the resin should produce a transparent, evenly hardened raw material.

If we consider the process of manufacturing resin and glue, these technologies differ from each other. Before adding a plasticizer to the resin for the manufacture of bulk products, its temperature should be increased by heating. In addition, in this way it will be possible to reduce the viscosity of the material. To heat the resin, use a water bath, then lower the resin into a container of water and cool to fifty degrees.
Please note that this heating method will also help increase the time for the resin to cure. As the resin boils, white foam appears on its surface, and its color becomes slightly cloudy. This composition is not suitable for use, therefore, in order to reduce its viscosity, a solvent must be added to it. However, it should be taken into account that the presence of a diluent in the resin negatively affects its strength, so the quality of the material in this case remains at a low level.
Water should not be present in either the resin or the hardener. When moisture gets into the resin, it begins to become cloudy. The procedure for preparing the resin begins with adding a plasticizer to its composition. At the same time, the composition is gradually heated.

In order for the ingredients to mix well together, you should use a construction mixer or a special attachment on electric drill. In the instructions you should look at the amount of plasticizer added to the resin; most often it ranges from five to ten percent of the composition.
Next, after adding the plasticizer, the process of introducing the hardener into the composition follows. At the same time, the resin must be cooled to thirty degrees. Since the mixture should not boil under any circumstances. The ratio between resin and hardener is one to ten. In order for the quality of curing to remain at the proper level, all components of the composition should be mixed well.
To obtain a homogeneous composition, the hardener is poured in gradually and very slowly. Please note that if you slightly exceed the proportion of hardener, the resin begins to boil. In this case, its further use is unacceptable. To make a lot of resin, use a drill to mix it.
There is such a term as the vital activity of a resin, which means a process that begins from the moment a hardener is added to the resin and ends with the complete polymerization of the material.

Products made from transparent resin: how to make it yourself
In order to produce large material from resin, you will need to follow a certain technology for working with this material. As a result, the finished item should be particularly transparent and should not contain air bubbles.
At the same time, the resin must harden evenly, both inside and outside the product. If the product thickness is more than two millimeters, the material is applied gradually, only after the first layer has hardened.
There is an option of pouring resin into specially prepared molds. In order for the product to be easily removed from the mold after polymerization, you should lubricate it with Vaseline or any greasy substance before pouring.
To color the product, special dyes in powder form are used. After pouring, the product is kept at a certain temperature, after two or three hours, it begins to polymerize. In order to speed up this process, we recommend placing the product in the oven for five hours. The complete polymerization process takes more than a week.
Further actions regarding the epoxy resin product are based on its machining, cutting, grinding. In the process of manufacturing products from epoxy resin, preference should be given to foreign-made resin, since domestic materials characterized by low and uneven polymerization, especially inside products.
To prepare a colored epoxy composition, you should use special dyes. Please note that the color dye must be evenly distributed in the composition. Otherwise, the product will be unevenly colored.
Please note that only high-quality pigments should be used, as otherwise there is a risk of the resin becoming cloudy or losing its attractiveness. Products made of polyester resin and fiberglass are highly practical and have good adhesion. However, due to high cost they are not common.
It is possible to combine epoxy resin with polyester. However, please note that contact of these two liquids without a polymerizer is not allowed.
Please note that the use of epoxy resin in liquid form is highly toxic, so the process of making products from jewelry resin, must be carried out in compliance certain rules security.
We invite you to familiarize yourself with them:
1. It is prohibited to pour resin into containers that will later be used to store food products.
2. To avoid getting burns or dermatitis, you must wear special clothing, gloves, and a protective mask.
3. The shelf life of the resin is one year, after given period, it becomes unusable.
4. If the resin gets on exposed skin, you should wash it off the surface with soap and water.
5. If working with resin is carried out in indoors, then it must have a high-quality ventilation system.
Epoxy resin products video:
Many people are familiar with epoxy resin - an excellent material for stickers, almost universal glue, an excellent binder for all kinds of putties.
But not everyone obviously knows that epoxy resin is also a wonderful ornamental material.
But first, a few words about the resin itself. It comes in different brands: ED-5, ED-6, EDP, etc.
The resin consists of two components: the resin itself and the hardener, which are thoroughly mixed immediately before use in the ratio specified in the instructions for this glue. 
The curing time of the resin is from four to twelve hours, depending on the temperature, concentration of the hardener and the volume of the mixture. In large volumes, due to the self-heating of the mixture during polymerization, the resin hardens very quickly, and sometimes even, as they say, “burns out” - it heats up very much, foams and hardens in the form of dirty foam, becoming unsuitable for work. Therefore, if you want to fill a large volume of resin, you need to place the vessel in cold water, snow, ice.
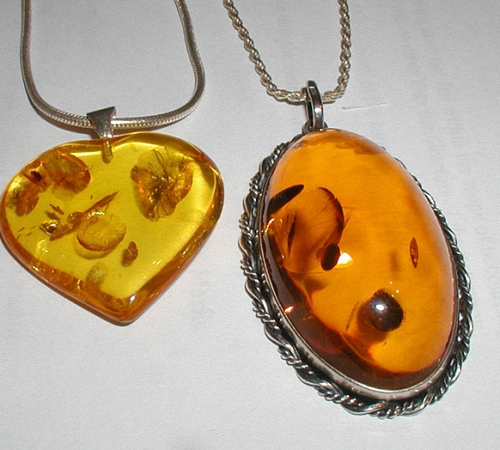
Like in amber
Amateur entomologists can be advised to store caught rare insects not in boxes with a glass top, but embedded in epoxy resin, then they can be viewed from all sides - top, bottom, side.
Insects are poured with resin into a collapsible plexiglass mold: four sidewalls, a bottom and a lid are fastened with plasticine.
Resin is poured into the mold up to about half its height, and a carefully straightened insect is carefully placed on its surface. Follow up. so that there are no air bubbles left underneath.

After the first layer has almost hardened, the final pouring is done. The resin must be poured to the very top, until a convex meniscus forms on its surface. After this, the mold is carefully covered with a lid (but forget about any air bubbles!) and left alone until completely cured. The next day, disassemble the mold: epoxy resin does not adhere to plexiglass at all, so the mold can be easily disassembled, and you will be left with a block sparkling with polished edges the color of light honey with an insect immured in it.
Portrait-souvenir
I can recommend it to photography lovers. a method of finishing portraits using epoxy resin.
The outline of the head is cut out from the photograph and glued using the same resin onto a previously veneered valuable species wood plank. Then the entire surface, along with the photograph, is covered with a layer of resin and left for 20-30 minutes so that the resin is partially absorbed, and, if necessary, covered with resin a second time. Next, the surface is covered with a plate of plexiglass, pressed tightly to remove air bubbles with a sheet of thick plywood, on which a heavy load is placed - an iron, dumbbells, etc.

After the resin has hardened, the plexiglass is separated from the surface.
The final stage of the work is cutting the portrait along a pre-selected contour and finishing the ends: sanding and covering them with varnish or paint of a suitable color.
Epoxy necklace
Lovers of jewelry can be offered to make several elegant trinkets from “amber”, the role of which will be successfully played by the same epoxy resin.
For the manufacture of bracelet or necklaces You will need, in addition to epoxy resin and plexiglass, several pieces of sheet brass and brass or copper wire.
After carefully heating a sheet of plexiglass over the gas or hotplate, bend it to the shape of the gutter (better irregular shape). Seal the ends of the gutter with plasticine and pour resin into the gap.

To obtain an imitation of amber on the surface of the resin in different places add a few drops of water, a few drops of nitro paint red, brown and yellow flowers and carefully stir them into the resin with two or three movements with a match. Water produces veins milky, and from nitro paints - each in its own shade. A good effect is also achieved by pouring pieces of pre-prepared resin, tinted using one of the above methods. In this case, pieces of tinted resin are crushed with a hammer, placed in a trough mold and filled with resin.
After polymerization, the casting is removed from the mold and cut into segments. The ends of the segments are polished, and two holes in each are drilled into them using a simple jig.

The segments are assembled into a bracelet or necklace using silk or nylon thread, and a polished sheet brass lock is attached to the outer segments. The decoration is ready.
Lamp "Autumn"
Another homemade product that I would like to talk about will probably appeal to many readers.
Sconce "Autumn". It is best made using autumn leaves.
For front panel For the base of the sconce, a sheet of plywood 5-8 mm thick is taken. A layer of epoxy is applied to the plywood and a large maple leaf is applied. The sheet must first be dried by placing it in a book for several days or ironing it with a hot iron.
A layer of resin is also applied to the top of the sheet, and this “sandwich” is covered with a sheet of plexiglass. (Make sure that between the plexiglass and maple leaf there are none left air bubbles.) A sheet of plywood is placed on top and a weight is placed.
After 10-12 hours the weight is removed and the plexiglass is easily separated. All that remains is to cut out the sheet along its contour using a jigsaw - and the front panel of the base is ready.

The actual base of the sconce is made from a sheet of plywood 13-15 mm thick. The contour of the front panel is transferred to its surface and cut out with a jigsaw. In addition, two holes are cut out in the base - for the switch button and for the suspension bracket. A hole is drilled in the upper part of the panel equal to the diameter of the tube you have (10-12 mm).
After gluing, the ends of the base are cleaned and covered with black varnish or paint.
The lampshade for the sconce can be made from canned food glass jar suitable size and shapes. To do this, the bottom of the jar is removed. This is done as follows. Along the line of the intended cut, a mark is scratched with a needle or file. The jar is placed in the sink and filled with boiling water. Usually the bottom in this case is separated exactly according to the risk. Then the edge of the cut is ground using a fine-grained stone. This operation is best performed under running water. Grinding the end will take you at least an hour: don’t rush, otherwise, at best, your lampshade will break, and at worst, it could end in cuts.

Then the leaves are glued onto the jar with the same epoxy resin. This part of the work is carried out in two stages. Half of the jar is smeared with a layer of resin, leaves are placed on it in the desired “mess”, which, in turn, are also smeared with resin. The leaves are then pressed against the jar plastic film as shown in the figure.
After the resin has hardened, the second half of the can is glued in the same way.
The lampshade holder can be made from a tin lid. It is rolled onto the neck of the jar using a rolling machine. home canning, then a hole is cut in it for the lamp socket and a decorative ring-crown made of duralumin is riveted. All this is painted with black varnish.

Assembling sconces. A hole is drilled in the front panel and a switch button is installed in it. Opposite the upper hole, a steel plate 1-1.5 mm thick with a keyhole-shaped hole is attached to the base with two screws for hanging on the wall.

A tube is inserted into the upper hole - a bracket for attaching the lampshade. Going to electrical wiring. The sconce is ready.
In this short article, I, of course, could not talk about a hundredth part of what can be done with epoxy resin. I believe that readers, having shown a certain amount of imagination and ingenuity, will themselves be able to find a use for such a truly “magical” material, which is “epoxy”.
I. Evstratov.
Greetings everyone! Anyone who loves working with resin and who loves the “kitchen” of creating something with their own hands!
So, I started by choosing from my supplies the flowers that I wanted to fill, and outlined the desired contours of the decoration on paper (the plants must be completely dry). You can skip this step and fill it without a stencil, but I wanted the plants to fit =))
I chose flowers of heather, forget-me-nots and speedwell.


Now you need to prepare the resin: mix (according to the instructions!) and leave for about 2-3 hours (to gain viscosity). Immediately after mixing, there are a lot of bubbles in the resin; they will go away on their own after a while and you can use it. At this stage it is good to pour it into molds. But I'm waiting for it to thicken.

While the resin is infusing, I make the number of stencils I need and cut out:

Important point- it is necessary to prepare the surface on which the products will harden. It should be as smooth as possible; If you don’t remove the dust before pouring, it will end up on future brooches and earrings. In my case, the surface is glass, and with the help of a building level you can lay it as level as possible by placing something under it.

The next step is to put on flat surface file or several files and UNDER Place stencils on them.

Pour the finished, slightly thickened resin directly onto the file and spread it with a toothpick so that the height is approximately 2-3 mm. Necessarily you need to cover it with a dome-lid! Experienced way I found out that under a low dome the likelihood of dust sticking is less than if you cover it with one general and high one. After 15 - 30 minutes, the resin may crawl away from the contour, then you also need to use a toothpick to return it to its place or drip more resin and distribute it.


Now we forget about the resin for about a day. It is necessary that the newly made bases harden completely and then you can separate them from the file (you can separate them earlier, but the uncured resin will bend and leave fingerprints). The edges, of course, will not be perfectly smooth, so you need to process them with sandpaper or a file. If there are paired elements, such as earrings, then you need to make them as symmetrical as possible.
The files themselves are convenient to use for any work with resin! This will protect your table from resin sticking to it.


We mix a new portion of resin, leave it to infuse and in the meantime try on the arrangement of dried flowers and if everything suits you, you can continue!


After the bubbles have come out of the resin (30-60 minutes have passed), drop a couple of drops onto the base, distribute them and place the flowers. This is necessary in order to fix them on in the right place. Cover with a lid and leave to dry.

Well, another day has passed)) (or half a day). Again we prepare a new resin, leave it to thicken, but not too much! Otherwise, when pouring too thick resin, the resulting bubbles on the plants will be difficult to remove and you can break a twig or leaf when pushing out the bubbles with a toothpick! It is better to use its medium consistency, which is similar to fresh honey). This filling is needed primarily so that the resin flows into all the irregularities of the plant. Let me remind you about a flat working surface, because if at this stage it is not level, then the resin will simply drain and ruin the mood and work. The higher the lens needs to be formed, the smoother the surface should be!

Then follow the well-known scheme: cover with a lid and leave to dry). A day later, you need to dilute the new resin and wait for it to have a thick consistency (thick honey) and pour it again to form a voluminous coating. Remove again FULL drying under an anti-dust cover on a flat surface (complete drying varies among different resin manufacturers, but it is better to play it safe and not touch the products for several days; unless the plans included leaving fingerprints, of course)
After complete drying, turn the finished product over. front side and do another fill with thick resin, because There are no plants on it, you can do just one fill so as not to leave a flat back surface and remove the texture of the file! This way the plant ends up inside the mold. At the same time, the form becomes very strong and you won’t be able to break it, just saw it))) All this work seems easy, but to do everything carefully you need to have a certain amount of patience and skills!
Decorations made using resin require careful handling and do not like open sun (plants can burn out if left for a long time, for example on a windowsill)
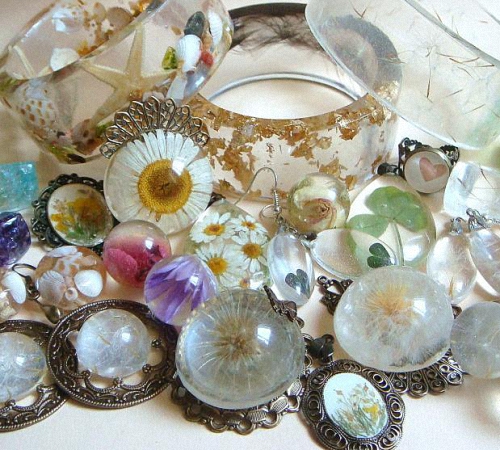
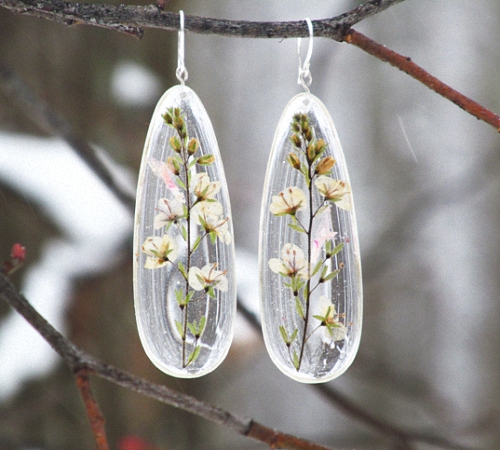
When all the fillings are completed and dry, you can make the intended decoration (for example, make a hole with the thinnest drill), or use it as you please. I love simple shapes and a minimum of decor, so I ended up with the following decorations and photographs in the new winter:
Pendant with a sprig of heather 20 x 80 mm


Earrings with forget-me-nots on silver earrings 28 x 70 mm

Pendant with a twig of speedwell 30 x 62 mm

Earrings on silver earrings with a sprig of speedwell 23 x 64 mm


Thank you for your attention! I wish everyone inspiration and implementation of their ideas!
Epoxy resin is synthetic and is used in various industries. You can make a variety of products from this material yourself.
How to make resin for making products?
To make an epoxy compound yourself, you need to prepare a resin and hardener. If you make a large amount of resin, it will generate significant heat, which is created as a result of polymerization. Some types of resin can harden instantly when a hardener is added. If not observed special rules, the composition may boil, during which smoke is released and the resin deteriorates, sometimes it can even catch fire. In such cases, it will not be possible to produce a high-quality product.
When purchasing resin, you need to study all of it technical properties, and what it is intended for. After the reaction, the composition produces a transparent solid product.
Making resin at home is done using heat, this is done before adding the hardener. Thus, it is possible to produce products of volumetric sizes, while the viscosity of the composition decreases. Heating is performed in a water bath, then the resin is immersed in a prepared container with water and cooled to 50 degrees.
This heating method helps extend the curing time of the resin. During boiling, foam forms on the surface of the composition, the color of which gradually becomes cloudy. This resin cannot be used to make products; the viscosity must first be reduced by adding a solvent. But when such materials are added, the quality of the composition decreases and the product becomes less durable.
When preparing the composition, there should be no water in the resin and hardener itself. Otherwise, the composition will be cloudy and of poor quality. A plasticizer is added to the resin while the mixture is gradually heated. To thoroughly mix the components, use a construction-type mixer or a drill with a special attachment. The plasticizer is added to the resin in an amount of 5 to 10 percent.
After the plasticizer has been added, the hardener begins to be introduced, at which time the resin should have a temperature of 30 degrees, that is, the composition should not boil. In order for the resin to harden properly, it is stirred well and up to 10 percent of the hardener is added. In order for the composition to be homogeneous, the hardener must be added slowly and gradually. If the amount of hardener exceeds the norm, the resin will boil and become unsuitable for making products. To prepare a significant amount of resin, the components are mixed using a drill. After adding the hardener to the composition, the resin gradually hardens completely and becomes hard.

How to make your own epoxy resin products?
In order to pour a large resin product, it is necessary to adhere to a certain technology; the object must have transparency, without the formation of bubbles in the inside. The resin should harden evenly, in the inner and outer parts. If the product has a thickness of more than 2 millimeters, then the resin is applied in layers. Each subsequent layer is applied on top of the already hardened previous one.
The resin can be poured into special molds, which are first lubricated with Vaseline so that the finished products can be easily removed.
To give the product the required color, a special powder dye is used. After the forms are filled out, you need to wait about three hours a certain temperature for complete polymerization. Complete polymerization takes about a week; to make this process faster, the product is placed in a special oven.
After hardening, the product is removed from the mold, cut, ground and polished. To make products from resin, it is necessary to select a composition with high polymerization, otherwise it will harden unevenly.


Features of acrylic epoxy resin
Epoxy resin is a synthetic material and is used in various industries. But to make the resin hard, it is necessary to add a hardener. When making products, you can combine other materials with resin, for example, wood or appliqués for decorations. Epoxy resin has the following advantages:
- The material is resistant to acidic environments, chemicals, alkalis;
- Epoxy resin is also highly resistant to moisture and ultraviolet radiation;
- After hardening, the resin shrinks slightly and no harmful substances are released;
- Products made from epoxy resin are highly resistant to wear and abrasion.
The epoxy composition is mixed with a hardener, the number of components is indicated on the packaging. After this, a polymerization reaction occurs, and then the mixture hardens, and can be hard or soft, in the form of rubber. Phenols are used as hardeners; these substances cause the composition to polymerize. After hardening, epoxy resin cannot be brought into a liquid state.
If you add the wrong amount of hardener to the resin, the resulting product will be of poor quality, will not harden, or in the future drops of the substance will be released on its surface, it may stick. To determine the amount of hardener, you must follow the instructions for the epoxy resin.
If you add too much hardener to speed up the process, you can ruin the product, since it will take some time to harden. To make the polymerization reaction faster, you need to increase the temperature by heating to required temperature. When the temperature rises by 10 units, the reaction occurs up to three times faster. Some types of resin can harden when cold, but the process occurs faster as the temperature increases.
Products made from epoxy resin have high strength, low moisture absorption, and good resistance to wear and mechanical damage.

Features of using epoxy resin for pouring products
In order for the epoxy resin to harden, the material can be worked at temperatures up to 180 degrees, in relation to the hardener. Resins can be cold-cured or hot-cured. The first type of material is used at home or when there is no possibility of increasing the temperature. In order for products to have high strength, good resistance to temperature changes, and chemical substances, it is necessary to work with hot-setting resin.
Epoxy resin can be used in various fields:
- Epoxy resin is used to impregnate glass fabrics or threads that are used in various industries.
- The material can perform the function of waterproofing; it is used to treat rooms basement type, swimming pools, floor and wall surfaces.
- Using resin epoxy type You can make coatings that are resistant to chemicals. Epoxy resin can be included in paints and varnishes, which are used for interior and exterior decoration. Also, epoxy material can be part of materials that are used for processing wood, concrete, and metal.
- Epoxy resin is used to make large products that are used in the interior and household.
- This material can be used to make various types jewelry that is highly durable, souvenirs, and other products.
- Epoxy resin can perform the function adhesive composition. It can be used to glue materials with different surfaces.
Some types of hardeners that have cold polymerization are not difficult to work with, since special proportions are not necessary. Based on epoxy resin, a special adhesive can be made, which is reliable and durable; it is used in various industries.
To prepare a transparent product, you need to add a hardener to the resin and mix thoroughly. And then start pouring the prepared and lubricated molds; after complete hardening, the product is ready.
How to prepare a painted epoxy composition for making products?
To prepare a colored epoxy composition, special dyes are added, which must be evenly distributed throughout the material. Otherwise, the product will be stained in places; the dyes must be of high quality to prevent clouding of the composition.
To color the resin, various types of dyes are used: oil, typographic, acrylic and stained glass. The dye should not be more than 5 percent; it is added gradually, one drop at a time, noticing the result. If the dye oily type, then you can first put it on paper so that it absorbs excess oil. Using stained glass materials, a transparent appearance is obtained. But you can also use special dyes for epoxy resin. Such coloring components are added to the composition before the hardener.
Moisture should not be allowed to get into the epoxy resin, so dyes are water based do not apply. Water can be used if it is necessary to create cloudiness or stains, thus imitating amber. In this case, only two drops of water are added to the composition.
Epoxy resin can be mixed with polyester compound, but the two components are not used without hardeners.
Before pouring the composition, the molds are lubricated with technical fat so that the product can be easily removed in the future. When hardening, the viscosity of the resin gradually changes; at first it is liquid, at which time the material is poured into special forms of simple and complex type. Then the resin begins to thicken, and you can make a small bulge of a round or oblong appearance. Using this composition, you can make a drawing manually or using a template. Gradually, the resin becomes thicker, and making refined patterns on the surface becomes impossible, but the composition in this form can be used as an adhesive.
After this, the resin becomes like rubber, there is no stickiness, but the product can be bent into the required shape. In this case, the product can be given an original look by deforming the shape; later it will harden and become solid. At the final stage, the resin is completely solid and the product is considered finished.
After complete hardening, all defects and edges are sanded using sandpaper, and the shine of the product will be lost. To renew it, a final coating with epoxy resin is performed on top, and final drying.
When making jewelry, holes are made using a thin drill. Also, when pouring the material into molds, silicone sticks are inserted into the composition, which do not stick to the epoxy resin; as a result, after hardening, ready-made holes are obtained.
Epoxy resin can be used to make various beads, pendants, earrings, rings, souvenirs, as well as large items.
Safety rules when working with epoxy resin
Epoxy resin in liquid form has increased toxicity, therefore, when manufacturing products, it is necessary to follow all safety rules:
- For the composition, you cannot use a container that is subsequently used in food.
- If the composition gets on the skin, you can get burns, so it is recommended to work in protective clothing, gloves, glasses. It is also necessary to wear a respirator to prevent vapors from entering the respiratory system.
- If the composition gets on the skin, it urgently needs to be washed off with soapy water.
- If the work room closed type, then it is necessary to ensure high-quality ventilation. When sanding products, all dust is collected with a vacuum cleaner. The resin can only be stored for a year, after which it is no longer suitable for use.
 (1 ratings, on average: 5,00 out of 5)

