How to make a window sill wider in an apartment. Plastic window sills - dimensions and characteristics. Marble and granite window sills
Often the window sill is undeservedly left without attention. But it can become a beautiful and functional addition to the interior. For example, turn into bookshelf, a place to relax or convenient system storage We have collected many creative and quite accessible ideas for any interior that will help you use your window sill wisely.
1. Reading space

Sometimes it's nice to spend time reading your favorite book. Don't rush anywhere and don't fuss. It is best to sit by the window, as daylight is the most favorable for this process. And in this case, the window sill will be the most suitable place.

A wide, strong window sill has every chance of becoming comfort zone recreation. It is a good idea to equip the tabletop itself with a soft floor cushion and surround it with decorative fellows. In the cold season, a blanket or fluffy skin would be useful here.


If the window sill is not suitable for sitting, then it can be used for other purposes. For example, put books on it, and if there is no heating radiator below, then make comfortable shelves under the window sill and put the entire book collection on them.

4. Storage systems
It's not just books that can be stored under the windowsill. This is a great place for small drawers, which can also be made with your own hands or ordered from a carpentry workshop. They are convenient for hiding seasonal items, shoes, a first aid kit, tools - everything that needs to be put out of sight.

5. Workplace
Another way to functionally use a window sill is to arrange on it workplace. Standard width surface allows you to easily place a laptop, a lamp, a notepad and a stand for pencils and pens on it. The chair for such a home office needs to be selected according to the height of the window sill so that it is comfortable to work behind it. If the tabletop is high, then it would be appropriate to choose bar stool.


6. Place for decorative display
When there are enough storage systems in the interior, there is a place for relaxation, reading and work, then the window sill is quite suitable for placing a decorative display. At any time of the year, freshly cut flowers will be a good way to refresh the interior, which can even be placed in simple transparent jars or bottles.Do you want to carve out at least a little usable space on your small kitchen? This is possible if you use the window sill - replace it with a tabletop and integrate it into the work or dining area. From this article you will learn how to do this as efficiently as possible, what technical nuances need to be taken into account when remodeling and what variations of the window sill-countertop there are.
General rules for remodeling a window sill-table top and practical tips
- The main condition for arranging a window sill-tabletop of any configuration is that air must circulate freely around the radiator.
The heat from the battery should rise unhindered to the window, and cold air from the window - go down. Otherwise, the kitchen will become cold and damp and, what is even more dangerous, the kitchen windows will begin to constantly fog up. If the latter happens, then the window slopes, and then the kitchen walls, will become covered with mold.
What to do? If you plan to use the tabletop-window sill as a table or cabinet with open shelves, then for normal air exchange it is enough to make several holes in it or build in a ventilation grille as shown in these photo examples.

If you plan to equip the underframe of the window sill-countertop with cabinets, then their doors should have perforations or lattice inserts, as, for example, in this photo.

An example of arranging a cabinet with lattice doors under a window sill-countertop

- Keep in mind that a window sill-countertop and, especially, a cabinet built above the radiator (even with lattice doors) will worsen the heating of the kitchen (by 2-3 degrees). Heat loss can be compensated by installing an additional radiator or underfloor heating systems. In addition, the battery from under the window sill can be moved to another location along the same wall or to an adjacent wall. Relocating a radiator ideally requires a coordinated design and thermal calculation, however, in practice agreement is often sufficient Management company Houses. And one more nuance - since moving/replacing the battery requires turning off the riser and draining the water, this should be done during the non-heating season.
- The window must be at least 1.5 cm higher than the window sill-table top.
- To avoid the formation of mold on window slopes, do not forget to treat them with an antiseptic primer. And so that the slopes can be frequently cleaned from accidental stains and splashes, they should be painted with moisture-resistant paint.
- Under no circumstances should you install a stove on a windowsill-tabletop. Firstly, this is prohibited by sanitary and building codes, and secondly, it is simply impractical, because splashes of oil during cooking will certainly end up on the windows.
- When planning to leave the battery under the windowsill-countertop in plain sight, it is highly advisable cover it with a decorative screen, paint in bright color or to match the wall. However, sometimes it is enough to replace a large and outdated radiator with a more compact and modern one.

Radiator with perforated screen under the window sill-tabletop

- Due to the proximity of the window and adjoining external wall The window sill-tabletop must be made of super-wear-resistant material. Perfect option – fake diamond, which is not afraid of either moisture or culinary work and, moreover, allows you to create a seamless surface. If the outer wall of the kitchen freezes and leaks, the windows are prone to fogging, and mold once “bloomed” in the room, then you should play it safe and choose artificial stone for arranging the window sill-countertop.

- No matter how you arrange the space under the window, it should be well lit. For this you can use wall sconces or pendant lamps. If the window sill-tabletop serves as a bar counter, then hanging lamp can be hung at a height of 70 cm from its surface. Lamps above work area they can hang higher, the main thing is to place them directly above or in front of the workplace, and not behind it (otherwise the person standing behind the tabletop will simply block the light from the lamp with his back).

- It is most practical to decorate the window above the window sill-tabletop with cassette roller blinds, attached directly to the sash. Also, all types of short curtains are suitable for window decoration: Roman curtains, standard “rolls”, horizontal blinds, cafe curtains or classic curtains.


- Sometimes, to get the most out of a kitchenette, you need a window sill-countertop with an irregularly shaped canopy. So, for example, it can narrow in an area of high traffic (say, near the refrigerator) and expand where there is more space.


It is also very good when the corners of the window sill tabletop are not sharp, but rounded.

- When arranging a working window sill-table top it can become a problem search for built-in dishwasher suitable height, because Most PMM models are designed for a height of the lower tier of the kitchen of 82 cm.
- If the window sill has very wide slopes, then it is advisable to make its new countertop (and the cabinets and possibly the sink that go with it) narrower. After all, if you add up the depth of a wide window sill with the depth of a standard 60-centimeter tabletop, it turns out too long distance from the window to the edge of the table.
Options for arranging a window sill-countertop
The window sill-tabletop can be equipped and used as:
- Work area with sink under the window;
- A work surface for preparing food (without washing);
- Dining area or bar counter for breakfasts and snacks;
- Additional storage space for equipment, food and utensils.
Let's look at each of these options in more detail.
Window sill-tabletop as a work surface (without sink)
Converting a window sill into a tabletop allows you to increase work surface with minimal clutter in the kitchen, it makes it possible to cook under a pleasant daylight and with a view out the window. Also, the window sill-tabletop offers a bonus - the ability to use it as a bar table or equip it with an underframe additional places storage However, the window sill work surface also has disadvantages:

Since most often a window sill-countertop involves combining it with a suite, the question arises - what to do if the height of the window sill and the kitchen floor cabinets do not match? Here are some solutions:
- If the window sill is higher than the cabinets, the headset, then everything is simple: kitchen countertop and cabinets line up under the window. In this case, the gap between the window sill and the tabletop is protected with the same material that is used to decorate the apron or is covered with a ventilation grille. In this case, the canopy of the window sill table top can be cut off, the window sill can be replaced with a panel to match the table top and used as a shelf.


- If the difference between the window sill and the cabinets is small, then the kitchen furniture is adjusted to the window sill due to the base and legs, less often due to the height of the cabinets themselves and increasing the height of the floor. Here are some useful numbers:
- The standard height of the cabinets (without table top and base) is 72 cm.
- The base has two sizes - 10 cm and 15 cm.
- The height of the kitchen window sill in a city apartment can vary from 72 to 90 cm (excluding the countertop).
- The standard thickness of a kitchen worktop (it must be taken into account when calculating the final height of the kitchen) is 4 cm or 2.5 cm (less often).
- Ideally, the height of the working surface should be 15 cm lower than the bent elbow of the owner/hostess of the kitchen.
- If the window sill is lower kitchen furniture , then converting it into a countertop is more difficult. The most radical method is the following: the window sill is increased to match the height of the furniture, and the window is installed smaller. However, this is only possible in a private house, and in a city apartment such interference load-bearing wall and the front of the building is prohibited. However, if the window faces the loggia, then it is theoretically possible to “raise” it legally. The second method: the size of the window opening does not change, but the design of the window changes - it is supplemented with a horizontal impost (an additional frame profile). As a result Bottom part it turns out to be blank and is closed by a cabinet, while the shutters above the window sill open as usual. From the outside, the blind part of the window can be hidden behind a balcony flower “pot”.

This window sill tabletop could look even better if the window mullion ran directly above the table


The third and easiest way: the kitchen is simply installed on top of the window sill (see photo below), and the niche formed behind it is used for storage household chemicals or indoor plants. Unfortunately, this solution is not ideal: you will no longer be able to open the window wide open, the niche will not be so easy to tidy up, the insolation of the room will worsen, and from the point of view of fire safety the idea is not very successful. However, these inconveniences are not so critical.


And finally, the fourth method: the window sill and furniture are combined, but are not adjusted to each other in height, but the kitchen countertop is adjusted to them. You can beat the difference between surfaces different ways. For example, different levels of the kitchen can simply be lined with the same countertops. As a result, the interior will turn out, although not so harmonious, but overall it will look good.


Also, different levels of the kitchen can be united by a single tabletop with invisible seams (in this case it should be made of wood, or better yet, artificial stone contrasting color).


Window sill-tabletop with sink
A window sill-countertop with a sink is the most desirable, complex and costly remodeling project to implement. Indeed, in addition to the problems described in the previous chapter, there is also the issue of connecting water supply and drainage pipes to the window. In addition, washing in the windowsill, although it brightens up the home routine with pleasant lighting and a view of the surrounding area, in practice it is not always convenient. Firstly, if window slopes not too wide, the window will often get splashed. Secondly, the sink faucet will prevent the windows from opening.

How to move the sink to the window and connect water communications to it?
With pipe supply for hot and cold water As a rule, no problems arise, but you will have to worry about connecting the drain pipe from the sink to the riser - install it at an angle of 2-3 cm for each meter of length. In this case, all communications need to be hidden, for example, inside kitchen set, V plasterboard box go to the podium.
Now a little about coordinating the transfer of the sink. If you are moving the sink along the “native” wall, then developing a project is not required. Moving the sink to the opposite or adjacent walls already requires the development of a project and its legalization in housing authorities.
And here are the others useful tips for arranging a window sill-countertop with a sink:
- It is advisable that at least one casement opened 90 degrees, then you can wash the window completely without any problems. To do this, you need to place the sink not in the center of the opening, but closer to the edge.


The exception is three-leaf windows - in this case the sink is placed opposite the central blind sash.

- To window glass avoid splashes of water as little as possible, choose a deep sink, and it is better to choose a faucet with a medium or deep spout.
- If possible, it is worth installing a folding faucet (with a bayonet mount) instead of a conventional faucet. Such models are more expensive, but they allow you to open the windowsill-tabletop windows wide open without any problems.
- Since there cannot be a cabinet for storing dishes above the sink near the window, it should be provided on the side of the sink or under it. For the same reason, you should choose a sink with a wing for drying dishes.
Window sill-tabletop as a dining area or snack area
Convert a window sill into a bar counter or dinner table The easiest way is to just replace the tabletop, add one or two supports or a table (if necessary) and select suitable chairs. As a result, the dining area turns out to be compact, well-lit and very cozy.

- Keep in mind that there must be a distance of at least 25 cm from the front edge of the window sill-bar counter to the radiator/wall, otherwise the feet of those sitting will rest against them.

- The shape of the window sill table can be irregular shape as shown in the photo below.


C-shaped kitchen with window sill-bar counter
- How to make a dining table-window sill with your own hands? Just install a folding wall table at the same level as in the photo below.

The balcony has long ceased to exist utility room and container unnecessary trash. Today it's stylish extra room or a landscaped space for a recreation area, workshop, or office. Glazing and insulation are the basis of a future comfortable balcony or loggia. Plastic windows and balcony glazing frames look complete thanks to the installed window sills. We will talk about choosing and installing a window sill.
Plastic window sills
 Window sill made of glossy plastic
 PVC products are perfectly combined and matched when installed with any window profiles made of metal-plastic. Their popularity depends on the following properties and performance characteristics:
- The ability to laminate with durable decorative film of various colors and textures, which retains its presentable appearance for decades, and minor mechanical impacts do not leave scratches or chips on it.
- The material does not rot, does not fade in the sun, is resistant to temperature changes, low temperatures and high humidity.
- Plastic window sills easy to maintain, do not require periodic painting and are durable under normal operating conditions.
- Internal stiffening ribs provide a fairly light product with high strength.
- Dividing the internal volume into cavities increases thermal insulation properties window sill.
- The material of the product does not support combustion and is highly flammable.
- Dismantling and installation is carried out without special tools.
- Environmental friendliness.
When choosing a window sill made of plastic, you need to remember that it is impossible to repair it once a dent or hole has been punched on the surface. The issue is resolved by completely replacing the product.
 Plastic window sill can be selected in various colors and textures
 Wooden window sills

Wood products always look natural, stylish and cozy. The type of wood and the degree of drying are the main indicators that influence the quality of the resulting window sill. Hardwood - oak, beech, larch and others - is used to create a solid window sill. Its luxurious texture will be emphasized special wax, and oils and impregnations will protect against moisture, microorganisms, and the possibility of fire.
The technology for producing finger-joined laminated panels from bars (lamellas) of cheaper species allows products to be made cheaper. Window sills are made this way various forms and sizes. Their strength is almost twice that of solid ones. wooden products from the same breed.
Flaws wooden window sills – possibility of swelling, cracking, exposure to temperature changes, fear of direct sun rays, fading of coatings in the sun, the need for careful constant care.

Window sills made of chipboard and MDF

The material of the products is wood chips, which are compressed and covered with a reliable layer of laminate. Window sills of this type can be classified as wooden products, but they differ significantly in the following characteristics:
- more rigid and durable;
- retain their shape and original dimensions under the influence of external factors;
- resistant to heat and moisture;
- wide selection of texture and color options;
- ease of maintenance (it is advisable to exclude the use of abrasive cleaning products);
- lower cost.
Marble and granite window sills
 Marble window sill
 These are the most common breeds natural stone, used for the manufacture of window sills. They always look rich, solid, textured. The main advantages of stone products:
- durability while maintaining a beautiful original appearance;
- homogeneity of the material;
- environmental friendliness;
- increased strength;
- organic compatibility with various finishing materials;
- resistance to peak temperatures and sudden changes;
- hygiene;
- variety of textures of different colors and shades;
- practicality in care.
Of the minuses, we note the following:
- Heavy weight, which limits its use on external balconies and balconies with lightweight parapets.
- High price.
 Granite window sill
 Window sills made of artificial stone

The basis of the material is mineral fillers, bound into a monolith with polymer resins and tinted with dye in the desired shade. Artificial stone is cheaper, but looks rich, just like natural stone. Window sills made from it are durable, not afraid of impact loads, resistant to chemical influences. A small minus is poor resistance to abrasive cleaning. It is recommended to use special polishes for them.
Marking, trimming window sill blanks
Selecting material, color or option decorative finishing of the future window sill, we begin the main work. At the first stage, the workpiece for the window sill is marked and trimmed. Its length corresponds to the length of the installed frame. For a linear window sill along window frame The workpiece should be cut according to the markings with a perpendicular cut. If the future structure will go around the perimeter of the front and sides of the parapet along a broken line, more careful marking of the window sill will be required, taking into account the angles at which the sections of blanks connected into a single whole will be located to each other.

To determine the width, measure the distance from the glazing frame to the inner edge of the opening (for a loggia) or parapet. If you plan to place shelves or cabinets under the window sill, measure the distance to the edge of the frame (for shelves) or the edge hinged door(for lockers). To the obtained value add 2-3 cm, by which the window sill will be placed under the frame during installation, and 5-8 cm - the amount of the outlet (canopy). The size of the canopy is selected taking into account saving balcony space. A large window sill outlet will prevent the proper circulation of warm air, which prevents condensation from forming on the double-glazed windows. The required thickness of the window sill is selected at the stage of purchasing the production blank.

You can trim a wooden and PVC window sill with a jigsaw, a saw with a fine tooth, or a grinder (for wood you need a special cutting wheel). When working, control the speed of the tool and the force applied to it to obtain smooth edges without scratches, cracks or chips.
Window sill installation
You need to prepare for the installation of the window sill. To install a PVC product, it will be useful to screw it under the bottom of the frame U-shaped profile made of plastic. The longitudinal end of the trimmed window sill blank will be inserted into it.

The profile location is set strictly horizontal, without sagging (depending on the distance between the fasteners). To give rigidity to a long window sill, use a backing made of wooden blocks. They are laid every 25-30 cm on the parapet or frame under the window sill and secured with screws or cement mortar. The length of the bars should not reach the edge of the opening or frame 1-2 cm.
 Also, instead of bars, you can use plastic wedges
 Under a window sill with a large projection, or which will be subject to significant static loads during operation, you need to install several support brackets. They will take on a significant part of the total load.

After the preparation has been completed, the window sill is installed.
Important! Before placing the PVC window sill board under the window, special decorative plugs are attached to its ends.
The panel is carefully inserted into a pre-fixed U-shaped profile or placed under the frame and secured. Knock the window sill to the junction with the frame with gentle blows through the extension so as not to damage the surface of the material. Installation of the board is carried out while maintaining an inclination (no more than 3-4 degrees) towards the room to prevent the accumulation of possible condensation. At this stage, we obtain a window sill installed and lying on supports made of wooden blocks.

Now we need to do the low tide. When its installation is completed, the gaps and cracks between the window sill and the parapet (if it is concrete or brick), or a frame intended for shelves, cabinets, and insulation devices, are filled with foam.

Before this, the installed part is securely fastened and expanded so that the pressure of the foam cannot lift or deform it.
 You can put something heavy on the windowsill itself
 Fastening of narrow balcony window sills is carried out by mounting them on a construction or special glue solution. With this method, specially installed spacers act as a press.
It is advisable to entrust the installation of stone window sills to specialists from a specialized company. Without experience similar work any miscalculation can be very costly.
The video shows two methods for installing a window sill:
Nuances of choosing and installing window sills
- Matte and rough plastic is better than glossy plastic, suitable for use on the balcony. It hides the ubiquitous dust and minor scratches on its surface.
- A wooden window sill requires proper protection from dampness; it is better to install it on an insulated balcony.
- For massive window sills made of artificial or natural stone, you will need a reliable parapet base - concrete, brick. Such products are more suitable for use on loggias.
- Due to the big total length balcony frame, supporting brackets are required for the window sill. A wooden or metal (profile) frame for insulation can cope with their role.
- The choice of the width and material of the future window sill should also take into account its additional functional purpose and expected loads - use as a shelf or tabletop.
- Unlike a loggia, it is better not to additionally load the base slab of an external balcony. This factor also needs to be taken into account when choosing window sill material.
- When installing a window sill made of wood, MDF or chipboard, the places where it comes into contact with the wall are laid with any convenient waterproofing material.
- The remote glazing structure, extending outside the perimeter of the balcony parapet, allows you to install a wide window sill (up to 40 cm) and at the same time not occupy usable area premises.
- Don't shoot protective film from the window sill board until the completion of its installation. This will protect the surface of the product from chips and scratches.
The standard method of attaching a window sill is with adhesive. Products made of PVC, wood or chipboard are “planted” on “liquid nails” for these materials, and stone ones are placed on silicone sealant or cement glue. If the supporting platform has defects or a pronounced slope towards the room, it is leveled reinforced layer plasters or install the board on leveling dies and fill the space under it with polyurethane foam. However, when the window sill width is more than 200 mm, it is often necessary alternative installation.
In houses with thin walls(panel buildings of the 1980s and later) the supporting platform is small - 100–120 mm, and adhesive fastening a window sill with a width of more than 150–170 mm is not reliable enough (we do not consider cases where the structure has additional supports - legs, cabinets). You have to wedge the board window frame. The essence of the method is that the window sill is not pressed against the window, but placed under it to a depth of 10–40 mm, then leveled with pads and fixed with foam. This way you can fix a product made of plastic, wood-polymer composite and wood, providing high strength with a small contact area with the wall (½ and even ⅓ of the width of the board). However, from under the bottom bar of the window frame you will have to partially remove the insulation (foam), which will increase, so the method is unsuitable for stone window sills with high thermal conductivity.
In houses with thick walls (single-layer brick and block), glue is enough to securely fasten the window sill, but the wide “step” prevents air from the radiator from blowing through the glass, and the window often fogs up. To avoid this, it is advisable to provide a ventilation gap: install the window sill on narrow slabs (made of plastic, chipboard, antiseptic wood) 20–30 mm high, directed perpendicular to the window, and leave a gap between it and the window (again 20–30 mm), covering it with a narrow lattice. Glue or polyurethane foam should be applied locally so as not to block the air channels, and the battery should be decorated with a convection screen that directs the flow of warm air into the ventilation gap.
In a bay window, one continuous window sill is often appropriate, rather than several under each window. The difficulty of installation lies in the need for precise adjustment of parts joined at oblique angles. When using standard wooden and plastic products You can't do without a miter saw or miter box. A more expensive option is to order a prefabricated structure made of wood or artificial stone. In this case, craftsmen from a specialized company will take accurate measurements and install the window sill so that the joints of the elements will be almost invisible to the eye.
In a glazed loggia, where the windows are installed on a thin parapet, there is practically no supporting platform. It is necessary to use metal consoles. They are suitable for any light window sills and can be quickly installed using screws and dowels.
METHODS OF INSTALLING A WIDE WINDOW SILL
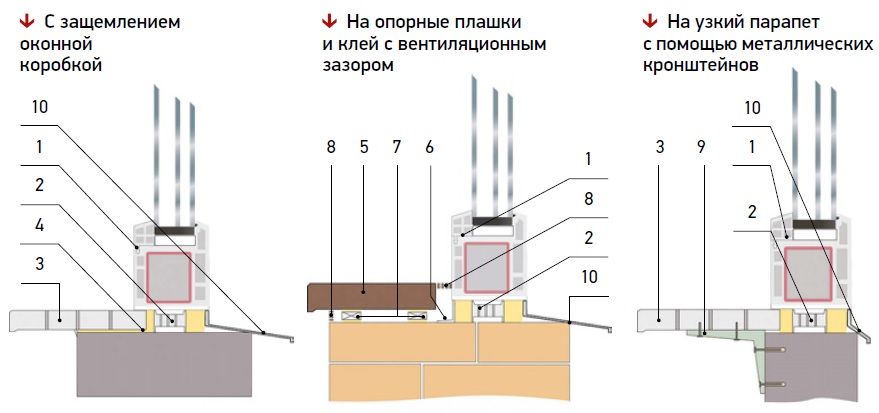
Elements window design: 1 - window; 2 - stand profile; 3 - PVC window sill; 4 - polyurethane foam or glue; 5 - window sill made of wood or chipboard; 6 - plastic cover; 7 - support dies; 8 - ventilation grilles; 9 - bracket; 10 - low tide. Visualization: Vladimir Grigoriev/Burda Media
- The window sill should be installed before finishing the slopes, regardless of whether you plan to plaster or panel them.
- Although on modern windows condensation rarely forms; it is advisable to install a window sill with a slope of 1–3% towards the room in order to divert water from the frame and mounting seam, for example, accidentally spilled when watering flowers.
- Before applying the glue, brick or concrete surface should be cleaned of dust. When attached to cement composition the base must be primed, and if polyurethane foam is used, moistened to ensure complete polymerization of the material.
- If the edges of the old window sill were embedded in the wall, it makes sense to install the new one in the same way, ensuring the most durable fastening.
- The gap between the window sill and the window frame should be closed with a special self-adhesive petal seal or filled with silicone plumbing sealant.
Moving to new apartment, we rejoiced at the increase in our living meters. But there is much less space for flowers. The window sills turned out to be so narrow that even a saucer could not rest on them, not to mention flower pots. The problem had to be solved urgently before we lost half of the collection. It was especially important to solve the problem narrow window sill in the kitchen.
Options
The first option that comes to mind is a plastic window with a plastic window sill. True, the window sill increases by only 10 centimeters. The gain is not as big as we would like. In addition, if the kitchen is small, the work table (no matter where it is placed) makes the kitchen cramped and uncomfortable.
The decision came naturally. You need to make the window sill a full-fledged working surface - from wall to wall. In this case, the window sill will have a length of 2 m, a width of 45 cm (near the wall) and 60 cm (in the window opening).
Window sill installation
To make a wide window sill, we used 2 simple narrow kitchen tables without a “top” and fronts. Such bedside tables can be easily purchased at a home improvement store or ordered from a kitchen furniture company.
The bedside tables were placed sideways external wall, opposite each other. Thus, they became a reliable support for the tabletop. Adjustable legs made it possible to adjust the height of the bedside tables and the level of the window sill.
For the tabletop we took a large sheet of plywood (12 mm). According to the plan, the tabletop is slightly wider than the side tables, and goes into the window opening. Taking into account the uneven geometry of the walls, the base for the tabletop had to be cut out according to a pre-made pattern. For curly carving, a jigsaw was needed.
The next stage is covering the countertop ceramic tiles. We used medium-sized tiles: for small kitchen dimensions large tiles visually reduces free space, and laying very small tiles is a rather tedious task. As a result, the choice fell on the tiles that were used to decorate the wall. The total size is 20x20 cm, and each one consists of four small “tiles” (10x10 cm).
To avoid wet processes, the tiles were attached to the plywood with glue, which is popularly called “liquid nails.”
The seams were covered with white grout. The end was covered with an aluminum threshold. By the way, the window slopes were done last, when the wide window sill was already completely ready.
Impressions from using the window sill(five years later)
No need:
Do wide seams between the tiles - the designer's desire to maintain the size of the cells and lines, as on the wall, played a cruel joke. Rough seams 5 mm wide turned out to be “dirt accumulators”. At first they were intensively cleaned and washed. However, the grout began to crack due to constant cleaning. Hence the moral: lay the tiles closely on the countertop (window sill), with minimal gaps.

Use relief tiles, even if they are already used for walls. From an aesthetic point of view, it’s beautiful, but from a household point of view... Relief tiles have to be cleaned regularly with a brush (for smooth surface a rag is enough).

In order not to shut off the gas valve, a large hatch (15x15 cm) is made in the plywood; one whole tile serves as a cover for it. If necessary, the tiles can be easily removed. You can install a furniture handle on it. True, experience shows that even without a handle, such a hatch is quite easy to use.
 (1 ratings, on average: 5,00 out of 5)