3 sockets on one wire. One day at work as an electrician: connecting sockets with a flexible wire
It's hard to imagine a home electrician who doesn't know how to properly wire an outlet, but we've all had to do something for the first time. Even such a seemingly simple procedure for connecting an outlet requires certain knowledge and correct sequence actions. This article is intended precisely for those who already know how to change a burnt-out light bulb and are ready for new achievements.
Basic standards for the physical part of socket installation
When installing an outlet, you need to know what to connect, where, what the electrical wiring has to do with it, what you cannot do with your own hands, and what you should never do. Right? Sorry, no – wrong! Despite the fact that a socket is primarily an electrical product, it is the physics of installation and fastening of this terminal product that is very important.
Let's (without electricity for now) see what errors can lie in wait in this simple, but very well detailed workflow:
- The main fastening element of the socket is the supporting frame. This is a metal square on which the filling is mounted;
- Fixation in the wall is carried out due to spacer brackets(inside the socket) and locking screws, with which the frame and the socket box are connected into a single whole;
- Socket box at the same time securely fixed to the wall.
What are the main mistakes that novice electricians make when performing the task of how to properly connect an outlet? You are right, they start with the problem of how to connect the wires to the outlet, which sometimes leads to big problems with cleaning.

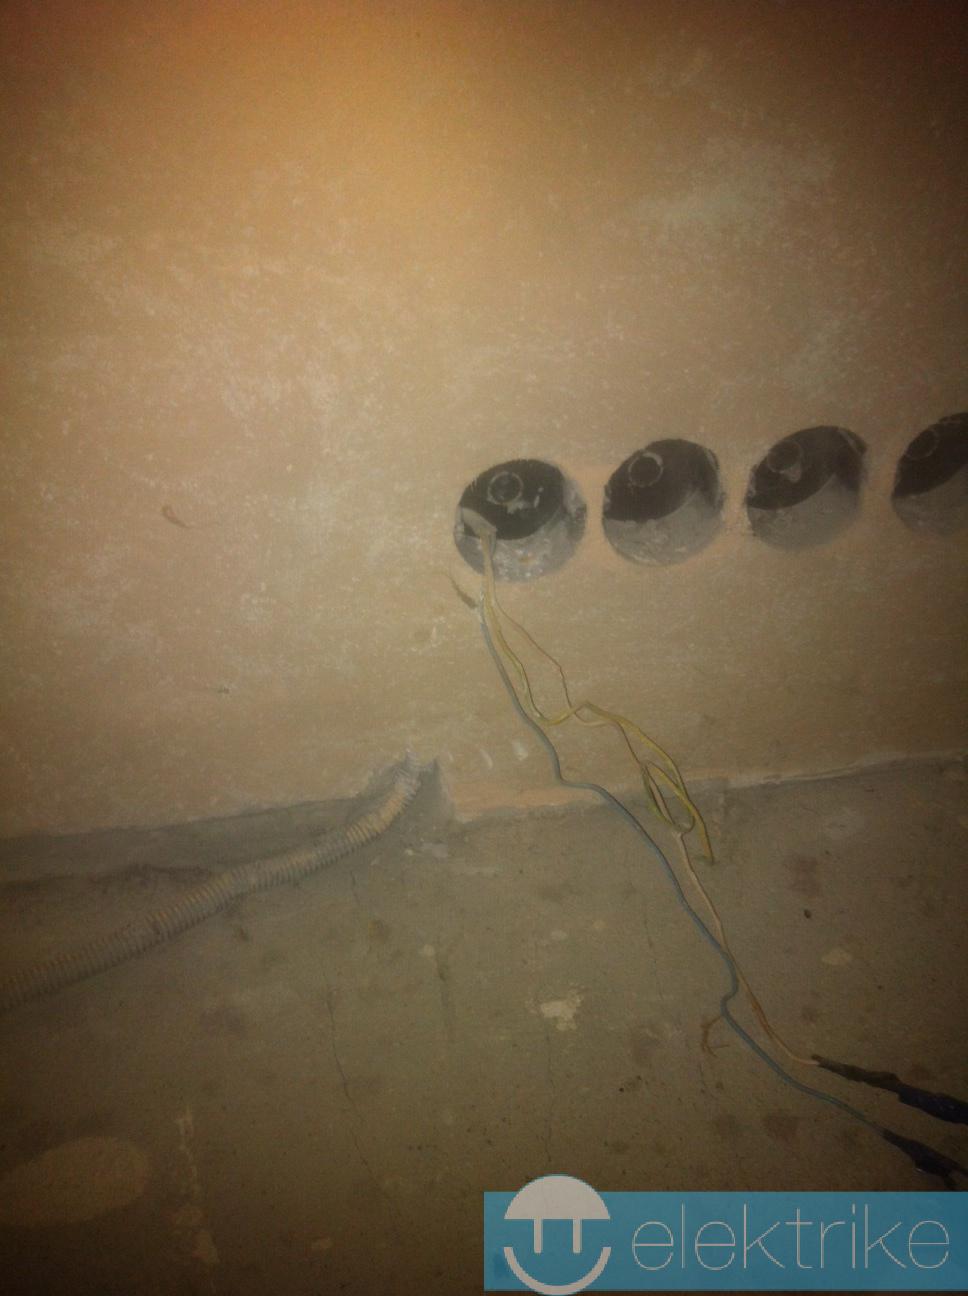
What happened in this case? It's simple. The socket was not secured; after the plug of the mixer, where the meat was ground for the dog’s porridge, was pulled out, the socket was pulled out along with the plug. This led to a cataclysm. The socket fell into the mixer bowl, which led to the following consequences. The hairdryer, broom, massager and beer on the floor are not exhibits. The family was going to the bathhouse when the mixer bowl exploded, causing all this destruction.
The socket burned out and so did the wiring, causing problems on the circuit connected to it. How to solve intractable problems in the electrical network. The good thing is that no one was hurt. This is what the outlet looks like now 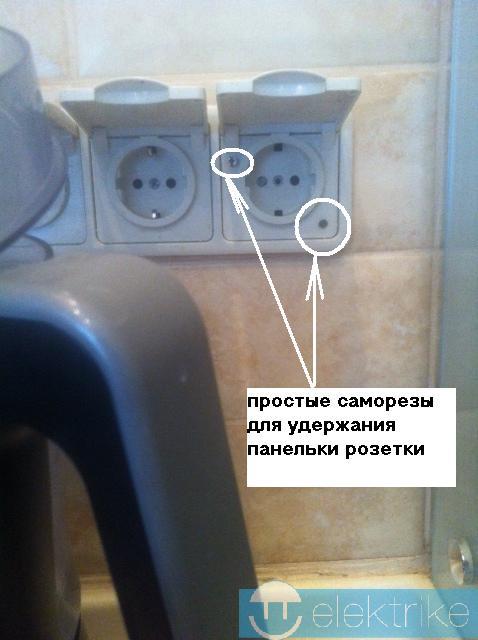 . Obviously this is a dummy.
Before connecting the wires to the socket, make sure that you understand exactly how to securely attach it to the socket!
Before doing electrical wiring, make sure that the socket box is securely installed in the wall, that the spacer brackets will fix it inner part sockets, and that the locking screws will secure the frame. Otherwise, when you pull the plug, you risk it along with it pull out the socket from the wall, and you have already seen the consequences.
When thinking about how to choose the right retaining screw, give preference to a longer and thinner screw. Fat can destroy plastic cup the socket box, which is why there will be no fixation.
A few familiar steps to start with. How to connect wires to an outlet.
There are different sockets, for example television  or 3-phase 380 Volt
  , or some others (there are 42 types of sockets in total), but the installation principle will be the same.
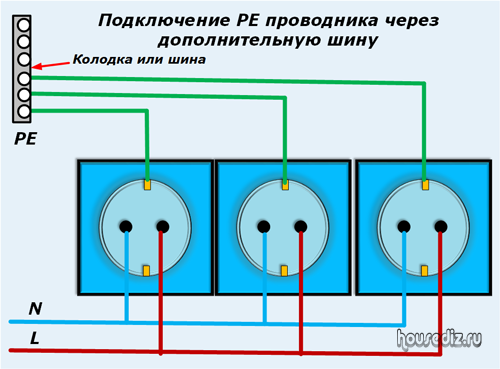
- Let's compose. How to connect wires to an outlet? That's right - it must be connected in series to avoid overloading the wiring. The meaning is clear - it’s better to let one socket in the block burn out than a line inside the wall. After all, if all three sockets connected in parallel experience an overload, it will work, but the wires may burn out.
- Having cut off the necessary pieces of wires (observing the color dependence - phase, neutral wire(zero) and ground), making sure that the size is chosen correctly and there will be a reserve.
- Without installation, we check the possibility of connection and that we have a good idea of the sequence of actions.
- We turn off the power and assemble the first socket to make sure that there is power and everything works.

We act without fanaticism, if three sockets are enough,
we leave three. If you decide that you need more, then get ready. It won't be easy.
Having finished preparatory stage, we think, do we understand everything about how to properly connect the outlet(s), or have we forgotten something? If you are sure that everything is in order, we proceed to installation. More precisely, thoughts about how to properly connect wires to an outlet.
After you've thought about everything and developed an action plan, evaluate the supply of free ends of the wire (pictured above good example) and the ability to keep this supply in the electrical box (just in case), after which:
After this, there will be a few little things left, like crimping the decorative frame, making sure that the socket is securely fastened and other little things. Have we forgotten anything?
Bottom line
In conclusion, we will give you a sequence of actions that will help you avoid various mistakes. So that nothing sad happens to home wiring when installing sockets:
- We will mark the place for the socket box.
- Let's find out how to properly connect the outlet.
- Let's make sure we know how to connect the wires to the outlet.
- Let's find out how many outlets we need in this part of the room.
- Before applying power, let's check the entire circuit.
- Let's remember that any mistake can be very expensive.
- And before connecting the wires to the outlet, we turn off the machines and de-energize the line.
- At the same time, let's make sure that we know exactly how to connect the wires to the outlet, and how to check that all connections are made correctly.
After which we will stop reading speculation online, paid for by someone unknown, and listen to the recommendations of those who have experienced all the mistakes in their own skin and know exactly the price of each screw in the socket. And also how to connect it correctly. Without stories from Wikipedia and other answers, but only based on personal experience. And then, having tightened the last screw, we will know for sure that the socket (two, three, four or five) is assembled correctly, and for many years it will not require any repairs or corrections of the work done.
If, of course, you do everything slowly and very carefully.
Repair work in an apartment is not only plastering and painting the walls and then gluing wallpaper. To make your home cozy and comfortable, you need to take care of installing electrical appliances. Therefore, the installation of sockets may not be the main event, but it plays a key role in the renovation of the apartment.
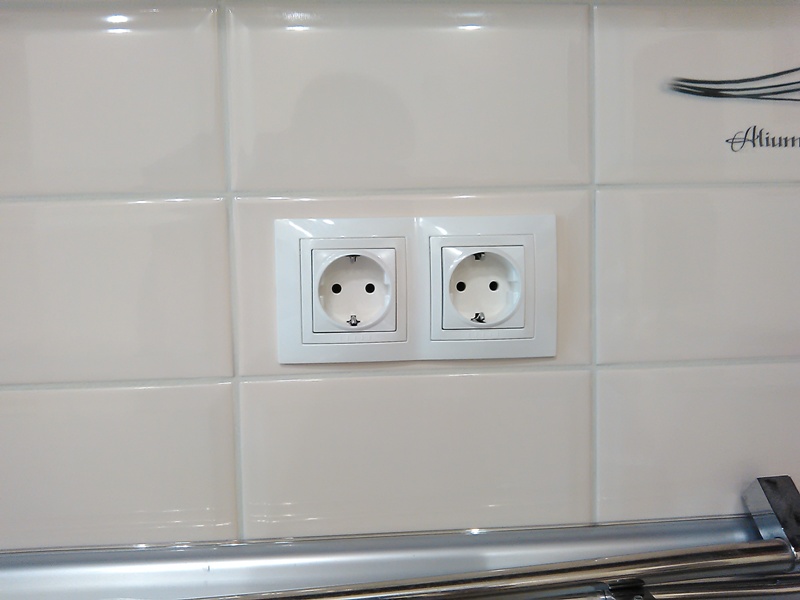
Modern devices are becoming more energy-intensive, in addition, there are more and more of them in our Everyday life. Therefore in Lately Triple sockets, which provide connection to several devices at one point, are in high demand. This connection diagram will be useful in the kitchen, where it is usually not possible to run an extension cord, but there is an urgent need for the simultaneous use of several electrical appliances necessary for cooking. In this article, we will look at how to install , let’s look at the nuances of self-installation.
Components for assembling a triple socket
Let's look at what main components our triple socket will consist of. Modern market electrical equipment offers customers a wide range of sockets. However, in this abundance, finding a triple socket in a single housing is very problematic. Even after finding the product you are looking for, a person may encounter two problems:
- 1. Obviously overpriced product;
- 2. The model does not meet the buyer's requirements.
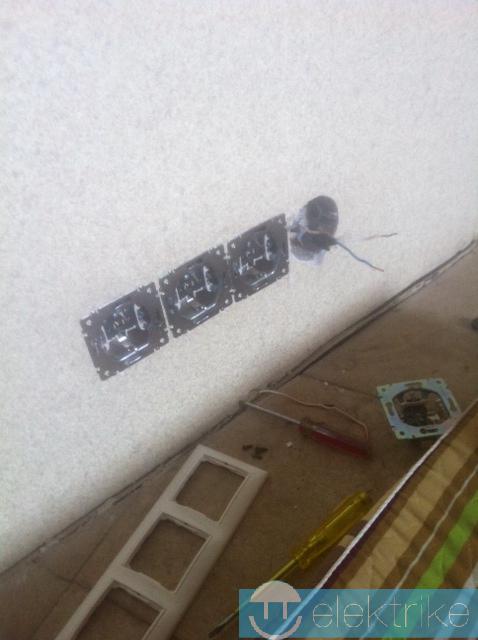
What to do in such a situation? Most craftsmen use this method in 99% of cases - they collect required size block of single sockets. Therefore, a triple socket is often assembled from three ordinary sockets.

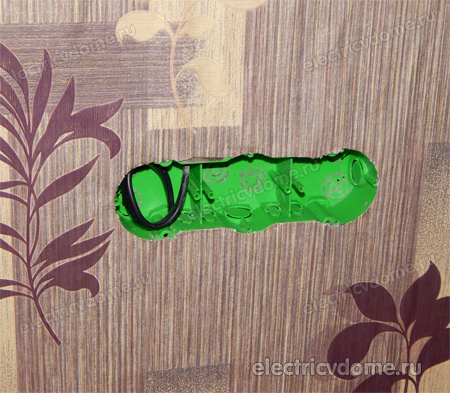
For this we need three regular sockets, With rated current 16 A. Moreover, we only need their internal part. You can safely throw away the overhead frames for each outlet, since we won’t need them. And to combine three single sockets, we need a special overhead frame with three holes, which will create the appearance of a single whole.
How to install socket boxes for a triple socket
The installation process begins with determining the location of the block of three outlets. From correct location the functionality of the design will directly depend. For example, in the kitchen, it is convenient to install three sockets in one socket above the countertop. This way, you can simultaneously connect your microwave oven, multicooker and other household appliances without worrying about the length of the cord.
In a room, it is better to install such a unit behind the TV, skillfully masking all connected wires with a wide screen. It is possible to install such a block of sockets in bathrooms, but here it is important to comply with the requirements fire safety. In particular:
- Minimum distance to flowing water - 60 centimeters (zone 3);
- The socket group must be sealed and moisture resistant with an appropriate degree of IP protection.
Having decided on the installation location, you need to prepare the tool and you can start marking the walls. For installation triple sockets in one socket box you will need:
- 1. Construction level;
- 2. Roulette;
- 3. Pencil or marker;
- 4. A hammer drill with an attachment for punching walls and a crown.
Please note that it is better to install a block of three sockets on initial stages repair work until finishing is applied to the walls.
Wall marking
Please note that this is very important stage work, which will determine the geometry of the sockets and the convenience of wiring. Therefore, marking walls must be approached with maximum responsibility. When marking, you need to be guided by the number of sockets combined into a block.
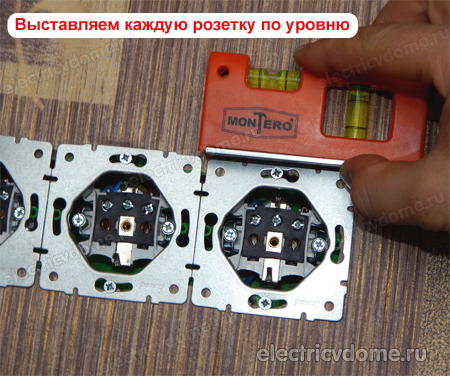
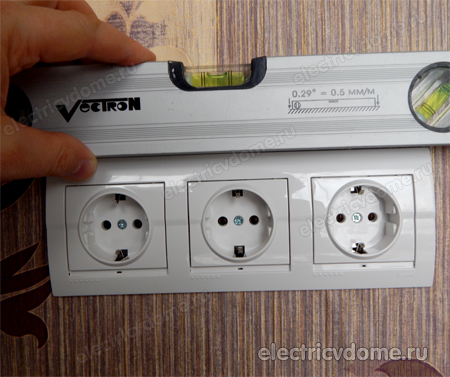
When carrying out work, be sure to use a building level: this way you will gain confidence that the structure will be perfectly level and there will be no problems with installation and connection. If a block of three sockets sits crookedly, the mistake made will immediately be evident.

To mark the walls for installation electrical outlets there are certain requirements. For example, distance between centers of socket boxes is exactly 72 mm. Take this into account when applying markings. Failure to comply with this parameter will lead to the fact that the decorative panel simply will not “sit” in its place.
In addition, the groove for laying wires must run strictly horizontally or vertically from the socket box. Only after meeting these requirements can you drill holes and tap the walls.
Drilling a hole in the wall
After the walls are marked, you need to make a mounting hole for the socket box. This is not difficult to do, the main thing is to have on hand a good hammer drill with a special diamond bit for concrete. Such “crowns” are used to drill holes of a given diameter in brick walls and concrete floors.

The algorithm for working with a crown is simple and intuitive, so even a novice master usually has no problems. The nozzle is inserted into the chuck and drilling of a hole begins in in the right place. Drilling ends when the bottom of the bit touches the wall. The remaining concrete is knocked down with a chisel.
If you are installing socket boxes in a plasterboard wall, then to drill holes you will need a special nozzle for plasterboard walls. You can also use a utility knife.

Also, do not forget about the power cable; it is also necessary to make a groove for it. The width of the groove depends on the thickness of the cable that will be connected to the sockets (whether it will be corrugated or not). For our socket group we will need cable with a cross-section of at least 2.5 mm2.
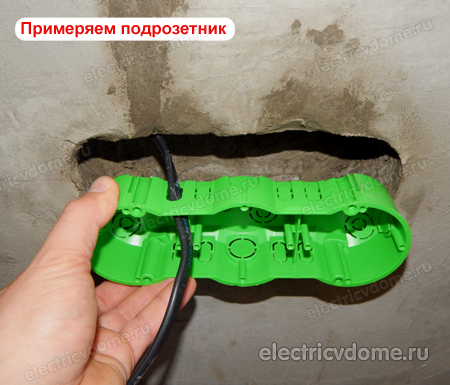
We fix the socket box in the concrete wall
To keep it in the wall, you need to fix the box with alabaster. Here it is important to correctly calculate the amount of mixture that will be applied to the back and side walls. If you overdo it, then the excess alabaster will stick out; an insufficient amount of the mixture will not be able to ensure reliable fixation of the socket box. The amount of alabaster is determined individually, depending on the type of partition.
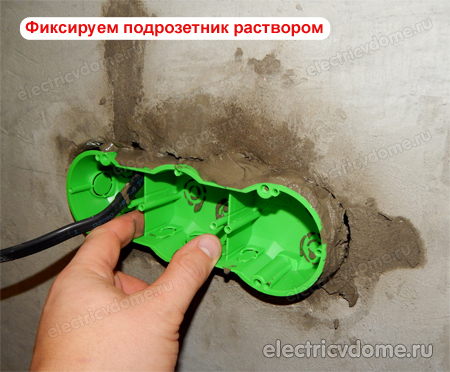
The consistency of the alabaster mixture should not be too liquid, as it will spread when applied. But you also don’t need to make it too thick, otherwise it will be difficult to apply and smear (besides, the thick mixture will quickly set and dry). I always prepare the mixture by eye, in small portions.

This material will provide better adhesion of the socket box to the wall and will dry quickly. By the way, it is precisely because of the drying speed that alabaster should be preferred to other types of building mixtures.

Process installing a socket box in concrete wall What happens is this: a diluted mixture is applied to the inner walls, a block is inserted and securely fixed for a while. At this stage, it is important to observe the geometry and align the structure to a given level. Please note that the mounting screws must match both the vertical and horizontal level of the sockets.

At installation of a socket box for a triple socket Don't forget about the power cable; we also insert it into the hole. Some craftsmen, on the contrary, fix the socket boxes without a cable and push it into the box only after the solution has dried. Explaining this by saying that the cable, bending, knocks the box out of level. There is no significant difference in this and you can do it the way that is easier and more convenient for you. It's easier for me to install the cable right away.


The alabaster will dry for about two hours, when the mixture sets, you can start connecting the wiring.
How to connect a triple socket
As you may have noticed in the photo, only one cable fits our socket box, and three sockets will be installed here. Therefore, we will connect the sockets to each other with a loop in series. This connection option is the most optimal in this case, as it helps to significantly save on electrical cables.

But there is one peculiarity with this connection method. According to the electrical installation rules (PUE), daisy chain connections are not applicable to connecting sockets. However, as practice shows, most electricians do not follow this rule. For example, electrician Uncle Petya makes homemade jumpers from cable cores and powers the second socket from the terminals of the first, the third socket from the terminals of the second, etc. This is how all three wires of the cable are connected (in the case of a three-wire system) - phase, neutral and ground.
BUT, as I said above, according to paragraph 1.7.144 of the PUE, it is PROHIBITED to do this. Namely, when connecting, it is forbidden to break the neutral protective conductor. I try to adhere to the requirements of the PUE and below I want to tell and show how the train works correctly.

The regulatory document states that neutral protective and grounding conductors must be connected to devices and installed using a separate branch method. Therefore, in our case, the grounding wire to each outlet must be connected with a separate branch, and not with a loop.
How to implement this rule into action? Everything is very simple. It is necessary to make as many branches of the grounding wire as there will be sockets. The branch can be made using crimping. We can easily hide all the connecting nodes that we get in this case in the box.
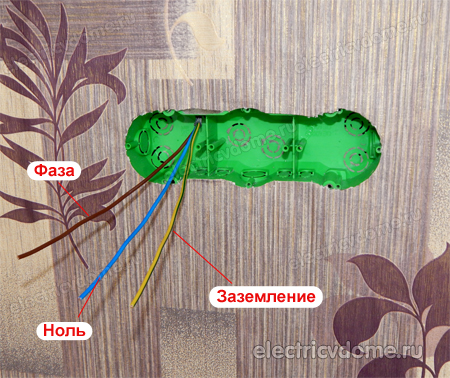
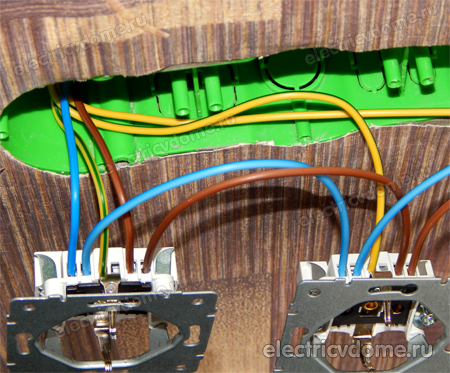
To perform this procedure, we need to cut a piece of cable. For this purpose I use VVG cable 3*2.5 mm2. It’s good that the coloring of the wires in it is done in a human way: the brown wire is phase, the blue wire is zero, the yellow-green wire is grounding.
We prepare three pieces of wire for the grounding branch. The connection will be made using the crimping method.
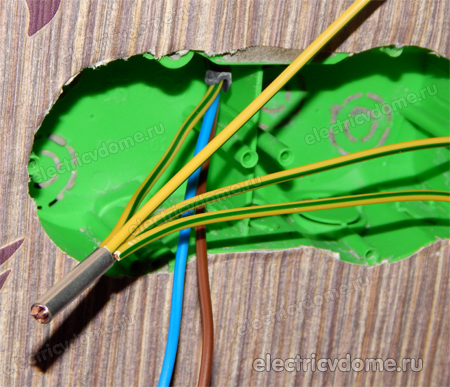

To connect the phase and neutral wires, you will need to make two sets of jumpers. Three more pieces of wire will be required to install the ground wire branches.
We connect the prepared pieces of yellow-green wire with the grounding conductor of the power cable and crimp the press with pliers. In order to insulate the sleeve I will use heat-shrinkable tubing. The resulting connection is neatly placed on the bottom distribution box.

![]()
As a result, we got a separate grounding branch for each outlet, which does not contradict paragraph 1.7.144 of the PUE.

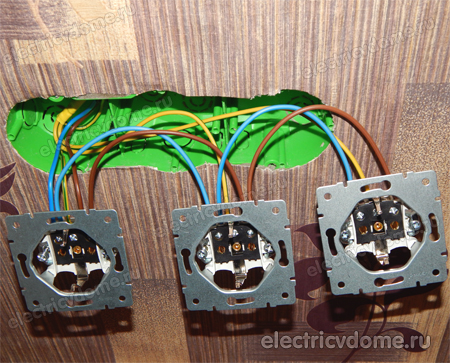
We connect the phase and neutral wires with a loop. There are no rules restrictions here. To the first terminal of the socket we connect the phase from the power cable and the jumper going to the next socket. To the second terminal - we connect the neutral wire with a jumper according to a similar circuit. The number of loops is repeated according to the number of sockets combined into a single block.
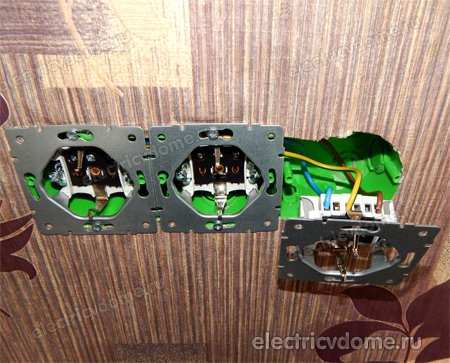
Fortunately, the design of the sockets is such that it allows you to plug two wires under one contact. Remember that if you tighten two wires under one contact, then you need to use wires of the same cross-section, otherwise the wire with a larger cross-section will tighten well, and the wire with a smaller cross-section will have poor contact. This may cause a fire.

Next, all that remains is to install the sockets and secure them decorative panel. Now you know how to install and connect a triple socket into one socket box. Good luck to everyone, see you next time. Thank you for watching. I'll be happy to respond to comments, don't hesitate to ask questions.
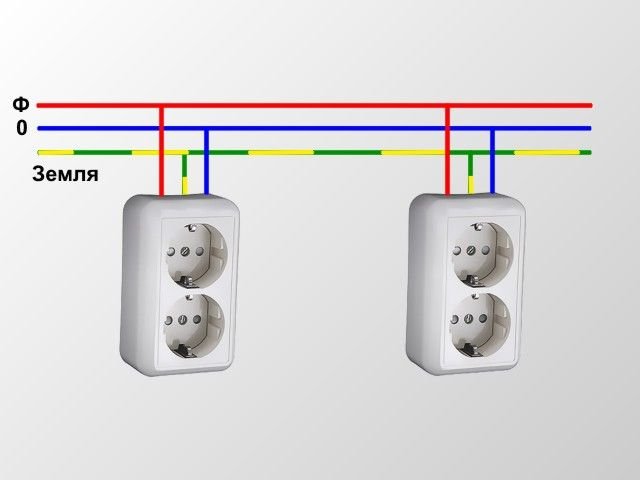
Connecting sockets with a cable, that is serial connection, can be found almost everywhere. This is the most common way to connect them. This requires less cable and reduces labor costs. Some people think that connecting sockets with a cable is not permissible, since the neutral protective conductor will break, which is prohibited by the PUE. Although most electricians regulations don't pay special attention and connect the sockets in series using jumpers from the cable cores.
We try to adhere to the requirements of the PUE and below I want to tell and show how we do this.
First, let's read the PUE clause 1.7.144:
The connection of each open conductive part of the electrical installation to the neutral protective or protective grounding conductor must be made using separate branch. The series connection of exposed conductive parts into the protective conductor is not permitted..
The connection of conductive parts to the main potential equalization system must also be made using separate branches.
Connecting conductive parts to additional system potential equalization can be performed using both separate branches and connection to one common permanent conductor.
From this paragraph it is clear that the connection of neutral protective and neutral working conductors must be made using branches and their sequential connection is not allowed. That is, it is not allowed to connect these conductors to the contacts of the first socket, then connect the second socket using jumpers from the cable cores, etc.
But what if you need to connect the sockets with a cable, for example in a block consisting of several sockets? I just want to show you how we do this.
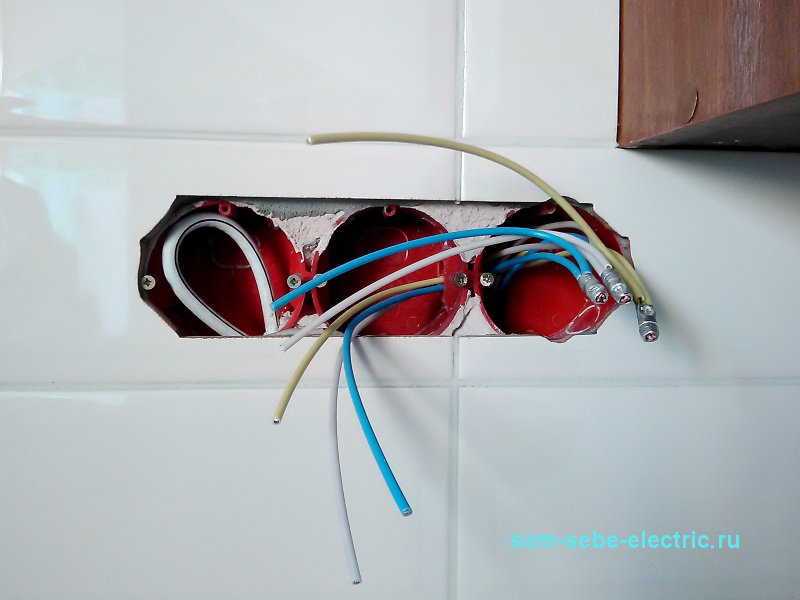
Connecting sockets with a cable looks like this. From the shield the cable went to the first socket, then from it went to the second, from the second to the third, etc.
In order not to violate the PUE clause 1.7.144, it is necessary to connect the zero working and zero protective conductors do using separate branches. To do this, in order to accommodate the connections of the branches, we use deep socket boxes. They are about two centimeters deeper than ordinary boxes, which allows you to fit everything in them freely.
Alternatively, Hegel installation boxes can be used. Take one deep socket and connect it to several ordinary ones.

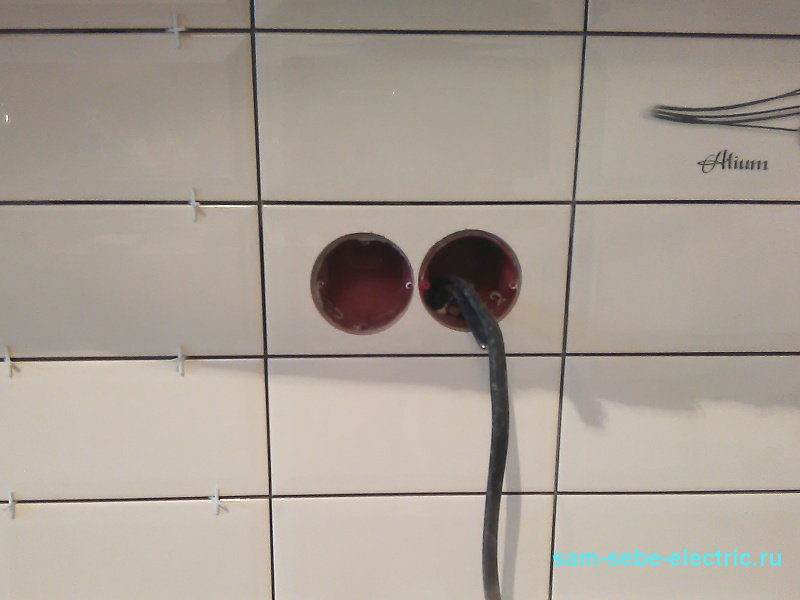
Below I show an example when it is necessary to connect two sockets located in one block, and it is necessary to connect the next block, also consisting of two sockets. To do this, a cable comes from the switchboard to the first block, and the second cable goes from it to the second block.
We mount the connected installation boxes into the wall and lead both cables into a deep socket box. In the photo below, the second cable is hard to see, since it lies under the first.
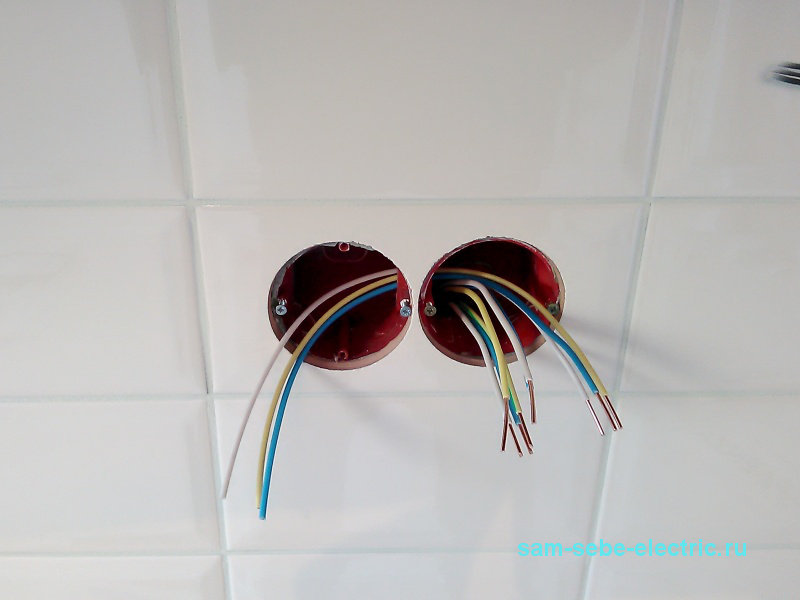
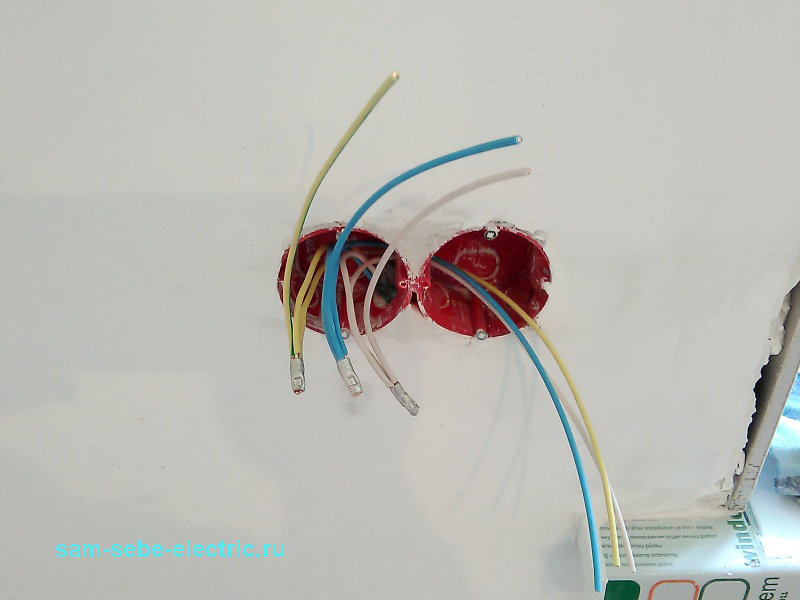
Then we cut all the ends and prepare two sets of jumpers. Thus, it turns out that in the deep socket box there will be four phase conductors, four neutral working conductors and four neutral protective conductors. These are groups of cores: 1 - from the panel, 2 - to the first socket of the block, 3 - to the second socket of the block, 4 - to the next block of sockets.
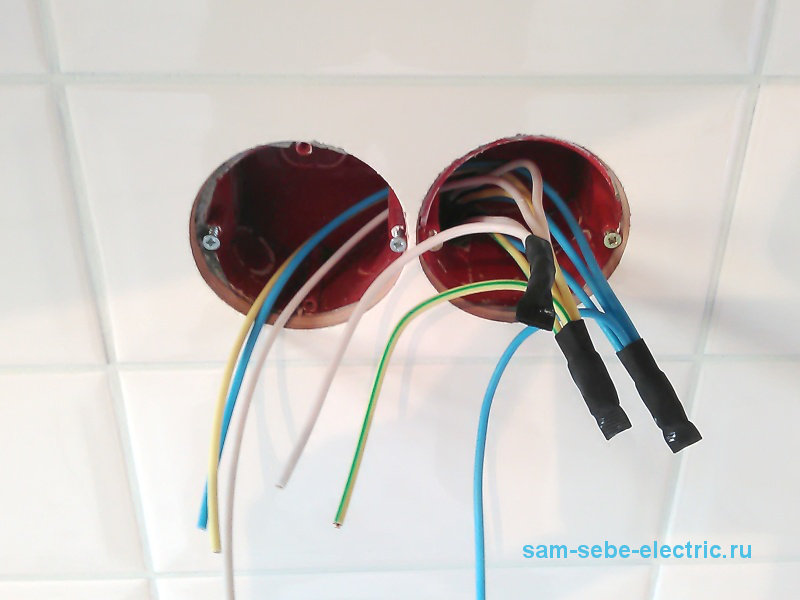
Next, we group the conductors by color and connect them. I make all connections using crimping.
![]()
We insulate the sleeves using heat shrink tube, because it is reliable, safe, fast and inexpensive.
Then we carefully place all connections in a deep installation box. Thus, separate branches are obtained for each contact of the socket. This is allowed by the PUE. Also, when using this option connection of sockets, there is no need to use hidden distribution boxes. It turns out that they will be located in the sockets themselves and will always be accessible if necessary.
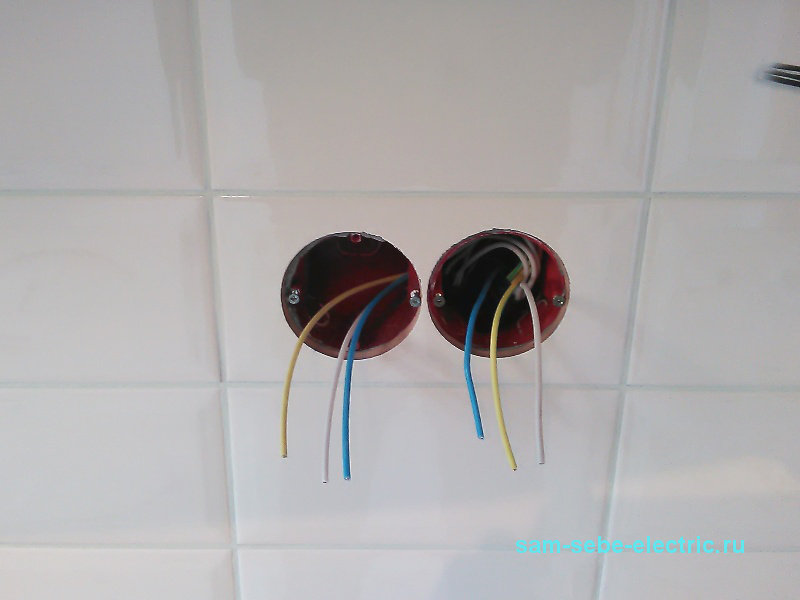
On final stage We install the sockets ourselves.
Below is the next block of sockets, to which the cable goes from the already connected block. The same operations as described above are performed here.
The next photo shows final result. The second block of sockets is on the left side of the photo
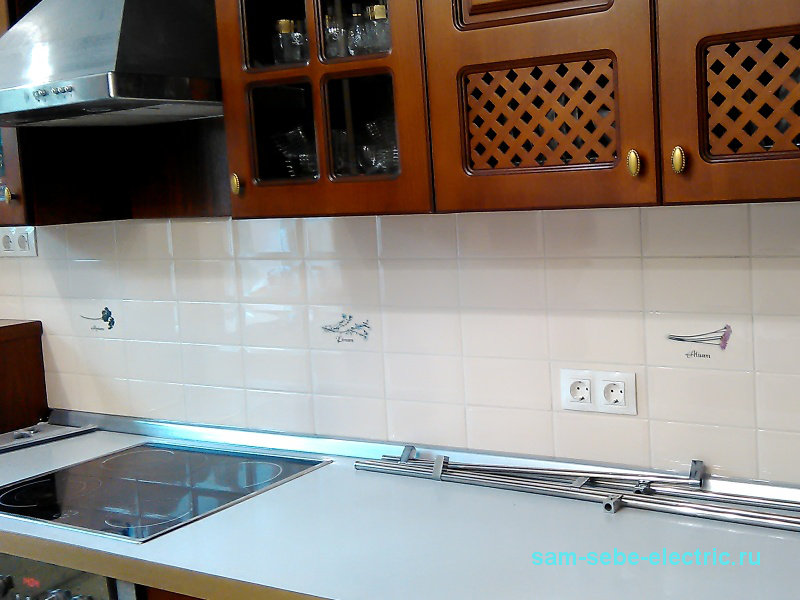
Throughout the apartment, we connected sockets with a cable, as described in this article. Therefore, there are no hidden distribution boxes in the outlet lines, and if necessary, there is access to all cable connections.
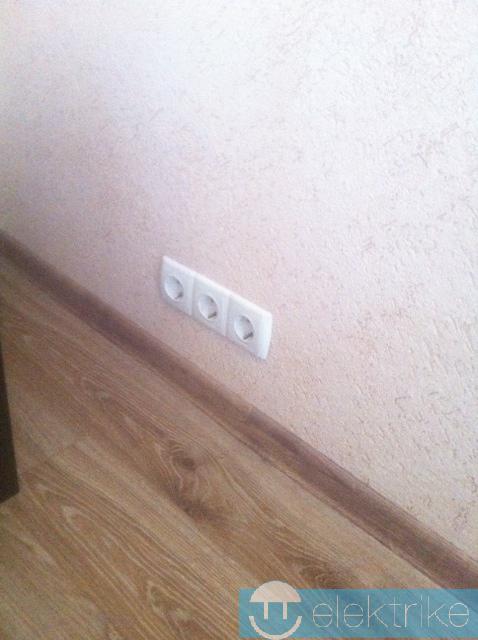
Sockets in the room...
Sockets in another room...
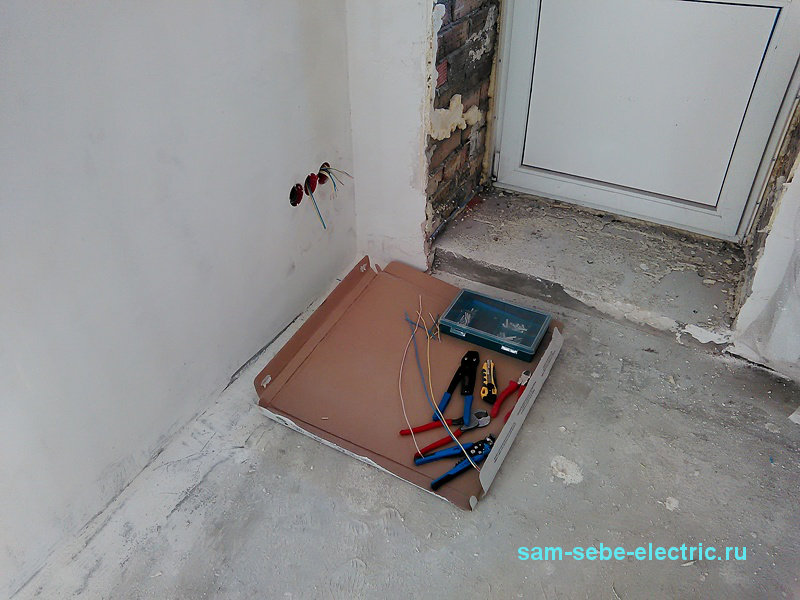
When the floors in the apartment are not yet ready, then use tools and Consumables put on something clean. I love it when all the instruments are clean.
![]()
How do you connect sockets with a cable?
It’s worth immediately capturing the reader’s attention that modern man lives by double standards, simultaneously operating in the world of electricity.
This objective reality emerged during the transition period when:

The need for such a transition arose gradually, and began to be implemented thanks to urgent demands from an international electrical company. People began to massively use powerful electrical consumers in everyday life, which create the maximum load on the home network. Breakdowns of electrical equipment, wiring faults, and fires began to occur.
Homes and people began to be seriously disturbed.
We had to develop and implement new protection systems, which required changing the connection diagram household appliances to the ground loop. To this end, the designs of electrical outlets and cables have undergone changes for the new standards.
Cables and sockets for buildings with TN-C system
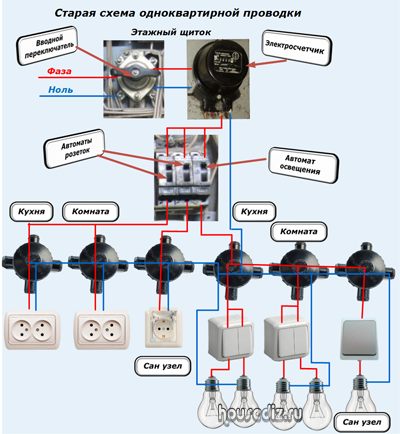
In old wiring single-phase network Only two conductive cable cores are used:
- phase potential;
- working zero.
They are connected to the internal contacts of the socket. In many countries, it is customary to place the working zero on the left, and the phase on the right, if you look at the mechanism from front side. However, in our country, rarely anyone pays attention to this rule. Even in a separate room, the uniformity of installation is not often observed, which is wrong.

For three-phase power supplied to the floor panel apartment building, a four-core cable is used, through which three phase potentials and a working zero are transmitted.
Cables and sockets for buildings with TN-C-S and TN-S systems
In these diagrams all cases electrical appliances additionally connected to the ground loop. For this purpose, another protective neutral conductor (PE conductor) is used inside the cable, which is mounted to the sockets on the terminal of the additional connector.
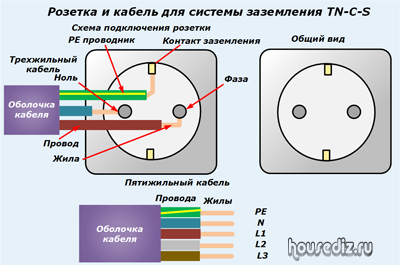
As a result, a single-phase network uses a three-core cable, and a three-phase network uses a five-core cable.
Recommendations for owners of old apartments on transition to the new standard
Converting buildings to a safe power supply scheme on a national scale requires large material costs. It is carried out in stages and cannot happen quickly. Moreover, power supply organizations will reconstruct the circuit from the power source transformer substation right down to each apartment block of a multi-storey building.
This is where their function ends. Refinement of home wiring inside the apartment is the responsibility of its owner. There is time for this. It must be timed to coincide with the next repair and completely replaced, sockets and equipment.
Connection diagrams for apartment sockets
IN practical activities there are many options. Depending on the chosen method, sockets and switches are connected.
Power cables are supplied from located inside the apartment panel in one of the following ways:
- radially;
- along the ring;
- mixed.
Inside small rooms, it is considered optimal to divide the wiring into two groups, as has long been done in a single-apartment wiring diagram:
- power socket group;
- lighting part.
Each of them is powered through its own protection. Don't forget about or. Moreover, sockets for powerful consumers such as washing machines, electric stoves connect a separate line, if possible, with a whole piece of cable without any connections.
Distribution boxes of the socket group are used for sequential connection of consumers to their protections in the apartment panel. From them only one cable goes to the outlet.
Please note that the required number of sockets in modern room taking into account the number of operating electrical appliances, it can reach up to ten pieces. Constantly using extension cords and tees is inconvenient and dangerous.

Therefore, instead of a single socket, mechanisms or entire blocks mounted through an overhead frame are installed.
In this case, the difference should be clearly understood electrical characteristics the applied scheme.
What is a socket block
It can accommodate up to four individual outlets and is factory assembled with all internal electrical connections made. Wiring for the unit is carried out like a single socket.

This differs from an overhead frame, in which each socket is usually assembled into a serial cable with wires connected from one to another. This is more economical and technically simpler: it does not require laying a lot of cables and using additional protection.
However, powerful consumers connected to individual sockets of overhead frames must be powered with an individual cable.

How to connect a protective conductor to a socket
The installation of a PE conductor is always subject to increased requirements for connection reliability and mechanical strength. For this purpose, the loop method is prohibited here. Only the branching method is allowed, when the entire protective zero line is made with a single wire from start to finish. Assembling it in pieces when connecting them by any means is not allowed.
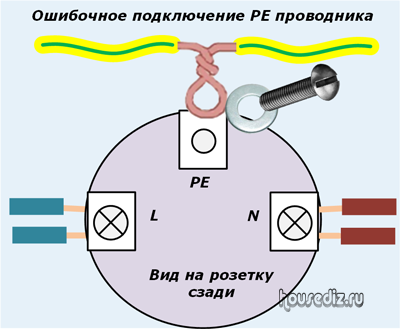
The reason for such a strict requirement is that fault currents reach very large values. They are capable of burning any unreliable connection. In this situation, connected consumers will be left without protection.
This point of the rules is not always followed even by electricians, when the PE wire of the conductor is inserted under a screw with a whole metal core, but stripped insulation using a loop.
This is an erroneous action and is not considered a branch.
Methods for creating branches for sockets
There are two technical solutions to reduce material costs for laying PE conductor to sockets:
- using special connectors;
- additional connection box.
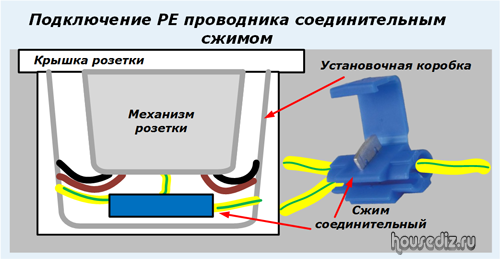
Method No. 1
To simplify the installation of a protective zero for connecting sockets with a cable, you can use Scotchlok TM type connectors specially designed for such purposes, using mortise contacts. It is often called a "clip".
This connection point can be placed directly inside the installation box between the socket mechanism and the bottom. When choosing parts, it is enough to provide for the possibility of providing a small reserve space.
Method No. 2
An additional branch box is created next to the socket line, connected by a PE conductor to the shield. Inside it, branches are connected to each socket by welding. It is allowed to use a connecting block.
In both cases, when connecting the phase and neutral wires for the sockets, a loop is formed, and a PE conductor - a branch.
To conclude the presentation of the material, I suggest you watch the video of the owner of elektrik-sam.info “Socket connection diagram”.
Connecting sockets with a cable is often used during installation electrical wiring in the apartment. This is a fairly common connection method; at its core, it is a backbone connection for consumers.
Connection methods
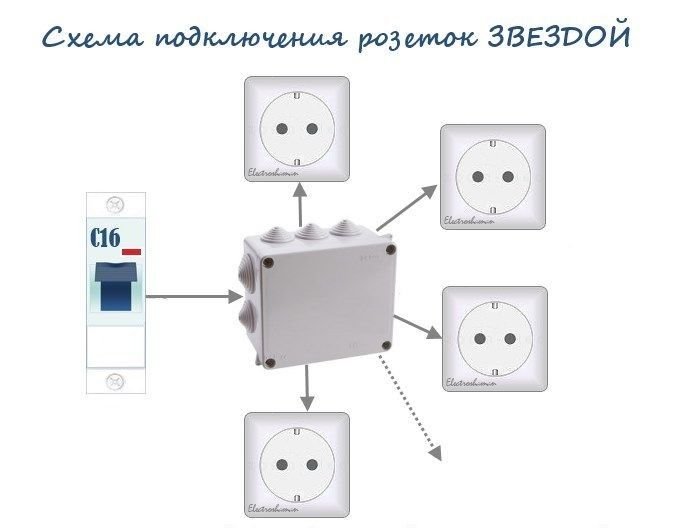
Currently, there are two main schemes in the apartment:
- Radial connection (sometimes called a star connection, which should not be confused with the circuit used in three-phase circuits). This technical solution widely used in apartments and private houses. Its main advantages are simplicity and reliability. The main disadvantage is the high consumption of expensive cable.
- Ring circuit. It is practically not used in our country, but it is widespread in some regions Western Europe. The meaning of this connection is that the electrical circuit supplying the load is closed in a ring. This makes it possible to supply consumers simultaneously from both sides. The ring circuit significantly increases the efficiency of electrical wiring compared to traditional radial connections and at the same time is more reliable in relation to the main one.
Connection diagram
In the case of radial connection, each is allocated a separate line going directly to the distribution box. Naturally, the reliability of such a scheme is the highest of all non-redundant connections. In order to reduce the consumption of electrical cables required for installing electrical wiring according to a radial diagram, socket cabling is often used.
Loop connection can only be used in cases where the total power of consumers, as well as their specifications and operating conditions allow this.
IN general view The diagram for connecting a group of sockets with a cable looks like this:
Since this circuit uses socket terminals as wire connection points, this connection has some of the properties of a series connection. electrical circuit. Namely:
- If a wire burns out at the terminal of one of the devices (the vast majority of breaks occur in such places), all the devices following it are inoperative.
- The connection of each consumer causes a significant increase in current in the wires connecting the sockets to the electrical box.
Thus, it is advisable to use a cable for connecting sockets in cases where the total power of consumers does not exceed the maximum permissible power of the cable supplying a group of sockets.
Features of installing a group of sockets with a cable:
- According to the requirements of the PUE, the PE conductor must not have breaks. To connect it to the terminals of the electrical installation, it is necessary to use separate branches. Incorrect connection of the grounding conductor can lead to the fact that if it breaks on one of the outlets, all other devices will also be ungrounded. Since determining the quality of grounding without conducting special measurements or visual monitoring of the integrity of the PE conductor is impossible, then in this case it is not possible to achieve the required level of electrical safety.
- To protect consumers powered by a group of sockets, it should be used at 16 A. If the total power of the electrical installations supplied exceeds 3 kW, then a separate line must be laid for each device.
Installation of branches in a socket box
To fully comply PUE requirements and without incurring too much cost for laying a separate PE conductor to each socket, you can make branches directly in the socket box. For this purpose, special terminal blocks or crimp sleeves can be used.

The main advantage of terminal blocks is that there is no need to use special tool for their installation. Such products are installed very quickly and easily. In addition, each of them can be easily dismantled for repairs or maintenance of the connection points of the wiring elements.
In turn, the advantages of crimp sleeves include more high quality electrical connection, as well as their low price.
When using terminal blocks or crimp sleeves, you must act very carefully, since you will need to compactly arrange all the resulting connections in the socket box. Some experts recommend not limiting yourself to making a branch for the ground wire, but connecting the phase and neutral to the socket contacts in the same way.
Phase and neutral wires can be connected directly to the socket contacts. The quality of such a connection is largely determined by the type of contact. Standard bolt clamps are often unable to provide sufficient reliability for connecting two wires inserted into them at once. Therefore, for devices intended for connection with a cable, it is necessary to use terminal blocks. Another option is to use high-quality devices equipped with several clamps for each terminal.
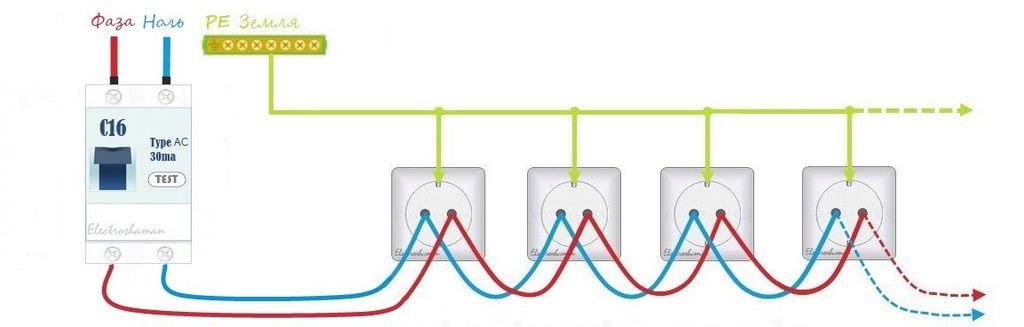
The procedure for installing a daisy chain connection
- Preparing installation sites for socket boxes and gating walls for laying cables between sockets.
- Laying the cable from the distribution box to the first socket box, from the first to the second, and so on according to the number of sockets in the loop.
- Preparation of branches for connecting the PE conductor, and, if necessary, the neutral and phase wires.
- Installation of branches and laying them in the socket box.
- Connecting the neutral, phase and grounding conductors to the corresponding terminals of the device.
- Fixing the working part of the product in the installation box.
- Installing the outlet cover.
Thus, the daisy chain connection of sockets allows you to significantly save on the length electrical cables. In addition, it makes it possible to significantly reduce the volume construction work for laying electrical wiring. This technical solution may be ideal if there is a need to add one or two outlets in a room without carrying out large-scale renovation work.
 (1 ratings, on average: 5,00 out of 5)

