How to connect a legrand power socket. Connecting an Internet outlet: diagram, video, photo.
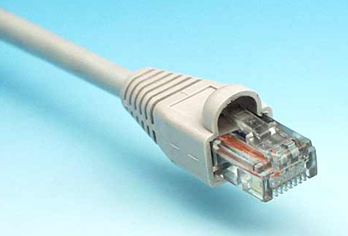
An Internet socket, which is used in computer and other communication networks, has a significant difference from connecting and installing conventional electrical equipment. This is due to the presence of a cable for data transmission (used twisted pair) and the presence of an RJ-45 plug that needs to be connected to the power supply (type 8P8C). These two differences significantly changed the structure of the connector, because of this, the installation and connection of the Internet outlet also changed significantly.
What is important to know?
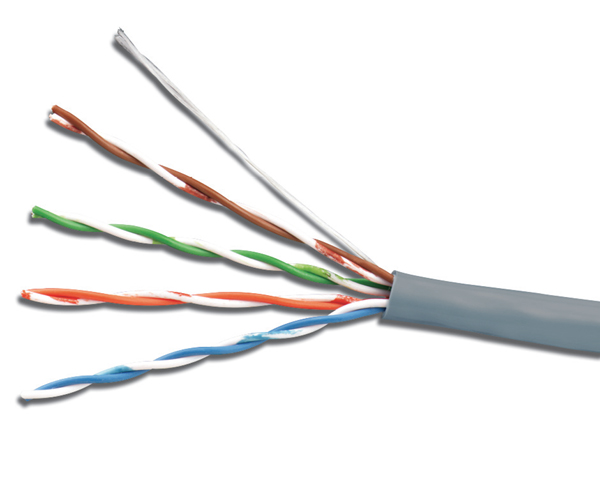
As a rule, a socket with two twisted pairs with four wires is used (eight cords are obtained). Each core is divided by color and has a personal color marking. They are all necessary for fast data transmission.
The 8Р8С type connector, which is used to connect to the socket, has the following form:
Manufacturing engineers spent a lot of effort developing such an Internet socket that the user could independently install and connect to electrical network without any experience and special device. In addition, the consumer must make the connection in such a way that the reliability of the connections and the safety of the contacts remain at the highest level.
Preparatory work
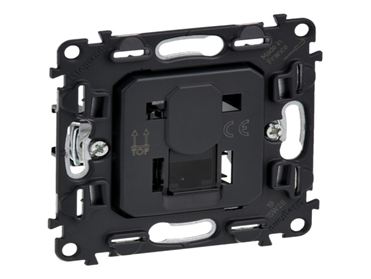
The example uses a product from the Legrand Valena model. Since its mechanism is suitable for many series of Legrand electrical installation equipment, it has become popular among consumers.
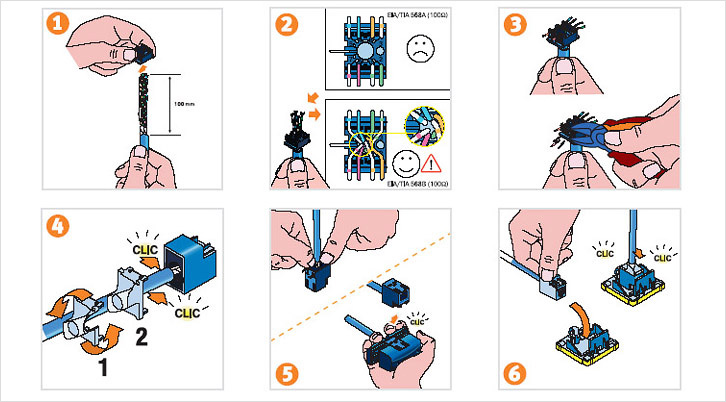
Before you begin installing a computer socket with your own hands, you need to install a twisted pair cable. To do this, the end of the twisted pair is brought out into the socket box.
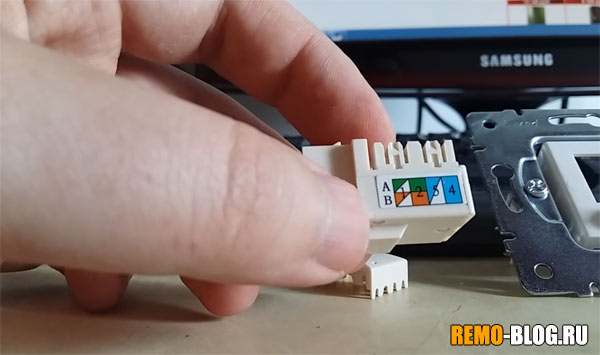
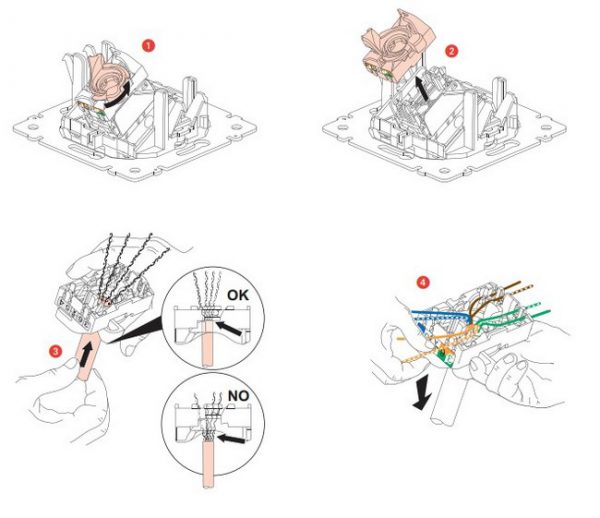
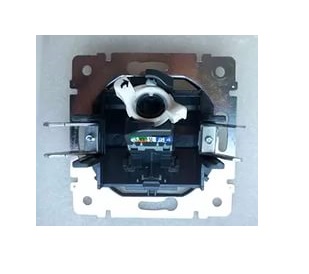
First of all, you need to remove the back cover from the mechanism. To do this, the Internet socket must be turned back side to the face. This is done as follows: you need to turn the white lock clockwise (approximately ninety degrees). How this is done correctly is shown in the photo below:

After the latch has been rotated, it stands perpendicular to the connector body and the rear part of the structure is easily detached from the device. Then you need to insert network cable (twisted pair) in the center of the back cover, which was previously removed. This is done from the side of the latch ( outer side). After this you need to expose the veins. To do this, you need to carefully remove the protective sheath from the twisted pair.

Connection nuances
There are grooves and stickers on the back cover of the Internet socket that indicate which circuit the device can be connected to. There are two connection schemes - A and B. Which type to use depends on how the equipment is connected to each other.
Today, almost all network structures independently recognize the connection scheme used and, if necessary, adapt to it. But the network outlet to which you need to connect the mechanism to access the Internet is best installed by connecting the wires of diagram B.
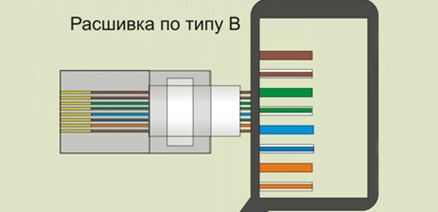
According to the diagram, it is required to place twisted pair cords of a certain color into the grooves of the cover of the corresponding color.
Then return the lid to old place. As soon as the cover has taken its place, you should close the white latch. To do this, it turns counterclockwise. It should be noted that incorrect installation covers are completely excluded, since the device has special elements that are mirrored on the connector (protrusion and groove). Therefore, it is impossible to install the elements incorrectly.
But the question arises: how is the Internet socket connected to the cable, since the insulation from the cores was not removed? This is considered the main difference between a network socket and other electrical installation structures. The pads with contacts in a computer socket are two sharpened plates. They are arranged so that the distance between them is equal to the cross-section of the double copper core.
Thus, the cover with all the inserted wires is placed in its original place, and these blades cut through the insulation of the twisted pair and come into contact with the cores that conduct current. This connection is reliable. It guarantees uninterrupted stable work electronic designs. In this case, the work will be carried out without unnecessary losses.
Then you should make sure that the installation of the cores is carried out correctly and cut off the excess ends of the twisted pair that stick out. The main thing is not to allow any cables to accidentally short-circuit with each other.
All that remains is to install the Internet socket in the socket box, secure it front panel. Once connected to the network, you can check the result. You can install and connect any network device yourself using this method. Even if the contact groups in them are different, the meaning will not change.
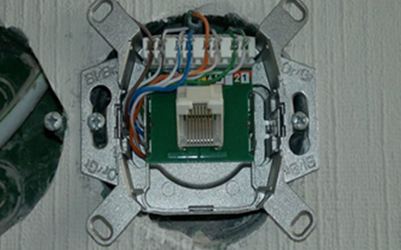
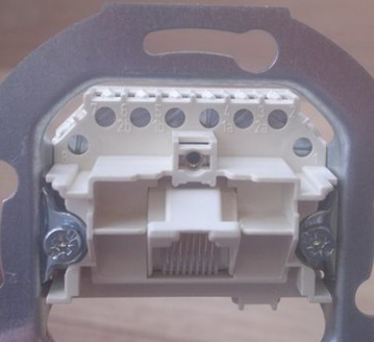
For example, there is a socket mechanism that is connected manually. That is, each twisted pair cord is squeezed into a specific terminal according to the number and, as shown in the photo below. This is a little more complicated and longer than installing an Internet outlet from the Legrand series. But the technology of how to install and connect the device remains unchanged: the cores fall into the hole between the pointed plates and touch the core, which carries the current.
Important! Before connecting the cable, you should call your Internet provider and find out what connection scheme is used in the apartment.
Now you know how to install and connect an Internet outlet with your own hands. We hope that the provided diagrams, video and photo examples were useful to you in your own electrical installation!
You probably don't know:
Like( 0 ) I do not like( 0 )
And the last one is the Internet, which is very popular nowadays. I already wrote about the first two, just follow the links, but about the last one, “tailored” for computers, I somehow kept putting it off. Today I want to correct this injustice and post full instructions by connection. I have a LEZARD socket, but it will be useful for everyone to look at it, because the principle is the same for everyone. As usual there will be photo and video instructions. So bookmark it...
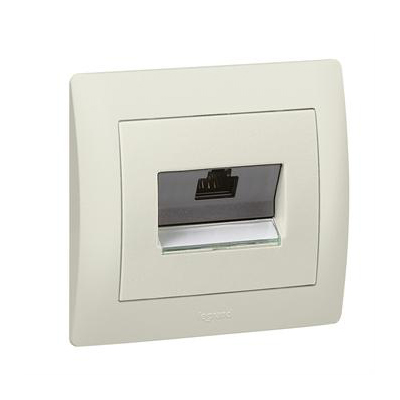
First, let's look at the Internet outlet itself. This plastic type, which is inserted into, but connected to an Internet cable, that is, there are no electrical wires there.
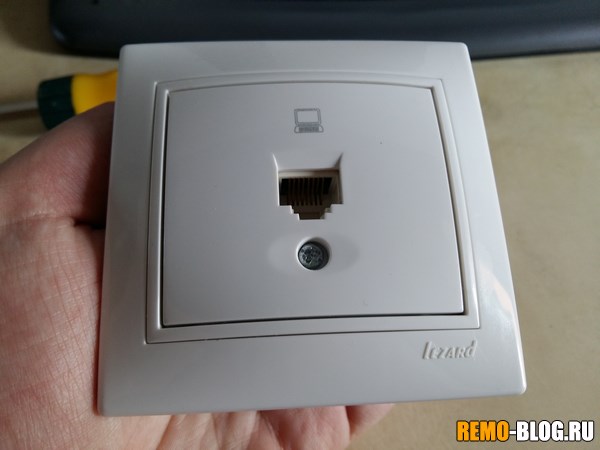
On the outside of this socket there is a connector for an RJ45 connector; it is into this that we then insert the wire from network card computer, laptop or TV (). Hangs on the wall to hide wires (which are embedded in the wall) and make it more aesthetically pleasing. Everything is hidden, everything is beautiful - this is the main purpose. I think now it becomes clear why it is needed!
Disassembling the Internet outletLEZARD
Before we mount it, we need to disassemble it. This is done in order to connect it to the Internet cable, and then attach it to the wall. Here we go:
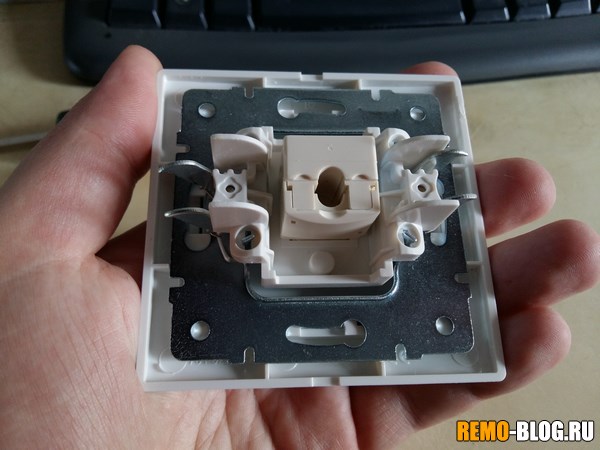
- Unscrew the body. We unscrew the central “bolt” and all the plastic decorative protection will come off. We don't need it yet.
- After this we need to remove the central part with the main contacts. It sits on the latches, just press on top and everything will come off.
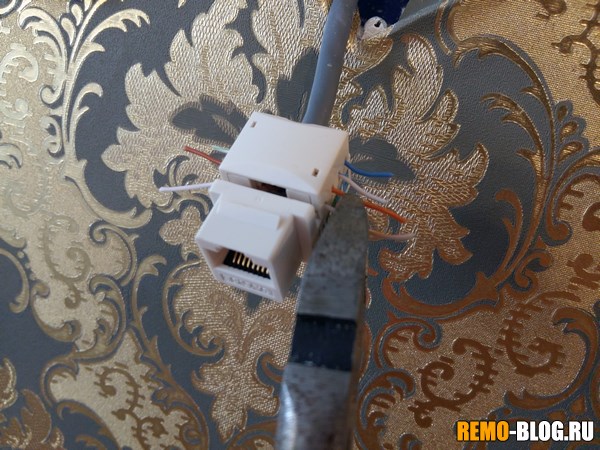
- The central part is in our hands, it is this that we will connect to the Internet cable. To do this we need to remove the top “small” cover.

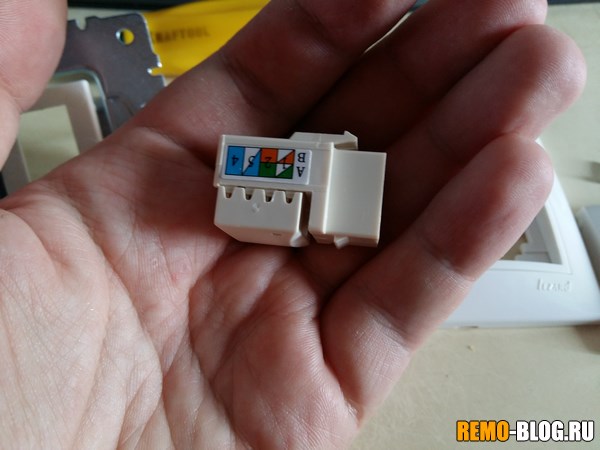
- We need to “plant” the already stripped cable into these contacts. However, another question arises - how to plant it? Where should any colors be? See the diagram below.

Connection diagram
As you can see, different colors are applied to the “sides” of the outlet; it is by them that you can determine how to make the connection correctly. However, there are two rows of colors: row “A” and row “B”, which one should you use?
- It's all just guys, the first row "A" is for self-connection, here the colors are not in the generally accepted configuration, as if for their own needs. It’s worth connecting this way if you did the wiring yourself. Scientifically, this configuration is called T568A, I do not advise you to use it, because now in Russia they use a slightly different configuration.
- T568B, " option B“- this is a generally accepted configuration; if installers ran a wire into your apartment, they will “crimp” it this way! I myself, as an experienced IT specialist, use only this method so that everything is in order in my head. So, everything is simple - we combine the wires according to the colors.


That is, “white-orange” is marked on the body, insert the “white-orange” wire into it, if it’s blue, insert blue, and so on. I think there is no need to explain here. Watch the video version below for more details.
I would also like to note that you need to connect all 8 wires! Of course, there is an option with “four”, but it works at speeds of up to 100Mb/s. But all “eight” can withstand up to 1Gb/s, and this is serious!
How to start a wire
Many people wonder how to connect a cable to an Internet outlet? Does it need to be cleaned, etc.?
There is no need to clean anything! We just take it required length piece and forcefully bring it inward, the socket has “incisors” on the sides, they are made like “teeth” with a point downward. They cut through the cable braid to the metal and prevent it from coming back out.
Thus, the connections are very strong, and there is also an additional cover on top that will not allow the wires to escape.
Final connection
Well, we have completely figured it out, most importantly with the wiring. Now comes the final connection. We cut the cable (to the required length, I advise you to leave 10 - 15 cm) - we strip it and insert it into our connectors and close the plastic “small” cover.

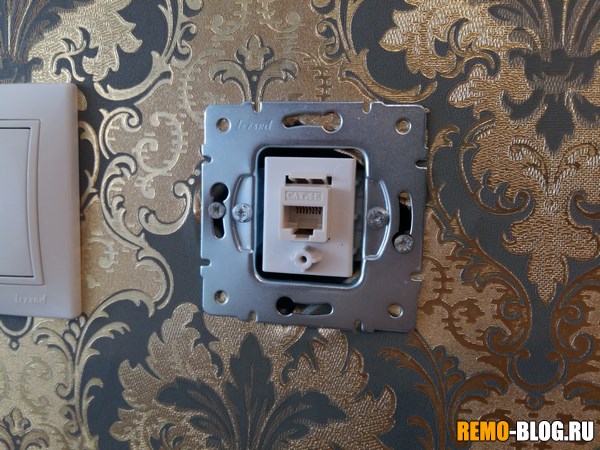
Then we insert the resulting “block” into the window of the metal frame.
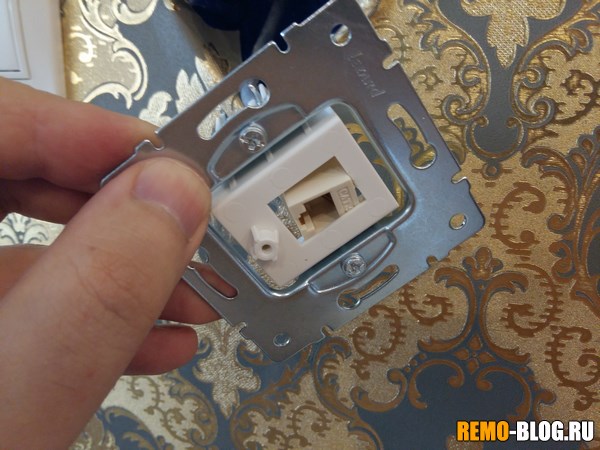
Now we mount the socket to the socket box. You may need both side locking bolts and standard ones from the socket box. This is what it looks like without the decorative “plug”.

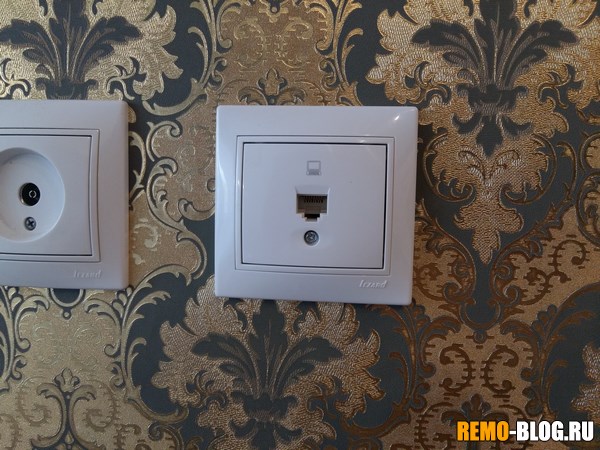
Now we take and put on the “plug”, screw it onto the “bolt”. This final stage, in fact, you can already use the Internet.

Now we are watching the video version of the article, in which I tried to tell in more detail.
VIDEO
Here are the instructions, use it guys. I’ve already connected several outputs this way, including behind the TV, and it’s been working for several years now!
An Internet socket is significantly different in installation method from a regular socket. The difference lies in the presence of a data cable (twisted pair) and a plug for connecting to the power supply. Because of these differences, the connector has a unique structure, and therefore the rules for installing such an outlet have their own characteristics.
Types of connections
Modern communications equipment is produced by a few large companies for the whole world. In such circumstances, it would be extremely irrational to use multiple standards for different markets. As a result, companies adopted uniform technical rules, which allow you to automate most tasks.
In previous years, to connect to equipment, it was necessary to create a crossing of the cores with each other. This inconvenience lost its relevance in 2001, when two standards were approved in the USA - TIA/EIA-568-B and TIA/EIA-568-A. Moreover, TIA/EIA-568-B is used much more often.
The main difference between computer sockets and standard connectors is the presence of a twisted pair cable. This device has eight copper wires, of which two or four pairs are made. Each core has its own color and marking. Thanks to this connection principle, the impact of electrical noise is reduced. If there is little interference, then achieve high speed Data transfer becomes easier.

The TIA/EIA-568-B standard connection uses the following core sequence:
- orange-white with orange;
- green-white with blue;
- blue-white with green;
- brown-white with brown.
The TIA/EIA-568-A standard uses a different order:
- instead of white-green - orange-white;
- instead of green - orange.
However, even if you mix up the connection method, this, as a rule, will not affect the connection, since modern routers are able to work with both standards.
Installation instructions
Sockets are manufactured in two types - for outdoor or for mortise installation. Different manufacturing companies may have different ways of securing cables, but general principle is the same in all cases.
Preparatory work
Before connecting the Internet outlet, we lay out the electrical wiring for the Internet (if it is not available in the new house). We direct the cable to a given place in the room, and then connect the router to this point to ensure communication.
When the wiring is ready, install the socket box. To do this, you will need a hammer drill and a special crown to make a hole in the wall. the right size. We first remove dust and any other dirt from the niche. Then we install the socket box. We fix it with viscous alabaster.
Having decided on the diagram, you can begin to connect the cores. To do this, we direct them into the required grooves of the box. There is no need to strip the wires, since it is safe and correct connection provided by the contact pad mechanism.
To ensure sufficient connection strength, we deepen the grooves in the wires. For this operation we use a crossing knife.

The principle of using the pads is quite simple - they are made in the form of sharp plates, which are spaced from each other at such a distance that after the lid is seated in its place insulating material easily cut with blades. In this case, the integrity of the cores is not compromised.
Terminal block installation
After connecting the wires, return the terminal block to the socket in reverse order. Don't forget to securely fasten the locking ring.
Next, check that the connection is correct. To do this, connect a device (for example, a router) to the outlet. If the device works, the connection is correct. If the device does not turn on, we look for a problem in the correct connection of the wires. It is also worth paying attention to the correct compression.
Advice! It is recommended to use a cable tester to check the connection quality.
When the connection has been checked, we cut off the excess wires, after which we can begin installing the socket in the socket box.
Installation of sockets of different brands
The following brands of sockets are distinguished.
"Legrand"
Connecting the “Legrand” internet outlet is carried out as follows:
- We remove the insulating layer of the cable using the blades in the handles of the crimping tool. We align all four pairs for ease of handling.
- Remove the front panel. To do this, unscrew one bolt that holds this structural element.
- A locking handle is located at the rear of the internal mechanism. Turn the lock counterclockwise. Then we remove the fittings.
- We put the body aside. In the already opened mechanism we find a hole and direct the cable into it so that the latch white was addressed to us.
- On the top edge there are a couple of schemes: each of them with its own color and number. We choose scheme B.
- According to the color, we distribute the cores and direct them into the clamp. The cores do not have to be inserted all the way.
- We connect the element with inserted cores to the main part. Turn the handle clockwise. After the clamp shrinks tightly, the recesses will push the cores to the place where they should be located.
- We mount the socket into a pre-prepared socket. We remove the spacers.
- Installing the front panel.

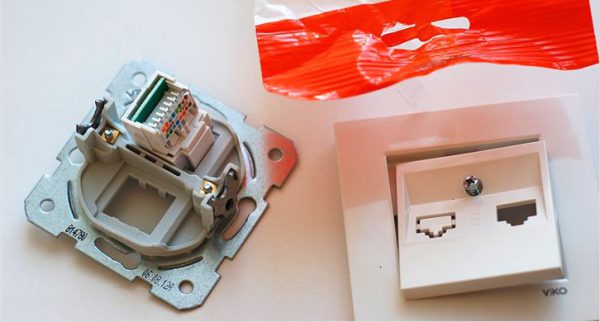
"Viko"
- Remove the front panel.
- We position the panel so that the sockets for the cores are at the top and the face is facing us.
- Next, you will have to navigate not based on a specific marking (there is none), but based on the information presented above according to the T568-B standard.
- We clean the veins. Please note: there is no piercing mechanism.
- The cores are inserted in pairs. Movements are from right to left.
- We fix the cables with a bolt.
- We use a tester to check the correct connection. If the tester is not available, insert the cable without installing a socket into the socket box. The functionality of the connection in this case can be seen in the connection properties.
- If the system is working normally, return the front panel to its place and fix the socket on the wall.
"Lezard"
- We remove the panel.
- We remove the connector by pressing the latch.
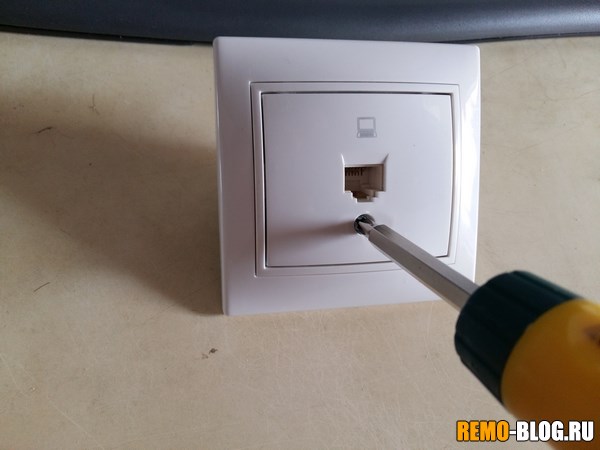
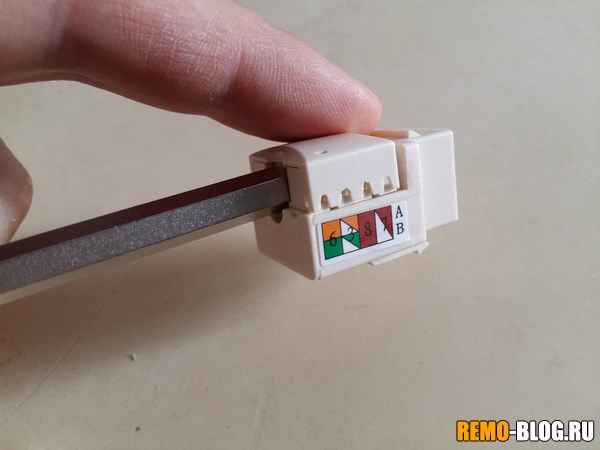
- Next, take a screwdriver and point it into the cable hole. We lift the tool, causing the lid to open.
- By standard scheme insert the wires. Moreover, there is no need to strip the veins. The veins need to be inserted deeper - for this operation we will need a stationery knife.
- Remove excess cores and close the lid.
- We install the latch and secure the front panel in place.
- We install the socket box.
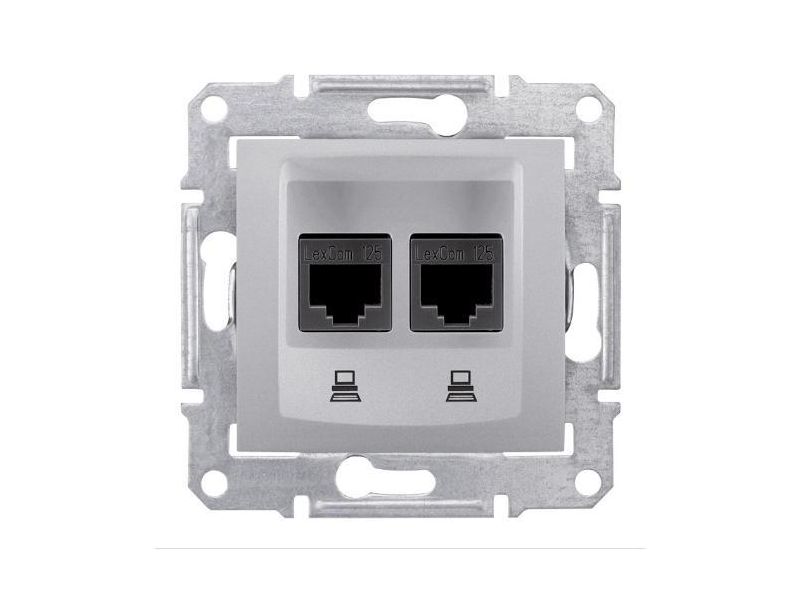
"Schneider"
This outlet is connected in the same way as the previous ones. The Schneider socket can be produced as a double. In this case, you will need to connect two cables from the router, since the parallel connection method is incompatible with the capabilities network equipment. Connection is made according to color scheme. It is necessary to swap pairs 2-3 and 5-6.
In the case of a single connector, the work order is as follows:
- remove the outer panel;
- we remove the main part by pressing a pair of latches;
- remove the central insert and the back cover from the mechanism;
- insert the cable into the cover and connect the wires according to the diagram;
- We assemble the mechanism.
An Internet socket is a fairly simple device, so if you strictly follow the instructions, you shouldn’t have any problems installing it. We remind you that when conducting electrical installation work Special attention safety precautions should be taken into account.
I think each of us has encountered an Internet connection. Everyone imagines how this happens. An installer comes, whose main task is to install an Internet cable into your apartment, crimp it and check the operation of the Internet. How this cable will be laid in the apartment itself does not interest him, although, perhaps for an additional fee, he will agree to carefully lay the cable.
The Internet works, everything is fine, but wires lying on the floor do not add comfort and order. At best, they can be filled in plastic skirting boards with cable channel. I decided to go ahead and insert the cable into the computer socket (RJ-45) in the wall. I suggest you see how I did it. Someone will definitely benefit from my experience.
By the way, if you decide to lay the cable yourself, ask the installer to measure you more cable. I don’t think he will refuse, and the excess can always be rolled up into a neat ring.
At first I had the idea to post Wi-Fi router right in the hallway. Less wires less work, less dust. All that remained was to choose a place to place it. Of course, you can mount it on the wall, but the router also needs electric outlet, which would be superfluous and completely out of place. Therefore, it was decided to place the Wi-Fi router on computer desk, where the rest of the periphery will be, which means you need to stretch the cable.
Note: I thought of all this only because I am in the process of replacing all the wiring in the apartment. Therefore, the twisted pair will be laid in grooves and holes in the walls along with a copper cable for 220V sockets. I would not risk drilling and destroying walls for the sake of laying just one Internet cable. 🙂
I know that now the “experts” will throw sticks at me that you can’t lay a network (lan) cable along with the wiring. I’ll tell you right away what I think. I've seen more than enough computer networks mounted close to power wires. Long corridors of many state In general, it is difficult to imagine institutions without bundles of wires stylishly hanging from the ceiling. Among them there are alarms and fire department, And computer network, and of course power wires. And all this disgrace has been working for years! It is difficult for me to remember at least one case in my practice when interference or interference from other wires caused a local network malfunction.
What can we say about a small apartment, where there is little load on the electrical network, and the apartment is divided into several circuits. The length of the joint laying of wires was only about 4 meters. If we consider from the point of view of safety and the possibility of heating the wire or fire, then here the question is rather about distributing the load on the electrical network and the right choice power cable. For sockets I used copper cable VVG ng(flame retardant) with a cross section of 2.5 mm, so, having cast aside all doubts, I began installation.
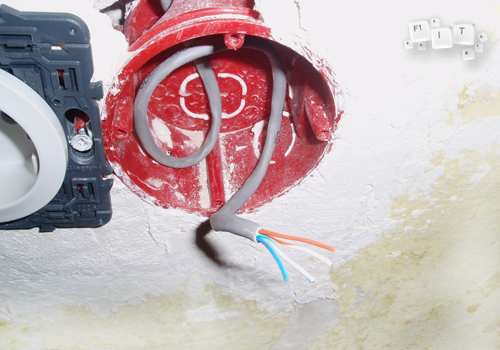
So, the Internet cable enters the apartment and goes into the wall. Then he follows cunning paths to the place where the computer socket will be located.
Before cutting the cable you need to make sure that you have everything necessary tools for installation into a socket. If all is well, then leave 15-20 centimeters of reserve and cut the wire. We are not in a hurry to throw away the crimped end; we will still need it to see how the wires were routed by color, since not everyone crimps twisted pair cables according to the standard scheme.
You can immediately remove the insulation (2-3 cm is enough).
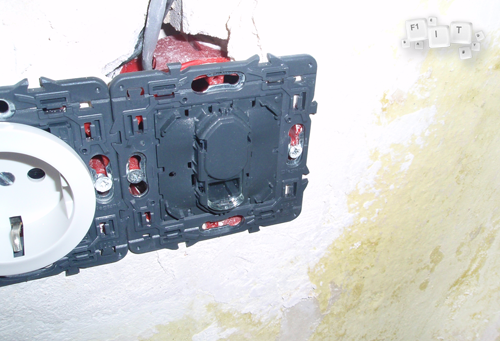
Now let's look at the socket mechanism itself. I used Legrand celiane, in which to secure the wire you just need to turn the locking mechanism. Some sockets may require a special mounting knife to punch the wires into the connectors. If you don’t have a punching knife, you can use an ordinary stationery knife, but this requires skill and may not work the first time.
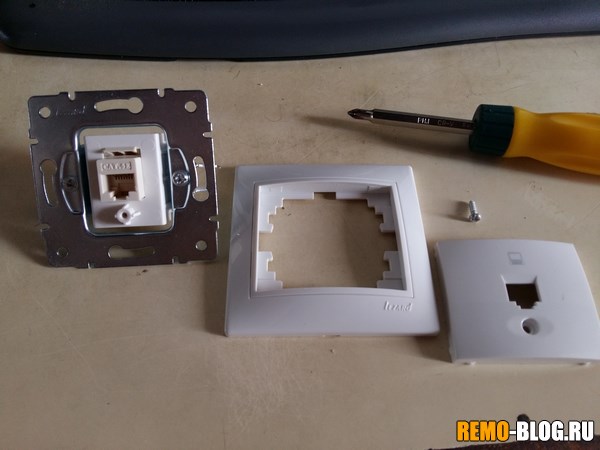
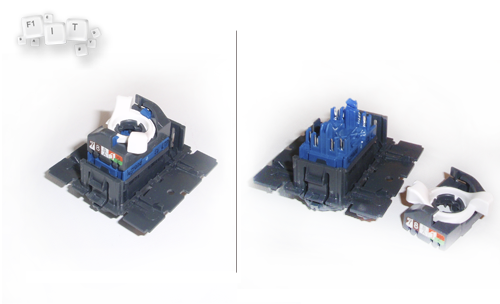
This is what the entire rj-45 socket looks like disassembled. 1 — frame for attaching the socket; 2 — the RJ-45 socket module itself; 3 — front cover.
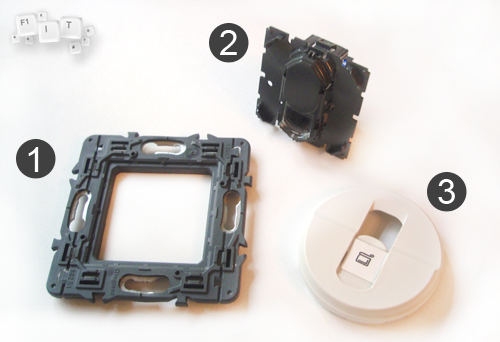
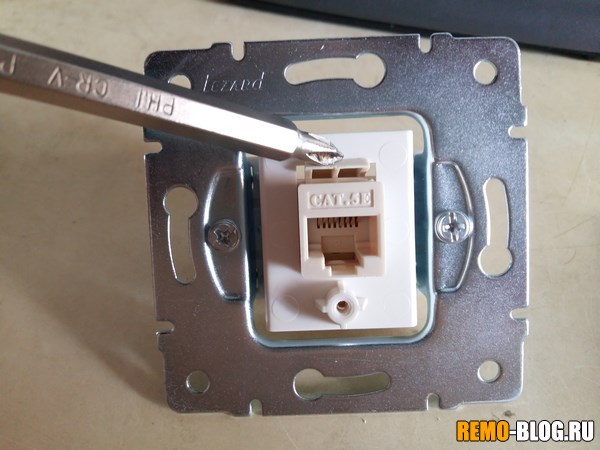
Photo of the module from the back side with the wire fastening mechanism removed. Please note that the connection diagram sticker is visible in the photo. Such stickers are present on all sockets.
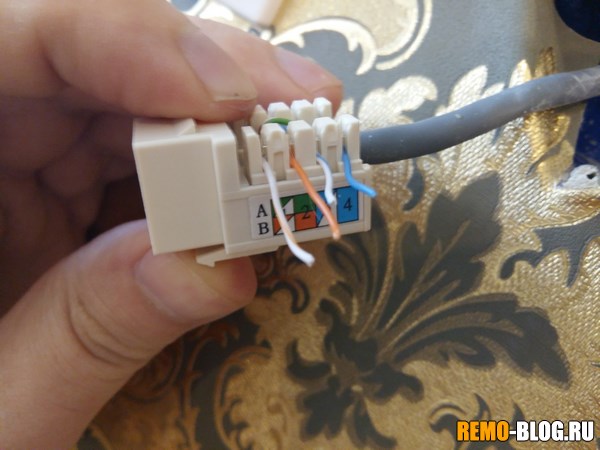
Now all that remains is to figure out where to run which cable. Any computer geek knows the colors of the location of the straight and cross cable cores by heart. In our case, only direct crimping should be used (top row in the photo below).

If your wire is crimped according to the standard pattern, then you just need to arrange the wires by color in accordance with the markings on the socket itself. My wire from the provider turned out to be 4-wire, which used 1,2,3,6 contacts. Respectively, color coding a little lost. If you pay attention, in the picture with the girls in the top row there is the 3rd contact white-green, and the 6th contact green. In my case, these colors were used instead white-blue And blue colors accordingly. This means that when installing the cores into the module, I will have to insert white-blue wire to 3rd place, instead white-green, A blue to 6th place instead green.
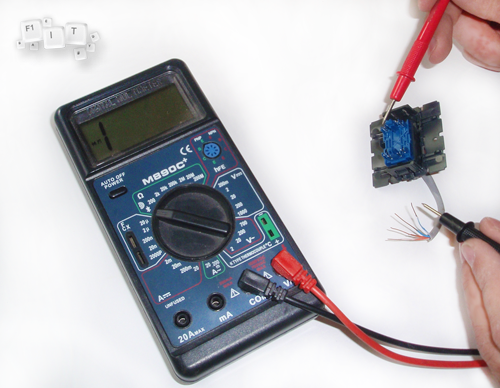
To be sure, you can ring the contacts with a multimeter. To make it more convenient, I used the already cut end of the cable, stripped the ends of the cores and plugged the connector into the socket. Then I rang all the contacts one by one, and since there were no surprises, the installation proceeded according to the scheme described above.
![]()
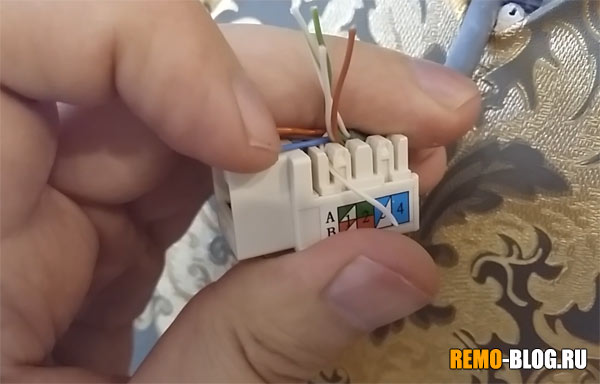
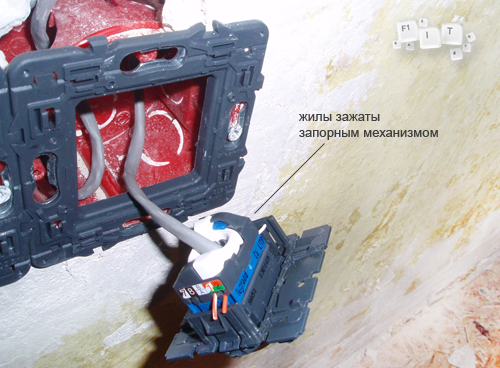
Please note that before fastening the cores, you need to thread the cable into the frame and into the fastening mechanism, since this is impossible to do later (however, this is a feature of the Legrand Celian socket). After the wires are laid out, put on the lock and turn it until it clicks, and then trim off the excess ends.
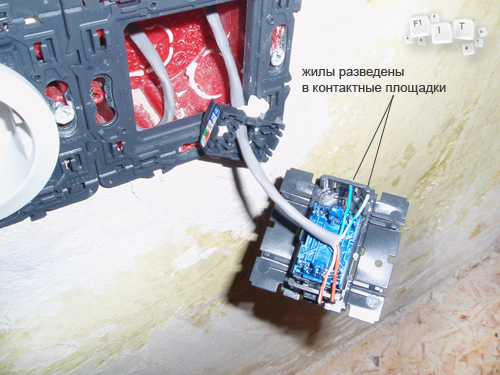
In the photo above you can see that the 1st contact is white-orange wire, 2nd contact - orange the wire. On the other side there is a 3rd contact - white-blue wire and 6th pin - blue the wire.
After this, we fill the excess twisted pair into the socket box and simply assemble the entire socket into a single whole. In my case, you just need to snap the module into the frame.
We put on the front cover of the computer socket.

After all the steps, we check the operation of the Internet. For this I connected wi-fi router into the outlet via a regular patch cord. Previously, I already wrote an article about how I, so now I have the Internet distributed to all devices via wi-fi networks. General scheme my home network is the following:
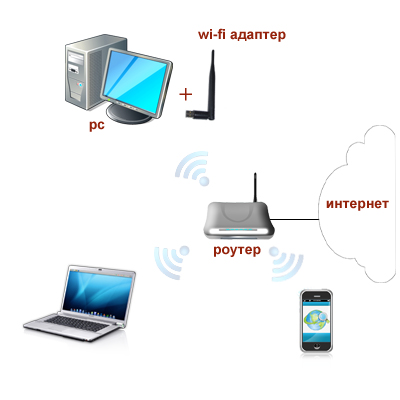
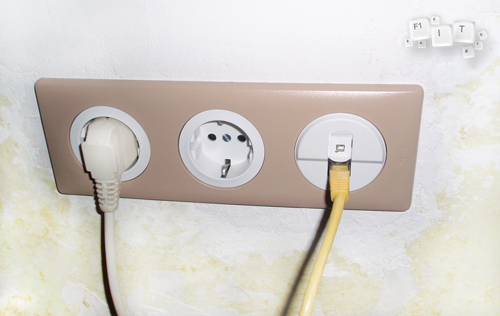
It is done! The Internet works, which means you can finally cover up all the grooves and put a common frame on the entire block of sockets. This is what it looks like now (unfortunately, without wallpaper 🙂). Photo final result will be a little later.
This is where I end the article. If you liked it, give it a thumbs up and press +1. See you soon!
Good afternoon, dear readers of the blog site. Today I would like to touch on a topic related to disconnecting the Internet cable in the apartment and its further connections to devices, and to be more precise, I will try to talk in detail about how to connect an Internet outlet. Usually the provider introduces a cable into the apartment, leaves a fairly large piece and re-crimps it. The left piece will allow you not to be tied to a specific place, it will be possible to remove the wire into the baseboard, and there will also be no need for subsequent installations.
It happens that in the course of constantly moving a laptop from room to room, while pulling the wire behind you, you can simply break the connector or break the cable at the place where it is connected. In this case, in order not to resort to the services of craftsmen and save money, you can easily do it yourself .
So, let's get back to the descriptive part of how to connect an Internet cable to an outlet. Usually people who have started renovations in their apartment think about this need, who initially included them in the project for a desktop computer or game console.
If you have provided for the installation of just one Internet socket, then no intermediate devices will be needed, but if there are several of them, then before making connections across the premises, it is necessary to install a suitable router with the ability to transmit a wireless signal in the gap between the cable entering the apartment and the connected fittings and further. You can read about that in one of my blog articles.
Often, installers and repairmen try not to bother connecting an Internet outlet, because for most of them, everything connected with data lines is a dark forest, but in reality everything turns out to be simple and elementary. Besides this for testing correct connection will need either special device, or a laptop or, at worst, a router with a ready-made patch cord, which workers usually don’t have.
Okay, this was all the introductory part and you are probably already tired of reading and waiting for the description of the process itself? To begin with, I will tell you a little about the preparatory work, this is a very important part, because without them everything can go wrong.
Preparatory work
The first thing we have to do is acquire the necessary tool:
- Phillips and slotted screwdrivers - necessary for disassembling the socket and its subsequent installation in the socket box;
- A stripper or thin knife is a tool for removing insulation;
- The internet outlet itself.
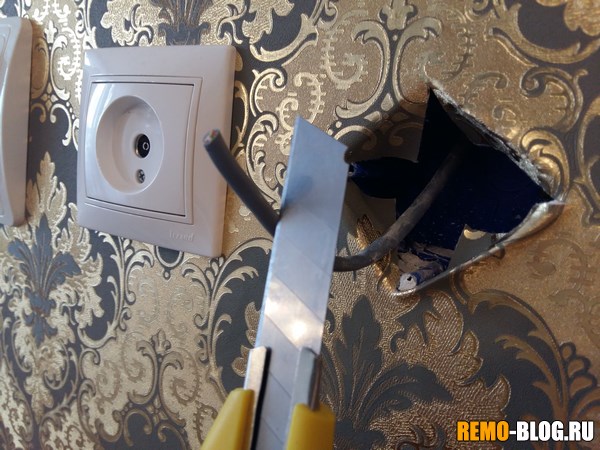
Next, we need to cut off the excess part of the wire protruding from the socket. The fact is that a cable that is too long will not allow the installation to be carried out correctly, since it will take up almost all the free internal space of the socket box. It is advisable to leave about twenty centimeters so that you can work with it calmly.
The next step is to remove external insulation and “unbraid” the veins. When removing insulation, be extremely careful, as pressing harder with a knife or stripper can damage internal wiring and thereby lead to repeating this operation and further reducing the length of the wire.
If you are going to connect a cable that was provided to you by your provider, then before cutting and throwing away the connector that was mounted at the end of the wire, be sure to remember the pinout of the wires (color sequence), since during installation it will be necessary to follow exactly this order. The figure below shows a typical cable pinout, but if the colors of the cores in the connector do not match those presented, then you should use your circuit, since on the other hand (in the service provider’s equipment) they are connected in exactly this way (something turned out intricately).
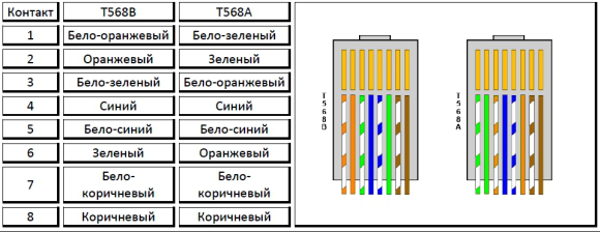
For connection, the T568B option is usually used
If you are going to connect an Internet outlet with a cable laid yourself or by a repair team, then on the one hand you must have in accordance with color scheme shown in the figure above, and on the other side a computer Internet socket is connected with the same sequence.
In fact, you can finish the preparation here and move on to directly connecting the twisted pair to the outlet. Since there are many varieties of such accessories on sale, I will try to talk about all the stages of connecting the most popular models of Internet sockets.
Most manufacturers lay down the same principle, but models may differ in the way the cable itself is connected to the contacts.
How to connect a Legrand internet outlet
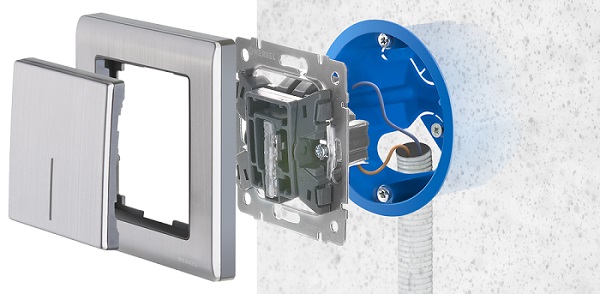
Legrand fittings are currently the most popular due to their relatively inexpensive cost, variety of models and ease of installation. The figure below shows appearance. Thanks to this design, it will fit into almost any interior.
If you turn the socket upside down, you will see special mechanism allowing you to easily secure the cores in the contacts.
 After finishing preparatory work(removed the insulation, unraveled the wires), it’s time to move on to connecting the twisted pair to the outlet:
- We remove the front panel, and if it is already built into the wall, then remove it from there;
- On back side unscrew the lock counterclockwise and remove the released part of the clamp (the second part can be put aside);
- We insert the prepared cable into the hole and disconnect the wires in accordance with the color scheme (scheme) shown on the case. The diagram shows two connection options “A” and “B”. If you are going to make the connection inside the apartment and you will have a router connected on the other side of the cable, then use scheme “B” (although to be honest this is not important, but many recommend it). If you are connecting a cable installed by a provider, be sure to pay attention to the order in which the wires were connected to the connector (there are situations when the installer is negligent in this process connects not in accordance with generally accepted diagrams). Fortunately, all the terminals of the Legrand computer socket, in addition to everything else, are also numbered, which, in principle, should not allow for a mistake;
- After we have connected the cores to the clamps, we take the second half of the fittings and join the two parts together (don’t be afraid to do something wrong, since the design simply will not allow you to make a mistake);
- Then we turn the handle clockwise, which will cut the veins and finally secure the connection.

The principle of installation in a socket box is the same for almost all models and therefore I will not describe this process in relation to each of them, but will describe all the nuances in a separate section at the end of the article.
Connecting a twisted pair cable to a Schneider outlet
In fact, the principle is very similar to the previous one, only the design of the socket itself and the method of fixing and clamping the cores are different.
Most often, Schneider computer sockets are sold with two RJ45 inputs, so that there is no need to run additional wires, but all connections are made in one place. However, it is worth considering that both sockets must be connected with different cables from your switchgear(router) because parallel connection will not give any result.
On the reverse side you can see two modules that can be easily removed from the overall structure to further simplify installation. Let's take a step-by-step look at all the stages of connecting an Internet cable to a Schneider outlet:
- The first thing you need to do is remove the center panel;
- Next, by holding two latches (removing the lock), remove one of the modules;
- We disassemble this module by removing the back cover;
- We connect the prepared cable in series to the contacts on the cover, and cut off the excess length of the cores with pliers;
- We put everything back together in reverse order.
Assemble without applying special effort, since there is a possibility of damaging fragile mechanisms, nevertheless, each operation must be completed with a certain click, symbolizing the fixation of a particular part.
As practice shows, there are no big difficulties when connecting an Internet outlet. Most of them are designed on the same principle and that is why I will not describe how to connect other models. And if you have a problem with certain accessories, you can ask me a question through the comments, where I will quickly try to help solve it.
After installation and before final installation, you should definitely test the connection for functionality. Connect your laptop or router with a patch cord and check if the signal passes through.
Installing an internet socket in a socket box
The last stage of installation of an Internet cable to a computer outlet is its installation in a place prepared for this purpose (socket box). In fact, there is nothing complicated here; it is enough to have a Phillips and slotted screwdriver and straight hands. The sequence should be as follows:
- We evenly lay and distribute the cable over the sub-socket cup, so that inner part the fittings were completely recessed and nothing was in the way;
- We position the metal frame so that the attachment points on the frame and the cup coincide with each other;
- We fasten the frame with self-tapping screws;
- We cover the resulting structure with a decorative panel.
Actually, this is where we should finish describing the process of how to connect an Internet outlet. If you have any questions, feel free to ask them in the comments field. And to top it off, I suggest watching a video on a current topic so that the instructions you read are fully understood.
 (1 ratings, on average: 5,00 out of 5)