DIY plaster animals. How to make DIY crafts for your garden using plaster? Creating the stem of the future mushroom
DIY garden crafts can bring you great pleasure. Choose the figure that best suits your character and the design of your garden. Let's try to make garden figurines from cement with our own hands. The process, surprisingly, is not as complicated as it seems. But the result is truly surprising!
See what beautiful flower containers you can make from cement mortar and an old rag. This is truly crafts made from scrap materials!

Decorative openwork ball made of cement.

To work, we need a cement solution - mix a thick solution of 1 part sand, 1 part cement.

We immerse a rope in the solution, it can also be strips from an old T-shirt, etc. Let's inflate balloon, we prepare a stand for it where it will dry. This could be a regular bucket.  We wrap the ball with a rope in cement mortar.
 After the solution has dried, use a needle to blow off the ball. All! Our garden art object is ready. Can be painted if desired.

Original crafts for the garden made of cement.
Agree, it looks like dragon eggs)) We will make this from cement.

We take the same balloon and cover it with cement mortar. Here you can add a tablespoon of gypsum to the solution, but you need to work quickly.

After the solution has dried, remove the ball and paint inner part eggs. Can be used as Easter decor at the dacha - by making it flower arrangement from primroses.

Crafts for the garden. DIY garden gnomes made of cement.
These cute garden gnomes are also very easy to make.

For the gnome we need cement, a metal rod, stocking and rope. We pour the cement solution into the stocking, and insert metal reinforcement into it for strength. By twisting the rope, we form noses and legs. Let's not forget about the beard - this is an additional piece of material under the gnome's nose. Hang the gnome by the top of the cap and leave to dry.

When the cement has dried, remove the gnome and polish the top with a more liquid solution of cement and gypsum. We are waiting for the gnome to dry and we can tint or paint it. Pretty guys, aren't they?

Garden fountain with leaves.
We will not talk about the principles of creating a fountain in the country. This is the topic of a separate article, and you can read about it in detail here. We will make leaves from cement.
>
We need a fairly large sheet, and with the help of cement, we form a copy of it.

After drying, the sheet can be worked out in more detail and painted.

And you will become, almost free of charge, the owner of such a beautiful fountain.

Original do-it-yourself flower beds.
Are you not a sculptor at all? But believe me, you can make these creative flower containers.

We need a plastic container, foam plastic, reinforcing mesh. We make a cement solution by adding a spoonful of gypsum directly into the palm with the solution and thus form our “sculpture”

But not all of us are fans of modern abstract art. But you can easily make garden crafts in a classic style.

But, because You are not a sculptor yet, you need a template - it could very well be an old doll.

Because it will not be just a decorative garden figurine, but a flower garden in the form of a girl’s head, then top part needs to be trimmed.

Then the head is painted. To add texture, the template is first painted with dark gray paint. Allow to dry and apply a layer of lighter paint. After drying, apply a layer of even lighter paint with light strokes.

This is a very simple process, and all the examples of this style that you see in the article were made by teenagers in a craft class.
Beautiful crafts for the garden. DIY garden figurines.
For those who liked the process of making concrete crafts, we will also tell you a simply stunning technique for creating garden figurines.

Yes, we will need the old doll again!

First, we strengthen the doll using hot glue and a bamboo sushi stick on a heavy stand. By the way, we can also make it from cement. We cut out angel wings from foam plastic and attach them to the doll with hot glue. Let's give the doll a new dress and, with the help of strokes of hot glue, create a more interesting texture on the wings and hair.

We coat our template with a solution of cement and gypsum. Let's paint.

Now, with the help of old toys, you can make almost any garden figurine yourself.

Cat flower bed.
This cute flowerbed cat is made from a plastic bottle and cement.  We will need: cement, sand, plaster, water, large plastic bottle, wire, paint, wooden slats, varnish
The owner of this cat, Natasha Koneva, will tell us how to make one funny figurine with your own hands. We cut off a plastic bottle - this container will be our flower garden. To prevent the cement from slipping off the plastic, we tightly wrap it with wire. Knock down from slats wooden frame. We attach our plastic container to it. 
Mix the cement mortar with the consistency of thick sour cream at the rate of 1 part sand, 1 part cement. We will add gypsum only to the finished portion that we have in our hand, because... the solution with gypsum hardens instantly. We work in rubber gloves. 
Take a handful of solution in your hand and add a tablespoon of gypsum to it. Knead it in your hands, roll it into a sausage and attach it to the frame. So, step by step, we apply portions of the solution on top of each other, creating the necessary bulges and smoothing the surface. 
We sculpt our cat’s face from small balls of solution in much the same way as we sculpted from plasticine in childhood. In order to small parts held on better; before attaching them to the body, we lubricate the surface of the figure with water. 
With a damp hand we polish the surface of our garden figurine. To dry, cover the figurine with cellophane for 3-4 days. On the first day, the figure must be periodically additionally moistened with water. After drying, sand the surface with sandpaper. 
You can paint such a figurine water-based paint, enamel, car paints. After painting, coat the surface with varnish. For the winter, the garden figurine must be removed from the street, because... It may crack due to frost. You might also want to get yourself such a wonderful cat. 
The great thing about cement figurines is that they are cheap to make compared to metal or wood garden figurines. You can start with simple crafts for the garden, which can be no less interesting than some particularly complex ones. You can combine cement with other materials. - for the face of this little garden fairy " Ladybug"Took the head of an old doll. 
Instructions
Prepare the form into which you will pour the material. You can buy a ready-made craft kit that already contains plastic molds. Silicone baking molds and even containers for sand cakes are also suitable for these purposes. You can also cut off the bottom of any hollow plastic or rubber toy. To make it easier to remove a plaster figurine, grease the mold with any vegetable oil.
Pour gypsum powder into a glass glass or jar. Add required amount water - according to the instructions on the package. The consistency should resemble sour cream. Stir the mixture so that there are no lumps left in it.
Pour the plaster into the prepared mold. Level the surface with a spatula or knife. Leave the mixture to dry for 30-50 minutes. If you are making a magnet, after 15-20 minutes press a magnetic plate into the surface of the plaster. Insert a loop of fishing line into the craft you plan to hang.
Make sure the plaster is truly dry before removing the figurine. Tap it with a pencil - the sound should be clear.
The shape of the finished craft can be changed. With the help of sculptural different sizes you can make carvings on plaster craft. First, draw the lines of the pattern onto the sketch of the figurine. Then, focusing on this sketch, mark the craft with a simple pencil. Cut the plaster into small pieces, layer by layer, achieving the desired effect. Use only sharply sharpened tools to ensure that the material is cut smoothly and without chipping.
If you want to make a multi-colored figurine, paint the plaster acrylic paints. Look for the label “for porous surfaces” on the acrylic packaging. You can apply paint using a foam sponge (for painting large areas) or a synthetic brush (for detailed work).
Video on the topic
Sources:
- how to make a figurine with your own hands
When approaching creatively spending your leisure time and decorating your home, pay attention to such a simple and available material like plaster. You can use it to make crafts with children and quite serious work for room decoration.
Plaster photo frame
To make a frame you need a transparent one plastic cover from a cake or other disposable container in which the middle is smooth and the edges are embossed. It should be the size you want the frame to be. Inspect the form carefully. If there are any dents on it, straighten them out. Otherwise, all this will be imprinted on the finished product.
Pour water into a deep bowl and gradually pour dry plaster into it. Stir thoroughly with a tablespoon or fork. You can also use it to break up the resulting lumps. The mass should be homogeneous, similar to liquid sour cream.
If you dilute plaster with warm water in which a pinch of salt is dissolved, it will set faster.
Pour the dissolved plaster into the mold in a layer of slightly more than 1 cm. Lightly shake the container or tap it on the table. Then the liquid mass will fill the entire relief, and air bubbles will come out. Lay a layer of gauze or bandage over the entire surface. This reinforcement will make the finished product more durable. Immediately pour another couple of centimeters of plaster into the mold.
If you want to make a large frame, you need to make a “sample” to lighten the weight of the plaster product. Step back from the edges of the slightly hardened craft by 3-4 cm and scrape out the entire middle of the frame with a spoon to a layer of gauze.
From a segment stainless wire make a loop so that the finished frame can be hung on the wall. If there is no wire, bend a fastener from a large paper clip. When the craft has hardened a little, insert the loop into place perpendicular to the plane. Give the final shape to the fastener after the workpiece has completely hardened.
Leave the frame to harden room temperature. Touch her periodically. While the plaster is curing, the piece will be very warm to the touch. When it has cooled, about a couple of hours, remove it from the mold and place it on flat surface for final hardening.
Gypsum is a malleable material for processing. Using a sharp knife, cut off unnecessary sagging, if any, from the finished craft. Sand any uneven surfaces with fine-grit sandpaper. Just be sure to cover your nose and mouth to avoid inhaling plaster dust.
Prime the plaster frame with impregnation for porous surfaces. After it dries, you can decorate your product with acrylic paints. They do not require fixing with varnish. Varnish the reverse side of the craft. Place a photo or painting that fits in the middle of the frame. You can make a printout on your computer using the specified parameters.
Sculpture from a children's toy
Children will be happy to color the three-dimensional figures that are obtained during casting. Be patient right away. A large toy blank will take several days to dry. Therefore, it is better to make several pieces at once.
Cut out sharp knife the bottom of a rubber children's toy. Dilute the plaster and pour it into the resulting form. Shake it so that the mass penetrates all the corners and curls of the figure. Leave your craft to dry for several hours. Then, bending the rubber away from the plaster, remove the cast sculpture. Pour a fresh portion of plaster into the mold, and leave the toy to dry for another three days. Then it can be painted.
Gypsum products can enliven any interior and give it individuality. Especially if they are not made at the factory, but independently - according to your own sketch. The technology for their creation is not that complicated.

There are two principles of action when self-production gypsum products. The first is the fill. The option is labor-intensive, requiring the creation of a prototype model (from wood, plasticine, clay) and a mold for pouring, but allows you to create beautiful volumetric figures. The second method is plaster carving. It is more suitable for creating decorative flat patterns. The only tools you will need are a sketch drawing, an awl and good knife or scalpel.
As a “model” for creating a mold for filling with plaster, you can use a ready-made product you like (for example, a figurine). It is thoroughly lubricated with Vaseline or silicone grease and laid on a flat surface (covered or otherwise protected), a wooden or steel frame is made around it, which is also lubricated so that the future form does not stick. Then a gypsum solution with the consistency of thick sour cream is poured into the frame, taking into account that the model can be removed from the mold after drying.
If the model for creating the mold was made independently, it must be durable, dried, and varnished.
When the solution hardens, the model is taken out. The future form is thoroughly dried, defects (for example, holes from air bubbles) are neutralized using the same gypsum solution, and the inside is varnished. After the varnish has dried, the mold is ready to pour plaster into it to create the final product, but you must remember to clean and lubricate it before each new pour. Figures of complex shape are most often assembled from several parts cast separately.
It is most convenient to fill the mold in two stages: first - thin layer, filling all the small cavities, then the main mass. If the product is large, it will be useful to strengthen it with reinforcement. The finished figure lends itself well to painting. For final processing, it is advisable to cover it with a layer of wax or varnish.
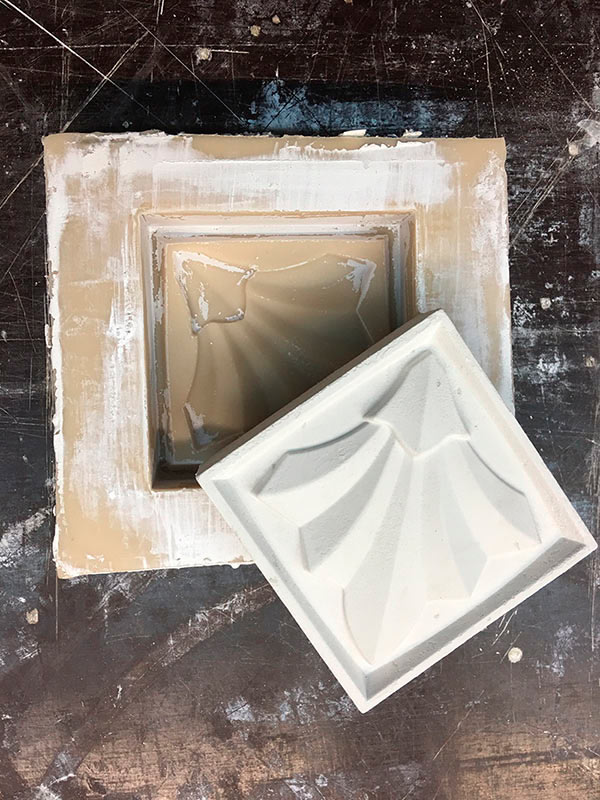
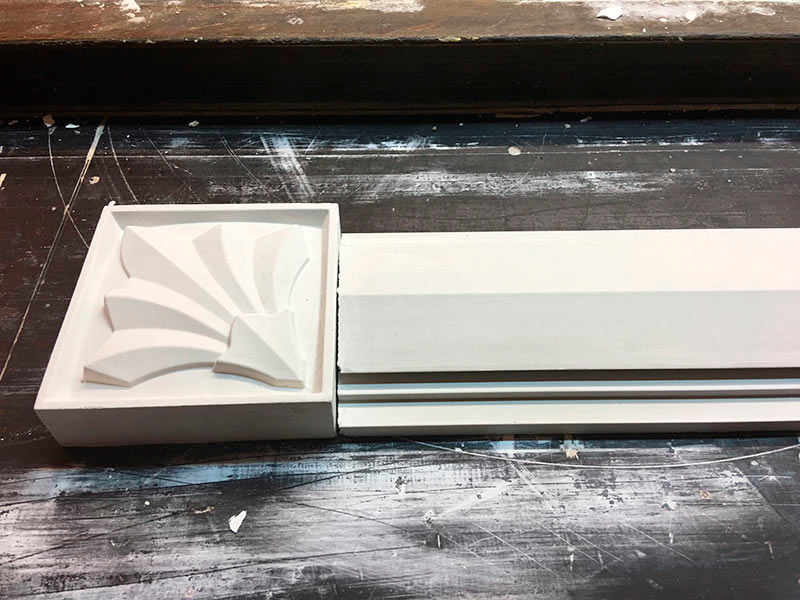
Relief plates, ornaments, decorative inserts It is more convenient to perform by carving on plaster.
To create a sketch of the future ornament, you will need thick drawing paper (if the elements are repeated, it will be convenient to fold it several times). The contours of the future pattern are drawn on it and punctures are made along the line at some distance from each other with an awl or needle. Place the frame on a flat, protected surface the right size(about 3 cm high).
Gypsum is poured in two stages. The first layer, filling the mold two-thirds, is prepared in a ratio of 2 parts gypsum to 3 parts water. Pour it in (without stirring) when it acquires the consistency of sour cream. The second layer is prepared in the same proportion, but kneaded very thoroughly. Fill the top part 10 minutes after the first, wiping the frozen surface with a damp cloth.
After 10-15 minutes, having removed the interfering slats, you can transfer the design to the surface of the plaster. To do this, the sheet with punctures is laid evenly on a gypsum blank and sprinkled with dry pigment (as it spills through the holes, it forms a dotted pattern). Using a scalpel or knife, a cut is carefully made in the plaster, parallel to the design (with a 2-3mm indent towards the “background”), then the background layers are carefully removed with the same knife so that the ornament protrudes.
Gypsum is environmental material, harmless and very cheap, which means that it is available to everyone who wants to make interesting and useful products with their own hands. Working with gypsum is a real pleasure, because this material can take absolutely any shape and hardens quickly. By the way, it can also be painted in different colors. Our master class will tell you how you can master this skill without much difficulty.
What you need to make colored plaster crafts with your own hands
To start making crafts from plaster, you need to stock up on a certain set of materials:
- Gypsum;
- Paints;
- Water;
- Spoon;
- Molds;
- Plastic jar.
Many who have decided to start making plaster crafts are wondering: how much does plaster for crafts cost? It is worth saying that this material has a low price, therefore it is considered one of the most affordable types of needlework. You can purchase it at any hardware store.
Particularly worth mentioning are the molds. In fact, you can use any containers as molds, but silicone molds are ideal for working with plaster. Where to buy molds is absolutely not important.
We make plaster for white and colored crafts
Anyone who has ever worked with this material knows how to make plaster for crafts. All you need is water and a mixture of plaster. First you need to pour water into the container, and then add plaster, as in the photo:

The mixture must be brought to such a state that it seems like liquid sour cream. Immediately after this, it can be poured into molds.
If you want to do colored crafts, then you need to follow MK:
1. First, we make gouache. You can add a little water to the jar, close the lid and shake. This is necessary so that the paint is completely dissolved.


2. We pour the diluted gouache into the container for preparing the solution.


The mixture should resemble liquid sour cream in consistency.

4. The next step is to pour the plaster into the mold


5. And finally, it remains to dry.

You can make anything you want from colored plaster, for example, hearts.


Or these swans for the garden:

DIY plaster crafts for the garden
To make wonderful plaster garden mushrooms, you will need:
- Round plate;
- Bottle;
- Cling film;
- Acrylic paints;
- Construction gypsum;
- Wire.

Find out how to make a mushroom quickly and efficiently here:
First of all, you need to make a mushroom stem; to do this, take a bottle and cut off the bottom of it. You can also add a wire to the middle of the stem, then the mushroom will be stable.

Then you should dilute the plaster with water and pour it into the bottle. The consistency should be like thick sour cream.

As soon as the plaster has hardened, it should be separated from the bottle; for this, a small incision is made directly diagonally.


The next stage is to move on to the mushroom cap and place a food bag inside.

After this, we dilute the plaster again and pour it inside the cup, and place the leg in the center. Once the plaster has hardened, it can be removed from the cup.

And finally, you should paint and varnish your product.
Making such crafts will be exciting not only for adults, but also for children.
A selection of videos on making all sorts of things from plaster
Most of us have a craving for beauty and comfort. In the courtyard own home, at the dacha and in the garden, we strive to surround ourselves with charming flower beds, lay out paths that invite us to walk, and cannot do without unusual and funny figures. Gypsum is one of those materials that can be easily transformed by hardworking hands into a wonderful garden decoration.
Features of the material
Gypsum or alabaster has a number of properties that predetermine its use in construction and medicine. It is also great for making garden figurines with your own hands. Even large sculptures are made from alabaster. The use of forms allows you to accurately copy the most complex volumetric figures. Working with the material is not physically difficult, so many women are interested in creating art with plaster. Professionals have already made a considerable number of alabaster crafts for the garden.
Plaster figurines for the garden for every tasteIt should not be forgotten that alabaster is a rather fragile material that is afraid of moisture. It is better not to test products made of alabaster for strength. They must be protected from water with paints and varnishes. In the autumn and winter, plaster figurines are stored in a dry room.
The most important thing is that to make figurines from such material, molds are needed.
Most often, garden figurines of animals and people are cast from alabaster. Less often - objects inanimate nature. We invite you to evaluate the photos of animals that you can make from plaster. Of course, you will have to come up with, purchase or make forms for them.
 A successful composition makes the squirrel come alive
  Another squirrel became interested in mushrooms
  This forest is home to foxes, hedgehogs and mushrooms
 The bear is made of plaster, but the honey is real?
 The pig is bored alone in the pen
 Plaster pots should be well insulated from moisture
 Some are just getting acquainted, others already have an heir
 In order not to make a mistake in choosing an alabaster figurine that you are ready to make with your own hands, it is useful to find a place in the garden for the future figurine and imagine the general plot of the composition. We recommend starting with a simpler figure.
Using this pattern you can make any figurine from alabaster
First of all, to cast a plaster craft, you will need a mold. A budget option- usage plastic bottles, old toys, dishes, etc. Of course, the list of possibilities is limited and you will have to rack your brains to find suitable material. It is much easier to use ready-made children's molds for plaster or sand. Large silicone molds that are used in production are too expensive. With a strong desire, silicone mold You can make it yourself, as the following video describes.
The material has limited strength and relatively large crafts are reinforced with mesh or wire. To save material and reduce weight, the figures are placed inside plastic containers. A special plaster intended for casting sculptures is stronger than alabaster and building plaster. To increase strength, PVA glue can be added to ordinary alabaster.
For ease of manufacturing and painting, figures are often made in the form of separate parts. The parts of the craft are fastened together with glue or alabaster solution.
To make it easier to remove the finished figure from the mold, it can be coated with a water solution liquid soap And vegetable oil. There should be twice as much soap as oil. The resulting mixture is diluted with five portions of water.
The dry material is diluted to the state of liquid sour cream and poured into the mold. The solution hardens in a matter of minutes. Chemical reaction accompanied by the release of heat. During casting, air voids may form. IN production conditions The issue is resolved by using a vibration stand. When working with your own hands, you need to carefully pour the solution, and the voids can be corrected with putty or alabaster solution.
 You will have to work with such a figure for a long time
 A small figurine will be ready for further work in half an hour already. A large casting should dry for several days in a dry place and out of the sun. You can continue working with the craft when your hand does not feel the moisture. It is easy to make drawings on the surface of the figure. For these purposes, use a knife, awl, or needle.
To protect against moisture and improve adhesion with paint, the craft is primed. You can use construction soil or half-diluted PVA glue. Professionals cover plaster sculptures with several layers of drying oil heated in a water bath. After the surface has brightened, you can continue working.
The surface of the figure is successively decorated with paints. Water based paints do not adhere to surfaces covered with drying oil. Oil, pentaphthalic, and alkyd enamels are suitable. Final processing carried out with drying oil, wax or varnish. The figurine can be decorated with all kinds of decorative elements: buttons, glass, acorns, pine cones, and more.
In practice, the same technology can be used to cast figures from cement mortar. They will be durable and will not be afraid of moisture. However, cement-based mortar hardens slowly, and it will be difficult to make relief designs on the surface.

 This is how a plant pot in the shape of a swan is made from plaster
 Crafts from plaster can not only be cast, but also sculpted. In this case, it is necessary to make a frame onto which parts of the craft are gradually applied. Prepare and apply the gypsum solution in small portions. It is better to do the work with gloves. It is convenient to use a plaster medical bandage. Pieces of bandage are soaked in water and applied to the figure. It is necessary to smooth out uneven areas. The sinks are sealed with alabaster mortar.
Note that stucco figures are often made from cement mortar, including the addition of gypsum. This is a separate article.
Master class on making a charming mushroom
The mushroom seemed to me the most suitable craft for decorating the site, which can be cast from plaster. Forms for it are easy to provide. The mushroom will fit perfectly in the garden. To make it you will need a very short list of tools.
 Let's take a step-by-step look at the figurine making master class:


 Upon completion of the work, I came to the conclusion: working with the material is easy and simple. The most important thing is to choose suitable form. I recommend that you try to build your own garden figurine. Let the video help you with your work.
At all times, gypsum sculptures and other products made of alabaster were highly valued. They could be used to decorate the inside of a house or install a statue on a terrace; plaster products can still be found on the streets. Many centuries have passed, and interest in the art of creating sculpture and stucco decoration is only growing, so the request “how to make plaster figure do it yourself” remains one of the most popular on the Internet.
When planning to work with plaster, you must understand that you will not be able to create a masterpiece, but making a simple product is quite possible. You can place the craft in your dacha; it will look good on personal plot. If you want to get a truly masterpiece, it’s better to turn to specialists. This will save you from the dirt associated with working with the gypsum mixture, save your nerves and save a couple of days that you would have to spend when making your own plans.
So, more about how to work with plaster yourself.

Stucco options
Before casting anything, you need to decide on the shape and type of the product.
Nowadays, there are several styles in which gypsum is an integral part. Most often in modern interiors Classic, Baroque and ultra-modern are used. Each style has its own details and compositions. For example, Baroque includes so-called figurative elements that have bizarre, sometimes disproportionate forms. Classic is different correct geometry drawing, inclusion of details in the form of flowers, diamonds, etc. Ultra-modern style is unique forms: abstraction or, conversely, clear geometry, a repeated pattern, or a minimal number of elements that contrast due to color or volume. You can see examples of trendy interiors Here.
Plaster stucco molding is created in the form different forms:, decorations, ceiling decorations, decorative masks, vases, etc. Each item has its own purpose, shape and proportions. Exclusivity can be given to the interior by a competent combination of plaster parts; a disorderly arrangement of stucco elements or a mixture of styles will lead to the corresponding results - an absurd and tasteless design.
Before you start work, prepare a sketch that takes into account the number and size of elements, their location and shape, according to the chosen style. Do not forget that stucco molding is located not only on the ceiling, plaster parts should be located around window and doorways, on the walls, in the interior. In workshops, this work is done by a professional artist, and plaster masters work with a ready-made sketch. You will have to do all the work yourself.
What you need to know about gypsum
Gypsum mixtures may have different composition . In addition to the alabaster itself, they include various additives that improve the properties of the solution and the finished product. When choosing a mixture, you need to take into account that the more complex it is, the better the quality of the product, but also the more difficult it will be to work with. For example, especially durable gypsum mixtures harden very quickly, the curing speed can reach a couple of minutes. Without the skills to work with plaster, you will not be able to fill the mold efficiently during this time, so this option will not suit you. Ordinary building gypsum hardens longer, but its qualities are far from perfect, although for training option and creating simple sculptural forms, it is quite suitable.
Distinctive features of alabaster are plasticity, fragility, ability to expand . The structure of the gypsum in the solution itself is very elastic and can be easily sculpted. But when the material hardens, all the parts become very fragile and delicate, and therefore require special handling. Particular care must be taken when removing the product from the mold.
Another property that is significant for the master is the ability of gypsum to expand when hardening. On the one hand, this is very useful; when hardened, gypsum is able to penetrate into small areas forms and fill them, thanks to which, correctly made plaster sculptures have the ideal accuracy that was determined by the form. On the other hand, novice craftsmen cannot calculate the percentage of expansion of the mixture, so they end up with a rough product that requires lengthy and careful refinement. Unfortunately, it is impossible to teach how to “feel the cast”; this quality comes with experience.
Many products require a frame . Beginning plaster craftsmen often miss such a moment as the frame, thinking that they can do without it. As a result, their products do not exist for very long, over time, and sometimes immediately, falling into pieces. Having decided to cast a plaster figure large sizes, sculpture or bas-relief panel, when developing a sketch, you should note the most vulnerable parts of the product. For example, for a person or animal these will be the limbs and head, but for a bas-relief all parts exceeding the size of ⅓ of the product will be fragile. It is these places that need to be strengthened with the help of a frame, and you cannot save on the structure. If you use ordinary metal as a base, it will rust and after a while the rust will show through the plaster; in addition, when the metal deteriorates, cracks will appear in the plaster.
A high-quality blank is the key High Quality casting . Before making a mold for casting stucco or sculpture, it is necessary to make a blank. This stage is one of the most labor-intensive. To make matrices at home, plasticine is most often used. Plasticine can be easily given any desired shape, and it will retain it perfectly, making it excellent for creating molds for making simple parts. gypsum stucco. It's even better to buy a special polymer clay. Unlike the rather soft plasticine, it hardens as it hardens. Another plus is that polymers do not lose their shape in heat as quickly as plasticine.
You can’t skimp on forms . When planning to work with plaster, many beginning craftsmen make the grave mistake of purchasing cheap molds. In fact, shape is one of the most important tools, without which it is impossible to obtain high-quality castings. Inaccuracy of shape, its flexibility, ability to stretch or tear - this is just a small list of disadvantages inherent in cheap templates. In workshops you can see very expensive high-quality molds; more often they are made by hand, for each order. If you don't want to make molds by hand, buy metal molds; they don't require special care and are not subject to deformation. The metal can withstand up to 2,500 processes of making sculptures.
Molds made of latex or silicone are cheaper than metal ones, but the strength of such forms is much worse than that of metal. Another problem is that the gypsum mass in them is distributed less well, which leads to inaccuracies in the finished product, so finished products need additional processing, and making adjustments without damaging the entire casting is not so easy.
After preparing the forms, they need to be lubricated with clear varnish or shellac so that the gypsum solution does not stick to them.
How to pour plaster
After all preparations, a gypsum solution should be prepared. Its consistency should be similar to sour cream. Although, there are a number of situations when the mixture is made thicker. A very liquid solution takes longer to harden; in addition, products made from it are fragile and unsightly.
To reduce warping of gypsum, it is made using lime water, which can be either quenched or not. To prepare a good mass of gypsum, you will need 1 part water and 0.7 of the same parts gypsum, and if you want to prepare a mass for pulling, then the mixture should be made thicker - here you will need 1 part water and 2 parts gypsum.
Before pouring, place the mold on a solid, level base: it should not wobble or move.
Pouring the finished solution is a fairly simple process; you just have to fill the mold.
The first layer is applied to the sketch using a brush, which will help fill all the depressions in the matrix. After this, the next gypsum layer is applied using a spatula, which should completely fill the mold. At this stage it is very important to ensure that there is no air bubbles. The poured plaster must be shaken well, this will remove air bubbles from the mass, so you will avoid the formation of voids.
If the product has enough big size, then after applying the first layer of gypsum, several copper wires should be placed in the mold, which will act as reinforcement and will increase the strength of the product.
Then we align back side products and leave to dry. The drying process can take up to four hours (until completely dry). After making sure that the product is ready, we take it out, carefully sand it and coat it with a special varnish. If you follow all the manufacturing rules, you should get an aesthetically attractive, as well as strong, reliable and durable stucco decoration.

Painting the stucco
To give the product a special look, you can paint it, it is best to choose light, pastel shades. IN classic design Gilding is often used, and in modern times silver plating is used. When choosing paint, give preference to specialized paint designed for interior work. The paint surface also needs to be sealed with varnish.
Important! Do not start creating complex elements before you have mastered the simplest stucco molding. Ask a professional to evaluate the finished product and only then continue with the work.
 (1 ratings, on average: 5,00 out of 5)

