DIY decorative items. If you're tired of the old stuff and want comfort: sensible advice from a practicing decorator. Decor from old light bulbs
If you have a fabric umbrella, it can be easily converted; all you need to do is take:
- transparent elastic film;
- scissors;
- wide braid;
- thread with a needle.
Make a small round cutout in the center of the cellophane circle. To make this place durable and not tear, it is better to also sew braid here. Place the cellophane cover on the umbrella and sew it from the bottom to the knitting needles using your hands, piercing the braid with a needle. After this, you can cover the sown seeds.
There are other interesting ideas for vegetable gardens that are quite easy to implement with your own hands.

This is how beautiful signs can be indicating what is planted where. Write on dark stones with white acrylic paint, and on light stones with colored paint.
Pets will not trample the beds with still weak shoots if you stick disposable plastic forks here, left over from a picnic. Knives made of the same material will also be used. You can write on them with a simple pencil where everything is planted.

Speaking about what interesting ideas for a vegetable garden you can quickly bring to life with your own hands, let’s focus on the following. Summer residents know how quickly the soil in outdoor pots dries out. If there has been a heavy downpour, water may, on the contrary, stand in the pot and lead to rotting of the plant's roots. Create optimal humidity Regular baby diapers will help to fill the soil in such a container. They will absorb excess moisture and release it during drought.
To do this, simply place a diaper on the bottom of the flowerpot, fill it with soil, water it, and plant the plant. Now you don’t have to worry about how your green pets feel in the country while you’re in the city at work.

How to make a pond out of a tire at your dacha?
Using interesting creative ideas, you will create it with ease. Look at the photo of the master class, which shows the stages of work. Then prepare what you need, this is:
- tire;
- durable film;
- decorative stones;
- plants;
- cement;
- sand.

Clean the tire from dirt, leaving only one side part of the wheel, cutting off the second with a sharp knife.
To make cutting the tire easier, lubricate it with laundry soap. Cut the cord with a hacksaw.
The tire can be completely dug into the soil or only a third. Put it in place, draw the outline of the wheel with a shovel. Dig the soil to the desired depth. If you want to make a decorative pond to decorate an area where people will not swim, then lay thick cellophane inside the tire. Secure its edges with stones.

Make sure that the film is not too tight, but is placed loosely in the tire so that the cellophane does not tear during use.
Prepare a solution of cement, sand and water. Using it, place the remaining stones along the edge of the pool. When the concrete has dried well, all that remains is to pour water, and you will have a decorative pond in your country house ready. It’s nice to plant aquatic plants near it with your own hands.
If you plan to swim in it, then you need to dig holes in the soil along the contours of the wheel, select the soil, pour a gravel-sand cushion, and fill it with cement on top. When it dries, place a tire on the platform, pour 2 more buckets of concrete into it, level it so that there are no holes left between the bottom and the walls of the pool.
IN decorative pond Water can be cleaned using a net or by periodically adding preparations to the water to purify it. And in a self-made pool, the water needs to be drained after it gets dirty in order to be replaced with clean water. Look at how the drainage system works.

Creative ideas will tell you how to decorate such a pond or pool in the country. Before filling with water, it can be painted inside and out.

If you plant moss along the edge of a dug-in pond, such a pond will also look great. You can place small pebbles inside.

The exterior decoration of the pond made of stones, which are “planted” on a concrete solution, looks beautiful.

If you don’t have a summer house, but want to have a small decorative pond, make it from a large flowerpot and place it on the windowsill. This one looks wonderful among indoor flowers and creates the humid microclimate they need.

For a small home pond you will need:
- flower pot or pot;
- a strip of roofing felt, corrugated iron or other waterproof material;
- clay soil;
- water;
- aquatic plants.
And if you have not one, but several tires at your dacha, then, in addition to a pond or swimming pool, you can make a swing for children. For the first, you need to first cut a notch on the side of the tire and turn the tire over to the other side. Both sides are cut in the form of petals. It remains to tie 2 strong ropes, and the children's swing
ready for the dacha.

You can also make a swing like this for kids. For similar use:
- tire;
- wooden board;
- bars;
- saw;
- paint;
- self-tapping screws

How to decorate a mirror in your home?
Not only on summer cottage You can create a lot of interesting things with your own hands; ideas for your home will tell you how to decorate your homestead or city home at the lowest cost.
See how to decorate a mirror to make it unique. If you spent a vacation at the seaside and brought back shells from there, use this design element. You can also buy them in the store. To decorate a mirror, take:
- mirror;
- degreasing solution;
- shells;
- glue.

When decorating rectangular mirrors, place large elements in the corner. Arrange identical shells in groups.

The pebbles also look beautiful. See how a mirror is decorated using these smooth pebbles.

To ensure that shells and stones stick well, do not forget to first degrease the surface and then glue these decorative elements to it.
And here are other ideas for the home that are also interesting to implement with your own hands. See how to decorate a mirror using mosaics.

For work take:
- sheet thin plywood or hardboard;
- jigsaw;
- glue;
- mosaic tiles;
- double sided tape;
- mirror.
- Place the mirror on a sheet of hardboard or plywood, outline it, leaving equal allowances for the frame on all sides, and cut it out. If you have a ready-made wooden or plastic frame, use it.
- Attach the mirror to the base using double-sided tape
- When applying glue to the frame, place the mosaic elements here. You can leave them like this or apply grout at the end of the job, let it dry, and remove the excess with a soft cloth.

For this idea use:
- thick cardboard;
- scissors;
- plastic spoons;
- spray paint;
- pencil;
- mirror.
- Cut off the handles of the spoons. We won't need these elements.
- Place the mirror in the center of a sheet of cardboard and outline it. Draw an outer line along which to cut the frame.
- We begin gluing the spoon blanks inside first, stepping back from the place where the mirror will be glued. Having completed the first row, move on to the second, then to the subsequent ones.
- When all the blanks are glued, cover them with spray paint and let it dry.
- Glue a mirror to the center of the frame.

Having cut off the handle of the metal fork, bend the remaining part with pliers and get this original ring.

A grater will help you store your earrings in an original way and never lose them at home.

Crafts from kinders
Children love to receive Kinder surprises, eat chocolate, and get a toy. Don't throw away plastic packaging, they will also provide a lot of interesting ideas for home, cottage.
Let there be a vase of flowers on the table that will never wither. For this interior decor, take:
- plastic packaging for Kinder surprises of different colors;
- green cocktail straws;
- scissors;
- small glass jar.

To secure it, cut it with scissors or tie it directly in the tulip above the hole with a knot.
After the Kinder toys are removed from the eggs, the plastic packaging can be used to make interesting entertainment for young children.

For this you will need:
- Kinder Surprise packaging;
- hammer;
- nail;
- pliers;
- lace;
- caps from plastic bottles.

And in plastic container do it with a hot nail. When the pieces have cooled down, you can use them. Pull the string through the hole in the plastic egg and tie a knot on the reverse side.

Educational toy for children is ready to use. Let the child string the lids on the string.
To prevent the end of the lace from fraying, lubricate it with natural glue made from starch brewed with boiling water. Do not use artificial glues for such a children's toy.
To diversify useful entertainment, invite your child to string lids with holes onto the pyramid, and its elements onto a string.

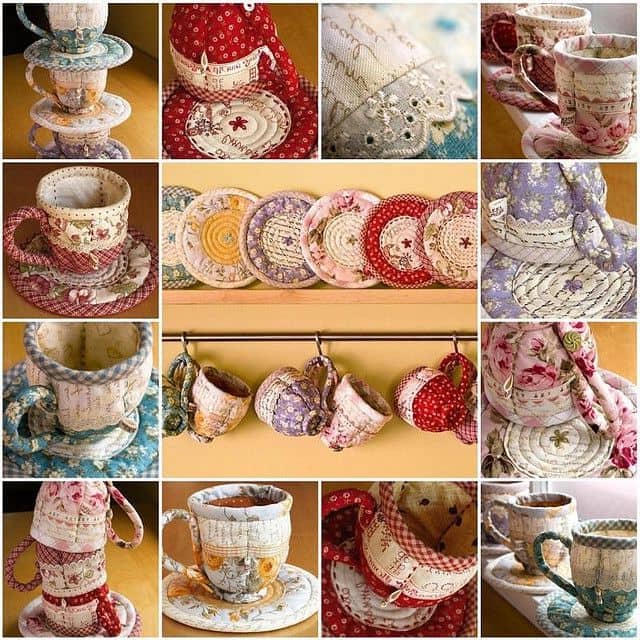
Such a pyramid and a kinder toy also look good in the interior, as does a tea set.

For this, the child will need:
- Kinder Surprise containers;
- plasticine;
- sheet of glossy cardboard.
The sugar bowl is made using the same principle and the cups are decorated. The saucers are made of plasticine.
From thin paper strips you can make elements using the kanzashi technique and attach them to make: a teapot, a samovar, cups, a sugar bowl.

Such DIY home ideas will help you bond with your child and make the living room even more comfortable. After all, then you will play tea party with him, seating dolls and animal figurines nearby. To do this, make these stools with your children, for which you need:
- hair bands;
- toothpicks;
- cardboard;
- scissors;
- glue.
Blanks made of rubber bands are glued or sewn to cardboard, then you need to glue 4 toothpicks to each stool - these are the legs.

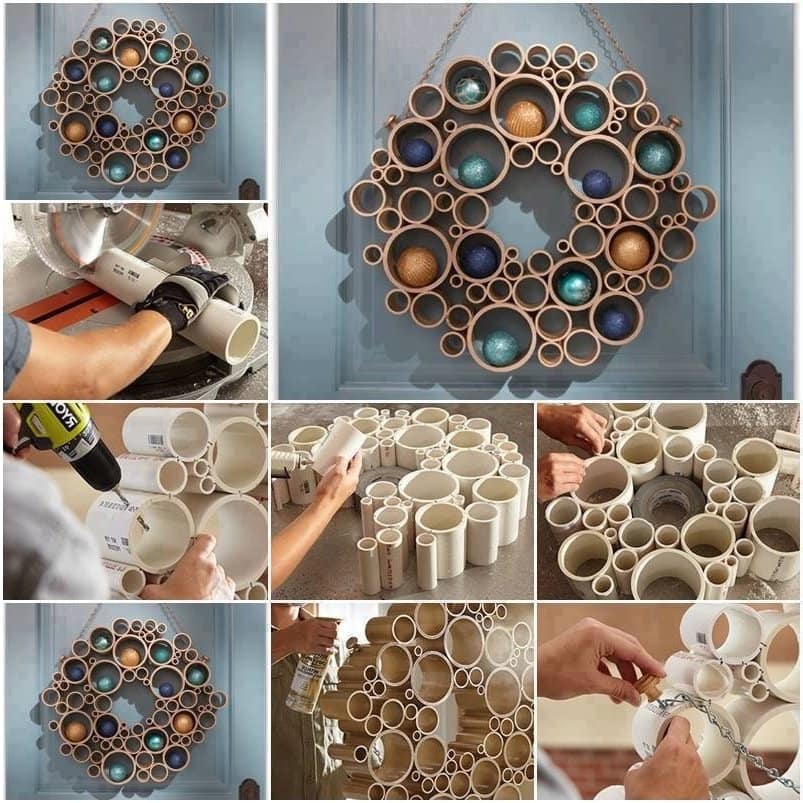
The Kinder collection requires several chocolate eggs. And from the remaining container you can make a Christmas wreath or just a home decoration. To do this, plastic packaging needs to be painted. acrylic paints, and then glue them together in the shape of a ring.

If you want to get such funny chickens, then glue red legs on them from colored paper. Make eyes and beaks from the same material.
Having put 4 black elastic bands on each yellow kinder package, you need to bend the wire in the form of antennae, glue paper wings, and paint the face. You will get such mischievous bees.

Here are other creative ideas that will decorate your home. Let children's works be displayed on the stand. Show them how to use plastic containers Using Kinder Surprises and plasticine, make these adorable animals.

And if you cut strips out of cardboard, roll each one into a pentagon, and glue them together, you will get a honeycomb like this. Plant bees here and you will have a natural corner at home.

Similar material will be useful outside the city. Such ideas for a summer house will tell you how to decorate a mesh fence.

And to make juicy strawberries, take:
- Kinder egg packaging;
- acrylic paints;
- brush;
- pencil;
- wire;
- green plastic bottle;
- scissors;
- candle.
- If your kinder packaging is not red, cover it with paint of this tone.
- When it dries, dip a pencil lead into black paint and make dots on the berries.
- Cut off the neck of the bottle. Next, using scissors, cut the ribbon from the bottle in a spiral. To attach it to the wire, heat sections of it over a flame and wrap it with plastic tape.
- Cut a small circle from the bottle and make its edges zigzag. These are berry greens.
- Heat the remaining free tip of the wire over the flame, first pierce the green “berry” with it, then the berry itself. Bend this edge of the wire with pliers.
- Use glue or flame to attach the green plastic leaves to the trunk. This is the garden figurine you got.

If you want to see other interesting ideas for a garden using scrap materials, watch the video.
Here's the second one telling you how to decorate mirrors with film and rhinestones.

There are people who inspire: with their lives, with their work, by becoming an example for others. And just recently I was lucky to meet one of these representatives.
Mikhail is a leading architect in the capital, and he is also a practicing decorator. He brings to all his design projects handmade items, which fit perfectly into the interior, adding liveliness, comfort and benefit to the owners of the house.
The most interesting thing is that most of his crafts are things that until recently were lying in the attic or closet and were essentially old trash. But it's worth applying to them creativity, a little patience and a few hours of work, and sometimes just half an hour, and in front of you is no longer garbage, but cool decorative items!
To beautifully decorate your living space, there is no need to purchase expensive decorative interior items. After all, all this can be done with your own hands. The main thing is to have imagination and be able to handle various materials and a tool!
Editorial "So simple!" invites you to familiarize yourself with 11 decor ideas, which will be useful and bring comfort to your home. No. 4 even won over my husband!
DIY home ideas
- Transform an old door into a unique coffee table, dining table or work table. To do this, you need to install the door on legs as a table top.

- With knitting skills you can create many beautiful things. For example, using yarn or threads, you can get unusual wall tapestries that will help enliven the interior and create an element of exclusivity.
To make such a panel, tie threads of the chosen color into thick braids, then connect them together into a single carpet. Make loops along the top edge so that the tapestries can be hung on the wall.
Pass a bamboo stick with a rope threaded through it through all the loops and hang the decoration on the wall. That's it, the beauty is ready!

- Great idea for a garden chair!

- Another item that is easy to make with your own hands is a hammock. This product will be an excellent addition to any interior.
All you need are old pieces of fabric and strong thread.

- Make an original one DIY lamp with wire lampshade even beginner needlewomen can do it. To make it you will need: colored wire for home crafts, a light bulb, a socket with an extended wire and multi-colored double-sided figures on a clothespin - in our case, butterflies.
Numerous charming, vibrant, colorful butterflies emphasize the airy lightness of the wire model, which will add a little magic to your home.

- A rug made of flat stones fixed on a rubber base will add an element of sophistication to the home. Also as finishing material Wood cuts, sanded and impregnated with antiseptic compounds, are excellent.

- Use some old straps to tie it down and you'll have a hallway stool like this.
Well, if you get tired of it, you can take it apart and go back to reading these books again!

- If you are bored with the design of an old door, take advantage of this great idea.

- Unusual design of bottle vases.

- Interesting decor for a candlestick or small vase using shells brought from the sea.

- Concrete, gypsum and clay also provide room for creativity. These materials are used to make unique stucco elements for interior decoration.
They also create beautiful garden lamps, original vases, fancy candlesticks, exclusive figurines and other decor.
I really like this idea of creating a stylish candle holder. Wonderful, isn't it?

I also suggest you learn 7 simple and effective ways like right now. For those who want to diversify the atmosphere in the kitchen, giving it originality, bright colors and at the same time an atmosphere of comfort!
Making something interesting is not only profitable, but also useful. In addition, the whole family, including small children, can participate in this exciting activity.
In a short period of time, without having any experience in performing such creative projects, from ordinary things and scrap materials you can make for your home.
Tell us about these great ideas to your friends on social networks, because inspiration is so contagious!
Nastya does yoga and loves traveling. Fashion, architecture and everything beautiful - that’s what a girl’s heart strives for! Anastasia is an interior designer and also makes unique floral-themed jewelry. She dreams of living in France, is learning the language and is keenly interested in the culture of this country. He believes that a person needs to learn something new all his life. Anastasia's favorite book is “Eat, Pray, Love” by Elizabeth Gilbert.
Create a beautiful and cozy interior in your home you can use handmade crafts. Making such original things is not so difficult - you don’t need professional skills for this. The things we make with our own hands are unique, they give the interior of the home individuality and add variety to the environment.
Handmade crafts exude the special warmth of a home. Thanks to unusual creative gizmos, you will have the opportunity to change the interior at will or in accordance with the seasons (for example, create New Year's decor). DIY home decor is varied and purposeful. Homemade beautiful things and useful crafts for the home can be used as original furnishings, decorative elements or as devices intended for storing various household items.
In order to make things with your own hands, you don’t have to buy expensive materials, you can also use improvised means.
Creating unusual decor is possible without large material costs. Most of you have various unnecessary little things in your house, for example, fabrics, colorful paper, buttons - all this can be used as material for crafts.
There is similar “junk” in almost every house, if you dismantle the pantry or rummage around in the attic, you will find something. Natural materials, glue and threads are also useful for making beautiful new items and homemade little things. But handmade decor ideas at home are also needed - of course.
Many people believe that only people with experience can make crafts and create presentable interior items on their own - this is a misconception. Show your imagination, combine different textured materials, don’t be afraid to experiment, and you will create not only a beautiful, but also original decor for home.

Even if you have to tinker with the first thing, each subsequent decorative craft will come out better and better, and you will spend less time.
DIY craft ideas for the home
So, what can you do yourself for your home? Let's look at a few ideas for inspiration. Among the proposed options, you will definitely find something interesting for yourself and try to make the thing you like with your own hands.
Housekeeper
One of the useful things for the home that also serves a decorative function, which you can make with your own hands, is a key holder.

The peculiarity of this key holder is that its design imitates brickwork. The basis for the key holder is thick cardboard (you can use part of a box). You will also need a tight toilet paper or thick napkins. Dense material is needed so that it does not spread when lubricated with glue. Stock up on acrylic paints, varnish and glue (ordinary PVA will do).
Make the back wall of the key holder from rectangular cardboard or a sheet of plywood. Hooks will be attached to the base. Cut out small rectangular bricks from cardboard, the size should be the same, and glue them to the base, leaving a small distance between the parts. Not the entire surface of the cardboard is covered with bricks.
In the central part you need to stick a sign decorated with an inscription, and in the upper part you need to place a beautiful picture.
After this, coat the bricks well with glue, and put a napkin (previously crumpled) on top and a little more glue for impregnation. Using a stick, press tissue paper or paper into the gaps between the miniature bricks to create corners. Give the craft time to dry.

Paint the dry panel with paint (to imitate natural brick, you need to choose a red-brown shade). Use bronze paint to paint the seams.
After the paint has dried, paint the bricks with the same tone using a dry brush (dip the brush into bronze-colored paint, then wipe it on paper until it is almost dry, and only then brush the brickwork).
On a note! When painting bricks, you need to move the brush without changing direction.
To give the key holder a smooth finish, coat it with a clear matte varnish.
The work is completed by attaching the loops, after which it can be hung on the wall or given as a gift to someone. The photo below shows the finished key holder:

Jewelry hanger
All representatives of the fair sex love jewelry; Almost every woman has jewelry that needs to be stored somewhere. An original storage for jewelry will be a hanger made like a painting.
In order to make a hanger for storing jewelry, you will need:
- baguette frame;
- plywood;
- stain (paint can be used as a replacement);
- hooks and drawer handles;
- nails;
- screwdriver and drills;
- cutting tool.
Cut the plywood according to the dimensions of the frame and coat it with stain, then dry it and apply it to the frame. Mark the places where the hooks will be attached and screw them. All that remains is to hang the decorations on the hanger.
Now you have a place to store women's treasures - jewelry.

Plastic canvas box for storing small items
A simple but presentable box designed for storing various small items can be made from plastic canvas.
Canvas is a material for embroidery. You will need a canvas made of plastic; you can buy it in stores that sell everything for needlework.
On a note! Plastic canvas is usually made in the form of sheets, A4 size. The perforations in the plastic canvas differ in size. Canvases are produced with different amounts perforations, the more there are, the smaller they are.
In addition to the canvas, you need to stock up on the following materials:
- dense threads;
- large needle;
- fabric or beads;
- scissors.
Embroidery on plastic canvas is almost no different from regular embroidery. Embroidery techniques can be different, the most popular are cross stitch and satin stitch.
The plastic canvas is flexible, but at the same time it is very durable.
Decide what the dimensions of your box will be. Divide the material into parts intended for the sides and the bottom. There should be five parts in total. Make elements for the lid. Make a workpiece whose size is 0.5 cm larger in width and length from the bottom. The sides of the lid should be slightly narrower. You will need five more parts. Then sew the parts with thick threads (you can use braid and even ribbons).

You can embroider any pattern on the blanks. Drape the parts that are not embroidered with fabric or embroider with beads.
Having completed all 10 blanks, begin assembly. The first step is to sew the side parts to the bottom. Then sew with outside all the side elements of the box and trim the top around the edges. The last step is to assemble the cover in the same way.
We assemble the lid of the box in the same way.
A beautiful box made of plastic canvas is ready.
Woven rugs using tapestry technique
One of the options to add coziness to the interior is tapestry rugs. To weave such things you don't need special tools. A rug using the tapestry technique can be made from scrap materials: thick threads that are used for knitting (they can be replaced with ropes made from old clothes) and cords.
A tapestry is a lint-free carpet made by hand. The base of tapestry rugs is decorated with ornaments created by interweaving threads. We will create a plot composition in the form of a circle with drawn lines; a thread will run along them, serving as the basis.
All work is carried out using weft threads. Hiding under a complex name ordinary ropes and braid, from which weaving and decorative patterns are created.
- choose a strong thread to create the base;
- pulling the weft thread should be done by hand;
- To make the tapestry more dense, you can press the threads to the center; for this, use a simple fork.

Stage one. We draw out cardboard measuring 500 x 500 mm. We stitch the cardboard with the thread chosen for the base. To do this, cut the markings drawn on the cardboard and thread a rope through the lines so that it runs through the central part.
Stage two. Let's start weaving the tapestry. You need to carefully fix the starting thread. Weaving using the tapestry technique involves pulling the underlying cord by alternating one thread at the top and the second at the bottom.
Stage three. After weaving the last turn of the thread around the cardboard circle, you need to turn the resulting rug over to the reverse side and cut off the base cords. When pruning, leave about 5cm at the ends. Pull the ends of the laces out of the notches made on the cardboard (there is no need to remove the picture while pulling it out) and tie them into pairs. Attach pompoms to the resulting knots.
Complete the composition by sewing a thick rope from the wrong side in a circle - this will hide the knots and ends of the threads.
Advice. By using different textures and shades of threads, you can make different rugs and then combine them into one. You will get a carpet big size, which can be hung on the wall or laid on the floor.
A tapestry rug placed on the floor will make it warmer and also looks beautiful. Weave tapestry rug It’s not difficult to do it yourself: try it and see for yourself.
Ribbon curtain
You can make an unusual curtain from ribbons. Tape curtains are suitable for both windows and doors. Making curtains from ribbons will take a little time; you don’t even need a sewing machine. A fluttering ribbon curtain repels insects well; Previously, such curtains were made from newspapers cut into strips.
To make a curtain from ribbons, you need the following materials:
- ribbons or fabric strips (with edges that do not fray);
- cornice;
- clips or buttons.
The ribbons need to be thrown over the cornice and secured with clamps. Large beads can be strung onto fabric strips for decoration.
The ribbon curtain performs not only a practical, but also a decorative function. The advantage of curtains made from ribbons is their lightness. This great option for a dacha, a ribbon curtain can be hung in an apartment.

Flower pots made from paper bags
Many people have houses paper bags, instead of throwing them away, make a flower pot out of them.
Materials for making flower pots:
- paper bags;
- wooden skewer;
- scissors;
- rope;
- glue;
- plastic container.
Take paper bags and mark them: eight strips measuring 70x300 mm, then cut the paper along the dotted lines.
Place a wooden skewer in the corner of one of the strips and wrap the paper base around it diagonally. You must make a paper tube from each strip. Tape the corners paper straws so that they do not unwind. The easiest way to do this is with a glue gun.

Take a plastic container, apply glue to it and wrap it with paper (from the same bags) so that the plastic is not visible. Glue paper tubes to the bottom of the container. Cut paper strips measuring 70x450 mm (you will need large bags) and make tubes.
Wrap the tubes so that they are pressed tightly against the walls of the container. Attach a long tube of paper with glue to the bottom of the container and wrap it around it, you need to braid the main tubes. Wrap all the main tubes, and then change the direction of weaving to braid the missing tubes - this way you need to wrap the entire container.

Make two holes in the sides of the pot (top).
Stretch a string through the holes made; tie a knot at each end of the twine to secure it well. Another woven tube will help hide the ends of the twine. Wrap the tubes protruding above the pot inside the container and secure with glue.
The unusual flower pot is ready.

Handmade items for the home can be used as decorative elements in your home or given to friends.
Most things made by hand are not only beautiful and original, but also useful and necessary in the household. Feel free to start working on homemade things and decorate your home with them.
Video For five more ideas for handmade crafts with your own hands to decorate the interior of rooms, see the video below:
Unusual and unique handmade designer items have always been highly valued, especially among decorators and home interior designers. Making interesting handicrafts for the home with your own hands is not only profitable, but also useful. This is an extremely exciting activity in which the whole family, including small children, can participate. In a short period of time, without having any experience in carrying out such creative projects, you can get from ordinary things and scrap materials original decoration, which will become an irresistible individual decor in the interior.
Interesting DIY crafts for the home (photo)
To beautifully decorate your living space, there is no need to purchase expensive decorative items. Everything can be done with your own hands, the main thing is to have imagination and be able to handle various materials and tools.
By investing a piece of your soul into a handmade product, you will receive worthy decoration, which will bring a special zest to the interior, give warmth and comfort to your home, and make your days brighter and more fun.

Wall decor
— great idea, especially if they display good author’s works with an original design.
For the first product we will need ordinary things that are found in almost every home. And so, we need:
- Cutting board (you can use scraps of laminated chipboard);
- Nails and hammer;
- Knitting thread;
We make panels with our own hands:
- Draw your chosen pattern or design on the board.
- Using a hammer, drive nails at equal distances along the contour of the pattern, so that their heights do not differ from each other.
- Tie the end of the crochet thread to the first nail, then carefully pull the thread to the adjacent one and make one turn around it. Continue pulling the thread from nail to nail until the entire painting is complete.


With knitting skills you can create many beautiful things. For example, using yarn or threads, you can get unusual wall tapestries that will help enliven the interior and create an element of exclusivity.
This decoration is quite simple to make:
- To begin, tie the threads of your chosen color into thick braids;
- Connect the resulting braids together into a single carpet. Make loops along the top edge so that the tapestries can be hung on the wall.
- Insert a bamboo stick with a rope threaded through it through all the loops and hang the decoration on the wall.


Knitted panel is a good idea for wall decor
Carpets and pillows
Mastery of knitting craft will also come in handy for other useful home decor items or accessories.
- They look very stylish and original: floor mats, pillows, ottomans, blankets. You can master the art of knitting them by studying several detailed master classes and lessons with step-by-step photos, which can be easily found on the Internet.


The most popular are soft floor mats with long pile, having a round or rectangular shape. To knit such a “fluffy decor”, you will need an exquisite artistic taste, a little patience and attention, especially if you are doing beautiful handicrafts for the first time.
- To quickly make a fluffy product, small strips cut from fabric are tied into the weave of the mesh.
- All elements are secured from the inside with tape, and a beautiful terry rug can be laid near the bed.
By replacing the stripes with many pompoms made of multi-colored yarn, you get a soft, cozy product for a child’s room.


There are a huge number of different knitting techniques. Despite this, this type of handicraft continues to actively develop.
The result is a lot of beautiful designer items that not only decorate the interior, but are also useful in everyday life. For example, a knitted blanket, in addition to its decorative function, can warm you up on cold winter evenings.


Ethnic motives remain the most fashion trends in interior design. A hand-made “mat-cape” will decorate an armchair, sofa, chair, or stool. For needlewomen who master the technique of crocheting, the material will be not only strong thick yarn or cord, but also ribbons cut from outdated knitted and textile products.
Most often, handicraft masters knit oval or rectangular multicolor capes. The lace elements sewn around the perimeter give them a special charm.


- A small cozy unit will allow you to insulate the tiled floor in the bathroom. mat with massage properties, which is easily made from ordinary corks from wine bottles. They are cut in half along the longitudinal line and glued to a piece of linoleum.

Wine cork rug
- Smooth stones fixed on a rubber base will add an element of sophistication to the room. Wood cuts, sanded and impregnated with antiseptic compounds, are excellent as finishing materials.


Free stitch embroidery
Satin embroidery is one of the oldest types of artistic needlework, which consists of embroidering the plane of a specific pattern. Simply put, a piece of fabric with a pattern of your choice is completely or partially covered with dense stitches of thread. The result is beautiful, picturesque paintings and panels that are not inferior in beauty to expensive masterpieces of art.
Mastering this craft on your own will require a lot of time and patience, but believe me, the final result will exceed all your expectations. Seemingly simple things turn out to be fashionable, stylish and unique elements decor that can highlight the individuality of any interior.


What you need for satin stitch embroidery
A set of necessary materials and tools that will be required for work:
- Fabric of any density (silk, wool or linen are perfect);
- Silk threads High Quality, the fibers of which have a characteristic sheen;
- Hoop ( special device for embroidery);
- Sharp scissors;
- A set of needles and a thimble;
Important! When choosing a needle, or rather its thickness, you should start from the density of the fabric you choose. For example, if the fabric is dense (sheepskin or wool), the needle should be as thin as possible, but if linen is used, the needle should be chosen thicker.
As for the technology of pulling stitches, everything is simple. Each of them can run in two directions, longitudinal or transverse, the main thing is that they are not all tightly tightened on the canvas. After the entire pattern along the contour is filled with threads, we can assume that one more original handicraft ready for home.


Beautiful handicrafts for the home have always attracted and attracted people with their subtlety and elegance. That's why hand-made masters, with their own hands they constantly create new, stunning interior items, delighting their fans with real masterpieces of art.
Exclusive handmade items can decorate the interior, fill the atmosphere with warmth and comfort, and add a touch of personal touch to the choice of design ideas from a variety of interesting options.
Soft toys for children
Tilda dolls with their original and unique design will fit into any interior and it is not at all necessary that it be a children's room; these dolls can take their well-deserved place in the very center of the kitchen or living room.
Every handicraft connoisseur will appreciate your choice and will not be able to resist admiration, especially if these dolls are made independently.


- Don't think that sew a Tildy doll It's hard enough. In fact, if you have the skills to work with sewing machine and you have the opportunity to buy everything necessary materials for making clothing parts and accessories - you may well end up with a unique interior doll.
In order not to spend money on expensive materials, some of Tildy’s clothes can be altered from your unnecessary things good quality, but when it comes to fabric for sewing the doll itself, it’s better not to skimp and buy quality material in a professional store.

Lamp made from improvised materials
make original lamp Even novice needlewomen can do it with their own hands with a wire lampshade. To make it you will need a simple set of materials and tools:
- Colored wire for home crafts;
- Bulb;
- Cartridge with extended wire;
- Multi-colored double-sided figures on a clothespin - in our case, butterflies.
- We attach the wire to the wire at the base of the cartridge and wrap it around in a chaotic circular motion, fixing the wire in the desired position.
- After a couple of circles, we attach the wire to the wire again, each time doing it higher than the previous one. With each new circle the lamp increases in volume, repeat the work to the size you need.
- Upon completion of work with the wire, you need to give the product some color. To do this, attach various figures in random order to the newly made lampshade. You can make them yourself or buy them in a specialized store.
The lampshade will gain lightness and airiness thanks to free space between the wire, so try not to pull the product together and perform each circle in a different direction.


Decor from old light bulbs
Do you have old light bulbs at home? Don't rush to throw them away. This simple material can be used as interior decoration. On the Internet you can find a huge number of unusual ideas for their use. Here are some of them.

Miniature garden made with light bulbs with my own hands- will be a great gift for a creative person


Paper decoration
Wall compositions using the quilling technique, the material for which is paper, look charming. Even children can create them, which will serve as a reason for organizing joint family creativity.
With their own efforts, folk craftsmen make stained glass fragments that fill the space with a bizarre play of color spots. They are used to decorate interior doors, lampshades, create screens, zoning rooms


Knitted items, sewing, patchwork, weaving
Do unusual decor for your own home, you can use plain paper.
- Wicker vases, voluminous toys, decorative baskets look great and can fit into a variety of interior styles. To make them, not everyone has the opportunity to prepare willow twig. Home craftsmen successfully replace this wonderful weaving material with tubes rolled from ordinary newspapers.
The prepared sheet is wound obliquely onto a thin knitting needle and glued together to form a thin elastic tube for weaving.


- Having set out on a dream to update the atmosphere of the bedroom, mastering sewing skills, they assemble amazingly beautiful pieces from individual rags. patchwork bedspreads.
Such products are easily obtained from elements crocheted or knitting needles. To update covers, pillowcases, napkins, tablecloths, the appliqué technique is used. Bright, beautiful fragments are cut out from any fabric, fixed with an adhesive base and processed along the contour with braid, cord or stitched with a decorative seam.

Patchwork is a fun activity for creative housewives

You can find applications for the patchwork sewing technique in any room—the nursery is no exception.

Having knitted an openwork cover for a regular glass jar Crochet cotton threads to create an elegant candlestick. Place a candle inside so that it does not rise above the neck and light it. The flickering of flames through the lace creates a mysterious romance, allowing you to decorate a luxurious holiday table.


Embroidery, beads
For embroidered paintings, pillowcases, napkins that decorate the interior, various threads are used - wool, silk, synthetic, linen. Embroidered fragments decorate the frames of mirrors, the seats of chairs, armchairs, and sofas.
Embroidered curtains look gorgeous. Amazing volumetric panels, embroidered satin ribbons, become bright accent, enlivening rooms of various functional orientations.


Stunningly beautiful panels, lampshades, and candlesticks are created using beads or beads. They are strung on a fishing line and intertwined into charming openwork patterns.
You can lay out a beaded tabletop coffee table, fixing the material with glue and covering it with varnish.


Updating furniture, garlands
Update coffee table possible using decoupage technique. To do this you will need to perform the following sequence of actions:
- To start wooden surface need to . To do this, it is polished, after which all dirt and dust are removed with a brush.
- Next, the tabletop is coated with white acrylic paint.
- The top layer with the pattern is separated from the napkin and placed on a dry surface.
- After this, carefully soak the paper with PVA glue, smoothing out all the folds with movements towards the perimeter.
- After drying, the tabletop is covered with a layer of transparent varnish.
Using this technique it is easy to give a new look to chests of drawers, cabinets, and vases. Not only are they used for decoration, but also bright fragments cut from fabric, magazines, and photographs.


Pieces glued in the form of a continuous or fragmentary mosaic give an interesting texture to surfaces. tiles, washed and dried eggshell, dyed millet, coffee beans, watermelon and apple seeds.
The final action is to apply varnish to the glued composition.


To make your child’s nursery more comfortable and safe, you can sew soft, comfortable and pleasant-to-touch ottomans for her:
- Using the patchwork technique, two circles are sewn together.
- A strip of fabric is sewn along the edges.
- Stuff the product using foam rubber.
- A decorative handle is sewn on top in the center.

Soft ottoman - important element when decorating a children's room


- To zone a room, separating, for example, it can accommodate all kinds of decorative garlands, hanging them in doorways or on windows.
- Elastic cords with stars, butterflies, flowers, and circles of various sizes cut out of foil will help transform the design of the room. Old gramophone records that are painted and bound into canvas metal rings will also contribute to interior decoration.


A variety of ideas for home crafts
Exists a large number of technological techniques for home crafts that allow you to make the interior not only more decorative, but also functional.
By connecting the ends of thick cuts together, you get a hot stand. Such a product can even be made from paper folded in several layers. The resulting strips are glued together in a spiral or formed into products in the shape of a square, rhombus, or rectangle.


Even photocopying techniques are available for home crafts, allowing you to transfer designs onto fabric. A pattern is attached to the fabric that needs updating front side. On the reverse side it is pressed with an ironing press or iron until full translation Images. All that remains is to dry and iron the product.


- From the usual glass bottle beautiful shape get unusual vases . For this outer surface bottles, in a spiral, need to be wrapped tightly decorative rope, fixing it with glue.
If you don't want to bother with rope and glue, you can paint the bottles in bright colors, decorate them using decoupage technique or make an interesting painting on them.


A simple and laconic bottle vase will be an excellent gift for your other half
- There is certainly room for creativity: plaster and clay. These materials are used to make unique stucco elements for interior decoration. They are also used to create beautiful garden lamps, original vases, fancy candlesticks, exclusive figurines and other decor.
- Similar handicrafts can become not only an excellent decoration for home interior, but also to be useful in everyday life. For example, for safe movement around local area at night, garden lamps can be placed along paths and paths.


Do beautiful vase using the papier-mâché technique - very simple
Homemade crafts are a fun activity. From the variety of ideas, it is easy to choose an option suitable for a specific interior in order to add a touch of individuality to it in the form of an original home-made product.

Try, experiment and you will definitely succeed.
Today we will prove to you that making the most interesting handicrafts for the home with your own hands is much easier than it seems to inexperienced handmade lovers. To understand its basics, you will need a minimum of available tools, skills and time. In this case you will receive original products, which you won’t find anywhere else except in your own interior.
- Fabric crafts for home
The best thing about doing home and garden crafts with your own hands is that everything necessary tools and materials can be found at hand. There is no need to spend money on ready-made expensive products to add a touch of home comfort, warmth and warmth to your interior if you can make them yourself!


How to learn to make rugs yourself
Floor rugs, which suffered undeserved oblivion several years ago, are once again coming to the forefront of interior design. They will find a place in children's rooms, hallways, bathrooms, near the bed in the bedroom or in front of the sofa in the living room. Especially popular are small round or rectangular rugs with an interesting texture (shaggy, fluffy, with long elongated loops, and so on). Let's look at two simple master class, having mastered which, you will be able to perform this beautiful handicraft for the home with your own hands.
How to make a crocheted floor mat: a master class for knitting lovers

You will need the following:
- thick crochet hook (suitable #10);
- thick yarn (you can use yarn of different colors, then the finished product will be brighter and more original);
- scissors.
Advice! Instead of yarn in its traditional sense, you can use old knitwear - T-shirts, long sleeves, T-shirts. You will not only find a use for old things, but also get soft and pleasant to the touch yarn, which is a real pleasure to work with.


There are also many interesting rug ideas that can be woven, knitted or crocheted.

"Granny" rugs are very popular in modern homes

Fluffy grass mat using a hook
You will need:
- five skeins of yarn in different shades of green;
- very thick hook No. 14;
- scissors.


Advice! Be careful when choosing threads. If you take acrylic or any other synthetic yarn, the finished product may turn out slippery and electrified. If you use woolen threads, there is a high probability that the rug will “pinch” your bare feet. Perfect option- This is a half-wool yarn.


In this simple way you can create an original rug for your home. Take a closer look, maybe there are materials in your apartment that are suitable for creating a real masterpiece?


Fabric crafts for home
Fabric decor is deservedly popular. It helps to bring a touch of home comfort, warmth and sincerity to the interior. Fabric decor looks especially good in rooms decorated in almost all styles. We invite you to get to know the very in simple ways production of original fabric paintings.
How to make eco-paintings from fabric and natural materials with your own hands?

Prepare the following:
- burlap or other natural textiles with a bright, pronounced rough texture;
- any natural materials (for example, coffee beans, cinnamon sticks, star anise, dried flowers, natural moss and so on);
- decorative elements (ribbons, wooden or bone buttons, lace);
- frame;
- cardboard for the base;
- glue gun;
- scissors;
- simple pencil.
Idea! Such paintings fit perfectly into styles such as country, eco, bungalow. They look best in kitchen decoration.

You can also create a huge variety of interesting things from fabric.


Fabric painting for a children's room
We offer to decorate your baby’s room with a very interesting homemade craft - a picture made of fabric on a foam base.
What will you need for this?
- colored shreds;
- foam base;
- picture to be transferred to the base;
- pencil;
- copy paper;
- glue;
- nail scissors;
- any flat, sharp object for pressing the pattern (for example, a patchwork spatula is suitable for this purpose);
- ripper
Advice! The steamer (as well as the spatula) can be replaced with other devices that are suitable in shape and thickness and are available at hand. For example, this could be a dull butter knife.
- On all sides of the foam blank, retreat 1.5-2.5 cm for the future frame. Press the resulting rectangle with a spatula.
- Transfer the selected image using carbon paper onto a foam base.
 (1 ratings, on average: 5,00 out of 5)