Stand for drilling units. Drilling rig stands (stands). Preparing for work
When performing carpentry and plumbing work, an appropriate tool designed to perform specific tasks. However, there are situations when it is much more convenient and easier to use special machines. They allow you to optimize the process and save time during the same type of work. Therefore, questions about how to make a drilling machine from a drill very often arise among modern craftsmen.
Necessity or luxury
First of all, it is worth saying that using such a device is very convenient when making holes in small horizontal planes. It almost completely eliminates the drill from backlash, which inevitably occurs when handmade. Even a small drill significantly increases the accuracy of the hole made, minimally reducing the error. Also, such equipment greatly saves time and effort if frequent use or monotonous work is required.
Almost all enterprises where plumbing work is performed are equipped with such units. The fact is that studies conducted in the field of occupational safety have shown an increase in productivity and quality when using them. Some of them even purchase a magnetic drilling machine to optimize production on large surfaces without the use of expensive equipment.
Why drill?
Currently, there are a lot of designs for creating such equipment at home. However, most experts recommend making a drilling machine from a drill. This is due to the fact that this tool already completely contains all the necessary components and assemblies, and they do not have to be purchased separately. In this case, the fixation on the structure is carried out so that the drill can be easily removed for independent work. As a result, we do not lose a tool that we can use ourselves.

Materials
In order to create a drilling machine from, you need to purchase the tool itself. It is selected in accordance with the parameters that the finished device will have to have. At the same time, experts advise paying attention to products that have their own slight play. Otherwise, the advisability of using it for work is called into question. You may also need:
- Guides. They use systems used in furniture production, or metal strips.
- Bed. Most often it is made from a metal plate or wooden box, on which magnets or ballast are attached for weighting.
- Fasteners When making a drilling machine from a drill with your own hands, you immediately select couplings or clamps suitable for fixing a specific tool.
- Wood or metal constructions- depending on what material is to be processed.
- The spring required to implement the reverse motion.
- If a drilling machine is created, then the magnets themselves will be needed.
Tool
In this case, the selection of the tool used depends on the material for creating the frame. However, it is immediately worth noting that a corner for measuring the connection of elements at 90 degrees will be necessary in any case. Even a mini-drilling machine requires great precision during its manufacture, since this will subsequently affect the quality of the holes produced.

Drawing
First of all, you need to decide on the design of the final product and the material for its manufacture. However, there is no need to come up with too complex technical solutions or expensive units. Standard drawing The drilling machine from the drill is quite simple. It involves creating a strong and stable frame on which a vertical tripod with a movable carriage is mounted. Considering this, Special attention It is worth paying attention to the implementation of moving the drill in a vertical plane, although the use of ready-made guides greatly simplifies this process. If you use the stand of a microscope, photographic enlarger or press as a frame, then the drawing will be based on their base, and the entire manufacturing process is greatly simplified.

Stand and tripod
Even a mini drill press needs a stable base. It should not only support the entire structure, but can be equipped various elements for fixing tools or other devices. When thinking about the design of a drilling machine, it is worth listening to the advice of experts. Many craftsmen recommend creating these devices from wood. Therefore, for the bed they use wooden frame in the form of a small box. There are seats on it for installing a vice or other structures. If the product is planned to be used on large surfaces, then the frame is made of a solid plate with a hole for a drill. This way you can implement the principle of drilling through.
Almost any drilling machine device involves installing a vertical tripod at an angle of 90 degrees to the bed. Therefore, it is very important to use an accurate one in your work. You also need to securely fix the tripod using additional mounts in the form of corners.
If the work involves working at a certain angle, then you can make certain devices in advance that will be attached to the frame. Most often in such cases, ready-made ball vices with adjustable angle tilt

Creating a Motion Mechanism
When making a homemade drilling machine from a drill, special attention must be paid to this stage. The fact is that the vertical stroke should be soft, without distortions, play or displacement. Taking this into account, professional craftsmen recommend using ready-made guides that can be taken from other devices. You can also use systems made to pull out drawers in cabinet furniture. They are quite reliable and can withstand heavy loads.
The guides are installed directly on the tripod or special strips attached to it. In this work, it is very important to use a measuring tool, since these elements must also be positioned at an angle of 90 degrees with respect to the frame and parallel to each other. Even small distortions or displacements should not be allowed.
The second part of the guides is fixed to a special carriage, where the drill itself will be installed. It is made of wood and adjusted to the dimensions of the original instrument. A small handle is also attached to the carriage, with which the operator will control the moving process.
To implement the return movement and facilitate control of the movement of the carriage, a spring is installed on the machine. One end of it is fixed at the top of the tripod, and the other is mounted on a movable mechanism. In this case, they immediately check the level of its tension, which, if necessary, can be changed by cutting the turns or stretching them. However, this adjustment is best done under load, which means it is performed only after fixing the drill on the carriage. Some craftsmen recommend making the spring removable so that it can be removed after work. This way it will not stretch and weaken.

Fixing the drill
Typically, instructions on how to make a drill press from a drill recommend creating special fastening systems that end up being very difficult to work with. However, if the tool is selected correctly, it can be fixed using ordinary plumbing clamps used to create connections between hoses and pipes. In this case, you will need to make certain changes to the shape of the carriage or even slightly adjust the drill body.
It is very important that the tool is clamped tightly and moves in the clamp. Therefore, even at the manufacturing stage of the carriage, they practically do not leave him free space, limiting structurally on all sides. In fact, the carriage itself is a kind of bed for the drill, in which it will sit very tightly. Additional elements are needed only for reliable fixation. This approach will greatly simplify the design and allow you to quickly remove the tool if necessary.

Conclusion
Taking into account the material presented above, we can conclude that a drilling machine from a drill can be made independently and without large financial costs. In this case, the final product will be maximally adapted to the performance of specific technical tasks and will be able to satisfy the relevant needs of the end user. However, it is worth considering the fact that factory designs usually have less error and are capable of performing precise work with minimal tolerance. Therefore, such devices are usually suitable for private use or in small workshops where high-precision holes are not required.
Many people, primarily those living in country houses, periodically have to perform work related to drilling holes in various materials. To do this, we use a hand-held electric drill (and some use a mechanical one!), and from personal experience We know very well how difficult it is to hold a strict vertical line with your hands. When making deep holes, there is always a risk of breaking the drill.
When performing carpentry and plumbing work, as a rule, an appropriate tool is used, made to perform these tasks. However, there are situations when it is much more convenient and easier to do certain work (in this case, we mean drilling holes) if you use it together with a drill. optional equipment. This complex application main cutting tool and an auxiliary device allow you to optimize this process and save time when performing the same type of work.
I used to read that there are factory-made devices for vertical drilling, capable of turning hand drill into a full-fledged drilling machine. But then I thought that this did not concern me at all.
Over time, I came to the understanding that in my small country house it is necessary to have at least a simple tabletop drilling machine made from a drill, information material about which I found on the page of the Banggood online store.
After reading the reviews and comments for this product (and from the comments it is clear that this device is sold all over the world!) I decided to buy it. My choice was also based on the fact that it is very easy to use and convenient for making not only vertical holes, but also has the ability to drill a hole at a certain angle. It almost completely eliminates the backlash that inevitably occurs during manual work. This essentially a drilling machine made from a drill significantly increases the accuracy of the hole made, minimally reducing the error. Also, such equipment saves a lot of time and effort if frequent use or monotonous work is necessary, since the drill does not need to be held in your hands and its vibrations taken into account.
At the time of purchasing this equipment, I already had a drill in stock and did not need to purchase it separately. In addition, it is fixed in the machine in such a way that, if necessary, the drill can be easily removed and used separately for independent work. In the end I old instrument I don’t lose it, I can use it if necessary on my own, but I save significant financial resources by purchasing equipment that is useful to me for relatively little money.
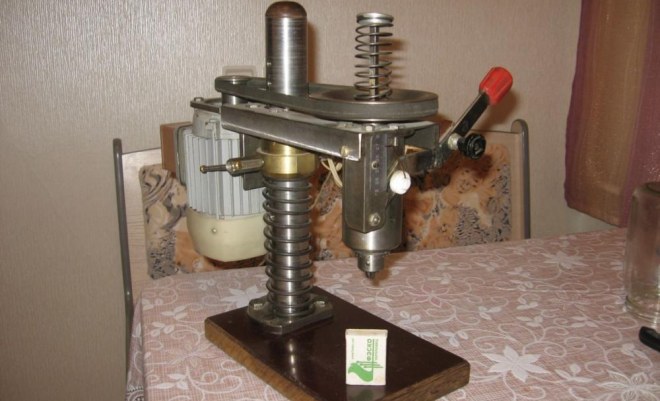
Design features
I would like to immediately note that in the seller’s photographs all the elements discussed in the review are clearly shown, and some also indicate required dimensions. Therefore, I will not duplicate this information in my review.
The drill is attached to the main unit of the device using a protruding clamp (made in the form of a clamp). Before attaching the drill, it is necessary to put a plastic cylindrical attachment on it (the delivery set includes several, both for attaching the drill and for attaching the engraver). 
The drill is secured in the clamp with a screw. To the left of the drill mounting clamp there is a metal guide for moving the drilling depth indicator and a scale for setting the cutting depth (vertical, glued - from 0 to 6 mm, gradation 1 mm). I haven't had any issues with them and everything works fine. 
On the left side directly behind the dovetail with rack there is a lock at the upper end of the return spring.
The vertical stroke of the “head” of the machine is generally soft; I have not yet noticed any distortions, play or displacements. Spring providing reverse stroke does it also softly and without jerking. 
The rotary mechanism with a scale (pasted around the circumference - from 0° to 90°, gradation 15°) is located directly behind the vertical feed lever. In order to rotate the “head” of the machine, you need to loosen the two fixing screws with a hex key and rotate. I had to make an effort when turning in some places. I assume that the processing of internal rubbing surfaces was poorly done. I’ll sort out this issue in the near future and, obviously, I’ll have to clean up this place too. After turning the drill, it is necessary to fix its new position. 
A special role in this design is played by the frame, which is made of a metal plate (the magnet sticks to it very well) and ensures reliable holding of the entire structure. If necessary, it can be attached to the surface of a carpenter's or mechanic's table; for this there are four mounting holes.
The upper part of the bed is a rectangular work table with a radial arrangement of four T-shaped slots for fixing other devices, and a hole in the center for the passage of a drill. The table plane has enough smooth surface– the result of milling (without subsequent grinding). Initially, I also did not have any complaints about these elements, but then serious ones arose. But more on that in the next reviews. There is something to tell. 
Includes a set of hex keys and additional tools not required for assembly.
When working on this miniature tabletop drilling machine, two main movements are carried out: rotation of the drill chuck and its translational movement in the vertical direction, which is provided by the carriage through the rack and pinion transmission of force from the lever. The rack is visible if you look at the main unit (carriage) of the device with back side. I would like to note that I did not find any lubricant in it on the rubbing parts. To extend the service life of this unit, I filled it with cannon lard (PVK cannon lubricant), which I have had since the times of the USSR. I don't think I did him any harm. 
In addition to these main movements, the possibility of auxiliary movement is provided - this is the movement of the “head” of the machine along the column to set the required distance between the chuck and the bed. The machine column is made in the form steel pipe(attached to the frame vertically with two mounting screws) and has a nickel finish. The main unit is placed on the column and fixed with two coupling screws (made in the form of a clamp). From below, this unit is secured from spontaneous sliding along the column with a black fastener, which tightly fits the column and is also secured with a screw.
Thus, main node fixtures can be moved along the column according to the height of the workpiece or workpiece. 

Recommendations
Before using this unit, you should loosen the three screws in the dovetail (located on the right side of the carriage), since they are initially (during transportation) tightened relatively tightly.
When installing a drill (especially a used one), pay special attention to the drill in terms of the presence of its own play. Otherwise the accuracy drilling work and the appropriateness of using this equipment is being questioned.
Dimensions of the machine from the manufacturer’s website: 
Advantages
- By using of this equipment you can not only perform drilling, but also make grooves in sheet material or parts of some structures, using additional equipment that is attached to the work table and the necessary cutter. In short, this drilling machine can also be used as a milling machine.
- The internal machining of the holes in the frame leaves some room for improvement. The file had to be taken by hand to remove unwanted burrs and sharp edges.
- In my opinion, the column tube is thin, which contributes to the appearance of vibrations in the system during operation of the machine.
- Fine grinding of the carriage parts and the bed itself is required for a stable position on the working surface.
The description of the product on the seller's website fully corresponds to the original. The purchased equipment fully justifies the money spent on it. It can also be used in the garage and in a city apartment (usually installed on the balcony). The stand is made of quite high quality, the base itself (bed and desktop), the column and some other parts are made of steel and have a pleasant appearance, the “head” of the machine walks along the column without special effort, there are no backlashes. Packaged in a box, complete with hex keys and 3 sizes of plastic cylindrical bushings for attaching drills of various models and sizes. Personally, I am very pleased with the purchase and the seller! I recommend it to you too! I'm planning to buy +53 Add to favorites I liked the review +27 +61
The drilling stand is an important component of a diamond drilling rig. The diamond drilling stand consists of base plate, columns and carriages. The diamond drill stand is the basis of all drilling equipment and ensures uniform feeding of the bit when drilling. Produce manual drilling diamond drill holes larger than 40 mm are almost impossible. Required long time hold a heavy machine in your hands in a strictly fixed position without the slightest distortion, otherwise the diamond bit may jam in the material.
The diamond drilling stand ensures uniform supply of the diamond bit in a strictly fixed position using a guide rack or gearbox. Some diamond drill stands have hydraulic feed, which creates the optimal pressure to drill through the material. The diamond drilling machine's stand can provide drilling at almost any inclination angle. The diamond drill stand is attached with just one anchor to all surfaces - ceiling, wall or floor. Strict fixation prevents the diamond bit from jamming and ensures comfortable conditions for work.
It is advisable to make a drilling machine with your own hands in situations where there is a need to drill holes in parts in a home workshop or garage various configurations, as well as made from different materials. It should be noted that such a device makes it possible to obtain holes with sufficient high level quality.
When you need a homemade drilling machine
In production or repair enterprises, where the drilling operation is considered the most common, a special device is used to perform it, the models of which may have different functionality. So, it can be a compact tabletop drilling machine, distinguished simplest design, or equipment equipped with several working spindles and numerical control.

To drill holes in various materials, which is done in a home workshop or garage, you can use homemade equipment. Naturally, for use at home you need a simple device that can be made from components and materials found in almost any garage or home workshop.
And in this article we will not leave unanswered the question of how to make a drilling machine at home, while spending a minimum of money. The drawings and experience of many craftsmen who have already walked this path will help us with this.
The need for such mini drilling equipment for metal, wood or plastic most often arises among those who are accustomed to independently performing various renovation work in your house or apartment. Also, quite often radio amateurs are puzzled by the construction.
It would seem that a conventional drill can be used to perform such an operation, but such a tool is not always able to provide the required quality and accuracy of drilling operations. Homemade, in addition to its compactness, has one more important quality: It can accommodate different types of drills.

Drilling machine from a conventional drill
To make a small but functional drilling machine for your home workshop, you don’t need to purchase special materials and components. The design of such a convenient and useful desktop device contains the following components:
- the base, which is also called the bed;
- a mechanism that ensures rotation of the working tool (a conventional drill can be used as such a mechanism);
- device for providing supply;
- a vertical stand on which the rotation mechanism is fixed.

The stand on which the drill will be mounted can be made from chipboard sheet. This material is quite capable of supporting the weight of such a device. The bed of such a mini-machine should be more massive, since it protects the entire structure from vibrations, which can negatively affect both the quality and accuracy of the resulting hole, and the comfort of work.
As a material for this frame, you can use an ordinary furniture board, the thickness of which is more than 2 cm. It is most convenient to use the base of an old photographic enlarger for this, slightly modifying its design. Sometimes an old microscope is used, but this is a rather rare option, since such a unit will not be large enough and its use will be limited.

The quality and accuracy that a homemade drilling machine will provide depends primarily on how correctly and reliably the connection of its base and vertical stand is made. Important elements Such a micro machine consists of two guides along which the block with the drill attached to it will move. Such guides are best made from two strips of steel, which must be securely screwed to the rack using screws.
When making the block, it is advisable to use steel clamps that will securely fix the drill on it. In addition, in order to avoid unwanted vibration processes when drilling, a thick rubber gasket must be installed at the junction of the block and the drill.
After this, you need to make a feed mechanism for such a mini machine, which should ensure the movement of the electric drill in the vertical direction. The manufacturing schemes for such a mechanism may be different, but it traditionally contains in its design a lever and a spring, which is attached at one end to the stand, and at the other to the block with the drill. This spring gives the feed mechanism greater rigidity.
Drilling machine from a drill that is not planned to be removed from it, you can make it more convenient to use if you disassemble the original switch of the drill and mount a separate button on the frame of the mini equipment. This button will always be at your fingertips and will allow you to quickly turn the device on and off. As you can see, it’s not at all difficult to make a drilling machine from a drill; all you need to do is read these instructions carefully or watch the training videos in this article.
An example of a drill machine in more detail
As an example, let's look in more detail at one of the options for a homemade drill assembled at home.

Manufacturing a machine using an asynchronous motor
Lack of excess electric drill- this is not a reason to abandon the idea of making a drilling machine with your own hands. To drive the rotation mechanism of such equipment, you can use any Electrical engine. Such engines, which were previously installed on various techniques, will probably be found in the garage or workshop of any home craftsman.
Asynchronous motors, which are equipped with washing machines. If you have such a motor, you can confidently use it to make home drilling equipment. Making drilling equipment with such an engine at home is somewhat more difficult than using a drill, but the power of such a machine will be much higher.
Given the fact that an induction motor weighs more than a conventional drill, you will need a stronger base and stand to accommodate the feed mechanism.
In order for such a mini drilling and attachment machine to vibrate less during operation, it is necessary to install the motor on a powerful base and place it as close to the stand as possible. But here it is important to maintain the correct distance, since the convenience of installing the belt drive depends on it, due to which the rotation from the motor will be transmitted to the drilling head.
In order for you to make such a machine at home, you will need the following structural elements:
- gear;
- a hexagon on which the pulley will be placed;
- two bearings;
- two tubes, one of which must be with internal thread;
- clamping ring, which must be made of durable steel.
The hexagon also connects to metal tube, bearing and clamping ring. Such a connection must be very reliable so that the resulting assembly does not collapse during operation.
The mechanism necessary to ensure the feed of the tool in such a mini machine must consist of a tube on which cuts are first made, and a gear. The tube will move due to the connection of its teeth with these cuts. An axle with a hexagon is then pressed into this tube, the height of which must correspond to the amount of the required tool feed.
Example of a drilling machine with an asynchronous motor
Let's consider one of the very serious options for a homemade drilling machine with asynchronous motor, made clearly not by a newbie. Few home craftsmen would dare to take on such a project, but if, as they say, the urge comes, then nothing is impossible.
Drilling is one of the most common technological operations in carpentry, so every master knows how important it is to make the hole quickly, and most importantly, as smooth and clean as possible. When you have a drilling machine at hand, drilling a hole evenly and quickly is not a problem. And vice versa - when it is not there, the quality of drilling long holes can be difficult. In this article we will offer one of the options for a drilling machine from a regular household electric drill or.
Introduction
Drilling a thin workpiece is not a problem - even if the drill is not perpendicular to the drilling plane, it will not be easy to visually notice that the hole is not level, so, as a rule, the master will be satisfied with the result. In such cases, you can drill “by eye”. When the depth of the hole is large, then even with a slight deviation from the perpendicular, the “curvature” of the hole will be noticeable. For such cases it is necessary to use special devices, or better yet, a drilling machine. Therefore, this time we will try to make a homemade machine from a drill or screwdriver.
Original idea
This design is very versatile, since its basic part (base and spindle box) is the working part of several other devices described in the following articles:
These articles contain photos and videos of do-it-yourself machines.
 |
 |
 |
Thus, part of the structure of the described machine can be used for the manufacture and subsequent assembly of three more additional devices. If necessary, having all the components, you can assemble the necessary ones at your discretion this moment devices.
Preparing for work
Before you begin, you need to think through the sequence of all technological operations during manufacturing. homemade machine, plan manufacturing technology, decide on future materials and tools that will be needed during the work process.
Tool
To make a machine from a drill or you will need the following tool:
- or .
- Jigsaw.
- Angle grinder (angle grinder or simply “grinder”).
- Drill or .
- Grinding machine.
- Different hand tool: hammer, screwdriver, clamps, wood crown (or simply “crown”), square, marking pencil, etc.
Material and components
To make a machine with your own hands, you will need the following materials and components:
- 15 mm.
- Pine board, solid;
- Furniture drawer guides;
- Sleeve;
- Furniture footwear;
- Wing nut;
- Fastening: M6 bolt, self-tapping screws of various lengths.
Main structural elements
The design of the drilling machine consists of the following main elements:
- Base:
- Vertical frame;
- Spindle box;
- Platform (horizontal support);
- Drilling table;
- Drill mount (), used as an electric motor and spindle;
- Drill();
- Spring-loading mechanism and drill feed handle.
Making a drilling machine
To describe the entire process of making a homemade drilling machine, we will divide it into stages according to structural elements, attach a photo with comments, and place a video below.
Base
Vertical frame
It all starts from the foundation. To assemble a vertical frame, you need to take two types of bars, two of each standard size, made of pine or birch with a cross-section of 30 x 40 mm and a length of 60 mm.

We fasten them together in pairs, in pairs, where one face is flush and the other plane is offset. It is better to coat the joint plane with wood glue.


Spindle box base
To manufacture the spindle box (the moving part of the machine), sliding (rolling) elements are required. Furniture drawer guides will be used for this purpose.

It is necessary to cut 4 guides 120 mm long, and also make stoppers at the ends to prevent accidental exit from each other.

To make the base you need to use or make from three blanks with the following dimensions:
- 140 x 155 mm – 1 pc.
- 155 x 55 mm – 2 pcs.
Then you need to install furniture guides on them.

And assemble the spindle box itself into a “U-shaped” structure.


If the installation was carried out correctly and evenly - without distortions, then the spindle box should move along the frame freely, without clamps.
Platform (horizontal support)
To make a platform (horizontal support), we need to make two blanks:
- 260 x 240 mm
- 50 x 240 mm


Drilling table
To make a drilling table you will need 4 blanks.
| Size | Qty | Description |
| 260 x 240 mm | 1 PC | Tabletop |
| 260 x 60 mm | 1 PC | Vertical table plank |
| Rectangular triangleCuts: 60 x 60 | 2 pcs |

Since great forces are possible on the table, it must be made strong enough, so you will need additional elements strength - these are corner stops. There are two of them and they must be installed at the corner junction of the plank and the tabletop.


The drilling table is fixed to the frame using a bolt, which is tightened with a nut on the reverse side. To install the bolt, you need to press the wing nut into the guides.


After this, you can install the drilling table on the frame, tightening it with a nut with a handle made of.

Drill mount
The manufacture of a drill mount begins by gluing two sheets together and making one blank measuring 165 x 85 mm. This is a very important structural element and will require additional strength, so two layers need to be glued together.
The drill will be fastened by clamping it in the seat of the front handle, and since it differs for different models, you need to decide on the model and, accordingly, the diameter of the seat hole for the tool that will be used in this machine. Drill a hole for the drill.


The first installation of the drill mount should not be too strong, you just need to “bait” the part, since in the future there will be an adjustment of the perpendicular and, most likely, adjustments to the installation position will be required. Installation is carried out using a pair of screws on the back of the spindle box.


After alignment, it is necessary to more thoroughly fix the attachment of the drill to the spindle box (an additional 4 screws), and also install an additional angle stop.

Spring-loading mechanism and drill feed handle

In the future, we will need to install the drill feed handle, so the axis of its rotation will be the pre-installed foot in the end of the upper spring mounting bracket.


Installing the handle on the machine is not difficult - one end of the handle must be secured with a screw to the upper spring mounting bracket, and the end of the metal rod must be secured with a screw to the drill mount.

Now all that remains is to drill a hole in the drilling table so that during drilling operations the tool passes through the workpiece, while the drilling will be complete and there will be no unnecessary chips on the surface of the workpiece.

Conclusion
Bottom line
We made a drilling machine from a drill with our own hands, and attached photos of all the technological operations! If you follow all the instructions described above, you will get an indispensable tool that will rightfully take its rightful place in your workshop.
Overall dimensions of the machine
Here is a table with overall dimensions homemade drilling machine from:
Blank drawings
Here are drawings with the dimensions of all the parts of the homemade drilling machine described above.


Video
Video on which this material was made:
 (1 ratings, on average: 5,00 out of 5)

