Incredible kitchen made from boxes - even adults will love it. Stylish DIY kitchen for girls DIY toy kitchen for girls
Hello! Tell me, have you tried to make your children’s playroom yourself? If you have experience in this matter, share it in the comments! I and all readers will be very grateful to you for this! And, continuing the topic, today I will tell you what needs to be done to make a kitchen made of cardboard for a child with your own hands. Of course, everyone can participate in the manufacturing process, both adults and our main assistants, children. After all, everything is done for them.
Kitchen from scrap materials
Before we start tinkering, it’s worth addressing a few questions:
- Where will the craft be placed?
- Based on the first point - what size will it be?
- What material will be used (perhaps some are already in stock, but others will have to be purchased)?
- What is the age of the baby for whom it is made. And also, right there, at this point: are we going to make crafts for a girl or a boy?
- Will it be durable design or for a short time?
Of course, it wouldn’t hurt to make a layout or drawing on paper to at least roughly see what we will be aiming for.
If there is a suitable place for a large structure in a child's room, that is wonderful. Then you can create a play area where the house will find its place (we talked about it in one of the articles), and the kitchen will also be located here.
Space allows, we can make a craft that will not be for our child’s toys, but for him. That is, according to its size, both tables and stoves.
The most suitable material for "furniture" there will be simple box. We will also need pieces of wallpaper, colored and multi-colored paper, paints, and also children's dishes. And among the tools - scissors, a stationery knife, glue, tape, possibly a stapler (but only for fastening parts where the baby will not get caught and get hurt). For realism, you can take accessories from old furniture. Plastic bottle caps are also very helpful.


The size will depend on the age. The comfort of the baby is important, so that when playing, he does not hunched over, but also does not stretch. And yet, it will be more interesting for a boy if there are more “technical devices”, such as a toaster, microwave, etc. Perhaps your baby will enjoy fixing all these things more than fiddling around in the kitchen.
If you plan for your little one to regularly play in his kitchen, you will need to try and make the structure more durable. Perhaps then something from real kitchen can be transferred. For example, chairs or some dishes.
What can be made:
- Bake,
- Table,
- Sink,
- Fridge,
- Closet,
- Devices;
- Dishwasher, etc.
It seems that we have not forgotten all the main points. All that remains is to put everything into practice. Let's see how to make both a toy and a game for toddlers. A small master class.
Master class: Kitchen
Small comfortable kitchen
The kitchen is only 2 boxes, but it has everything you need: a stove, a refrigerator, a shelf and a small countertop. Project and implementation belongs to Alis from Spain.


Kitchen with sink, stove and slate board
My favorite thing about this kitchen was the slate board idea. After all, it is very easy to make and fits into the kitchen, and the baby will be delighted - 2 toys in one! The author of the idea shared master class on your personal blog.
How to make a slate board? There are many recipes. The easiest one is to paint it black. acrylic paint. It will last a long time, the child will get tired of it faster than spoil it. There are more durable options: with the addition of grout for joints, putty.
How to make a slate-magnetic board? Magnetic soil or a special film is used as a basis for it.


Large kitchen-cafe
If you have already drawn up a rough plan of work, and know what to do and how, if you have accumulated enough boxes, then go ahead! And also, think about what you will do and what you will entrust to the baby. Children's work doesn't have to be difficult; rather, creative.
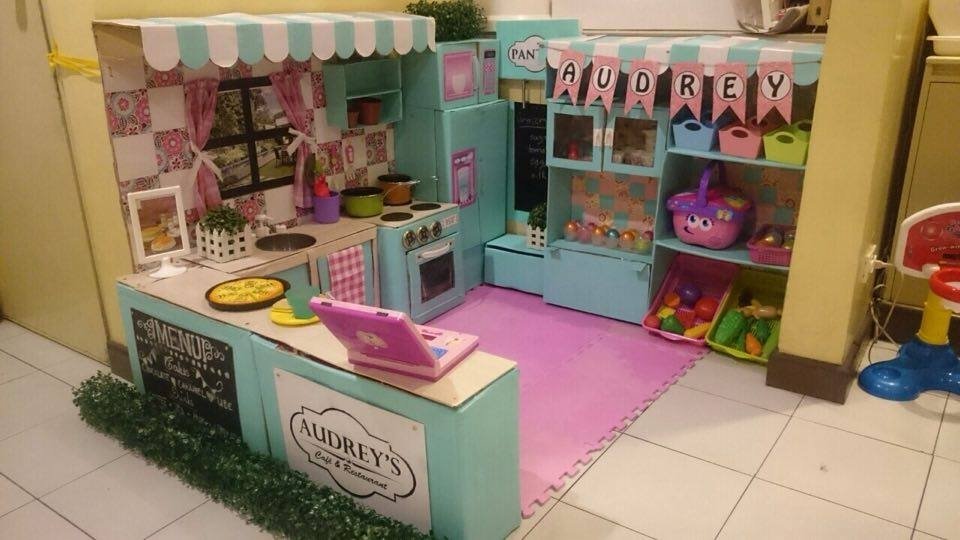
And today I will tell you about a wonderful idea for such a kitchen that belongs to one young mother from the Philippines - Rodessa Villanueva-Reyes.
Here we go? What do we do:
- Let's put the boxes in their places. Our big ones will be a refrigerator and an oven. A table and cabinet can be made from several small ones.

- Don't forget that we want to keep everything as close to the real thing as possible. So, draw on top of the furniture, etc. doors and windows. The hole in the sink should be the size of the bowl that we will allocate for this. Cut out all these holes.

- Now let's give it all decorative look. Cover the cardboard with wallpaper and paper.
- Perhaps appliqués need to be made somewhere. For example, if there is a “window”, then we will glue curtains to it; or, “handles” to the doors, “burners” on the stove, or a program of operation on the microwave.


- All that remains is to arrange the flowers and dishes in their places.

- Do you want to call it a Restaurant or give it a name "restaurant". Then you need to make an elegant sign or even an advertising brochure.

Kitchen appliances made of cardboard
And today I propose to make a toaster.
While playing, the child will also learn time!
Found a wonderful master class on the blog estefimachado

What about the products?
Last time we did, but for this kitchen we need more ingredients. As you can see in the photo above, excellent toast and scrambled eggs are made from cardboard.
How do you like cardboard pizza?
Another option is felt products. How delicious they are! You don't even need to sew them.

And the bones and veins can be drawn with wax crayons or felt-tip pens. If desired, of course, you can sew it together and stuff it with cotton wool for volume.

My daughter Masha began to take an interest in kitchen chores by the age of two! And we decided to give her a children's kitchen for her birthday. We studied the stores' offers, compared the prices, and assessed the quality. I didn't like anything. Even the most expensive options left much to be desired.
We decided that we would make the kitchen ourselves! While my husband was actively working, I drew a sketch and determined the dimensions of the future structure. Dad was greeted ready to visit the hardware store. We bought the essentials, planning to use what would no longer be useful at home. It's even more interesting!
The base for our kitchen was the nightstand. No one has used it for a long time.

We carried out an inspection of the house and found an old disassembled desk, several slabs of chipboard.

We replaced the top of the bedside table with a tabletop that was previously covered with a film that imitates marble. The base was installed from below, the side parts and the top shelf were attached.

The sink was installed. It was a stainless bowl.
While our dad was working, I decided to make a stove myself. I used two flat flashlights with LEDs. I took them apart, took out the rings with semiconductor devices and, using small self-tapping screws, screwed them to thick cardboard.

On top I glued another layer of cardboard with holes for rings and buttons.

Then I used a sheet of black cardboard the same size as the main one and cut out circles corresponding to the diameter of the LED rings. WITH inside I glued thick film from a doll box onto the slots and painted the edges with bright nail polish.

I made slits in place of the buttons. WITH outside glued disks onto film circles, leaving free space. The holes for the buttons were sealed with aluminum tape, extruding the shape of the buttons. Added a little decor.

Pasted it front part to the base. She covered the top with thick film and placed the structure in a poster frame.
I drilled holes in the countertop under the future stove to hide the wires.
The hob was secured using liquid welding and covered with aluminum tape around it so that the child would not pick it off. The result is a glass-ceramic panel with touch buttons.

Everything is working!!!

Plywood was attached under the tabletop. They drilled a hole in it and inserted a light bulb for oven. The battery pack was also located there.
The inner walls of the oven were covered with self-adhesive film, and guides were attached for the baking sheet, the role of which was played by a plastic tray.
The panel has
- button to start the oven, turn on the light;
- a temperature controller made from the front wheels of an old car, decorated with aluminum tape;
- a timer made of rear wheels equipped with a spring mechanism, which, after winding, returns to its original position, simulating the end of the cooking process.
The door was made of chipboard. We cut a hole in the slab and covered it with the remaining film from doll box, attached a handle, as well as a magnet holding the door, which was hung on its hinges.

My husband made the washing machine. For the drum, he used a plastic colander - the base of the lid for microwave oven. The motor was removed from an old broken radio-controlled car.

This is how everything is attached inside. What glitters is the detergent container. It is made from an ice cream container and covered with aluminum tape.

The machine panel has a power button (the light comes on), an opening powder compartment, and a dial for selecting the washing mode from the teether.
LONG CONSTRUCTIONI still can’t believe that I have FINALLY completed my BIGGEST unfinished construction! I was inspired by a chest of drawers from Lena Nikitina back in the fall, and I nursed my ideas for a long time and thought about where to get the material, and how to pull this whole thing off so that my husband wouldn’t kick me out onto the street with such a large-scale project. And so, somehow I was dragging myself out of the store, loaded with string bags of groceries, past the trash heap, and there was cardboard exactly like I needed - HUGE and not very wrinkled. My husband wasn’t at home, so I threw my string bag and went back to get some cardboard. The cardboard, although large, was quite thin. I glued it together into a 70x70 square and put it aside until better times, when I could get hold of more cardboard. A month later, somewhere in the store with Kristinka, they asked for several boxes, my husband stomped his feet, threw my cardboard boxes from one corner of the room to the other, so it was necessary to put this stuff into action quickly. Here's what came out of those stocks:
My cardboard something stood in this form until the new year, because 1. The cardboard ran out. 2. I was terribly unhappy with the crooked shape that turned out - there are no right angles in it! But I’m a builder, but I’m ashamed!
I wouldn’t have finished anything if it weren’t for my husband, who started stomping his feet again - “What kind of cabinet is this, it’s just taking up space! Either finish it, or I’ll throw it away!” In short, I again stocked up on materials, and firmly decided to finish my something for my youngest’s birthday. And I was hooked! Changed the technology a bit and top part it turned out better.
Here is the result:


The faucet - Kristinka took out the shower at the right time while bathing, the fittings were cheap - 100 rubles, self-adhesive, the cabinets inside were painted with water-based emulsion, the sink - a stainless steel bowl, the burners - metal lids from cans painted with a marker. The oven door on top is magnetized with magnets from the grower to the coins. The valves on the stove are made from corks from Agushi (with bolts - you can turn them) with acrylic paint to match, but the paint is peeling off... Another disappointment - the hinges on the stove and the drawer to the kitchen itself are screwed with self-tapping screws coated with glue and hold tolerably well, but to the doors you can’t screw the loops on, so I just sewed them on, it’s somehow unreliable, but I can’t think of anything better, can anyone tell me how to attach them?
Such a play item as a children's kitchen has already become a full-fledged part of the children's interior. What child wouldn't be happy to see a small copy in his room? adult kitchen. This is not just a set of furniture and various kitchen utensils, it is, first of all, an opportunity to engage your child in play.

A play kitchen is interesting place which opens up a lot of opportunities for the development of creative abilities little man. Here you can cook lunches and dinners, invite household members for tea, and if adult relatives are full-time, they can always be replaced with dolls. And everything will be completely real!

Toy kitchen can be in a wonderful way introduce a child, regardless of his gender, to food products, functions kitchen appliances and furniture, as well as instill important social skills such as table manners.

However, if you have already been to children's stores in search of a play kitchen for your child, you have probably already seen these prices? Even such kits are quite expensive. We offer you to get acquainted with several ideas for creating your own game kitchen furniture. By the way, for this purpose, it is quite possible to use items from IKEA.

Shelving, chairs, bookcases, bedside tables and many other things can serve as a basis for your creativity. You can even find pieces of furniture that you won't have to repaint, as this chain offers furniture and miscellaneous items in a wide variety of shapes and colors.

So, to make a children's play kitchen, you can take an inexpensive bedside table, or a nightstand from a kitchen set (sometimes you can find it in the discount department individual items furniture from various sets at bargain prices). On top you need to make a sink with a tap and a stove, and at the bottom there are shelves for kitchen utensils and an oven.

To wash, you need to find a small sink and, after drilling a hole in the tabletop of the bedside table and sanding the edges, insert it into the prepared socket.

You can screw on a real faucet that has already been used, or be more creative and screw on a faucet instead English letter“J” made of plywood (you can cut it yourself with a jigsaw), for strength, place it on wood glue.

After that, we paint all this beauty in the chosen color, and paint the burners with silver or black paint. We screw on the handles, they can be bought at any store furniture fittings. And most importantly, don’t forget about kitchen accessories - dishes, towels, oven mitts, etc. Yours play kitchen ready!

Watch a video about the site
Categories
Label Selection Bath Accessories (79) Appliances and appliances (4) Bathroom (3) Wine cellar design (21) Interior design in loft style (82) Room interior design (42) Interior design for a girl’s room (47) Interior design for a boy’s room (21) Interior design modern hallway(101) Interior design modern bedroom(261) Design of living rooms (25) House plants (1) Home textiles (10) Animal houses (27) Home economics (98) Famous interiors (5) Interior of billiard and game rooms (7) Interior of dressing room (63) Interior of home cinema (22) Home office interior (238) Apartment interior in Australia (12) Apartment interior in Asia (34) Apartment interior in America (7) Apartment interior in England (43) Apartment interior in Africa (4) Apartment interior in Brazil (30 ) Interior of apartments in Germany (10) Interior of apartments in Europe (67) Interior of apartments in Spain (15) Interior of apartments in Italy (25) Interior of apartments in Canada (9) Interior of apartments in Poland (28) Interior of apartments in Russia (44) Interior of apartments in Scandinavia (38) Interior of apartments in the USA (62) Interior of apartments in France (14) Interior of apartments in the Middle East (15) Interior unusual apartments(22) Dining room interior (73) Apartment interiors (17) How to choose furniture (70) A collection of useful tips (34) Beds (5) Kitchen (4) Furniture and lamps (3) Wallpaper (2) Shoes (1) Balcony arrangement ( 196) Arrangement home gym(12) Basement arrangement (76) Clothing and wardrobe items (2) Windows (3) Original design two-level apartments (30) Original design of attics and attics (99) Apartment decoration (317) Room decoration (139) Laundry and storage room decoration (50) Useful tips Home Care (10) Flooring (9) Home Library Design Examples (24) Luxury Living Interiors (46) Modern design living room interior (118) Modern interior design for children's rooms (548) Washing and ironing (1) House cleaning (7) Removing stains and dirt (8) Unique interior design for penthouses (157) Exclusive interior design for bathrooms (279)When playing, children love to copy their parents. Watching their mother prepare food, they dream of their own toy kitchen. Ready-made play sets are expensive. Much cheaper and more interesting to do kitchen set to the nursery with your own hands.
Options for children's kitchen sets
Children's homemade kitchens can be simple, from cardboard boxes and stools, or assembled from decorated wood boards. Some craftsmen create real masterpieces for their kids. It all depends on your abilities, skills and preferences, as well as the availability of free space in the children's room.
Children's kitchens in the photo
DIY structures for the street or cottage
For games on fresh air can also be made Kitchen Area. Children love to play with water, so good decision- complement the design with a sink. You can wash dishes and toys in it without fear of spilling the contents or getting splashed.
It is better to make a kitchen for a summer residence from moisture-resistant materials. The design should be simple and functional. A small kitchen corner with shelves and a sink can be mounted directly on wooden wall country barn.
During construction play area With the kitchen you can use wooden chocks and remnants of boards that were not used for their intended purpose.
Suitable materials
The simplest option is a kitchen made from cardboard boxes. Even a mother can make it, armed with tape, a stationery knife, self-adhesive film, paints and, of course, imagination.
The next option, which mom can also handle on her own, is a kitchen in the form of a cover for a chair, table and other base. Sewing skills are required here.
If dad gets down to business, then the list building materials increases significantly:
- wooden boards, chocks;
- plywood;
- chipboard and fibreboard sheets;
- old furniture or parts thereof.
Be careful! The main thing when creating a kitchen is the safety of the child. The structure must be well secured, no sharp objects, exposed wires or small parts.
Making a kitchen out of cardboard boxes: step-by-step instructions
Creating such a kitchen will require a minimum amount of material and effort. Cardboard - pretty durable material, it is easy to assemble and model.
To do it yourself cardboard kitchen, you will need materials and tools:
- carton boxes;
- tubes from paper towels;
- sheets of paper;
- disks;
- multifora;
- plastic bowl;
- towel hooks;
- stationery knife;
- crepe ribbon;
- double sided tape;
- hot glue gun;
- leg-split;
- self-adhesive film;
- oilcloth.
Stages of work.
- Outline all functional elements in advance. Place the boxes on top of each other according to the design you came up with and secure them with double-sided tape.
- Assemble the tabletop from four layers of cardboard taped with double-sided tape. Use paper towel tubes as legs. Glue them to the tabletop using a hot glue gun.
- To make it more interesting for your baby to play, add decorative and functional elements. Cover the inside of the boxes with white paper and the outside with colored self-adhesive film.
- Make four legs from rolled cardboard and secure them to the base with double-sided tape. Cover the legs and tabletop support with twine.
- For secure fixation, attach all legs to the floor with double-sided tape.
- Insert a suitable sized plastic basin into the sink hole.
- Make a frying panel from a sheet of white paper, disks and multifora.
- Cover the tabletop with oilcloth and secure it with tape on the sides.
- Fasten cabinets and towel hooks with self-tapping screws.
- A homemade kitchen made from cardboard boxes is ready to use.
Homemade cardboard set - video
Play corner made of chair and cover
The kitchen cover option is very relevant for small apartments. This design helps save space and money at the same time.
To create such a kitchen you will need:
- scissors;
- ruler;
- sheet thick paper or cardboard;
- cotton fabric for the base - 2 m;
- fabric for curtains - 50 cm;
- fabric for side pockets - 50 cm;
- scraps of colored material for functional elements(windows, handles, oven doors, burners);
- fabric for edging the cover - 8 m;
- hooks;
- strip of fabric with Velcro;
- large buttons - 4 pcs.;
- sewing machine;
- iron;
- pencil or felt-tip pen.
Stages of work.
- Measure the dimensions of the chair on which the cover will be placed (A - height from the floor to the seat, B - width of the chair in front, C - depth of the seat, D - width of the seat at the back, E - height of the back).
- Cut the fabric, remembering to leave some extra for the seams.
- Cut out a circle from paper and trace it on the wrong side of the material. These are stove burners. Cut out fabric blanks.
- Cut the handles for the stove from the same material as the burners, only with a smaller diameter. Sew them to the cover and glue a button in the middle.
- Sew the oven door from two pieces of fabric: white (the door itself) and black (the oven window). Sew the black piece to the white one, and make a border on the sides from a strip of fabric of a different color.
- Attach the door to the cover in the place where it will be placed. Trace around with a pencil to mark the edge to which you will later sew the lower part. Secure the sides of the door with adhesive tape.
- Make a window on a piece of fabric that will be on the back of the chair.
- If desired, sew small curtains.
- Sew a pocket for kitchen utensils to the side of the cover.
- Now all the pieces of the cover need to be fastened together. First sew the window with the stove and oven, then the side elements and the back of the chair back. Add a border with a different color ribbon.
- Sew fastening ribbons.
- Sew felt pies and cakes that will be baked in the oven. Attach Velcro to the back of the toy food.
Homemade version from a wooden bedside table
For the manufacture of wooden kitchen required male power. Use an old bedside table as a base.
To work you will need:
- wood paint;
- jigsaw;
- plastic bowl;
- switches for gas burners;
- assembly adhesive;
- faucet for washing;
- curtain fabric;
- wire for fastening.
Step-by-step instruction.
Children's kitchen made of plywood
Creating a kitchen from plywood is the most labor-intensive method. Since the structure is assembled from scratch, a drawing and assembly diagram with the dimensions of the main parts are required.
Materials and tools that will be needed during the work:
- two sheets of plywood;
- self-tapping screws;
- tools: jigsaw, screwdriver, drill;
- PVA glue;
- two cans of varnish;
- accessories: magnets, hooks, handles.
 (1 ratings, on average: 5,00 out of 5)