How to connect a light strip to a power supply. How to properly connect an LED strip with your own hands: recommendations from professionals.
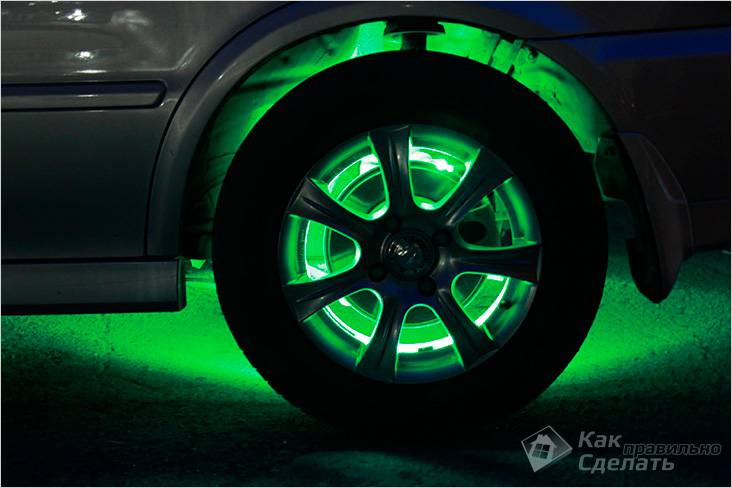
LED strip is a modern, universal lighting source that can be used in decorative purposes indoors and outdoors. Multi-tiered ceiling structures, interior arches and niches, furniture, cars, billboards - this is a small list of places that are transformed by this type of lighting. Compact and flexible lighting fixture can be placed in hard-to-reach places; long service life allows you not to think about frequent replacement. In this article we will look at how to install an LED strip with your own hands.
Types of LED strips
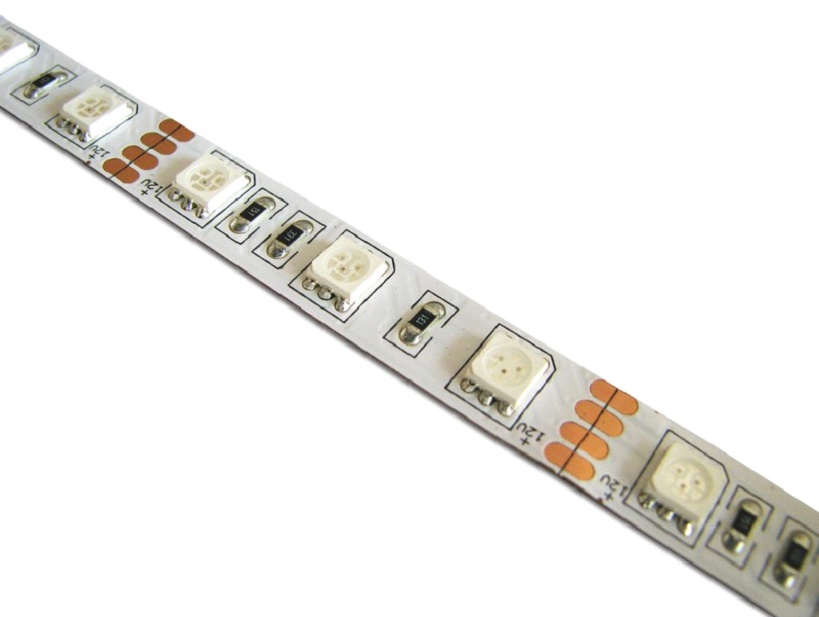
Lighting strips are made from strips dielectric material, on which light-emitting diodes are attached at regular intervals. Special tracks are applied to the base of the tape along which electricity. To limit the current, resistors are included in the circuit. The width of the lighting fixture varies from 8 to 20 mm, the thickness is only 3 mm. The degree of illumination depends on the number of LEDs on 1 meter of strip; it can differ tens of times - 30–240 pieces. The size of each diode is indicated in the strip marking; the larger it is, the more intense its luminous flux. In powerful devices, lighting sources are arranged in several rows. The standard strip is 5 meters long and is sold on reels. The cutting locations are marked on the backing; the tape can only be divided along these lines.
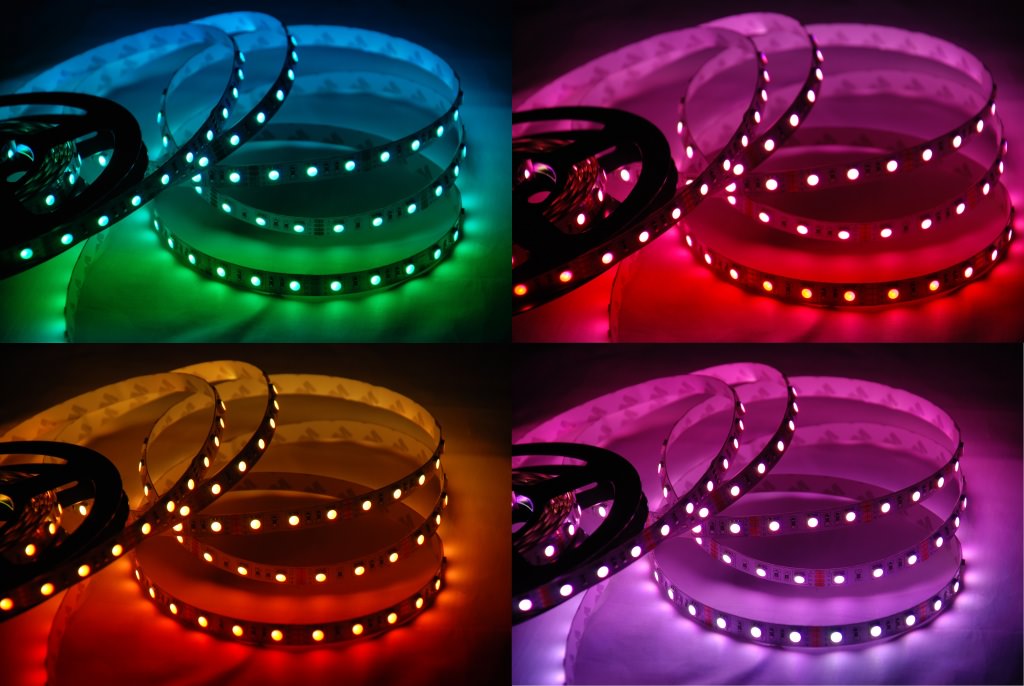
The main classification of LED strips is based on the color of the emitted glow:
- SMD – monochrome color rendering (white, blue, green, red). White version glows are divided into warm, moderate and cold.
- RGB is an LED strip that provides lighting of any color. Three diodes are placed inside its case, indicated by the color names - red, green and blue. Their combination, created by the operation of the controller, gives any glow. The cost of this design is three times higher than SMD tape.
Lighting devices are produced open, intended for indoor installation, and waterproof, designed for use outdoors and in water, protection class - IP. For ease of mounting, some LED strips are equipped with self-adhesive film.
Advantages and disadvantages

- Compact size and plastic structure, allowing the tape to take the desired shape.
- Elimination of overheating, which is important when lighting suspended ceilings and other temperature-sensitive surfaces.
- Possibility to obtain the selected color by adjusting the combination of color combinations.
- Easy to install, double-sided tape does not require any installation effort.
- Long service life, significantly exceeding the service life of traditional incandescent lamps.
- Numerous possibilities of use.
- Economical use of electricity, which is not spent on heating.
- Safety – this light source does not contain harmful gases and impurities, and does not pulsate.
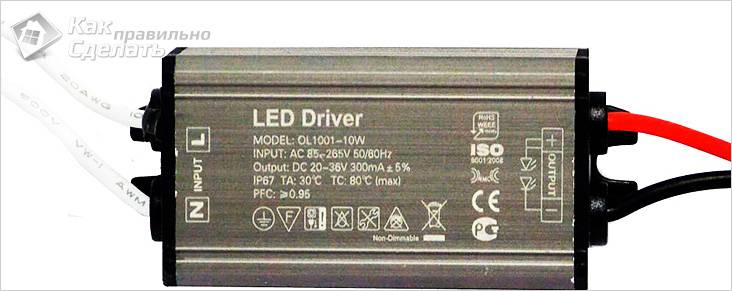
Selecting a power supply

A source is required for the LED strip to work. direct current, so the connection in shared network excluded. It is necessary to install a device that converts alternating current into direct current, with a voltage of 12 or 24 volts. To choose the right power supply, you need to calculate its power. For the calculation, the power value of 1 meter of tape, the total footage of the lighting device used and the safety factor are taken. For example, SMD 3014 6 meters long – 24×6×1.15 = 165.6 W – power value for power supply. The operating voltage of the tape is indicated by the manufacturer.
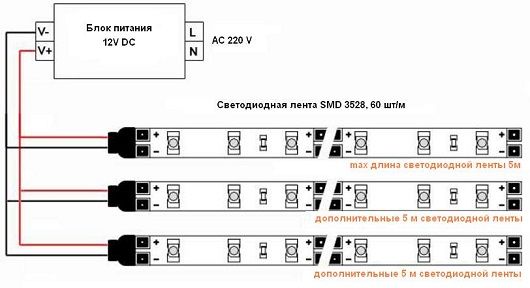
When using several tapes, you can do common block power supply, but due to the high power, such a device will be of considerable size and it will be difficult to place it hidden. It is more convenient to select a separate power source for each lighting strip. Thinking how to connect LED strip to the power supply, select parallel circuit. If you connect the tape in series, the remote diodes will receive the least voltage and will be dim.
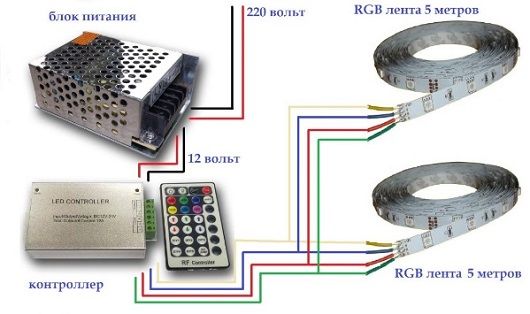
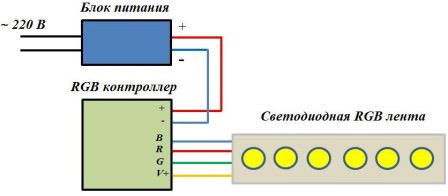
Connecting an RGB strip requires inclusion in the controller circuit. If you connect directly to the power supply, the tape will glow, but the color will not change. There are four wires for connection, and on the controller there are terminals with color designations:
- B – blue.
- G – green.
- R – red.
For the fourth wire, the terminal is indicated by a voltage number - 12 or 24 V. After connecting to the LED strip, the controller is connected to the power supply.
An LED strip can only consist of LEDs of the same color. In this case, a controller is not required to connect it.
Installation stages

The work begins with cutting the strips required length, it is necessary to ensure that the cut follows special marks. Connecting strip sections can be done in two ways: using special LED connectors or soldering. You can assemble a circuit using connectors quite quickly and simply, just put the tape on the contact pad and slam the lid. This mechanical method does not require any skills, but the cost of the part is quite high; if several connections are required, this will significantly increase the cost of lighting.
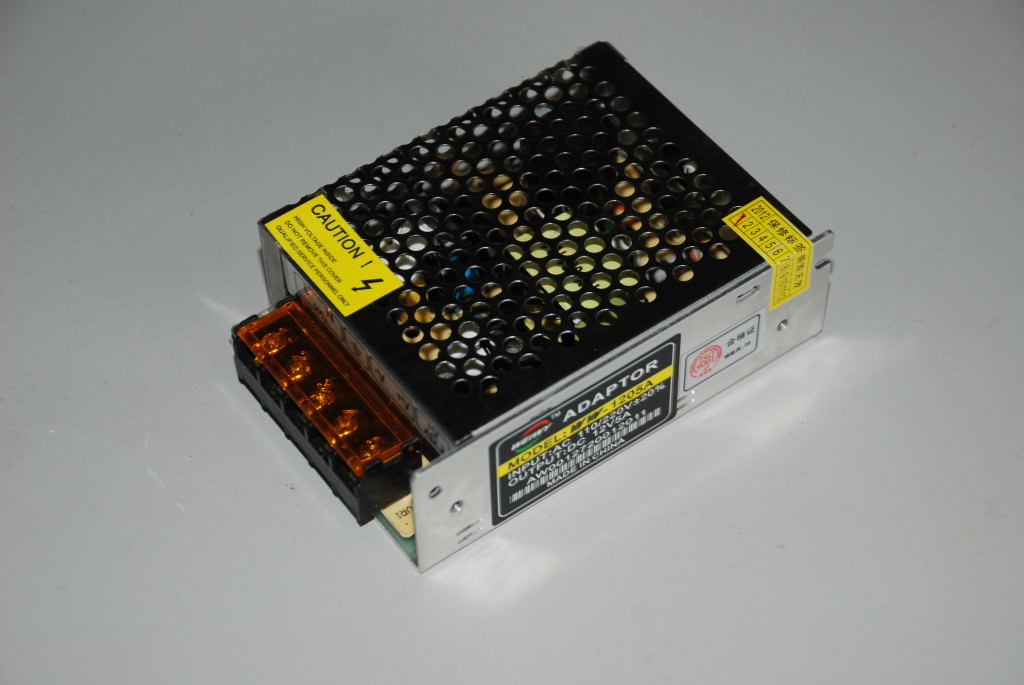
The simplest power supply has two terminals, one of them is plus and the other is minus; when connecting to the controller, it is important not to confuse them, otherwise the device will fail. Having assembled the entire circuit, it is connected to the network through the input of the power supply. If the LED strip functions correctly, it can be fixed in the selected location.
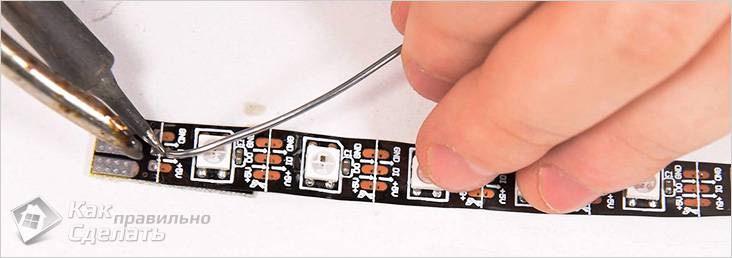
If it is necessary to splice the ends of the tape without a connector, use a low-power soldering iron. A layer of solder is applied to the contact pads of the tracks being connected, and it is necessary to remove it from the base of the tape. protective film. Next, the two parts are superimposed on one another and heated with a soldering iron until the solder melts.
You should not make the length of the LED strip more than five meters, because the LEDs at the end of the strip will not shine at full power.
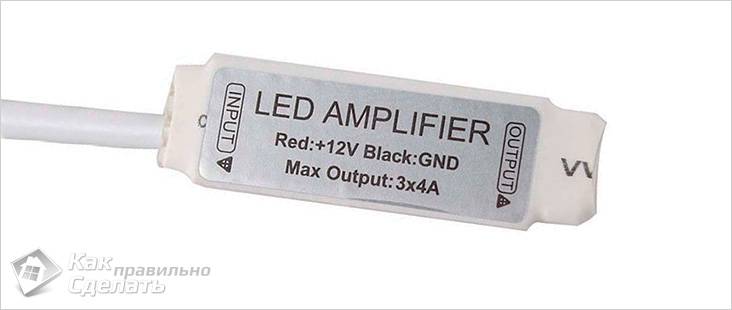
If it is necessary to connect several color tapes, an amplifier is installed. This device is placed behind the first LED strip, and the second is connected to it. This scheme uses one controller and two power supplies. A single-color LED strip has only two wires to connect to the power supply: red means positive, and blue means negative.
Connection in progress mechanically or soldering. To do this, the ends of the wires are stripped of insulation and tinned. A layer of solder is also applied to the contact parts of the tape. Having attached the ends of the wires to the contacts, they are touched one by one with a soldering iron. Despite the low voltage, the bare ends are worth wrapping insulating tape. A dimmer can be installed in the circuit between the strip and the power supply to regulate the light output.
Installation LED backlight The ceiling is applied to a clean and grease-free surface. Only by observing this condition will you ensure reliable fastening of the lighting device.
The latest LED strip models are offered with complete set All you need for connection is a power supply that has protection against incorrect polarity connection, and a controller.
Video
In this video you will see how installation is performed LED RGB LED strips on site:
In this video you will see how to connect the LED strip to the power supply, as well as how to adjust the brightness of the light using the remote control and change the color of the backlight:
Photo


The lighting of interior parts is often done using LED strips. They are highly economical and can be single or multi-colored. Each type of these lighting sources has its own characteristics, including the connection diagram of the LED strip to a 220 V network, which is used in residential premises. Basic distinctive feature Such tapes can be cut only after 1 meter, and in certain conditions - even after 0.5 meters. When connecting, you need to pay attention to maintaining polarity when connecting the conductors to each other.
Operation of LED strips from a 220 volt network
Most products of this type are designed for connection to DC networks with a voltage of 12 volts. Thus, the LED strips are powered mainly using a special power supply. However, there are schemes that allow you to connect these light sources to a network with a voltage of 220 volts. In order for this operation to be successful, certain modifications must be made.
For this purpose, a five-meter 12 volt LED strip is cut into 20 equal parts. The cuts are made in specially marked places, otherwise several LEDs will fall out of the overall circuit and will not work. A diode bridge is used to rectify the voltage of 220 volts.
The parts of the tape are connected to each other in such a way that the positive output of one segment is connected to the minus output of the next segment. If there are few LEDs during operation, a capacitor must be included in the circuit. The amount of current flowing along the tape tracks must be controlled. If this value exceeds the norm, additional resistors or parts of the product are included in the circuit.
How to connect an LED strip to a 12 volt power supply
The rated voltage of LED strips is 12 or 24 volts. Therefore, their operation is possible only with the use of a switching power supply. It reduces the voltage, and a direct current is generated at the output. The LED strip is connected to the power supply through the corresponding poles, marked “plus” and “minus”.
The power of each strip can be different, depending on the number of LEDs. In accordance with this parameter, the most suitable power supply is selected. If the tape power and specifications blocks do not match, this can lead to dim lighting of the LEDs or failure of the device itself as a result of overload. To calculate the characteristics of the power supply, you need to add from 20 to 30% to the power value, compensating for losses arising from the length of the conductors. Thus, with a tape power of 24 watts, you will need a rectifier with a power of 32 watts.
Most simple option is to connect a single-color LED strip to the selected power supply. A standard five-meter strip just needs to be connected to the corresponding outputs of the rectifier with the current polarity marked. The connection of wires to the contacts of the tape is carried out by soldering. For this purpose, a soldering iron with low power to avoid damage to the product. If necessary, the connecting conductor can be extended with conductors with a cross-section of 1.5 mm2. In most circuits, the red wire is positive and the black or blue wire is negative.
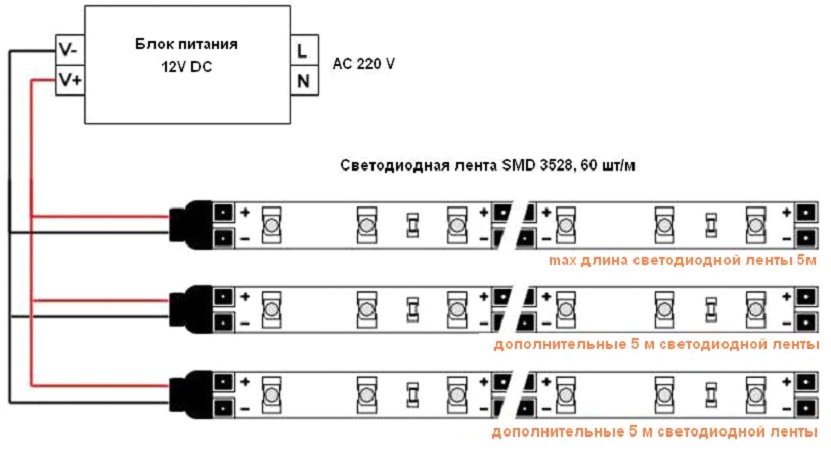
Connecting single-color tapes has specific features. For example, you cannot connect two products in series. This will result in a lack of normal glow on the second tape. In addition, the current-carrying paths of the first strip may overheat, which will lead to failure of the LEDs. The most correct connection is made by parallel connection LED strips. In this case, the connection of the second band is done using individual wires, connected directly to the power supply through an extension conductor.
How to connect an LED strip to 220 without a power supply
Factory-made LED lighting strips are designed for use together with a power supply. This device converts the alternating current of the home network into direct current. At the same time, the voltage drops from 220 to 12 volts. However, under certain conditions, it is possible to connect such lighting devices directly to a 220-volt network.
For correct execution For such a connection, a 12-volt strip, 5 meters long, must be cut into 20 parts. Subsequently, alternating current 220 volts is rectified with the help of included in general scheme. Next, all parts of the tape are connected in series with opposite poles. That is, a plus connects with a minus and vice versa. In some cases, flickering may occur, the frequency of which is 25 Hz. It is removed using a 5-10 mF capacitor, 300 V, mounted in a common system.
Connection with controller
Multicolor LED strips can be used not only for lighting, but also as an additional decoration for the interior of the room. They are divided into groups and controlled using a remote control and a special controller. Thus, additional elements are added to the circuit.
The color scheme is conveyed in three colors. These are Red, Green and Blue. Therefore, multi-colored LED strips are of the RGB type. Each strip has three groups of LEDs that glow in these three colors. LEDs of the same color do not have schematic connections with each other. Each group has its own output, so any tape is equipped with four contacts, three of which correspond to color groups, and one serves to supply power.
When all three controlled contacts are connected to a common signal output, the color will be white. If you turn them on one at a time, they will only produce red, blue or green color. To obtain different shades and control them, the LED strip must be connected through a controller. The controller ensures that all three lines are turned on simultaneously. However, the signal intensity in each channel will be different.
Depending on the type of control, these devices can be mechanical or electronic. In the first case, switching is carried out manually, for example, using a conventional three-key switch. The main disadvantage of this method is considered to be a significant limitation in the range of color effects. Electronic controllers provide control of more than just the number of available LEDs. They regulate the intensity of their glow. These devices can be equipped with one or more channels, depending on the number of tapes to be controlled. Each controller has a separate output in the form of a wire with a sensitive element at the end. It is necessary to adjust the light using the control panel.
How to connect an LED strip through a switch
The simplest circuit is considered to be connecting from the switch to the power supply, and then to the LED strip. Thus, turning the backlight on and off occurs using a regular switch.

Connection is very simple. TO a regular switch located in the 220 volt home network, the power supply is connected. Wherein phase wire connects to the brown input conductor L, and neutral wire connects to conductor N of blue color. The power supply is then connected to the LED strip. In this case, strict observance of polarity is necessary so that the plus is connected to the plus, and the minus to the minus.
It is recommended to place the power supply as close to the tape as possible. The length of the cable to be laid should not exceed 7 meters, otherwise the brightness of the glow may be significantly reduced. If, however, there is a need to lay a line that is too long, it is necessary to use a conductor with an increased cross-section of cores.
Use in conjunction with a dimmer
After the lighting fixtures are connected, you need to adjust their brightness. The simplest methods are in the form of a potentiometer or rheostat. However, even with a slight loss of power, such devices become ineffective. Therefore, currently the adjustment luminous flux carried out using special active dimmer circuits on semiconductors.
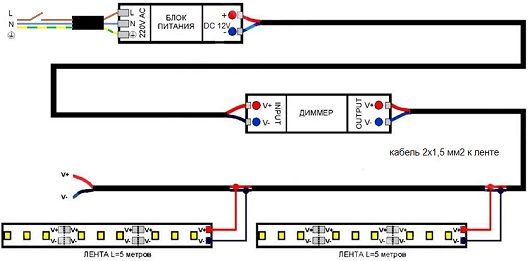
The dimmers are powered from a 12 or 24 volt network. The device itself is included in the circuit between the LED strip and the power supply. The output of the block is connected to the input of the dimmer, and then the output of the dimmer is connected to the strip. During connection, polarity must be strictly observed. The power of the adjusting device must correspond to a certain amount of tape. If the dimmer power is not enough, you need to use a special amplifier.
Connecting multiple LED strips
When connecting no more than two tapes, in this case it is possible to serial connection, provided that the second stripe is of insignificant length. At the connection points, a check is made for possible voltage drops.

Most often, single-color tapes are connected in parallel. For this purpose, a power supply with increased power is used, corresponding to the connected lighting devices. The same goes for multi-color ribbons. The only difference will be the use of an amplifier in the circuit. It connects to the end of the first tape and the beginning of the second. In some schemes, several power supplies are used at once.
Various methods allow you to not only connect the LED strip to a 220 V network, the circuit of which is most widespread. A variety of switching and adjustment devices allow the use of LEDs in the most various rooms, with almost any interior.
Behind last years LED strip has firmly taken its place in the lighting market thanks to a whole host of advantages that allow it to be used to create lighting in various areas of human activity.
The main advantage of such a product is the ease of assembly and installation with your own hands. But to do this, you need to know the structure of the LED strip and the principle of its operation. At the same time, many people prefer to make a control system for lighting together with it. This article will try to help you understand the design of the product.
Where is it used?
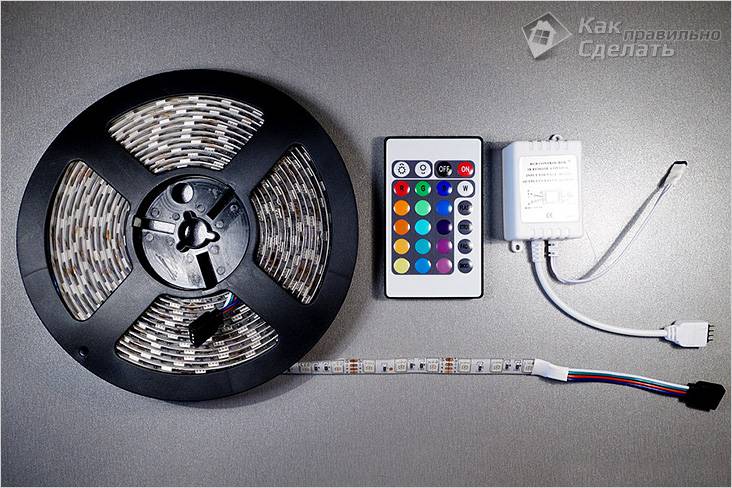
Controller and remote control
Many people often use LED strips to control the lighting system and create a unique play of light in their home. But for a control system with such a light source to work, it is necessary optional equipment: controller and remote remote control.
Today it is impossible to do without an LED strip in the following situations:

All this diversity is based on a wide range of types of such light sources.
Available variety
The lighting market today surprises us with its diversity. But if we take only the part that is represented exclusively by LED strips, we will also have something to look at. Today the most popular models are:
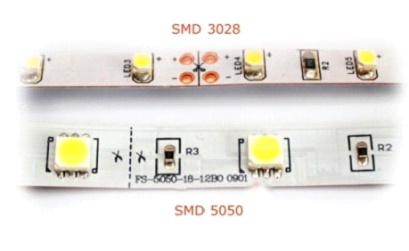
- SMD 3528;
- SMD 5050;
In addition, such products can have different voltages: 12 volts and 220 volts. To connect a 12 volt product to a 220 volt power supply It is imperative to use a power supply. It will allow you to connect a 12-volt strip to a standard 220-volt network without any problems.
Knowing how the tape is structured makes it possible to properly control its luminous flux using additional equipment. Let us consider separately each type of tape in terms of its structure.
First model
Model SMD 3528 is one of the most popular tapes that are widely used in a wide variety of applications today. The design of such a tape is simple and it easily connects to a power supply or controller.
The SMD (SLW) 3528 device involves placing 30 LEDs in one meter of strip. They are spaced at intervals of 33 mm. The diagram of such a device is shown below.

Each LED has a brightness of 5 Lumens with a white glow. As a result, the brightness of one meter of SMD 3528 will be 150 Lumens.
LED strip SMD 3528 can be additionally protected from negative impact moisture with a special layer of silicone. With this modification, it can be installed in places such as on the ceiling in the bathroom or kitchen. Moreover, it can even be used in water, for example, to illuminate swimming pools.
Note! When installing this light source, you must remember that cutting into pieces of the required length should be done only in specially designated areas. To create a control system, you will need to solder wires from additional equipment to the tape at the contact points. The connection diagram here is the same as when connecting two sections of the product.
It is worth noting that the cut points of the waterproof SMD 3528 models are also equipped with silicone protection.
There is SMD (SLW) 3528 tape on sale, which has 60 LEDs per meter. In this case, the device has a diode spacing of 17 mm. Consequently, such products are characterized by twice the brightness of the previous version.
A device of this type consists of the following parts (the diagram is shown below):
Each block contains three LEDs. This device is determined by the supply voltage. At a voltage of 12 volts, three LEDs connected in series produce 4 volts. This is the nominal voltage. Therefore, the tape is cut in blocks - every three LEDs.
Second model
The LED strip model SMD 5050 has a completely different design than the previous version. The diagram of its device is as follows.
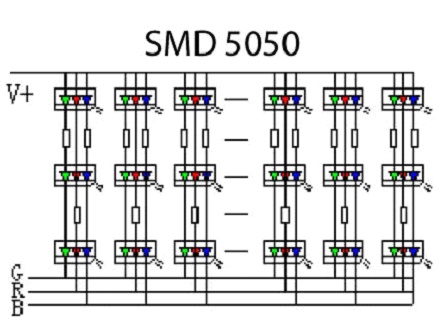
SMD 5050 tape
The difference is that there is a different number of diodes. Here there are three crystals in one LED. But the differences do not end there, since the crystals here have different color design. SMD (SLW) 5050 uses three basic colors:
- blue;
- red;
- green.
In this case, such a device will glow in one color - red, blue or green, respectively. But there is another option - glowing with all three colors at once. In such a situation, the glow will turn out white. Additional equipment can be used to control brightness and luminous flux. To control, we connect a controller and here you can already fantasize: make the brightness of one crystal minimal, and leave the other two at the same level, etc.
Note! Using a controller with an SMD 5050 tape, you can obtain a luminous flux of up to 16 million different shade variations.
If you need to organize lighting on the ceiling using SMD 5050, you need to take into account the brightness of the tape. SMD 5050 has a brightness of 12 lumens. This strip produces three times more brightness than can be achieved using other types of LED products.
As a rule, the 5050 model has a voltage of the same 12 volts. Therefore, it also requires a power supply to connect to a 220 volt network. But there are models that have a voltage of 220 volts. Here a power supply is not needed, since the strip and network will have the same voltage. But SMD 5050 at 220 volts is used less often than 12-volt ones.
Connection
LED models SMD 3528 or 5050 are connected to the controller to control the light according to the same scheme as when connecting a 12-volt strip to a 220-volt network. In this case, you should connect a power supply that will make it possible to reduce the voltage to 12 volts. This diagram is shown below.

Connection diagram
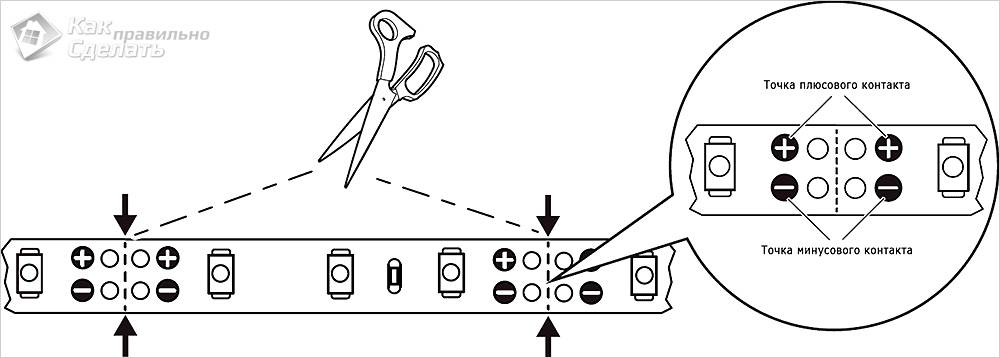
Cut location
The products are 5 meters long in a skein. Therefore, very often they should be cut to attach, for example, to furniture. Subsequently, these pieces are either connected to each other, or attached to a power supply (for connection to a 220-volt network) or a controller. Therefore, we will begin our consideration of the connection diagram with the procedure for preparing the light source.
The connection diagram is implemented as follows:
- measure the required section of the tape and cut it in a strictly designated place;
Note! The length of the required piece of product is determined by where you intend to attach it.
Soldered wires
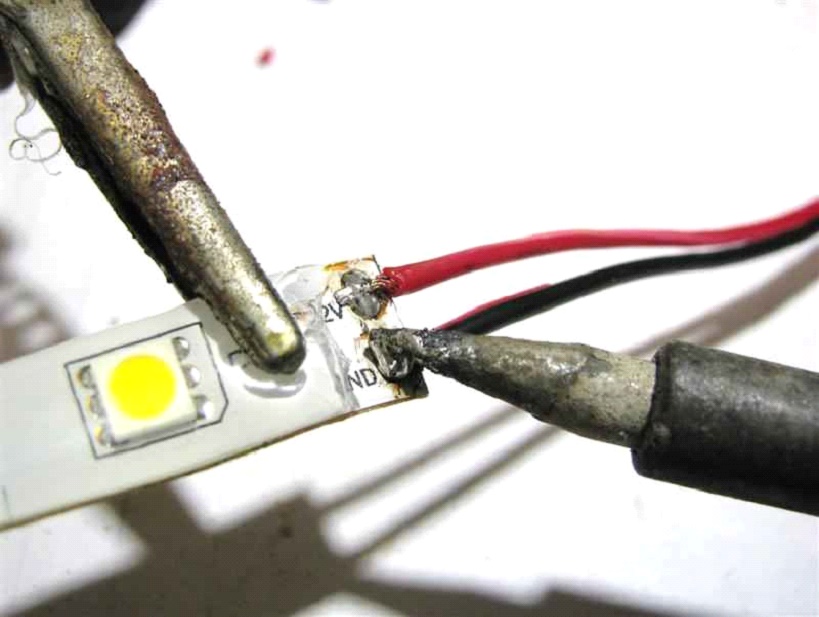
- after cutting the wires that should be connected to the light source, you need to strip them at the ends;
- Wires should be connected to the contact pads that appear at the end of the tape. To do this, use a soldering iron and soldering kit(rosin and tin) solder the wires to the contact pads;
- after the wires, in strict accordance with their sign (“-” and “+”), have been soldered to the contact pads, we process the working surface;
- then contact insulation is necessary. If the insulation is poor, there is a risk short circuit, and the lighting device will continue to work incorrectly and short-lived.
It is especially worth noting that the most in a simple way Connecting the wires will use a special LED connector. This is the so-called mechanical method.

LED connector
It is enough to simply attach such a connector to the contact pads (the contacts of both products must match) and slam the lid. That's it, no need to work with rosin and tin.
Note! Using an LED connector is an expensive proposition. For the price, one such contact will cost you about half a meter of LED strip. And it itself is not the cheapest purchase.
That's why old way Soldering contacts today remains more than in demand and relevant.
Conclusion
Before choosing an LED strip to create lighting on the ceiling or anywhere else in the house, you need to clearly understand the differences in the design of the two main types of LED products. It is also worth paying attention to the fact that the voltage of the light source and the electrical network that each of us has at home is usually different. Therefore, in this situation, you will need a high-quality power supply, and if you want to control the color of the room lighting, you will need to additionally purchase a controller and remote control.
By following the rules for connecting both types of LED products to the power supply and controller, you can create a unique play of light, colors and shadows at home. How to make a fluorescent lamp with your own hands? Assembly Guide floor lamps do it yourself General lighting of the railway: how to calculate, calculation example
To connect an LED strip, you must first decide on the installation method. Among other things, you may additionally need a controller.
Regarding tools and Supplies, then they can be as follows:
- If the work is done with monochrome tape, then besides itself, you will need a rectifier alternating current, at the output of which a filter capacitor is mounted.
- For working with RGB models you will need special devices. Here you need to choose the right power supply and controller, for which you need to know the electricity requirement and the voltage indicator of the product.
If you plan to do not linear lighting, but create geometric figure, then you will need to cut the tape and work with its pieces. In some cases, for such work you will need.
In order for the installation of LED strips to proceed correctly, and most importantly, to give the desired result, it is worth knowing a few nuances:
- Length. To choose the right roll, you need to take the parameters of the place where you need it in advance. LED lightening. Since such tapes can be divided into parts, this will help to correctly calculate the footage. But it is worth remembering that cutting can not be carried out in any place, but only where there is a dotted line.
- Polarity. This point is important since LED products are semiconductor devices. But if the polarity is incorrect, they simply will not light up, but they themselves will not deteriorate. Therefore, you just need to fix this moment.
- Cutting. A standard coil is 5 meters long, but it is rarely used in its entirety, especially at home. Therefore, in this case, you will need to divide it into separate segments. This action can only be performed at special marks, otherwise the circuits of the LED lamps can be damaged, which is why they simply will not light up.
- Compound. To connect 2 separate pieces, a soldering iron is used. For such purposes, each area of the cutting dotted line has contact pads. Before starting soldering, they are cleaned and tinned. To connect such pads, it is necessary to use wires with a diameter of no more than 0.5 mm.
- Soldering. If tape is used, which involves soldering the contacts, then before working with the pads, they are first cleaned of the silicone coating. Only after this can you use the soldering iron.
All these points play an important role in connecting an LED product, so the quality of their execution will depend final result. For example, if the silicone coating is not completely removed from the pads, the wires will not be able to fully secure themselves in place. Or, if the polarity is not observed, the diodes will not light up. This means you will have to do all the work again.
Connection instructions
Before installing the LED strip, you should know that each lighting will require its own power. This parameter is affected by the number of LEDs per 1 linear meter. Accordingly, the more there are, the more energy is needed.
connection of single-color tape
To connect a single-color ribbon, you must perform the following steps:
- If necessary, first the strips are divided into segments. There are marks on the tape that indicate permitted cuts. If they are not followed, the contacts may be damaged. Therefore, it is worth measuring in advance the surface area that requires lighting.
- After the workpieces are prepared, they are turned over to the wrong side so that it is possible to remove the coating from the adhesive base. Only the first 2 cm are removed and the layer of glue is removed at the same place.
- Next, the connector is installed. To do this, the contacts are pulled out, and the end of the strip itself is inserted into the resulting connector. After this, the edges are closed with a lid.
- It is important to check the polarity, for which the pluses must match on both sides of the connector. Before installing the product, you must ensure the strength of the connections.
- Next, proceed to connecting to the electrical network (220 V). First of all, the connection location is selected, since the power source should be as close as possible. After this, they begin cutting the cable. The edges are stripped of insulation and soldered together. Connections must have heat shrink tubing, which are also heated with a soldering iron.
- The next step There is a connection between the power supply and the LED strip. There are 2 options - solder the wires directly to the product or use a connector. Under no circumstances should you overheat, so the temperature of the soldering iron must be calculated very carefully. Optimal value- no more than 200 - 250 degrees.
Power can be supplied using a standard switch, although a separate device can be installed. It is not rational to provide a separate connector specifically for LED lighting.
connecting RGB strip
As for connecting the RGB strip, the connection diagram is almost the same as installing the monochrome version. BUT! If you do not use the controller, you will lose the opportunity color effect. Therefore, such a device must be installed in the gap between the power supply and the product itself, connecting the red and black wires of the unit to it.
At the same time, you can set automatic adjustment of colors and brightness in lighting. Using a remote control, a program is set for changing the lighting intensity and alternating the switching on of light bulbs. This option is often used in entertainment venues.
parallel connection two RGB strips
If there is a need to connect more than one RGB strip, then it is worth using a parallel connection scheme. But it’s worth taking care of the amplifiers. This device is connected to the first segment, after which each subsequent element is connected in turn.
As for the power supply, you can connect the entire circuit in one power supply. The only thing is that in this case you need a device of slightly higher power, so it will be subject to more voltage..
It's worth saying that modern manufacturers LED strips usually complete their products suitable model power supply and controller. And this is not to mention the fact that there is protection against erroneous comparison of polarities. Therefore, there is no need to worry about not being able to create LED lighting yourself. The main thing before buying is to ask such questions to a consultant.
Connecting the power supply
Electric current is supplied to the LEDs through a special device - a power supply. Its fundamental parameters are voltage and power. To do this, you need to know the performance of the tape used, since the unit is only allowed to operate at 80% of the specified power, otherwise it will quickly become unusable. Therefore, you should always leave a reserve of power.
To connect the power supply and the tape, a parallel connection is used, not a serial one. The work itself looks like this:
- The light turns off.
- Wires are being stripped, having previously determined where in the block the input (AC IN, INPUT, AC L, AC N) and output openings (DC OUT, OUTPUT, V+, V-.) are located in the block.
- To the contacts of the LED strip power wires are installed.
- After that insulation is carried out with a cable channel.
If desired, you can purchase finished model block, which will be located in plastic case, which means already have additional protection from external damage and moisture.
In order for the block and the tape to function well with each other, it is worth remembering a few rules:
- Choosing a block model, you need to be interested in its moisture resistance.
- The unit should not overheat(more than 50 degrees), which means it is located away from heating devices.
- Around the device there should be at least 20 cm free space so that it can cool down.
- If multiple sources are used simultaneously, then they should be at a distance of 15-20 cm from each other.
- Even if the block has high moisture resistance, it is necessary to protect it as much as possible from places where water accumulates.
- It is not recommended to install the device in the electrical network with dimmers of 220 W.
Connection errors
Errors may be of the following nature:
- If you need to connect more than 1 tape, then you must use a parallel connection rather than a serial connection. Thus, each subsequent segment will burn less brightly, since in this case the resistance is increased.
- If you reverse the polarity, the LEDs will not light up at all. This is not scary, because you just need to match the sides correctly and the lighting will appear.
- By mixing up the inlet and outlet of the power supply, you can achieve the point that it simply burns out. Therefore, you should be especially careful here.
- When working with the tape, do not bend it. If it is necessary to make a room, then this place should not contain any electronic elements. In addition, during the work process, in no case should you provide physical pressure on the diodes themselves.
- When using a soldering iron, then its contact with the surface should not exceed 10 seconds, otherwise the elements can be damaged.
Kinds
For convenient use, such lamps are produced in flexible strips with an average length of 5 meters. But if desired, through extensions, this size can be safely increased.
Depending on its purpose, the LED strip can be:
- Single color– red, blue, yellow, green or just white.
- Multicolor- here color palette wider, and all the lights can be on at the same time.
The latest products require a special remote control that can control the glow.
Also, LED strips have another classification:
- By LED type-SMD 3028 and SMD 5050.
- By density arrangement of light bulbs on the strip - 30, 60, 120, 240 LEDs per 1 linear meter.
- By power– from 7.2 W to 28.8 W per 1 linear meter.
- By color.
- According to the degree of moisture resistance— P 20, IP 65 and IP 68.
Depending on where exactly such a lamp will be used, it is worth selecting the characteristics of the tape.
Device
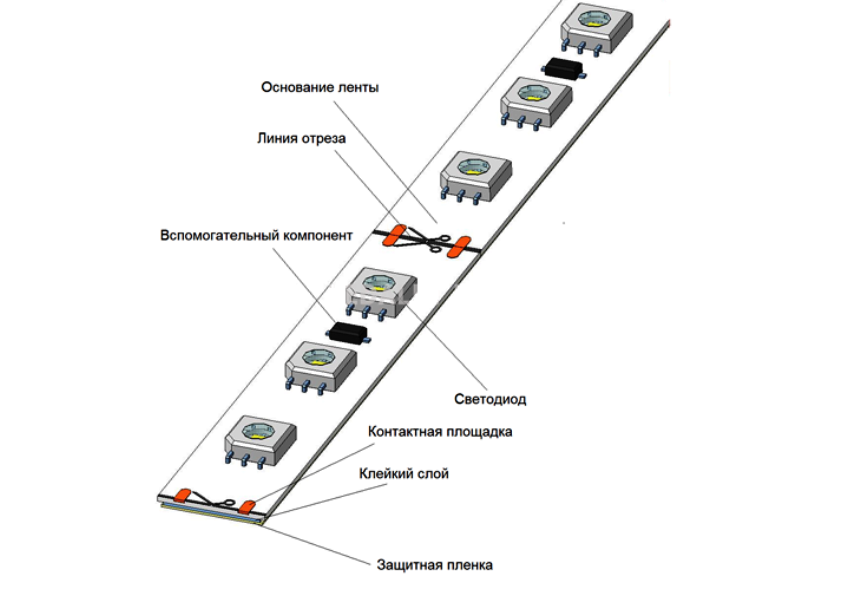
tape device
Today, there is a wide variety of LED products available. But their essence is the same - LEDs are located on adhesive tape, which are connected to each other by current-carrying paths. In order for such a lamp to work, it is also equipped with diodes and transistors.
You can purchase such a tape in a roll of 5 meters, and then it is cut into pieces of the required length. BUT! Here it is worth considering the fact that each such segment has its own boundaries. Typically, manufacturers mark the cutting location with a dotted line.
Thus, instead of 5 meters, you may end up with many pieces 5 cm long, where each piece will contain 3 LEDs and 1 limiting transistor. The reverse side is equipped double-sided tape, which greatly simplifies installation. If necessary, you can choose models where the LEDs are located not in 1 row, but in 4. This will directly affect the intensity of lighting.
Each tape has its own marking, which indicates the width and height parameters. For example, SMD3028 – 3.0 – width, 2.8 – height.
To control the lighting, during the installation process, the strip is connected to the power supply, and if an RGB product is used, then a controller is also needed. This device not only provides switching on and off, but also helps regulate the color of the lamps and their intensity.
IN Lately became very popular LED lights, which are thin flexible tapes, maximum length which are five meters. Such products can be built up, cut into separate pieces and given any geometric shape.
The product consists of flexible mounting tape eight to ten millimeters wide, on which LED elements are fixed. They are located at the same distance from each other. The board also contains resistors designed to limit the current. The product is available in lengths of one or five meters.
The tape uses diode elements of two types:
- measuring three and a half by two point eight millimeters based on one crystal;
- light bulbs measuring five and a half millimeters, formed by three crystals.
LED products operate from DC sources, having a voltage of twelve or twenty-four volts. That is, from the power supply, or from the battery.
- A tape, on one square meter of which there are from thirty to one hundred and twenty elements, requires a voltage of twelve volts.
- Board with the number of elements up to two hundred and forty pieces per one square meter The product is designed to be connected to a twenty-four volt source.
The LEDs on the product are arranged depending on the number of elements on it - in one or two rows. The intensity of the luminous flux is also related to the number and type of LED bulbs.
Types of LED strips and their characteristics
Thanks to the addition of trace elements, LEDs can be in almost all colors except white.
- Monochrome LED elements create lighting of one specific color.
- Colored lamps on the board can be different color and radiation intensity. With their help, you can change the specified operating mode, thereby changing the color or recreating any shade.
Types of tapes for organizing RGB light emission
Type of strips with LEDs LED-R-SMD3528 and LED-R-SMD5050.
- R red LEDs.
- G– green.
- B blue elements.
They are soldered along the entire length of the tape, three pieces next to each other. The color of the lighting changes due to group changes in the intensity of the glow of elements of each color. The products are widely used for interior lighting. LED strips in this case should not be visible. Otherwise the color change will be less effective.
All LEDs in the LED-R-SMD3528 series have a size of 3.5x2.8 mm2 and, depending on the color of the glow, emit a luminous flux of up to 2.2 lumens.
LED elements of the LED-R-SMD3528 series shine brighter, since they are larger in size than the previous ones. Their size is 5x5 mm2, and the luminous flux is from 2 to 8 lumens.
Luminaires with LED-RGB-SMD3528 and LED-RGB-SMD5050.
A distinctive feature of these products is that three elements of different colors are mounted in one housing. The luminous flux of this type of lamp is much less, the maximum is 2.5 lumens. Their advantage is that due to the location of different elements at one point, it is achieved high efficiency grace of flowers. Therefore, such LED strips are used without restrictions. With their help, they create lighting designs for various rooms.
Resistance of LED strips to moisture
The product can be installed on almost any surface. Their installation is quite simple. However, you should first pay attention to the degree of protection of the LED lamp.
- Waterproof tape should be installed only in dry rooms (living room, bedroom, children's room, hallway, etc.).
- The waterproof lamp is intended for rooms with high humidity air. For example, using such an LED product you can decorate a bathroom. But, in this case, you need to make sure that no water gets on it.
- The moisture-resistant product is used for working in water. It can be used to illuminate aquariums, swimming pools, and fountains.
When choosing a moisture-proof tape, you should take into account that when passing through protective layer in the form of silicone, part of the light flux is lost.
Rules for connecting LED strips
- First of all, you should decide on the power of the product, the required luminous flux and color scheme.
- The power of the power supply should be twenty percent greater than the load of all the LEDs on the board.
- The degree of protection of the equipment must correspond to the room in which it will be installed. For example, the recommended degree of protection for a bathroom is IP 67 or IP 68.
- After all the elements have been selected, you should decide on the connection diagram and type of installation.
LED strip: 220V connection
Connecting one standard size tape
An LED product five meters long is easy to install. Enough connect it to the power supply, which in turn is powered by household network at 220V.
- To connect the lamp to the power supply with the cords removed, you should focus on their colors. The red color of the cord means plus, and the blue or black color means minus. Cord with plug Designed for home network.
- Power supplies that do not have external cords are equipped with marked clamps and instructions for the product, which contain a connection diagram.
- To provide good contact Between the lamp and the conductor, you can connect them by soldering or use a connector, which will need to be purchased additionally.
- To connect, you need to move the special clamping plate of the connector, slide it onto the edge of the tape and return the plate to its place. After these steps, all that remains is to connect the wire that goes from the connector to the power supply.
How to connect several LED strips
This connection has its own nuances.
- It is not recommended to connect tapes in series. With such a connection, the voltage on the second lamp will drop, and the first one may overheat.
- The correct connection option is to connect the second tape to the power supply terminals.
- To connect two monochrome tapes, you can use two power supplies. That is, each tape has its own power supply.
- If only part of the second lamp needs to be connected to the first strip, then they can be connected in series. The voltage drop in this case will be insignificant. In any case, before the final connection of LED products, they need to be temporarily connected and checked to see if the voltage will drop. For this purpose, you can use double-sided connectors.
To install two LED products, you must use power unit big size and power. To save space, it can be installed in a suspended ceiling frame.
To connect lines with colored elements, you should use the controller.
- This type of product is connected using four conductors. One wire is common, and three are designed to control the colors of the lamp.
- At the ends of the board with LEDs and the controller there are pin markings: V + for common wire power supply, G is for green, R is for red, and B is for blue.
- The product can be connected to the controller using connectors or soldering.
- If you need to connect several RGB lamps, then they are taken into account total load, which must be less than the rated load of the power supply and controller.
- If the controller is designed for a smaller load, then you should use special amplifiers.
- The second lamp should be connected to such an amplifier, which, in turn, is connected to the main product with LEDs.
- For the amplifier it is recommended to purchase separate block nutrition.
When connecting colored LED strips it is quite often used remote control, with which you can control the lamp from a distance of several meters.
 (1 ratings, on average: 5,00 out of 5)

