How to make an eagle owl from plastic bottles with your own hands. Wise owl, garden: we make it from plastic bottles and other available materials. Plastic vase in decoupage style
A child at any age is interested in creating crafts with his own hands. different topic: the world, nature, animals, etc. In addition to the usual materials for crafts (plasticine, colored paper, puff pastry) you can use those that we are used to throwing away after use. For example, parents can make a variety of children's toys for the child. Such crafts from plastic bottles like, for example, “owl” is not just easy to do, but very easy. Therefore, even a child can create such an owl with his own hands.
How to make an owl from a plastic bottle: master class
In order to make an owl craft from a plastic bottle, you need to prepare the following materials:
- Styrofoam;
- epoxy adhesive;
- magnet packaging;
- beads - 2 pieces;
- plastic bottles Brown(from beer, kvass);
- self-tapping screws;
- acrylic paints;
- tassels;
- scissors.
Stages of work:
- We take a piece of foam plastic and cut out the head of the future owl from it.
- We make the eyes from epoxy glue, pouring it into the magnet packaging. We insert eye beads inside the resulting mixture.
- We cut out a small piece for the beak from a plastic bottle and glue it.
- Let's start making the owl's face. From the bottle we cut out small oblong plates with rounded edges so that they look like feathers. We start gluing them around the eyes.
- We cover the edges of the feathers with strips of plastic.
- We cut feathers for the wings from the middle of a plastic bottle.
- Let's take it five liter bottle and screw the resulting feathers to it so that they look like folded wings.
- The finished owl wings should look like this.
- The last row the feathers must be folded over the edge.
- Next, each subsequent feather should cover the junction of the previous one.
- We take another five-liter bottle and begin to make an owl’s body out of it. Using a hot knife, cut off the neck. From the side of the back we cut off a small part and bend it upward - this will be the back of the owl’s head.
- The bottoms of two liter bottles cut into small pieces - these will be feathers. We screw them around a large plastic bottle.
- We cover the back of the head with feathers. Using self-tapping screws, screw the owl's head to the bottle.
- We begin to attach feathers in a circle at the junction of the body and head.
- Next, use acrylic paints to paint the owl at your discretion.


You can make an owl simpler, using just one two-liter plastic bottle. A soda bottle that has a "waist" at the bottom of the bottle works best. The procedure for creating an owl is as follows:


How to make various crafts from plastic bottles for your garden and home?
For most people, a plastic bottle is just ordinary garbage that litters the house. But in in capable hands This, at first glance, worthless thing can turn into a very beautiful, and most importantly, unique decoration for a personal plot.
The big advantage of such man-made decorative objects is their low cost, and that is why a family with the smallest income can afford to decorate their living space with such decor. If you are interested in this idea, then let’s figure out together what can be made from empty plastic bottles.
What can you make from plastic bottles with your own hands?
Simple swans made from plastic bottles
 Flower made from plastic bottles
 Lake made of plastic bottles
 Decoration made from plastic bottles
 Chandelier made from plastic bottles
  Flowers from plastic bottles
 Plastic bottle toy
 Toy made from plastic bottles
 Fence made of plastic bottles
 Until recently, plastic bottles were used to contour flower beds, beds and garden paths. But over time, craftsmen realized that plastic is a very malleable material from which many beautiful things can be made. Therefore, people began to experiment and from unnecessary garbage they began to make beautiful voluminous flowers, garden lanterns and chandeliers, various kinds of stands, vases, candy bowls and even full-fledged fences.
To create all these masterpieces, craftsmen used bottles different sizes and shapes, cutting out blanks from them, carefully connecting all the parts together, and then painting them with paints in the desired color. Yes, and remember that plastic can not only be cut, if you take the workpiece and hold it a little over heat (an electric stove or a lit candle), you can make very beautiful three-dimensional compositions with perfectly rounded parts.
 Swan made from plastic bottles
 Making plumage
 You can find a lot on the Internet different ways manufacturing plastic swans for garden decoration. But unfortunately, they are all quite complex and therefore, in most cases, they are not entirely clear to people who have never done needlework. That is why we decided to introduce you to a method for making a swan that absolutely everyone can handle.
Materials for making a swan:
- One five liter bottle
- Up to fifteen bottles of milk or kefir (needed for making plumage)
- Wire and scissors
- Piece of hose
- Paint for coloring the finished product
Making a swan:
- So, first, take a black marker and draw lines on the bottle along which an opening will later be cut (you can insert flower pots into it). You can see how to do this correctly in the figure above.
- Next, take a piece of hose required length, insert a thick wire into it, and then use your hands to give the workpiece a shape that visually resembles the neck of a swan. Insert the finished product into the neck of a five-liter bottle.
- At the next stage, start making the feathers of our swan. To do this, cut out blanks simulating feathers from milk bottles. To make it look as natural as possible, cut it along the edge with sharp scissors, and then heat the resulting fringe over a lit candle (this will help fluff up the feathers).
- After this, we cut off the neck and butt of several milk bottles and put them on a hose (we make an imitation of a swan’s neck). In the outermost bottle we cut off only the bottom, leave the neck in place, and form the head of our decorative bird from it.
- At the final stage, we take the previously prepared feathers and carefully glue them to the resulting body. We do this in such a way that there is not even the slightest gap between them.

 Pigeons from plastic bottles
 I would like to say right away that if you want to reduce the time it takes to make pigeons, then use white milk or kefir bottles to create such decorative objects. In this case, you will not need to paint absolutely the entire workpiece; it will be enough to paint its head.
So:
- Prepare a standard milk bottle and cut the neck as shown in the master class
- After the body of the dove is formed, we proceed to making its head
- To do this, take a piece of thick foam plastic and as much as possible sharp knife cut out a blank that visually resembles a bird’s head
- At the next stage we move on to making the pigeon plumage
- This can also be done as shown in the master class or using the method that was used to make the swan's plumage
- After the feathers are ready, make a small hole in their lower part and secure the wire in it
- At the last stage, connect all the blanks together and correctly paint the dove’s head with paints
Peacock made from plastic bottles

 Peacock body
 Making plumage for a peacock
 Attachment of empennage
 Making the tail
 Making the head
  Making peacock legs
  Final assembly of the bird
 If you want to make a beautiful peacock, then you will have to be patient. Unlike a swan and a dove, this one requires its characteristic plumage. This means that in this case it will not be enough to cut the correct feathers. They will still need to be properly connected to each other and only then attached to the body of the future peacock.
Making a peacock:
- So, first, make the body of the bird. To do this you will need to use one five-liter bottle, two half-liter bottles and two plastic sticks
- Next, proceed to cutting out the feathers and shaping large pieces plumage
- When the plumage is ready, start making the tail. Be sure to take into account the size of the torso and make sure that it is not too large
- When the tail is ready, start making a foam head (immediately paint it with paints)
- Connect all the parts of the peacock together and, if desired, place it on a heavy stand
Butterflies made of plastic

 Butterflies from plastic bottles
 Cutting template No. 1
 Cutting template No. 2
 Cutting template No. 3
 Plastic bottles are an ideal material for making beautiful and colorful butterflies. Depending on what size bottle you use for this, you can get either very cute little butterflies or very large ones that can be an independent object decoration of the garden or yard of a private house.
The best part is that making these insects does not require any special skills from people. All you have to do is stock up on bottles the right size, scissors, paints and, of course, imagination.
- To begin, cut off the neck and bottom of the bottle (you should still have the most pliable middle part in your hands)
- Draw a butterfly on a leaf or find a suitable template on the Internet
- Using a black marker, trace the outline of the butterfly onto the bottle.
- Cut out the design with sharp scissors and decorate it as you see it.
- Ready-made butterflies can be attached to a wire and then placed on flower beds or just on the lawn
Yes, and if you have stained glass paints, then you can use them to paint the transferred outline on the bottle, and after they have completely dried, cut out a completely finished butterfly. Since in this case you will get rather convex lines, you will have the opportunity to fill them with small rhinestones or sequins.

 Ladybugs made from plastic bottles
 Ladybugs from the bottom of a bottle
 If you want to make a ladybug as quickly as possible, then stock up on bottles of red (1 pc.) and black (2 pcs.), as well as an ordinary stapler. One bottle will imitate the body of a bug, and from the other you will make characteristic points.
So:
- Cut a blank simulating wings from a red bottle
- Next, take a black bottle and cut out circles from it
- Draw beautiful eyes on one of them and attach it to the bottle cap
- Use a stapler to secure the remaining black circles onto the ladybug's wings.
- At the last stage, attach the wings to the bottle and the craft will be ready
If you wish, you can make a similar insect from plastic caps. To do this, you just need to take paints and paint them correctly. So small ladybugs will become wonderful decoration plants that grow in pots.
Owls made from plastic bottles
 Owls made from plastic bottles
 An owl made from a plastic bottle, made using the method we will now introduce you to, can be as full-fledged flower pot, as well as an original flowerpot, which can either be placed on the floor or hung on the summer veranda.
- First, cut off top part bottles
- Using paints, give the workpiece the desired color
- Next, take a simple pencil and draw a picture on it that will imitate the face and plumage of an owl
- Using a plastic cutting knife, give the craft the required form
- Add dimension to the owl using contrasting color lines
Yes, and if in the future you want to use such a craft exclusively as a flower pot, then do not cut holes that imitate plumage. You can achieve a similar visual effect with paints, simply by correctly drawing the feathers. This pot can be used for growing indoor flowers or for growing spices.

 Pig made from plastic bottles
 As you already understand, crafts made from plastic bottles can have several purposes at once. Plastic pig is also no exception, therefore it can be a flower pot, flower bed or a full-fledged decorative object.
If you want to make a pig solely for decoration, then proceed as shown in the master class. If in the future you plan to plant plants in it, then carefully cut out an opening of the required size in the upper part of the workpiece and additionally reinforce it with a plastic rim.
So:
- Cut off the necks of four liter bottles (these will be the legs of our pig)
- We attach them to a wire and then attach them to a five-liter bottle
- Next, cut out rounded pieces from the middle part of the plastic bottle (these will be the pig’s ears)
- We attach the ears on the top of the bottle closer to the neck
- At the next stage, cut out two small circles and fix them on the pig’s face
- At the very end, we paint the entire workpiece in a gentle pink color and using white and black paint we draw the eyes of our pig

 Chamomiles from plastic bottles
 If you want to decorate your home or garden with flowers that will delight you all year round, then try making them from plastic bottles. Now we will teach you how to make very beautiful and, most importantly, as realistic daisies as possible, which will become the most beautiful decorative object in your home. It is best to make them from white milk bottles. Since they are more pliable, it will be much easier for you to form thin chamomile petals from them.
Simple tips:
- First of all, cut out circles of the same diameter from the middle part of the plastic bottles
- Next, start forming the flower itself from them.
- To do this, first divide the circle into four parts
- Next, we again divide each of the four segments into four parts
- If you do everything right, you will get 16 perfect petals.
- In the next step, take nail scissors and carefully round the edges of the petals
- After this, cut out a small circle from plastic and cut it along the edge
- Hold this blank over the candle until the edges begin to fluff.
- Paint the resulting blank yellow
- Cut from a green bottle correct form star (it will imitate the sepals of a flower)
- Cut out characteristic leaves from the same green plastic
- Take the wire and wrap it around satin ribbon or corrugated paper
- Connect all the parts together and the chamomile will be ready
Roses from plastic bottles

 Roses from plastic bottles
 Roses can also be made in a similar way. The petals and stem can be made in the same way as for a chamomile, but the bud itself will need to be made a little differently. In this case, you will need to cut a rectangular blank from plastic and divide it exclusively into four parts. Another nuance in making a bud is curling the ends of the petals. In this case, you will need to heat the workpieces more than usual, and then use a round wooden stick to give them the desired shape.
If you refuse to carry out this stage, you will end up not with a rose, but with a poor flower that can hardly be used to decorate your home or garden. Yes, and remember, if you need to paint the plastic, you need to do this even before you start connecting the petals into a bud. Since the finished workpiece will turn out to be quite voluminous, you simply will not be able to paint it as well as possible and, as a result, your rose will have unsightly gaps.

 Palm tree made from plastic bottles
 Making the top
 If you want it on your personal plot flaunted, then you don’t have to buy expensive seedlings and wait for years for them to grow to the desired size. If you wish, you can make such a tree from brown and green plastic bottles:
So:
- At the initial stage, make a barrel out of bottles
- To do this, cut off the bottom and neck, and then start inserting the bottle into the bottle
- When the hollow piece is ready, strengthen it wooden stick or an iron rod
- Next, we begin to make the top of the palm tree
- To do this, cut off the bottoms of the bottles, and then cut them into thin strips
- Flexible rods or a plastic hose will also need to be inserted inside these blanks.
- At the very end, all you have to do is secure the top to the trunk and securely fix the palm tree in the flowerbed
Plastic vases for fresh or artificial flowers
 Plastic vase in decoupage style
  Vase with a pattern
 Vase with wickerwork
 The easiest way to make a vase from a plastic bottle is to simply cut off the neck and then paint the entire surface of the resulting blank in the desired color. And to make such a craft look more impressive, it can be additionally painted with floral designs or covered with rhinestones and sequins.
Plastic vase in decoupage style:
- Take a two-liter bottle and cut off the top
- Coat it well outer part blanks with PVA glue, and then apply the selected napkin to this layer
- Gently level everything using a soft brush dipped in glue and wait until the top layer is completely dry.
- Next, take one that matches the color and style. decorative tape and use glue to attach it along the edge of the neck of the vase
- If desired, you can additionally decorate the vase with beads and ribbons
Ottoman made from plastic bottles
 Ottoman made from plastic bottles
 A little higher, we already told you how you can make various things from empty plastic bottles. decorative ornaments for home and garden. And now we will teach you how to make a soft pouf from plastic that will decorate any interior.
But remember, if you want the perfect product in the end, then use bottles of the same size to make it. If you make a pouf from one and two liter bottles at the same time, then you will definitely not be able to create something of truly high quality.
So:
- To begin, prepare 16-20 bottles of the same size
- Using tape, secure the bottles together in pairs.
- When you have completed this task, form a circle from the blanks and also secure everything with tape
- Measure the diameter of the workpiece and, based on this data, cut from thick cardboard two circles
- Place the bottles between them and wrap everything with tape again
- At the next stage, cover the workpiece with foam rubber and carefully sew everything together with small stitches
- From suitable material sew a removable cover and put it on the ottoman
Broom made from plastic bottles

 Broom made from plastic bottles
 To make a broom, it is best to take two-liter bottles. Their sizes allow you to create a fairly voluminous fringe, which fights garden debris quite effectively.
- First, find a smooth stick that will imitate the top of a broom.
- It will be better if its diameter allows you to put a plastic blank on it
- Next, take the bottle and cut off the bottom
- Then, with sharp scissors, cut the workpiece into strips, without reaching the neck
- Make several blanks in this way and insert them one by one into each other.
- Secure everything with wire and place it on a smooth wooden stick
 Mosquito trap made from a plastic bottle
 As you probably already understood, a plastic bottle in skillful hands can turn into quite beautiful and original item. But besides decorative elements This material can be used to make a mosquito repellent, which can be placed both inside the house and on summer terraces. You can see how to make this miracle device in the picture located a little higher.
Remember, if you want the trap to do its job as well as possible, the liquid in it must be changed every day. It is advisable to do this in the late afternoon, after draining the old one and rinsing the container. clean water. If you follow all these nuances, you will be able to forget what mosquitoes are and enjoy peaceful nights even in the wettest period of summer.
Video: What can be made from plastic bottles for the garden and country house?
Flight of fancy creative person knows no boundaries. Taking used material as a basis, you can create an innumerable number of masterpieces that are especially relevant in landscape design plot. Usually crafts are placed on the ground; an owl made of plastic bottles, conveniently located among the branches of the garden, will surprise those around you. There are several ways to make a night bird, they differ in degree of complexity. The proposed master classes will help you choose suitable option making an original owl from plastic bottles with your own hands.
Impressive night hunter
Let's start with the most time-consuming option. To work you will need:
- Plastic bottles, preferably the same color.
- 5 liter plastic canister.
- PVC pipes Ø 20 mm, length 0.9 m.
- Scissors, knife.
- Self-tapping screws.
- A piece of foam.
- Aerosol paint for exterior use.
Be patient and get started:
Work begins with the formation of the owl's frame. Pipes that serve as claws are fixed onto the plastic canister with self-tapping screws. Cone-shaped shapes from the top of plastic bottles placed on the pipes with their necks down will help to give them volume. Part of the 5 liter container plays the role of an owl's breast.

Comment! Voluminous feathers will add to the attractiveness of the future owl. The part is formed from the convex part of the bottom. To create such beauty you will need a significant number of plastic bottles.
When some of the parts are ready, they begin to cover the owl's paws. Having previously pierced the elements of the owl with an awl, the feathers are fixed on plastic frame wire.

The next stage is the torso. Usually the back of the bird is decorated with feathers first, then the sides and belly. The owl's back is left open for further fixation of the wings from plastic bottles.

In order for an owl to sit on a branch, it will need strong claws on its feet. The part is made of wire, which is decorated with a corrugated pipe. When constructing the shape, space is left between the fingers for PVC pipes. This will give the owl additional stability. The wire part of the claws is clamped between the pipe and the bottle and secured with electrical tape or tape.

The basis for the bird's head will be a fragment of foam plastic, optimal thickness is 10 cm. Cutting the desired shape will be easy with a stationery knife. The top of a 5 liter plastic bottle will help you create a voluminous nape.

Attention! Treating the foam with putty followed by sanding provides the head with a smooth surface.
The head is covered with fragments from plastic bottles. The eyes are framed with two rows of small feathers using Moment glue.
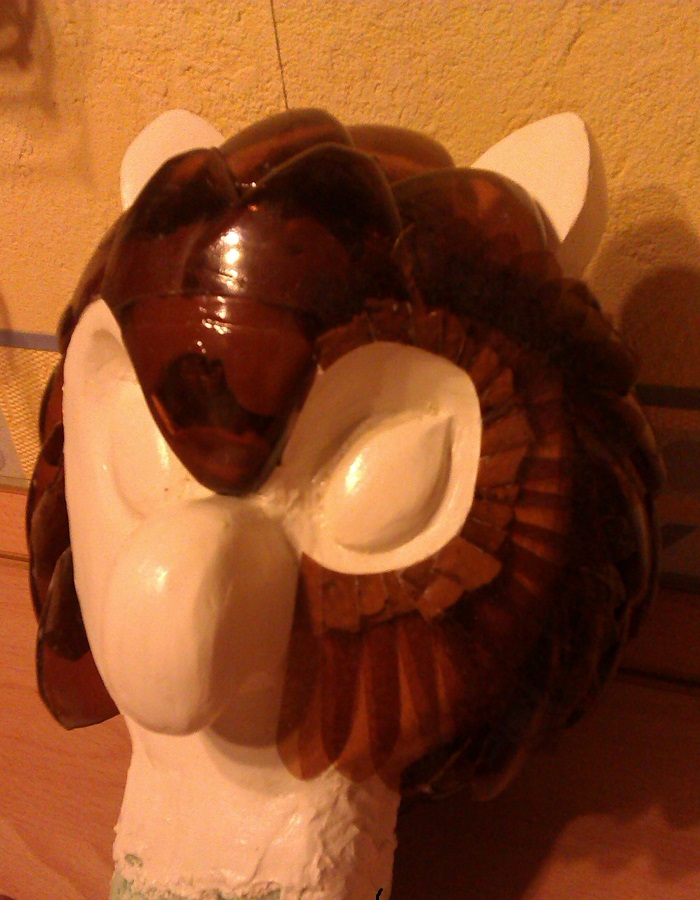
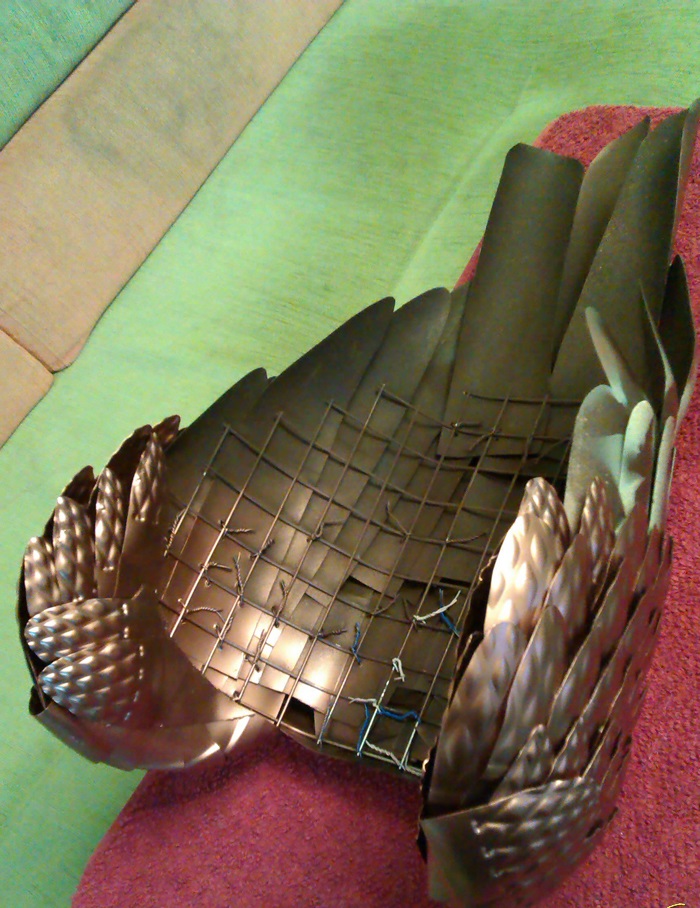
The head is attached to the body with self-tapping screws and proceed to the formation of the wings. Chain-link mesh is used for the frame. Optimal size cells are 25x25 mm. Main stages of the process:
- Begin by fixing the tail feathers.
- Attach 2 rows of long plastic feathers.
- The back area is covered with details similar to the entire body.
- Feathers cut from corrugated bottles will help make the wing more decorative.
It is preferable to paint an owl from a plastic bottle with aerosol paint, which goes on in an even layer. The areas around the eyes are highlighted with a different shade. There are many options for eye design; in our case, they are made from ready-made beads. The final touch- mounting the wings and tail section onto the rest of the body.
Such an owl will successfully participate in an exhibition of folk crafts.

Simplified version
The following master class will help you make an owl with less time and effort. For creativity you should prepare in advance:
- 2 liter bottles of dark color - 5 pcs.;
- transparent plastic container;
- tin eye covers - 2 pcs.;
- glue gun;
- acrylic paints, brushes;
- scissors, awl and knife;
- pliers;
- nylon threads.
Owl made from plastic bottles master class:

Finally, the remaining elements are treated with paint and the owl from a plastic bottle is ready to take up residence in the garden.
Crafts made from plastic bottles are distinguished by their versatility: they can be used to decorate home interior, so garden plot or a children's playground. In terms of manufacturing technology, they are practically the same: garden products simply need to be coated with waterproof types of paints, and also not to use paper or cardboard in their design, which can get wet in the rain. Plastic products are durable and practically not susceptible to external factors, therefore ideal for decoration summer cottages and flower beds. Below is a master class on making an owl from a plastic bottle. This instruction leaves room for imagination; the bird can be made in several versions, differing in their complexity, so this craft is suitable even for children.
Step by step creation
To make an owl you will need:
- Bottle of any size. You need to choose a bottle a certain shape- for an owl, “fitted” ones, which taper slightly in the middle, are more suitable. It will be easier to form the body of a bird from them;
- Scissors or stationery knife;
- Scotch tape or construction stapler;
- Paints and brushes.
Two parts should be cut from the bottle. The first is the bottom and Bottom part bottles to the point where it begins to narrow. If you turn it upside down, it will look like an owl's head with ears. The second is the part of the bottle between the neck and the label, that is, another expanding part. The neck of the bottle should be cut off. The resulting part will have holes on both sides, into the wider one you need to insert the first blank - the owl's head.

The product will look neater if the parts of the bottle are cut in such a way that when connected, a smooth transition from one component to another is obtained. If this effect could not be achieved, you can align the joint using a stapler or tape. It is important to use them with inside crafts so that they are invisible after painting it.
If it is intended that the owl will be used to decorate the house, it is necessary to trim the only hole remaining in the product for stability.
The next stage is painting the owl. To maintain proportions, it is recommended to draw eyes with a diameter of about a third of the entire height of the product. It is better to use acrylic paints - they are better suited for coating plastic products. The paint must be applied in several layers so that the insides of the owl, for example, the tape used to fasten it, do not show through.


If the owl was created for the home, the product is ready. But if you plan to install the craft in the garden, a few more modifications are needed.
- for attaching an owl to a tree: in the lower part of the owl you can make a couple of holes through which you can thread a rope. You can use it to tie an owl to any tree branch, while masking the hole in the product;
- for fastening on the ground: to prevent the owl from being carried away by the wind, you can pour any heavy filler into it, for example, sand or stones. At the same time, it is recommended to fix even a weighted owl in one place - for example, surround it with pebbles or dig it slightly into the ground.
Owl decorations
A common way to decorate owls from a plastic bottle is with hats. One of the most consistent with the image of a wise bird is a professor’s cap, which is made from another bottle and plywood.

To do this, you need to cut off a flat part of the bottle, glue a square piece of plywood onto the resulting cylinder and paint the resulting headdress black. Then the cap is glued onto the owl's head; if it seems that it is not held securely, several slits can be made in the owl's head into which the edges of the cap should be inserted.
Another way to decorate an owl is with professor's glasses. They are made from waste CDs, which are glued to the bird's eyes with the mirror side facing out.
It is worth noting that such decoration is only suitable for products made from large bottles, for example, five-liter bottles.

However, if desired, you can cut out circles from the disks, suitable for decorating smaller items. The eyes of owls can be decorated using all sorts of methods: pupils from unnecessary buttons or beads look good, glued eyelashes that are cut out from the remaining unnecessary parts of the bottle. In addition, to decorate the owl, you can glue a voluminous beak to it, also cut out from leftover plastic. If desired, you can give the owl additional volume by gluing feathers to it. They are easy to cut from the same bottles; you can also use disposable plastic spoons.

When attaching them, it is important to follow the order and move from the bottom rows to the top so that they overlap the joints. Feathers can be used to decorate the entire owl or just its wings. With this design, it is important to remember that a product with many details is more difficult to paint without leaving transparent parts of the plastic, so if children are making an owl, you can paint all the feathers and the body of the owl separately, and then assemble the already tinted parts.
Video on the topic of the article
The long-awaited spring has arrived, and we probably all can’t wait to quickly go to the dacha and bring beauty there. Someone has probably already prepared something interesting for their favorite dacha, because in winter we had a lot of time to make something. If you haven’t done anything, don’t worry, today we will look at a small master class on making an owl from plastic bottles. You can make this owl very quickly and besides, it is very easy to do. But this wonderful bird can be made not only for the garden, but also for your home; the owl will fit perfectly into your interior. To make a funny owl we need very little material, but the main thing is your desire. Let's get started and create a night beauty with our own hands.
To make an owl from a plastic bottle you will need:
* Plastic bottle.
* Scissors or utility knife.
* Marker.
* Thermal gun.
* Acrylic paint.
* Brushes.
Method for making an owl from plastic bottles:
To make an owl with your own hands, we need a plastic bottle of the required size. If you are making an owl for your garden, plot or playground, then it is best to make it from a large plastic bottle. If you make it small, it will not be as noticeable when flowers, leaves, etc. bloom. it will simply get lost from view and will not be so noticeable in your garden. But if we are making an owl for home, then the size of the bottle is not important.
Also pay attention to the volume of the bottle; it is better if the bottle is wider. After all, we all know that the owl is a fairly well-fed bird.
When was it picked up? the right bottle Let's start making our beautiful owl. The author used a two-liter plastic bottle from the Coca-Cola drink.

Remove the label from the bottle and use a marker to draw lines. We draw lines in the places where we will cut the bottle. In the photo everything is labeled where to cut.

The bottom will be used to make the head of our owl.

We cut out the blanks along the lines and throw away what we don’t need. We leave two blanks for making an owl.

We connect the blanks together. You can simply connect them together, and then when painting they stick to each other. But you can make it more reliable and fasten them with a heat gun. Thermal guns are now sold in many construction stores; you can buy the simplest one. Be careful, plastic bottles become deformed when heated, so add just a little bit of glue. You can also fasten plastic bottles with a construction stapler; this can also be purchased at any hardware store.

The owl is almost ready. Now we need to color it beautifully. This is where your imagination is needed. The owl's eyes should be the most expressive, large and beautiful))) But if you don't know how to color an owl at all, then you can find any photo you like on the Internet or make exactly the same one.

We paint with acrylics artistic paints, also if we are making an owl for the street, automobile ones will be suitable aerosol paints(they paint plastic well and can stand outside for a long time).
I would also like to note that if we put such a craft in the garden, we will have it strong wind it will immediately fly away and we will not see it again))) To prevent such problems from arising, we need to pour plaster or cement into the lower hole, then our owl will not fly away from us. If you want to put an owl on a tree, then of course plaster will not work. Make a small hole at the bottom and secure our owl with ropes.
That’s it, the owl made from plastic bottles with your own hands is ready, it turned out unique and very beautiful. We thank the author for his work and master class on making an owl.

Copyright © Attention!. Copying text and photographs can only be used with permission from the site administration and by indicating an active link to the site. 2019 All rights reserved.
 (1 ratings, on average: 5,00 out of 5)

