Musical instruments from scrap materials. DIY musical instruments for kindergarten. Rattle - dog made from a sock
Kolotygina Svetlana Valentinovna,
music director
MKDOU kindergarten "Mishutka" Zheleznogorsk-Ilimsky
Master class for parents and children
"Making musical instruments from waste material"
Master class for parents and children on making musical instruments from waste material for noise orchestra and their use in fairy tales - noisemakers.
Target:
- Expand parents’ understanding of the variety of homemade noise musical instruments;
Show techniques and methods for making noise musical instruments from waste material;
Involve children and parents in acting out fairy tales - noisemakers using noise-making musical instruments made from waste material;
Promote the development of creative imagination; promote joint creative work child with parents.
Progress:
Musical director: A mysterious and alluring world of sounds surrounds the baby with early childhood. How to help little man take place in the world musical sounds? Learning for preschoolers should not only be an easy and enjoyable pastime, but also interesting . Musical instruments for children they always remain wonderful, unusually attractive objects that they really want to play with. After all, an instrument for children is a symbol of music, and the one who plays it is almost a magician. The most favorite type of children's orchestra is an orchestra of homemade musical instruments, which allows all children to be included in music playing. Using homemade tools and household items in pedagogical practice, it not only brings much-needed excitement for children, it is also important from a methodological point of view. They develop ingenuity, associativity and variability of thinking, and contribute to the enrichment of musical hearing, especially its timbre-rhythmic component. Practice has proven that children who were withdrawn, thanks to playing homemade musical instruments, become liberated and open up from different sides, become more sociable, and can perform in front of big amount people actively participate in all types of activities.
So what is noise? (parents' answers).
Noise is random, non-periodic vibrations of a sounding body.
Unlike musical sounds, noise does not have a precisely defined pitch.
What are noise sounds? (parents' answers),
Noise sounds include crackling, rattling, creaking, rustling, etc., and noise orchestral instruments are devices for producing noise that create a certain rhythmic and timbre coloring.
What do you think can be classified as noise orchestral instruments?
Noise orchestral instruments include percussion instruments with an indefinite pitch: drums, gongs, cymbals, tambourine, triangle, castanets, etc.
Some noise musical instruments can be made with your own hands. They are the ones who arouse special interest in music and the desire to play music. .
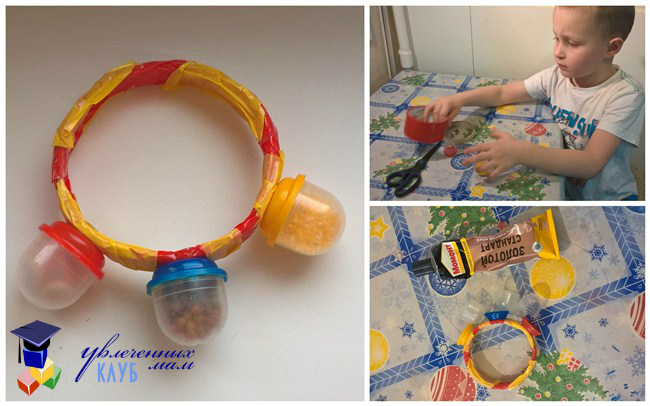
Here's what you can always have on hand: tin and plastic jars with dry rice, buckwheat, spoons, pot lids.
All kinds of rattles, combs, baby rattles, a bunch of keys, a bag of nuts - a wonderful rustle. Various papers (cellophane, parchment, newspaper, corrugated paper, etc.) Wooden cubes, blocks. Spools of thread. Natural materials: acorns, chestnuts, nuts, cones, their shells and much more. The music director draws the attention of parents to an exhibition of musical instruments made from waste material:
There are different noise instruments. Please take one tool for yourself, look carefully, and try to describe what it is made of and how it can be used.
"Rustlers"
Colored plastic “Kinder Surprises” are filled with beans, peas, seeds or beads, etc. To turn the “rustle” into a “rattle”, a hole is made on one side of the “Kinder Surprise” for a stick holder. To vary the timbre, you can use cereal as a filler for the rattle.
"Rustling clock".
A thin round rubber band is pulled through the lid of the matchbox (to fit your wrist, and you can put any seeds, cereals, etc. in the box. Having put the watch on your hand, you need to shake your hand to “wake up” the instrument. This instrument is also convenient to use as a landmark (right, left side) when performing musical-rhythmic movements.
"Naughty caps" Caps for toothpaste, deodorant, varnish different sizes. With these instruments, children enjoy tapping out the rhythm of songs and dances. Depending on the timbre of the “voice,” the caps acquired names: grandmother, grandfather, baby.
"Flappers".
To create this tool, you need to use an awl to make two holes in the bottom of a Vaseline jar, thread a thin rubber band through them, secure it with knots inside the jar, leaving a rubber band loop on the outside, close the lid and connect both parts with adhesive tape. Firecrackers are placed on the palms of the hands. Preschool children love to clap their hands in different rhythms when “clackers” are “hidden” in them. You can use the same principle to make crackers for mayonnaise lids.
"Maracas Transformers"
Various fillings (cereals, seeds, beans, peas) are poured into jars of chips - these are maracas. If you play on the lid of the maracas with a stick or finger, it “turns” into a drum. This transformation of the instrument allows it to be used in games to determine the nature of music.
"Drummers with two voices"
came out of transparent plastic containers for raisins. The children gave this name to the instrument, noticing the different sound of the drum if you play on the colored side and on the transparent side.
Sounding keys.
For convenience, you need to make a rack in the shape of the letter P and hang the keys. The percussion instrument can be a nail, a spoon or a stick (a wooden or plastic hammer may work). Instead of a rack, you can take clothes hangers.
"Zvonariki"
Metal jars with metal pendants attached to the lid.
"Miracle Castanets"
Double folded cardboard from under light bulbs. For both internal sides paste cardboard metal lids from beer bottles. The sound is produced by squeezing the miracle castanets in the child’s palm.
Ratchet "Accordion"
Wooden or plastic parts from a pyramid assembled with an elastic band. The elastic band is tied with a loop on both sides. We stretch it as if we were playing the harmonica.
Shaker.
Tin cans for coffee and drinks with small bulk items.
Musical director:Children love everything bright, shiny, colorful, so it is advisable to decorate all homemade tools with colored, shiny packaging or self-adhesive paper, etc. Children can decorate all these tools to their taste by covering them with multi-colored paper.
Now let's call our children and try to make musical instruments with our own hands (children are invited and, together with their parents, make musical instruments with their own hands).
And now I suggest we play together with our musical ones, homemade tools to “Orchestra” (the Russian folk melody “Oh you, canopy” sounds).
Musical director: One of the most fascinating forms of musical and rhythmic games with noise instruments for a child is the telling of fairy tales and noisemakers. Playing along with musical instruments while telling even the simplest fairy tale, long known to a child, will open up a fascinating world of musical creativity. Parents can organize such joint play time for a child without special methodological or musical training. In such a fairy tale, the text is composed in such a way that after one or two phrases the child is given the opportunity to depict something with noise.
But still, when choosing the text of a fairy tale, it is necessary to take into account how suitable it is for children in terms of complexity and volume. It is important to determine in advance the noise design for the selected story or fairy tale, semantic accents and pauses, make appropriate notes or symbols in the text. Thanks to the use of tools, a story or fairy tale becomes more interesting and vibrant. Playing the instrument should sound in pauses, illustrating the text. With facial expressions and gestures you can tell your child the volume and speed of the game.
An adult must prepare instructions for playing instruments in advance, but at the same time be ready to support the child’s unplanned entry and creative initiative.
The child must gradually remember the names of the instruments and recognize the sound.
And now the guys and I will show you the noisy fairy tale “Little Red Riding Hood”.
Noisy fairy tale "Little Red Riding Hood"
1. (Hurdy organ) Once upon a time there was a little girl. Her name was Little Red Riding Hood. Once
Mom baked a pie and said to her daughter:
Go, Little Red Riding Hood, to grandma, bring her a pie and a pot of butter and find out if she is healthy.
2. (Metallophone notes in order) Little Red Riding Hood got ready and went to her grandmother.
The path was not close. Sometimes she walked slowly.
3. (Metallophone notes one after the other) And singing funny songs, she skipped.
4. (Metallophone - from high sounds to low ones) She went down the hills.
5. (Rattles and triangle). I admired the beauty of the summer meadow, with butterflies hovering above it.
6. (Metallophone - sounds in order. Hare - xylophone, abrupt sounds, across the step). On the girl’s way she met various forest animals, one of which was a mischievous hare.
7.
(Wooden sticks, maracas, drum) And so Little Red Riding Hood entered the dense forest.
8.
(Tambourine) Where the terrible gray Wolf noticed her.
9. - Where are you going. Little Red Riding Hood? - asks the Wolf.
I go to my grandmother and bring her a pie and a pot of butter.
How far does your grandmother live?
Far away,” answers Little Red Riding Hood.
Okay,” says the Wolf, “I also want to visit your grandmother.” I will go along this road, and you go along that one. Let's see which of us comes first.
10. (Metallophone and tambourine) The Wolf said this and ran as fast as he could along the shortest path. And Little Red Riding Hood took the longest road.
11. (Tambourine) Before Little Red Riding Hood had time to reach the mill, the Wolf had already galloped up to her grandmother’s house and was knocking on the door: Knock, knock!
12. (Rattle) - Who's there? - asks the grandmother.
13. (Tambourine) “It’s me, your granddaughter, Little Red Riding Hood,” the Wolf answers, “I came to visit you, brought a pie and a pot of butter.”
14. And my grandmother was sick at that time and was lying in bed. She thought that it really was Little Red Riding Hood and shouted:
(Rattle) - Pull the string, my child, the door will open!
15. The wolf pulled the string and the door opened.
(Tambourine) The Wolf rushed at the grandmother and swallowed her at once. He was very hungry because he had not eaten anything for three days. Then he closed the door, lay down on grandma’s bed and waited for Little Red Riding Hood.
16. Soon she came and knocked: (Bell) Knock-knock!
17. (Tambourine) - Who's there? - asks the Wolf. And his voice is rough, hoarse. Little Red Riding Hood was scared, but then she thought that her grandmother was hoarse from a cold, and answered:
It's me, your granddaughter. I brought you a pie and a pot of butter!
The wolf cleared his throat and said in a thin voice:
Pull the string, my child, and the door will open. Little Red Riding Hood pulled the door and opened it.
18. The girl entered the house, and the Wolf hid under the blanket and said:
Granddaughter, put the pie on the table, put the pot on the shelf, and lie down next to me!
Little Red Riding Hood lay down next to the Wolf and asked:
(A tambourine and a triangle sounds)
Grandma, why are your hands so big?
This is to hug you tighter, my child.
Grandma, why are your ears so big?
To hear better, my child.
Grandma, why are your eyes so big?
To see better, my child.
Grandma, why do you have such big teeth?
And this is to quickly eat you, my child!
19. (Tambourine) Before Little Red Riding Hood had time to gasp, the Wolf rushed at her.
20. (Drum) But, fortunately, at that time woodcutters with axes on their shoulders passed by the house. They heard a noise, ran into the house and scared the wolf.
21. (Quick tapping of palms on the table) The wolf was so frightened that he released the grandmother and ran away.
22. (Clapping hands) But Little Red Riding Hood and Grandma both remained safe and sound.
Musical director (to parents): Would you like to show a fairy tale-noisemaker? (tools are distributed to parents).
Fairy tale "The Cowardly Hare".
Once upon a time there lived a cowardly hare in the forest.
One day a hare came out of the house, and a hedgehog suddenly rustled in the bushes! (rustles)
The hare got scared and ran (drumming with fingers)
He ran and ran and sat down on a tree stump to rest. And the woodpecker knocks on the pine tree! (knock the cubes)
The hare started to run (drum)
He ran, ran, ran into the very thicket, and there the owl flapped its wings! (ratchets)
A hare ran from the forest to the river (drum)
And there were frogs sitting on the bank of the river (a harp made of pencils)
They saw a hare and jumped into the water (bell ringers)
The hare was glad that the frogs were afraid of him - and boldly galloped back into the forest.
Reflection: Now let's organize an exhibition of the musical instruments that you made today with your children.
I suggest you answer the following questions in writing:
Did you like your work?
What new things did you learn today?
What else would you like to know about music education? (Parents write their answers in pictures with musical instruments, then they are displayed on the board to make an orchestra).
A child’s musical development is not complete without familiarity with musical instruments. And if the right tool If you don’t have it at home, you can always make it yourself. And even if it sounds completely different from the academic version, the pleasure from the manufacturing process and subsequent playing with such an instrument will exceed all your expectations.
Passionate mothers have prepared for you 4 master classes on creating a guitar, tambourine, piano and stringed instrument from scrap materials. I'm sure they will inspire you to create music with your children!
Stringed instrument
Our string instrument is made very simply, in a minute. We will need:
- tin lid from a box for tea, sweets or cookies, preferably square or rectangular shape so that the rubber bands hold better;
- rubber bands.
Exactly after a certain interval we pull the rubber bands onto the lid. We had rubber bands that were slightly different in length, so when we pulled them and played them, they made a slightly different sound.
In principle, this can be achieved with the same elastic bands, just adjust their length using a knot. Let's start playing the strings with our fingers. The sound is reflected from the iron cover and becomes more melodic and loud.
Oksana Demidova and Fedya 4 years old, St. Petersburg.
To make the piano we took:
- a square candy box;
- color film;
- cardboard;
- plastic.
First, Dad cut the box to look like a real piano with a nice curve! Then he and Sonya began to cover the piano with colored film (there was no black film, so they made the piano red). Due to the presence of bends, I had to use my mother’s hairdryer to ensure that the film lay flat. Dad made a plastic insert inside (so that the structure would not sag) and covered it with light beige film.

Cardboard was glued to the bottom of the piano, which protruded slightly from the front. A keyboard was glued onto the protruding part (found on the Internet). Dad made three legs and a lid holder from plastic. The legs were glued with double-sided tape, and the holder was special glue. Now you can organize puppet concerts.

Olga Silina with her daughter Sofia (4.7) and her husband Andrei from Moscow.
Acoustic guitar
I'm a big music lover. I especially like string instruments. Therefore, it was decided to make something from strings. My eldest son and I spent a long time choosing what to make: a guitar or a balalaika. The guitar won. To make it you will need:
- box cardboard (the thicker the better);
- PVA glue (or glue gun);
- double sided tape;
- pencil;
- awl;
- several rubber bands for money;
- stationery knife (or a regular one);
- two paper clips.
First you need to cut out the silhouette of a guitar from cardboard. You will need three parts with a neck and a hole in the body (socket) and two parts without a neck and hole. It is most convenient to cut with a stationery knife. Next you need to glue the two parts with the neck together. We used PVA glue for this.

Do you want to play with your child easily and with pleasure?
Then, stepping back a little from bottom edge holes in the body, draw a line approximately 7 cm long and make a shallow slot along it. Insert a pencil or stick into the slot (first cut off a piece from the pencil required length) and make four cuts in it with a knife. This will be the string nut. Below the line, mark four points at equal distances from each other and make in these places through holes using a thick awl (you can use a screwdriver with a thin drill). On the top of the fingerboard we do the same, only here the length of the pencil will be approximately 4 cm. This will be front side guitars.

Now we take 4 rubber bands for money, cut them and tie one end of each rubber band to a paper clip. We thread each elastic band into the hole at the top of the neck so that the paper clip remains on the wrong side. We stretch the rubber bands and thread the second end of each of them into the holes in the bottom of the guitar (under the hole in the body) so that the ends of the rubber bands are again on the wrong side. There we tie them to the second paper clip. If you pull the elastic bands different strengths, then you can get different pitches of the “string”.
All that remains is to glue another cardboard part of the guitar silhouette with the neck on the wrong side so as to cover the paper clips with the rubber bands tied. And glue two parts of the body without holes on top. This way we get something like a guitar body with a resonator.
All that remains is to dry the craft and, if desired, color it with felt-tip pens or paint.

By the way, if you tension the strings well, the guitar sounds tolerable and you can play something on it.
Jaromir 4.6 years old, Arthur 1.8 years old and mother Anastasia Kalinkova, St. Petersburg.
Tambourine
To make a tambourine we needed the following materials:
- paper ring from tape;
- multi-colored tape;
- glue;
- containers from shoe covers;
- various cereals;
- nails.
My husband screwed 3 shoe cover containers onto a paper ring using tape. We decorate the ring. We covered it with multi-colored tape. Beans, buckwheat were poured inside, corn grits.

They sealed them with glue so they wouldn't open. The result is a tambourine that can even be given to children.
Svetlana Chaika, Vitya 4y. 5 months, Moscow, pos. Kokoshkino.
Noisemaker made from pistachio shells
We took the idea of making a musical instrument from pistachio shells from a magazine. First, we soaked the shells for about a day to make them softer, then we made holes in them. It wasn't easy, but he helped me with it special tool for punching holes. Then they put one shell on a thread and ordered a knot. It is better to make the balls not long, as they get tangled during the game. I really enjoyed playing the noise, the sound is pleasant, not loud.

Irina Sartakova, son Nick, 5 years old.
Do you like the idea of making musical instruments with your own hands? Save it to your wall social network to repeat with children!
With my own hands. Of course, making a violin or piano without special training, materials, or equipment at home is unprepared for this species the master will not succeed in his activities. And this is a fact that should be accepted unconditionally. But our article will tell those interested how to make fairly simple musical instruments with their own hands.
Where to find source material for crafts
Any object from which sound can be extracted is considered musical. And this is almost everything that surrounds us! If you carefully follow one-year-old babies, then it will become clear: the back iron bed, when it is struck with a spoon, it produces a melodic ringing, similar to the sound of a metallophone. And if you knock wooden spoons on the table and chairs, you will get an amazing resemblance
It turns out that we are surrounded by continuous musical instruments! You just need to decorate them with your own hands in the right way, collect them in one place and place the “musician” next to them.
Gift for a drummer
For example, a beautiful one is made from a set of pans, lids and wooden sticks. Pencils are suitable as the latter, wooden spoons, brushes. You can also carve special sticks for a beginning drummer from wood.
As you can see from the photo, making these with your own hands is quite simple. For beauty, you can even come up with a special emblem and decorate each item with it. For “plates”, metal lids mounted on a stand are suitable. By the way, metal buckets, mugs, bowls, basins will coexist wonderfully next to the pots. The main thing in this matter is to choose containers of different sizes that are capable of producing different sounds.
Tool for spoons
Everyone knows such a Russian as spoons. Even solo numbers are practiced, where the performers manage to perform quite interesting compositions.
You can expand the capabilities of spoon musicians by creating an entire installation for them. It will require a wooden matryoshka doll. By arranging them in ascending volume, you can get an excellent installation tool.
DIY Guiro
Skilled woodworkers can make quite professional musical instruments. Handmade ratchets are also of interest to musicians today.

Initially, guiros were made from the fruits of the gourd tree, on which notches were made. Its place of origin is considered Latin America. Modern guiros are musical instruments made by hand from solid wood with notches along which a scraper called a “pua” should be driven. The musician thus produces interesting chirping sounds when accompanying singing or performing his part in an orchestra.
Today, these kinds of musical instruments appear, made by hand from metal or plastic tubes. In Russia, rattles made of wooden planks with notches were an analogue of guiro.
Maracas, shakers - rattles
You can make musical noise instruments with your own hands from a variety of containers. Metal coffee cans, plastic yogurt bottles, Kinder surprise egg cartons, etc. are suitable for crafts. wooden boxes and even the inner cylinders from paper towels or toilet paper from cardboard. Only the latter need to be sealed at both ends so that you can put anything there. A shaker is also made from two disposable cups, gluing them together with tape.

To create a sound effect, grains, sand, small pebbles, beads, shot, and buttons are placed inside the container. You can attach handles to round containers and paint them acrylic paints. Then you get very beautiful musical noise instruments, which you can build with your own hands from scrap materials.

Castanets
Children love to make a variety of crafts together with adults. You can also make musical instruments with your own hands at home.
You can make castanets using two large buttons with loops attached to them. These devices are put on the large and middle fingers. The castanets knock when they touch and a sound is produced.

From absolutely unnecessary things, prepared for disposal in the trash, you can make enough interesting crafts. Do-it-yourself musical instruments are created by gluing covers onto cardboard pieces, after which the blanks need to be fastened together by folding them perpendicular to each other.
Tambourine
Children's musical instruments often contain bells and bells that ring beautifully. You can hang them on an empty paper towel cylinder or along the edges of disposable plates taped together. It is best to fold the latter asymmetrically.
Having brightly colored the instruments made in this way, you can use them in a children's noise orchestra.
Whistles and pipes
Easy to make DIY ones that produce sounds when the performer blows into them. They are made from the hollow stems of grass blades, the bark of twigs, plastic handles, cocktail straws. If the latter are cut diagonally by different lengths, then you can get whistles that make different sounds.

Whistles are also made from bean, pea or acacia pods. In childhood, everyone “played” such a musical instrument at least once.
Craftsmen make pipes from wood by cutting holes in hollow tubes. But this requires special skill. No less difficult - and just as interesting! - make a toy whistle from clay or salt dough. Usually a version of the “Dymkovo” toy is used here. Although you can make a little thing by hiding a ready-made whistle inside. Having made several of these toys that make sounds different heights, you can even play some tunes on them.
You can make homemade musical instruments with your own hands from almost nothing. For example, a cap from a plastic bottle, on which a piece of rubber cut from a burst balloon is stretched, will become an exciting toy for a child.
You can also use empty bottles as a whistle. If you blow into the inlet from top to bottom, applying the container only to the lower lip and holding it vertically, you can make amazing sounds! Musicians change the inclination of the “instrument”, the distance between the lips and the hole of the bubble, the force of blowing air, and different melodies are born.
"Litrophon" or "singing bottles"
Today, more and more often, performers with such interesting instruments appear on stage that you are amazed! And what don’t they make them from! You can make it yourself, for example, from bottles or wine glasses, filling them with water.

Different heights of sounds produced are achieved by the amount of liquid poured, the material used to make the dishes, and changes in the volume of the container. The less water is poured, the thinner the sound. For beauty and convenience, the liquid is tinted.
Harp, or “musical comb”
Taking an ordinary flat comb (“hedgehog” will not work), you need to cover the location of the teeth with foil or tissue paper. By blowing into this simple instrument you can make cool rattling sounds.
Talented musicians from the stages perform various musical compositions on the harpa, including classical ones. Particularly interesting is this tool, made from a comb with different tooth thicknesses.
The main theme of Oginsky’s “Polonaise” or the melody of a folk song/hit comes out surprisingly similar to the original!
DIY guitar
This is truly amazing! But you can even make a guitar with your own hands from scrap materials, or simply from trash.
Closed ones are used as a basis. carton boxes, empty flat plastic shampoo bottles. Of course, the sound of the instrument will depend on the material of the guitar frame and the size of the hole cut in it.

It is also important to choose the right strings for your guitar. Most often, they take stationery or aviation rubber bands and pull them with different forces.
So now you don’t need to run to the children’s toy store if your baby is capricious. After all, you can simply make an exciting toy for him - a musical instrument that will become the child’s most beloved and expensive thing.
Even without a special musical education, without mastering the methods of learning to play professional musical instruments, you can instill in children an interest in beautiful melodic sounds, fill the house with noisemakers and rattlers with music and children's laughter. We'll tell you how to do it simple tools with your own hands.
Playing musical instruments contributes to the development of a child’s creative abilities and the manifestation of his emotionality. Experts note that children's music playing between the ages of one and a half to three years actively develops thinking, auditory perception, and develops the child's ability to show initiative and independence. For many, this helps overcome shyness and stiffness.
We don’t take serious music lessons into account yet, let’s talk about simple toys, which you can make with your own hands to entertain kids, teach them how to beat a rhythm, and just make noise and rattle to their heart’s content.
A baby's first toy is a rattle. Make it as easy as shelling pears. Choose one that is light and easy to hold plastic bottle and fill with cereal, buttons, beads, etc. Be sure to check for strength; the child should not “gut” the contents - this can be dangerous. The sound should not be sharp - the child may be scared. Babies are attracted to everything bright, so take care of the decor, but keep in mind that the toy will end up in the baby’s mouth.
Bells make a melodic sound; you can buy them in fishing stores. Even kids will love instruments with bells and bells. The sound of bells can accompany songs and dances.
 www.maam.ru
It is convenient to hold the instrument by the stick. To attract attention, you can make the base of the toy in the form of the head of a man, animal, etc.


 fastory.ru
If you don’t know how to sew at all, try to do it even simpler: attach bells to cardboard tube. Its length should be comfortable (so that the child can wrap his palm around it), and inner part can be painted in bright color to attract the child's attention.
 www.maam.ru
A ringing bracelet with Velcro can be put on the baby's hand. By the way, it’s very convenient during a walk - you will always hear where your baby is when there are a lot of kids nearby.

If you don't have Velcro on hand, make a musical bracelet with an elastic band.
 mamhelp.ru
Castanets are great for training coordination and motor skills, especially if both hands are used. You will need matchboxes And walnuts. The larger the shells, the lower the sound. The difference in pitch will be clearly noticeable if the nuts differ in size by 1.5-2 times. You can make different sounds for the right and left hands.
 fastory.ru
You can make a harmonica out of popsicle sticks in a matter of minutes. Place a piece of paper between two sticks. If you want to make the sticks colored, remember that the paint must be safe, because... will come into contact with saliva.
 krokotak.com
For the development of speech, it is very useful to blow, whistle, etc. Make a useful musical instrument from cocktail straws - a pipe. Scotch tape will help secure the structure.
 www.maam.ru
Long forgotten curlers. Why not a noisemaker for a music lover? Attach them to a stick or pencil and hand them to your baby.
 www.maam.ru
You can do the same with old ones. unnecessary keys. They will ring hoo!
 yarmama.ru

Tired of stepping with your bare feet on pencils and markers scattered around the house? Make a musical instrument out of them. Ttttrrrrr from top to bottom and bottom to top...
 www.maam.ru
Unnecessary disks and beads will help you build a ratchet. Don't forget to leave loops at the ends of the cord so that your child can hold the instrument comfortably.
 www.maam.ru
Who would have thought that burst balloons would still be useful? Stretch them onto the jars and the drums are ready!

Maracas can be made from any container. Try pouring various cereals and beads inside - the sound will be different.
 yarmama.ru
The sound of rain is a peaceful and soothing sound. Making a musical instrument with a similar sound is not difficult. Peas or other cereals are poured inside the hollow tube.
 yarmama.ru
To make the instrument sound for a long time, you need to create obstacles from toothpicks, then the cereal will pour out more slowly. The holes on both sides are securely sealed.
 fastory.ru
You can please a young guitarist with this instrument. The strings will be “louder” if they are made from thick fishing line.
 www.tavika.ru
Or maybe you are growing up not a guitarist, but a psaltery player?
 fastory.ru
In a city apartment you cannot afford what you can in a country house. Make it for the kids musical wall from old dishes - and they will be delighted!
To make musical instruments and, most importantly, to give them to children, you need courage and patience, because, most likely, you will have to listen to sounds that are far from harmony. But, however, no one doubts the benefits musical toys— they attract the attention of children, develop hearing and a sense of rhythm. And a home orchestra can generally become a tradition for family evenings and holidays.
Svetlana Lobacheva
MUSICAL NOISE ORCHESTRA.
A-priory explanatory dictionary, a musical instrument is an object with which musicians produce sounds. Consequently, the material for making musical toy instruments can be different: waste and natural.
As starting materials For my noise orchestra I used: boxes from DVD discs, the discs themselves, beads, plastic plates, jars of cream, kinder surprises, pen refills, shoe cover cases. Suitable fillers include: sand, cereal, gravel, bottle caps, beads, paper clips - in general, anything that rings and makes noise.
Drum
To make a drum we will need:
Cream jar;
Beads, cereal, balloon;
Ballpoint pen body;
Shoe cover case;
Making a drum body and rattle sticks
Filling for sticks (beads, small buttons, beads or any cereal)
Take a cream jar - this will be the drum body.
Secure a rubber balloon instead of a lid.
Take two ballpoint pen refills.
Open the shoe cover case and make a hole in the colored lid that is smaller than the thread of the handle body.
Screw the handle body into the hole.
We fill the case with beads or cereals and close it.
We decorate the drum with colored paper or oracal.
The drum is ready for use
Gusli
We will need:
Stationery rubber bands for strings;
DVD box - for the resonator;
Colored paper, stick or pencil.
Cut a hole in the disc case.
Pull rubber bands onto the case.
Place a pencil under the elastic strings - they will rise.
The instrument setting can be adjusted by choosing rubber bands different thicknesses(the thicker the rubber band, the lower the sound).
Play the harp either by plucking the strings one at a time or by running your finger along all the strings at once.

Ratchet
To make a ratchet we will need:
6 DVDs
Stationery eraser,
Beads, colored paper or oracal.
Drill holes in each disk. Decorate the blanks with colored paper or oracal, string them on a rubber band, inserting beads between the blanks. To hold it suspended when playing, make loops of rubber bands on the sides of the ratchet (5 beads strung on both sides of the ratchet). Secure the first and last beads with an additional knot. Tie the ends of the elastic with a triple knot. Kid holding a ratchet in front of him. threads his index fingers into the loops and plays by sharply squeezing and unclenching the plates with his palms (“strike”);

A fascinating form of musical and rhythmic games for children is onomatopoeia and elementary music playing on children's noise musical instruments. From 4 to 5 years old, children with great pleasure play to dance music, accompany children's songs, improvise sound pictures on a given topic, or illustrate suitable poems with noises.
Playing children's noise instruments develops an ear for music, rhythm, musical memory, develops verbal and non-verbal communication skills, develops the willingness and ability to act in a team, develops fine and gross motor skills, as well as auditory, visual, and tactile perception abilities.

Such joint play time for a child can be organized by any parents without special methodological or musical training.
 (1 ratings, on average: 5,00 out of 5)

