Laying tiles with carpet insert. How to lay tiles on the floor, advice from experts. Traditional method of laying tiles on the floor: rules and features
Laying carpet tiles
1 Preparation
1.1 unpack the tiles a day before the start of laying work for acclimatization, if it is not possible to unpack all the boxes, then open the packages for air circulation (no more than 8-10 pieces in a stack)
1.2 installation should be carried out at a room temperature not lower than 15C, with a moisture content in the air of no more than 75% and a floor temperature above 10C
2 Floor
2.1 laying of tiles is carried out only on a cleaned, leveled, sufficiently strong floor protected from moisture
2.2 remove all remnants from the old flooring
2.3 repair all holes and other damage
2.4 the concrete floor must be dry, with a humidity level of up to 3-5%
2.5 anhydrite cement floor – moisture content up to 1-2%
2.6 on a wooden floor, you need to remove all unevenness; if necessary, level it by laying orgolite and plywood
2.7 If necessary, prime and putty the floor
2.8 if the floor is varnished or polished, degrease it and then treat it with fine sandpaper
2.9 do not lay carpet tiles on top of other carpeting
2.10 if the floor is slippery, you need to prevent slipping; clamps are used for this; When using adhesive tape, place it diagonally to the direction of movement in the room and preferably through one row
2.11 if the tiles are located on a floor with communications, then anti-slip agents with electrically conductive properties are used to get rid of static voltage
3 Laying
3.1 use special glue or anti-slip agent to secure the tiles to the floor
3.2 carry out installation after the glue has dried using a special melting tool
3.3 in rooms up to 20 sq.m. Placement of the covering can be carried out using 2-sided adhesive tape or fixing agent, as well as butt clamps. To clarify all questions, you can ask them to Tilex specialists.
3.4 placing tiles along the edges of rooms and in doorways requires special attention; all cut edges must fit snugly against the walls of the rooms
4 Guarantees
4.1 the manufacturer bears full responsibility for the quality of the floor covering; if a defect is found, you must inform the seller
4.2 defects found before and after work are also covered by warranty
4.3 Tilex is not responsible if the defect appears after poor quality work in placing tiles on the floor
5 Floor protection
5.1 Do not allow heavy objects to move on incompletely laid tiles
5.2 if work will be carried out in the room after the covering is placed, the tiles must be covered to avoid contamination and damage.
6 Laying technology
6.1 start placing the covering from the point of intersection of lines that are parallel to the walls
6.2 do not start placement directly from the walls of the rooms
6.3 in offices, start placement from the corridor and end in the office, which will make the transition optimal
6.4 distribute the fixative over the area where the coating is intended to be laid and, after drying, place the coating according to the pattern
6.5 detailed technology for placing the coating is set out in the instructions for working with the fixing agent
7 Trimming the covering along the baseboard
7.1 make sure that the covering is pressed tightly to the floor; if necessary, use a mechanism to smooth the tiles to achieve a more complete fit to the floor
7.2 place tiles with maximum alignment to avoid visible joints and joints without protruding fibers
7.3 cut evenly, spread the coating with the cut edge towards the baseboard
7.4 when calculating, try to avoid excessive trimming so that the remainder does not exceed 10 cm.
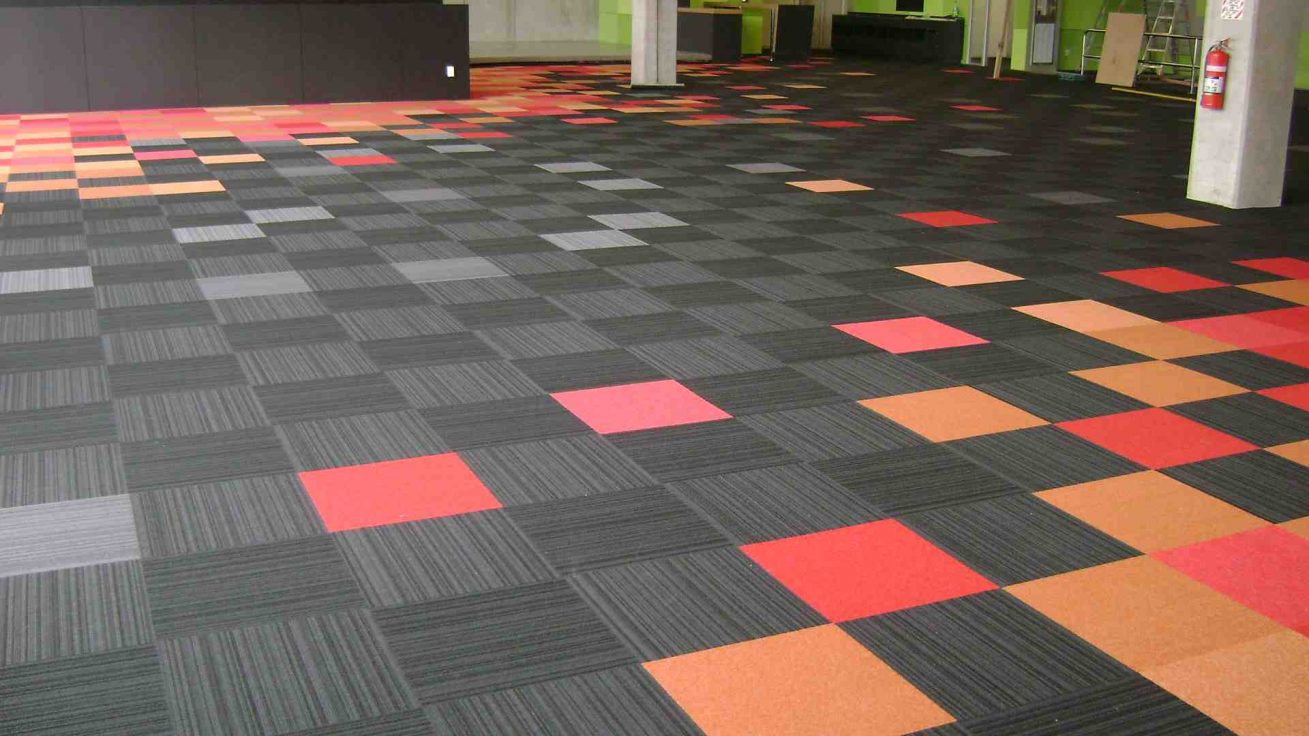
Types of styling
1. chess
used for modular short pile flooring in the form of loops and felt tiles, not for cut pile flooring
2. monolith
direction of the covering pile in one direction, used for floor coverings with cut and colored pile; carry out placement in the direction of the main movement around the room or at a maximum angle to the light
Installation on a raised floor
On tiles measuring 500 or 600 mm, apply the adhesive with a roller; avoid getting the substance between the raised floor slabs.
Typically, such a floor consists of slabs measuring 600 mm. The method of placing the floor covering depends on its size: 500 mm. laid in a standard manner; if there is a subfloor and a 600 mm covering, the tiles are placed exactly along the perimeter of the access point to the subfloor.
Heating floor
Laying tiles is possible if the floor temperature is not more than 28C. Two days before the start of the process of placing the floor covering, you need to lower the temperature and then, after finishing the work, gradually, within 48 hours, increase it again to a maximum of 28C.
Office chairs
Chairs in offices usually have wheels, so the tiles are laid entirely with adhesive to avoid damage to the tiles. The wheel size should not be more than 50 mm, and the wheel width should be min. 20 mm.
Stairs
When placing the coating module, you need to use shackles for protection. Glue the covering, covering it completely with glue; also apply glue to the riser and to the underside of the module.
Skirting boards
If carpet tiles are used as baseboards, then consider the need to coordinate such work with fire safety services.
Preparatory work
It is necessary to ensure that the carpet tiles are acclimatized as effectively as possible before installation work begins. To do this you need to unpack carpet tiles at least 24 hours before the start of installation work indoors. Carpet tiles are installed at a minimum permissible room temperature of 15°C and a maximum permissible air humidity of 75%; the base temperature must not be lower than 10°C. If it is not possible to completely unpack a box of carpet tiles, it is enough to open the cardboard sides of the package to ensure good air circulation in the package. Packages should be stacked in no more than 8-10 pieces. up.
Base
Carpet tiles should be installed on any floor that is level, dry, durable, protected from moisture and clean. Any remnants of previous carpeting, as well as any adhesive, varnish or dirt, must be removed before installation. All damage, cracks or unevenness must be repaired. Follow the manufacturer's instructions for using the appropriate floor repair products.
Concrete floor
New concrete floors must be dry. According to the diagnostic monitoring system of technological parameters for concrete floors, the humidity level should not exceed 3%. Using the alternative protimetry measurement method, the humidity level should not exceed 5%. The relative humidity in the room should not exceed 75%.
Anhydrite cement floor
The relative humidity in the room should not exceed 75%. The floor must be dry. According to the diagnostic monitoring system of technological parameters for such floors, the humidity level should not exceed 1%. Using the alternative protimetry measurement method, the humidity level should not exceed 2%.
Wooden floors
Any loose areas must be removed and the floor leveled. A very bad wooden floor requires restoration of the surface using plywood or hardboard. Orgolite sheets (always installed with the smooth side down) should be fastened in increments of 15 cm (bgg 1) using nails or a stapler. In the same way, you can attach plywood up to 6 mm thick. Plywood sheets with a thickness of more than 6 mm. must be secured with screws at 23 cm intervals (9yg). The same rules apply to chipboard and MDF.
Floor after coating removed
The floor surface must be puttied and primed. Allow the primer to dry before applying the adhesive.
Other types of floors
Varnished and polished surfaces of the base must first be degreased and then treated with fine-grained sandpaper.
Special Notes on Base Condition
Any type of floor must be dry, clean, solid and durable;
Do not install carpet tiles over existing carpet.
coating;
Use anti-slip products and allow to dry before installing carpet tiles;
As an alternative means to eliminate the sliding effect, retainers can be used. When using adhesive tape, place it diagonally to the direction of walking, if possible, every other row, in accordance with the purpose of the floor and the required characteristics. When installing carpet tiles on utility floors, use electrically conductive anti-slip agents to ensure that static stress is released horizontally and vertically. If necessary, use a 1.25 m copper circuit for every 40 m2. floor. Install the circuit under the carpet tiles, crosswise and with grounding.
Installing carpet tiles does not require the use of permanent adhesives or finishing coating. We recommend using special adhesive or anti-slip compounds (which are applied to the entire surface of the floor, especially under the joints). After the adhesive has dried, you can lay the carpet tiles using a straightening tool. For small office spaces of less than 20 m2, double-sided adhesive tape or Desso clamps and clips can be used under the joints to install carpet tiles. For advice on this issue, please contact Desso Technical Support. Special attention Care should be taken to install edged carpet tiles around the perimeter of the room, as well as in doorways.
Note: All edged and edge carpet tiles must fit tightly and clearly against the walls of the room.
Manufacturer's warranty
If any defects are discovered in the materials, the carpet tile installer must notify the manufacturer before resuming work. The manufacturer is responsible for defects within the scope of the warranty under this product. The warranty applies to defects discovered before or during installation work. Desso accepts no liability in the event of poor quality or incorrect installation methods (see appendix).
Protection of the coating during and after installation
It is not allowed to walk or move heavy objects (furniture) on partially laid carpet tiles; all work on installing the tiles must be completed. Upon completion of work, it is recommended to take measures to protect the new coating, especially if these areas are used by third parties. If the use of areas is expected before final commissioning, it is necessary to cover the relevant areas of the floor, and it is also recommended to use cloth to protect against dirt.
Laying carpet tiles should always start from a certain point at the intersection of two lines parallel to the walls. You should not start laying tiles from the wall. IN office premises laying carpet tiles must begin in the corridor and end in the office, thus achieving an optimal transition from the corridor to the office. Apply the recommended fixative to a conveniently sized area, and once the fixative has dried, lay the tiles according to the accompanying drawing. More detailed technology For applying the fixative, see the instructions for use of the fixing composition.

Trimming along the baseboard
Carpet tiles must be firmly fixed and pressed using a powerful straightening tool. Make sure the undersides of the tiles are aligned as much as possible to minimize the appearance of seams and joins. Particular attention should be paid to prevent the fibers from protruding upward at the joints between the tiles. Using a carpet tile straightening tool, you can ensure perfect styling tiles and hide the joints as much as possible.

In order to ensure even laying of carpet tiles along the baseboard, cut the tiles as shown in the figure, laying the tiles with the cut edge towards the baseboard. When calculating the point where you will begin laying the tiles, try to minimize the need for trimming. Do not allow significant cutting of the tiles (remaining at least 10 cm).

Visible effects
There are two main types of carpet tile layout (see picture); arrows on the back of the tile indicate the direction of the pile.
Chessboard view
For this type of layout, it is necessary that the direction of the pile of the laid tiles be towards right side adjacent tile. This type of layout is suitable for carpet tiles with short (loop-shaped) pile or felt tiles. This type of layout should not be used when installing tiles with cut pile.
Monolithic view
The tiles are laid out so that the arrows of all tiles point in the same direction. This type of layout is necessary for tiles with cut or colored pile. Try to lay the tiles at the maximum possible angle to the light or in the direction of movement in the room.

Laying carpet tiles on a raised floor
The raised floor usually consists of 600 mm slabs. Desso produces 500 mm carpet tiles, and some types of Desso carpet tiles can be 600 mm. The technology for installing carpet tiles here depends on whether 500 mm. the tiles are laid in the usual way as in standard floors, or 600 mm. The tiles are installed on the access panel in the underground space.
Both 500 mm and 600 mm are suitable for installation on a raised floor. carpet tiles, also using the recommended adhesive, Desso fasteners or clamps. The adhesive composition is applied with a roller. Make sure that no adhesive gets between the raised floor slabs so that the slabs can be separated if necessary.
Heating floor
Carpet tiles can be laid on heated floors as long as the floor temperature does not exceed 28°C. It is necessary to reduce the heating temperature at least 48 hours before starting installation work. Also, only after 48 hours after installing the carpet tiles, you can gradually return the floor temperature to 28°C.
Wheelchairs
In rooms where office furniture has wheels, it is strongly recommended to install carpet tiles on an area completely covered with adhesive. To avoid damage to carpet tiles, the minimum permissible wheel diameter should be 50 mm and the width at least 20 mm.
Stairs
Carpet tiles can be laid on stairs, provided safety ties are used. The tiles are glued to the steps of the stairs using an adhesive composition. The adhesive is also applied to the riser and to the back of the carpet tiles.
Skirting
To use carpet tiles as a baseboard (vertical placement), it may be necessary to coordinate such an installation with fire safety specialists.
Each of us wants to have a comfortable and cozy home, and the key to this, first of all, is a warm floor. That is why types of flooring such as woven rugs, felt runners and carpets are widely used. But the development of technology brings its own changes to life, and these materials are replaced by carpet. One of its varieties is carpet tiles. In this article we will talk about what this is flooring, what are its advantages and disadvantages. Let's review the manufacturers and their pricing policies.
Carpet tiles and their applications
Carpet tiles are a more technologically advanced modification of carpet. Its main differences were:
- Size. The form of production of such flooring is squares with a size of 40x40 or 50x50 centimeters;
- Base. It is denser and stiffer than carpet, and as a result, less flexible.
In terms of their composition, carpet tiles almost completely replicate carpet, with the exception of one important point. Anthrone is added to the material from which the pile is made. This synthetic fiber, which traps dirt particles that fall onto the surface from shoes. Dirt is practically not absorbed into the pile: it remains on the surface, and no special tools or devices are required to clean it. Regular cleaning with a vacuum cleaner will return the coating to its original appearance.
Carpet tiles have good soundproofing and thermal insulation properties. The height and quality of the pile can be varied, depending on the class of tiles, their purpose and scope of use. This covering can be laid:
- In a residential building or apartment. Convenient for covering raised floors or places where plumbing or electrical communications pass.
- In office spaces and corridors with high traffic.
- Cafes, restaurants, shops– places with increased load, leading to faster abrasion of the surface. Due to modular design coatings can only be replaced with damaged elements, without touching those that are in satisfactory condition.
- In the rooms and corridors of hotel complexes. The tiles allow you to create a unique floor surface design, are resistant to dirt and are easy to clean.
Like any other flooring, carpet tiles have both positive and negative sides.
Advantages and disadvantages of coating

The advantages of carpet tiles include the following factors:
- Easy to install. Due to its shape and size, it easily spreads onto the prepared surface.
- Another advantage that the size of the tiles gives is the low percentage of waste during installation. Usually it is 2-3, rarely – 5% of the total amount of material. For rolled materials this figure can reach from 10 to 25-30%.
- Unlike bulky, rolled carpet, tiles are convenient for transportation and storage.
- Easy installation and dismantling leaves the possibility of free access to hidden communications.
- Performs the function of a heat-saving layer, provides good sound absorption and vibration protection.
- Coating good quality has high wear resistance and reliably retains color.
- Quickly restores its original shape after cessation of exposure to the surface.
- If the need arises, you can replace individual fragments of the covering, therefore, when buying carpet tiles, you need to purchase a certain amount of material in reserve.
- Does not absorb dirt and is easy to clean.
- The pile is treated with antibacterial impregnation, which prevents the breeding of microorganisms and insects in it. Antistatic treatment repels dust.
- The ability to combine tiles to create a unique pattern or design.
The biggest disadvantage may be the price of carpet tiles. Depending on the quality and manufacturer, the cost per square meter of coverage can vary from 15 to 50 conventional units.
Another disadvantage is that modular carpet (another name for carpet tiles) of lower quality, when used in rooms with heavy traffic, very quickly loses its attractive appearance and becomes unusable.
Composition, characteristics and varieties

Carpet tiles are usually produced in the form of squares with a side length of 50 (sometimes 40) centimeters. It is very rare to find a coating of a different, shaped shape - but these are, as a rule, special batches made to order. The weight of 1 m2 of the product is approximately 4-5 kilograms. The length of the pile, depending on the model, ranges from 1-8 mm. The pile covering itself can be of two types:
- Woven. The production technology is in many ways similar to the production of carpets.
- Tufted. The base of the product is stitched with polyamide or anthrone threads High Quality, which are subsequently held together with a specialized adhesive composition.
Woven carpet tiles have a higher price per m2 than tufted ones. This is determined by production technology and quality of the material.
Consists of this decorative coating of two layers:
- Base. It is made of bitumen resin or polyvinyl chloride compound reinforced with a fiberglass layer, like a sandwich: two layers of resin are “separated” by a layer of fiberglass. This design provides high strength, resistance to bending deformation and the ability to withstand high loads. When laying, the elements fit tightly and securely together. In addition, bitumen and PVC are heat-resistant and moisture-proof materials, so these tiles can be used in rooms with high humidity and “warm” floors.
A shock-absorbing bubble layer is laid on top of the base layers, on which the pile covering is located.
- Pile. The pile layer is made using the tufting method: the base of the carpet is stitched with pile threads. High quality tile carpet is made from 100% polyamide. Less wear-resistant types contain threads made of polypropylene or polyolefin. This coating retains its color for a long time and does not fade due to the fact that the thread is colored at the production stage by adding dye to the plastic. The tufted layer of carpet tiles can be looped or split.
To protect against microorganisms and dust accumulation, the fiber is treated with antibacterial and antistatic impregnations.
Carpet tile laying technology

The preparatory stage includes the following types works:
- Calculation of the amount of coverage.
- Buying tiles with a reserve (2-3 additional elements are enough).
- Selecting adhesive for the material.
- The flooring is carried out in a room where the temperature is 16-20 degrees, the humidity level is 40-60% - the necessary conditions should be created 24 hours before the start of work.
- The carpet is placed on a dry and clean surface. Installation on wooden surfaces involves fastening with nails; the caps will need to be recessed.
- Old plank floors need to be puttied; you can lay chipboard sheets with the rough side up so that the coating backing adheres well. The concrete base is also puttied and leveled.
How to lay carpet floor tiles:
- Apply markings to the floor using a hammer.
- Place the elements on the floor and leave them to straighten for at least 15 hours for acclimatization and “straightening.”
- You need to start laying from the center of the room, and the first row should be perfect - this will ensure a good final result.
- Apply carpet tile fixer to the backing and secure the element (on wooden surface the coating can be further strengthened with nails).
- In order for the carpet tiles to be laid perfectly, the squares are tightly fitted to each other, but without unnecessary effort, so that the flooring does not warp.
- Constantly checking the evenness of the masonry will ensure a good result; if the tile is glued unevenly, it should be carefully torn off and glued again - it is better to do this right away so that the composition does not have time to set tightly.
- Near walls and threshold strips there is a need to trim elements. This is done with a sharp shoe knife. You only need to cut on the back side (backing)! The cut points should be adjacent to the wall, but not to adjacent elements.
- If the laying is carried out in an area with minimal traffic, you can do without fixing - this is a free laying method.
- All manufacturers indicate the direction of the pile with arrows - pay attention to this.
- The cut pieces can be used for flooring in the corners of rooms, arranging bay windows and other non-standard floor elements.
All stages of work do not require special skills, so they can be carried out with their own hands. It should be remembered that laying carpet tiles, the price of which is higher, may be more convenient due to the presence of an adhesive layer, ideally observed square parameters and other little details.
Tools for work

To work you will need:
- Tensioner for tight alignment of squares. This can be an ordinary wooden slats, in the center of which there is a handle, and near the edge there is a row of nails, the heads of which are a couple of millimeters higher than the level of the pile. The tensioner is pressed against the flooring and moves with force in the desired direction - this ensures that the elements are tightly connected to each other.
- Chop cord.
- Metal ruler for marking.
- Roulette.
- Shoemaker's sharp knife.
Glue selection

As for which adhesive fixer for carpet tiles to choose, it all depends on the thickness of the coating. Thicker piles require a heavy adhesive base. In addition, if the installation of elements is temporary, then you will have to remove the material - a tightly set composition will not allow this operation, which means that the glue must be removable, that is, it must quickly soak under the influence of water. You need a waterproof floor, then the adhesive base must be extremely hard and well resistant to moisture (waterproof).
Now let’s look at several types of fasteners on which you can quickly lay the flooring:
- Forbo 541 – adhesive for carpet tiles with vinyl, bitumen backing on moisture-absorbent or non-absorbent substrates. It is a ready-made viscous mass, glues tiles of a stable shape, and allows elements to be replaced up to 5 times without re-application. Economical consumption, binds dust, quickly applied, dries within 60 minutes.
- Homakoll 188 is a fastener that allows you to quickly lay stable or flexible flooring. Can be applied to absorbent and non-absorbent substrates, optimal for creating mosaic covering, economical, can be applied by roller. The finished mixture allows you to quickly replace coatings, does not contain solvents, is suitable for heated floors, and is not frost-resistant. Dries in 1-1.5 hours. Not suitable for installation on parquet or vinyl flooring. To remove the coating, just dilute the adhesive with water.
- Thomsit is an inexpensive adhesive without organic solvents, can be used on heated floors, and has high adhesion. Suitable for rooms with increased traffic and increased load on floors. It is applied by roller and has good filling properties. Frost-resistant, therefore used for finishing floors in rooms with low temperatures.
Which glue to choose depends on the user. Manufacturers often indicate not only tile laying technologies, but also give recommendations on the use of the adhesive composition that is most suitable for this type of product.
Review of manufacturers
Forbo
The Forbo company produces its products, including in Russia, from raw materials from the best foreign manufacturers. Carpet tiles based on bitumen with polyester pile, the height of which is approximately 3 millimeters, are mainly intended for use in office and administrative buildings. For use in houses, apartments and residential buildings, a modular carpet is produced on a PVC basis, with a pile 8 mm high, which consists of 80% wool, 10% each of polyamide and polyester.
The average cost of Forbo flooring will be from 17 to 26 USD/m2.
Desso
This Belgian-Dutch enterprise produces over 30 types of environmentally friendly, hypoallergenic carpet tiles on a durable reinforced base made of modified bitumen. Polyamide pile with the addition of anthrone, produced by the loop method, has a height of 5.5 mm for models for residential, guest premises, restaurants and 3.5 mm for office, administrative or public buildings. The product price will be approximately 14 – 17 USD. per square meter.
Interface

Another Dutch manufacturer of high-strength carpet tiles of 33 wear resistance classes, with a low coefficient of linear expansion (no more than 0.2%) has in its assortment over 250 models of flooring with various patterns and a palette of colors, which are suitable for a wide variety of design solutions: from simple and strict to abstract. The vendor guarantees that its products will maintain their quality for 15 years, although the actual service life can be up to 40 years.
What are carpet tiles, their advantages and disadvantages, rules for calculating the required amount of material, features of preparing the surface for laying, technology for installing tile carpet.
Advantages and disadvantages of carpet tiles

In fact, carpet tiles are the same carpet, which is currently a more popular finishing material. decorative material. If the latter is supplied in the form of rolls, then the tiles are supplied in separate squares. However, these are not all the differences between these flooring materials.
Typically, carpet tiles have a more rigid backing. It is made of polyvinyl chloride or bitumen and is additionally reinforced with fiberglass. Such a strong base gives elasticity and density to the coating. The tiles do not slip on the floor, fit tightly to the surface and are joined.
The top layer of floor carpet tiles is pile: loop or cut. The most common size of one module is 50x50 centimeters. Such dimensions give the material certain advantages.
In general, carpet tiles have the following advantages:
- Simplicity and ease of transportation and installation. During operation, damaged tiles can be replaced with new ones without the need to dismantle the entire covering.
- Minimal waste during installation. The approximate waste percentage is two. At the same time, when installing rolled material, this figure can reach 30%.
- Wide design possibilities: you can combine tiles of different colors, shades, textures, create mosaics, “patchwork” floors, and various patterns.
- Environmental friendliness of the material. Insects and microorganisms will not multiply in it, and the coating itself does not emit toxic substances during operation.
- High rates of heat and sound insulation.
- Possibility of using multi-layer tiles on “warm floors”.
- The pile of high-quality tiles is treated with a special dirt-repellent impregnation.
- Antistatic coating.
- Abrasion resistance.
- Does not block access to communications installed under the coating.
- Fast recovery after removing the source of mechanical pressure (no dents remain).
As for the disadvantages of this material, it is worth noting the high cost of tiles in comparison with rolled carpet. If you buy low quality products, when laid on the floor, they will not resemble a real carpet, but will look disjointed. If you have pets at home, their claws and teeth can damage individual elements of the coating. And it is not recommended to lay this material in rooms where there is high humidity or risk of liquid spills.
Carpet tile laying technology
Installation of this flooring material is quite simple, and most importantly - exciting. After all, everyone can show their creative abilities to the maximum by arbitrarily combining modules. The main condition when laying carpet tiles is a smooth subfloor.
Preparatory work before installing carpet tiles

Carpet tiles are placed on a smooth, level surface. Installation is carried out on a wooden, concrete, vinyl base, as well as on laminate. The room in which the work will take place must be dust-free and clean.
If your subfloor is uneven, you should level it. To do this, use a leveling compound or lay down sheets of fiberboard or thick cardboard and attach with fasteners. Any cracks or holes in the subfloor should be filled and sanded.
In addition, it is necessary to prepare the material itself for installation. To do this, we bring the carpet tiles into the room where installation will be carried out and unroll them. The coating should be left for 24 hours to adapt to the humidity and temperature of the room. This is necessary in order to prevent the appearance of condensation on the back of the tile in the porous rubber. Laying wet carpet modules is prohibited.
New tiles may have bad smell. It will disappear after a few hours.
Calculation of material for flooring

As a rule, the module of such a coating has the shape of an even square. Carpet tile sizes are 16 x 16 inches (400 x 400 mm) or 20 inches (500 x 500 mm). Usually the packaging of the material indicates how much area in square meters this tile can cover.
To determine how many modules you will need, you should make the following calculations:
- We measure the maximum length of the room and divide by the length of the tiles. This way we will determine how many products we will need for the longest row. We take part of one tile as a whole.
- We measure the maximum width and divide by the size of the module. Again we count part of an element as a whole tile.
- We multiply the resulting numbers. This will give us the total number of modules.
- We buy 10% more, taking into account fit and errors when cutting the material.
Marking the floor for laying carpet tiles

An important stage before installing the material is marking the floor. It is especially important to do this if you are laying colored tiles. The line between the products will turn into a noticeable line. Any distortion will spoil the appearance of the coating.
To lay out a clear tile pattern on the floor, you should measure the room and determine its center. After this, we draw an even straight line that passes through the central point and is parallel to the wall.
At the same stage, you can lay out the tiles on the floor to pre-distribute them in the desired order. This way you can determine for sure whether you have enough material for installation.
Features of installation of carpet tiles

Before starting work, you should check whether all necessary tool you have in stock. You will need: scissors, tape measure, utility knife, steel ruler.
We carry out further work in this order:
- Place the center row. You should start from center point rooms from the entrance. We install the tiles tightly to each other along the line. This must be done so that all the whole pieces fall in the middle of the room, and the cut parts fall on the corners and edges.
- While working, make sure that the pile is directed in one direction. Usually for this purpose the manufacturer sets with back side arrow that indicates the direction of installation. If you do not comply with this requirement, the floor covering will not look solid.
- After the row is laid in the center, we fix it to the subfloor. There is no need to use carpet tile adhesive. The material comes with double-sided tape. There is no need to glue the entire row at once. The tile clamp is placed under the corners, and the fragment holds all four corners.
- We fix the modules along the laying of the next row - we slipped it under the adjacent one and laid a new tile. This way you will avoid dust getting on the tape, which leads to a deterioration in its adhesive properties.
- We carefully control the parallelism and perpendicularity of the installation. If the fragment is laid incorrectly, tear it off and glue it again.
- Before laying carpet tiles, smooth the pile on the attached parts. This way you will avoid it getting into the joints, and the contact will be as tight as possible. You can use a small plastic rectangle, like a credit card, for these purposes.
- So we lay the material throughout the room, with the exception of last row. It will have to be trimmed. We do this simply: measure the required piece with a tape measure, take a sharp knife-joint, a ruler and a backing board.
- We cut through the pile from the back side. We make a neat cut and bend the tile. We break it along the line.
- If there is lint left on the knife blade, clean it with a sponge soaked in white spirit. Otherwise, the blade will quickly become dull.
- To cut external corners, you should lay the future corner module on the last intact tile on one side and mark the cutting lines.
- We process the internal corners last. We make markings and cut out first one rectangle, and then the second. We join them in the corner.
- To make the tile carpet look seamless, like a single covering, you can use a toothed roller. They should go over the joints to confuse and combine the pile of adjacent modules into one layer.
Rules for installing thresholds

Special thresholds are necessary in order to mask the joints between adjacent tiles. They also perfectly protect the flooring from scuffing and delamination.
Their use is justified in doorway, and also when tiled carpet is combined with another type of covering.
In modern construction, several types of thresholds are used. They can be made of different materials: boards, metal, MDF, polyurethane. If you need to compensate for differences in height in adjacent rooms, you should choose a leveling threshold.
If it is necessary to cover coverings of the same height, then you can use a straight sill. It is fixed with screws, nails or glue.
Methods for forming a pattern from carpet tiles

This modular material can be laid in any way. Carpet tiles look beautiful if they are used to create a specific pattern or design. This way you can emphasize the originality of your flooring and show your imagination.
Let's consider popular options:
- Straight row and diagonal. We place the diagonal pattern at an angle to the walls or parallel to them. We start the pattern from the far corner and towards the exit from the room. You can also cut a frieze out of tiles and lay them in a straight row. It is advisable to use material in contrasting colors or shades of the same color.
- Taking a running start. This installation allows you to create many interesting patterns using two or more shades of material.
- Modular grid. This pattern is considered irregular and combines square and rectangular modules of different colors. This is a rather complex installation method, and therefore requires careful calculations and preliminary additional markings on the subfloor.
- . It is more convenient and beautiful to make such a coating using small modules. You can compose the composition yourself or use drawings from the Internet. These floors look great in large rooms.
Carpet floor tiles - great choice for those who want to bring additional comfort and warmth to the room. This is a practical and beautiful material that is easy to install with your own hands and easy to care for.
Laying tiles on the floor is an extremely popular solution for decorating many rooms. However, not everyone knows that it is possible to lay tiles different ways, and in the process of working with different bases, certain nuances must be taken into account. Let's look at how to lay tiles on the floor: laying methods, technology features and the specifics of choosing a suitable material.
Many owners pay a large number of time and attention to choosing the appropriate finishing material, focusing on its color, texture and size. Of course, it is extremely important to choose the tile suitable size, so that it is commensurate with the room, but the issue of choosing the installation method should also not be left aside. Let's consider all the popular options.

Traditional method of laying tiles on the floor: rules and features
The traditional method got its name because it is used many times more often than all others. This popularity is due to the ease of installation, as well as the ability to use both square and rectangular tiles. In this case, the elements are laid in even rows parallel to the floor. In this case, it is extremely important to place them as closely as possible to each other and maintain an even arrangement of rows.
Helpful advice! To give the traditional installation method an unusual look, you can use multi-colored tiles. This option will make the coating original, but at the same time allow you to preserve high speed carrying out all necessary work.
Despite all its simplicity, this method, like others, has certain nuances that need to be taken into account even before installation work begins:
- all defects, unevenness and other manufacturing defects will be very noticeable if the tiles are laid in this way. Therefore, you need to either carefully examine each element and eliminate the unsuitable ones, or choose another, less demanding method;
- If the cladding is made with tiles of the same color, then the coating will look rather monotonous. This is not to say that this is a disadvantage, but it is worth considering;
- this option is only good for seamless ceramic tiles.

Although laying tiles on the floor in the traditional way can be done independently and in the absence of special skills, you will still have to pay attention to the issue of uniformity of the masonry, as well as the size of the seams (both vertical and horizontal).
How to lay tiles diagonally: the most beautiful way of laying
Laying tiles on the floor diagonally can rightfully be called the most beautiful of all options. But at the same time, the technology for laying it is the most complex, although at first glance it may seem that the basis is a simple traditional method. The main difficulty in this case is that it is necessary to accurately mark the diagonal axes, which will serve as guidelines for laying out the tiles.
Moreover, cutting the tiles correctly will require a lot of time and effort, which also presents additional difficulties in the process of laying tiles using this method. However, thanks to this method, it is possible to hide almost any surface unevenness. This option looks especially good when tiling the floors of small rooms.

Important! During installation, the pattern grid must be positioned at an angle of 45 degrees, so only tiles are suitable for this method. square shape. This must be taken into account before you lay tiles in the bathroom using this method.
It is interesting that the design itself is quite self-sufficient, and even if a plain tile is used, it always looks extremely interesting. But before you lay tiles in this way, you need to understand that the process always results in a lot of scraps. And this may not please the thrifty owner who does not want to overpay for beauty, but if we are talking about the need visual expansion placement or hiding irregularities, then this method is undoubtedly the best.
As already mentioned, the main difficulty of this method is carrying out calculations of the diagonal scheme. In addition, you need to thoroughly prepare the surface by removing the old coating, removing any remaining paint and priming the base before laying the tiles. This way you can position the tiles as evenly as possible, using less adhesive solution.
The first row is laid in the traditional way and rectangular tiles are used for this. In this case, the length of its diagonal should correspond to the diagonal of the square tiles that will be used as the main ones. The second row is laid using pre-prepared tile triangles. Then everything is quite simple - the rows are laid according to the principle of diagonal layout in horizontal rows.

Technology of laying tiles on the floor with an offset (in a running motion)
Perhaps most of all this method resembles brickwork. This solution looks original and is used quite often. In this case, a plain rectangular tile will look best, although you can often see the use of square tiles.
If, when choosing how to lay tiles in the bathroom, you preferred this option, then with its help you can solve two additional problems - hide minor defects, and also make the design of the floor interesting and original. And when correct selection color scheme, tiles laid in staggered patterns can give the room a special atmosphere. According to the recommendations of experts, this method is best suited for decorating rooms such as a kitchen or corridor.
As for the features of the technology for laying tiles on the floor, it is important to know that the tiles must be laid in horizontal rows, and each element of the next row must be positioned so that its middle coincides with the seam of the previous row.

Important! It cannot be said that the installation procedure itself is in any way significantly different from the traditional one, however, there is one feature - the thickness of all seams must be the same.
As an unusual solution, we can consider examples when offset laying is done diagonally, that is, at an angle of 45 degrees relative to the wall. But in this case, it is extremely important to ensure that the surface is prepared in advance and is as smooth as possible. Otherwise, the desired effect will not be achieved.
You need to start laying by placing the lighthouse slabs in the corners of the room. This way it will be possible to determine the floor level and correct existing defects. After this, the screed is moistened with water and proceed directly to laying the tiles using a solution. They do this in rows and along the lighthouse.
Then the masonry is leveled with a hammer, and the lighthouse slabs are removed. After complete drying, which can take from two to three days, the seams are filled with liquid mortar or cement.

How to lay tiles on the floor in a herringbone pattern: options and technology
The herringbone flooring method is most often used for parquet. This option looks very unusual, especially if you use non-oblong ones for this. wooden elements, and tiles. Naturally, only rectangular tiles are suitable for this purpose.
There are two options for laying tiles in a herringbone pattern:
- simple, which is no different from how it is done in the case of laying parquet;
- with an attachment, for which tile inserts are additionally used small size. Often they use elements of a different color or mosaic.
Saying that this method was originally intended for laying parquet, we can conclude that such a coating will look best if its surface imitates wood. But for tiles that look like stone, this option is not very suitable, as it ends up looking rather unnatural.

Example good use ceramic herringbone installation method
In order to obtain the desired result and lay the tiles in a herringbone pattern, it is necessary to rotate the elements to the right or left during the installation process, depending on the diagonal arrangement of the tiles. The amount of waste in this case will be minimal, and the visual effect will be stunning.
How to lay tiles on the floor correctly: modular installation
Modular installation – perfect solution for those who are new to working with tiles. At the same time, the method allows you to decorate the surface as the owner wishes. You just need to think about how to lay tiles on the bathroom floor, design a suitable pattern and carry out some necessary calculations.
A modular pattern will be an excellent solution for small rooms, especially since you can choose the appropriate color and pattern yourself, taking into account the features of the interior. It is advisable to make as accurate a drawing as possible, which includes an indication of the dimensions of the tiles, as well as the location of the seams.

Helpful advice! If you don’t want to develop the project yourself, you can purchase a ready-made tile set and a diagram that demonstrates in detail how to lay tiles in the bathroom with your own hands.
Most simple solution is the use of a modular effect, when one large tile depicts many small elements of various formats. In this case, the main thing is to follow the principle of the model grid - the same pattern should be repeated many times. Taking this into account, you can decide for yourself how to lay out the tiles in the bathroom in a beautiful and original way.
How to lay tiles on the floor in an original way: the “labyrinth” method
The “labyrinth” method, or as it is also called “braid,” can be performed in various ways, but in the end it always gives the impression of stripes intertwined with each other, inside of which there is a square of a different color or shade.

In order to lay out the interlocking stripes of the pattern, you need to use rectangular tiles, and for the inside, smaller square elements.
Helpful advice! In order not to make a mistake with the size of the tile when purchasing, it is best to immediately fold one of the elements of the design in the store. This way you can make sure that all the elements match each other and will look good together.
This method looks decent in any room, but if we are talking about laying tiles on the bathroom floor, then this option can be called ideal. Even if the room area is small and there is no window, a correctly selected shade of yellow in combination with such a pattern can create a lighting effect and make the bathroom brighter and more comfortable.
Related article:
Stages of preparation and laying of tiles. Complexities and features of the process. Creating a base and screed. Insulation and waterproofing of the coating.

You can also consider how to lay porcelain tiles on the floor. Using this material, this design also looks very attractive.

Laying tiles on the “Deck” floor: technology and features
The “Deck” method is unfairly used in flooring not as often as others. Indeed, in fact, this method of laying the covering perfectly imitates deck boards, which brings a certain mood to the interior. In this case, the tiles are laid offset and it is extremely important that the distance is the same across the entire floor plane without exception.
You will notice that this method is somewhat similar to brickwork. This is true, except for the fact that the displacement of elements should not be done by half of each tile, but only by a small segment of it.
It is worth paying attention to the choice of color and structure of the coating. By giving preference to tiles that imitate wood and do not have an unglazed coating, you can create a very convincing semblance of a wooden floor.

Imitation tiles natural wood often used when laying using the “Deck” method
How to lay floor tiles using the "Carpet" method
“Carpet” is one of the most sophisticated options for laying tiles on the floor, which provides the opportunity to decorate the room in accordance with the interior theme, as well as own preferences. The essence of this method is that two, three or more colors of tiles are used, as well as a border that frames this pattern around the perimeter.
How complex and beautiful a “carpet” you can create depends solely on your imagination, as well as your skills in working with tools and materials. It is best to use this method on a fairly large area of the room, for example, in a hall or a large bathroom.
How to lay ceramic floor tiles using the Kaleidoscope method
One of the most unusual ways, how to lay tiles in the kitchen - “Kaleidoscope”. Just like the previous option, it allows you to independently come up with a pattern that will decorate the room. But here it is extremely important to strictly adhere to the plan, since it is very easy to get confused in the elements. It is best to pre-mark the floor surface accordingly, thus making your work easier.

When using the Kaleidostop method, you can use multi-colored tiles with different patterns
Important! Another difficulty with this method is the need to prepare a perfectly level base in advance, since all the unevenness will be very noticeable.
As you can see, laying out floor tiles is an art that will take time and attention to detail to understand. So it’s worth considering all the existing options, and having decided on your own capabilities and preferences, begin implementing the chosen method of laying floor tiles.
Before moving on to consideration of installation features tiles for various reasons, it is worth familiarizing yourself with some of the recommendations provided by experts. It is stated that, taking into account these simple tips, you can significantly extend the service life of the coating, making it as durable and reliable as possible:
- preparing a level base is the main task to be solved;
- the prepared surface must be vacuumed again immediately before installation;
- the adhesive composition that will be used to fix the tiles must be selected taking into account the level of humidity in the room in which you will be working;

Before you should take care of the quality of the base
- for any method that is more complex than traditional or diagonal, it is advisable to mark the floor;
- for complex patterns, the tiles must be cut in advance and then laid out on the floor surface covered with fabric to see the result before starting to apply the solution;
- at in a simple way When laying, you can start from the corner, but in the case of most complex patterns you need to find and mark the center of the room;
- liquid means for pre-treatment of the base - ideal to provide the tiles with a more reliable fixation;
- before proceeding to laying the tiles, you need to wait until the impregnation has completely dried;
- grouting of the floor tiles can be started no earlier than the period indicated on the packaging has passed for the adhesive to completely dry;
- The color should match or be combined with the color of the tiles to create a single, beautiful flooring.
Basics of choosing and laying tiles in accordance with the interior of the room
Choose the most suitable option tiled covering can be done by looking at several examples finished interiors using this material. It is important to understand that in residential premises, tiles are almost always combined with a heating system, since otherwise, walking on the floor in the cold season will be quite uncomfortable. You need to read and watch additional instructional videos about how to properly lay tiles in a bathroom that has a heated floor system.

If we are talking about laying floor tiles in the living room, then ideal option can become a coating that outwardly imitates laminate. This is a suitable option for modern interior, which will harmoniously fit into a room of any size. In large rooms, it is better to give preference to calm, monochromatic colors that will not make the floor too colorful and tiring to look at.
If you need to lay tiles on the floor of a bathtub, then due to the small area it is permissible to use brighter and more original colors. Do not forget that the chosen color and texture of the coating can influence the perception of space. For example, a glossy surface light shade will expand the room, while dark matte tiles will do the opposite.
Before laying tiles in the kitchen, you should make sure that the chosen material is not too easily soiled. In addition, you should not purchase slippery tiles, since in the kitchen the flooring is constantly exposed to contact with water, which can lead to dangerous situations.

How to lay tiles on the floor correctly: features of working with different surfaces
Having familiarized yourself with the various methods of laying floor tiles and choosing the most suitable option for yourself, you can safely move on to familiarize yourself with the intricacies of the installation procedure. Considering the considerable cost of laying tiles per square meter, many want to refuse the services of a specialist and do everything necessary themselves. To do this, first of all, you need to stock up on tools that may be required during the work process:
- building level;
- hammer;
- glass cutter, or grinder;
- wire cutters;
- roulette;
- notched spatula;
- a simple pencil;
- sponge and clean rags.

Helpful advice! It is worth taking care in advance of the availability of personal protective equipment and purchasing, at a minimum, safety glasses that will protect your eyes from dust particles generated during the cutting of tiles.
If during the installation process there is a need for shaped cutting, for example, to bypass a riser or heating pipe, then a tapped drill made of hard alloy, as well as a string with an abrasive coating, are used for this.
Also, in addition to the tiles, you need to purchase special crosses, which are used as dividers, glue mixture for tiles, grout, as well as sealant and silicone sealant. All this will allow you to lay the tiles on the floor with your own hands.

How to properly lay tiles on a concrete floor: features of preparing the base
First point preparatory work that need to be done before putting floor tiles─ dismantling the old coating and cleaning the surface of all existing stains: oil, paint, grease, etc. Then the existing base is checked using a building level, as well as a visual assessment: if there is significant damage, potholes, cracks or deviations in height, then a new cement-sand screed must be made.
It is important that before gluing the tiles to the floor, the surface is hard and as smooth as possible. Otherwise, you will have to spend more glue on installation, and tiles laid on a soft base are much more susceptible to damage as a result of stress: cracks, chips, and simply falling off.
After you are convinced of the quality of the old screed or have made a new one, you should take care of laying the layer thermal insulation material. This will reduce heat loss and reduce the consumption of resources spent on heating. Another option is to install a heating system, which is the best solution possible.
In the second case, the thickness of the screed should be at least 40 mm, and to further strengthen the base, it is worth using a reinforcing mesh.

If concrete base is in acceptable condition, or for some reason it is impossible to make a new screed before laying the tiles in the bathroom, and you have to work with what you have, then all the depressions can be smoothed out with cement mortar. But for protrusions, it is best to use a chisel, with which you can relatively easily knock off interfering parts of the coating.
You can also use a grinder for leveling. And in order to ensure reliable adhesion of the base to the adhesive composition, it is worth first applying a layer of primer.
All these preparation methods are relevant for concrete structures or monolithic slabs. But laying tiles on a wooden floor is also possible. Let's look at how to install it in this case.

Laying tiles on a wooden floor: surface preparation features
The same requirements apply to the wooden base on which the tiles are planned to be laid as in the case of concrete. First of all, the surface must be smooth and durable. The presence of old, worn or rotten boards is unacceptable, since it can lead to the fact that the tile covering will simply fail at some point as a result of the destruction of the base. Therefore, all imperfect boards must be replaced.
Helpful advice! If a board that seems good at first glance begins to “play” as a result of the load, then this defect can be eliminated by laying additional lags under it. Although in some cases, simply replacing the fastening elements (nails or screws) with new ones helps. In any case, it is imperative to carry out an appropriate check before laying tiles on a wooden floor.
Another way to install a strong and reliable base for laying tiles when working with a wooden floor involves using sheets of chipboard, OSB or plywood. In this case, it is very important that the material is resistant to moisture.

When laying such an additional layer, it is necessary to leave gaps of approximately 5-8 mm between the sheets to give the material the opportunity to compensate for changes in air humidity without deforming the surface. The laid sheets are attached to the base using self-tapping screws and are opened with a layer of primer before laying the tiles on the wooden floor.
Considering the fact that ceramic coating does not allow air to pass through and does not allow air to penetrate to the base, it is worth taking care of the presence of internal ventilation so that an environment favorable for the growth and reproduction of harmful microorganisms is not created inside. Thus, laying tiles on a wooden floor is quite possible. The main thing is to pay due attention to the issue of preparing the base, and before laying tiles on a wooden floor, treat it with special protective agents.
How to choose the right adhesive for laying tiles in the bathroom with your own hands
Regardless of the type of base, the installation technique is always the same. But the choice of a suitable adhesive composition should be approached with special attention, since depending on the surface on which it will be applied, its composition should differ. For concrete floors, an adhesive made from cement based. In order to prepare it, you must add the amount of water specified by the manufacturer to the finished dry mixture.

A completely different glue is used when working with a wooden base. In this case, glue solution has the consistency of mastic, which, among other things, can provide compensation for deformations resulting from changes in air humidity in the room.
Apply to the reverse side using a notched trowel. facing material. In this case, grooves should form on the surface. Then the tile is pressed to the floor surface and gently tapped using a rubber hammer. You can learn more about how to glue tiles in the bathroom using one or another method of preparing the mixture from the photo or video instructions.
Rules for cutting and calculating floor tiles
It is almost impossible to lay tiles on the floor in such a way as to avoid cutting and adjusting the material. One way or another, the material has to be adjusted to the required size at the edges of the room or in places where heating or water pipes are located. Particular attention should be paid to how to lay tiles in the toilet, because in this case even more complex cutting of the tiles will be required.

It is not always possible to use a regular glass cutter for fitting, since manufacturers usually use more durable material than for wall. Additionally, floor tiles are thicker, making them even more difficult to cut properly.
In this case, it is best to use a grinder, which allows you to figure cutting, albeit with an uneven edge. All imperfections caused by such pruning can be eliminated using special tongs (nippers) manually.
The most convenient option for cutting tiles is to use a tile cutter, since with its help all procedures can be carried out as quickly and firmly as possible, and the edges will be smooth.
Important! Despite all positive characteristics With a tool such as a tile cutter, it is impossible to cut a thin strip (less than 10 cm) with it. In this case, it is better to do it manually using wire cutters.

It is very important not to forget about personal protective equipment, which must be present when cutting tiles. Sharp pieces that fly apart in one way or another can cause serious injury. Therefore, it is important to protect your eyes (or better yet, your entire face) and wear thick clothing that can provide protection.
After all the necessary tile elements have been cut and laid using an adhesive composition, all that remains is to wait for it to dry and rub the seams. How exactly is it carried out? this procedure It is worth considering separately to take into account all the subtleties and nuances. After all, it is the final stage that will determine how long the coating will ultimately last and how hygienic its use will be.
Grouting tile joints on the floor: what is it for?
In order to pay due attention to grouting the joints between tiles, it is necessary to understand how significant a role this process plays in the matter of its further operation. First of all, it is worth noting that the seams are the gap that remains between the elements after they are laid.

There are certain norms and rules that indicate the main guidelines that you need to rely on in the process of work. So, the basic rule is that the wider the tile, the larger the seam should be. Typically it ranges from 2 to 5 mm.
The need for grouting is due to several reasons:
- Over time, walls undergo natural shrinkage, so some free space so that the tile can move without damaging the surface;
- thanks to the presence of cracks in the dense cladding, the walls “breathe”;
- the use of a special grouting composition prevents the penetration of moisture, and therefore the development of mold, fungi and simply the accumulation of dirt in the cracks;
- due to the presence of grout, adhesion between individual fragments of the cladding is improved;
- grout has a significant decorative role. Properly and neatly designed seams can mask minor tile defects, such as nicks and chips. In addition, using grout you can hide the remaining mortar.

Thus, the service life of the floor covering, as well as how attractive its appearance will be, depends on compliance with the technology for using grout. That is why it is worth taking a closer look at what principle should be used to select the mixture and how to carry out all the necessary work yourself.
How to choose the right grout mixture
In order to avoid any problems during the grouting process, it is necessary from the very beginning to select a mixture that is ideal in all respects. This seemingly insignificant nuance plays an important role, so it is worth paying attention to the following aspects:
The color of the grout is the main criterion that most people pay attention to first. The color of the grout can have both a positive and negative effect on appearance entire coverage. A universal option that is almost always appropriate is white. But in combination with colored tiles, it will not give the feeling of a single canvas. For this. You can choose a grout shade that is as close as possible to the color of the tile. Contrasting colors are used less often, since choosing the right combination can be very difficult.

Helpful advice! To get the grout of the desired shade, you can simply add white to the base mixture required quantity color scheme
The composition and properties of the grout also play an important role. Depending on what components are included in the mixture, and this can be alabaster, gypsum, epoxy resins, Portland cements and others, the characteristics will also be different. Here you need to navigate by what conditions the material will have to face.
So, for rooms with high humidity, for example, if we are talking about a bathroom, you need to choose compositions that include water-repellent components. If the surface is subject to serious loads, then you should pay attention to the wear resistance of the composition. The best solution is an epoxy mixture.
The composition of the grout will differ depending on the surface for which it is intended. For example, when it comes to tiling a wall surface, ordinary grout is used, which can wear out over time under significant loads. For flooring, it is worth purchasing a more tenacious mixture, designed for constant contact with shoes, pieces of furniture, etc. The main thing is that the structure of the grout is not loose.

Technology for preparing grout for floor tile joints
Today, many people are engaged in the production and sale of high-quality grout. various manufacturers. Such a wide range allows you to choose the most suitable option for a given situation. You can find two types of grout for joints on sale: dry powder and ready-to-apply mass.
In the first case, the main difficulty is diluting the required amount of the mixture, since it can be difficult to understand exactly how much may be needed. That's why the best option– dilute the powder little by little, gradually using it as needed. Typically, manufacturers indicate on the packaging as accurately as possible how much water needs to be added to obtain the desired consistency, but you can adjust this yourself, determining by eye whether the result is satisfactory for you.
The second option is a mass that is completely ready for use. It can usually be purchased in jars or small buckets. The main advantage of this solution is the absence of the need to tinker with breeding yourself and the ability to carry out all the necessary work as quickly as possible.

The disadvantages of the finished mass primarily include short term storage For this reason, leftovers that are not used will likely have to be thrown away. Taking this into account, we can conclude that diluting grout yourself from a dry mixture is more profitable.
If you want to save money on purchasing grout, you can consider making it at home. To do this, you can use alabaster diluted with water to the consistency of a plastic mass. The main disadvantage of this option is its short service life, since usually such grout crumbles quite heavily. Can be added to strengthen gypsum mixture, but this will only improve the situation a little.
How to grout seams on tiles: technique for applying the mixture
In order to apply the finished grout to the seams and bring it all into proper form, you will need a container into which the solution will be poured, a brush, a construction mixer, as well as a foam sponge and a small rubber spatula. It is best to dilute the grout gradually, in small portions and in a small container.

Helpful advice! Using a mixer is only justified if you have to work with a large area. In all other cases, to obtain the desired consistency of the mixture, it will be enough to stir it for some time with a spatula.
The grout application procedure is as follows:
- The tile seams that are to be worked with must be thoroughly cleaned of dirt, dust, and fungus. A special tool is provided for this.
- Using a brush previously soaked in water, the seams are soaked to improve the quality of adhesion between the materials.
- Then you need to dilute a small amount of grout in the prepared container.
- Using a rubber spatula, apply the elastic mixture to the seam so that the gap is completely filled. In this case, additional compaction is necessary to avoid the formation of voids.
- All excess that gets on the tile can be easily removed using the same spatula.
- To prevent cracks from appearing in the future, at this stage the grout in the joints must be moistened with water.

Important! To ensure maximum protection from the effects of water and the formation of fungus on the surface, it is recommended to additionally treat the areas where the baseboard will be laid with a sealant.
You need to understand that the procedure for grouting joints on the floor and walls is somewhat different. And if in the case of wall coverings the seams should be sealed in the direction from top to bottom, then for floor coverings the rule applies - from the far corner to the exit. Before starting work, watching a training video can be extremely useful. In this case, the grouting of floor tiles will certainly be done better.
In order for the grout to dry completely, you need to leave it for a day. And after that you can proceed to the final processing of the seams. To do this, special antiseptic agents are used that can prevent the appearance of fungus and mold, protecting all vulnerable areas of the coating.
One way or another, if we are talking about laying ceramic tiles on the floor, some moisture will accumulate on its surface and over time may begin to penetrate through the seams. To prevent this, use . Its application is the final stage of sealing seams, which provides the maximum level of protection.

Final cleaning of the tile surface before use
In order to start using the coating that was obtained as a result of the work, it is necessary to give it an attractive and complete appearance. The main task is to eliminate as much as possible all traces of excess mortar and putty. And since rubbing joints is usually carried out in several approaches, since the mastic tends to partially sag as a result of drying, the surface should be cleaned only at the very end.
In order to effectively clean the surface, you will need a foam sponge moistened with water. The tile needs to be wiped so that the grout that is on the surface of the tile gets a little wet. Then, using a scraper or the same spatula, you can remove all excess. All stains can be easily washed off with a damp cloth or sponge.
Helpful advice! If relief tiles have been laid, cleaning them with a sponge will be quite difficult. In this case, it is most convenient to use an old toothbrush.

It is best to clean the surface before the grout has completely dried, since after this it will become very difficult to soften it. Of course, even in this case, it is possible to completely remove the excess, but the process will take much longer and require a lot of effort.
It is necessary to scrape off completely dried putty very carefully, since it is very easy to damage the surface of the tile, especially if the surface of the tile is glossy. As for the relief surface, it will be almost impossible to remove dirt here, so you need to do this as soon as possible.
Recommendations for caring for tile flooring
It may seem that knowing how to lay tiles on a bathroom floor is all you need to achieve a beautiful, long-lasting finish. But in fact, constant care is the key to long service life of tiles.

In this case, you need to learn two fundamental rules:
- Only regular cleaning of seams can guarantee the absence of pathogenic bacteria and fungi. At least once a month, you should clean the grout lines on your floor tiles. How exactly to do this, everyone decides for themselves: you can resort to using special detergents or soapy water, you can also use vinegar or lemon. Bleach is suitable for surface disinfection. In addition, a steam cleaner will do a wonderful job of cleaning.
- If possible, you need to save the remaining grout in order to be able to carry out regular grouting, which, one way or another, will be needed. This re-grouting is done as needed if the old seams have darkened and cracked. In this case, the old putty is cleaned out, after which the seams are treated with an antiseptic and a new layer is applied. If it is also necessary to remove a layer of sealant, this can be done using a blade.
By observing these simple recommendations, and by regularly paying attention to the condition of the tile covering, you can significantly extend its service life and keep it in its original appearance. It will also be useful to read on the Internet recommendations and user reviews on how to clean the seams between tiles on the floor. You can often find useful ideas and advice on forums.

How much does it cost to lay tiles on the floor: prices for services
If, after you are fully familiar with how to properly lay tiles in the bathroom, the task still seems too difficult to you, it may make sense to seek help from professionals. Our specialists know exactly how to properly lay tiles in a bathroom, kitchen or hallway using any method and will complete the task as quickly as possible.
So, all that remains is to find an offer at the most reasonable price. Many craftsmen offer to lay tiles on the floor, but this service should not cost less than 550-600 rubles per 1 m². Of course, there are a huge number of craftsmen whose services are much more expensive, so here the choice is entirely up to the customer.
In any case, it will be useful to familiarize yourself with the pricing policy, and if such a cost seems excessive to you, then you can always read the instructions again, watch a video about laying tiles on the floor and try to do everything yourself.

Technology for laying tiles in the bathroom: video instructions
Having familiarized yourself in detail with how to lay tiles on the floor, as well as with how to properly grout the seams on the tiles, in most cases you can get to work without hesitation. However, it can also be very useful to watch a training video, which demonstrates each stage of work in detail and provides useful recommendations from specialists in this issue.
 (1 ratings, on average: 5,00 out of 5)

