DIY eared chair drawings and diagrams. DIY chair: furniture accessible to everyone. Preparation and assembly of parts
IN modern design You can often find interiors with indoors. This effect creates coziness and makes the room “warmer”. But for the sake of such an element, it is completely inappropriate to make a real brick wall where there is none according to the construction plan. This is expensive, reduces the area of the room, and also creates additional load on the foundation.

Just for such cases there are decorative panels with imitation brickwork. And if store version for some reason it doesn’t suit you, and there can be a lot of them: price, quality, color scheme, shape, size, etc., then we can offer you a simple and inexpensive way imitation brickwork with your own hands. And the greatest advantage of this method is that it does not require special skills, for example, working with putty and other building mixtures.
To imitate brickwork you will need:

- cardboard packaging boxes (thick cardboard is required)
- PVA glue
- hot glue gun and rods for it
- thick paper napkins
- tassel
- pencil
- ruler
- utility knife or scissors
- paints, varnish
Progress
The surface on which the brickwork will be imitated (it can be a wall or panel) must first be prepared. Clean the wall of old wallpaper, if necessary, prime it with a special construction primer or a 1 to 2 solution of PVA glue and water. If the wall was covered with paint, then wipe the surface from dust and degrease.

Imitation of decorative brickwork
There are quite a few varieties of bricks. It all depends on which one suits your interior best. And, if you have the opportunity to experiment with the color of the brick, then you need to decide on the size of the bricks right away. The main dimensions of the brick can be seen in the figure

In addition, the type of masonry depends on which side of the brick will be visible. Each side has its own name and will look completely different in the interior.
1 - bed
2 - spoons
3 - poke
Eat different variants decorative brickwork: e.g. outer side It can be completely laid out with a bed or a spoon, or it can combine different sides of the brick.
In our example, we will imitate red brick masonry; we will lay it with a spoon with dimensions of 228x65.
On a sheet of thick cardboard (packaging box) we draw out the “bricks” of the required size.

Then we cut the sheets along the marked lines using scissors or a stationery knife and a ruler.

The “masonry” in the interior can be either solid or reveal some kind of image to us. For clarity, in in this example we took the photo from the calendar. In the interior this can be a drawing, photo wallpaper, stucco, etc.
Mark the boundaries of the drawing. If the boundaries according to the plan should go under the brick decorative masonry, place the drawing on the wall. We glue, we draw, we sculpt.

We cut some of the resulting “bricks” in half. This is necessary so that the masonry is staggered and looks realistic.

We begin to glue the “bricks” to the surface. This can be done with glue heavy wallpaper, for example, vinyl. You can use PVA glue or any other convenient for you to work with. After some experiments, I settled on this method: PVA construction glue + hot glue gun. If we consider them separately, PVA glue dries for a long time and does not immediately fix the bricks, and a hot glue gun, if used without PVA, uses up the rods very quickly. Therefore, we do this: apply PVA glue to the entire rectangle, with the exception of the corners themselves. We apply glue from a hot-melt gun to the corners. Hot-melt adhesive immediately fixes the “brick” in in the right place, and PVA reliably fixes it within 24 hours.

It is most convenient to start laying from a corner. We fix the first “brick” in the lower left corner.

We will fasten the next one at a certain distance, leaving space for an imitation seam of 07-10mm.

We will retreat the same distance from above, starting to lay out the second row. It will start with half a “brick” to create a checkerboard pattern.

When all the rectangles are glued, we leave them to dry for the time specified in the glue instructions. If it is PVA construction adhesive, then the drying time will take about a day.

When the glue has dried and the “bricks” are securely fixed along their entire length to the wall or panel, we begin decorating with napkins. This is to add texture to our brickwork and to hide the corrugation of the packaging board.
You need thick napkins High Quality so that, when soaked in glue, they do not tear or roll up.

Using a brush or sponge, thickly apply PVA glue on top of the rectangles.

We crumple the napkin in our hands to form folds.

And we apply it to the wall, in the place where the glue was applied. Apply glue on top of the napkin with a brush once again.

Select the gaps between the rectangles with a brush or finger.

This way we cover the entire wall. We make sure that there are folds and well-defined gaps - seams between the masonry.

Let it dry for another day.
When the glue dries and hardens, we begin painting.

The color is selected in accordance with the design. In this example we imitate red brick. By mixing white, orange, red and black paint we achieve a resemblance to original color bricks

And we cover the “bricks”. You can do this with a brush, or with a sponge, imitating the slightly porous structure of brick.

Then we go through the “seams” in the brickwork with a thin brush. You can also choose the color of the solution to suit your taste. But most often it has a slightly grayish tint.

We remember that after drying the paint becomes lighter than it appears. liquid state. If after drying the color does not suit you, then the wall can be repainted until it acquires the desired shade.

When everything is ready, the folds on the bricks can be highlighted with darker or lighter paint, thereby giving the masonry a little antiquity and texture.
Apply paint of a suitable shade to the “bricks” with a dry brush.


It is best to varnish the paint on top to protect the surface from moisture and dust.

Such walls in the interior look very believable and beautiful. The work is not difficult, you don’t need to be professional builder or a finisher, the materials are available, and everything can be done to your liking, choosing colors and shapes to suit the interior.
Today, the use of brick or its imitation in design is very popular. It is used in various rooms and styles: loft, industrial, Scandinavian. Many people like the idea of giving wall coverings an imitation of real brick, and there is nothing difficult in its implementation.
Finishing methods
There are two ways to perform this finishing. The first is gypsum tile cladding, which fakes the brick and is applied to wet plaster. The second method is to imitate brickwork when creating relief surface. This type of masonry will bring originality and freshness to the interior.
The surface of the walls, finished in brick, unites the strict lines of the rows and highlights special decor textures of each square. The natural surface of brick is rough and uneven, so many people use its imitation. This finishing method is preferred to natural brickwork, and it belongs to architectural style loft.


Peculiarities
When choosing a material for this finishing, the following criteria are taken into account: aesthetics, price and harmlessness.
In this case, plaster to imitate brick is the most suitable option, which has a number of advantages:
- Purchasing this material does not require large financial investments.
- Wall cladding takes relatively little time.
- This coating is applied in a thin layer, and you don’t have to worry about narrowing the room.

- This coating is easy to apply yourself, without involving specialists and avoiding additional costs.
- Brick-like plaster can be used to decorate not only the surface of the wall, but also the kitchen backsplash, corners or doorways.
- This plaster imitates the finishing of expensive clinker tiles.


How to choose plaster
Before starting work, you must purchase everything in advance necessary materials. In terms of imitation of brickwork, it is most acceptable gypsum plaster, wherein When purchasing, attention should be paid to the following characteristics of the material:
- It should be easy to apply and have elasticity.
- It is important that there is no shrinkage property after hardening.
- Before use, there should be no preliminary or additional puttying of surfaces.
- The material must be environmentally friendly and harmless.


But you should still give preference to ready-made mixtures; they have greater elasticity and ease of use. This material, diluted to the desired consistency, is sold ready for use. This mixture is a homogeneous mass that can be applied immediately. The advantage of such plaster is that the container with the remaining mixture is tightly closed, and it can be used even after a long time.


Dry mixtures can be varied and heterogeneous. They include various components, for example, an additive in the form of large stone chips. To do this, the manufacturer indicates on the packaging for which surface this composition is suitable.
For priming the working surface, many different compositions are also produced in liquid and paste form. But before this type of work, it is better to treat the wall liquid composition deep penetration.
Application process
Before you start creating a simulated brick surface you need to find out whether the walls are suitable for such work. They must have flat surface and not a “strewn” state, a suitable wall relative to the floor has an angle of 90 degrees. The absence of large holes, bumps and dips is important. If there are any, using cement mortar, beacons and plaster mesh alignment must be done.


You can evaluate the condition of a surface by applying a long rule to it. If gaps of more than 3 cm per meter of length appear between the rule and the surface of the wall, proceed to leveling.
If there are small defects (cracks, small irregularities) on a straight wall, there is no need to plaster it, just repair the defects with cement or putty. After complete drying, you need to treat the surface with a deep penetration primer, first mixing glue into it. Primer treatment is required, otherwise decorative layer The plaster will begin to flake off and fall off over time.


Before work you need to check plaster mortar , prepare an auxiliary tool so that it is always at hand if necessary: a roll of tape, a wide and narrow spatula, a rule or laser level and a cord for displaying beacons. It is very convenient to mix the mixture with a drill on which a mixer is attached - a special attachment for thorough stirring. To avoid damaging the flooring, lay down oilcloth.
After completing all necessary conditions you can start guiding plaster mixture. The simplest and most applicable method involves adding color to the induced solution. You just need to dilute the dry solution as indicated in the instructions for use, add the coloring element there and mix everything thoroughly using a mixer.


If you have never encountered similar works, in this case, you should not apply too much solution. After some time, you need to try to work it out, otherwise it will set and become unusable for application. The solution must be adjusted to a certain viscosity until it acquires the consistency of thick sour cream and begins to slide off the spatula evenly, without falling in pieces.
The induced solution is taken on a spatula and thrown onto the surface, while smoothing it upward. If you want the surface to imitate brick, do not try to level the applied mortar too smoothly. Brick has no smooth surface, it is usually uneven and rough.
When decorating a brick, you must take into account the width of the seam, if not this condition the finished surface will look unnatural. In this case, the dimensions of the most common brick are not very important, since this material is made both elongated and square.


Currently, textured and relief non-standard bricks are produced. And this look can be imitated by this plaster. When starting to carry out such work, it is preferable to have some experience gained in finishing imitation of ordinary standard brick.
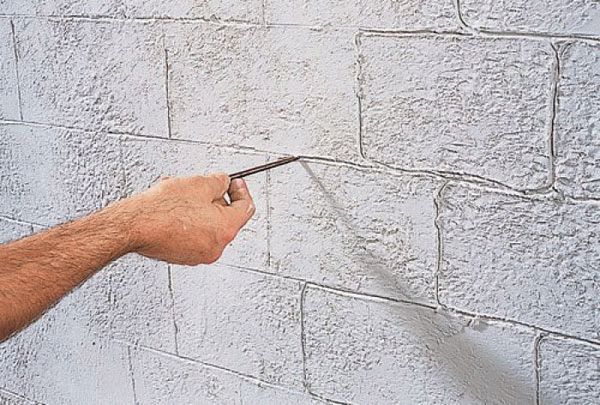
When applying seams between falsified bricks, use a ruler, or better yet, a rule. Then the line will be perfectly straight. If you want a curved line, you can draw it freehand. The seam must be done before the solution hardens on the surface. When carrying out stripes, excess will appear, which can be easily removed with a dry cloth.


In this way, each applied pattern is “drawn” in turn. A prerequisite is that the coating must be damp; the decor must be applied before the solution sets or hardens. After this process, the surface is allowed to harden and it is not recommended to touch it during drying. To obtain the original texture of bricks, you can brush over the decor with a dry and hard brush.
After the wall covering has dried and become strong, use sandpaper and sand the decor, but this depends on your preferences. The last point is the removal of all unnecessary plaster elements that spoil the design. Subsequent processing of the resulting decorative surface will depend on the type of solution used and the presence of coloring elements in it, which are not always added.

Color
It makes no sense to leave plaster that imitates brick in its natural light gray tone. This is why it is painted. In this process, there are many design options and complete freedom of choice, it all depends on your taste. Natural brick has different shades, so you can mix several options of colored pigments, achieving better visual similarity.
You can first apply a layer of paint of one color, and after a few minutes create a different color or give individual bricks a more bright look. There is a variety of shades in natural brickwork, which is why decorative coating, imitating brick, can have many tones.


You can experiment with colors without fear of ruining them, bricks are currently produced in a variety of colors - from bright to dark. And few people will be able to guess that the “masonry” is fake. The only thing that can ruin the look of the interior is the inconsistency of the imitation masonry color scheme with furniture or floor covering. Therefore, when covering, choose matching tones.

Also, a decorative coating that imitates brick is made with your own hands using tape. This process requires construction tape with a width equal to the masonry seam. Then, on the wall covering, which is finished with plaster imitating brick, horizontal and vertical lines corresponding to the connecting seam are drawn using a ruler. It should be taken into account that the vertical lines through one horizontal row are shifted by half a brick. The drawn strips are painted over their entire length with paint similar to the color of the mixture being applied, and after drying, tape is glued to the painted lines.
Be sure to first glue the horizontal stripes, and only then the vertical stripes; if the order is different, it will be difficult to remove them later.


Then a layer is applied to the glued tape decorative plaster, while smoothing it out and leveling it out. Smoothness will depend on your preference for embossed or perfectly smooth decor.
As soon as the applied solution begins to harden, remove the tape. A little effort is enough to pull the horizontally pasted strip, and the entire structure will easily come off. After complete drying, you can use any method finishing decorative wall under the brick.

Exist various options imitation brickwork with your own hands. They allow you to create a surface that will completely replicate the brick coating. This makes it possible to bring exceptional design ideas to life, creating an interior that will be filled with beauty and comfort.
Imitation brick wall done with your own hands in various ways. Some of them require the necessary skills, others are practically ready-made options. Each method is suitable for a specific case.
Ready-made types
Currently, there are ones that completely replicate the texture of brick. The advantage of such products is their low cost and ease of installation, which varies depending on the type of product. The following options are available:

All options have their advantages and disadvantages, but there are ways to make an imitation of brickwork - exclusively with your own hands.
Application of corrugated cardboard
Usage corrugated sheets cardboard is a rather unique method that makes it possible to create decorative surface, using a minimum of materials for this. The work requires the following components:
- Directly cardboard. Boxes can be used for household appliances. The main thing is that their density is not low.
- Quality paper napkins(dense, not torn).
- PVA. To work you will need a large amount of glue.
- Gun for needlework (filled with hot glue).
- Stationery knife, ruler and pencil.
- Paint and varnish. For the final finishing stage.
 Materials required for the manufacture of brick inlays from corrugated cardboard
 Advice! Thin cardboard - no The best decision. It will not allow you to create the necessary texture. If it is not possible to use thicker material, then you can use some trick. It consists in the fact that the fragments are glued together to create the required thickness.
 To imitate brickwork from corrugated cardboard, it is better to use dense material
 The technology consists of a sequence of actions:

Thus, it is possible to form decorative wall under a brick with your own hands, which will not require large financial costs.
 Ready-made corrugated brickwork
 Using a stencil and pattern on plaster
This is a simple option that requires only extreme care. The work is as follows:
- A layer of plaster is applied to the surface. The thickness should be more than 4-5 mm, otherwise you won’t get an expressive texture.
- Next, take a stencil. It can be rubber or plastic.
- It is well moistened with water so that the main side does not stick to the damp solution.
- The stencil is applied to the surface and pressed. It is necessary to remove it from the wall carefully, because sudden movements can remove part of the mixture.
- The procedure is repeated. It is important to consider that the horizontal lines must match. If you don’t keep an eye on this, you end up with fragmented areas that are not connected to each other.
- At the end, the imitation brickwork is well primed and covered with wax. The seams are unstitched. The surface is painted with acrylic paints.
On a note! To create a more interesting effect, color is added directly to the plaster. Then it is possible to create a play of shades, because the joints are painted in different ways. Do not forget that if you paint the wall directly, then after drying the shade will become a little darker.
You can make a DIY brick wall from fresh plaster without using a stencil. The technology is as follows:
- Lines are drawn on the surface to indicate the seams of the brickwork. This is done a little arbitrarily to achieve more naturalness.
- Using a narrow scraper, the plaster is removed. The joints are immediately rubbed with a dry brush. This will allow you to form a relief and also smooth out the bricks a little.
- The finished wall is primed and painted.
These methods allow you to decorate only a newly made layer of plaster. If some time has passed after applying the plaster mortar and it has had time to dry, then it will not be possible to create a brick wall using the methods described above.
Bricks on putty
This option is used when the idea of creating a brick wall came some time after plastering. In this case, to implement it, putty is used, which is pre-painted in the desired color.
 Brick wall made of putty
 The general procedure is as follows:
- The wall is well cleaned of dirt and dust. If necessary, degrease. Apply a layer of primer.
- Markings are made on the surface. It should repeat the horizontal and vertical seams so as to create an imitation of brickwork.
- The joints are painted with the selected color and left until completely dry.
- Next, apply masking tape. Its strips should run along the painted seam lines. This is done like this: first paste over the horizontal lines, and then the vertical ones (they should overlap the previous ones).
 Marking masking tape under brickwork
 - Apply to the surface thin layer putties. The required texture is immediately formed, so the layer becomes uneven. Can be used additional tools, which will help create relief.
- Leave the mixture for a while until it sets. Now remove the tape. This is done very quickly, because the segments are fastened together. The putty is left until completely dry.

- The layer simulating a brick wall is additionally sanded, creating an original texture.
Thus, all work is done exclusively with your own hands. It is possible to form an excellent decorative surface that will be the highlight of the interior. But you need to read that the question of how to make an imitation of brickwork has not only a technical side. It is much more important to fit it correctly into the decor of the room so that there is no unnecessary heaviness or thoughtlessness.
Every day, a brick wall is used more and more often: previously, such surfaces were carefully decorated, but today, on the contrary, they are even artificially created. Moreover, not only professionals, but also ordinary people. All you need is a little patience, a great desire and this article, from which you will learn all the secrets of creating an imitation brick wall with your own hands.
Option 1 – brick wall made of cardboard.
To build it we will need:
- Ruler and pencil;
- PVA glue;
- directly sheets of cardboard - thick, like in packaging boxes;
- scissors or stationery knife;
- brush;
- varnish, paints;
- hot glue gun with rods;
- thick paper napkins.
- Let's prepare the surface on which we plan to create a false brick wall. To do this, we will clean it of old wallpaper, if there is any on it, and prime it (instead of a primer, you can use an aqueous solution of PVA glue, the ratio of water to glue is 2 to 1) or, if the wall has been painted, thoroughly wash it from dust and degrease.
- Next, you should decide on the size of the brick and which side it will lie on. There are several options for both sizes and installation methods. Exactly how your wall will look should be decided at this stage. And to make this easier, pay attention to the schematic drawing below; on it you will find the most popular brick sizes and the correct name for each of its faces (number 1 indicates bed, 2 - spoon, 3 - poke).

Let's say you need an imitation of red brick masonry - a 228x65 mm spoon.
- We take a sheet of cardboard and draw it according to the given dimensions.
- When all the “bricks” are drawn, cut them out.
- Let's complicate the problem in the example and assume that the brickwork should not be solid, but should reveal a certain drawing, for example, from a calendar. Let's mark its location on the wall. If the drawing opens partially, we glue it right away.
- We cut some of the cardboard bricks in half, they will be needed to create a chess “order”.

- We start laying the “bricks” from the lower left corner with an indentation of 7-10 mm. The same indentation should be made between the rows. Every second row should start with a half.
- When all the cardboards are glued, you will need to wait until the glue dries. Construction PVA will require at least a day. Only after this can you proceed to decorating with napkins.

- Apply glue to the surface of the “bricks” with a brush, crumple the napkin in your hands until folds form and apply it to the cardboard coated with glue. Again, coat the top with glue, press out the gaps with a brush or finger, and when the entire wall has been treated in this way, leave it to dry for a day.
- The glue has dried and hardened, which means you can proceed to the last stage - painting with the chosen color. In this example, we are creating an imitation of a “bare” brick wall, so we need a brick color, to get it we will mix orange, red, black and white paint. Apply given color You can use a brush, or you can use a sponge; most importantly, don’t forget to coat the “seams” between the false bricks with a thin brush. Here you can also choose the color according to your preferences, but light gray looks most often and most realistically.

- To protect the surface from dust and moisture, it is additionally recommended to coat it with varnish.
Option 2 – brick wall made of polystyrene foam.
To set it up you will need:
- glue;
- Styrofoam;
- plywood;
- soldering iron;
- spray paint for cars;
When everything you need is at hand, begin to act in accordance with the instructions.
- Cut the foam into equal sized rectangles. In our case it will be 20x6 cm.
- In the case of arranging an interior element, coat the plywood with glue and glue the “bricks” to it at the same distance from each other (gaps). If you plan to imitate a brick wall with your own hands on the wall, then the latter must first be cleaned and primed.
- When the glue (you can use standard construction PVA) dries, use a soldering iron to imitate the structure of a brick. Just wear a mask - melting foam is very toxic!
- That's practically all. All that remains is to process the resulting wall spray paint in 3 layers (each of them must dry well before being covered with the next one).

Option 3 – traced brickwork.
To simulate it you will need:
- kitchen sponge;
- Ruler and pencil;
- paint of the desired color (in our case it will be obtained by mixing the available 2 red and 3 dark paints).
That's the whole list.
- Cut the sponge according the right sizes bricks
- On the wall where the imitation will be created, draw the lines along which you will work.
- Dip the sponge into the paint (or mixture) and press it firmly against the wall. Do this several times until you get the print you want. Next, make a gap (indent) and repeat this step again until the entire wall is covered with these “bricks.” And don’t be afraid if something isn’t perfect – it’s even more natural.

Option 4 – brickwork made of putty.
To recreate it you will need:
- directly putty (any except finishing);
- level;
- pencil;
- putty knife;
- window seal with a thickness equal to the desired joint of the false brick wall.
A furniture stapler may also come in handy (if the glue you choose cannot securely hold the seal), but it is not necessary.
So, standard sizes brick – 250×65×120 mm. In accordance with them, basic surface markings should be carried out.
- Step back 65 mm from the floor, use a level and a pencil to mark a straight line and glue the window seal onto it.
- Step back 65 mm from it again and do the same thing again. And so on until the entire surface of the future “brick” wall is filled with these horizontal stripes.
- Make vertical markings. To do this, step back from the lowest point (from which one, it doesn’t matter, unless there is a corner in your false wall, otherwise you need to start from there) 250 mm and draw a vertical line, then another 250 mm... and so on throughout the first row. The second row and each subsequent even row should be done in the same way, only in order to get a checkerboard order, the first “brick” must be halved. Afterwards, glue all the drawn lines with a sealant.
- Dilute the putty, fill the resulting “honeycomb” to the entire thickness of the seal (there is no need to cover it) and leave until completely dry (about 24 hours).
- Peel off the seal (this is not difficult to do, since it does not “resist”), paint the imitation brick wall with your own hands in a more natural color, and after it dries, seal the seams tile grout or cement.

Video.
People always strive to improve their home. The desire to update the furnishings of premises always finds proposals in the field of various design developments. The imitation of a brick wall in the interior of a home arouses keen interest from the population. To decorate a room with brick walls, you don’t need to do it from natural material. It is enough to create its imitation. Few people know how to make an imitation brick wall. Inventive people have come up with many ways to create various coatings walls depicting a brick wall.
Decorative wall surfaces in the form of brickwork
Brick in the interior can look not only in the form of convex elements of the correct geometric shape. This can be imitated masonry from wild stone or other natural materials.
You can create an imitation of brickwork with your own hands or purchase a ready-made one decorative brick in the form of tiles. Construction stores offer a wide range of similar materials.
Whatever option is chosen to imitate brickwork in the interior of the room, it is necessary to prepare the bases of the walls.
Preparing walls for decorative finishing
Before you start making brick walls with your own hands, you need to prepare the surfaces of the fences. Preparation is done in several stages:
- The walls are cleared of old finishing coating, dust and dirt.
- The surfaces are leveled with putty. Putty is used on a gypsum basis.
- After the putty has completely dried, the walls are coated with a primer.
Ways to imitate brickwork
Exist various ways how to make imitation brickwork. Here are the most popular ones:
Painting method
One of the cheapest options to depict the appearance of brickwork on a wall is to paint the surface of a vertical fence. This can be done in 2 ways.
Option 1 involves performing the following actions:
- the prepared surface is painted using a roller;
- the painted wall is drawn into many rectangles; rectangles should represent lateral surface bricks;
- “bricks” are separated by horizontal and vertical stripes, which should look like masonry seams;
- The seams are highlighted with dark paint.

With the second option, the seams need to be done differently. Vertical and horizontal grooves are pressed into the wet putty. They do this with a suitable tool at hand.
Then the entire surface is primed and painted in the desired color.
The grooves are highlighted in a different color, and sometimes left in the same color as the entire wall.
Plastering masonry walls
Brickwork can be depicted using plaster. This do-it-yourself imitation of a brick wall attracts with its simplicity. For this method, you need to stock up on narrow adhesive tape (scotch tape). Proceed as follows:
- The prepared wall surface is covered with strips of tape. The strips are glued so that they look like seams between bricks.
- A layer of plaster is thrown onto the wall. Some experts say that it is better to do this by hand. Hands should be wearing rubber gloves.
- Depending on the taste of the owners, the surface finished with plaster is made into relief or smoothed with a spatula until it is even.
- As soon as the layer of plaster on the wall becomes half-hardened, the tape strips begin to be pulled upward.
- Pull out duct tape in such a way that even grooves remain after it.
- As a result, the wall takes on the appearance of brickwork.
- Do-it-yourself bricks made from plaster on the wall are primed and painted.
- On a brick wall made of plaster, the grooves in the form of seams are covered with darker paint.
- Use a spatula to adjust the decorative relief on the wet plaster.
- The brick wall made of plaster is primed and painted in the desired color.
Video:
In some cases, they can do without adhesive tape. The grooves are pressed under the ruler with a wooden stick.
For greater strength, the plaster solution is prepared by mixing cement mortar with tile adhesive in a 1:1 ratio.

Making homemade brick tiles
You can imitate a brick wall with your own hands using homemade tiles. To make brick tiles, you need to make a mold for casting plaster decor.

At home, you can make your own silicone mold for casting decorative elements. To do this, proceed as follows:
- buy liquid silicone and hardener in the store;
- make wooden box; it can be made from construction plywood;
- prepare templates or buy ready-made decorative tiles;
- mix liquid silicone with hardener and pour the mixture onto the bottom of the box;
- decorative tiles or templates are dipped into liquid silicone front side down;
- when the mixture hardens, the tiles are taken out of the box; Silicone molds ready for casting homemade bricks.
Making decorative bricks
Having received the finished form, we begin to make decorative bricks. Make homemade tiles like this:
- To obtain a decorative coating without damage, work surface the molds are lubricated with a fatty composition (vaseline, machine oil or a similar substance).
- Prepare liquid plaster or alabaster.
- The solution is poured into a silicone mold.
- After 2 - 3 hours, the finished tile is removed from the mold.
- Notch finished products does not create difficulties. Silicone bends well, and the bricks easily fall out of the mold.
Before pouring, the bottom of the mold can be coated with a layer of dye. As a result, the finished tile will be painted in the desired color.

Plaster decor is also cast in polyurethane forms. Polyurethane is a more rigid material and practically does not bend.
The tiles are cast and wooden formwork. The method makes it possible to obtain material only with a flat front surface.
Technique for laying gypsum tiles under brick
DIY brickwork from gypsum tiles This is done in exactly the same way as laying ceramic tiles on the walls:
- bricks are laid on cement glue mixture or for liquid nails; wooden slats are used to form even seams;
- long strips are inserted into horizontal seams; vertical slats are made in length equal to the height of the tiles, or plastic liners are used;
- after laying the next row of bricks, the slats are removed; the seams are filled with the same adhesive or a special mixture is used to fill the gaps between the tiles;
- at the end of the work, paint or varnish the brick wall with your own hands;
Sometimes the laying of decorative elements is done without seams. Small gaps between the tiles are filled with putty.

Wallpaper
Imitation brick on the walls can be designed as wallpaper. Market building materials offers big choice wallpaper with the image of brickwork.
Paper
Roll wallpaper on a paper basis can be designed in the form of brickwork various shapes and colors with and without stitching. Imitated paper-based masonry is one of the cheapest options for decorating brick walls.
Paper-based wallpaper rolls are sold in 50 cm width and 10 m length. They are easy to cut into convenient lengths. Of all kinds finishing interior walls paper wallpaper- the cheapest material.
Vinyl
A do-it-yourself brick wall can be made from vinyl wallpaper. Vinyl relief coating conveys the structure of the masonry well. Convex shapes create a full visual perception of a natural brick wall.
The main advantage vinyl coverings is their high moisture resistance, so vinyl surfaces can not only be subjected to wet cleaning, but also easy to wash.
Liquid wallpaper
The material is easy to process. Using a handy tool, the surface liquid wallpaper formed in the form of a brickwork relief. Pliable soft material allows you to create an imitation of masonry elements of the most varied shapes and colors.
Wallpaper is quickly glued to prepared walls, and the pasting process does not particularly litter the room, with the exception of small wallpaper scraps.
Styrofoam
Designers offer an interesting solution for wall decor in the form of foam bricks. Polystyrene foam - extremely soft lightweight material, having low thermal conductivity and high sound insulation. Decorate the walls with polystyrene foam like this:
- Using a cutting tool, any masonry relief can be easily cut out on the surface of the foam. The front planes of the bricks are also formed.
- Treated foam boards are primed and painted.
- Polystyrene foam has high adhesion, so it can be attached to walls using any glue. PVA glue is often used.
However, it should be noted that the main disadvantage of this type of finish is its softness and fragility. If handled carelessly, the surface of the foam is easily damaged.
Repairing damaged areas of polystyrene foam is quite simple:
- foam chips are mixed with PVA glue;
- fill the damage with a spatula;
- the repaired area is primed and painted;
- if the damage is more extensive, then the unusable piece of finishing is cut out; New foam is glued in its place.

Wooden planks
The flesh-colored surface of the wood perfectly conveys the color of the surface of baked brick. Parquet boards are used as decoration.
If the farm has the appropriate woodworking equipment, then the planks can be made independently.
Planks are best made from coniferous wood. “Brickwork” in the interior of any room in the form of wooden bricks will add a special sophistication to the interior.
Wooden elements are attached to the walls special glue for wood. You can also use other adhesives (PVA, liquid nails, etc.).
To emphasize the texture of the wood, the planks are coated with furniture varnish.
Seams between masonry elements are best made from wooden slats. Under no circumstances should wet compounds be used. Moisture can saturate the wood and damage its structure.
It doesn’t matter what material the imitation brickwork is made from with your own hands. The main thing is to decorative finishing walls brought aesthetic pleasure from the perception of the interior of the entire room. All the materials described above are environmentally friendly and will decorate any interior in accordance with the tastes of the home owners.
 (1 ratings, on average: 5,00 out of 5)

