DIY decorative chest. Made from wood, cardboard or paper. DIY gift. Cardboard chest DIY fairy chest
A chest (sandyk) is a product with a hinged top lid. It is mainly used to store various things, jewelry, books, toys or other items. But it can also serve as a table or decorative element. Often chests are made of wood, with elements of forged products. However, they come in both heavy iron and lighter, but not so reliable, cardboard.
Previously, if there was a chest in the house, this indicated the wealth of the family. Such a thing was useful both before and can be useful in our time.

A beautiful and original chest can not only decorate your interior, but will also an original gift for your friends. Of course, you can buy it, but we invite you to try your hand at making it yourself. After all, you will agree that a thing made with your own hands is valued much higher than something purchased.

And it will require much less money for production. For example, a chest made of cardboard is very cheap. In this article we will look at how you can make two types of chests yourself.
Wooden chest
Wood is a classic. Usually all storage products were made from it. Material for long years deserved a lot positive feedback. It is easy to work with, natural and 100% environmentally friendly. The tree will serve as a chest long service. And the cost of the material is not so high. In Russia, wood is considered one of the available materials.

So, to make it yourself, you need to prepare the following tools and materials:
- jigsaw;
- hacksaw;
- screwdriver;
- screws, bit;
- roulette;
- pencil;
- construction gun;
- hot glue;
- clamps;
- emery cloth;
- masking tape;
- paint brush;
- wood glue, paint, varnish.

In addition, you need to prepare boards of the required thickness in advance and dry them well so that your chest will last for many years and not crack.
Note! Wet boards are not recommended to be used. It is better to initially buy dry material, ready for processing.

Where to start
For those who have never worked with wood, but are excited about this idea with a chest, of course, it will be a little more difficult than for those who have at least some idea in this matter. But with great desire and patience, you will succeed. In fact, there is nothing overly complicated about assembling the chest. First you need to make a drawing or diagram of all the parts, then cut them out with a jigsaw. You can use the first piece as an example for the second. For convenience, you can number all the details in pencil with inside.

The sizes of the chest can be different, depending on what it will serve you for and what will be stored in it. This article will not indicate specific sizes, since it is better for you to know which chest will look good in your interior.

Once you have decided on the dimensions and cut out all the parts, you need to assemble the sides, and then attach them to the bottom, which is a solid plate. Top part(the cover) will be attached last. To create the lid, simply hammer boards onto pre-cut pieces in a semicircle. To connect the parts, use self-tapping screws, but take into account the length of the screw so that its end does not stick out in the middle of the chest.

If you do not want the caps of the screws to be conspicuous, you can disguise them with special putty or use overhead corners. This will give your chest a more antique look, making it original and beautiful. Other details of the main part and lid are provided by the fittings you choose. Next, with the same screws you need to secure the decorative hinges and lock, and these details will not only give your chest an attractive appearance, but will also make it more durable.

Decorating a wooden chest
After the chest is ready, it's time to use your imagination. At this stage, you need to make a robot from a simple, inconspicuous box beautiful element decor. First of all, you need to sand the surface and corners with sandpaper. In order to give the chest an antique look, it needs to be covered with stain or a special varnish.

The varnish can be applied with a regular brush or roller. After the varnish has completely dried, we apply a transparent coating, which will give the furniture a fresh look.

If you wish, you can draw some kind of design on the chest. You can do this using a stencil. If you are good at drawing, then try coloring it by hand. Can be done pirate chest with your own hands, drawing a skull and crossbones on it. Here your imagination can run wild.

There are many design options wooden furniture- this is forging, inlay, carving and many others. If you are interested in the idea of a pirate chest, then they will help you with this Forged Products, which can be ordered or simply bought at a hardware store. The main thing is don’t be afraid to experiment! Then the product you make will delight your eye and also surprise your guests.

Master class on how to make a chest from a cardboard box
If the first version of the product is more complex, then making a chest from cardboard will not be difficult. And the cost of construction will be scanty. You don't need any special complicated tools. You will need something that is always at hand.

So, in order to make such a chest, you will need:
- Cardboard box.
- Scissors.
- Cardboard and paper.
- PVA glue.
- Paints (gouache or watercolor) black and gold.
- Sponge.
- Ruler.
- Two brushes.
- Pencil.
- Napkins.
Having prepared everything you need, you can begin manufacturing work.
Stages of manufacturing a cardboard product
The first thing you need to do is the lid. We will make it from the top of the box. To do this, you need to draw lines from the inside using a ruler and pencil. Thanks to this, the cardboard can easily bend in those places. Then cut out two identical semicircles, leaving teeth along the edges of the curve. Then glue them on both sides, bending the teeth onto the lid and gluing them with PVA glue. Next, you need to glue the outer and internal corners masking tape or a napkin well soaked with PVA glue. In addition, you can strengthen your chest if you glue an additional box covered with fabric or wallpaper inside the box. After that, wallpaper the entire chest, attach handles on the sides, and start painting and decorating.

Note! Use for decoration soft materials, such as fabric, leatherette, cardboard, napkins, etc.
There is no need to use materials such as wire, copper, bronze, or rivets for a cardboard chest. The thing is that they can only ruin your fragile structure. And somehow attaching such material would be almost impossible. You can cut belts from leatherette that need to be glued with PVA glue. You can decorate the chest using baked clay. Just roll it out like dough and cut out shapes that interest you with a knife. Then stick it in the oven. After the clay has baked, glue it to the chest using glue.

Now all you have to do is paint the entire chest one color, let it be black. After the paint has completely dried, you need to gild the surface of the finished product. A sponge will help you with this. Apply a little golden paint to a sponge and rub it over the surface in certain places, for example, on belts and other decorative elements.

To make the legs for this chest, you can use regular bottle caps, or wooden blocks, which will also be painted and glued. At this stage, you can say that your chest is ready. It can be used to store various small items, or simply to decorate your room.

Conclusion
This is how easy and simple you can transform your home and make for yourself convenient design for storage various little things. These masterclasses will help you. Try, experiment, and surprise yourself.
Chest - undeservedly forgotten, but very comfortable spot storage of things. And also a colorful home decoration and a great gift for the hero of the day or newlyweds! Make a decorative chest with your own hands, it’s not difficult at all:
DIY decorative chest. Step-by-step instructions with photos
Collect frame from boards measuring 40x50 cm. To make the sides, you need to step back 10 cm from the edges of the two boards and cut the material in a semicircle. The sides are glued to the bottom or fastened with self-tapping screws.

Decorative chest with your own hands. Photos step by step

Cover the walls with boards. The first blanks are attached in the upper part under the semicircular cuts. After them, on the sidewalls, 20 cm from the top, marks are made with a pencil - they are needed to indicate the future cutting of the lid. Then the boards are fastened on both sides to the very bottom.

Cover the lid. Narrower blanks are attached to semicircular sections to form a lid.

Saw the sides with a jigsaw along the marked lines. After completion of the work, it is recommended to cover the wood with stain or varnish.

Attach loops. With their help, the sawn-off lid is attached to the base. On the other side, screw a loop on which you can hang a lock.

old chest with your own hands. Photo

Attach to the sides pens, for example, bronze. They need to match the style of the hinges and lock.

Decorate DIY chest. For example, fill the bottom with iron corners. Leather strips nailed with nails with large heads look interesting on a decorative chest. Finally, the legs are attached to the bottom.

DIY wooden chest. Photo instructions

Complete inner part . To do this, cover the entire space with velvet, choosing the color to your taste.


DIY decorative wooden chest. Option 2
There is another way to make a wooden chest with your own hands. It involves the following steps:

Preparation of material. As in the previous case, it is necessary boards. Select the size depending on the size of the chest you want to receive. A quarter is made using a router.

how to make a chest. Step by step photos

Assembly boxes. From the resulting blanks, a box is assembled, which occupies approximately two-thirds of the size of the future chest.


Preparation of material for bottom. To do this, the quarters on the boards are processed using a router.

Bottom installation. It is assembled from blanks using self-tapping screws.

Manufacturing covers. Two side semicircular walls are cut out, then the lid is sheathed with boards over the entire surface.


Product coating stain or varnish. This is necessary for decoration and also to preserve the wood.


Fastening accessories. The chest needs three hinges, legs and handles. They can be purchased at any store, but to make the loops look more interesting, it is recommended to file them with a jigsaw. Two loops are attached to one side of the lid, and one, for the lock, is attached to the other. The legs are screwed to the bottom, and the handles are screwed to the sides.


old chest with your own hands. Photo master class


Finishing. Copper or steel tapes that are attached to the edges of the product look stylish. However, you can use any decor.

DIY pirate chest for a children's room
If the child's room is designed in a nautical theme, a pirate chest will be suitable for it. It looks great in such a room and is very convenient for storing toys or children's things.

To make such a chest, you must first prepare materials and tools:
- furniture board;
- glue;
- putty for working with wood;
- acrylic paint in caramel, brown, white and black colors;
- gold powder;
- a little flour and milk;
- decorative beeswax;
- potal for imitation gold leaf and glue for it;
- leather belts;
- jigsaw;
- spatula to create a cut texture;
- stencils with images corresponding to the theme;
- rope;
- drill with a pen attachment;
- furniture casters;
- door hinges.
When everything you need to make a pirate chest is ready, you can get to work. The stages are:
Creation blanks. They are cut from furniture board according to a pattern. Since they will have to be connected with a lock, the tenons should be cut out immediately.

Assembly designs. The parts are connected and coated with glue for strength.

DIY pirate chest for a children's room. Photo instructions

Painting. Before applying the coloring composition, the chest should be covered with a layer of plaster inside and out. Only after it has dried can you apply caramel-colored paint.


Creation textures. To make the chest look stylish and interesting, we recommend decorating the freshly painted surface with a mixture of milk, flour and brown paint. All ingredients are thoroughly mixed to obtain a composition resembling the consistency of sour cream. It is applied in large strokes to the outer surface of the product. While the paint has not dried, a spatula is passed over it - the result is a clear wood pattern.


Decoration. The pirate chest is actually ready, all that remains is to decorate it. To do this, a stencil is applied to the lid. The picture can be anything: a ship, an anchor, etc. Apply on top White paint, the stencil is removed - and the drawing appears on the surface. All outer surface covered with wax with the addition of gold powder and sanded with a soft cloth, after which a thin translucent layer of black paint is applied. The inside of the chest is covered with gold leaf using gold leaf glue.


Installation accessories. All parts are assembled: the lid is attached to the base door hinges, furniture casters are installed on the bottom. It is better to make a handle from a rope, passing it through two holes in the lid. The ends of the rope are tied sea knots. Finally, leather straps are attached to the sides of the design on the lid, which wrap around the entire product.


It turns out to be a stylish do-it-yourself pirate chest for a children's room.

DIY chest with a flat lid
The instructions above show how to make a chest with a semicircular lid. But it can also be flat. This product is even easier to make. The instructions are:
First of all, you need to prepare tools and materials by deciding on the size of the chest and cutting the boards.

Collect sidewalls: connect several boards, attaching thin bars along the edges.


Glue parts of the chest, using a furniture board as the bottom. The sides of the product are covered with boards. Don't forget to cut out the grooves so that the pieces fit end-to-end.


Collect cover: take measurements, cut boards of suitable length, connect them by gluing thin bars on the sides. Then drill two holes in the top on both sides. Do the same on the lid. A rope is inserted into each hole on the chest, pulled through the hole in the lid and tied at both ends with a sailor's knot.


Do pens: drill two holes in the sidewall at a short distance from each other, insert a rope, tie knots. Repeat on the other side.


Cover by stain or varnish.


DIY chest-bench. Photo


Chest with flat lid ready with your own hands!
DIY decorative chest from a box
If you don’t want to work with wood, you can make a chest out of cardboard with your own hands. Suitable, for example, packaging from household appliances. Manufacturing stages:


From the top make cover. To do this, you need to forcefully draw lines across the entire surface so that the cardboard bends. Then cut out two semicircles and cover them with wallpaper, leaving teeth around the circumference. The blanks are attached to the lid on both sides.


DIY cardboard chest. photo


Insert the inner box into the outer one, having previously attached pens. Both parts are firmly glued to each other (for convenience during work, they can be fastened with clothespins) and covered with wallpaper.


Create decor. It can be made from leatherette, cutting out shaped belts, or baked clay. Cuts of napkins and thick twisted threads will also come in handy. The elements are glued to the chest, and patterns are formed from threads and cuts.


cardboard money chest. Photo


Attach legs. They are cut out of wood or plastic and glued to the bottom of the chest.


Paint DIY cardboard chest. The surface is covered with black acrylic paint, then apply with a sponge thin layer gold.


DIY paper chest
Another economical option a chest made of paper and cardboard, which is useful for storing various small items and will serve as interior decoration. It's very easy to do:

Prepare materials and tools. Cardboard will come in handy box, consumer paper two shades, from which tubes of the same size are rolled, glue, tailor's pins, side cutters, decorative elements.
Take cardboard box need size, make it marking future chest and cut it out. There should be semicircular sides on both sides.

Cover the outer part paper, bending inward about 6 cm.

Tubes flatten and pin along the long side.

DIY paper chest. Photo
Secure strips of a different shade on one side of the chest with pins and weave with existing tubes so as to create an imitation of a basket. Weave all the way to the top, then fold the remaining ends and glue from the inside of the layout. Also braid the sides, not forgetting to glue the strips to the bottom.


To make a lid you will need a regular bottle, the width of which is equal to the width of the chest. Take a piece of cardboard of the appropriate size, wet it, attach it to the bottle with tape, and after drying, spread it with PVA and cover it with newspaper. Cover the finished lid with the same paper as the entire product.


Attach strips along the edge.
Try on the lid issue by weaving it or in another way, for example, by simply gluing strips of paper evenly.


Decorate the chest as you like.
DIY chests
It is not necessary to stop at the design options described - a do-it-yourself chest can be anything! Here are some examples:
Do-it-yourself wooden chest, made in the style of log house made of rounded bars, decorated with metal handles, hinges and lock. The surface is covered with stain.

Carved chest with massive metal handles and ring for the castle. There is an ornament carved on the sides, weaving from thin boards on the lid, the bottom protrudes slightly beyond the walls of the product.

Stylish black chest, covered with leatherette and decorated with leatherette belts. Bronze hinges, locks and handles are perfect for it, as well as decorative nails with large heads.

Laconic wooden product, suitable as a place to store things. A regular hinge and metal handles are used, the lid is flat with rounded edges, and the chest is painted in a discreet color.

Product rectangular shape, reminiscent flirty box. A do-it-yourself decorative chest is covered with plain leatherette or paper, decorated with vintage locks and a patterned metal flower.

Bright chest with a flat lid for a children's room, decorated with images of cartoon characters. The handles are cut out on the sides, and a recess is also made under the lid on one side for ease of opening.

Until quite recently, such a piece of furniture as a chest stood in every home, and in modern world it can rightfully be called an exclusive item. Do-it-yourself chests, photos of which can be seen in our article, are used as your heart desires; for example, they can become a place to store some things or simply an element of room decor. And if you have already decided how you will use the chest, then this article will tell you how to make it from scrap materials.
How to make a decorative cardboard chest with your own hands
Such a chest can easily be made from the most ordinary box the right size. In order to make a cardboard chest with your own hands, you will need:
1) cardboard box;
2) regular ruler;
3) pencil;
4) stationery knife;
5) paints;
6) to decorate the finished product - various decorative decorations.
Step-by-step instructions on how to make a chest with your own hands

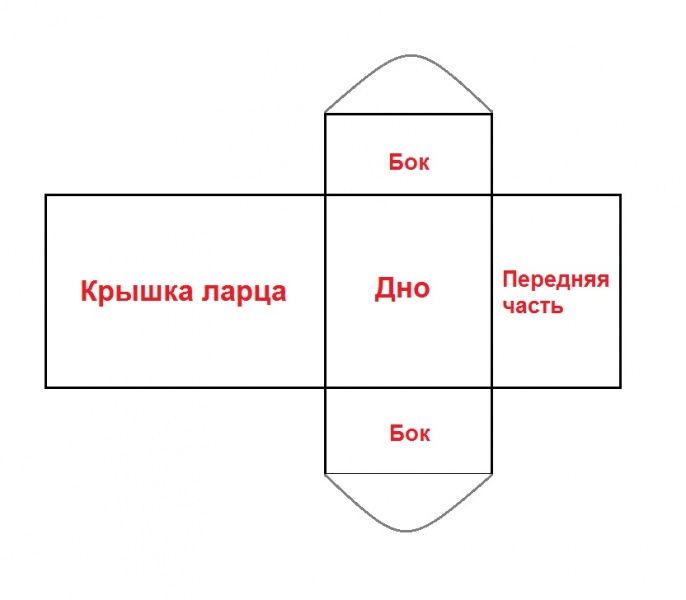
So let's get started. First of all, using a pencil, you need to draw a sketch of our future chest on a cardboard box. We mark two cutting lines around the box, and semicircles for the lid on the sides. Using a stationery knife, all excess is cut off along the bend and from the end, and the top is also trimmed.
A lid for the chest is made from a sheet of cardboard, which must correspond to the width of our box. The lid is connected to the back wall of the chest using plastic nuts or the most common office fasteners. Thanks to this action, the lid will not fall off when opening.
The lid also needs to be connected to the front wall using a lock.
For decoration, strips of dark cardboard can be glued onto the body and lid of the chest. They can also be secured with clips.
You need to attach handles to the sides of the body - and the chest is made from a box with your own hands. You can put both toys and not too heavy things in it.
Money chest
Today, a money chest can be used at any type of celebration. Many are sure that the most best gift- this, of course, is money, and for such a gift you just need to come up with the most reliable storage place. Ideal option will be a chest made and decorated with your own hands in the style of the main festive theme.

For work we will need the following materials:
A cardboard box of the required size;
Stationery tape;
Stationery or pocket knife;
For decoration - various materials and accessories.
When starting to create a product, you need to make a pattern for the chest and stock up on one more additional box.
The existing box must be unfolded in such a way that the bottom is rectangular in shape, and the front and back walls are high.
The next step will be longitudinal grooves, which are made carefully so as not to pierce the cardboard, using a knitting needle on the front and back walls. This is necessary so that we can ultimately make a rounded lid for our money chest.
From the second cardboard box it is necessary to cut out the side walls, sized to match the width of the bottom of the chest. You need to make 2 of these blanks. Round off the tops of the side walls.

Now you can start assembling. All joints are connected using tape, the lid is bent into in the required form and is also secured with the same tape. The side walls must be attached to the chest and carefully fixed.
In order for the hand-made money chest to become beautiful piggy bank, you need to use a penknife or stationery knife to make a hole on its lid for money measuring approximately 1*10 cm. When the assembly of the money chest is completed, you can begin decorating. Its surface can be covered with wallpaper, paper or beautiful fabric. If desired, you can glue a variety of original accessories onto the surface of the chest.
Wedding chest

The tradition of giving wedding gifts to a young family goes back to ancient times. One of the most popular gifts is considered to be a certain amount of money, with which a newly-made family can buy exactly what is needed in the future. this moment. However, transfer banknotes from hand to hand is considered bad omen, that’s why a beautiful wedding chest was invented for such purposes. Making it with your own hands from an ordinary cardboard box will not be difficult at all.
Handmade money chest
This chest is a rectangular box or a casket-shaped suitcase. It can be beautifully decorated with all kinds of decorative materials; the color scheme can be in the classic white, brown, black style, or to match the color of the themed celebration. To add a touch of originality and unusualness, you can decorate the chest with your own hands in a more non-standard form, adding symbolism.
Design options
According to the masters, even the most unusual and complex shapes of chests can be made independently. For example, unusual and original solution will be a wedding box made in the shape of a house, symbolizing a family hearth, a casket or a cake. In order to make a cardboard chest with your own hands, you will definitely need:
Stationery knife;
Ruler;
Medium size cardboard box;
Stationery glue, PVA, or better yet, a glue gun;
Elements for decor - pictures, pebbles, beads, ribbons, shells;
Colored paper for interior and exterior decoration.
To make truly visually beautiful and high-quality chests with your own hands, photos of which can be seen in the article, you only need to have the right materials And necessary tools. As practice shows, almost all the materials needed for this can be easily found at home, in the pantry, or in the garage.

The main thing is to remember that the quality of the glue directly determines how tightly the decorative elements, finishing paper will stick, and most importantly, whether the chest will come unglued during the special event.
How to make a chest from a box with your own hands more neat, without visually visible seams? To do this, it is recommended to give preference not only to double-sided tape, but also to a glue gun, with which you can evenly distribute adhesive composition over the entire surface of small parts.
When starting directly to make our ceremonial chest, it is recommended to prepare the ground in advance, namely, draw up diagrams or patterns, which can be made from a huge cardboard box.
The back of the chest should be higher than the front. In this situation, the length equals the sum of the width and height of the front of the box. The bottom protrusion should be about seventy millimeters with a slot on top of the entire pattern so that the bottom does not fall out.
The required slot for the money envelopes should be made directly on the pattern, because after the chest is ready, cutting the hole will become a little problematic.

Master Class
Let's learn how to make a wedding chest with your own hands from a shoe box.
1. First you need to cut out the lid from a cardboard shoe box.
2. After the first step is completed, you need to make a dome out of the shoe box lid. To do this, you need to glue the cardboard to a pre-cut box. The resulting composition should resemble an arch; cardboard is also added to the side, and everything is secured with double-sided tape. If for some reason you think that adhesive tape alone will not be enough, then you can resort to using paper clips and a stapler.
3. The third step will be lining our future wedding chest. The first step is to measure the parameters of the box itself and the lid. Then you need to cut off the required piece of fabric for the upper part. After that, we begin to carefully sheathe it. The entire box is sheathed in the same way. Everything needs to be done slowly, with maximum care, so that the end result is a beautiful and flawless result.
4. The fourth step is considered to be one of the easiest, but also the most crucial stages. Using a stationery knife, cut a hole for money and check whether the bills fit into it. Carefully, so as not to burn the entire finished box, hold a burning match in this area - this will avoid the appearance of arrows on the fabric.
5. The most interesting and most last step in making a cardboard money chest with your own hands, it is customary to consider colorful and original decoration. Here you can give free rein to your imagination. The side panels and contours of the product can be decorated with openwork lace or satin ribbons. The festive look of the box is successfully emphasized by bows, beads and rhinestones, so you shouldn’t skimp on them. Stylish photos of a young man married couple you can decorate the side panels of the chest.
To simplify the task as much as possible, you can give preference to lighter and more quick ways making a money chest for a wedding celebration. You can use a regular cardboard shoe box. There is absolutely no need to cut, cut or glue anything. The only main thing is to carefully and beautifully decorate the external part, buy beautiful ribbons. Original decoration there will be fresh flowers and grass on the lid.
Ready-made wedding money chests
You don’t have to make a chest for a wedding ceremony yourself. In the modern world in specialized salons you can find the most original models. Of course, this will cost much more, but it will save a lot of time.
Larisa Logunova
I present to you an option for making a fake chest.

I needed it for autumn holiday. At first I just wanted to order from furniture store, but when I found out about the price (5000 rubles, I decided to do it myself. My box cost 10 times cheaper.
If you want to make the same, then you will be required:
2 identical carton boxes;
1 can of PVA glue (If large chest - 2 jars) ;
Unnecessary newspapers or magazines;
Wallpaper or self-adhesive for decorating the external and internal surfaces;
2 window hinges;
3 furniture handles;
Screws with nuts for fastening hinges and handles;
A small piece of thin plastic (to reinforce the areas where the handles and
1. Prepare box: cut off top covers, all seams, creases and other irregularities are glued with several layers of paper (of necessity).

2. From another one the same boxes cut out the blank for the lid. We also glue the bumps and corners with paper. (number of layers - as needed).

3. Cover surface chest made from newspaper sheets (we glue many layers to make it cardboard) and glue it to the glued blank.

4. Now prepared box, and cover the lid with newspapers in several layers.
The more layers you make, the stronger your box.


The chest is ready.
Publications on the topic:
Fragrant Christmas tree, Fluffy Christmas tree, Decorated Christmas tree, You are so cute! New Year holidays are in full swing and very coldy we have no time to be bored.
“Master class “Magic chest” Hello, Dear friends and colleagues! Once again I present to your attention my new work.
December is a hot time, even if it's -20 outside! As the holidays approach, the workload increases sharply. You begin to regret the day.
The competition took place in the fall. The idea for this competition appeared after I made my model “Garden and Vegetable Garden” (information about it is in.
I decided to make these houses for my children for a puppet theater and other games. First, cut out four from a cardboard box.
I suggest you do Christmas tree toy do it yourself quickly and easily to decorate a Christmas tree in the yard. For this we need: - box,.
I'm waiting for the Golden Catch! I'll find a diamond treasure! “Robber is a nasty word! I like the word “pirate”! The skull and crossbones are emblazoned on the flag.
Real high-quality chests made from solid wood have lost their popularity. True, not long ago they were still used for storing prophetic, expensive items and jewelry.
Today, the chest is more often used as a decorative element, a sign for themed events, and primitively as authentic boxes for storing jewelry and decorations. In the article we will look at several fascinating master classes in which we will learn how to make an authentic chest out of cardboard in an hour and a half.
What is the chest for?
How to make a beautiful chest from thick cardboard with your own hands and what can it be good for?
In addition, he will easily
An irreplaceable feature when creating a children's pirate party or wedding. Homemade item may be intended for gifts or bride price, where guests will put their envelopes with monetary gifts.
If desired, the product can be decorated in a folk or New Year’s genre, and using special paints, it can be “aged”, giving it the appearance of an old treasure chest, battered over the years.
Of course, the finish will largely depend on individual preferences Total. In the master classes we will get acquainted with the very thesis of assembling a decorative chest.
Master Class. Light chest
If you have always been far from hand-made, but decided to join this difficult but exciting business, you should start from the very beginning. simple option execution of the chest.
To assemble an authentic chest from ordinary cardboard with your own hands, you will need the following materials:
- cardboard box;
- stationery knife;
- plastic screws and nuts;
- stationery loops;
- PVA glue;
- cardboard strips.
Manufacturing process:
- To begin with, you need to make the appropriate markings on the box: on the end parts of the blank, draw semicircles and lines that will encircle the chest;
- According to the marks, cut off the excess parts of the box as shown in the diagram;
- Next, you need to make a lid from cardboard, which can be attached to the formed semicircles either with tape from the inside, or with stationery loops;
- In proportion to the size of the lid, make strips of cardboard;
- Frame the chest with a cardboard strip on both sides, securing them with plastic nuts;
- If desired, you can attach a lock and handles made from thick paper.
As you can see, making a chest yourself is not difficult. If desired, it can be filled with coins and decorative stones, then you will definitely have a nice pirate treasure chest.
Master Class. Chest-box
How to make a chest box?
To make a comfortable box for storing expensive prophetic or costume jewelry, you need to take the following materials:
- cardboard;
- polymer glue;
- putty;
- fabric for internal “upholstery”;
- PVA glue;
- tulle mesh;
- thick threads;
- acrylic paints (black and gold);
- a piece of leather or leatherette.
Manufacturing process:
- Take a small cardboard box and putty on the outside;
- Cut out three semicircles from cardboard onto which a lid cut from thick paper or cardboard will be attached;
- Be sure to apply a large amount of polymer glue to the front of the lid. Then it will fit tightly to the chest;
- Using regular glue, attach the semicircular lid to the workpiece;
- When you have filled all the irregularities on the box, glue tulle to it and cut off the excess parts;
- Using yarn or thick threads, lay out patterns in the form of flowers or abstractions on the lid and end parts of the workpiece;
- Then coat the entire workpiece with glue again so that during the process of using the box neither the tulle nor the patterns come off;
- After this, the chest can be painted with black acrylic paint;
- Using a sponge, apply golden acrylic paint to the patterns;
- Glue a piece of leatherette of the appropriate size to the inside of the lid;
- Cover the bottom and inner parts of the box with fabric or textured paper.
This master class will require perseverance and observation from the needlewoman, due to the fact that this scheme creating a chest out of cardboard is not easy. However, the resulting product will delight your eye for a long time.
Master Class. Pirate chest
To make a small pirate chest from thick cardboard with your own hands, you will need the following materials:
- Corrugated cardboard box;
- Acrylic paints (chestnut, golden, silver);
- Brushes and sponge;
- Scissors and pencil;
- Glue gun.
Manufacturing process:
- Cut out the parts according to this diagram;
- Then assemble the workpiece, and “strengthen” its corners by gluing slices of whatman paper to them. Then the structure will be more durable;
- As in previous master classes, form the lid by cutting out semicircles along the marked lines;
- Next, glue the curved cardboard cover to the semicircles using tape;
- It is advisable to glue the joints of the upper part of the lid with the semicircles with paper so that the structure does not fall apart during operation;
- When the workpiece is ready, start cutting out decorative elements: handles and locks;
- To make handles with your own hands, just cut out two identical cardboard strips and attach them to the end parts of the casket;
- Then you need to cover the entire box with ordinary napkins, and when the casket is dry, paint it with chestnut or black acrylic paint;
- Next you need to glue it to the workpiece decorative elements: palace, “metal straps”, as well as handles, then apply glue to them;
- Then all decorative elements are painted with either gold or silver paint.
How to positively make a chest lid out of cardboard?
The main thing in this process is to positively designate the semicircles on both sides of the box, which must be symmetrical. To do this, it’s best to use compasses or patterns. And before gluing the cardboard sheet to the workpiece, it must be bent so that the lid clearly fits in the shape of semicircles.
To assemble a beautiful chest of pirate treasures with your own hands from cardboard, ideally you don’t have to be a specialist and do hand-made work for several years in a row. Following the master classes outlined in the article, you will be able to quite easily make a beautiful casket with an authentic finish.
The main thing in this matter is patience and perseverance. If you follow each recommendation step by step, you will definitely achieve the desired result in the final score. Happy crafting!
 (1 ratings, on average: 5,00 out of 5)

