DIY bookshelves on the desk. You can easily make bookshelves from the simplest to the most exclusive ones yourself. Options for making a classic wooden bookshelf
Standard cabinet furniture has long lost its relevance; it has been replaced by a variety of hand-made wall shelves.
The design of such interior items is in no way inferior to furniture in the high-tech or loft style.

The materials for manufacturing are quite light and affordable. They can be used in any room or apartment.

By replacing old furniture with shelves, you can expand your space for something useful.


The most common types of wall shelves
Shelf equipment will be provided additional comfort and comfort, they will be indispensable in a children's room, kitchen or hallway.
Making furniture yourself is quite labor-intensive and difficult process, and anyone can assemble shelves, because this does not require any special experience. Any materials are suitable for this.
The functionality of the shelves will exceed all expectations. In addition, you can easily place decorative items and various small items on them, which will give your room a lived-in look.

Currently, open wall shelves are popular; their purpose depends on the location:
- for scarves and hats in the hall;
- for souvenirs and dishes in the hall;
- for cosmetics and photographs;
- for personal hygiene items in the bathroom;
- for textbooks and stationery in the nursery;
- for seasonings and containers bulk products in the kitchen.

Also, a shelf can be designed for a specific item, for example musical instrument, souvenir edged weapons, etc.
The aesthetics of shelves must be respected in all rooms, be it a garage, pantry or warehouse. It's always nice to look at neatly arranged and folded things or tools.

Often it is the shelves that are the subject of decoration; they are able to attract attention with the intricacy of their lines and unusual shapes.
But if you focus on the items that you want to demonstrate, then the shelf should be weightless and transparent, for example, made of glass.

Classification of shelf designs
Proper distribution of the load on the wall and shelf is one of the most important aspects when assembling them. Very often, objects that are not intended for this purpose are attached to the wall, for example, shoe racks or large flowers.

In this case, the main thing is to choose the right material and fastenings that will support the weight of the items placed on the shelves. There are several types of wall shelves, differing in their design:

- open and closed;
- cantilever racks;
- angular and straight;
- with or without back wall;

- multi-level;
- with right corners or rounded;
- various geometric shapes;
- use of various materials (glass, mirror, wood, metal, plastic).


Types of fastenings
Fastenings not only fulfill their intended purpose, but can also be a decorative item in themselves, for example, sidewalls made using artistic forging, macrame fastenings, various ropes, belts and cables.
You can securely fix the shelf on any surface with dowels, anchors, and brackets.

Choosing a room for homemade shelves
As mentioned earlier, shelves can be placed in any room, even in a nursery they are designed to create comfort and decor. When making them, use a children's theme.

The living room will help you rationalize the space and rid you of unnecessary bulky old furniture.

In the kitchen, hallway and bathroom they can be an independent piece of decor, and also perform their direct functions, which will streamline your life.

If you decide to equip wall shelves with your own hands, the procedure is very simple.


First of all, it is necessary to take dimensions from the place where it will be placed, make a sketch, select the material and type of fastening, taking into account the workload.


The final stage of work will be finishing and sanding your shelf to give it the most aesthetic appearance.

All that remains is to place your favorite items on it and enjoy the fruits of your labors.

DIY photo of shelves


Bulky, cabinet furniture is gradually losing its popularity. It is being replaced by light and elegant shelves on the wall, made with your own hands from scrap materials or ready-made blocks. The interesting and original design of wall shelves allows them to successfully compete with many interior and decorative items made in country, high-tech or modern style.
A wide selection of materials and ideas for the manufacture of such products makes it possible to use them in almost any utility, utility and residential premises.
We invite you to adopt the most interesting sketches in order to free up space from things and old furniture scattered everywhere and make your home more cozy and comfortable.
Features of wall shelves
 A DIY wall shelf will be appropriate in absolutely any interior:

Main types of wall shelves
 The method of fastening, the material used and the items that will be stored on the shelf determine the workload on the entire structure and on the wall on which it is mounted. It is quite natural that the method for attaching it to a vertical surface largely depends on the type of product.
A variety of photo wall shelves, which are presented below, can be used to place pots, flowerpots and flowerpots with.  In this case, you should take care of the safety of family members, since due to the earth with which they are filled, the structure is subjected to increased loads.
  For this reason, reliable fastening should be used to place such shelves.

Taking into account design features Wall shelves can be conditionally divided into the following groups:
- closed and open (with or without doors);
- straight and angular;
- console type;
- with and without side stops;
- through or closed back wall;
- in the form of one plane or rectangular;
- single-tier and multi-tier;
- fancy shape - diamond-shaped, inclined.
 Some of the most popular types of wall shelves include:

In order to make transparent shelves on the wall with your own hands, you need to order a set of glasses of the same shape in a special workshop. For safe use The ends of the glass are plastered, after which the blanks are secured in the free corner using brackets.
Glass shelves are suitable for storing books, cherished souvenirs, cosmetics, shampoos and personal hygiene items.
Materials for wall shelves
Anyone who is thinking about how to make a shelf on the wall with their own hands knows that the most various materials. Of course, the simplest and affordable option is normal wooden plank, nailed to the wall. That's just to create a modern and original design this space will not be enough. The choice of materials even simple products very wide.
Wood
 DIY wooden shelves are a good old classic. Diversify wooden structure possible using complex shapes and non-standard fastening. For interiors in the loft and minimalist style, a beautiful and unusual wooden shelf will be an appropriate solution. For classic design projects, the product can be decorated with carvings, and all structural elements must be carefully processed.
 For those who want to save on the raw material, we recommend using chipboard, MDF or plywood, which can be purchased at any hardware store for quite affordable money.
Metal
 DIY metal shelves, photo options, which you will find below, can perfectly complement the interiors of rooms in the style of minimalism, hi-tech and fusion. Installation of such products is impossible without special skills and tools. Among the advantages of metal structures are their strength, reliability and durability. Special surface treatment will protect the finished shelf from corrosion and give it additional attractiveness.
Plastic
 Currently, plastic is considered an ideal material for the production of various interior and decor items. Practical, lightweight, cheap, it can look simple and luxurious, imitating appearance natural materials and at the same time, excluding their shortcomings. For rooms with high humidity air, a plastic shelf can be an ideal option.
Glass or mirror
 A glass or mirror shelf is a real decoration for any room. Elegant and glamorous designs made of glass and mirrors can add grace and lightness to the room. However, such products have one serious disadvantage - increased fragility. An accidentally dropped object or a sharp blow can lead to very sad consequences.
Types of shelf fastenings
When choosing one or another mounting method for a future wall shelf, you should remember that the mobility and reliability of the entire structure largely depends on your decision. Experts distinguish following methods fastenings for shelves and shelves:

 Looks interesting and unusual hanging shelves, which are suspended from the walls or ceiling. The following can be used as a flexible base:
- braided plaits;
- belts made of natural or artificial leather;
- twisted macramé weave;
- decorative ropes, etc.
With the right approach, a mount can perform not only a utilitarian function, but also become interesting and unusual decoration. For example, forged sidewalls can be used as reinforced fastenings for wooden or metal structures and will become a harmonious addition to a room in Provence or country style.
Wall shelf design ideas - video
 When choosing a shelf for the wall, you should consider the following nuances:

Having trouble choosing a shelf? If possible, we recommend that you contact professional designers with this question, who will help you choose an ideal piece of furniture in all respects.
How to make shelves on the wall with your own hands?
 The algorithm for constructing a wall shelf with your own hands is extremely simple and clear.
- decide on the idea of a future wall shelf;
- make a pencil sketch and decide on the size and dimensions of the future product;
- make a design sketch linked to a specific location in the room;
- Depending on the idea being implemented, select the material and type of fastening.
- assess the working load on the wall and structure, depending on the load, decide on the use of reinforced or conventional fastening;
- Make markings on the wall where the structure is installed;
- cut blanks;
- collect individual elements into finished design;
- tinting brackets or hinges;
- in order for the shelf to look beautiful and neat, its surface can be covered with a special coating, the ends and joints can be processed by grinding or trimming;
- hang the shelf on the prepared mounts, check their reliability and safety;
- adjust the horizontal position of the product;
- arrange decorative items, books and other things that will be stored on the shelf.
If you love everything interesting and unusual and at the same time design your own home interior, we recommend that you pay attention to any available materials. Sometimes even the most unexpected things can be used for these purposes.
Heading for a walk in the park? Pay attention to unusual branches, rhizomes and stumps - with the right approach, in in capable hands they can serve as the basis for an exclusive shelf design.
Talk about the benefits of using wall shelves in modern interiors apartments and country houses it is possible indefinitely. However, we recommend not to waste time and pick up a few interesting pieces that will transform the interior space of your home and at the same time add practicality and functionality to the room. With this simple technique you can effectively expand the internal space. Use corner options, asymmetrical, single-tier and multi-tier shelves of various sizes, thereby hiding the shortcomings of the interior and emphasizing its advantages.
Making a shelf with your own hands - video
Kitchen shelf - video
In times of digital format, bookshelves in an apartment are a good omen, since people who read think more broadly and are capable of development. Those whose lives take place not only in virtual space, but also in real life, have to deal with books. These are textbooks and notebooks, a diary, folders with printed files, and periodicals. You shouldn’t get rid of book stands, but it’s better to make your own bookshelf modern design than a bulky cabinet, bookcase or old dusty shelving unit.
What options for bookshelves are most suitable in a modern interior?
Cabinet furniture in the form of bulky “walls” with a sideboard and bookcase has long been obsolete. They were replaced modern options to host a home library:
- lightweight double-sided shelving;
- transparent glass shelves;
- niches in built-in wardrobes;
- a lightweight display cabinet or pencil case with one door;
- DIY partitions with bookshelves, photo:
The main advantage of modern cabinet furniture is that it takes up minimal space in the room, does not clutter up or darken the living space. For all their functionality, modern options for shelving or shelves for books and souvenirs can transform any room interior.
However, whether bookshelves are destined to become an effective decoration in an apartment depends on the design decision. It has long been known that when old things become new life, they are undergoing some kind of rethinking. Original do-it-yourself bookshelves from scrap materials allow you to make real art objects yourself. If there is no such goal, but there is a desire to save on updating the interior, then old things, boxes and cases can find a new use.
Attention: It is important to place books where they will not be damaged by water and direct sun rays. It is not advisable to place them below the watering level indoor flowers and opposite the south window, where the light comes from.
It is not at all necessary to make the simplest bookshelves out of wood yourself if you do not have such an opportunity or skills. If you use your imagination, then even old boxes or boxes, updated with “self-adhesive” wood, will be no different from high-quality factory products. A lightweight DIY cardboard bookshelf is the simplest functional thing if there are few textbooks in the student’s room.

If you want to draw attention to your homemade wall rack original form, then it is important to think through in advance:
- placement of shelves;
- location height;
- allocated space;
- dimensions of the wall rack;
- material for manufacturing;
- general configuration;
- performance style.
Tip: When there is little space in the room, use any free space- partition between windows or above front door. Equip an unoccupied corner by the window with corner pieces of glass or mirrors of the same size on ready-made brackets. A DIY floor bookshelf is very convenient; it will also perform other functions, for example, a stand for an object.
The shelf structure can also be made in the form of crossbars between other furniture, and can also be designed as a long, shallow mezzanine along the wall at a short distance from the ceiling. A good option- place books on a window or niche between two rooms interior wall if they are not used for their intended purpose. It is not recommended to place books above the head of the bed. Although it is convenient to take out and put back “readings for bedtime,” a bookshelf with your own hands can collapse at the most unexpected moment.
Attention: Modern bookshelves should not be massive, unless the interior style dictates this. But the structure should not be allowed to sag under the weight of books or be too narrow for the largest volumes and dictionaries.

What is suitable for making homemade bookshelves?
Instead of natural wood, remnants of laminate with excellent wood decor or parquet board. These materials are initially cut to a width that matches the format of most books. This also eliminates the need to align raw material wall rack with the overall decor of the room.
As an option, use laminated plywood for a DIY bookshelf or chipboard. Construction supermarkets have quite a few suitable materials for these purposes - from plastic to natural wood.
If the choice in favor of eco-friendly materials is important, then it is still better to use natural wood or veneered furniture panels. Cutting is done directly in large retail outlets, which eliminates the need to look for a carpentry workshop at your place of residence. There are also ready-made planed boards and timber on sale, which, after varnishing, make excellent do-it-yourself bookshelves for the wall, photo:

Original design ideas for making shelves
For lovers original decor in the house there is an opportunity to show your creativity in making bookshelves with your own hands. Originality is easy to show in everything:
1. Type of fastening - wall, floor and shelves attached to beams near the ceiling.
2. Stylistics - country, retro, classic, avant-garde, gothic, modern, fusion.
3. Material for making shelves - wood, plastic, glass, thick fabric on a metal frame.
4. Periodicity - at equal distances from each other, chaotically or at unequal intervals, multi-tiered and multi-level structures.
5. Shape and general design of the wall bookshelf- horizontal and vertical lines, spirals, diagonals, flexible lines or recognizable outlines of familiar objects. For example, children's bookshelves are made with their own hands in the form of recognizable outlines in the form of a clown, cat, letter or house.
The shelf manufacturing algorithm depends on all these factors. If you use materials that are easy to cut yourself, the easiest way is to buy ready-made brackets and attach them to the wall in the chosen order. Good examples of DIY bookshelves, photos:

Attention: After cutting any material, the edges of each shelf must be processed if they do not rest against the sidewalls!
Glass blanks cut by a glazier must be processed by the master himself, if this is agreed upon in advance. Wood requires sanding and varnishing on all sides. Chipboard, laminate, chipboard and other derivatives require trimming along the cut. Trimming is done in any carpentry shop after cutting tile materials from waste wood. The processing of the edges of materials for making bookshelves affects their appearance and the overall impression of the structure.
But the most interesting look are shelves or exclusive book stands made from non-traditional materials:
- rope ladder with rigid rungs;
- a hard case for a guitar, trombone or cello nailed to the wall;
- old scrap wooden stairs on brackets for some distance from the wall;
- any packaging container suitable size(plastic, thick cardboard, plywood, boards, plastic).
Attention: Please note total load bookends, especially if they are made from non-traditional materials. Under thick volumes of publications displayed in a row, even classic bookcase shelves sag over time, and they have to be periodically turned over.

Update or add new look previously used materials will benefit from varnishes, paints, fabrics, veneer or textured wallpaper. It is better to sand the wood mechanically to simultaneously remove old layer and make the surface smooth. The board will change color if you cover it with stain and open it with colorless varnish. Pitch varnish, after opening the wooden bookshelf with your own hands, gives a black color with a brown tint.
- artificial aging;
- decoupage;
- collage;
- craquelure;
- applique.
Tip: Coat wooden shelves with a special antistatic agent that repels dust, preserving books. If it is important to preserve dilapidated collectible copies of antiquarian books or rare publications from destruction, then it is better to make closed shelves with glass doors. This will protect the volumes from temperature changes, evaporation and sudden invasion of shelves by pets or rodents. For example, do-it-yourself bookshelves, photo:

Options for making a classic wooden bookshelf
There can be one shelf for books or an entire wall-length installation. If you have no experience working with wood, then it is easier to use blanks cut by someone else. For connection horizontal planes They use not only base materials.
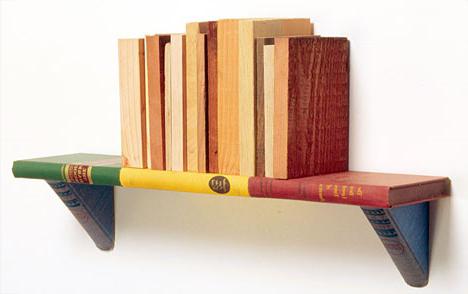
1. An exclusive version of the shelves - planed boards and wooden blocks, lined with columns on the sides. They can also be covered with covers from old books and magazines or original wallpaper. All that remains is to fix it on the wall.
2. A good option for a homemade wooden shelf without using woodworking tools is to string treated boards with holes on the sides onto a rope in the form of a ladder. Mounting is supposed to be on the ceiling or wall. They are also strung in 2-3 rows or asymmetrically. If desired, it is easy to create an original hanging structure.
3. Classic bookshelf - rectangle with or without doors. For a long time Sliding glass doors were in fashion, sliding out alternately from the right and left along a special plastic guide. Something similar, but in modern design, it’s not difficult to do it yourself if you have the skills to work with wood.

4. Wooden shelves It’s usually done with your own hands by those who have the skills and tools. A set of heavy encyclopedias, catalogs or dictionaries requires fairly thick boards good quality. They must be processed according to all rules and securely attached to the wall. The most harmonious designs look where the height is half the length of the rectangular shelf. But there may be other size options that should be reflected in the drawings, for example:
Craftsmen for woodworking usually use a saw, a screwdriver, a sander, a woodworking machine, a jigsaw, an angle grinder, or a universal power tool with attachments. For fastening to the wall you need self-tapping screws, brackets, dowels, screws or nails. If you do not use ready-made brackets, then with back side You nail special hinged hinges onto the bookshelf with your own hands from wood, with which it is attached to dowels and screws against the wall.
When working, it is important to measure the board correctly so that the upper and lower parts of the rectangular shelf exactly match in size. The same applies to the sidewalls. It is important that the hacksaw or other tool is strictly perpendicular to the sawing line. The appearance of the ends of each part depends on the quality of this work. Even the highest quality saw cut must be sanded or sanded mechanically.
Shelves made of tiled materials, thick chipboard or laminate contain chemical components. It is recommended to cover the ends with a special melamine edge, which adheres well with an iron. Be sure to carefully cut off any excess edges. The easiest way to connect parts is with a screwdriver.
Attention: When working with wood and lumber, be sure to follow safety precautions - work in a respirator, goggles and protective clothing. The serviceability of power tools is checked before the manufacture of shelves begins. Don't work at top speed. The performance quality of the attachments should be tested on scraps of material.

Decor of bookshelves for a children's room
It is advisable to use bookshelves for a children's room as part of the decor. Bright acrylic paints for wood or thin paper plastic are suitable, from which it is convenient to cut out figures and applique details. For example, do-it-yourself bookshelves, photo:

Attention: It is not advisable to use synthetic materials or dyes that emit harmful substances. Some varnishes and paints are used only for facades and exterior work - read the instructions for use. Give preference natural wood, eco-paints and odorless varnishes.
You can decorate the shelves together with your child - he will willingly join in the process. Invite him to choose sketches to decorate the structure and participate in the most simple processes, such as drawing the contours of a design using stencils. The child can also present the instrument, at the same time remembering the names of his father’s “tools”.
It is better to design identical horizontal shelves made of narrow boards in the form of display cases with a side so that books can be placed face down and not end up. At the same time, no special decor of the stands is required, bright covers are enough. This will help you quickly find your favorite fairy tales or children's poems.
As an option - shelves sewn from thick fabric in the form of pockets, which are suspended on fixed strips. They don’t have to be mounted on the wall; the side of a cabinet or other furniture in a children’s room will do. For the same purposes, a small rope ladder is used.
"Buffet wall" in sports room Can also be used as a bookcase. Bookshelves are also used for souvenirs, indoor flowers, collections of dolls or cars.
Original shelves for children are also made in the form of a tree, steps, a sun with rays or other objects. Good example how to make a bookshelf with your own hands - video:
Books, regardless of the genre of works, must always be kept in order. As a rule, special cabinets or mezzanines are used to store paper literature. Hanging shelves for books are very popular. You can make these devices yourself. Next, we’ll figure out how to make a book shelf with your own hands.
Simple designs
The most common are book shelves consisting of vertical racks, in which holes are drilled. Special pegs are inserted into them. In fact, they support the book shelf. Making such a design with your own hands is not difficult. Wooden or metal blocks can be used as racks. A steel corner can be used as book shelf holders.
Shelving
They are different. Shelves for books of the simplest design are made using bars stacked on both sides. The dimensions of the shelves for books can also be different. It all depends on the number and dimensions of the publications themselves. For example, there may be shelves for books, the dimensions of which are 220x22x2 cm. It is recommended to use bars made of larch, pine or fir. It is also quite possible to use chipboard or elements of old furniture. To build a medium-sized rack (5 shelves) you will need about 65 bars. Popular and metal constructions. They are usually collapsible. When increasing or decreasing the number of volumes, book shelves can be added or removed. You can mount lamps on the back side of the rack. If desired, the bars and shelves can be painted or covered with wallpaper. Such simple design Suitable for a room decorated in a minimalist style.
Important point
When assembling a book shelf with your own hands, the distance between the supporting bars should be at least 1.2 meters. Otherwise, the panel will sag under the weight of the literature. In general, such a design will look unattractive.
Is it possible to do without bars?
Can. Not everyone would like to see bars on the walls. There are two other ways to make a book shelf.
1. First option. In this case, the rack looks like a box. It is built between two walls. This is how a niche is formed. The vertical sides are not formed by a solid board. They are made up of scraps, the thickness and width of which is the same as that of a book shelf. These parts are supporting and are used instead of bars. The design is assembled like this:

The second option is invisible fastenings
A book shelf can be mounted on the wall so that the fixing elements are completely invisible. In this case, the boards are installed on long screws (there should be 4 of them - 2 on each side). They are screwed in using wooden plugs (rods). The part of the screw that protrudes from the wall will support the shelf. To decorate the protruding element, you can use a plastic tube of the required diameter. It can be transparent or painted in any suitable color. Screws are recommended to be used with semicircular head. In the areas where these support elements will be screwed in, holes of the appropriate diameter should be drilled. Instead of metal screws, you can use pins made of hard wood. Being also supporting elements, they must fit into the recesses that are made on bottom side each shelf. Difficulties may arise with installing the pins strictly horizontally. To control the position (verticality/horizontalness), you must use a level. There are also supports in the shape of a violin, with a coupling or screw thread. It is quite easy to install shelves on them - both made of wood and glass. Such designs are quite durable and attractive in appearance. The holes for the supporting parts must be drilled accurately so that they are positioned strictly parallel.

Cremaliers
You can install shelves along the wall without forming a niche. Here it would be possible to secure the consoles using brackets with rack(cremaliers). Exist different types bed designs. For example, there are those where the vertical slats are covered with panels of varnished or waxed wood or plywood, which is covered with material. As a result, only shelves and consoles are visible. This design allows you to completely mask any surface defects. You can also use metal or wooden racks, which are placed apart from the ceiling to the floor. Blocks - quadrangular compartments - are attached to them. The shelves are secured using spacer screws.
Hanging shelves
Instead of conventional designs, you can make hanging open shelves or cabinets without a back wall. They are quite easily secured with two bolts and brackets. The first ones are screwed into the wall. The brackets (suspensions) are fixed to the shelves on the reverse side. The latter can also be secured in racks with recesses. In this case they will be invisible. These hanging shelves are assembled from chipboard. Two-centimeter boards are joined to each other using a tenon, putty and painted.
Rack "cubes"
This is what a children's book shelf might look like. The design is based on the principle of playing with cubes, allowing you to create fun structures using numerous combinations as a basis. By placing individual boxes in a herringbone pattern in the center of the room, you can separate the two parts of the library with publications on different subjects. For example, it could be entertaining and educational literature. Bookshelves-boxes can also be placed along the walls at a certain distance between the structures. The spaces between boxes can also be used to increase the overall storage capacity. Boxes are assembled from chipboard, the thickness of which is 1 cm. The dimensions of the boxes are 50x23x25 cm (approximately). Each box can use two boards (top and bottom) 50x23 cm, sides - 25x23 cm and back wall 48x23 cm. Since the width of all elements does not exceed 23 cm, you only need to cut out the parts to length. When cutting, it is recommended to mark and saw the material one by one. You shouldn't outline everything at once. This is due to the probable error during cutting of 3-4 mm.

Assembly of boxes
The side walls are attached to the ribs of the rear side. For fixation, you can use nails and/or glue. After this, the top board and bottom are attached to the sides and back. After this, the entire structure is dried (if glue was used). All sides of the box must be proportional and equal to each other. The edges are polished sharp corners and the edges are rounded. Finally, the structure can be painted. If it is intended for storing children's books, then it can be decorated colorfully, make appliqués or use multi-colored paint. When choosing materials for finishing, it is necessary to take into account their safety for humans, especially for children.
Rotating shelf
It can be a piece of furniture and placed in a recreation area. The bookcase on roller wheels is very convenient to use. This design, painted in two colors (red and white or white and ocher), looks very modern and attractive. In general, the design is quite simple to manufacture. The main difficulty can only be fitting and fixing the components at right angles. To assemble the shelf you will need:

Preparatory work
Identical shelves are cut from boards. A support rod is made from a block (sawed off required length). You should draw diagonals on the shelves and draw a square at the center of their intersection. Its cross-section must exactly match. A through square is cut out in the upper and lower shelves. It should be such that the support beam fits into it without difficulty. Wood can be removed using a chisel. Next, the side vertical partition walls are made. All finished elements are sanded. To facilitate the process, you need to put marks on the shelves - on the bottom and top sides - where the vertical partitions will be located.

Assembly technology
The four vertical partitions are glued and nailed to the support rod. This will form the first floor. The entire structure is glued and nailed to the bottom shelf. The upper edges of the vertical partitions are lubricated with glue. The next shelf is placed on the rod and nailed. Next, the vertical partitions of the next floor are fixed in a similar way. The nails are driven in at an angle. Their caps need to be sunk with a rivet hammer. By the way, you can replace them. Next, the next shelf is glued and nailed. The work is repeated until all parts are installed. At the level of the last vertical partitions, the supporting central rod is cut off. Next, the four side walls are glued and nailed. They should be such a length that their upper part protrudes 1 and the lower part 2 cm beyond the edges of the horizontal elements. Four rollers are attached to the axes at the bottom. Their total height is 9 cm. After this, the surfaces are carefully sanded again, all edges are smoothed, and the edges are polished. After completing this work, you can begin finishing the shelf. It can be painted, varnished or decorated with decorative carved elements. This design does not take up much space, is compact and convenient.
An excellent decoration for any interior will be light, neat, interesting wall shelves, which are an excellent alternative bulky cabinet furniture. Assembled from specially purchased ready-made blocks, or made from scrap materials available in every home, these products will bring comfort and originality to any room.
Beautiful shelves will find their application in any room of the apartment, be it the kitchen, living room, bedroom, hallway or bathroom. With their help, the room will look more lived-in, interesting, and extra bed for storing any useful items.

First, decide for what purpose it will be used. wall structure, this will help you not to make mistakes with required sizes and durability of the device.

Shelf for heavy objects, such as books, aquarium, collectible dishes, potted plants, must be as reliable as possible, made of solid materials.
You can find a large assortment of wall shelves at attractive prices in the First Furniture store.


A shelf in the bathroom for storing various cosmetics and bath accessories may not be so strong, but be sure to keep in mind that the materials for its manufacture must be moisture resistant.

If the wall shelf will be used only as an original art object for interior decoration, to perform the function of decorating a room, and objects and things are not expected to be displayed on it, then for its construction it is permissible to use any, even the most fragile, materials.

Therefore, before starting the process of designing a shelf, be sure to consider the following details:
- full load on the structure;
- fastening method;
- compliance of the materials used with the purpose of the room in which installation is planned;
- product style and design;
- functional.

Types of shelves
When wondering how to make a wall shelf with your own hands, first decide which type of future design will be more suitable for the chosen room and will fully correspond to the assigned functions and your preferences.

Based on design features, shelves are:
- closing and fully open;
- linear and L-shaped;
- with or without side fencing elements;
- through, or with a rear limiter;
- single-tier or having several levels;
- round and rectangular;
- unusual shape, steeply inclined, diamond-shaped;
- limited on all sides or consisting of one base, etc.


If you pay attention to the materials used for manufacturing, then wall shelves can be:
- glass;
- with mirror surface elements;
- wooden;
- made of MDF, chipboard, plywood;
- polymer and plastic;
- combined - using several types of raw materials.

Think about which materials will be most preferable for constructing a shelf yourself, more wear-resistant and reliable, and choose an option that suits you with all its characteristics.

After studying numerous photos of shelves made by yourself, you can choose the option that best suits your taste and take it as a sample, try to make the most similar design, adapted specifically to your apartment.

Let's start designing
After you have decided on the model of the wall shelf, you have found and prepared everything necessary materials, it’s time to move on to the creative process, that is, creating a product.

It is best to adhere to the following algorithm of actions:
Draw a rough sketch on paper, indicating the planned dimensions of the shelf, or even better, a full-fledged sketch of how the future shelf will look on the wall, indicating its dimensions.

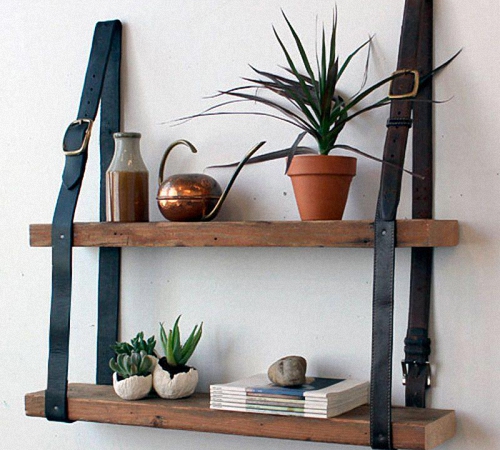
Decide on the type of fastening, whether it will be construction dowels, anchors, brackets that can withstand heavy loads, or whether the shelf will be attached to a flexible base, for example, flagella, braided ropes, belts - these fasteners are only suitable for lightweight ones used primarily as a decorative element , shelves

Carry out cutting of materials according to the right sizes, or, in the case of using store-bought blanks, prepare them for assembly. Proceed with the immediate assembly of all parts and components, attach brackets, hinges or other prepared fasteners to the shelf.

After complete assembly of the structure, if necessary, begin decorating it using various elements: appliques, buttons, beads, paints, etc.

Make horizontal markings on the wall surface to ensure even mounting to the wall. Attach the finished structure to the place allocated to it, check the strength of the structure.

The process of making a shelf with your own hands has come to an end, now all you have to do is display your favorite collection on it, lay out a set of books or any other items for which the shelf was intended.

I would like to highlight a few unusual, original and simple ideas wall and floor shelves. It is not at all necessary to make a standard design; you can decorate the interior of the room:

Shelf with straps - to assemble it you will need two flat boards and two strong leather straps.

An invisible bookshelf - you will need several steel brackets on which the books are placed. Looking at this design, it seems that the books are simply floating in the air.

A shelf made of branches and curved driftwood - wooden parts are assembled into a multi-tiered structure, and the immediate base for arranging objects is made of glass or plastic.

A wall shelf made of water pipes will be an excellent decoration for interiors of special styles.

Floor shelf made using glass bottles and base boards.

There are a huge number of variations in the design of wall shelves, because such a piece of furniture can be made from almost any material at hand. Turn on your imagination and begin the creative process of creating an unusual, aesthetic and functional piece of furniture.

DIY photo of shelves


 (1 ratings, on average: 5,00 out of 5)

