DIY home crafts: ideas for decoration and interior. Crafts for the home: DIY interior decor ideas from scrap materials No one else will have such sofa cushions
What has not been invented in the world of design for a comfortable, stylish and at the same time original interior. Experienced craftsmen know how to surprise their customers. Do you think it’s impossible to do something like this? But in vain! We've got 80 luxury home ideas that are not unlike designer bells and whistles.
1. Beaded curtains
Instead of an ordinary door, lovely curtains made of beads and beads look much more interesting. It’s very easy to make these, you just need to buy a lot of beads.
In the process of work you will need: scissors, a base for the curtain (cord, fishing line), a cornice, large beads and the beads themselves.

Think over the pattern, then measure the fishing line, folding it in half. Leave some extra space to attach it to the bar and start weaving.

We decorate the bar and fasten the bead threads.

2. Decor on the wall in the form of a world map

Materials needed: twine, hammer, pen, stationery metal nails, a plain area on the wall, world map.


The finished panel can be decorated with anything - photographs, pictures, postcards and other things that you always want to look at.
3. Marine motifs: unusual clock on the wall
How to transform your home environment and maintain a romantic beach mood? We recommend making a watch from sea pebbles.

To work, prepare pebbles, clockwork, scissors, ruler, paints, marker, glue, cardboard and wrapping paper. 
We wrap the frame with paper (you can also use a nice thick fabric).

We paint the pebbles in different colour, draw a dial, mark the place for attaching the mechanism and attach a loop to it.

Glue the pebbles.

We install the mechanism and admire the unique masterpiece!

4. Magic lamp
Even an ordinary glass jar can shine without electricity. And it won’t be difficult to make such magic happen.

For a sparkling lantern, prepare a glass jar, a lot glass balls, alcohol, cotton wool, luminescent paint and brush.

First, wipe the inside of the jar well with alcohol, and only then use a brush to make strokes and dots of paint. Let it dry completely. All that remains is to pour glass balls- so the rays in the wonderful lamp will playfully echo.

5. Picket lamp

6. Paintings of flower buds
Everyone can do artistic crafts when they have flowers, paints and inspiration.


7. Felt rose basket for small items
Felt – comfortable material primarily for those who are just learning the basics of cutting and sewing. It is not necessary to skillfully sew and cut out, since such fabric does not require an overlocker. Simply cut and connect.

So, prepare: felt, ruler, knife, pins, thread, hexagon-shaped stencil.
 Transfer the shape and cut it out.

Gather the core with pins.  Attach the remaining petals.
 A wonderful basket in the shape of a rose is ready! It can have a lot of functions - from storing small items, to a newspaper rack and flower pots.

8. Natural composition from branches and fresh flowers
 Materials: wire, wire cutters, a beautiful ribbon, small branches up to 15 cm long (about 60 pieces), pruning shears and the best flowers.

We make the frame.

We twist our composition and secure it with the remaining wire.
 The final touch is decor. We wrap the branches with ribbon, place the flowers inside and place them in a glass flask. The result is incredible!
9. Decorate the walls with origami paper

10. Functional board organizer

11. Original shelf with jars

12. Gorgeous lampshade“Glowing Lace”
 Materials: lace fabric (this could be a piece of an old curtain), a brush, PVA glue, an electric mechanism and an inflatable balloon.
First of all, cut the lace fragments.

We inflate the balloon, coat it with glue and overlap our lace circles. Let it dry for a day.

We pierce the ball with a needle, peel it off from the lace surface.

We make a hole in the opposite side for wiring. We install the electrical mechanism.

13. Bucket lampshades
This original lampshade imitates an old bucket, creating an antique effect. But in fact it is made of dense specific fabric.

14. Signs with messages

15. Colorful photo collage

16. Impressive photo wall

17. Creative pendant with photos

18. Letter of Memories

19. Exclusive vase from a can and nuts


20. Laconic cute vases on the wall

Materials: planks (preferably square), fasteners, leather tape, cute glass pots, screws, hammer, screwdriver and scissors.


21. Decorative clay pot


22. Transforming old shoes

23. An extraordinary panel - a new role for old-fashioned ties

24. Decorate the wall with children’s hats and elegant dresses

25. Vintage window frame cabinet

26. Not a standard place for skis
 27. “Ski” photo frame

28. Musical wall of guitars

29 ... and vinyl records

30. Headboard made from old pallets
A very simple idea for creating a cozy interior identity. You can hang different things on pallets: mini garlands, ribbons, cute fabrics.

31. Cork mat
A great alternative to regular bathroom bedding! It is convenient, practical and beautiful. This rug repels moisture, and its natural color will harmoniously fit into almost any environment.

32. Old storage boxes

33. Picket fence for a hanger - an element of vintage decor

34. Retro idea: decorate the inside of furniture with beautiful wallpaper


35. Wallpaper on the doors

36. Wall frame - a place of honor for a luxurious wallpaper ornament
 37. Double function of one pattern
Support the theme of the wallpaper on the wall by wrapping books in it.

38. Update your table lamp by decorating the lampshade with some pretty wallpaper.

39. Nature in your home


40. Another role of an ordinary hanger

41. Hanger with clip as a holder for paintings, photographs and other decorative items

42. Office tablet for compositions on the wall

43. Artist's experiments

44. Bright chandelier with pompoms for a nursery

45. Lush paper balls for decoration

46. Garland in boho style

47. Cute braid for a Roman blind

48. Transforming the lampshade with lovely fringe

49. A fun interior detail – a garland of mini pom-poms by the window

50. Restoration of a high chair for a nursery
It’s easy to make a beautiful and stylish piece of furniture from an old chair with scuffs and scratches. Prepare your paints masking tape and colored wool threads to make a cute pillow with pompoms for the high chair.


51. Snag as a hanger

52. A vintage chest is a great alternative to a coffee table
 53. Original bedside table from a chest


54. A chest as an exhibit inside a glass box - a central piece of interior decor

55. Extravagant dressing table from a suitcase

56. Unusual minibar

57. “In limbo” – chests a la shelves


58. Storage cases

59. Adorable pet bed

60. Music wall

61. Cities and countries above the desktop

62. Note board

63. Instead of wallpaper, old newspapers

64. Precious bookmarks
IN modern world With computer technology, books have also acquired electronic format. But for some of us, the ritual of reading good old books in their original form still takes place. A luxurious bookmark will not only further emphasize its significance and value, but will also become a decorative highlight of your interior. This kind of thing is easy to do with your own hands.

Any decorations are suitable for decoration - beads, brooches, stones.

For work you will also need: wide colored ribbons (velvet or satin), scissors, thread, needles, wire cutters, glue and clips for decoration.

Find the perfect combinations for your taste. 
Glue the ribbons well by folding them in half.

We decorate the ends with clips.

65. Serving decor – butterflies made from napkins

Add a romantic touch to your table decor by turning paper napkins in cute bright butterflies. You just need a thin wire, scissors and, of course, the napkins themselves.

Fold the napkin in half. 
We form triangles along diagonal lines.

On one side, we connect the ends of the triangle to the vertex.

Turn it over and bend the top to the base.

That's all! All that remains is to make the antennae from the wire.


66. Bird on canvas


68. Stylish decoration of plates

Materials needed: white plates, tape, special markers, water, cotton swabs and an oven. Cotton swabs with a glass of water will be needed to adjust the pattern.

Option N°1


Option N°2


The final touch is to secure the resulting drawings by placing our plates in the oven. For porcelain 220°C for 30 minutes, for ceramics – 160°C for the same 30 minutes.

69. Unusual cover for a vase
A vase made from a plastic bottle with a decorative cover made of multi-colored lightning bolts looks much more attractive!

Materials: 12 zippers (20-25 cm), plastic bottle, thread, knife.

Sew along the length of the zipper.


Sew the two edges together (you can do this by hand).

Let's try it on.

Cut off the top of the bottle.

We trim the flowers and enjoy the composition! 

78. Family organizer: making a menu
 79. Luxurious basket “Pink Heart”
80. Romantic decor – heart made of branches

Such options for great ideas for handmade crafts and other things for the home are what you need when the usual interior is no longer inspiring, and you can’t afford to radically change the decor.
Create a beautiful and cozy interior in your home you can use handmade crafts. Making such original things is not so difficult - you don’t need professional skills for this. The things we make with our own hands are unique, they give the interior of the home individuality and add variety to the environment.
Handmade crafts exude the special warmth of a home. Thanks to unusual creative gizmos, you will have the opportunity to change the interior at will or in accordance with the seasons (for example, create New Year's decor). DIY home decor is varied and purposeful. Homemade beautiful things and useful crafts for the home can be used as original furnishings, decorative elements or as devices intended for storing various household items.
In order to make things with your own hands, you don’t have to buy expensive materials; you can also use improvised means.
Creating unusual decor is possible without large material costs. Most of you have various unnecessary little things in your house, for example, fabrics, colorful paper, buttons - all this can be used as material for crafts.
There is similar “junk” in almost every house, if you dismantle the pantry or rummage around in the attic, you will find something. Natural materials, glue and threads are also useful for making beautiful new items and homemade little things. But ideas for handmade decor at home are also needed - of course.
Many people believe that only people with experience can make crafts and create presentable interior items on their own - this is a misconception. Show your imagination, combine different textured materials, don’t be afraid to experiment, and you will create not only beautiful, but also original home decor.

Even if you have to tinker with the first thing, each subsequent decorative craft will come out better and better, and you will spend less time.
DIY craft ideas for the home
So, what can you do yourself for your home? Let's look at a few ideas for inspiration. Among the proposed options, you will definitely find something interesting for yourself and try to make the thing you like with your own hands.
Housekeeper
One of the useful things for the home that also serves a decorative function, which you can make with your own hands, is a key holder.

The peculiarity of this key holder is that its design imitates brickwork. The basis for the key holder is thick cardboard(you can use part of a box). You will also need a tight toilet paper or thick napkins. Dense material is needed so that it does not spread when lubricated with glue. Stock up acrylic paints, varnish and glue (ordinary PVA will do).
Make the back wall of the key holder from rectangular cardboard or a sheet of plywood. Hooks will be attached to the base. Cut out small rectangular bricks from cardboard, the size should be the same, and glue them to the base, leaving a small distance between the parts. Not the entire surface of the cardboard is covered with bricks.
In the central part you need to stick a sign decorated with an inscription, and in the upper part you need to place a beautiful picture.
After this, coat the bricks well with glue, and put a napkin (previously crumpled) on top and a little more glue for impregnation. Using a stick, press tissue paper or paper into the gaps between the miniature bricks to create corners. Give the craft time to dry.

Paint the dry panel with paint (to imitate natural brick, you need to choose a red-brown shade). Use bronze paint to paint the seams.
After the paint has dried, paint the bricks with the same tone using a dry brush (dip the brush into bronze-colored paint, then wipe it on paper until it is almost dry, and only then brush the brickwork).
On a note! When painting bricks, you need to move the brush without changing direction.
To give the key holder a smooth finish, coat it with a clear matte varnish.
The work is completed by attaching the loops, after which it can be hung on the wall or given as a gift to someone. The photo below shows the finished key holder:

Jewelry hanger
All representatives of the fair sex love jewelry; Almost every woman has jewelry that needs to be stored somewhere. An original storage for jewelry will be a hanger made like a painting.
In order to make a hanger for storing jewelry, you will need:
- baguette frame;
- plywood;
- stain (paint can be used as a replacement);
- hooks and drawer handles;
- nails;
- screwdriver and drills;
- cutting tool.
Cut the plywood according to the dimensions of the frame and coat it with stain, then dry it and apply it to the frame. Mark the places where the hooks will be attached and screw them. All that remains is to hang the decorations on the hanger.
Now you have a place to store women's treasures - jewelry.

Plastic canvas box for storing small items
A simple but presentable box designed for storage various little things can be made from plastic canvas.
Canvas is a material for embroidery. You will need a canvas made of plastic; you can buy it in stores that sell everything for needlework.
On a note! Plastic canvas is usually made in the form of sheets, A4 size. The perforations in the plastic canvas differ in size. Canvases are produced with different amounts perforations, the more there are, the smaller they are.
In addition to the canvas, you need to stock up on the following materials:
- dense threads;
- large needle;
- fabric or beads;
- scissors.
Embroidery on plastic canvas is almost no different from regular embroidery. Embroidery techniques can be different, the most popular are cross stitch and satin stitch.
The plastic canvas is flexible, but at the same time it is very durable.
Decide what the dimensions of your box will be. Divide the material into parts intended for the sides and the bottom. There should be five parts in total. Make elements for the lid. Make a workpiece whose size is 0.5 cm larger in width and length from the bottom. The sides of the lid should be slightly narrower. You will need five more parts. Then sew the parts with thick threads (you can use braid and even ribbons).

You can embroider any pattern on the blanks. Drape the parts that are not embroidered with fabric or embroider with beads.
Having completed all 10 blanks, begin assembly. The first step is to sew the side parts to the bottom. Then sew all the side elements of the box from the outside and trim the top around the edges. The last step is to assemble the cover in the same way.
We assemble the lid of the box in the same way.
A beautiful box made of plastic canvas is ready.
Woven rugs using tapestry technique
One of the options to add coziness to the interior is tapestry rugs. To weave such things you don't need special tools. A rug using the tapestry technique can be made from scrap materials: thick threads that are used for knitting (they can be replaced with ropes made from old clothes) and cords.
A tapestry is a lint-free carpet made by hand. The base of tapestry rugs is decorated with ornaments created by interweaving threads. We will create a plot composition in the form of a circle with drawn lines; a thread will run along them, serving as the basis.
All work is carried out using weft threads. Hiding under a complex name ordinary ropes and braid, from which weaving and decorative patterns are created.
- choose a strong thread to create the base;
- pulling the weft thread should be done by hand;
- To make the tapestry more dense, you can press the threads to the center, for this you use a simple fork.

Stage one. We draw cardboard measuring 500 x 500 mm. We stitch the cardboard with the thread chosen for the base. To do this, cut the markings drawn on the cardboard and thread a rope through the lines so that it runs through the central part.
Stage two. Let's start weaving the tapestry. You need to carefully fix the starting thread. Weaving using the tapestry technique involves pulling the underlying cord by alternating one thread at the top and the second at the bottom.
Stage three. After weaving the last turn of the thread around the cardboard circle, you need to turn the resulting rug over to the reverse side and cut off the base cords. When pruning, leave about 5cm at the ends. Pull the ends of the laces out of the notches made on the cardboard (there is no need to remove the picture while pulling it out) and tie them into pairs. Attach pompoms to the resulting knots.
Complete the composition by sewing a thick rope from the wrong side in a circle - this will hide the knots and ends of the threads.
Advice. By using different textures and shades of threads, you can make different rugs and then combine them into one. You will get a carpet big size, which can be hung on the wall or laid on the floor.
A tapestry rug placed on the floor will make it warmer and also looks beautiful. Weave tapestry rug It’s not difficult to do it yourself: try it and see for yourself.
Ribbon curtain
You can make an unusual curtain from ribbons. Tape curtains are suitable for both windows and doors. Making curtains from ribbons will take a little time; you don’t even need a sewing machine. A fluttering ribbon curtain repels insects well; Previously, such curtains were made from newspapers cut into strips.
To make a curtain from ribbons, you need the following materials:
- ribbons or fabric strips (with edges that do not fray);
- cornice;
- clips or buttons.
The ribbons need to be thrown over the cornice and secured with clamps. Large beads can be strung onto fabric strips for decoration.
The ribbon curtain performs not only a practical, but also a decorative function. The advantage of curtains made from ribbons is their lightness. This great option for a dacha, a ribbon curtain can be hung in an apartment.

Flower pots made from paper bags
Many people have houses paper bags, instead of throwing them away, make a flower pot out of them.
Materials for making flower pots:
- paper bags;
- wooden skewer;
- scissors;
- rope;
- glue;
- plastic container.
Take paper bags and mark them: eight strips measuring 70x300 mm, then cut the paper along the dotted lines.
Place a wooden skewer in the corner of one of the strips and wrap the paper base around it diagonally. You must make a paper tube from each strip. Tape the corners of the paper tubes to prevent them from unraveling. The easiest way to do this is with a glue gun.

Take a plastic container, apply glue to it and wrap it with paper (from the same bags) so that the plastic is not visible. Glue paper tubes to the bottom of the container. Cut paper strips measuring 70x450 mm (you will need large bags) and make tubes.
Wrap the tubes so that they are pressed tightly against the walls of the container. Attach a long tube of paper with glue to the bottom of the container and wrap it around it, you need to braid the main tubes. Wrap all the main tubes, and then change the direction of weaving to braid the missing tubes - this way you need to wrap the entire container.

Make two holes in the sides of the pot (top).
Stretch a string through the holes made; tie a knot at each end of the twine to secure it well. Another woven tube will help hide the ends of the twine. Wrap the tubes protruding above the pot inside the container and secure with glue.
The unusual flower pot is ready.

Do-it-yourself items for the home can be used as decorative elements in your home or given to friends.
Most things made by hand are not only beautiful and original, but also useful and necessary in the household. Feel free to start working on homemade things and decorate your home with them.
Video For five more ideas for handmade crafts with your own hands to decorate the interior of rooms, see the video below:
Every woman dreams of arranging her home so that it becomes the coziest corner where she always wants to rush from work and gather with her family, celebrate holidays or simply enjoy the tranquility of home. DIY home decorations are becoming increasingly popular today. After all, as you know, various little things add coziness to the house, which are in harmony with the decor and with the mood of all household members.
And of course, who doesn’t want to decorate their home before the holidays - for example, a birthday or New Year - with various little things of a suitable theme! But you will have to spend a lot of money on decorating the rooms, because such trinkets in specialized stores are not as cheap as they seem. That's why the best option You will be able to make home decorations with your own hands, the creation of which will also become a fun activity for you and even for your children.

It is possible to complement and refresh the interior of any room with the help of exclusive flower pots, and for this you don’t have to run to the stores, you just have to look for old pots that are lying around idle. Using scrap materials and faceless, lying around pots, you can make wonderful crafts to decorate your home with your own hands.
There are many ways to decorate flower pots. So, for example, you can use paint from balloons or wrap them with coarse multi-colored threads, glue fringe or ruffles around them.

Using scrap materials and faceless, lying around pots, you can make wonderful crafts to decorate your home
Another one of interesting options is covering old flower pots with beads, beads, sequins or appliqués, which are finally varnished.
The knitted clothes with which they are wrapped will bring originality to the pots. To do this, you don’t have to start learning knitting yourself; just choose an old knitted sweater or a boring scarf and, using scissors and a needle and thread, create a new fashionable garment for flower pot.

It’s a little more difficult to make a colored mosaic for pots, but the result will be so impressive that you won’t regret the time spent. So, to decorate with mosaics you will need the following material:
- colored glass, pebbles or pebbles;
- “hot” glue (PVA is also possible);
- tile grout;
- brush.
In order not only to paste over the pot, but also to lay out a drawing, you should prepare glass pieces of several colors. Initially, the desired design is laid out on paper and only then transferred to the surface. First, glue the image and only then process the rest of the flower pot.

After the entire pot is decorated with glass, tile grout is applied on top. If at this moment some pieces of glass fall off, it’s okay: in a day, when the pot has dried, you can glue back the fallen elements.
After treating the pot with grout, you need to wait 15-20 minutes and use a damp rag to wipe it off the glass. The grout is reapplied after a day and also washed with a rag. After another 24 hours, the product is finally coated with varnish - and original decoration, what you created is ready.
No one else will have cushions like these again.
When there is a sofa in the living room, it’s just furniture, but if you decorate it with a couple of cute pillows, the room immediately feels cozy and warm.
Advice! To decorate pillows, you can embroider a pillowcase yourself, and not just with threads, but using beads, ruffles or other elements.
It’s easy to sew sofa cushions yourself. If you don’t have enough time for this, you can buy a couple of inexpensive small pillows in the store and, using your imagination, create a lovely decoration for your home from them, inspired by some suitable photo from the Internet.

It’s easy to sew sofa cushions yourself
For greater convenience, it is better to make appliqués not on the pillow itself, but on top of the pillowcase, which can be removed and washed or changed. And there are many options here. You can prepare the applique yourself and sew it on. Or use an iron to glue a finished purchased decorative element - this will not be difficult at all. The material for the pillowcase can be silk, velvet or any other fabric that matches the interior of the room.
Modern sofa cushions do not have to be square - you can make them round, like animals or in the shape of letters, for example. If you still decide to sew a pillow yourself, you can use scraps of different fabrics rather than a uniform fabric. For padding, it is better to choose hypoallergenic material.
DIY decorated vases
Everyone knows perfectly well that in stores you can choose a vase to suit every taste, color and size, but it is not always possible to spend the amount written on the price tag for the vessel you like. And sometimes you just want to decorate your home with something original and exclusive.

Advice! Light and great solution will use a glass bottle of any original shape.
After first removing the label, remove any remaining glue from the bottle, then place a bouquet of dried flowers in the bottle. And finally, the entire composition is sprayed with spray paint in a silver or golden color, or any other color - the main thing is that the craft looks harmonious with the room decor.

Original decor You can create vases with your own hands from paper, and since it is also simple, feel free to involve your child in such an exciting activity - in the end, decoration for the home and good mood guaranteed. For such a vase you will need:
- glass bottle, glass or jar;
- corrugated paper of different shades (or you can use pieces of pages from a fashion magazine);
- PVA glue;
- small scissors.
The selected paper should be cut into uneven pieces different sizes. Apply glue to the prepared bottle and apply pieces of paper one by one in a chaotic manner. Treat the entire bottle this way. Next, when the first layer is pasted, apply glue on top again and add more pieces of paper. We do this until the entire surface is covered. At the end, we treat the craft with glue again and wait until it dries. If you have acrylic varnish in your house, you can varnish the product, but even without this coating the vase will look great and will become another home decoration made with your own hands from scrap materials.
We complement the interior with a tree made from coffee beans
The coffee tree will not only decorate the rooms, but also fill them with a magical aroma. Made with your own hands, this original and beautiful tree will be an excellent present for any occasion, as well as a cute decoration for your home.
To make a tree from coffee, you should prepare the following material:
- large coffee beans;
- plastic ball;
- brown paint;
- glue;
- gypsum;
- small flower pot;
- Styrofoam.
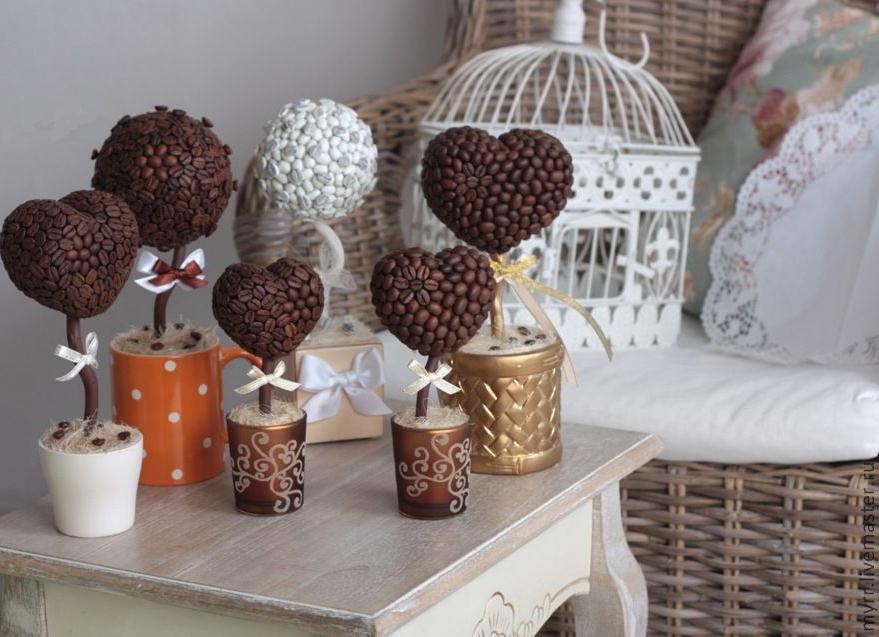
The coffee tree will not only decorate the rooms, but also fill them with a magical aroma
First of all, we color the ball in Brown color, so the original shade will not appear from under the grains glued on top. After the paint has dried, we pierce a hole in the ball into which the tree trunk will go, and begin to cover it with grains.
For the trunk, you can use any stick or branch, which will be wrapped with rope, ribbons or anything else you wish. We insert the barrel into the hole made in the ball until the end, and we also glue coffee beans around it for better fixation.
Before securing the tree in a pot, you should wrap a piece of wire around the base of the trunk. We put the finished tree in a pot and cover it with polystyrene foam, then dissolve gypsum in water and pour it into the pot. When everything is dry, the craft is ready. If you want, you can decorate it further.
How to decorate your home for a birthday
Birthday is a wonderful holiday for every person, regardless of age. Therefore, many people like to decorate their home to maintain a festive atmosphere and, of course, to the delight of their children.
First of all, when decorating rooms, they remember balloons, without which no one can do children's party. But in order for the balls to really bring pleasure, it is better, of course, to make a composition out of them, to come up with something original - then it will not be just a bunch of balls, but a real decoration.
Pictures made from multi-colored balloons attached to the walls or ceiling will look beautiful; you can also use ribbons for decoration.

When decorating your room, think about balloons
Another fun option is to scatter inflated multi-colored balloons randomly across the floor. This idea will appeal to children who will happily play with the balls.
Advice! If the balloons are filled with helium and satin ribbons are tied instead of threads, then interesting photographs can be attached to the ribbons.
My home is my castle. Yes, that's what they often say. But you and I are not living in the Middle Ages, our fortress should not be an ordinary house, but a cozy nest, where everything is beautiful and comfortable. In this article we will look together at different ideas decorating rooms that you can do yourself without much expense.
Hallway
Even the simplest entrance area can be made functional and stylish. Finishing wood panels will bring a fresh note to the interior. Not only is it simply beautiful, it is also convenient. On the panel you can screw hooks for bags and jackets. You can do the same on top small shelf for useful little things.
For small apartments there is also interesting solution. Shoe rack, hooks and cabinets can be combined into one organizer.

Regular front door You can also make it a stylish element using wooden diapers.

To keep your shoes out of the way and not dirty anything, you can make an unusual stand from a wooden box and stones. So even after a walk in the rain, your hallway will remain clean.

By the way, instead of pebbles, you can use an artificial mat made of plastic grass.
An old ladder can be used as a shoe rack. Now all the shoes will be at hand.

For a couple of years now it has been fashionable to make all sorts of homemade things from wooden pallets. In the hallway you can use them as shoe stands. You can make a shelf on top for small items or just put flowers, and attach hooks for umbrellas on the sides.

There is a small life hack for pet owners. To keep dog or cat bowls out of the way, mount them on a separate shelf in a closet or under a countertop.

Surprise your guests non-standard approach to such an ordinary thing as coat hooks. Wooden slats, branches, screws, a little imagination and voila! Unusual hanger ready.

Bathroom and toilet room
These premises should, first of all, be comfortable. However, one should not forget about beauty. After all, everyone is pleased when the necessary things are at hand, when there is no need to untangle the wires from the hair dryer or rush around looking for ear sticks. We offer several simple ways organization of space.
An old closet drawer or shutters from a flea market can be turned into a toiletry holder.

And old floorboards can be used in wall decor. It looks unusual, but is very simple to do: the slats are either glued to the wall or screwed with self-tapping screws. They can be painted, varnished or otherwise decorated on top.

Nowadays it is very possible to use jars to serve drinks and dishes. Why not use them in decoration? You don't have to look for those same Mason jars that the whole Internet is crazy about. Any others will do.

We are all accustomed to the fact that towels hang on hooks and take up quite a lot of space. Use shelves to store bath accessories. And it’s convenient, because you can put something else on the shelves, and it’s beautiful.


Now it has become very possible to use stone to decorate a bathroom. They cover the walls and decorate the bathtub. You can even make a rug out of pebbles! Just don’t forget the rubber base in this case so as not to scratch the floor.

To avoid the hassle of separating your laundry before washing, make a rack with several storage baskets at once. Baskets can be painted in the color of the laundry for which they are intended.

By the way, about washing. Tired of plain white washing machine? Paint it. All you need is permanent enamel and a stencil. The latter can be made from masking tape.

Living room
Getting a stylish shelving unit quickly and inexpensively is no problem. Use wooden boxes. They can be arranged as you need, making shelves of various sizes. There is another plus - you can put together such a cabinet with your whole family and have a lot of fun.


Using the same principle, you can make a desktop. You will need modular shelving from Ikea, a table top, slats, screws and some paint. The number of shelves and the shape of the entire table depends on your needs.
In general, the use of wood in the interior is one of this year’s highlights. Wooden pallets are used, parts from old furniture, stairs, branches, etc.


Hanging shelves will help make your living room more interesting. You can use both ropes of different diameters and belts.


A cornice is always a very expensive pleasure. But if you have a non-standard window and only need to order the appropriate size, then it turns into a complete pain. The simple solution is to use tap water plastic pipes small diameter. You just need to paint them in a color that suits your interior.

Another life hack on the topic of curtains. How to decorate a window without using a cornice at all? You will need a wooden lath and a lot of hooks for clothes. Don't forget to sew the loops to the curtain.

You can zone the space in different ways: walls, screens, curtains. There is another way - jute cords. You can use any other materials like ribbons or colored fishing line.

Bedroom
Garlands and photographs will help you decorate your bedroom walls in an unusual way. But you don’t need heavy frames with glass or any special things for this. Photos can be broadcast on fishing line, rope or directly on the wall on double-sided tape. And single-color garlands will create an atmosphere of comfort and romance.


Shelves of unusual shape will add freshness to the interior.


Great idea for girls to organize their decorations. You will need branches, cords and decorative nails. The latter need to be stuffed onto branches at the required distance and hung on the wall with laces.

The new is the well-forgotten old. The same goes for decor. You don't have to buy a new chest of drawers or cabinets when you have an old one. You can simply paint it. And then your favorite thing will serve you for many more years.


To save space, there is one very simple “trick” - a shelving wall. This will help get rid of most of the closets in the room.

Add some magic to your bedroom with cotton clouds and garlands.

An old ladder can serve not only as a clothes hanger, but also as a library shelf. This solution seems strange, but just try it – it’s really convenient.

Most important element bedrooms - bed. A large double bed is a dream. However, such a thing is often expensive. Don't despair, because making your own bed frame is not at all difficult. Using wooden slats of different thicknesses, self-tapping screws, saws and stain, you can make the bed frame exactly the way you want.

Kitchen
The kitchen is the most visited place in the house. Making it functional and comfortable is quite easy, and now we will look at several examples of rational organization of space that will not only help to restore order, but also make the room more comfortable.
To keep spatulas, spoons, forks and knives out of the way on the countertop, use jars. If you paint them, it will be great.

In small kitchens, you need to make the most efficient use of space. Hidden shelves and built-in wardrobes are your best friends in this case.
Even in the cabinets themselves, you can organize the space so that you can fit more. Internal shelves can be mounted not only on the walls, but also on the doors. It seems like such a simple idea, but so useful.

Life hack: to prevent lids from pots and pans from taking up much space, use regular plastic towel hooks.


There is always one problem with deep drawers - it is difficult to get to what is in the depths. The solution is simple - round rotating shelves. All products are visible and easy to get.

We are all used to the fact that spoons, forks, etc. are stored vertically in the kitchen drawer. What if the box is too small for, for example, a rolling pin? Diagonal placement of sectors will allow you to fit everything.

So that all the spices are visible and not lost kitchen countertop make the stand with a ladder. On the top tier you can place small pots with herbs, like parsley, dill, cilantro or basil. Now everything is at hand.

Corner sofas and kitchen islands can also be assembled with your own hands. Moreover, you can think of places to store kitchen utensils in them. Not only will no one have such furniture, but it will fully meet all your needs.


One of the very convenient moves in the kitchen is the use of magnetic tape. You can store knives on it, as well as spices in jars with metal lids. Great idea to save space on your kitchen counter.

And your favorite mugs can be hung on regular hooks. Both stylish and comfortable.

Who said that when we grow up, we part with our toys? There's no need to do that. You can use small figurines to decorate your interior. They can find new life as magnets, coasters, handles, or anything else you come up with yourself.


It would seem that you can do with such an ordinary thing as a refrigerator. We all like to put notes on it with reminders. What if you write on the refrigerator itself, and with crayons? You just need to paint it all with special paint for chalkboards and enjoy. By the way, this technique works on any surface.

Yard and garden
When decorating your home, you shouldn’t forget about what’s outside. Let's start with the entrance area. From concrete blocks and a couple of wooden slats you can make a cute and comfortable table where flowers, a watering can, a lantern or anything else will live.

By the way, you can make various benches from concrete blocks, decorate flower beds, build a barbecue, and even make flower pots. It all depends on your imagination.


You can also do it yourself stylish ottomans and armchairs. You need old tires, liquid nails and thick rope. The finished structure can be painted in any color. These ottomans are suitable for both indoors and outdoors, because they don’t mind rain.

Boxes or pallets made of wood can serve as the basis for a garden cabinet. Here you can store various flower accessories, pots, watering cans and other tools. What if you leave the top flat? work surface, then you can make something or replant flowers.

What could be unusual in a flower pot? It would seem - nothing. However, here you can surprise everyone. Plant succulents in a birdcage. When they grow, it will be very beautiful. And instead of the usual hanging pot you can use an old chandelier.

An ordinary children's inflatable pool can be used as a sofa. Just put a blanket or blanket inside and cover the sides with pillows.

It’s so beautiful to use candles in the garden, but they are constantly blown out by the wind. To prevent this from happening, you can make candlesticks from empty tin cans or from ordinary glass. You can decorate everything with stones or ribbons if desired.


These, of course, are not all ideas for home and garden, only a small part of what you can do with your own hands. You just need to not be afraid to experiment and fill your home with cute and beautiful things.
Unusual and unique handmade designer items have always been highly valued, especially among decorators and home interior designers. Making interesting handicrafts for the home with your own hands is not only profitable, but also useful. This is extremely exciting activity in which the whole family can participate, including small children. In a short period of time, without having any experience in performing such creative projects, from ordinary things and scrap materials you can get an original decoration that will become an irresistible individual decor in the interior.
Interesting DIY crafts for the home (photo)
To beautifully decorate your living space, there is no need to purchase expensive decorative items. Everything can be done with your own hands, the main thing is to have imagination and be able to handle various materials and a tool.
By investing a piece of your soul into a handmade product, you will receive worthy decoration, which will bring a special zest to the interior, give warmth and comfort to your home, and make your days brighter and more fun.

Wall decor
- a great idea, especially if they display good works of authorship with an original design.
For the first product we will need ordinary things that are found in almost every home. And so, we need:
- Cutting board (you can use scraps of laminated chipboard);
- Nails and hammer;
- Knitting thread;
We make panels with our own hands:
- Draw your chosen pattern or design on the board.
- Using a hammer, drive nails at equal distances along the contour of the pattern, so that their heights do not differ from each other.
- Tie the tip of the crochet thread to the first nail, then carefully pull the thread to the adjacent one and make one turn around it. Continue pulling the thread from nail to nail until the entire painting is complete.


With knitting skills you can create many beautiful things. For example, using yarn or threads, you can get unusual wall tapestries that will help enliven the interior and create an element of exclusivity.
This decoration is quite simple to make:
- To begin, tie the threads of your chosen color into thick braids;
- Connect the resulting braids together into a single carpet. Make loops along the top edge so that the tapestries can be hung on the wall.
- Insert a bamboo stick with a rope threaded through it in advance through all the loops and hang the decoration on the wall.


Knitted panel - good idea for wall decoration
Carpets and pillows
Mastery of knitting craft will also come in handy for other useful home decor items or accessories.
- They look very stylish and original: floor mats, pillows, ottomans, blankets. You can master the art of knitting them by studying several detailed master classes and lessons with step-by-step photos, which can be easily found on the Internet.


The most popular are soft floor mats with long pile, round or rectangular in shape. To knit such a “fluffy decor”, you will need an exquisite artistic taste, a little patience and attention, especially if you are doing beautiful handicrafts for the first time.
- To quickly make a fluffy product, small strips cut from fabric are tied into the weave of the mesh.
- All elements are secured from the inside with tape, and a beautiful terry rug can be laid near the bed.
By replacing the stripes with many pompoms made of multi-colored yarn, you get a soft, cozy product for a child’s room.


There is a huge amount various techniques knitting. Despite this - this type handicraft continues to actively develop.
The result is a lot of beautiful designer items that not only decorate the interior, but are also useful in everyday life. For example, a knitted blanket, in addition to its decorative function, can warm you up on cold winter evenings.


Ethnic motives remain the most fashion trends in interior design. A hand-made “mat-cape” will decorate an armchair, sofa, chair, or stool. For needlewomen who master the technique of crocheting, the material will be not only strong thick yarn or cord, but also ribbons cut from outdated knitted and textile products.
Most often, handicraft masters knit oval or rectangular multicolor capes. The lace elements sewn around the perimeter give them a special charm.


- A small cozy unit will allow you to insulate the tiled floor in the bathroom. mat with massage properties, which is easily made from ordinary corks from wine bottles. They are cut in half along the longitudinal line and glued to a piece of linoleum.

Wine cork rug
- Smooth stones fixed on a rubber base will add an element of sophistication to the room. As finishing material Wood cuts, sanded and impregnated with antiseptic compounds, are excellent.


Free stitch embroidery
Satin embroidery is one of the oldest types of artistic needlework, which consists of embroidering the plane of a specific pattern. Simply put, a piece of fabric with a pattern of your choice is completely or partially covered with dense stitches of thread. The result is beautiful, picturesque paintings and panels that are not inferior in beauty to expensive masterpieces of art.
Mastering this craft on your own will require a lot of time and patience, but believe me, the final result will exceed all your expectations. Seemingly simple things turn out to be fashionable, stylish and unique elements decor that can highlight the individuality of any interior.


What you need for satin stitch embroidery
A set of necessary materials and tools that will be required for work:
- Fabric of any density (silk, wool or linen are perfect);
- Silk threads High Quality, the fibers of which have a characteristic sheen;
- Hoop (special device for embroidery);
- Sharp scissors;
- A set of needles and a thimble;
Important! When choosing a needle, or rather its thickness, you should start from the density of the fabric you choose. For example, if the fabric is dense (sheepskin or wool), the needle should be as thin as possible, but if linen is used, the needle should be chosen thicker.
As for the technology of pulling stitches, everything is simple. Each of them can run in two directions, longitudinal or transverse, the main thing is that they are not all tightly tightened on the canvas. After the entire pattern along the contour is filled with threads, we can assume that one more original handicraft ready for home.


Beautiful handicrafts for the home have always attracted and attracted people with their subtlety and elegance. That's why hand-made masters, with their own hands they constantly create new, stunning interior items, delighting their fans with real masterpieces of art.
Exclusive handmade items can decorate the interior, fill the atmosphere with warmth and comfort, and add a touch of personal touch to the choice of design ideas from a variety of interesting options.
Soft toys for children
Tilda dolls with their original and unique design will fit into any interior and it is not at all necessary that it be a children's room; these dolls can take their well-deserved place in the very center of the kitchen or living room.
Every handicraft connoisseur will appreciate your choice and will not be able to resist admiration, especially if these dolls are made independently.


- Don't think that sew a Tildy doll It's hard enough. In fact, if you have the skills to work with sewing machine and you have the opportunity to buy all the necessary materials for making clothing parts and accessories - you may well end up with a unique interior doll.
In order not to spend money on expensive materials, some of Tildy’s clothes can be altered from your unnecessary things good quality, but when it comes to fabric for sewing the doll itself, it’s better not to skimp and purchase high-quality material in a professional store.

Lamp made from improvised materials
make original lamp Even novice needlewomen can do it with their own hands with a wire lampshade. To make it you will need a simple set of materials and tools:
- Colored wire for home crafts;
- Bulb;
- Cartridge with extended wire;
- Multi-colored double-sided figures on a clothespin - in our case, butterflies.
- We attach the wire to the wire at the base of the cartridge and wrap it in a circular, chaotic motion in a circle, fixing the wire in the desired position.
- After a couple of circles, we attach the wire to the wire again, each time doing it higher than the previous one. With each new circle the lamp increases in volume, repeat the work to the size you need.
- Upon completion of work with the wire, you need to give the product some color. To do this, attach various figures in random order to the newly made lampshade. You can make them yourself or buy them in a specialized store.
The lampshade will gain lightness and airiness thanks to the free space between the wires, so try not to tighten the product and make each circle in a different direction.


Decor from old light bulbs
Do you have old light bulbs at home? Don't rush to throw them away. This simple material can be used as interior decoration. You can find a huge amount on the Internet unusual ideas on their application. Here are some of them.

Miniature garden made with light bulbs with my own hands- will be a great gift for a creative person


Paper decoration
Wall compositions using the quilling technique, the material for which is paper, look charming. Even children can create them, which will serve as a reason for organizing joint family creativity.
With their own efforts, folk craftsmen make stained glass fragments that fill the space with a bizarre play of color spots. They get rid of them interior doors, lampshades, create screens that zone rooms


Knitted items, sewing, patchwork, weaving
Do unusual decor for your own home, you can use plain paper.
- Wicker vases, voluminous toys, decorative baskets look great and can fit into a variety of interior styles. To make them, not everyone has the opportunity to prepare willow twig. Home craftsmen successfully replace this wonderful weaving material with tubes rolled from ordinary newspapers.
The prepared sheet is wound obliquely onto a thin knitting needle and glued together to form a thin elastic tube for weaving.


- Having set out on a dream to update the atmosphere of the bedroom, mastering sewing skills, they assemble amazingly beautiful pieces from individual rags. patchwork bedspreads.
Such products are easily obtained from elements crocheted or knitting needles. To update covers, pillowcases, napkins, tablecloths, the appliqué technique is used. Bright, beautiful fragments are cut out from any fabric, fixed with an adhesive base and processed along the contour with braid, cord or stitched with a decorative seam.

Patchwork is a fun activity for creative housewives

You can find applications for the patchwork sewing technique in any room—the nursery is no exception.

By crocheting an openwork cover for an ordinary glass jar from cotton threads, you get an elegant candlestick. Place a candle inside so that it does not rise above the neck and light it. The flickering of flames through the lace creates a mysterious romance, allowing you to decorate a luxurious holiday table.


Embroidery, beads
For embroidered paintings, pillowcases, napkins that decorate the interior, various threads are used - wool, silk, synthetic, linen. Embroidered fragments decorate the frames of mirrors, the seats of chairs, armchairs, and sofas.
Embroidered curtains look gorgeous. Amazing volumetric panels, embroidered satin ribbons, become a bright accent that enlivens rooms of various functional orientations.


Stunningly beautiful panels, lampshades, and candlesticks are created using beads or beads. They are strung on a fishing line and intertwined into charming openwork patterns.
You can lay out a beaded table top for a coffee table, fixing the material with glue and covering it with varnish.


Updating furniture, garlands
You can update your coffee table using the decoupage technique. To do this you will need to perform the following sequence of actions:
- To start wooden surface need to . To do this, it is polished, after which all dirt and dust are removed with a brush.
- Next, the tabletop is coated with white acrylic paint.
- The top layer with the pattern is separated from the napkin and placed on a dry surface.
- After this, carefully soak the paper with PVA glue, smoothing out all the folds with movements towards the perimeter.
- After drying, the tabletop is covered with a layer of transparent varnish.
Using this technique it is easy to give a new look to chests of drawers, cabinets, and vases. Not only are they used for decoration, but also bright fragments cut from fabric, magazines, and photographs.


Pieces glued in the form of a continuous or fragmentary mosaic give an interesting texture to surfaces. tiles, washed and dried eggshell, dyed millet, coffee beans, watermelon and apple seeds.
The final action is to apply varnish to the glued composition.


To make your child’s nursery more comfortable and safe, you can sew soft, comfortable and pleasant-to-touch ottomans for her:
- Using the patchwork technique, two circles are sewn together.
- A strip of fabric is sewn along the edges.
- Stuff the product using foam rubber.
- A decorative handle is sewn on top in the center.

A soft ottoman is an important element when decorating a children's room.


- To zone a room, separating, for example, it can accommodate all kinds of decorative garlands, hanging them in doorways or on windows.
- Elastic cords with stars, butterflies, flowers, and circles of various sizes cut out of foil will help transform the design of the room. Old gramophone records that are painted and bound into canvas metal rings will also contribute to interior decoration.


A variety of ideas for home crafts
There are a large number of technological techniques for home crafts that can make the interior not only more decorative, but also functional.
By connecting the ends of thick cuts together, you get a hot stand. Such a product can even be made from paper folded in several layers. The resulting strips are glued together in a spiral or formed into products in the shape of a square, rhombus, or rectangle.


Even photocopying techniques are available for home crafts, allowing you to transfer designs onto fabric. The design is attached to the fabric requiring renewal with the front side. On the reverse side it is pressed with an ironing press or iron until full translation Images. All that remains is to dry and iron the product.


- From an ordinary glass bottle of a beautiful shape you get unusual vases . To do this, wrap the outer surface of the bottle tightly in a spiral. decorative rope, fixing it with glue.
If you don’t want to bother with rope and glue, you can paint the bottles in bright colors, decorate them using the decoupage technique, or make an interesting painting on them.


A simple and laconic bottle vase will be an excellent gift for your other half
- There is certainly room for creativity: plaster and clay. These materials are used to make unique stucco elements for interior decoration. They are also used to create beautiful garden lamps, original vases, fancy candlesticks, exclusive figurines and other decor.
- Similar handicrafts can become not only an excellent decoration for your home interior, but also be useful in everyday life. For example, for safe movement around the local area at night, garden lights can be placed along paths and paths.


Making a beautiful vase using the papier-mâché technique is very simple
Homemade crafts are a fun activity. From the variety of ideas, it is easy to choose an option suitable for a specific interior in order to add a touch of individuality to it in the form of an original home-made product.

Try, experiment and you will definitely succeed.
 (1 ratings, on average: 5,00 out of 5)