DIY living room design. How to create a unique interior for your living room with your own hands? What kind of walls can you make yourself?
Modern owners want to see their home not only cozy and comfortable. The interior now plays an important role. It must be exclusive and unique. Therefore, many craftsmen strive to make furniture with their own hands. This allows you not only to save cash, but also to collect such interior items that will satisfy the individual needs of household members.
The furniture in the living room should be comfortable and stylish. In addition, it must be in harmony with the entire interior of the room.
Thanks to the abundance of materials and accessories that can be found in stores selling goods for the manufacture and repair of furniture, it is not difficult to develop and implement your own design of cabinets, cabinets and shelves. Even a novice master can do this. It is only necessary to determine the upcoming scope of work in advance.
Drawing up furniture drawings
The assembly of any furniture should begin with drawing up a detailed drawing of the future product. The diagram must indicate not only the overall dimensions, but also the dimensions of each individual part. Only such a drawing will allow you to assemble a cabinet or cabinet without errors and annoying flaws. Moreover, shortcomings made during preparatory work are sometimes quite difficult to eliminate during installation.

Figure 1. Drawing of a wall for the living room.
If you have some experience in making interior items, then it makes more sense to immediately develop an entire furniture set rather than individual modules. This approach will provide a unified interior design. In addition, you can immediately take into account the size of the furniture and its location in the room.
A general drawing will be useful even if you are a novice furniture maker. You can first assemble only 1 TV stand or bookshelf. And then return to a single scheme and mount a rack or cabinet. In any case, drawing up a preliminary drawing must begin with taking measurements. In this case, you must take into account the dimensions of the room itself.
Typically, for a living room set, the following dimensions are taken into account:
- Height modular design(first of all, the dimensions of the largest furniture are taken into account).
- A long headset (as a rule, it should be equal to the value pier).
- Depth of storage spaces.
The dimensions of other parts depend on the depth parameters of the drawers. For example, the value top covers cabinets and countertops. Usually the lower tier of the set is made deeper, and the upper one wider.
As an analogue, you can take the overall dimensions of the finished furniture module. They are indicated in manufacturers' catalogs. Naturally, you can take into account your own dimensions. But it is necessary to maintain the specified proportions. As a result, you should end up with a single circuit, an example of which is shown in Fig. 1.
Return to contents
General design of the living room module

Drawing of a built-in wardrobe in the living room.
At self-installation It is most convenient to assemble symmetrical structures. Moreover, the so-called wall will fit perfectly into any living room. As a rule, such furniture consists of the following elements:
- linen closet;
- bookcase;
- TV stand with shelves for video and audio equipment;
- closed storage sections (with shelves and drawers);
- open sections (what used to be called a slide).
Their location depends only on your tastes, preferences and characteristics of the room. They can be lined up in one line or collected at an angle. Some elements can be located on the floor, and some on the wall (wall drawers). But remember that a modern living room should be comfortable, comfortable and safe. Therefore, you should not arrange furniture so that one element lies on top of another. For example, mezzanine drawers on cabinets. Try to secure every single part.

Figure 2. Drawing of a wall assembled from several parts for the living room.
Wall made from individual parts, is also convenient because the maximum length of chipboard or plywood sheets does not reach 3 m. Therefore basic modules usually consist of 2 or 3 parts. In this case, it is necessary to calculate the overall design so that the joining points of 2 modules do not violate the symmetry of the entire module. This drawback can be easily eliminated if you provide a single façade for adjacent cabinets. Or make 1 element much longer than the others. An example of such a layout is shown in Fig. 2.
As a rule, long pieces of furniture are placed at the bottom. They can serve not only as the basic support for the entire structure, but also visually combine the furniture module into a single stylistic solution.
Return to contents
Module element design
Each individual piece of furniture from which the whole structure is assembled can be roughly disassembled into the following parts:
- frame;
- bottom (horizontal plane);
- lid or tabletop;
- sidewalls;
- facade.
The frame usually consists of upper and lower frames, pulled together by longitudinal stiffening ribs, which support the corners of the furniture. If the size of the cabinet or cabinet is small, and a material with a thickness of 25 mm or more is used for their manufacture (chipboard, laminated chipboard or furniture board), then you can do without a frame. In this case, the necessary rigidity of the structure will be provided by the walls themselves.
The dimensions of each individual piece of furniture in the living room must be calculated taking into account the legs or lower stands (wheels).

Figure 3. Diagram of a simple TV stand.
Protruding parts must also be taken into account. decorative finishing. For example, accessories. These dimensions are not taken into account in the general drawing. But they are important when you think about the required depth of the drawers.
Once you have taken into account everything you need, you can begin to draw up a detailed drawing of a separate piece of furniture. In Fig. Figure 3 shows an example of a simple TV stand.
If you do not have enough experience in making furniture with your own hands, then you should not take on complex designs with curved facades and shaped countertops. Strict geometric lines may not look any worse. The main thing is to choose quality material.
Return to contents
Selecting material for making furniture
Many parts for furniture assembly can now be purchased at finished form. These could be, for example, shelves of complex shapes made of glass or chipboard. Specialized stores sell ready-made facades and countertops, mirrors and other structural elements that allow the installation of exclusive interior items.
In addition, carpentry workshops offer to cut blanks of the sizes and shapes you need. Therefore, it is not necessary to have complex woodworking equipment to make furniture yourself. This service will allow you to use not only non-standard parts, but also to ensure reliable fastening of the elements to each other.

Drawing of a coffee table for the living room.
The fact is that the most durable way to connect large parts is considered to be a tongue-and-groove assembly. But to make it you need a milling machine or a hand cutter. And also considerable experience in using them. But all the necessary components and parts can be performed by a master for an additional fee. All you have to do is assemble the furniture.
When going to the workshop, prepare a drawing with everyone required sizes. Ideally, you should have on hand a diagram of each individual part with the fastening locations and their dimensions marked on it. If you want to order the production of shaped elements (lids or tabletops), then you need to first make a life-size paper pattern.
For self-assembly Furniture now usually uses the following materials:
- Chipboard or MDF - for side walls and frames of large furniture;
- Laminated chipboard - for facades, covers and countertops;
- thin plywood or fiberboard - for the back walls and bottoms of drawers.
The thickness of the material depends on the design of the furniture. To make furniture cabinets for the living room, MDF or furniture board (solid wood) is usually used. But option 2 will cost much more. Chipboard is considered more reliable and less susceptible to temperature changes and moisture. Therefore, such material is often used in the manufacture of kitchen furniture.
Return to contents
Additional materials for assembly

Scheme of a hanging shelf for the living room.
To decorate the edges, experts recommend using laminated edging tape (ABS). It happens different thicknesses and colors, so you can choose the material to suit individual design. But it is necessary to take into account its thickness. If this parameter is less than 2 mm, then it is not taken into account when drawing up the drawing.
For self-assembly you will definitely need the following fasteners:
- confirmations (eurobolts);
- wooden dowels;
- mensolo holder (hidden console with dowel);
- mounting angles (they are used to attach plinths);
- holders for shelves (it is wiser to purchase metal ones);
- minifixes.
We must not forget about handles for facades and hanging hinges. It makes more sense to purchase them as a set. And immediately the amount that you need. To make the fastening points look neater, you can use plugs matched to the color of the furniture. Once you have everything ready for assembly, you can begin installation.
Similar materials


In modern city apartments, the living room is a very special space. This is a room in which not only the whole family and guests gather to relax, but also a sleeping place. That is why the interior of the room has a number of features.
The living room must meet all the requirements of comfort, style, beauty and practicality.
This applies to the choice of colors and textiles, furniture and lighting. To make the living room cozy and stylish, you need to plan what kind of appearance it will decide which functions to perform.
Living room zoning

To zone a room, you can use arches, curtains, partitions, etc.
The interior of a living room with your own hands is complex precisely because it includes many completely different zones. In a modern apartment, in the living room there are areas for relaxation, eating, and games for children. Therefore, attention must be paid to where and how work on the distribution of spaces will be carried out, how they will interact with each other.
Cannot be combined with each other dining area and space for relaxation. They can be nearby, but they should not penetrate each other. The area for children's games should be separate. Brightness is welcome here natural light during the day, minimal furniture. It is not recommended to arrange a sleeping place in the living room, but if the area of the apartment leaves no other choice, then it should be organized in such a way that it is not disturbed by the rest of the furnishings.
Interior lighting
In creating the interior of a living room, a special role is played by lighting. It allows you to transform even the smallest and cramped room, making it more spacious and brighter. When choosing lighting systems for the living room, you need to consider:
- light distribution rules;
- brightness of lamps;
- color rendering;
- shine;
- direction of light flux;
- color temperature of lighting system lamps;
- flicker;
- level of natural light.

When arranging a living room, you should choose and arrange the lighting correctly.
It is necessary to combine all these parameters in such a way that they are balanced and harmonious. Thanks to properly designed lighting systems, you can effectively zone the space, make it more comfortable, but not overloaded.
Various models of lamps are used for the living room. Their selection depends on exactly what the interior will be like. Typically a combination of diffused and indirect lighting creates a soft and pleasant effect. At the same time, the level of illumination is sufficient for normal stay in the room. When arranging lighting devices, it is important to take into account what equipment and furniture are used for this.
It is important to select all lamps so that they match the style. For example, for a room in a classic style, sconces and floor lamps of strict shapes are suitable; a large chandelier in the center of the ceiling will look good. For a modern and bold style, spot lighting is perfect, as it creates the necessary mood. Often such lamps allow you to completely replace the central ones. large chandeliers, which are not always suitable for decorating a room.
Living room furniture
The interior of the living room cannot be planned without correct placement furniture. It is necessary to separately consider each zone, its purpose, and then begin selecting pieces of furniture. Usually modern cabinet furniture is purchased. These are tables, cabinets, shelves, sofas and armchairs. For the recreation area, cabinets, soft and comfortable chairs, shelves, sofa. Used Appliances, for example, a television panel.
It is necessary to arrange pieces of furniture so that they are comfortable and do not clutter up the space.
The interior should not include a lot of furniture, but it all depends on the area of the room. For example, if the TV and furniture will be at different ends of the living room, then there should be no long distance, otherwise using them will not be so convenient. But too tight a position will be inappropriate.
To make the living room interior more harmonious and comfortable, you need to use the following basic methods:

The television panel should be placed opposite the sofa.
- The television panel should be placed opposite the sofa, and armchairs should be placed near the adjacent wall. They can be located on the sides of the sofa, but not too closely.
- The television panel is placed in the center, and around it a sofa and armchairs are placed opposite each other.
The interior should be designed so that personal space is not reduced. Depending on the style, you can use both a fireplace and a capacious aquarium. But there are certain limitations here. For example, dinner table Under no circumstances should it be placed near the fireplace or between the TV panel and the sofa. You cannot place furniture so that it completely blocks the passage to the balcony or makes it difficult.
If the living room interior includes a dining area, then it should be separated by at least a shelving unit. For separation, you can use other methods - a special lighting system, curtains in the form of beads, unusual floor lamps. But it is also impossible to overload the room with various accessories. It is important to choose furniture taking into account the style of the room. For example, a country style interior cannot include metal objects furniture that is completely unsuitable for romantic, classic styles.
Accessories and textiles for the living room interior

Curtains for the living room should match the style and color scheme of the room itself.
The living room is demanding in terms of accessories and textiles. This is not only furniture upholstery, but also draperies, including window curtains, capes or sofa upholstery. Attention should be paid to the design of window openings. A lot depends on them; often it is the draperies that set the tone for the setting. Curtains should be selected taking into account the style of the interior. For example, silk, satin, and velvet are great for classic style, but for country style it is best to take natural fabrics - cotton, linen. Light tulle is also used for finishing. It allows you to soften too bright daylight, but provide good lighting.
In addition to style, you need to pay attention to which side the windows face. For the southern room you can use darker draperies, but for the northern ones only light and translucent ones are suitable. When choosing curtains, you need to take into account what color the walls will be used. You cannot use dark curtains, as they will create too gloomy an impression. In this case, cool shades are suitable.
To decorate the room, you can use only tulle, but the folds should be draped thicker. The pattern depends on the total area, but it is better not to use one that is too intricate and frequent. It should be combined with patterns on the walls and upholstery. A good solution for the living room would be lambrequins.
Bold solutions and bright colors are great for the living room. In this case, one of optimal solutions will modern style hi-tech or minimalism. They give the room more space, have the necessary strict features, while completely maintaining comfort. Cool colors and contrasting solutions are suitable. Textiles can be used in strict accordance with the overall style.

The interior of the living room in a classic style includes simple lamps, paintings on the walls, etc.
The use of other accessories is also taken into account. These are paintings on the walls, lamps, figurines and so on. For the classic style, less pretentious lamps and graceful floor lamps are suitable. The paintings on the walls should be appropriate; still lifes, views of picturesque corners of nature, and family portraits work well.
When choosing accessories for the living room, you must remember that they must fully correspond to the purpose of the room. You can use shelves with books and trinkets; beautiful vases with fruits and sweets are well suited for coffee tables. But a large number of There will be too much dishes in the room, even if one part of it will be used as a dining room. We must remember that the living room is intended for general use and relaxation, the choice of accessories and textiles should fully correspond to this function.
Creating a living room interior with your own hands is not so difficult if you plan everything in advance. The selection and preparation of design must be approached carefully. Various finishing options, lighting systems, and textiles are taken into account. It is necessary to take into account exactly what functions the living room will perform, and whether there is a need to combine it with other rooms.
1. Introduction. General in living rooms different styles. (Fig. 1)
Common features in living rooms of different styles
Do-it-yourself wall - slide 3. Furniture walls made of plasterboard in the living room 1. Introduction. Common features in living rooms of different styles. Michail RybakovThe living room is a place where guests are welcomed, spent time communicating with friends, and holidays celebrated. And in many families, intimate tea parties with loved ones also migrated from the kitchen to a spacious living room with soft sofas and beautiful original living room walls - slides.
Living rooms are no longer the same. Thanks to modern construction and finishing materials, today we can recreate stunning living room interiors, and even do-it-yourself living room furniture. Every day, methods are improved and new finishing options appear, but the main stages of repair and construction remain unchanged. It is exactly how to design and make wall slides for living rooms with your own hands that will be discussed in this article. Since it is impossible to cover all construction methods in one article, we will focus on two - walls made of plasterboard and walls made of wood or chipboard and plywood.
2. Wood in the interior of the living room. Wall - slide with your own hands.
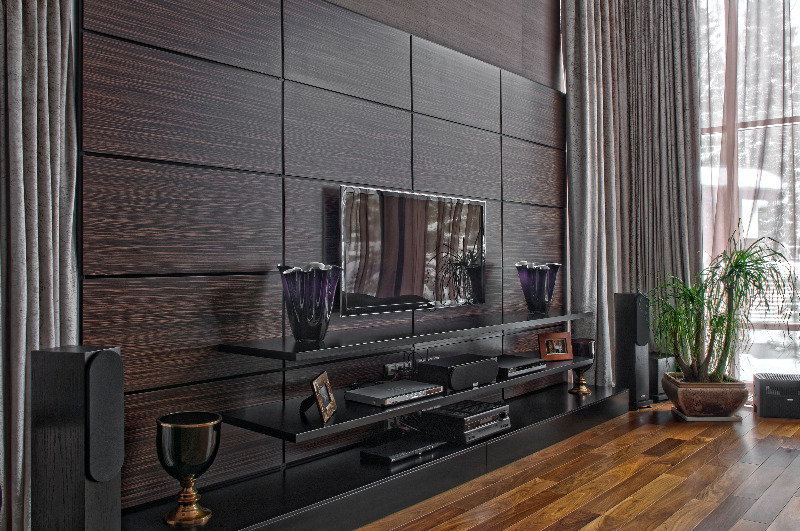
Furniture wall in the living room photo. (Fig. 2)
Wall - slide with your own hands Furniture wall in the living room photo
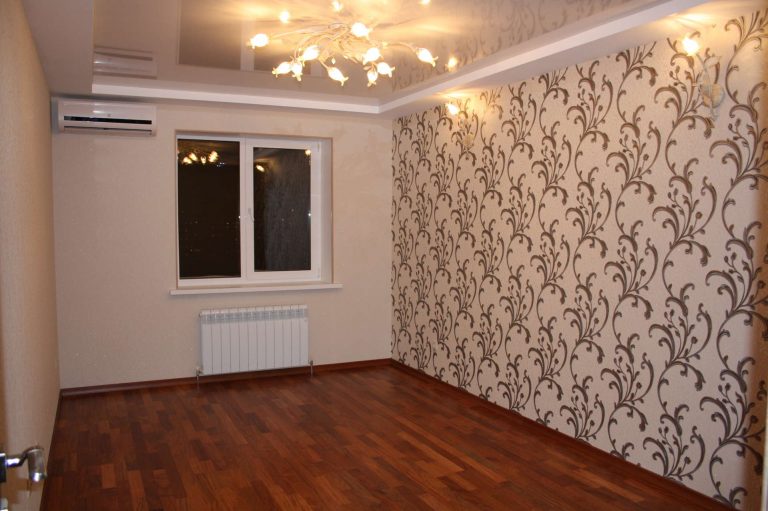
It is exactly how to design and make wall slides for living rooms with your own hands that will be discussed in this article. Since it is impossible to cover all construction methods in one article, we will focus on two - walls made of plasterboard and walls made of wood or chipboard and plywood 2. Wood in the interior of the living room. Wall - slide with your own hands Furniture wall in the living room photo. Michail RybakovFor many years, one of the most common materials used to make living room walls has been wood and its analogues in the form of chipboards and plywood. This universal material makes it possible to build walls - slides of almost any complexity. The wall model options proposed below are placed in the niches of the rooms. Wooden slides are often made in combination with other materials. For example, often the base of the walls is covered with wood siding or plasterboard. In this case, the lateral and back walls if they are installed, they serve more of an aesthetic function. External part built-in furniture cabinets also surprise with a variety of decor in the form of stone panels, glass and mirror stained glass windows. There are also extravagant furniture options, consisting of shelves, modular cabinets - chests of drawers, and entire mini towns - labyrinths. (“Bedroom, study and living room in a one-room apartment”, “Attic living rooms. white and dark wood in decoration.”, “High-tech living room with a wall slide for a beloved cat”). (Fig. 3, 4, 5)
Michail RybakovThere are also extravagant furniture options, consisting of shelves, modular cabinets - chests of drawers, and entire mini-towns - labyrinths (Bedroom, study and living room in a one-room apartment, Attic living rooms in white and dark wood in finishing, High-tech living room with a wall slide for a beloved cat)
For example, often the base of the walls is covered with wood siding or plasterboard. In this case, the side and rear walls, if installed, serve more of an aesthetic function. The outer part of the built-in furniture cabinets also surprises with a variety of decor in the form of stone panels, glass and mirror stained glass windows. There are also extravagant furniture options, consisting of shelves, modular cabinets - chests of drawers, and entire mini towns - labyrinths (Bedroom, office and living room in one-room apartment, Attic living rooms with white and dark wood decoration, High-tech living room with a wall slide for your beloved cat). Michail RybakovThere are also extravagant furniture options, consisting of shelves, modular cabinets - chests of drawers, and entire mini-towns - labyrinths (Bedroom, study and living room in a one-room apartment, Attic living rooms in white and dark wood in finishing, High-tech living room with a wall slide for a beloved cat)
For example, often the base of the walls is covered with wood siding or plasterboard. In this case, the side and rear walls, if installed, serve more of an aesthetic function. The outer part of the built-in furniture cabinets also surprises with a variety of decor in the form of stone panels, glass and mirror stained glass windows. There are also extravagant furniture options, consisting of shelves, modular cabinets - chests of drawers, and entire mini-towns - labyrinths (Bedroom, study and living room in a one-room apartment, Attic living rooms in white and dark wood in finishing, High-tech living room with a wall slide for a beloved cat) . Michail RybakovSo, using the example of one of the apartments, we will consider in more detail the process of manufacturing and installing a wall in the living room. This process is divided into the following stages:
* Creating a drawing and carrying out calculations of the dimensions and quantity of required material. This part of the process is very important. The speed of work on the actual installation of the living room wall directly depends on how meticulously the measurements of the niche and all future pieces of furniture are completed and transferred to paper. To obtain the most accurate result, it is important to take into account not only the dimensions of the niche, height, width and number of elements of the furniture wall, but also the thickness of the material used. The figure shows an approximate drawing of what is required when installing built-in furniture. Based on the proposed sample, you can independently describe and calculate the material for your living room slide. Living room renovation photo. (Fig. 6, 7)
Living room renovation photo
Michail RybakovLiving room renovation photo
To obtain the most accurate result, it is important to take into account not only the dimensions of the niche, height, width and number of elements of the furniture wall, but also the thickness of the material used. The figure shows an approximate drawing of what is required when installing built-in furniture. Based on the proposed sample, you can independently describe and calculate the material for your living room slide. Living room renovation photo. Michail Rybakov* Having drawn up a drawing and sketch of the future built-in furniture wall in the living room, you can begin to assemble the necessary tool and material procurement.
The list of tools required to carry out work on arranging such furniture includes common and familiar items for carpentry work. You will need tools for measurements (tape measure, square, plumb line, marker), for installation (drill, screwdriver, hammer drill, jigsaws) and for processing (trowels, painting tools, grinders or hand-held devices). ("Painting tools, brushes, rollers" , "Spatulas and additional tools for painting work" , "Carpentry tools" , "Drill and screwdriver" , "Power tools. hammer drill, jackhammer" , "Power grinding tools" , "Jigsaws, reciprocating saws , planes, milling machines").
In our case, we will need wooden beams for installation finishing panels(if desired, can be replaced with a metal profile), several beautiful sanded and processed beams for mounting shelves (they are also sometimes replaced with metal corners or other decorative holders for shelves). You will also need several more types of boards (for shelves, sashes, sides) and platbands for decorating the sashes of the wall cabinets (sashes can be purchased ready-made in the required size and, taking into account their size, the entire slide can be calculated). The part above the fireplace will be sewn up using fiberboard, so you need to prepare this material in advance. Don’t forget the accessories (canopies, locks, magnets, door handles).
* The next step will be working with the electrical wiring. Before covering the walls with panels and slabs, you need to update or even install new wiring. It is important to calculate how many and in what part of the wall it is better to place sockets in order to make it more convenient to connect equipment and not create extra coils of wires and extension cords.
* And finally, the assembly of the structure. Let's look at this process in more detail using an example illustrated with photographs.
After updating the wiring, the preparation of the wall for decoration begins. To do this, install the frame as shown in the figure and cover it with panels. In this case, white laminated panels are used. More details about how the installation of panels for wall decoration is carried out are described in the listed articles: "Wall panels. Types, features. Photos." , "Wall panels. Do-it-yourself selection and installation", "Plastic panels", "Wall panel finishing", "Laminated panels". (Fig. 8, 9)
Michail RybakovDo-it-yourself selection and installation, Plastic panels, Wall panel decoration, Laminated panels
More details about how to install panels for wall decoration are described in the following articles: Wall panels. Types, features. Photo, Wall panels. Do-it-yourself selection and installation, Plastic panels, Wall panel finishing, Laminated panels. Michail RybakovNext, strips of wooden beam. They will serve as shelf holders. The lower cabinets are made of glued wide boards, but if chipboard or plywood is used, then parts of the required size are cut out. (“Chipboard in the interior. types and methods of processing”, “We are building a podium. Photos in the interior”, “Do-it-yourself library with an office and a guest room.”)
After assembly load-bearing structure I'm starting to decorate it. The photo shows how, using elements from fiberboard and decorative slats with platbands, you can make beautiful sashes for cabinets and hide the joints of the structure. To maintain an attractive appearance, decorative frames are fastened with special glue. After giving time for the glue to harden and gain strength, the entire structure of the furniture wall is coated with paint. If you want to preserve the external texture of wood, then it is better not to use fiberboard for decoration, but to use wood everywhere. (“How to cover wood with stain”, “Stain for wood”, “Types of varnishes”). (Fig. 10, 11, 12, 13)
The photo shows how, using elements from fiberboard and decorative slats with platbands, you can make beautiful sashes for cabinets and hide the joints of the structure. To maintain an attractive appearance, decorative frames are fastened with special glue. After giving time for the glue to harden and gain strength, the entire structure of the furniture wall is coated with paint. If there is a desire to preserve the external texture of wood, then it is better not to use fiberboard for decoration, but to use wood everywhere (How to coat wood with stain, Stain for wood, Types of varnishes). 10, 11, 12, 13) Michail RybakovIf you want to preserve the external texture of wood, then it is better not to use fiberboard for decoration, but to use wood everywhere (How to coat wood with stain, Wood stain, Types of varnishes)
Michail RybakovIf you want to preserve the external texture of wood, then it is better not to use fiberboard for decoration, but to use wood everywhere (How to coat wood with stain, Wood stain, Types of varnishes)
The photo shows how, using elements from fiberboard and decorative slats with platbands, you can make beautiful sashes for cabinets and hide the joints of the structure. To maintain an attractive appearance, decorative frames are fastened with special glue. After giving time for the glue to harden and gain strength, the entire structure of the furniture wall is coated with paint. If there is a desire to preserve the external texture of wood, then it is better not to use fiberboard for decoration, but to use wood everywhere (How to coat wood with stain, Stain for wood, Types of varnishes). Michail RybakovIf you want to preserve the external texture of wood, then it is better not to use fiberboard for decoration, but to use wood everywhere (How to coat wood with stain, Wood stain, Types of varnishes)
The photo shows how, using elements from fiberboard and decorative slats with platbands, you can make beautiful sashes for cabinets and hide the joints of the structure. To maintain an attractive appearance, decorative frames are fastened with special glue. After giving time for the glue to harden and gain strength, the entire structure of the furniture wall is coated with paint. If there is a desire to preserve the external texture of wood, then it is better not to use fiberboard for decoration, but to use wood everywhere (How to coat wood with stain, Stain for wood, Types of varnishes). Michail Rybakov3. Furniture walls made of plasterboard in the living room. (Fig. 14)
Furniture walls made of plasterboard in the living room
After giving time for the glue to harden and gain strength, the entire structure of the furniture wall is coated with paint. If there is a desire to preserve the external texture of wood, then it is better not to use fiberboard for decoration, but to use wood everywhere (How to coat wood with stain, Stain for wood, Types of varnishes). 3. Furniture walls made of plasterboard in the living room. Michail RybakovMethods of arranging furniture from plasterboard remain no less popular. The use of drywall does not have such a long history as the use of wood, but it is loved as professional builders, and home craftsmen for its versatility and relative cheapness.
The main difficulty when working with plasterboard structures consists in the ability to competently design a frame. Drywall itself also has its own nuances of use, and while working with it, a huge number of questions arise, answers to which can be found in the articles listed below: “Walls with niches and shelves made of plasterboard”, “Creating a unique ceiling design”, “Walls made of plasterboard ", "Arch made of plasterboard. Installation and photos", "Installation of a plasterboard partition". (Fig. 15, 16)
Michail RybakovInstallation and photos, Installation of plasterboard partitions
Methods of arranging furniture from plasterboard remain no less popular. The use of plasterboard does not have such a long history as the use of wood, but it is loved by both professional builders and home craftsmen for its versatility and relative cheapness. The main difficulty when working with plasterboard structures is the ability to competently design the frame. Drywall itself also has its own nuances of use, and while working with it, a huge number of questions arise, answers to which can be found in the following articles: Walls with niches and shelves made of plasterboard, Creating a unique ceiling design, Walls made of plasterboard, Arch made of plasterboard. Installation and photos, Installation plasterboard partition. Michail RybakovAs is the case with plasterboard structures, as with wooden structures, you can often see the use of not only plasterboard. To create original and bright slides, wooden and glass parts are used, they are also decorated with slabs of natural stone or panels imitating natural stone, inserts made of processed wooden planks and colorful untreated tree trunks. Wall slides in this style can support both the eco-friendly interior of the room and ethnic design motifs. (“Painting walls with water-based paint”, “Laminate on the wall”, “Wall panels to look like stone”, “How to putty walls for painting”, “Gypsum tiles to look like stone”, “Wood for finishing floors and walls. Parquet and wood fantasies” ). For example, a combination of wood and stone will fit perfectly into a Scandinavian interior design or a chalet-style home. In addition, thanks to the emergence of models of devices that imitate real fireplaces, furniture walls began to be decorated with these stylish items, which, regardless of whether they function like real fireplaces, warming the room ( electric fireplaces) or simply serve original decor but still fill the atmosphere of living rooms with a feeling of home comfort. (“Gallery of 30 options for stone fireplaces in the interior”, “Fireplace for your home”). . (Fig. 17, 18, 19, 20, 21, 22).
Stylish walls for the living room photo
Wall slides in this style can support both the eco-friendly interior of the room and ethnic design motifs (Painting the walls water-based paint, Laminate on the wall, Stone-look wall panels, How to putty walls for painting, Gypsum tiles stone-like, wood in the decoration of floors and walls, parquet and fancy wood). For example, a combination of wood and stone will fit perfectly into a Scandinavian interior design or a chalet-style home. In addition, thanks to the emergence of models of devices that imitate real fireplaces, furniture walls began to be decorated with these stylish objects, which, regardless of whether they function as real fireplaces to heat the room (electric fireplaces) or simply serve as original decor, but still fill the atmosphere of living rooms with a feeling of home comfort (Gallery from 30 options for stone fireplaces in the interior, Fireplace for your home). Stylish walls for the living room photo. 17, 18, 19, 20, 21, 22). Michail RybakovStylish walls for the living room photo
Michail RybakovStylish walls for the living room photo
Slide walls in this style can support both the eco-friendly interior of the room and ethnic design motifs (Painting walls with water-based paint, Laminate on the wall, Wall panels to look like stone, How to putty walls for painting, Gypsum tiles to look like stone, Wood for finishing floors and walls parquet and fantasy wood). For example, a combination of wood and stone will fit perfectly into a Scandinavian interior design or a chalet-style home. In addition, thanks to the emergence of models of devices that imitate real fireplaces, furniture walls began to be decorated with these stylish objects, which, regardless of whether they function as real fireplaces to heat the room (electric fireplaces) or simply serve as original decor, but still fill the atmosphere of living rooms with a feeling of home comfort (Gallery from 30 options for stone fireplaces in the interior, Fireplace for your home). Stylish walls for the living room photo. Michail RybakovStylish walls for the living room photo
Slide walls in this style can support both the eco-friendly interior of the room and ethnic design motifs (Painting walls with water-based paint, Laminate on the wall, Wall panels to look like stone, How to putty walls for painting, Gypsum tiles to look like stone, Wood for finishing floors and walls parquet and fantasy wood). For example, a combination of wood and stone will fit perfectly into a Scandinavian interior design or a chalet-style home. In addition, thanks to the emergence of models of devices that imitate real fireplaces, furniture walls began to be decorated with these stylish objects, which, regardless of whether they function as real fireplaces to heat the room (electric fireplaces) or simply serve as original decor, but still fill the atmosphere of living rooms with a feeling of home comfort (Gallery from 30 options for stone fireplaces in the interior, Fireplace for your home). Stylish walls for the living room photo. Michail RybakovStylish walls for the living room photo
Slide walls in this style can support both the eco-friendly interior of the room and ethnic design motifs (Painting walls with water-based paint, Laminate on the wall, Wall panels to look like stone, How to putty walls for painting, Gypsum tiles to look like stone, Wood for finishing floors and walls parquet and fantasy wood). For example, a combination of wood and stone will fit perfectly into a Scandinavian interior design or a chalet-style home. In addition, thanks to the emergence of models of devices that imitate real fireplaces, furniture walls began to be decorated with these stylish objects, which, regardless of whether they function as real fireplaces to heat the room (electric fireplaces) or simply serve as original decor, but still fill the atmosphere of living rooms with a feeling of home comfort (Gallery from 30 options for stone fireplaces in the interior, Fireplace for your home). Stylish walls for the living room photo. Michail RybakovStylish walls for the living room photo
Slide walls in this style can support both the eco-friendly interior of the room and ethnic design motifs (Painting walls with water-based paint, Laminate on the wall, Wall panels to look like stone, How to putty walls for painting, Gypsum tiles to look like stone, Wood for finishing floors and walls parquet and fantasy wood). For example, a combination of wood and stone will fit perfectly into a Scandinavian interior design or a chalet-style home. In addition, thanks to the emergence of models of devices that imitate real fireplaces, furniture walls began to be decorated with these stylish objects, which, regardless of whether they function as real fireplaces to heat the room (electric fireplaces) or simply serve as original decor, but still fill the atmosphere of living rooms with a feeling of home comfort (Gallery from 30 options for stone fireplaces in the interior, Fireplace for your home). Stylish walls for the living room photo. Michail RybakovWalls with built-in lighting look incredible and enchantingly attractive. Lighting can be of three types: spotlights mounted in plasterboard or rotating lamps, installed LED lighting or simply mini wall lamps. When equipped with a backlight with a step-by-step light level switching device furniture wall Can be used as a night light or to create a festive mood during meetings with friends. (“Illuminated plasterboard ceiling”, “Wall lamps”, “Illumination of furniture with LED strip”, “Two-level plasterboard ceilings”). . (Fig. 23, 24, 25)
Living room interior design photos
Walls with built-in lighting look incredible and enchantingly attractive. Lighting can be of three types: spotlights mounted in plasterboard or rotating lamps, installed LED lighting or simply mini wall lamps. When equipped with lighting with a device for gradually switching the light level, the furniture wall can also be used as a night light or to create a festive mood during meetings with friends (Illuminated plasterboard ceiling, Wall lamps, Furniture lighting LED strip, Two-level ceilings from plasterboard). Living room interior design photos. 23, 24, 25) Michail RybakovLiving room interior design photos
Michail RybakovLiving room interior design photos
Walls with built-in lighting look incredible and enchantingly attractive. Lighting can be of three types: spotlights mounted in plasterboard or rotating lamps, installed LED lighting or simply mini wall lamps. When equipped with lighting with a device for gradually switching the light level, the furniture wall can also be used as a night light or to create a festive mood during meetings with friends (plasterboard ceiling with lighting, wall lamps, furniture lighting with LED strip, two-level plasterboard ceilings). Living room interior design photos. These slides are suitable for classic style in the interior. Today, construction stores sell a huge amount of such ready-made decor made of plaster and plastic. You can also use ceiling plinth for decoration ( Ceiling plinth, Bas-relief in modern interior, A piece of nature in the interior - a unique stucco tree from, Do-it-yourself bas-relief on the wall, Types of baseboards and methods of their installation). Classic interior living room photo.
So, after looking at dozens of photos from various options interiors, we finally decided on the design and decided to renovate the living room with our own hands, as in the photo.
Where to begin? Planning? Or the choice of materials? Let's start in order.
If you are renovating for the first time
When skills are not enough, but extra costs there is no need for designers and professional craftsmen; the easiest option is to practice in a small secondary room, bedroom or office. It is also worth looking into insulating, glazing the loggia or combining it with a room.
- The living room often uses the highest quality and expensive materials, since it will take a long time to renovate the room. Having practiced on a smaller area and cheaper finishing materials, you will be able to handle expensive ones easier - there is less chance of ruining them;
- By attaching a balcony to a room, you will add additional square meters and get your hands on solving organizational issues. The VMC has its own database, so that if the work on combining the loggia with the bedroom is successfully carried out, then it will be easier to obtain permission to demolish the wall between the living room and kitchen if you want to combine the rooms;
- Balconies are usually small, especially in old houses; even a little training will help you feel better about the material and color.


First stage
Before preparing the living room for renovation with your own hands, several important issues need to be resolved. This stage requires the approval of all family members, if you live alone - long thought and drawing up a room plan.

Before starting repairs, decide the following:
- where to put the TV and multimedia devices;
- where to place the sofa and armchairs so that you can clearly see the image on the screen from any place;
- will a table with personal computer, or you will need to replace it with a compact laptop;
- where to store books, photo albums, sets of dishes, clothes, linen, etc.;
- where to place chandeliers, lamps and floor lamps, is it necessary to highlight a specific area of the living room with light;
- Is air conditioning needed in the room?
- availability of additional decorative elements on the walls - photographs, paintings, frescoes, mirrors;
- Is LED lighting on the ceiling necessary?
- Do you want to arrange a corner with a fireplace;
- The most important thing is: are you able to think through the interior of the room from start to finish, or do you need to turn to the services of a professional designer?

These questions seem trivial, but the further choice of materials and the plan for upcoming repair work and the total cost of renovating the hall.
How to prepare a living room for renovation
When the previous issues have been resolved and the costs have been calculated, it’s time to prepare the space:
- Decide on old furniture - throw away what is not needed, take the rest to another room so as not to accidentally damage or stain it;
- Dismantle old coverings, remove lamps if you plan to replace them. It is also worth dismantling the old wiring;

- An important step is to install new wiring in accordance with the design, do not forget to install circuit breakers. Problems may arise during the process if you have not dealt with electricity. Without knowing the nuances of working with wiring, you can make serious mistakes, sometimes life-threatening. Therefore, it would be wise to use the services of a professional electrician at this stage;

- The last stage of preparation is technically simple, but requires a lot of physical effort, some bags with plaster mixtures how much do they weigh? To rough preparation walked faster, enlist the help of a partner. You will have to level the floors for a new coating, plaster the walls (or line them with plasterboard) and ceilings.

The further body of work is very large and requires great care and responsibility. You must not only think about what materials to use and how to install them, but also how to properly renovate the living room without delaying it over time.
Ceiling decoration
Note: if you decide to install suspended ceilings or suspended ceilings in the living room, then do it when finished fine finishing other surfaces.
So, depending on what interior design you have chosen for your living room, a variety of materials are used when decorating the ceilings. Most popular:
- Design suspended ceilings is divided into two main types: modular (subdivided into lattice, cassette and rack) and solid in the form of a stretch ceiling or plasterboard structure;
- Expanded polystyrene boards are easy to install and quite cheap. What does this ceiling look like? Quite nice, but don't expect sophistication from it;

- Paint can also be considered an inexpensive surface design option. Unlike wallpaper, this material is resistant to moisture, so the ceiling can be washed during cleaning;

- Wallpaper is the simplest and economical option. Given the abundance of textures and colors, you can easily choose a coating that will harmoniously fit into the interior.

Important: Some types of suspended ceilings are difficult to install, so you will have to seek the help of professionals at this stage.
The most optimal option for decorating the ceiling in the living room in terms of price and quality is plasterboard and proper lighting. This is not surprising; such a ceiling is practical and beautiful. A stretch ceiling will cost more, but it also looks beautiful and stylish.


How to decorate walls
The design of the walls, as in the case of the ceiling, depends only on the design project of the room and financial capabilities. Here is a list of options from the most budget to the most expensive:
- Dye. The simplest and inexpensive material for wall decoration. Please note that for painting you need a perfectly smooth and Smooth surface, otherwise the paint will only highlight all the imperfections of the walls. The paint seems rustic, but it’s not - with the right artistic skill, walls can be turned into whole paintings;


- Wallpapers are universal, they come in a wide range of colors, and the choice of patterns and textures is truly enormous. Wallpaper is one of the most popular finishing materials for the living room;

- Decorative plaster, especially its “Venetian” variety, great option for decorating a living room in Mediterranean style or in numerous country styles;

- Drywall can hardly be called a material for finishing, but it is an ideal tool for leveling the surface of walls. Any type of finish fits perfectly on top of gypsum plasterboard;
- Wooden or plastic wall panels. It is better to choose for the hall natural wood- it looks beautiful and is safe because it does not emit toxic substances. It is better not to use PVC to renovate a living room with your own hands. According to their design, any panels are divided into two types: stacked (slatted or tiled) and sheet.


Natural or artificial decorative rock, perhaps the most original version wall decoration. At the same time, it is the most expensive and literally the heaviest - both in weight and in installation.


So, the choice of material depends on your imagination and wallet. None of the room design options is better or worse than the other.
Choosing a floor covering
The floor is the surface that bears the heaviest load, including heavy furniture and, of course, constant walking. The choice of material depends on whether you plan to receive many guests, or whether you want to turn the living room into cozy island for privacy and relaxation. To finish the floor in the hall use the following:
- Laminate is a beautiful, high-quality and fairly inexpensive finishing material. The surface of this material can imitate natural wood of any species. There are panels painted in more exotic colors;


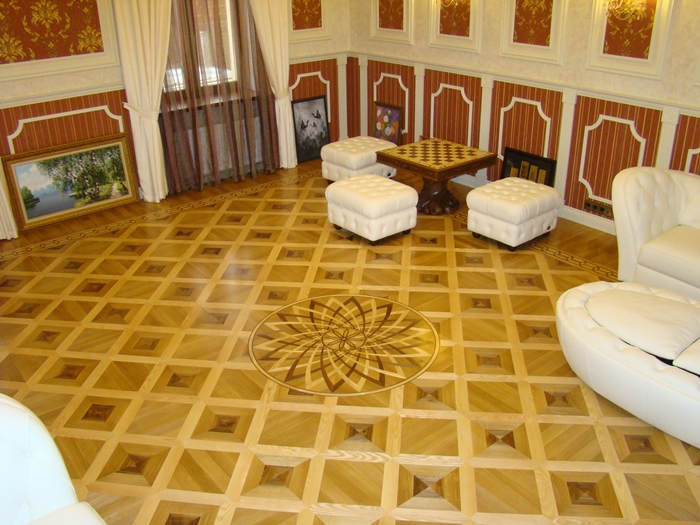
- Parquet - natural and environmentally friendly pure material made from various types of wood. By using parquet boards, laid out in one pattern or another, you can decorate any room. Parquet is quite expensive, so it is used very rarely in ordinary apartments;

- Cork floors are an excellent natural material based on the bark of the cork oak tree. This floor has good noise and heat insulation qualities. The material is hypoallergenic and not hazardous to health. Cork can be used as a stand-alone covering or as a backing for laminate flooring;


- Linoleum is one of the most popular materials used in living room renovations. Why? It is very easy to install; even a beginner can handle this floor. The surface of linoleum can imitate natural materials from wood to granite and marble;
- Self-leveling flooring is expensive, but perfectly smooth and very nice option. The coating with a 3D pattern looks most impressive;

- Ceramic tiles are not the best suitable option for the living room. It's better to leave it for kitchen area, if the room is combined.

When thinking about renovating your living room with your own hands, choose natural wood, cork or laminate for the floor. If desired, you can also install a heated floor system.
By correctly arranging the texture of materials and their colors, you will create a harmonious and beautiful interior in the room. Repairing a living room with your own hands is not that difficult, the most important thing is to decide on it.


Photo gallery (51 photos)
The living room is the heart of the home. It reflects the owner’s inner world, his taste and preference. To some extent, the living room shows the status and financial situation of the owner. Its main role is to welcome guests. The environment here makes the first impression on visitors, and if it is bad, it is very difficult to correct it. Let's look at ideas for renovating the living room in this article.
Living room renovation ideas
Of course, the living room, like any other room, has a number of requirements:
- functionality;
- convenience and comfort;
- beauty and practicality;
- uniqueness of the interior.
Living room interior
The living room does not have any special functional requirements, like, for example, a bedroom or a children's room. Therefore, here you can implement any ideas, because the scope for their implementation is simply enormous. In this room, a variety of architectural forms and design delights will not be superfluous. The only requirement is that they should not violate the integrity of the idea and be in harmony with other solutions in the house.
Often, the interior of a living room, especially a small one, is designed holistically, without dividing the room into zones. But if you wish and have the appropriate opportunity, you can create conditions convenient for work and rest for each family member by dividing one large room into functional zones.
In this case, it is necessary to take into account the age of the residents, their interests, occupation and individual wishes.
Also, many owners combine the living room with a kitchen, a guest bedroom, a library and other rooms with a specific functional purpose. There are different universal options for such solutions.
They can be used in full, or you can only take the main ideas from them. This depends both on the general layout and style of the house, and on the habits and lifestyle of its inhabitants.
Very interesting results are obtained when applying similar solutions in small houses and apartments. This opens up completely new possibilities that previously seemed fantastic.
One of the most common options is combining the living room with the dining room and kitchen. This method achieves a bright and unified image in which both hosts and guests feel open and comfortable.
The attached loggia is suitable for decorating a place for tea drinking or a winter garden.
The division or attachment of functional zones can be done using sliding partitions, floor structures, furniture. Lighting performs this function very well. Also, when decorating the interior, you can use materials with different patterns and textures, but at the same time beautifully combined with each other and with the overall decor.
Soft upholstery on the wall will help create a unique mood conducive to relaxation. Mirrors will increase the space, add light and airiness. An exquisite frame will be an excellent accent that will attract the eye.

Color solution
In choosing color scheme for walls, you need to remember that it will play the role of a background for furniture and decor, so it should not stand out and attract attention. The exception is small areas that emphasize the individuality and tastes of the owners, but there should not be too many of them.
It is better to decorate the ceiling in the living room in light colors. This will give the room visual volume. By using spotlights you can divide the room into functional zones. A correctly selected chandelier will only highlight the dignity of the room. It should match in style with common interior rooms.
In addition, you can choose the main accent.
It is very good if the chandelier has common features or some similar elements with, for example, furniture or wall decoration.

The furniture can be absolutely anything. It depends on who lives in the house - young people, elderly people, children, and on lifestyle. After all, age is not some kind of limitation, and good taste should be demonstrated by everyone.
Upholstered furniture with smooth lines will create the most comfortable conditions for relaxation. Warm colors will give you comfort. Furniture with clear and strict lines can feel somewhat cool. Bright details in warm colors will wonderfully soften this phenomenon.
Simple and easy to use functional furniture in subtle colors, to avoid a boring look, use one item bright color and interesting shape. It could be designer coffee table, interesting carpet on the floor, Wall panel With unusual decoration or painting.
Along with its direct purpose, furniture can carry additional function decorative elements. These can be fancy-shaped chairs, ottomans, or a designer coffee table. By the way, an ottoman is a fairly multifunctional item.
You can put it under your feet, you can sit on it. It will do an excellent job as a table for newspapers and magazines, and with appropriately selected colors it can become an accent that will attract the guest’s eye.
The most popular floor coverings are laminate, linoleum, and parquet. Laminate and linoleum are quite affordable, but the latter has an advantage in terms of wear resistance. Parquet – pretty expensive coverage. Moreover, it constantly needs care. IN different zones material can be used different colors or use different styling methods. Laying parquet or linoleum diagonally gives a very interesting effect, especially in small rooms.
Many people believe that it is impossible to make high-quality repairs without resorting to the help of designers. This is especially true when decorating and arranging furniture. But in reality everything is much simpler. Stores provide a wide range of finishing materials.
In each such department, a competent specialist will advise you on basic issues. And your own imagination will help you create a one and only atmosphere that you will want to return to again and again.

 (1 ratings, on average: 5,00 out of 5)

