Terminals for hob. Sockets for the hob: photo, installation. Which socket should I choose for my hob? What socket is needed for the hob?
A modern kitchen is equipped with cooler electrical equipment than starships in old movies. And it requires a responsible approach to the selection and installation of wiring and electrical installation products.
Let's start with the fact that if you decide to please the owner of the kitchen and install a lot of modern household appliances, both small and large, first take care of the new electrical wiring. To begin with, separate the lighting and power circuits, and then count the amount of equipment and how much the kitchen units will “eat”. Most likely, you will need several supply circuits. In order not to impose formidable rules for households in the style of “do not turn on the washing machine and dishwasher at the same time!”
Remember!!! All high-power kitchen appliances must have a separate power line from the electrical panel.
But if washing machine can be moved to the bathroom, and not everyone has a dishwasher, then the stove and oven will not disappear from the kitchen. Let's talk about them, or rather about sockets for hob And oven.
Why should the socket for the hob and oven be hung on a separate power line?
Electric hobs and ovens consume a lot of power (from 2.5 to 10 kW). Because, according to modern rules electrical safety, sockets for them require a separate dedicated power line from the panel. Moreover, if the hob and oven provide for independent installation, then they will require two sockets, with separate connection points on the distribution panel.
Which outlet to choose for the hob and/or oven
It all depends on the characteristics of the technology. Hobs and ovens come in both single-phase and three-phase and can have a power from 2.5 to 10 kW.
On a note! All hobs require a separate disclaimer. In principle, they do not have plugs, and some models may come without a cable included (there are only terminal blocks). Think about it: do you really need an outlet for your hob? It may be more expedient to connect the power cable from the panel directly to the panel terminal blocks, or to connect the cables through a mini panel if the surface is supplied with a cable. In this case, a plug-socket for cooking will not be needed. But you shouldn’t forget about the machine and the RCD; we put them on the electric stove line. How to choose them is described below.
Single-phase connection
(most common)
“Cooking” and/or oven with a power of up to 3.5 kW are connected to standard socket at 16 A/220 V. In most cases, the oven has a regular wire and a 16-amp plug (if connected independently), so you only need an outlet. The hob does not have a plug, so you will have to select both a plug and a socket.
For more powerful single-phase models of electric stoves and cabinets from 3.6 to 7 kW You will need a power socket with characteristics of 32 A/220 V and, if necessary, a special 32A plug.
Three-phase connection
A three-phase hob and/or oven requires a 380 V power supply and a 20 Amp three-phase outlet if the power no higher than 3.5 kW or 32 Amps for powerful cooking from 3.6 to 7 kW. If the oven and/or hob does not come with a plug, you will also need a 3-phase plug with the appropriate amperage.
Remember!!! Plugs and sockets for such equipment must have a grounding contact. That's why they have more pins and holes. Single-phase ones have three (2 feeders and ground), three-phase ones have five (3 feeders, ground and neutral). Connection without grounding is dangerous to life!
Thus, it is impossible to replace special sockets for the hob and oven with models for lighting fixtures and small household appliances.
Where to install sockets under the hob and oven
There are no special requirements here. Usually this is the basement area of the kitchen and the installation height is 10 cm (top edge of the outlet). If the oven is mounted above table level, then it is advisable to also make an outlet nearby.
General rule! Do not install sockets and auxiliary equipment directly behind the equipment. Otherwise, you may end up with a problem—the oven or dishwasher will get stuck and won’t go into place. The same applies to other communications. They need to be installed either next to the equipment or below its level if the equipment is planned to be installed above the floor.
Concealed or outdoor installation
It's your choice, whichever is more convenient. The only rule is wooden house performed external electrical wiring, and all devices are installed the same. This is an electrical safety requirement, since wood is a flammable material and hiding wires and other ignition sources in it is strictly prohibited. This, by the way, also applies to kitchen furniture. If you need to install an outlet for the oven, and there is a cabinet next to it, then cut it out back wall hole and mount everything into the wall or on the wall, but not on the cabinet!
In the case of concrete or brick walls You can use both options for installing a socket for an electric stove. From a security point of view hidden installation preferable. But if the repair period is long over, it will do outdoor installation using cable channels. When installing, avoid contact of the wire with flammable materials, such as wood, non-fire-resistant plastics.
Remember!!! Cannot be laid for grounding separate wire, grounding the outlet to risers or pipes. Do not connect other stoves or ovens to the power circuit. kitchen appliances. This is life-threatening.

Buy a socket for the hob, install it and that’s happiness!
There will undoubtedly be happiness, but one outlet is not enough for it. You will have to make a whole list of components.
Single-phase connection
1. Cable. For single-phase network We use 3x4 or 3x6 cable, brands VVGng (flat, round) or NYM. The cross section is selected according to the power of the equipment.
2. Box or socket box. For wall mounting Electric stove sockets will come in handy with an overhead box. Its characteristics must match those of the socket. That is, if we set it to 20 A, then the box and socket are marked as such. Similarly with 32-amp ones - we take everything the same.
If the installation is internal, for example, in a city apartment or a brick cottage, then a special socket box is needed.
Electric hobs are very popular. They are safe, economical and very easy to operate. However, buying a high-quality electrical panel will cost you a considerable amount. Because of this high cost not everyone can decide to Additional services hob connection specialists. If you are confident in your abilities and are ready to try connecting the hob to the mains without outside help, then today you will learn about all the nuances of this responsible work.
Safety rules when connecting a hob
Connecting a hob to the electrical network is a very responsible task that requires maximum concentration. How long your new purchase will last depends on how accurately you follow all safety rules and regulations.
First of all, you need to make sure that the wiring in the kitchen is in satisfactory condition. If you neglect this step, then in a few months you may end up with a new, but faulty hob. The fact is that if the wiring is bad, the stove will constantly be disconnected from the power supply, knocking out the plugs, which will quickly become unusable.
When connecting the hob to the network, do not forget to turn off the circuit breakers in the electrical panel.
It is necessary to lay separate lines from the input distribution panel to connect powerful electric stoves. If you do not have the opportunity to do this, then you should refuse to connect a powerful stove.
Cross section copper conductors should not be less than 4 sq mm. It is also necessary to make grounding. If this is not done, the device may turn into a life-threatening object. For added safety, an automatic shut-off device can be installed.
You can connect the hob with a wire that goes directly from the panel to the terminals. Electrical wiring can be open or closed type. In the first case, the wires go directly along the wall, in the second they are hidden in it.
Choosing a fork for the hob
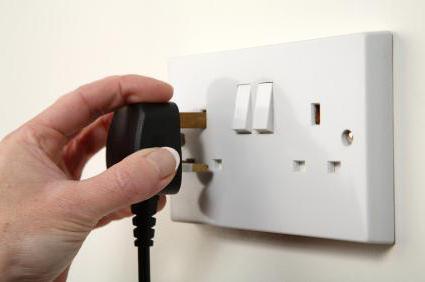
If you expect to frequently move the stove and disconnect it from the power supply, then you will need a special outlet. You also need to purchase a device such as a plug.
The plug connection must be selected depending on the rated current. For a single-phase network, the power outlet must have three terminals, and for a three-phase network, five.
Sockets and plugs for powerful electrical appliances are made of special plastic. Sometimes they have a lid. Sockets for single-phase and three-phase networks will differ significantly. For single-phase, you need a 32A installation, and for three-phase 16A.
The appearance and structure of the socket and plug are not particularly important. However, it is very important that it can withstand the flow of current.
General purpose sockets should not be used. They will not be able to withstand the current required for the hob, and sooner or later they will catch fire.
The hob cord should be long enough to easily reach the outlet. It is also necessary that this cable be flexible enough and have the same number of cores as the number of cores in the wiring. To strengthen small wires in the cable, use a sleeve insulated pin lug.
How to connect a single-phase hob to electricity
The most questions arise when connecting an electric hob to a 220 V network. Usually an electric hob, for example, Hans, has 6 wires, while in the house there are only three wires. However, this problem can be easily dealt with by installing special jumpers. They can come as a set. If there are none, then you will have to make them yourself using special clamps.

Connecting the hob to electricity:
- Locate the cover on the back of the panel. Open it with a screwdriver, under the cover you will find the terminals.
- If there are 6 of them, and there are 3 wires in the apartment, then you need to combine the contacts. To do this, you need to combine three phase wires together, then two neutrals, and leave the ground on its own. Sometimes the equipment comes with jumpers already installed, in this case you connect the power cord to groups of contacts: one to phase, one to neutral and yellow-green to ground.
- You can see the connection of a hob with three wires to the network in the diagram. In this case, the ground wire must be connected to the top of the outlet, and the phase must correspond to the wiring of the wires in the outlet.
If you connect the stove in an apartment where there are only two wires in the wiring, then you will need to install a separate grounding circuit. If this is not done, the warranty on the device will no longer apply, and you will have to deal with any breakdown, even a manufacturing defect, yourself.
Also, sometimes you may encounter the need to connect the panel to a 380 volt network. However, such wiring is extremely rare.
Connecting an Electrolux hob 4 wires
Some models of Electrolux, Bosch, Hansa, Gorenje brand hobs have a four-wire wire. Therefore, it can be very difficult to decide where to connect them if there are only 3 wires in the apartment.
Electrolux brand hobs already come with a wire. This makes the installation process easier, but in this case you need correct scheme connections.

A four-core cable consists of the following wires: neutral, ground and two phases. To properly connect the wire to the hob, you need to know some nuances.
Installing a 4-wire hob:
- Find the location where the terminals are located. They are usually found with back side housings. Unlike Bosch brand panels, Electrolux has plastic case. To open it, you just need to pry off the cover with a screwdriver.
- Find in open box the output is “ground”, it is usually yellow-green in color. Near this output there should be a jumper for two wires. Phase wires are inserted into it; they are black and brown colors. To do this, you need to check the screws with a screwdriver, insert a jumper and tighten everything.
- When connecting the plug, you will only need to use the brown wire, and the black one will need to be insulated with a heat pipe.
All further actions when you connect two-phase equipment are carried out in exactly the same way as you would connect a single-phase electrical panel.
How to connect an induction hob
Connecting an induction hob is not difficult. Of course, there are connection nuances, for equipment with different quantities wires Let's talk about the main points of such work.

Tips for connecting an induction hob:
- Determine how many wires there are in your apartment.
- Open the access panel on the back of the panel. Unscrew its cover using a screwdriver. Locate the terminals.
- If necessary, combine the wires into required amount groups. The phases are combined into one group, the neutrals into another, and the ground must pass separately.
- Next, the panel wires are connected to the corresponding pins of the plug.
Connection induction cookers, compared to gas ones, this is a completely simple task. Due to the fact that there is no combustion in such models, you can use them without fear for your safety.
Connecting an induction hob yourself (video)
Which of the connection methods we described you will need to use depends on the type of panel and type of wiring. If you are not confident in your abilities, then it is better to entrust such work to electricians.
Attention, TODAY only!
Popular attribute modern kitchen- built-in hob and oven. Recently, more and more consumers are giving preference to electric models, which functionality superior to gas analogues. Install household appliances it will be done by hand. The main thing is to correctly calculate the installation space and take care of high-quality wiring that can withstand the high loads of the power line.
Electrical wiring requirements when connecting kitchen appliances
Before installing an oven or hob, you should pay special attention to the quality of the electrical wiring. Key points to consider:


Important! Grounding of the electrical appliance ensures safe operation devices.
Installation and commissioning of the hob
Preparing the installation site
To insert a panel into kitchen countertop You will need the following tools:
- electric drill;
- screwdriver;
- electric jigsaw;
- construction knife;
- Ruler and pencil;
- silicone sealant.
Do-it-yourself installation of an electric hob is carried out in the following order:

Further actions are to install the surface in the prepared hole and connect the equipment to the power line according to the diagram.
For reference. Detailed diagram connection is shown on the back of the electric hob (burner, built-in).
Diagram and choice of connection method
Commissioning diagrams for kitchen panels and ovens in apartment buildings assume the use of one phase - a 220V network. In the private sector, it is sometimes advisable to arrange three-phase network- such a connection redistributes the load when several burners are operating into 3 phases.
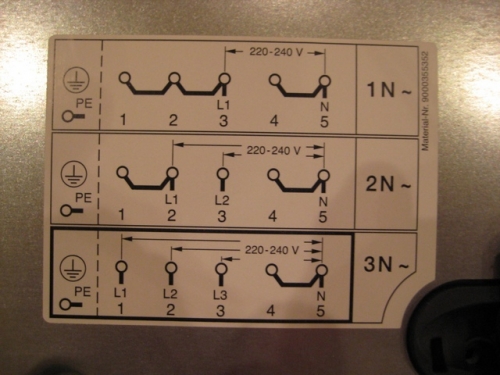
Symbols on the diagram:
- 1L, 2L, 3L - phases;
- N - neutral conductor;
- earth code or PE - grounding of an electrical appliance.
The hob is connected to the power supply in one of the following ways: through a socket/power plug or using a terminal box.
With the first option, you need to choose the socket and plug wisely. A stove power of 7-8 kW corresponds to a current of 32-38 A. The plug must support wiring with a cross-section of 4-6 mm2. Often, the RSh/VSh-32 connector is used to connect the hob. A similar connection is applicable in one-, two- and three-phase networks.

Advice. It is advisable to use ready set, since the plug of one manufacturer may not fit the socket of another.
It is better to give preference to white plastic models - they are of higher quality compared to black carbolite ones. Structurally, the elements are no different; the connection order is the same.
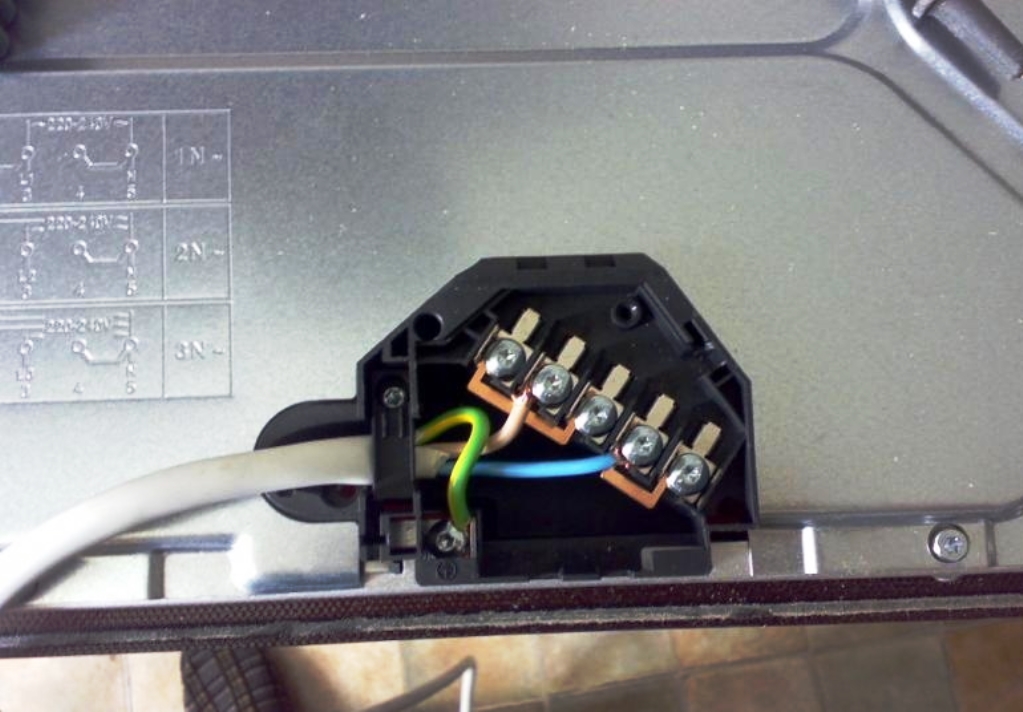
Connection via a terminal is considered by many to be simpler and more reliable. There are several pairs of contacts and screw fasteners located on a plate made of heat-resistant plastic. The wires are connected from two opposite sides, observing color coding. Terminal blocks selected according to the power of the electrical appliance.
Instructions for connecting the hob
Commissioning of the electrical panel through the terminal box depends on the number of network phases. If a three-core wire is laid, then a 1-phase connection diagram is used:

- Connect terminals No. 1, No. 2 and No. 3 with copper jumpers; connect to them phase wire(black, white or brown);
- connect the zeros (No. 4 and No. 5) to the neutral (blue) wire;
- Connect the corresponding yellow-green wire to the PE (ground) terminal.
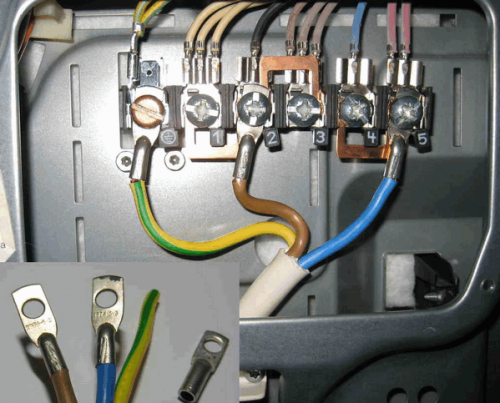
A two-phase connection uses four wires. Their connection is carried out according to the following scheme:
- connect wires No. 1 and No. 2 with a jumper, connect a phase conductor to them;
- connect the second phase conductor to terminal No. 3;
- connect terminals No. 4 and No. 5 with a jumper, then connect the neutral conductor to them;
- secure the ground wire.
The five-core cable is used when three-phase connection. In this case, connect terminals No. 1, No. 2 and No. 3 with three phase conductors; the subsequent procedure is similar to the previous one.
Algorithm for connecting a power plug to a kitchen hob:
- Disassemble the plug by unscrewing the fixing screw.
- Route the cable into the connector mechanism and secure it with staples.
- Remove 1-1.5 cm of insulation from the wires and strip the wires.
- Secure the wires to the plug terminals according to the diagram. The conductor cores must not extend beyond the terminals.
- Assemble the fork body and tighten the screw.
Connecting an electric hob with your own hands: video
Types of built-in cabinets by installation method
Based on the installation method, built-in ovens are divided into dependent and independent. Functionally, they do not differ from each other, but the installation technology is somewhat different.
Dependent Models supplied as one set with the hob. The work areas are connected by wires and have a single control panel, which is usually located on the front of the oven. Dependent cabinets are compact, which is especially important for small kitchens. However, when purchasing, you must take into account that if the control panel fails, both devices will stop working.

Independent have the ability to be installed separately from the hob. This device can be placed anywhere in the kitchen.
Distinctive features of independent models:
- unlimited choice of location for installing the oven;
- possibility to refuse the hob - modern models ovens are equipped with functions of steaming, defrosting, etc.;
- high cost of equipment.
Procedure for installing and connecting the oven
Calculation of the dimensions of the “box” for the oven
Manufacturers kitchen appliances We have developed a unified standard that allows you to easily install the oven body in the designated section of the furniture. The main thing during installation is to adjust the evenness of the oven. Minor distortions can reduce the heating efficiency. Leveling is done by adjusting the height of the legs; a building level is used for control.
To protect the device from overheating and premature failure during installation, a number of nuances should be taken into account:

- the optimal distance from the base of the body to the floor is 8 cm, but not less than 5 cm;
- air gap around the perimeter of the oven - 5 cm;
- distance to the back wall - 4 cm.
Important! Connecting an electric oven via an extension cord is prohibited. A separate outlet must be provided.
Installation and connection to the electrical network
After preparing the place and “trying on” the oven for installation, you can begin connecting to the electrical network. If the power of the stove does not exceed 3.5 kW, then it can be connected through a regular outlet. Otherwise, you will have to pay more attention to the new wiring and the choice of outlet.
Connection order:
Electric hob: DIY repair
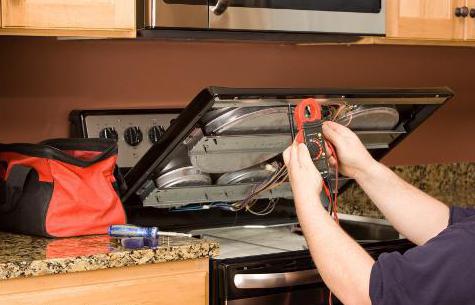
The most common malfunction of an electrical panel is that the device does not heat up or one of the burners does not work. In this case self-removal breakdown comes down to the following steps:
- Check the voltage at the outlet. Often it is this electrical point that fails.
- Inspect the plug and cord. When found mechanical damage just replace the plug.
- If the previous steps did not solve the problem, you will have to remove the hob. First you need to disconnect the wires and unscrew the fastening strips.
- Check the functionality of the transformer and thermal fuse. For this you will need a multimeter. If there is no voltage or if it differs from the nominal voltage, install new elements.
- Check the reliability of the wiring connections at all points: switches, control unit, burners or thermostat.
Advice. An affordable alternative to a multimeter is an indicator screwdriver.

The most common causes of breakdown of a 2-, 3- and 4-burner electric hob:
- fuse blown due to power surges - installation protective device overvoltage networks will solve this problem;
- a broken circuit on the heating element leads to the breakdown of one of the burners;
- sensor failure - result improper care and operation;
- overheating of the surface - thermostat failure.
When choosing a hob, you need to compare the main parameters of the equipment:
- Decide whether you need a dependent or independent plate. In the first case, the range of goods is significantly reduced.
- The second important point is the choice of material for making the stove in general and the burners in particular. Cast iron spirals are inexpensive, but take a long time to heat up and are energy-consuming. Many people believe that the best electric hobs are glass-ceramic. Their main advantages: creative design and high heating speed. A progressive version of glass ceramics is induction surfaces, which are energy efficient.
- Functionality of the stove. Availability additional options makes cooking faster and more convenient. It would be good if the hob is equipped with: a timer, a heating function, a standby mode and a safety shutdown.
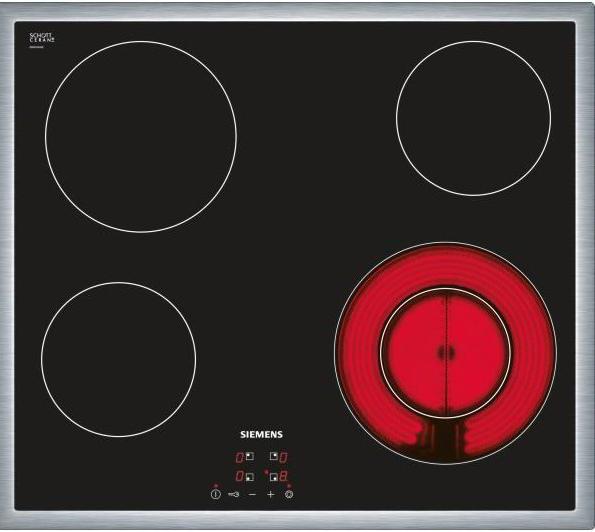
- The number of burners is determined based on the intensity of use of the stove and the dimensions of the kitchen. Electric 4-burner hob - classic version, suitable for a family accustomed to regularly eating at home. For arranging a small working area You can choose a compact 2-burner model.
Electric hobs: which ones are better. Reviews and tips for choosing a work surface.
IN Lately The built-in type of technology has gained wide popularity. It is compact, stylish and elegant. The hob has become a worthy practical alternative to a conventional stove.
Many people are interested in how to connect the hob. This article will describe the rules.
How to make the right choice?
Built-in panels can be rectangular or hexagonal. The width of the rectangular ones is from 25 to 90 cm. The depth is 60 cm. Hexagonal plates have acquired another name “honeycomb”, as they are very similar to the honeycombs of bees.
Which model to choose - gas or electric?
The hob can be gas-electric or combined.
The electrical panel will become the best solution for a house that does not have gas. If it is available, then we recommend purchasing a gas unit.
The combined model is able to operate on both electricity and gas.
Dependent and independent panel
A dependent model is a model that functions only in conjunction with an oven. As a rule, it is located on the oven body or on the hob itself.
It should be noted that combining an oven and hob is not always possible, even if they are made by the same company. You can determine how compatible the elements are using a special table.
An independent model is one that is equipped with its own control panel and is independent of the oven. The main advantage of such units is their arbitrary placement in kitchen area. The dependent model requires placement only under the oven.
Type of control: mechanical or sensory?
The mechanical type of control involves a rotating knob. Most users prefer this type.
Touch models involve touching the panel with your hand. This method is considered innovative. It's very convenient.
It has an undeniable advantage. It is easy to clean due to its perfectly smooth surface.
Choice of material
The material for the hob is usually glass ceramics, aluminum, enameled coating or stainless steel.
Let's look at all the models:
- Aluminum. Such devices require mechanical control. They are very convenient to use. These units are affordable and resistant to mechanical and thermal loads. Aluminum can withstand impacts but is susceptible to scratches. In addition, stains from moisture and fingers form on the surface.
- Enameled. Their main advantage is their affordable cost. Models with this coating are presented in a wide range different colors. There are no fingerprints left on them. The only downside is the possibility of chipping if a heavy object falls on the panel.
- Stainless steel. These models are more expensive than enameled and aluminum ones. They, like aluminum, are not resistant to fingerprints and wet stains.
- Built-in glass-ceramic hob. Such models have a touch control method. They are stylish and sophisticated and easy to clean. In addition, glass ceramics are subject to rapid heating and cooling. The only one significant drawback is that glass ceramics are brittle and can crack if struck. Also due to the hit cold water Cracks may form on the heated surface.
 Review of the best manufacturing companies
The hob can fall into one of three categories:
- The first one should include elite equipment highest quality. These are manufacturers such as Miele, Gaggenau, Kupperbush.
- The second category consists of mid-level models, which are distinguished by affordable price And high level functionality. These are Electroluxe, Whirlpool, Goreje, Zanussi, Bosch, Siemens.
- The third category consists of budget models. Special attention slabs from Ardo, Hansa, Ariston deserve.
Additional properties
When choosing a hob, you should pay attention to the presence of additional properties. There are panels that automatically turn off when liquid gets in. There are those equipped with a timer that give a signal and turn off the burner. There are models with a child lock.
Hob covers
When the burners are turned off, cover the cooking surface with lids to protect it from damage. The basis for their production is either high-strength steel. The raised lid protects against dirt getting on the wall, and if it is lowered, it protects the cooking model from cracks.
Lids made of steel are not so expensive, but those made of glass and glass ceramics have a more aesthetic appearance. In addition, they can be quickly washed. As a rule, the lid is lowered using a special mechanism.
The role of power when connecting a hob
Connecting the hob to the electrical network requires taking into account the power indicator of the unit.
If the device has high speed heating, then it consumes more electricity. In some cases, the figure reaches 7 kW per hour. Connecting an electric hob requires careful selection of the cable.
Especially this rule applies to the supply contacts of the hob. To minimize contact and reduce the likelihood short circuit Power is supplied to the surface terminals. The hob is connected to the electrical network using copper cable with a diameter of at least 4 mm.
How is an electric hob connected?
If the plug is prepared, then connecting the hob to the electrical network does not present any difficulty.
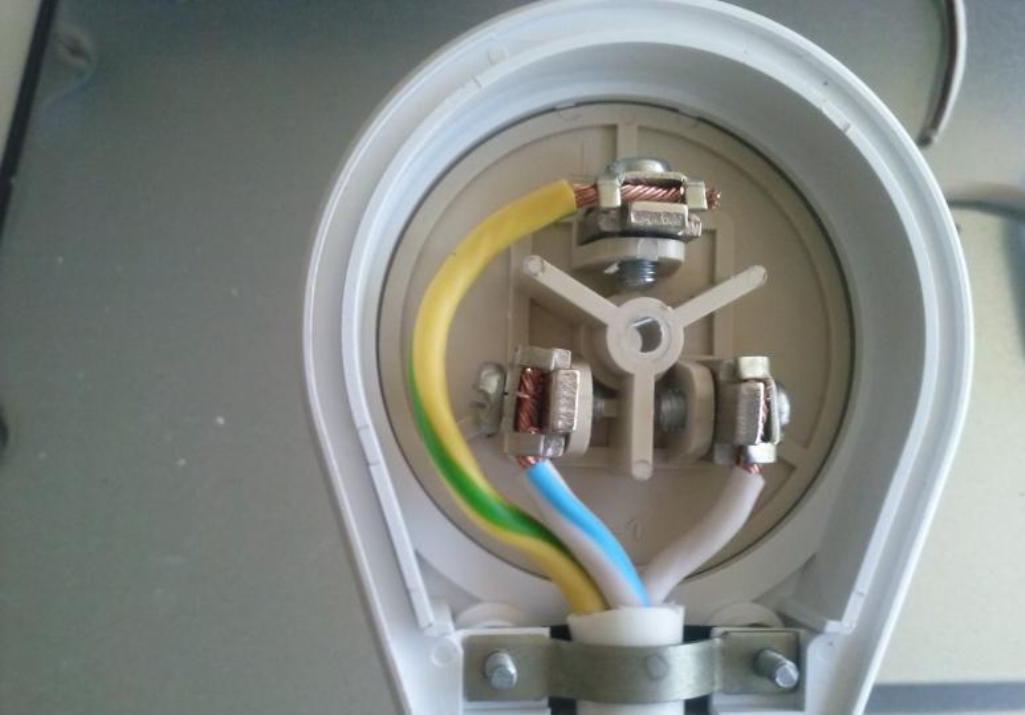
It is much more difficult to figure out how to connect the wires that go to the outlet. For example, four wires branch off from the hob, and there are three in the wall. When the hob is connected independently, the diagram displays a three-phase surface.

The black and brown wires are connected together. The twisted conductors are connected to the apartment phase. Typically this is a white wire. The ground wires will remain free.
The terminal block contains copper jumpers. To ensure their correct location, you need to refer to the diagram located near the block. When working with a device such as an electric hob, the connection diagram will help you position the jumpers and connect the wires correctly.

If you are not familiar with technology, it is recommended to have a professional electrician connect the hob to the electrical network.
Connecting an electric oven
The advantages of the oven did not leave any housewife indifferent. The devices are not only safe and easy to operate, but also have wide functionality.
Innovative electric ovens combine the function microwave oven and defrosting, grilling and steaming. Selecting an oven is not a difficult task, but you will have to tinker with the installation.
Instructions
Many people are interested in how to properly connect the hob and oven.

- To get started, check out technical characteristics oven. This will help you install the outlet correctly. Depending on how much power the unit consumes, calculate required indicator electric current, which is needed to connect equipment. Typically, the power is 3-3.5 kW. In this case optimal indicator is 16 amperes. Otherwise, a current of 32 amperes will be required.
- You should select an outlet. Determine how good the wiring in the kitchen is. If the wiring is old, the oven will require an additional outlet. New electrical wiring must be made of copper. Its cross section depends on the current requirement. An indicator of 16 amperes requires a cross section of 2.5 mm2, at 32 - 4.0 mm2.
- A separate machine should be installed, through which it will be connected to the electrical panel. It must meet a current strength of 25 or 40 amperes with an outlet rating of 16 or 32 amperes.
- The oven must be grounded. For this purpose, a separate line is drawn leading to a power cabinet located underground, or a special conductor is used for grounding (if your apartment has a three-phase wiring).
- If the oven is purchased complete with hob, then you need to pay attention to the principles of management. Most innovative devices have a single control panel with the oven. In this case, connecting only the hob will be sufficient.
- When choosing an electric oven, give preference to the brand that manufactured the hob. It is advisable that the oven and hob are from the same brand. This will save you from the problem of connection failure due to mismatched control system connectors.
 (1 ratings, on average: 5,00 out of 5)

